Label and plaffones do it yourself: from threads, fabrics, paper and other materials. How to make a paper lamp with your own hands to make label from cardboard with your own hands
Lamps and lampshades do it yourself. Ideas, master classes
Hello everyone!
Creating or decoking lamps and lampshells The occupation is not only incredibly interesting, but also enough useful: it allows not only to create a unique subject, and in full compliance with the interior of your home, but also to save. It is enough to purchase the easiest lamp for little money and beat it to your taste. And there are options that and how to make a huge set, in a variety of techniques, using a wide variety of materials.
I picked up for us with you the idea of \u200b\u200bcreating and decorating lamps, I hope you can choose the appropriate option for yourself :) Pleasant viewing!


A lampshade decorated using decoupage technique, the base of the lamp is made of books

Decor of the metal frame of lampshar with feathers - very stylish :)

It is often enough to decorate the lampshades, fabric or paper flowers are used, the result is very romantic :)
Fabric flowers with candle processed

Cutting convolutions are used as colors

Flowers from twisted fabric


Ready Flowers used here


The flower is made of a stem strip of fabric, striking on one side and assembled in a bud

Spiral roses from newspapers

The bottom of the lamp is decorated with spiral paper roses

Decor of Ikeaevsky lampsome paper flowers

Lace and knitted napkins look very beautiful

The form attached with glue


The ball is inflated and the lace napkins are applied with the help of adhesive. After drying, the ball skeins, blown away and removed.


Very beautiful option: As the base of the lamp, the bird cage is used, the lamp shade is decorated in the decoupage technique with an outdated.

Even an umbrella can be used for chandelier :)

Even Loskutka trimming fabrics will go into business: wrapped, knotted. This option will be remarkably fit into the design of the country house or children's room.

Buttons-buttons


For the manufacture of lamps, various glass containers are used very often and successfully use banks, bottles. Just below, I led the master class on the manufacture of such a lamp.

A bottle as the base of the lamp - the bottom is also given a similar master class.

It is a bit more complicated here - the hole is drilled down on the back side of the bottle, through which the cord is started.

The lamp is made of figured metal sheet


Origami technology is successfully used to create lamps.


On the base of lampshar glued fabric strips

Lampshade from various retro leaves

Abazhur from the basket - why not? :)

The second life of metallic coland

Unnecessary fork-spoons created a very interesting version of the chandelier :)

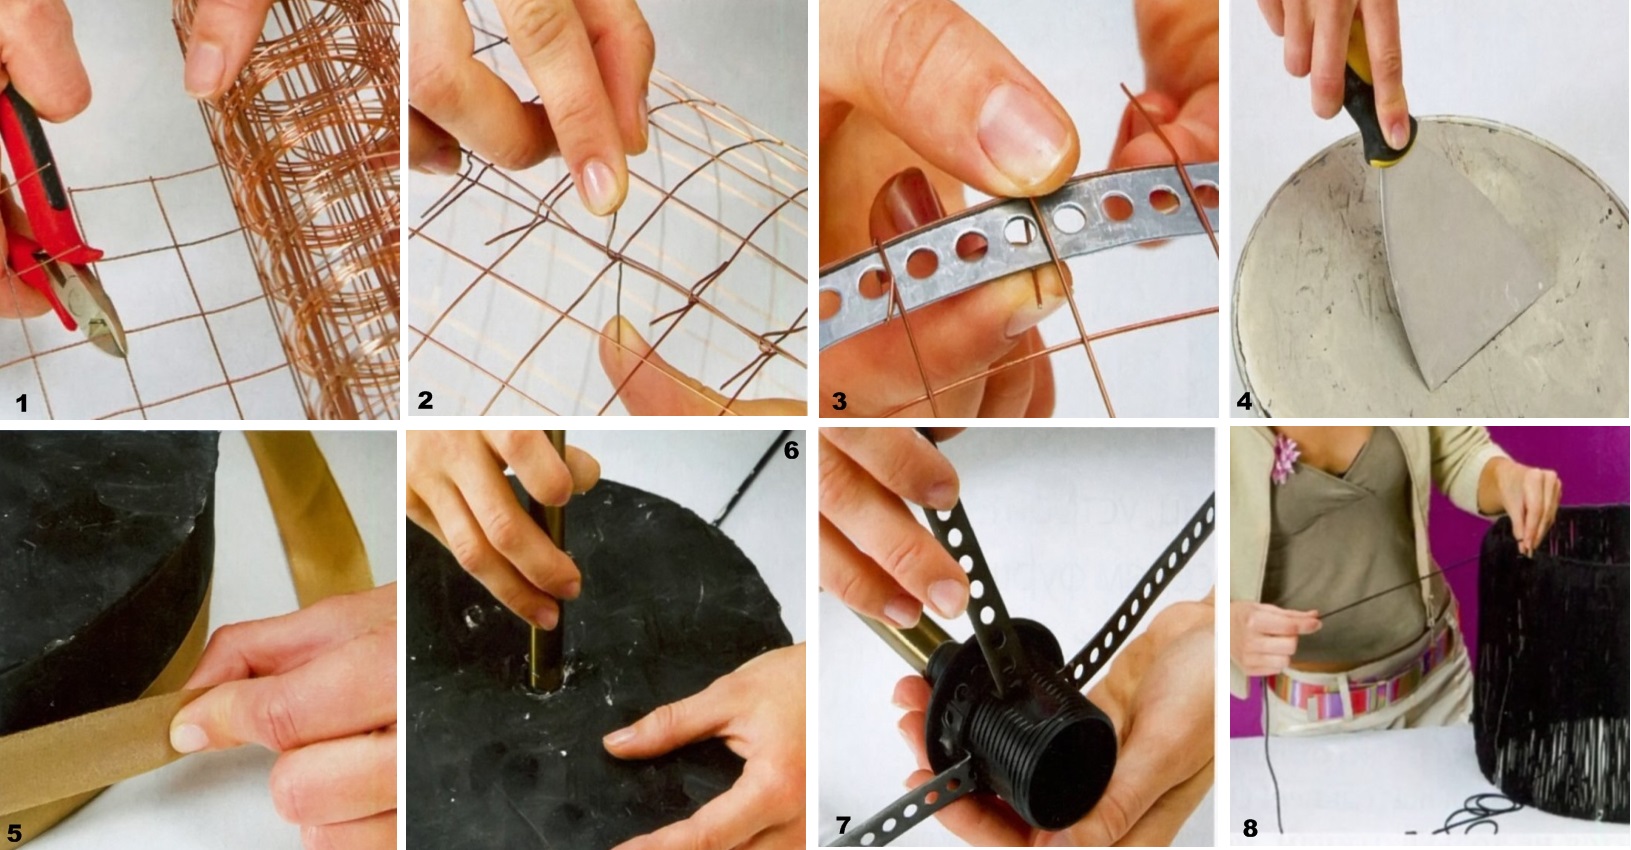
Very cute solution: a metal mesh and beat the poultry is stretched on the frame. I think for the children's room.

And now bird subjects :)


Abjeur painting acrylic paints


Shallow veneer lamp

The base of the lamp is placed by marine shells

Knitted lampshades - look very comfortable :)


Decor of amusing memorable photos and slides


Flowers on this lamp - this is the bottom of plastic bottles :)

Lampshades are planted with paper circles

Vegetable lampshade :) I think, still a flower is frying there :)

Shashore from Shornov

Decoupage technique also applied here

Very interesting solution - wire as an art object :)

Lampshade decorated with cloth strips

Branch lamp 
A lampshade is decorated with crumpled compressed coffee filters (forms for cupcakes)

Glass vase lamp

Base of lampshar - unnecessary toy soldiers, short and painted aerosol paint

Creative lap fetra

Shade from balls for ping pong :)

Flower decor

And many more, many different ideas ...


Master class on the manufacture of lamp from can & broit caps from Tom & Brit (BestOfinteriors.com)

We break through the nail hole to create a hole

Insert the patron

Stain in one color

Screw the light bulb and insert into the jar

Lamp is ready :)
Paper Lights from Varrell.com Resource


We will need an image of the castle


Cut out, cutting the winds, glue


Inside place a point lamp on batteries

Chandelier from a rope from Sarah M. Dorsey (sarahmdorseydesigns.blogspot.com)

We will need a rope, MOD Podge glue (can be replaced by diluted PVA), ball

In order to create a wavy shape, Sarah used wooden slats. We lay out the shape, we laughing glue for fixation.

After drying, we lay out on the ball and scrolling abundantly glue


After drying, remove the lampshade from the ball and stain in the white aerosol paint - the Sarah has four layers


Very beautiful lampshade of grandma squares from the author of the resource aboutgoodness.com 


We are tightening with lampshane cloth

Strip tissue bend in half along and twist in roll


Run slightly

We apply glue on the fold and glue to the base


Master class to create a base for lampshar from Kiri (ilikethatlamp.com)

Necessary components

Bottle carefully mine, disinfect and dry

Covered aerosol paint


Mounting process


,


That's so a bottle of Jein has turned into a base for lampshar :)
As you can see, a sufficient thing is simple and very interesting. Give the will of your fantasy, create and let your home be beautiful and cozy!
Well, for those who still prefer to buy ready-made lighting devices, I recommend to look into a specialized Internet-shop Lampa.ua. - where in a huge assortment are high-quality and stylish desktop lights, chandeliers, sconces, accessories, etc. From the best manufacturers and at very flexible pleasant prices :) By the way, this online store according to Google statistics is the most popular among Ukrainian buyers :) Use with pleasure!
I wish everyone good luck and excellent mood !!
There is a desire to make the interior of the room more diverse, but at the same time you need to spend too much money? Yes, because you yourself can, make a lampshade of fabric, in oriental style, which will look very original and decorate absolutely any room at home.
How to make lampshade with your own hands?
First you need to make the workpiece of the required material. You will need: glue and scissors, thin paper and light bulb, rope and air ball.
And so, take your balloon and inflate it to get a medium size.
Take a trailer or some container and pour the glue into it.


Paper is better to take two different colors. It should be broken on narrow strips.
Next, these stripes must be applied to the balloon. Attach first of them to begin with (any color). Then you need to apply glue. Thus, it is necessary to glue the strip over the strip. The order may not be definitely geometric, you can use and chaotic, this is the case of everyone. In general, it is necessary to glue in the same way, strip over the strip, until the whole ball is talked completely. Slide the paper-plated ball to some kind of clothespin and wait for its complete drying. It will last somewhere a couple of days.


When your ball is dry, take the marker and apply some pattern on the ball. It can be some interesting and unusual hieroglyphs, for example.
The top of the ball must be used for the opening under the light bulb. To do this, it is necessary to cut through this hole by ordinary scissors.
In the resulting hole, make a pre-prepared lamp.


Such a flashlight can be fixed anywhere. For fastening the bulbs you can use a small wooden wand.
And so, now you should not be a serious question about how to make a lamp lamp, because your lamp is ready and made you with your own hands!
And if your acquaintances and friends will ask about how to make a lampshade, you can boast your own masterpiece of art!

In fact, lanterns can make the most diverse, which only imagine can, and maybe there is no ...

Usually, the issue of registration of light in the process of repair is not paid enough attention, because of what people are subsequently not only in the twilight, but also suffer from ill-impaired. In this case, you can not only buy a lamp, but also make it with your own hands, and this option will be the most original and unusual. But the options for creating their huge set, and here are the main of them.

- Option photo lantern with your photographs. To do this, prepare a photo on printing, paper and printer, a lamp of paper, glue and a ribbon, a cup and a brush, a knife and a pattern of a template. And here is the most difficult - to get into the right dimensions in the process of proper cutting the sphere. Next to worry about what. Glue + Hands will do everything at an intuitive level. By the way, from such lanterns you can make a whole family row.
- Lusters from bamboo. To make them, you can take advantage of ordinary bamboo curtains with thin ribbons glued with conventional glue and clothespin in the balls. Then the light source and voila also add there! Such an option is fast, budget.
- The lamp in which the lampshade is made of traffic jam.
- Chandelier from a wide variety of cans.
- The lamp from the waste paper, that is, old magazines are used for its manufacture.
- Lamp in the form of a light cloud. This option is temporary, but it is perfect for registration of any kind of celebration. The main thing is that it is necessary for the manufacture of this type of lighting, it is wool and ready-made lights from paper, as well as hands, desire and working hands.
Photo instruction how to make label do it yourself


Traditional lamps with tissue lampshades are beautiful table lamps, luxurious chandeliers, laconic bras, creating a romantic and cozy atmosphere in any room. If you have such items at home, do not forget that it is easy to breathe new life in them, making lampshade with your own hands based on the old lamp.
Tip 1. In this way, it is best to update the lampshades, the diameters of the upper and lower rings of which are equal. If you decide to decorate a lamp with rings of different sizes, do not hurry to throw out the old decor. It will help to make a pattern correctly. Without it, it will be difficult to choose the size of the fabric, be careful with the calculations.
Main materials:
- textile for lampshar;
Tip 2. To find out how the fabric will look with the light on, you can lower the textile sample to the window. Making a lamp shade for lamps do not need to choose too dense textiles, it can miss an insufficient amount of light.
- upper and lower ring from lampshar;
- plastic with adhesive for sticking textiles intended for the manufacture of lamps. (You can buy in specialized stores, may also be called "PVC film for lampshades"). The color of the plastic is selected depending on the shade of the fabric. For light it is better to use white.
Technique (well if there is, but you can do without it):
- sewing machine;
- iron;
For measurements:
- ruler or other flat long object;
- corolnic;
- tailoring meter.
Trivia:
- paper tape;
- malyary Scotch;
- chalk for drawing;
- pVA glue;
- pencil;
- scissors;
- clips for paper or clothespins;
- tassels for glue (preferably thin);
- threads.
Prepare:
- surface for work (table);
- heavy items that can be used as loads when gluing;
- wet napkin or towel, which can be removed the remnants of glue from the product.
Making lampshade with your own hands. Master Class .
Stage 1. Preparation
1. Measure the diameter of the rings and decide on the height of the future ishable. Write down this data.
2. Cut plastic in size. Consider that the length of the plastic should be a pair of centimeters larger than the base diameter so that it can be connected to the ring.
3. Cut the fabric, pre-adding to sizes from paragraph 1 to 2-5 centimeters on each side so that you have a convenient cut for further work. Take the location of the drawing on the lampshar. This moment is especially important in the case of large ornaments.
Tip 3. Tissue Crimple For Establishment You can attach with painting tape to the table, front side down. So she will not move and sneak.
4. Finally, determine the location of the ornament on the future toast. We note on the fabric the accurate edge of the future lampshar (in size from paragraph 1). To do this, you can draw a corner from the left and lower edge. This will be enough for further work.
Stage 2. Cloth sticking
5. Prepare PVC tape to gluing. Make sure the fabric is clean, there is no fluff on it and other small contaminants. We proceed to sticking, using lines made in the last step.

6. Sticking must be taken carefully, holding the fabric, if necessary, use a ruler to remove air pockets and wrinkles. The cloth remained from the edges can be cut so that the PVC tape is about 5 mm.

Stage 3. Rings Preparation
7. To make sure that the rings are smooth, you need to put them on the table. If some part does not come into contact with the surface, align the frame as long as it becomes flat.

Stage 4. Bonding design.
8-9. Secure the lamp shade with the PVC-ribbon glued to the top and bottom ring using paper clips or clothespins. Make sure that the indentation from the edge is the same everywhere and the lampshade uniformly lightened to the frame.


10. Making sure that the lamp shade is fixed correctly, without distinguishing, mark the pencil beginning and end of the seam, upper and lower lines, mark where the top and bottom of the lamp is located.

11. After that, the design can be disassembled. To accurately glue the lampshade with your own hands, connect the top and bottom point of the seam chalk.
12. Put the workpiece on the table, face down. Excellence with the marked line and gently apply glue without leaving the edge.

13. Connect the seam.

14. Put the lamp to the lamp and give the seam as shown in the picture.

Stage 5. Treatment of edges
15. After drying the glue, remove the press. Check the upper edge to the table. Gently apply a thin layer of glue along the perimeter of the inner edge of the lower edge of the lampshar.

16. Insert the frame, adjust the fabric by fixing the edge on the ring with clothespins. After the glue dries, you can start working with another edge.

17. Place the remaining frame inside the lampshar and only then apply glue. So that the internal connections of the rings were less noticeable, place one of them on the seam. The design is also fastened with clothespins before drying.


18. Make sure the rings are fixed firmly. Only after that carefully remove the clothespins.
Step 6. Printing Paper Tape
19. Put the pencil on the table and spend the line as shown in the picture.

20. Apply glue along the new line and secure on it a paper tape, aligning the place of connection of the tape and labeling fabrics. Half tape is attached to the outer edge as in the photo.

21. While the entire tape.

22. In places where the central guide frames are located, cut out small triangles in the ribbon as in the picture.

23. Gently apply glue to the remaining part of the tape and turn it into it, leading it under the ring. Make sure that the tape is pasted exactly.

24. Repeat operations 20, 21, and 23 for the bottom edge.
 25. Below we will tell how to make a lampshade with your own hands with a textile ribbon of the same color, but you can not use this technology, but choose other options for finished finish: fringe, tapes of another color, etc.
Preparation of textile tape
In total, it is necessary to make three tapes:
- Two for processing the lower edge. (Their length should be a pair of cm larger than the diameter of the rings);
- one, equal to the height of the lampshar to mask the connection location.
1. On the existing textile cut, we draw parallel lines with a width of about 5 cm at an angle of 45 degrees to the fibers. (If you want to make a wider or narrow kant, you can change the width of the tape. However, do not forget that the cut slicing should be enough to close the paper tape and turn inside.)

2. Cut the cloth on the tape.
3. The edges of the tapes need to be cropped at an angle of 45 degrees and stack. Do not forget that you will need tapes with the right and left corner. It is necessary to correctly pick up the ornament, which will make the connection being unnoticeable.

26. Scroll to connect the tapes using an iron.
Stage 7. We disguise the connection location.
Tip 4. To make lamp shade with your own hands, it is worth abiding the maximum accuracy and clarity of actions on this and the following stages.
27. Take a lesser length tape and, separating it in about 3 parts, glue, as shown in the figure below. For a better connection, you can try the ribbon iron. In the same way, attach the remaining part of the tape.

28. After its complete drying, apply glue on the inner side and glue the tape to the connection site on the lamp.

Stage 8. Processing the edges of the lamp
29. Fold one of the ends of the long tape in half and cut the edge at an angle of 45 degrees. After the reversal, you should get a cut in the form of a triangle. Tape edges so that they connect to the middle of the wrong side (see Figure) and glue them in the same way as in paragraph 27.

30. Stick the tape just as we did in paragraphs 20 and 21. At the same time, it is not necessary to glue the end of the tape, just secure it with a clothespin. It will be more convenient to work if you apply glue on the tape from the inside to one of the half.

31. Making sure that the tape is glued exactly, go to the connection of the ends. At the second end (even) cut the triangle mirror so that the connection is continuous tape.

32. Squeeze the ends glue and neatly connect them.

33. Repeat step 23 to secure the tape on the inner part of the lamp.

34. Repeat step 8 for the second edge.
After complete drying, the manufacture of lampshair can be considered completed. It remains only to consolidate it on the lamp and enjoy the result.

Coach in the house and new creative solutions!
← Share with Other
Each hostess wants to make his home unusually beautiful. Some make it in some unusual style, for example, Provence, country or minimalism. Someone is trying to decorate the elements of the decor. Others make an emphasis on a single element, for example, a lamp or a ceiling.
Consider the options how to make a plane for a chandelier with your own hands. For this, you will need not some rare, but ordinary remedies.

Option number 1: Paper
The easiest way to make the original lamp shade. Such an element of the decor can have any shape. He is harmoniously suitable almost to any interior - in the kitchen, in the living room, in the nursery. It is worth remembering that the service life of the paper lamp lamp depends on the quality of the paper. It should not be too thin, but at the same time light-minded.
The easiest way to consider how to make a lampshade with your own hands from the remaining wallpaper from repairing. Consider how to perform a product in the form of harmonica. The workflow does not take much time and does not require any special skills, skills or schemes. From the wallpaper you can make a lampshade for lamp with their own hands, for desktop lamp or sconce:
- To begin with, it is necessary to prepare the material - part of the wallpaper with a length of 1.5 m and a width of approximately 30 cm.
- Pencil or pen marked the ribs.
- Carefully form the harmonica. The width of each edge should not exceed 3 cm.
- Using hole punch, make a hole in the harmonica.
- Turn in the holes a decorative lace and glue the lamp to the side seam.

Make such a product can even be even a child.
In the process of work, instead of wallpaper, you can use rice paper. With it, you can update the old lampshade. Drawn with such paper, it will look stylish and modern. You can decorate the product using such decor elements as special stamps, stickers, etc.
Paper lampsions with their own hands will decorate any interior style. The main thing is to choose the right color gamut and form.
Option number 2: Rope
It will be originally looked by lampshade from the rope with your own hands. It can be applied to decorate any lamp: sconce, lamp and others.
First you need to prepare the necessary tools and materials:
- 20 meters of rope;
- 1 inflatable ball for the base;
- pVA glue;
- white paint (preferably in a can);
- duct tape;
- gloves (ordinary economic or medical);
- device for weaving (special plate or box from spirits).

Such a lampshade do it yourself easy enough:
- Using a table for weaving to make decorative ribbon from the rope. Her lines can be smooth or curved - as you will tell you fantasy.
- Now you need a ball filled with air to poke tape.
- Taking the ball on the reference point, lay the rope with smooth turns. At the same time lubricate it with glue.
- Remove with a lamp with a plander. Paint it in white. Top to wear ready-made lampshade.
- It is completely lubricating the ball into the ball completely and again.
- Needle pin the ball and remove it out. After that, the shape woven from the rope will remain.
A lampshade from the twine, with their own hands, from the twine or from the rope is suitable for a table lamp, a beam or lamp. It is recommended to use ice-lamp to use it, which will not heat such a plane.
Option number 3: Threads
Another option is the lamp shade with their own hands. Made independent chandeliers from threads look very original. They attract attention and fit perfectly in any interior.
You will need:
- balloon;
- cotton threads of one or more colors;
- 250 ml of PVA glue;
- cord-suspension;
- energy saving lamp;
- scissors;
- big needle;
- kleenka or plastic size with sheet A3;
- petrolatum;
- brush;
- cat and wand.

The process of making a lampshar for a table lamp, a scheduling, chandeliers or a lamp from the threads with their own hands consists of several stages:
- Inflate the ball. It is desirable that its size is from 25 cm.
- Lubricate its surface with vaseline.
- The working surface is covered with paper or oil.
- Closer to the bottom of the tube with glue to pierce the hole.
- Wrap the ball threads in any order.
- Grease thread glue. Leave for full drying overnight.
- With the help of a cotton wand, to separate the ball, blow and pull it out.
- At the top of the finished product make a hole for the lamp and cartridge.
- Insert the lamp inside. Secure the holder for the cartridge in the hole.
Now just hang ready-made lamp to the place intended for it.
Option number 4: Lace
You can try to make lace lace lace. From this material you can make a lamp lamp for the old table lamp with your own hands, for a scheduling or lamp.
Work begins with the preparation of things necessary for the work. This is actually a lace, PVA glue with a tassel, an air ball and electrical elements for the lamp.

Stages of work:
- First stage - Preparation of lace. It is necessary to cut several circles of different sizes.
- Inflate the ball. Lubricate its surface with glue.
- Enclose lacy circles to the ball. Do it you need a mustache.
- Leave the product to complete drying. It will take about a day.
- Ball burst and pull out out.
- Secure the cartridge, lamp and wires. It is recommended to use low-power lamps that will not heat lace.
Option number 5: Macrame
Lovers of the original decor elements will undoubtedly pay attention to the lampshade macrame.
For the manufacture of lampshades from Macrame, you must prepare:
- 172 m cord with a thickness of 3 mm;
- tubes and rings made of metal for the frame;
- 8 rings with a diameter of 7.5 cm;
- 1 ring with a diameter of 17 cm;
- 1 ring with a diameter of 36 cm.
How to make a frame for lampshar with your own hands? We combine two rings (17 and 36 cm in diameter) and 8 metal tubes with a length of 27 cm.

The workflow for the manufacture of the plastic itself looks like this:
- You need to cut off 40 yarns from the cord of 3.5 m each. Secure them on the upper ring.
- Using the schemes for macrame, weave the openwork grid.
- At the bottom edge, insert 8 rings, laid by their thread.
- Also larger all the vertical tubes of the frame.
- Lower edge decorate with decorative elements.
Before making lampshades do it yourself, you can see master classes. They will help to master the basic elements of the macrame weaving and avoid errors in the workflow.
Option number 6: Fabric
It will be great to look at the lampshade of the fabric. Using the tissue, you can update or renovate the old product. Just cover it with its prepared material and decorate with any suitable decor elements. Fabric lamp shade based on cardboard is suitable for desktop lamp, sconce, infrared lamp, night light and even chandeliers.
In order for the product to be neat, it is necessary, before taking, shelter on the sewing machine. Besides her, you need to prepare:
- iron;
- pencil;
- line;
- the cloth;
- pins;
- suitable threads;
- dense paper (thin cardboard or watman);
- universal glue.
The workflow consists of several stages:
- Make paper pattern of the desired form. It is important that he approached the frame.
- Connect the template with a cloth using a pin. Bring it with a pencil. Draw another line 2 cm from the template line.
- Wrap the allowance inside, gradually disconnecting the pins. Mark the line of fold.
- Pattern remove.
- Start fabric on a typewriter.
- Well smooth fabric.
- In a well-ventilated place, decompose the workpiece and lubricate it with glue. Give a little dry.
- Glue the fabric to the frame. All seams and sections should be hidden.
- Give the lamp drying. A day later, it can be used.
It will be good to look at the lampshade of fabric, decorated, for example, with flowers, buttons, bows. Instead of ordinary tissue, you can use organza.
Option number 7: Tree
Separately, it is worth saying about the lamp to the steam room, a sauna or in a bath with their own hands, because there is high humidity, and glue can stop keeping the shape of the product. For making with their own hands, wooden materials are most popular with their hands from the girlfriend.
To make a pair of label from a tree with your own hands, you need to take:
- paper;
- pencil;
- wood;
- sandpaper for grinding;
- saws.

With this set of tools and materials, you can make an angular lampshade:
- On paper, draw a template of the bottom of the frame. He must have a trapezoid form. It is important that its sides fit to the walls of the bath.
- Using a pencil, transfer the drawing to the prepared wood. Cut.
- Collect emery paper.
- Cut 3 strips with 1 cm wide and 0.5 cm thick. The height should be equal to the height of the lamp.
- These planks will combine the upper and lower part of the frame. They need to be nailed on the sides and in the center.
- Having measured the distance from the center to the edges, cut a few more planks of the same size.
- Planks fasten with self-draws from the inside of the lamp. You can fix them in any position.
As can be seen, the options for making lampshades with their own hands. In addition to those listed, there are still wires from wire, knitted, lampshade of beads and many others. In the process of work, almost any material is used, which was at hand. If necessary, you can make a new product, and you can update the old (to make a restoration). Almost always requires a scheme or pattern. It is important that the workpiece corresponded to them. Only in this case, the finished product will become a real decoration of the house or apartment.
What could be more interesting and the original multifaceted lamp, which will be done with your own hands?! By itself, the lamp is an indispensable attribute in every home, but it must be different something else, isn't it?!
The idea of \u200b\u200binspiration, in order to build such beauty, may appear the most different paths. The main desire.
So, in order to take directly, to work, you will need:
PVA glue
Corrugated cardboard
Scissors
Cutter
Simple pencil
Rule
Normal light bulb

Once you have acquired everything you need for the manufacture of a multifaceted lamp, you can proceed directly to the work itself


From the cardboard it is necessary to start cutting the strips of the thickness, which you want. But pre-draw sketches with a pencil and ruler so that there are enough flat stripes.
Stripeds should be a lot to have enough for the frame of the lamp


Now, you can proceed to sticking. It is necessary to do it very carefully, in order not to grind glue. Take one strip and create a square, gluing one after another. The shape of the lamp you can come up with yourself. Squares to fasten each other in different ways.
It is important to remember that one layer should be less than the other.
So, it should work both the frame itself and the walls of your lamp.


After the frame is assembled. We need to make a steady base of the lamp and spend the light in our lamp.
For the manufacture of the base of the lamp, you need to prepare 3-4 squares. To do this cut the required number of strips and glue them with each other.


The resulting squares also should be punctured all together - it will be the base of the lamp

After that, it is worth conducting light. We will conduct in the base of the lamp.
To do this, you need to take the cartridge and circle its contour on the bar, which is actually to keep it.

Cut a hole on the outlined lines

It is necessary to glue the cartridge holder into the lamp.


That's all, the lamp is practically ready. Print the light bulb inside the frame is completely optional, because it will stay quite tight. The frame of the lamp can be painted in the color that is suitable for your interior.
 Why you can not give icons
 Is it possible to give icons as a gift: Signs, the opinion of the Church
 A year ago left her husband, and now I do not know what to do