Chemical preparation dispensers for the pool. Options for making a sensitive float with their own hands Electronic chemistry dosing systems
Any fisherman who relates seriously to the fishing process, there is always a marker float. It is needed to designate the place of fishing, for the implementation of accurate casts, especially when fishing on the feeder. This float is installed in the fields of bait fish or in places where there are essential debris. In other words, with the help of a marker float, you can designate a perspective place on the reservoir.
But it does not end in this features. With the help of a marker float, it is possible to determine the bottom terrain, as well as its character: sandy, stony, solid, or or et al. It can be bought, and can be made independently at home.

It can be made it from the girlfriend or unnecessary items that can be easily found in the garage or in the workshop of any fishery lovers. For this you can use the following girlfriend:
- Used syringe.
- Marker.
- Plastic tube from drill or a bora.
- Plastic barrel, from under Kinder Surprise.
- Another suitable object, with positive buoyancy.
Manufacturing technology is the same, despite the one object or material is used. This is due to the fact that the appointment is the same. It is enough to study the process of manufacturing such a float using any one object and it can be done then from any other subject or material.
As a basis, you can take a tube from the drill in which there are two plugs, on one of which is the ring for fastening. If the rings design does not suit, then the plastic ring can be cut off, and install the carbine in its place. On the other hand, the tube needs to install the stabilizer, in the form of a dart pipe. By the way, this is such a plumage and is suitable in this case. If the float is assembled correctly, then you can get this sample:

If the principle of manufacture is understandable, then you can safely begin the manufacture of a marker float from any other subject.

From an unnecessary syringe, you can also make a great marker float, and it is much easier to make it than from the tube from the drill. In order not to spend time on the description of its manufacture, it is better to see the corresponding video. As they say, it is better to see once than to read than a hundred times, especially since an experienced fisherman tells about it, focusing his story on the subtleties of its manufacture.
Video "How to make a marker float from a syringe"
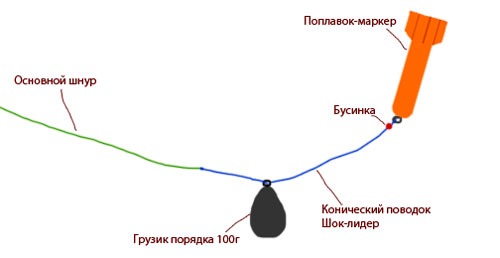
To establish a marker float, for starters, a sliding weight from 50 to 100 years of cargo depends on the life of the water and the presence of a flow on the line. The cargo should be such that the float can not keep it in the thickness of water. To the edge of the fishing line is attached directly to the float itself.
The float also performs the role of a stop, without giving goods the opportunity to fly from the fishing line. And now, most importantly, how such a tackle is used.
How to use a marker float
To begin with, it is necessary to determine the purpose of the marker float, as well as with the functions performed. And they can be as follows:
- A marker float will help not lose the water area of \u200b\u200bthe reservoir, a perspective place or a place where the bait was abandoned.
- To find out what depth is a reservoir in a particular place.
- Determine the character of the bottom of the reservoir.
As a rule, the marker float is thrown through a conventional rod or gets on a boat at the desired distance along with the bait. It is very important that the bait is delivered to a dope of fishing with a certain accuracy, and not scattered on a large area. This is where the marker float will help, which will be there a reference point where the portion of bait should be taken. Thus, a point spot of bait will be formed, which will make fishing more efficient.
The depth of the reservoir is defined as follows: the marker float is thrown, during the abrasion it will be in close proximity to the cargo. Finding into the water, the cargo will go down down. When the cargo drops to the bottom, and it will always feel, you need to start to burst the line so that the float floods to the surface of the water. The number of injected fishing line and will mean the depth of the reservoir, in the place where the cargo is. Naturally, before stepping, the fishing line needs to be remembered how many rings the fishing line is gone. You can proceed differently: after the float appears on the surface of the water, start winding the fishing line until the float does not fall to the goods. In this case, it is also necessary to count how many revolutions made a coil.
With this float you can find pits, as well as drops of depths, broval and rigs. As far as it is known, large fish is located in such areas of the reservoir, which can be bolded to be promising.
A similar float, or rather the tackle, will help determine the character of the bottom. For this, the cargo is simply dragged on the bottom. If the bottom is solid and clean, then the cargo will take place without much resistance, and if the bottom is or), then the cargo will be stuck in Ile, and it will have to pull it with a certain effort. If the bottom is stony, then peculiar tapping on the stones will be traced, and the load itself will be moved by jerks. Naturally, in order to learn how to use the cargo to determine the nature of the bottom, there will be a lot of workouts, because this is a thin.

A marker float, with a certain approach to the fishing itself, may be an indispensable thing, especially when departures on unfamiliar reservoirs. Yes, it will have to spend a lot of precious time on manipulation, but the result will not make himself wait.
Experienced fishermen understand perfectly well that going to fishing, you should immediately search for a promising place. Just so and where it fell, you can't catch fish on the pond. Therefore, the search for rods, holes, focate is the primary task of the fisherman who arrived on unfamiliar reservoir. Well, if there is a boat and echo sounder, then the task is simplified and very much. And if fishing is carried out from the shore, you should always take a marker float and a powerful rod.
In the summer they gave a piece of solid foam from an old rescue vest. Well, and since in the summer I lose up to a dozen floats, I decided to try to make them myself. In winter, I do not go fishing, a lot of time.
Saw it into parts. The size is chosen at your discretion, but since I am satisfied with small, then we saw this piece of 4 parts.

In the market I bought bamboo speakers for kebabs, they cost a penny, and picked up the drill of such a diameter so that the sprinkle came to the hole, which we drill in the workpiece.

Now we attach an exemplary float shape by a stationery knife.

Insert the ships in the workpiece.

Drip a drop of Chinese super-glue between a skeletal and foam. This is done in order to when we draw a foam, it did not scroll.

It hits the glue with the moment, and after 5-10 minutes you can already turn it out. Here I had to help my wife call, to hold the drill and regulated the turnover. There is a simple way out of this position: to hold the drill in the testicle, and turn turns to adjust the speed adjustment pedal from the sewing machine. But for this you need a drill without electronic adjustment of revolutions, and otherwise it does not work, the drill immediately takes more than half of the revolutions. You can also adjust the lighting controller for the chandelier.
Next, freamed into the drill of our float so as not to remember the skewer. Shot with a slight hand and everything - she will hold.
Yes, I forgot to write that the skewers choose as much as possible! But they will still beat, so you need to lie down with your left hand over the antenna.
Since we did the initial processing with a knife, the float will be sausage. To avoid this, you need to take something hard and impose on it sandpaper. I got a flat file under my hand, so I took it. The lower end of the file must be resting in a table or, like me, in a cutting board. Drill to spin up to medium speed and smoothly bring the file with sandpaper to the float. We start with a major sandpaper, we remove all the beats and gradually give the form of the future float.

When the beatings were removed, you can remove the file, and then work at the expense of the rigidity of the sandpaper, moving to the smallest one.


That's what happens when you rush. A little stronger pressed a file - and Kiel broke!

Before completing the processing, we change the direction of rotation of the drill and slightly rake already very small sandpaper. This is done in order for the foam veins, which listed along the rotation of the drill, drove and the pores opened.
Now we divorce the glue of PVA to the state of milk and the tassel is missing the foam. Envy. Now our float has become like a hedgehog! This all the villi rose and harden from glue. Press again the float in the drill and the skin, preferably a new zero, we remove these vile.
Then we embarrass the plate a little baby powder and pour ordinary emulsion in the jar. We dilute it with water to the condition of the cream. Emulsion should be the simplest, which is not desirable to wash and wipe.

Now the powder rubbing into the foam.

Dip in emulsion.

Sprinkle with a little more.

We start this crawling to rub. Well, the main thing is not to overdo it with a supper, but everything will quickly be thick and badly flashing. Here you need to look like Kashitz falls on the foam. It is advisable to achieve a smaller number of open pores from the first time.

Align the Cashitz evenly on the float, to wait when the cashem starts to keep the pores closed (it is approximately 30-40 seconds), and again dip the float into emulsion. I'll say right away, for the future: in the bank there should be no air bubbles (fither), as they will stick to the float. Float should be raised slowly! In order to, at the expense of the surface tension, the extra emulsion, and then further and lacquer, glasses in the bank immediately, and did not form flutters during drying.

Next again we are dry. Pumps from foaming may appear again, we remove them as last time. Sunday again and pull out the float into emulsion and look at how much unsigned pores are left. If they are, and they will be 100%, then we rub the powder and repeat everything. And three times, until you achieve that when the float is approached from emulsion, there was not a single open pore.
All this is dried every time until complete drying. After drying, the surface must be smooth, without pores and irregularities. But now we take emulsion waterproof and super-white. We dreamed the water as much as cream, and without any suit, just pour and slowly pull out our float. Envy. Again, dip and again envy. After drying, the tassel is painting this super-white paint antenna.

Well, the float remains to paint. Yes, I forgot to write that sushi float with clothespins for linen. Let's hang over the keel, then for the antenna. Dyes are now different, you need acrylic, which are diluted with water.

About the color of floats you can talk long and a lot. There is no questions with floats that are not afraid of nitro-paints, and this is mainly of wood. Everything is simple - Okaril is a thoroughly little sandpaper, plunged immediately to Nitrolak (it will react and fill all the irregularities and pores), and then color any dyes. It is best to use automotive enamels, nitrocracks, and still sold in stores for lovers to collect various models very bright nitrocracies in small bottles. But it all requires costs, and you will not buy several multicolored cans of expensive car enamels to use each can of several grams from each bank. Here the main thing to sharpen from the wood itself the body of the float, that with the help of a drill is quite problematic.
Well, this is all reasoning, and we will proceed from what we have in stock. Now our float (foam) is also protected and can be painted by nitrocracy. But I will tell how I did about my mistakes that manifested themselves after a while.
We take the jar and in it pour super-white waterproof enamel (was higher in the photo) and add a dye to the shade you need. Do not forget to dilute with water. This composition will paint the bottom float.
Here the role is played here. If you fish at a depth, you can not bother and paint in any beautiful. But if in a shallow water, then it is desirable to pick up the color of some kind of snag, falling into the water leaflet and the like. You know yourself that large fish is very careful and to the bright items closely getting stuck.
Immerse the float in our paint and slowly raise. Paint should be evenly and easy to drain. I raise about 10-15 seconds, so that the glasses immediately and there was no height.

Of course herself. It is enough to plunge once.
Next, we do the following color in another jar. It takes quite a bit, and you can apply directly with a brush, but by 2 times. Tassel should be very soft, because she will then apply lacquer. I bought such a few pieces, they approximately 17 rubles. Do not forget the tassel immediately rinse well. Yes, in the yellow dye, I just added some of the glue of PVA, because if you add a dye into enamel, then the color becomes pale.

From the keel float with a knife to the shrinkage all our previously applied layers of putty and paint. I thought for a long time than painting. I tried to breed all sorts of colors and with a slow rotation drove the most thin tassel draw rings, but because the ships are still curves and beat a little, then the width of the lines of lines was different and I decided to paint further with markers. Drill works on small revolutions, bring the marker, the ring is ready. First, draw light, and then dark tones. Waiting for the time the marker is dry.

Well, now the responsible moment comes. We will cover our float with colorless nitroquacked wood. The fact is that the lacquer dissolves the marker! Therefore, we do this: on the most almost slow turns, we include a drill, macausus in varnish and literally only touched our coloring. One movement, for one second, coated with a thin layer of varnish Blue rings and nearby are black. Rinse a brush from the remains of the marker, which blurred bristles with varnish. Again Macaus in varnish and the same fast movement covered the bottom float, and then the black rings on the antenna. Sorshem very good. And so do 2 times. For the third time you can already be the body of the float with a brush to cover, but you need to have too little varnish on the tassel. I slightly spent, mumps, then again ... For the third time you can and the antenna is all, almost to the tip you go. If only it was possible to take the float and not blurred hands. The most tip will then paint the brush last time.

Slightly snack :)

Well, now you can apply two final lacquer layers with immersion. Only, of course, after each layer, dried watches 12, and after the second layer - a couple of days. We lower the float to the jar with varnish so that the lacquer covered the first black ring, and smoothly raise - 10-15 seconds. In the same vertical position hang to dry.

Annox then cover with a varnish tassel. That's actually all!
This applies to those who attack the float on the nipple from the bike. But since I use sliding floats, then continue.
We buy a nichrome spiral in the store for 2 kW and unwind it on the coil from the old fishing line. Cut off the caution of the tip of the keel and consider varnish to the skewers.

Further, we are looking for something like a mandrel for winding spirals from the purchased nichrome. It should be literally on a little bit thinner killets. We clamp the mandrel into the drill, fix the start of the wire and screw the spiral on the mandrel. Then we reject a couple of turns of our spirals with a knife, in the resulting ring insert the tip of the rounds and make the rings of the ring so that the start of the wire is almost hidden under the main spiral. The photo is clearly visible. This is to ensure that the fishing or carabiner does not cling to the beginning of the turn. You can of course pick up the finished spring from the glands for cars, they are stronger, but it needs to be spinning near the car service and rummage in the chem.


It remains to paint and cover with varnish. That's all the technology. It turned out maybe a little mutually, but I think everything is clear.

Well, now about what was not necessary to do ...
It turns out the lacquer bleaches the marker! After two months after the manufacture of floats, the blue color became completely pale, and the black pale turned! But the yellow, who bred on Clee Pva, remained bright, and the body itself was not pale itself! The conclusion suggests itself: it was necessary to breed the paint on the glue of PVA or waterproof enamel! But then it would be necessary to apply a brush.
I remind you once again that the testing of floats in the field has not yet been carried out, and how they will show themselves, we will learn only in the spring. If someone was able to help, or it was just interesting, then I would be glad.
This is what eventually:


Feeder fishing is considered a very complex view of fishing. And without specifying the place of fishing is not to do. With this task, only one means can cope - the marker float. After installing the float at a certain point of fishing, you can repeat the casting there.
Often the marker float acts as the designation of the nailed place or the bottom anomaly. After all, throwing gear into a pre-marked place significantly increases the chances of catching a large instance. After all, the success of fishing depends on the choice of the right place of fishing.
The primary task with which the marker float can cope - determine the depth of fishing. This is the device allows you to determine the nature of the soil at the bottom of the reservoir And you can easily distinguish the sandy bottom from it.
The most interesting is that it is not necessary to buy this product. Each fisherman can easily make a marker float with their own hands from the remedies.
Special difficulties with independent manufacture of the marker float, as a rule, does not occur. As the basis for the float, any material has positive buoyancy.
As the basis for the float you can use:
- Any plastic bottles from medicines.
- Classic float only large size.
- A piece of wood powered float.
- Syringe.
- Any item has positive buoyancy.

Georgic for a marker float can be bought in the store. And you can make yourself. Fit the usual loaded to the leash and on the other of its end, lock the crosstalk of a small size.
It is worth carefully approaching the slaughter of the ring, so that it does not prevent the passage of the fishing line.

The optimal option is the idea to make a marker float with your own hands from the syringe. The use of such an element taken as the basis of the float allows you to significantly simplify the manufacturing process.
For the manufacture you will need to stock up the following components.:
- Medical syringe of 20 cubes.
- Scissors.
- Awl.
- Lighter.
- Tweezers.
- Lubes.
- Cut wire (for the manufacture of a bracket).
- Glue.
- Pliers.
- Bright color nail polish.
- Swivel.
After you collect all components you can proceed to the manufacturing process. It looks like this:
- It is necessary to make a cylinder from the syringe. To do this, cut the ears and the fastening site of the needle.
- Now it is necessary to align the cropped edges.
- With the help of sewing, we make 2 holes in the syringe for the loop. To do this, you can warm the edges with a lighter and align them with your fingers.
- Twist a small bracket from the wire.
- Now you need to put on the bracket of the swivel. It is necessary to insert a bracket into the prepared holes in the syringe and break its edges, as shown in the figure.
- After that, it is necessary to pour into the syringe a bit of glue, so that it is growing around it by about 5 millimeters in height and leave it all silent.
- It is best to stick a hole in the syringe with a scotch - to prevent the glue to prevent the leakage.
- Then it is necessary to cut the piston from the syringe into two smooth parts and paint it with a bright varnish.
- Insert the piston inside the cylinder.
- You must additionally paint the cylinder itself. This is done to increase the visibility of the marker float.
- Puck the connection location with glue to ensure tightness.
Everyone, as you can see to make a marker float with your own hands, it is very simple and for this requires the minimum amount of materials and knowledge. Any fisherman will be able to make this device in the minimum time.
But with the last not everything is so unequivocal. For a fisherman-athlete, the correct position is barely noticeable, up to 5 mm, the tip of the antenna over the water. Among lovers, some frighten the float before the start of the antenna, others also leave another body float. At the "industrialists" - its own fishing technology. Sometimes it happens, hang a crushing with a weight corresponding to the written, and the float completely goes under the water. Usually, the float is reloaded at home in a jar with water, but when throwing a snap in the reservoir, it turns out that the Loading was incorrect, and it falls on the shore to bring it to mind.
This problem can be avoided if you make floats not with a constant, but variable loading capacity.
For this, there will be plastic syringes with a volume of 2 to 10 ml depending on what fishing rods you will be set (photo 1). For catching bleaks are suitable, and for pike, naturally, you need more larger.
I pull out the rod from the cylinder, cut off the round focus of the pressure, and the four-step gain on the piston gently cut. To the lower part, we adhere to a small wire loop for skipping a fishing line. The cylinder also cut the rim.
Instead of the needle, the syringe insert the antenna. Suitable material for it - a tubule for a cocktail, used rods of gel and ordinary handles, etc. Plastic tubes suitable diameters. You can put the tube by cutting off the needle, on its base or just on the needle without circumcision. So that the tube does not slip from the base of the needle and did not let the water, fix a piece of a shrink tube: heating over the flame of the candle, holding two hands, and for a flat shrinkage constantly scrolling over the fire.
Two important nuances
FIRST. Annox should be hermetic and well to stay on the base of the needle. For this, the opposite end is sealed with liquid nails, pressing the tip in the glue. An easier way is to cry on fire.
SECOND. Tightly sitting on the syringe, the antenka should be removed.
Otherwise, you will not be able to push the rod, nor push out: the air inside will not allow this to do. And you will have again the float with constant lifting capacity. But there was a goal to make a float with variable loading capacity.
In compliance with the technology of alteration, 3 ml syringe turns into a float with a variable loading capacity from 1 to 3.5 g
The last barcode is an antenna coloring in the desired color. As a result, you get almost free excellent snap (photo 2).
Seasonal menu
October - Paradise for spinningists. Accordingly, in this perspective and consider fishing prospects in the middle of autumn.
Pike. It leaves the coastal zone and hunts at depth, in the pits. Sit down to the "big piece", so try to present it big flares or volumetric wobblers.
Perch. Very active. Even the big pricker baits that cannot swallow are attacking. Preferences - Wobblers from 5 to 7 cm, the same flavors and turntables with petal No. 2-4.
Zander. It is perfectly caught as spinning and bottom tackle. There is a pack, and if you catch on spinning, use twisters of light tones: from white to salad.

Gpawnny dignity Float with variable loading capacity - you do not need to choose the load under the float. It is enough to move the piston inside the cylinder in one direction or another and choose the volume of the float under the weight of the Load. Even when replacing the float, you do not need to pick lead crushers again, it is enough to shift the piston.
A toilet is the place without which a person just can not do, but in order to comfortably and comfortably use the toilet, it is important to care for it, clean and disinfect. Tired of buying cleaning products weekly, which literally enough for a few days? The dispenser will be a relevant solution.
Instructions on how to make a dispenser with your own hands
In order to make a dispenser with your own hands you need:
- plastic bottle,
- Cleaning tablets
Prepare a conventional plastic bottle of 1.5 liters. Cut with a knife or scissors an upper honor of the bottle, noting from traffic jam, approximately 15 cm. Crasing the bottle It is important to calculate the size depending on the barrel, the bottle plug must be when the device is immersed slightly above the water level in the barrel, during washing, it should seek how to hang in the air.
Screw the bottle cork loosely, so that the water can leak out of the edge and flow. During the work of the water from the barrel and break the faucet so that it does not go inside. Suspend prepared edge inside the tank.
Take a piece of loose foambone and cut it out so that you can carefully, put the bottle into the edge. At the same time, the top edge of the foam rubber should be at the water level at the moment when the barrels are filled or slightly higher than it.
Stick to the foam rubber small weight (any heavy metal object) or screw in the bottom of several large screws. This is necessary so that the sponge does not pop up, and was inside the cut, in the thickness of the water.
Purchase cleaning tablets for toilet bowl. Place one of them on the foam rubber. Close the tank, unscrew the water supply faucet and make the first flushing, in which you will see simply clean water. But in the second and subsequent washes, foam and freshness will be visible, as if you just placed as usual a tablet in a barrel.
However, the tablet will not dissolve so quickly as it occurs when it is placed on the bottom of the barrel into the water, it will be able to extend its action up to two weeks, and the solution that is allocated when the tablet is wrapped, completely impresses the foam rubber and thereby creating an additional reserve of saturated solution inside Cutting a bottle and, accordingly, inside a flip barrel.
In such a homemade dispenser, several tablets can be placed immediately, without worrying for the fact that they will move fluently, and they will have to buy new ones.
 Why you can not give icons
 Is it possible to give icons as a gift: Signs, the opinion of the Church
 A year ago left her husband, and now I do not know what to do