Transferring images on a tree - technology features. The easiest way to transfer any image on the fabric or tree how to make a tree image
Let's try to translate the photo on the tree? This type of creativity is already known for a long time, and master classes showing how this is done, there is a provisional amount. I also decided to try my strength in this process, and today I suggest you see how this happened to me (I still hide my face under the "veil" 😉).
I will show 2 options for translation pictures (why two? About it just below ...) and tell about the errors allowed when executed. And at the end of the master class, we compare the results.
How to quickly translate photo on a tree
So, in order to translate the photo to the tree, we will need:
- suitable base (I have these segments of the board)
- grief machine or sandpaper
- soft brush
- rubber roller
- depending on the selected option - PVA glue or acrylic varnish

First you need to prepare a wooden foundation. The surface of the board should be clean and smooth. That is why we will need a grinding machine. The role of the latter plays the electric drill and a special emery nozzle. Locked the board and smoothing the corners, we will get a suitable form to transfer the photo with your own hands.

Keep in mind that the wooden surface has its own structure that will be shifted through your photo. Be ready for it.
Now prepare a photo. The selected picture must be printed, and necessarily on the laser printer, and necessarily in the mirror reflection. By size, my photo is a little less than the board, I specifically left small fields so that the texture of the tree is noticeable.
Transfer photos to the wooden surface using PVA
In the first version for translation a photo on the tree, I used PVA glue. And not the stationery, but construction. I do not know whether they differ in composition, but it seems to me that with the help of glue purchased in the construction supermarket, the picture is improved better, and the paper is removed easier.
We cover the undiluted glue only the front side of the photo, i.e. The one we will translate.

We apply a photo on the board and press well. The picture is better not to move (paper can break or wrinkle). Leave drying.

My photo on the board burned a day. And as soon as it dried, I immediately noticed the error ... See?

Yes, it is either the plots, or poorly pressed by roller. Well, there is nothing to do, we continue ... We remove the paper, and for this we use a spray gun.

It is not necessary to make a lot of paper, just slightly spray the surface. We need to wet only the top layer so that the photo of the photo on the tree was successful. We give paper a little bit (minutes 2-3) and start your fingers roll it from the surface.


Attention! In no case do not apply power in order to remove as much paper layer as possible at a time. Together with the paper will come down and the picture.
Look at the photo - all the mistakes allowed are clearly visible. The lack of glue at the first stage and excessive pressure when scolding the paper led to the appearance of rush in the translated photo.

Well, we start again ...
Transfer photos to the board with varnish
Re-polling the board, proceed to the second version of the translation of the picture on a tree, in which we will try to take into account all the mistakes made.
In this method, I used to transfer the photo a colorless acrylic glossy varnish. The varnish is often used to secure an image based on, and we also used it in the cradle to preserve the appearance of the product. First of all, I saved the wrong fingerprint with a photo of a scotch, cutting it around the edge of the picture.


White photo on the board and again roller, very carefully smoothed the picture. You need to drive all air bubbles. In this form, leave to dry. With natural drying it takes two days.

And now we take the edge of the tape and tear up the top layer of paper.

Then we repeat all the procedures that we have been done in the first version are wetted by water from the spray and wait until the paper is soaked in moisture.


And now, easy and gently, starting to download paper balls from the surface of the picture. Once again I remind - the efforts can not be applied! If you feel that under your fingers, paper dried up - you can still sprinkle with water. But! With an excess of the latter, it can impregnate the upper layer of the board along with the photo of the photo, and then the drawing will erase.
Scientific previous unsuccessful experience, I stretched the scaling of paper into 3 stages. That is, when the fingers began to slide on the paper surface, without rolling it, I stopped the process of translation a photo on a tree and put the board on the drying. After the surface is completely dried, I repeated all the steps.
At the last stage, I could remove a few paper residues from the foundation. And here Voila! The picture was transferred to the board at all without defects!

Now, to smooth out the border between the photo and the wooden surface, I went on a shallow sandpaper along the contour of the picture. Yes, the photo on the board will seem a little faded, but this is normal.

And now we cover the entire surface of the board with the same acrylic varnish. Do not forget that brush must be carried along the fibers. I put a varnish in three layers.

Conclusions and comparison of translation options for wood
So, what conclusions can be done when translating a photo on a tree with different options? I will express my opinion here based on the experience gained.
- when printing a photo we need to increase the contrast slightly (then the picture will get more bright)
- to transfer pictures on a tree it is better to use acrylic varnish
- apply lacquer need to both surfaces
- when drying the product it is necessary to wait for a complete drying photo
- screw paper only with light finger movements, without onslaught
- it is better to split the process into several stages with an intermediate drying
Here, when these conditions are fulfilled, the result will certainly be successful. Here, of course, there is a large field for activity and a flight of fantasy in terms of decor of the resulting image. You can come up with something for framing a picture or even frames around the photo, make some kind of background, come up with fasteners. Here, for example, you can see how we did, maybe some kind of idea and will come to mind ... 😉
You can translate the photo on the tree described above and get an interesting picture. She is quite suitable as a present for any holiday or just as a small gift surprise for friends.
PS. I have an addition to the article here, with a refutation ... 😉 I decided to check the theory that you can only transfill pictures on a tree only those that are printed on a laser printer. And that's what happened ...
How to translate a picture printed on an inkjet printer
Prepared the board above the method described. Printed a photo by glossy photobumage For the jack.

All stages of transfer are similar to the previous method. Only the only one - cut the photo along the border of the board.

After everything is well dry (I also used the hairdryer to speed up the process), begin the paper separation from the surface of the tree. And - Oh, Miracle! The photo paper broke away very easily, and the image itself remains on the board! Even water was not allowed.

Just left to fix a bit - carefully using a sharp knife, pour the remaining pieces of paper and separate them from the image itself. Everything!

So - experiment, and always check all available methods in practice. Good luck!
I translated the image printed on the usual laser printer. In the future I think to find a jet printer for printing color images. In this case, you must not forget the mirror image to display the image horizontally. Well, even made a small tone correction in the bright side.
The surface to which the image is translated should be smooth. I used empty paper with graininess 120.

The main element of the technological process is a gel medium. When I found a store for needlework and asked the seller to give me a gel medium, he asked me a question that put me in a dead end: "What are you?". " "Well, how, on the Internet it is written simply - gel medium. Let the pictures translate". The turn came to be surprised by the seller. It turned out that the translation of the pictures is only a side effect that the seller did not hear before, but in general gel is used for different effects "under the glass" and "with the straticles". From all the many gels chose a transparent glossy acrylic medium. It turned out, was not mistaken. The gel itself is similar to sour cream. And consistency and color, and the same opaque.


We glue a sheet with an image and a roller kicking bubbles.

The idea of \u200b\u200bthe method is that the top layer of paper, the carrier image is inserted into the medium (liquid glass). After complete frozen (we left the blanks to sax overnight) you just need to remove the paper layer. For this, the paper is swollen and rolls with fingers. I used the hard side of the sponge for washing dishes. Here it is necessary not to overdo and not damage the image itself. But this does not represent a special problem, the image is quite persistent.

We conducted a lot of paper removal experiments. The sponge showed itself from the best side. But when the paper was rolled with her fingers, a small paper pile remained, which climbed when applied varnish.
After removing the paper, only the paint of the printer is pasted into the liquid glass. At the same time, after drying, the gel became transparent and the structure of the tree appears clearly.


I must say technology is quite effective. The whole process takes two evenings. The image is translated clearly, does not blur. One gel bank with a capacity of 125 ml and worth 480 rubles was enough for 9 sheets A4. The only inconvenience is possible damage to the image when the paper is removed.
It remains only to spill extra.


Now, owning technology, you can think about its application. For example, decorating the caskets or the original marking of products.

You can purchase some things from this blog in our Vkontakte group:
Elements in the interior of wood make it more elegant and attractive. This decor can be made with your own hands. The easiest option will be a wooden plank with a pattern, which is applied to the surface in accordance with a specific technique. To make the product correctly and beautifully, you need to know exactly how to transfer the drawing to the tree in several ways.
How to decorate a tree by means of a picture
There are several techniques in which the drawing can be projected into a wooden surface. In each situation, it is worth knowing exactly how to transfer the drawing to the tree:
- Burning with a special device. The picture is obtained clear and relief. The contours are noticeably limited, you can create a shadow effect or shadow transition.
- Decoupage is the most popular and simple drawing technique. As a result, the image may turn out to be colored or black and white, the drawing can be of any complexity.
- For a wood thread, a sketch is needed, which is projected to the surface through several ways: Using a copy, redrawing, relief copying with sharp tools.
You can partially combine several techniques in one job. This is possible, provided that the person has an artistic talent, which will help abstractly present the result of the work.
Preparation of wooden surface
Before transferring the drawing to the tree at home, it is worth preparing the surface correctly. The process of work, and the result depend on the quality of the wooden basis. Terms of operation are also directly determined by the quality of wood preparation.

Preparation of a wooden surface:
- Select the right tree. It is best to work with pressed sheets of plywood, chipboard and other analogues, but natural material is quite suitable.
- Decide with the parameters and shape of the wooden base. Immediately get rid of the extra parts, stabbing the edges.
- The surface itself should be smooth and smooth. To do this, it is worth using a grinding machine, and hard-to-reach places to treat emery paper or file.
- Only then the sketch of the image itself is prepared for transfer.
Thus, preparation lies in three simple steps that even a child can do.
on wood
So that the burning procedure produced quickly and efficiently, the drawing on the surface of the tree is as accurate as possible and high-quality. To transfer images to the surface use several methods. The most popular option is to be transferred via a copy-step.

How to transfer a drawing to a tree for burning using a copy!
- You need to take a copy of the copies. It is advisable to use paper that was used more than once.
- Put a copy of the copy side to the wooden surface. From above, lay a sheet with a pattern and secure the design with a scotch or tape.
- Graphite pencil circle image line. It is necessary to work carefully, the maximum restricting the interaction of the hands with paper.
- After completing the lines, remove the paper layers. Figure for burning ready.
This method is very reliable, but requires special accuracy in performance. In the process of translating, traces of a copy of the photo can remain, which are almost impossible to cleaned from the tree surface.
Figure without a copy
In order to learn how to transfer the drawing to a tree without a copy, you can use in several ways. Everyone is characterized by a set of tools and materials, but simple in the sense of incarnation.

Image transfer methods:
- Graphite prints. Take a simple pencil with a soft rod and circling the contour of the drawing on paper. Rotate the image to a wooden basis and quickly press without shifts. In order for graphite to be qualitatively printed, it is possible to carry out a rigid roller or plastic strip on paper.
- Thermal transfer. First you need to pick up an image made on the proper instrument. With thermal exposure, a photocopy or printout produced on a powder printer is printed. Attach the back side to a wooden basis and warm the paper with an iron.
- Reprint with White Spirit. The picture must be printed on a laser printer or xerox. Attach a sheet of the pattern to the tree and wipe the White spirit. On the cotton disk it is worth noting a little means so that the paper does not rays.
There are other options, but the principle of incarnation is much more complicated and requires more time and money.
Preparation of wood to thread
To form an image on a blackboard or plywood, you need to know only a few basic rules. If the work is wrong, the thread process can be significantly complicated.
How to transfer a drawing on a tree for a thread to observe all the rules:
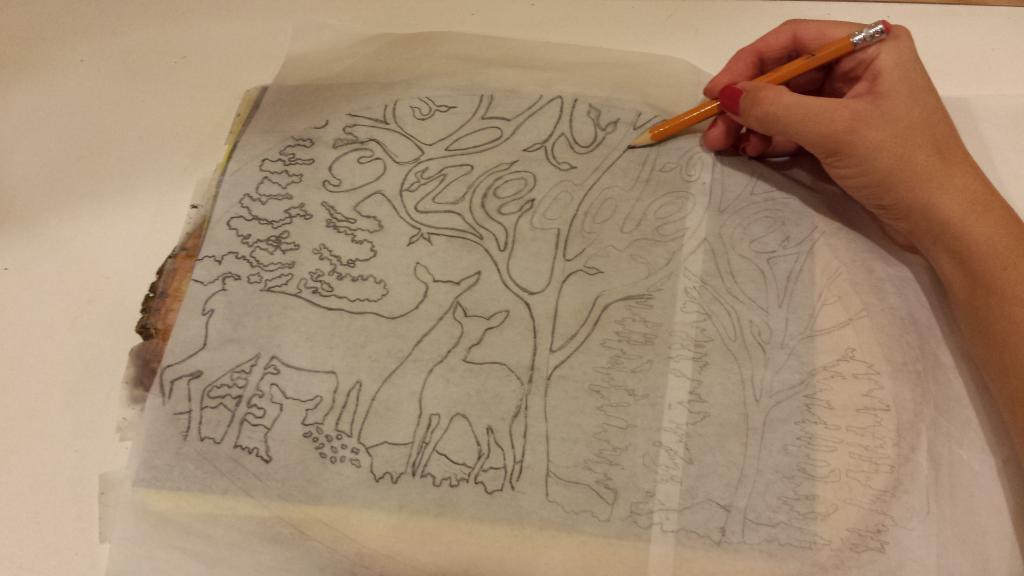
- On the surface of transparent paper to apply a grid. The cell size will depend on the desired dimensions of the pattern.
- If you need to create an ornament, part of the image is applied on a tracing and folded the sheet in half. Cut a pencil image on the second half of the tank.
- Symmetry drawing can be given by using a copy.
The method of transferring the ornament or image can be used from the above options. The main thing is to lay a sheet with an applied ornament so that the direction of the figure coincides with the location of the fibers.
Decoupage technique - Simple image transfer option
Often, not only the manufacture of interesting decorations for the interior with the image on the tree, and the more practical use of the technique is required. Knowing how to transfer a drawing on a tree, you can restore the old furniture, make a wooden element design.
For the embodiment of such ideas use the decoupage technique. The principle of such work is simple and does not require special skills, the presence of unusual materials or tools.

How to transfer a drawing on a tree with a PVA glue using the easiest algorithm:
- The prepared surface must be missed by PVA glue. The layer should not be too thick. Mails need to do smooth and uniform.
- Put the drawing on the surface of the tree and gently straighten the paper cloth. You need to drive out air and place the edges of the pulp base.
- Over the top once again wrap the image of a thin layer of PVA. Wait until everything dry, and duplicate the layer again.
Further treatment is chosen in accordance with the preferences of the Creator.
Additional finish
After the drawing was transferred to the tree and performed the secondary surface treatment, it is worth considering the options for further surface treatment.
There are several options:
- Covered with varnish.
- Paint.
- Progress.
- Leave a product without processing.
- Laminate.
Additional decoration can be attributed to the manufacture of a stand, framework, suspension for the finished product. Here you can show fantasy and skills.
The work shown by the example was made for a person who is fond of aviation, so and the photo for processing was chosen corresponding to your favorite topic. You should choose a photo that will suit your content and mood to a person for whom this work is preparing. The above is shown the image before and after processing.
Step 1. Materials required for work
Below is a list of all the necessary materials that have been used. It is not necessary that you will need this list in your specific work. You can fantasize and replace some other materials.
That's what you need to create this work:
- Printed photo;
- Wooden plates, the same size as the photo;
- GEL MEDIUM (acrylic paint-based gel);
- Brush for applying a gel on a wooden plank;
- Spatula, or knife, for uniform image distribution;
- Paint on wood and fabric (optional);
- Pigment;
- Sandpaper;
- Wax for smoothing and sealing the applied photography;
- Wax brush;
- Suspended bracket;
- Brackets for fastening (as two plates used).
Step 2. Image Search and Processing
At the first stage of creating a picture you have to find, process in a graphic editor and print a photo. Please note that the example used color photography, good quality, and the result was a monochrome picture made under the old days. In order, in the printed version, your photo has not come out too awesome, the original image should be high permission. The monochromicity and effect of the old photo are made using a graphic editor, such as Photoshop. At this stage, you fully form your future picture. From what you do now, it depends on how it will look in the finished form.
Step 3. Printing photos and search for a wooden plate
Prepare and processing the image you need to print it. Decide. In the example, a 20x30 cm work is presented, that is, the A4 format, and perhaps it is the most optimal option and price and size, do more - it will be more expensive and longer, to do less - work will be too small.
Find the desired wooden plank is a little more difficult than printing a photo. In more precise, it is possible that for this you will have to get around several shopping stores. There is a more expensive, but convenient option - you can make a plate of the desired size and format under the order. But again, this option can be much more expensive for you. And also, you can take two plates and combine them together, as shown in the example.
Step 4. Application of the gel on a wooden plate

Establish directly to work. Applying a gel on wood, this is the most responsible moment in creating a picture, on how high-quality you will do, the final result depends.
Gently apply a small layer of gel on the entire surface of the plank. If you apply too thick layer, the picture will look ugly, too thin - just will not fix it, and in some places will fall behind. Try to make the layer as smooth as possible over the entire surface. When the gel is applied to a skip, it's time to transfer the image. It must be said, this is the same complex and scrupulous process, as the application of a protective film on the phone screen, it requires you a huge concentration and steel nerves. Air bubbles when applied, will appear in any case, so try to smooth the picture and eliminate bubbles. You can smooth out the spatula, but very carefully, whatever you scratch the photo. Also, for this purpose you can take a ruler, or a fabric, this option is less "traumatic" for the image.
After you moved the image on the plate and got rid of air bubbles, leave the picture for the whole night and follow, whatever anyone touched it until the next day.

Step 5. Remove paper from wood

Now it is necessary to get rid of paper in the picture, so that only paint from printing remained on the table. To do this, take the cloth and moisten it with ordinary water, then go through a damp cloth along all surfaces of the picture. This is a pretty dirty process, so just in case, it is better to do it in old clothes. In different places, paper can be removed in different ways, somewhere easier, somewhere harder, so it is very possible that you will be tired by the end of work. Also, be prepared for the fact that at a time you will not get to remove all paper, and the process will have to repeat several times, with an interval of 20-30 minutes. And another little recommendation - keep your vacuum cleaner at hand, because the dirt will be quite a lot.
Step 6. Finish to transfer the image

And now the most creative moment begins the entire process. In your hands make a picture of what you want to do it, for this turn on your imagination and get ready to work. In our example, the goal was to make a picture of the aged, so that it was similar to a rariting thing. If you want to get the same effect, view a number of old photos, images of the beginning of the 20th century, analyze them and proceed to design.
First, apply the paint stain on the wood and blot it with a cloth, to remove unnecessary, be careful and do not overdo the paint. When the paint gets dry, pull it a bit with the same rag, for the greater effect of the antiquity.

We are now polished by the edges, get rid of the extra gel and continue to give the picture the effect of antiquity. Now, in the edges, we apply a pigment using the infused pigment, you can create something like the effect of vignetting, or you can add a pigment only on opposite edges, which would be a kind of frame. You can use a conventional sponge, or a porous tissue for applying pigment. Pigment packaging is smaller in volume than paint packaging, so use it economically, so that in the most responsible moment will not be without pigment.

When additional effects with paint and pigment are applied, proceed to the last stage of operation in this part. We apply wax to the finished image to give a glossy effect. Use the middle brush to apply a thin, smooth layer to print. Just like paint, the wax must warm up well. When the wax dries, go through it with a cloth, to smooth the surface and remove unnecessary. In the example, soft wax was used, so as a result, the surface was not too shiny, but the surface looks smooth and beautiful.
Step 7. Hang the picture

When the work is done, the picture is presented, help the owner hang your masterpiece for the most suitable place. If you, as in the example, used two planks folded together, instead of one whole one, then you should first combine them together with two small fastening brackets that can be purchased at any economic store.
In this instruction, I will show you 5 different ways to print on the tree. These are excellent methods that will allow you to make custom projects, such as signs, plaques, gifts, or just branding your creations.
Step 1: Collect Materials
Materials:
- pine board
- liQuitex Gel Medium
Step 2: Setup
I tested 4 methods How to transfer a drawing from paper to a tree and one method using technique. On each board, I used the same image on which my logo was with a large text block, a picture and text of the usual size, so for each type of application it will be seen how well the tree reacts with different application options.
All pictures were printed on my laser printer (not inkjet). I also focused a picture to the tree it was displayed correctly.
Step 3: Method 1 - acetone


The first method is to use acetone to translate toner on wood. All you need is acetone, paper napkin, nitrile gloves to protect hands, you can also use an old plastic card. When working with acetone, be careful and read the safety instructions.
I put a filtered picture on Faneru and wrap it for more reliable consolidation. Then I plunged the napkin to acetone and put it on the picture, tightly pressed it from above.
After several repetitions, the toner moved to the tree, and the paper was lagging behind the wood.
Pros: very fast, decent image quality, clean process
Cons: image quality average, acetone is a strong chemical
Step 4: Method 2 - Ironing


The following method is to use the usual iron. All you need to do is restructured paper. As in the last step, I wrapped the paper around the woods, and then saddled it, trying not to move the sheet relative to the wood. I tried to put very much to the iron very much, and the Iron myself put on a high temperature, but it seems to me, the temperature was not high enough.
The picture came out so-so, and it seems to me that it was due to the fact that the iron did not heat the paper to sufficient temperatures. I heard that the use of wax paper can improve the situation, also some craftsmen make pictures with a soldering iron with a special branding tip.
Pros: the cheapest method is done pretty quickly
Cons: poor image quality, the ability to burn yourself, charging a tree or paper
Step 5: Method 3 - Polyurethane varnish


The third method is based on the use of water-based polyurethane. I used POLYCRYLIC (this is just the name of the manufacturer's company, so you can buy any analog). You need a varnish, tassel for working with acids, a rigid toothbrush and water.
I had a polycrylic of a small tassel, trying to create a thin film so that it was wet, but did not become a puddle. Then I pressed the paper directly to the wet polycrylic and told the paper from the center to the edges, removing the air caught under the paper, and then removed the wood aside where she was dried at about an hour.
After the workpiece dried, I mixed it with water, and then cleaned so much paper as you can remove my hands. Then I took a toothbrush and gently rushes her surface until the rest of the paper was considered.
The quality turned out to be excellent! All but a small defect in the letter "F" looked very good. I was truly surprised by this way of printing on a tree.
Pros: Excellent image quality, water-based safe coating
Cons: Removing paper with a rather dirty method, it takes an hour per drying
Step 6: Method 4 - Gel solvent LiQuitex


The gel solvent was the fourth way. I used Liquitex Gloss, a foam bruster, an old plastic card, toothbrush and water.
The process is similar to the one in which the varnish was used is the only difference - we have a gel in the hands, not a liquid. With gel it is better to work foam, because the brush leaves many tubercles and strips.
I left a picture in the gel and brought the air to the air first with my fingers, and then a plastic card. Then I left the workpiece to be dried for 90 minutes, and then scraple paper toothbrush.
This option also looked perfectly, but several pieces of paper left on the tree, which could not be offended using a brush.
Pros: Excellent image quality, water-based safe gel
Minuses: It is harder to be harder, the surface becomes rough, dries long
Step 7: Method 5 - Laser CNC


So, now try the technological method. I had access to the device Full Spectrum Laser Hobby 20 × 12 and I used it to apply the same image. The device setting is very simple.
Image quality, as expected, was good. The only problem zone was the photo that the laser was difficult to copy. But the text and the logo, completely black in the photo, look great.
Pluses: Excellent detail of text and logo, configure, and the car will do everything for you
Cons: expensive for purchase, it's hard to find for rent, not very well copes with photos
Step 8: Apply the finish coating and the final opinion


I decided to apply a lacquer coating on the finished work to see how the appearance of the products and this procedure changed a little about my opinion about each of the methods proven.
Acetone was very darkened after the coating varnish and the final species liked me much stronger, so I put this result is higher than a sample with gel.
Option with iron ... so remained bad quality.
The polycrylic darkened even more and began to look even better. This is a certain favorite in my ranking.
The gel also darkened, but the surface of the tree was not leveled, and the pieces of paper that I could not remove, sticking out noticeably. To achieve a result similar to polycrylic, I had to spend much more time.
The variant on the laser CNC was almost not darkened, but it became a little more like a scorched tree, the detailing still remained excellent.
 Why you can not give icons
 Is it possible to give icons as a gift: Signs, the opinion of the Church
 A year ago left her husband, and now I do not know what to do