Stork from plastic bottles master class. Stork for the garden with your own hands: Three unique ways of crafts from undergraduate materials Aist from foam for the garden with their own hands
A stork is very easily made of plastic bottles with your own hands, the master class will allow you to perform this product in a short time. In this case, it is necessary to accurately comply with all instructions to get a really good result. The product can be placed on the homeland, which will give the opportunity to decorate the territory.
Make a stork independently allows a master class for which you need to use plastic bottles and other technician materials. In order for the drawing to look most realistic, it is necessary to make blanks from plywood. Wings and torso draw on them. Prepared templates must be carefully cut.
The following materials will be needed for work:
- plastic bottles;
- insulating tape;
- saws.
Bottles are better to take opaque (white) and dark, and then compose them, but only red is suited.
Prepared Templates need to be connected. This will require self-tapping screws. To make feathers, use white bottles, in which dairy products are usually sold. They need to be cut so that there are strips of the same width. On the edges you need to make a lot of shallow cuts to get a fringe.
The resulting wings are fixed on the body torso. To mount the maximum durable, use the adhesive gun. It needs to be gently applied, not leaving traces from glue on the torso. To make the tail and the rest of the body, which will be located at the bottom, you need to use plastic bottles of dark color. This container is sold, for example, beer.

The beak can be obtained from the blank of the plastic bottle, since the stork has a red beak, the base is wrapped with a red tape. Neista and legs are needed. For their manufacture, you can use a thick wire. For the eyes take a large bead, which is attached to the head with glue. On this stork for the garden can be completed. It can be put near the flower beds with flowers or some stand.
The details of the manufacture of the second option
To perform a bird-talisman for the garden with your own hands, materials and tools should be prepared:
- empty plastic bottles;
- 2 wooden bars: fat and wide (will serve as a base);
- aluminum thick wire (can rod) to make the lower limbs;
- polyfoam (thickness 10 cm);
- corrugated hose;
- plastic canister (2 pcs., Capacity 5 l);
- metal grid (under the wings);
- stapler.

How to make a stork with your own hands? The procedure will take a little time, but the algorithm of work is simple. A stork will appear on the trails of the household site or in the garden after several hours of execution.
First you need to proceed to the manufacture of the head and the beak of the bird. These parts are cut out of foam. On the surface you can either draw the eyes of black paint or glue 2 black buttons (you can use beads).
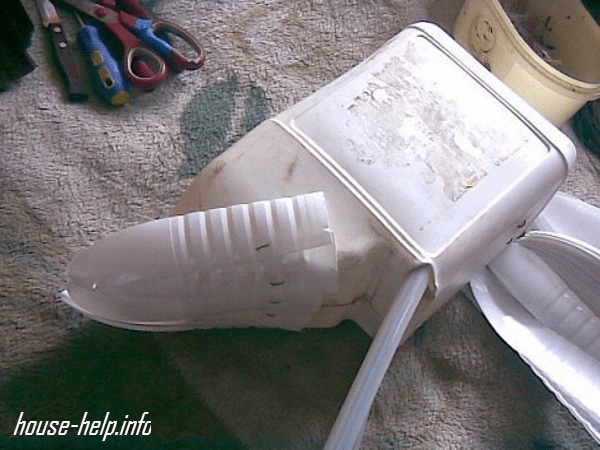
The beak itself must be cut out of a plastic bottle of dark color. It will consist of 2 parts, sticks to the head. To make a body torso, you need to cut off the knob from the canister.
Overseas tightly contour canister, bend the metal grid. Excess material to remove. Perform the lower limbs if you bend the rod, the ends of which should be fixed in a wooden bar. Plastic feathers are cut out of bottles. They are fixed to the base of the canister. Fasten the tail first.
You can put the neck AISThe using the fastener of the wire to the valve. The next step: put on a wire harvested hose. Since the necks should be small, they are attached to scotch. Feathers on the torso are fixed on a metal grid.
Since the bird in the garden will be located in a vertical position, the wings will be folded. They must be fixed by the stapler. Feathers should be located so that the details of each subsequent row on 1/3 overlap the previous row. This will give the craft of naturalness and naturalness.
The master class is completed by fastening individual elements. To give a product of maximum attractiveness, you can perform a decorative tint of beak, eye, legs. The cauldron can stand on the street throughout the summer, she is not afraid of bad weather.
Alternative product
The original stork for the garden can be supplemented with a baby in the nest. Performing this option will help make a housing happy and bring wealth to the house, well-being. For the manufacture of a stork sitting in the nest, the poultry patterns are used as the basis. This is quite modern and fashionable to date a homemade toy made of fabric matter. Patterns for her uncomplicated.

From dense and durable fabric, separate elements of the crafts are cut out. Details stitched with a thread. To give the body to the volume, it needs to be fill it with any filler, so it is not necessary to separate the bird at once. As a filler, skumps, sawdust, straw, feathers, unnecessary flaps, etc. can perform. After performing the filling stage, the hole is completely sewn.
Beak do separately. To create it, you will need a durable cardboard of red. The finished detail is attached to the already made head. You can sew clothes. To do this, you need to remove the measurements from the finished bird. At the final stage, the eyes are glued, the baby wrap in a light fabric and placed next to mom.
If you set the craft on the branches of trees in the garden, during the rain it needs to be removed from there so that the appearance of the product does not deteriorate. Another bird is placed on the windowsill, it will be perfectly harmonized with indoor flowers.
Taking the base of the stork from the fabric, feathers are obtained from plastic bottles of white, in which milk or other dairy products are sold. They are bonded among themselves. In the end, the wings are out.

Unusual option
The master class on the manufacture of a stork, which is based on a large plastic bottle of 6 liters. To make your head, you need to use a foam that needs to be carefully cut. No need to forget about the form of beak and eyes. Black pebbles, which fix glue, can act as an eye.
The beak can be made from a conventional plastic bottle. It also glues her head. A big plastic bottle will act as a torso. It needs to cut the neck. Special metal grid - wings. If the bird's wings are bent, it is necessary to make the appropriate bends on the grid.
Legs are made of wire, which is folded into several layers. Feathers will be made of plastic bottles of a light shade. They are cut so that individual feathers looked realistic. Fixation is performed using wire to the wings themselves.
So that the neck looked at volume, the bottles need to chop finely, it turns out the fringe. They are located rows. Small bottles are put on the paws, which are also cut at the base. If the fixation of parts seems weak, then the fastening process can be carried out using screws.
Production of a stork is not a very long and difficult event. To embody an idea of \u200b\u200blife, you can use the recommendations given. However, it is necessary to introduce into ideas and certain adjustments that will create a unique and original product.
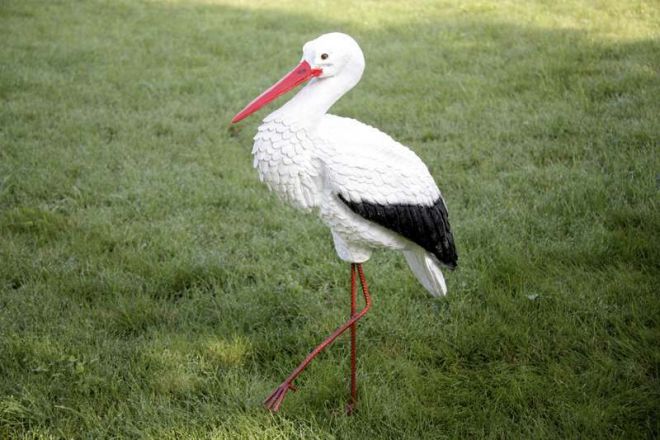
Bright garden crafts made of plastic bottles - a simple and affordable way to decorate a favorite site. The original sculpture of the stork from durable material will update the usual landscape and create a joyful mood. The figure of the bird made with your own hands will make the garden in unique and will become a family symbol of good and happiness.
How to make a stork from plastic capacities
To make such a crawler, you need to stockday time and show a creative approach.
My courtyard is decorated with a figure of a stork, the basis of which is a plastic 5-liter bottle, covered with mounting foam and painted with acrylic facade dyes.
Such a wonderful stork is obtained from a plastic bottle and mounting foam
What materials and tools will be needed
Creating your own bird design, you can collect it completely from plastic capacities, covering them with the help of glue or brackets. And you can make a sculpture more expressive, adding a plastic design with details from a tree.
Frame of this bird - wooden covered with plastic bottles
Or perform individual elements of foam.
You can create such an exotic collection using conventional plastic bottles and a piece of foam
For our craft of impressive sizes, you will need:
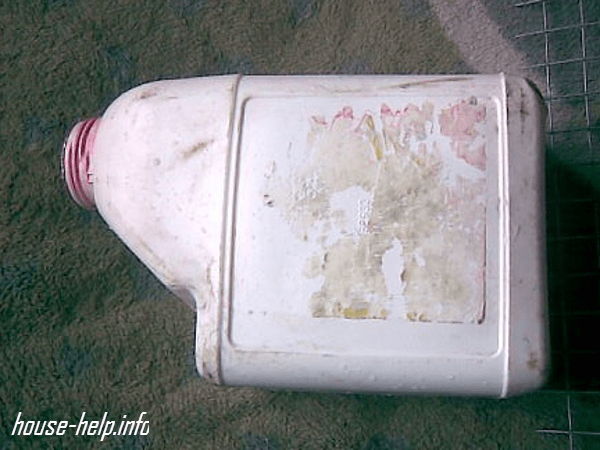
- Canister plastic 5-liter - the base of the body.
5 l canister make up the body
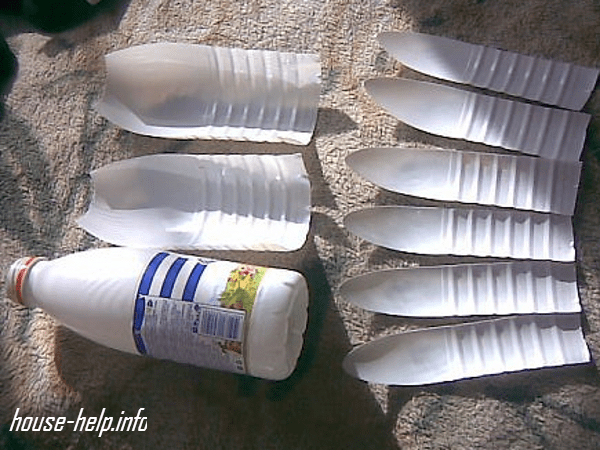
- Dairy plastic bottles of 1 l and 1.5 liters, from which a white plumage is cut. You can do and transparent taire, only before it should be painted with white paint for outdoor work.
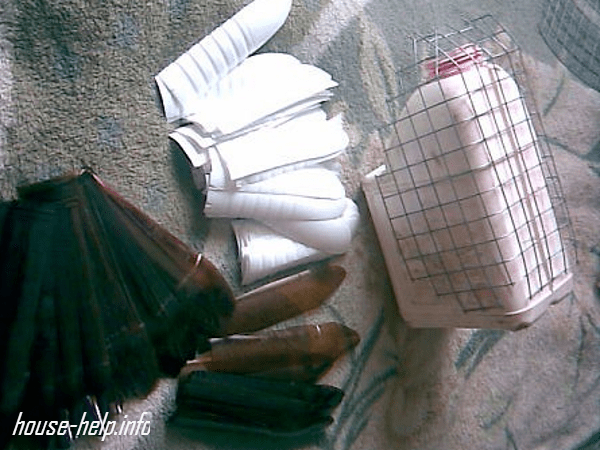
- Dark plastic bottles of different capacity: 3 half-liter will be needed for the manufacture of paws and beak, one and a half-liter - for dark feathers.
Plastic container dark color will need for feathers, paws and beak
- Polyfoam is a thickness of 10 cm, from which the stork head is cut with the beak.
From the piece of foams make the bird's head
- Sandpaper.
- Scissors.
- Corrugated tube for neck.
From the corrugated tube make a long bird neck
- Metal grid as a base for wings.
- Furniture stapler.
- Metal rod with a thickness of 6-10 mm for foot.
- Wire thin to fix wings.
With the help of wire wings firmly attached to the body layout
- Saws.
- Adhesive pistol or universal glue.
Glue universal quickly glues plastic and other materials
- Acrylic facade paints, tassels.
Stages of manufacturing a stork
By purchasing instruments and materials, first the birds are harvested first, then the assembly is made.
Head
From the foam plastic, the head with a beak is cut with a sharp knife.
From a piece of foam cutting the head of the bird
Then grind the rough surface with sandpaper. You can cover the preparation of white front paint.
The workpiece is grinding sandpaper to make the surface smooth
To strengthen the beak, 2 triangular plates are used, which make 0.5 liters from a dark bottle. Circling the neck and bottom, cut along the obtained cylinder and cut triangles. The plates bend in half and attach to the beak with self-draws.
The beak is made in plastic, strengthened it on the self-tapping screw
Paws
They are mastered from the top of the brown bottles of 0.5 liters. Capacity with cut bottom is cut to the neck along the 4 parts, sharpen on the ends and bend outward.
Forests with fingers cut out of dark bottles
Plumage
The most time-consuming and long-term stage of preparatory work - prefabricants of feathers. They will need a large amount, of different lengths, shapes and colors: for the design of wings and tail - long, dark and white, for the body - bright smaller size.
For crafts use light and dark feathers
The bottle is cut off the neck and the bottom, the remaining middle part is cut along and from the resulting rectangle, strips are cut. One edge of the strips is made round. From the liter bottle, 6 large feathers are made.
White bottle with a volume of 1 liter is divided into 6 parts
For the plumage of the neck, small pedeshes are cut out and the ends are decorated in the form of teeth or fringe. You can decorate the long neck with large plates of halves of dairy bottles, which are finely cut across the edges.
Frame Figure
The body is made of canisters with a cut handle.
Canister with a cut handle - this is the body of our bird
As the basis of the wings, a fine metal mesh is used, which is fixed on the canister with wire or brackets. The grid across the edges is cut into the shape of a wing and bend down.
A fine mesh is fixed on the canister - the basis of the wings
In the neck, the canisters are covered with wire and bend it, forming a frame of a long neck. Fix the wire for the metal rod feet and put on her corrugated tube or hose from the vacuum cleaner.
Strengthen wire for the neck and put on her hose
At the bottom of the tank, the hole is done and the bent rods are taught in it - it will be legs.
Legs make out of the wire, bent it and traveled to the hole at the bottom of the canister
Or plunge the canister from below and insert curved rods, on the ends of which they put the legs with a neck up.
Build details
After training, all parts produce a construction assembly.
- The head is planted on a wire and additionally attach to the corrugated pipe with glue.
- Cover the torso with a plumage from the bottom. On the canister brackets fix light feathers.
Begin to screw the feathers from the bottom of the body.
- Form the tail of feathers, having their rows and fixing the body with a stapler.
- Cover wire feathers to the edge of the mesh wing. To make the plumage of a stork with a black edging along the edges of the white wings, the first two rows are made of dark-colored feathers.
Wings begin to draw up feathers from the edge using dark color blanks
- Subsequent rows are formed from white troughs, overlapping their colors.
The third and subsequent ranks on the wing make from white feathers
- A row of feathers are screwed at the bottom of the neck with self-draws.
It is not difficult to make a stork with swallow wings
In this case, the feathers are screwed to the entire canister, and the mesh base of the wing is covered with a plumage from both sides.
On the painted wings of feathers fasten on both sides
Decorating garden sculpture
With the help of decoration, the plastic craft can be made brighter, especially if only transparent bottles were used in its manufacture. For this, acrylic dyes are suitable for outdoor work. Pre-plastic container is wiped with alcohol-based solution and painted with white or black paint before cutting the feathers.
Acrylic facade paint moisture resistant and not flexible under the sun
The beak and paws are painted in red or wind with red scotch.
Beak and legs are painted in red
Eyes make from beads, decorative blanks for toys or small butchers, which plant on glue. You can simply draw their black paint.
Acrylic paints after the coating of varnish become brighter.
Master class for making a stork
There are many options for manufacturing a stork from plastic capacities using elements from wood, mounting foam, foam.
Such an original composition of the Family Aist in the nest is also made of plastic
Even a beginner will be able to make such a garden sculpture, guided by the video with step-by-step instructions of the workflow.
Video: how to make a stork from plastic bottles
Storks from plastic bottles - original decorative decoration of the nursery and the subject of universal admiration. After all, they are made from ordinary garbage, transformed by skillful hands in works of art. Made of durable plastic, they are not afraid of rain and snow. Over the years, the figures do not swell, the paint will not hang out and will not fit.
A beautiful and bright figure of Aist will make a relocation of grace in the household landscape, especially if it is done with their own hands. It may seem to make a stork - it is difficult and a long-term practice in needlework is required, but the method of its manufacture is simple, and the materials are inexpensive. Such a sculpture will become an excellent addition to the local area and a decoration for flowerbeds, lawns and a garden plot, symbolizing the prosperity, well-being and family comfort of his owners.
How to make a stork for giving with your own hands: master class
Garden stork with her own hands - one of the favorite crafts of summer houses and gardeners and variations of her performance on the Internet are a lot, but the principle of manufacture in all cases is approximately the same, regardless of the materials and richness of the decor. How to make beautiful wooden plates at home.
First of all, the head, neck, torso, the frame of the wings and foot, which are connected by fastening tools are made.
All the remaining time is paid to a rather painstaking procedure for cutting, bachroming and decorating feathers - they will be the plumage of the body, neck and the tail of the bird. There are options for homemade without using plastic bottles, but they are less common. Read more Consider different options for making a stork in this article.
Materials and tools for garden shape
A figurine of the stork is the head, beak, neck, torso, foot, wings and white plumage with strokes from black feathers. All parts are fastened with each other with a furniture stapler and sit down on universal glue.
A stork calm can be chopped out of a wooden bar of the desired value, foam or 5-liter plastic canister.
- plastic bottles of 1.5 and 1 l from the milk;
- plastic bottles of 1.5 and 0.5 l from the kvass or beer;
- 5 l canister;
- scissors;
- glue;
- self-tapping screw;
- a piece of foam;
- corrugated tube;
- steel bars;
- frame mesh;
- thin wire;
- sandpaper;
- furniture stapler;
- red acrylic paint.
The plumage of the stork is also performed from transparent bottles, but then plastic under the feathers should be pre-painted with white and black acrylic paints.
Stages of manufacture of plastic bottles
Prepare the necessary materials and tools, you can proceed to the manufacture of components of the crafts. About beautiful wooden fences do with your own hands.
It is important that all parts of the stork body are commensurate among themselves.
Head
The contour of the head with a beak is cut out of the foam from the foam, after which the surface is primed, and the edges of the beak are aligned with sandpaper. If desired, the head can be painted with white paint - the coating will give the future product saturated white color and create an additional barrier from the sun, wind and rain.
The beak consists of 2 plates that are attached to the head screws. For the beak in the dark plastic bottle, the neck is cut off and the bottom, and the remaining part is cut to rectangular plates. From the resulting billets, triangles are cut off, which will later be subsequently the upper and lower parts of the beak.

The plates bend in the middle and are screwed to the place of connection of the head and beak.
Paws
The paws are cut out of 2 half-liter bottles with dark walls, pre-slicing from them bottom. The fingers of the future bird are cut from the very edge to the neck of the bottle - it should turn out 3 in front and 1 behind, and bend outward.

Each finger with scissors attacked the shape of a long acute triangle.
Plumage
Processing of blanks for feathers to give it a beautiful natural form with feathers - the most labor cost and long part of the work.
For cutting feathers at the bottle, bottom and neck are cut off, and the bottle cylinder is cut on 6 equal parts - 6 feathers. They will be different sizes: For the plumage of the body - small, for the tail - longer. Each Peru needs to give airiness, creating edging with a fringe at the edges. About metallic forged gazebos for the cottage will tell.
On the neck of the plumage can be made in 3 ways:
- having cut out even smaller on the size of the plate than for the abdomen, laying them with a fringe and curling with scissors;
- cutting off the large plates in the length of the neck and the offshore of their edges;
- i cut off half the bottle and making deep sharp cuts in the obtained plates.

Each feather is a rectangular plastic bottle plate with a rounded or embossed edge.
Frame
A stork is conveniently made from a 5-liter canister, which is pre-cut off the handle. Then the cellular grid is joined to the tank, which will be attached to future feathers - it bends and cut into the shape of the wing.
Next, you can start assembling the main part of the product - a tube-neck can be inserted into the neck, and 2 holes are cut down in the lower part, through which a long piece of thick rod, bent in half - these are legs.

Grids are fixed with wire or steel brackets on the canister.
Assembly and decoration
Storky is collected from the head, it is connected to the wire with a corrugated tube and is additionally fixed with a thermoclaim.
Feathers are fixed with a stapler, ranging from the bottom of the canister and then up the layers. The tail is attached in the back of the figure. The plumage on the mesh is also superimposed by layers, starting from the outer edge, and is fixed with the wire. In this case, black feathers are located from the outer edge. It turns out only about 6-7 layers of feathers. The extreme row, connecting with the tube, is screwed by self-drawing.
Around the neck, prepared plates are turned around with pointed edges of half the bottles.
The number of feathers depends on the location of the wings: the option in question is designed for folded wings, but when the wing mesh is covered with feathers from 2 sides and make the back of the stork.
After assembling the birds, you can proceed to the creative design of the crafts.
Eye can be bought ready-made in stores where parts for knitted and seasy toys are sold, and glued with a thermoclaim. For plug-in eyes, large black beads or balls are chosen. Eyes can be drawn - simple black or colored paints to your taste.
Paint feathers if transparent bottles were used during the work, it is necessary before cutting them, pre-lost the surface of the coating with alcohol.

The beak and legs are also needed to paint red paint. Alternatively, you can wrap them with a red scotch.
What can still make a stork
Folk craftsmen are committed to creating masterpieces from everything that was lying in the garage, including, as well as to use the remnants of building materials after repair. Several such variations of garden storks can be safely taken to note - make them no more difficult than the previous option.
From mounting foam
In this way, you can create a garden sculpture, making a sharpening and attaching a realistic image of a stork. The "skeleton" of the product will serve as a steel frame - the rods from steel are welded to each other, and then other elements of the body of the stork are attached to them.
For the manufacture of storks will be required:
- 5-liter plastic bottle;
- mounting foam;
- steel bars;
- styrofoam;
- paint;
- ground mortar;
- scotch;
- rasp.
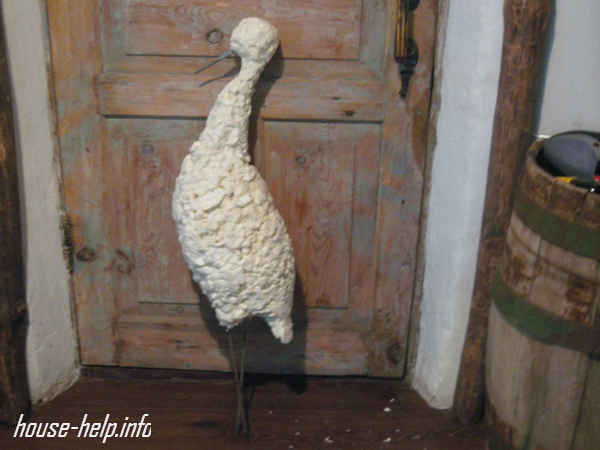
On the frame you need to wear a bottle torso, and to the cervical rod to attach to each other sharpened pieces of foam. Figure thighs of foam foam are fixed in the same way.
Even with the use of waterproof plywood, the possibility of turning the sculpture in the cold period of the year is raised, so it is recommended to remove it for storage to the room before heat.
For the manufacture of storks will be required:
- plywood;
- plastic bottles with white and dark walls;
- thermoclaysheaver pistol;
- rods;
- lobzik;
- self-tapping screw;
- scissors;
- screwdriver;
- furniture stapler;
- red acrylic paint.
Elements of the body and wings are preferably applied first on paper by creating a "pattern" of parts before cutting them on a sheet of plywood. Crylla is screwed to the body with self-drawing. The paws are made of steel rods and join the brackets to the sheets of plywood performing the role of the body. Plywood sheets also apply at or.
Feathers are created from bottles, and each plate, in turn, is processed by scissors at the edges before obtaining air bug. The plumage is applied to the entire surface of the stork, starting from the rear: first fold black feathers, and then white, of which the bird's tail is also created.

Each billet is stuffed along the edges and ground surface.
- a layer of red paint is applied to the plywood beak;
- eyes can be painted independently.
Roots of the paws can be sharpened from the bottom edge so that they can easily fix the product in the soil.
From foamflast
Aist from foam - monolithic design, non-heavy and simple in manufacturing.
To work will be required:
- foam sheets;
- steel bars;
- glue universal;
- scissors;
- saw;
- furniture stapler;
- sandpaper;
- acrylic paint of black and red colors.
First of all, legs are made - the lower edges of 2 steel rods are sharpened, and the upper - bend for later fixation in the body of the foam.
The main creative work on such a stork is to create the right blanks from the foam, because the finished bird will fully consist of it. The body, head and neck drawn in the foam and cut off the saw. About plastic barrels for watering will tell.
The storks are fixed in the brackets of the stroke, its surface is trimmed with a layer of foam for volume and on top of the wings billets are glued. The neck and head are sitting on the rod.

The beak of the stork is painted in red, and the eyes are better to make plug-in, from beads or balls - so the figure will turn out to be expressive.
Further perform the final modeling of the figure, give it smooth and beautiful features with sandpaper and a knife. This is the case when you can not make feathers for the bird - the embossed plumage can be cut directly on the body of the product, just focusing the black paint of the edge of the wings.
How to make a nest with a subsidiary for a garden
The classic composition with storks in the nest traditionally symbolized a cozy house with a large family in East Slavic peoples, pointed out fertility and guilty owners. Installing storks in the nest on their own plot, flowerbed, the roof of the house on or platform for recreation with children will help not only decorate the territory, but also show guests that the owners are masters for all hands. About street summer washbasins will tell.
Under the frame of the socket, old wheels from the bicycle, carts, trailer or cars are suitable. Essay the nest can be made of shrubs and living or dry branches, securing the entire design with steel wire and installing on a special platform consisting of X-shaped linings.
Video
How to make a stork from plastic bottles Look in this video:
Output
- The most time-consuming and work on a garden stork is to create his plumage - over each pen it is necessary to work manually, giving the edges to the edges or a fringe form so that they look like natural feathers of birds.
- Feathers from transparent bottles must be painted in white and black colors so that they simulate the natural plumage of the stork.
- Before painting feathers, they need to be wiped out of dust and lure with alcohol solution so that the paint lay down exactly.
- The easiest way to make a stork is to make it completely out of foam and sharpened with a knife and a rashpil to the desired form; The simplest wing without a frame is made of a piece of plywood, which is screwed to the homemade body with self-drawing.
- The torso with the neck can be made of plastic 5-liter canisters with a cut with a handle and a neck, into which the tube from corrugation is inserted.
- Make a garden sculpture and can be from the residues of building materials that have been repaired, and it will cost almost free. Additionally, you will need to buy only acrylic paints in order to draw your eyes and paint feathers.
A stork is very easily made of plastic bottles with your own hands, the master class will allow you to perform this product in a short time. In this case, it is necessary to accurately comply with all instructions to get a really good result. The product can be placed on the homeland, which will give the opportunity to decorate the territory.
Make a stork independently allows a master class for which you need to use plastic bottles and other technician materials. In order for the drawing to look most realistic, it is necessary to make blanks from plywood. Wings and torso draw on them. Prepared templates must be carefully cut.
The following materials will be needed for work:
- plastic bottles;
- insulating tape;
- saws.
Bottles are better to take opaque (white) and dark, and then compose them, but only red is suited.
Prepared Templates need to be connected. This will require self-tapping screws. To make feathers, use white bottles, in which dairy products are usually sold. They need to be cut so that there are strips of the same width. On the edges you need to make a lot of shallow cuts to get a fringe.
The resulting wings are fixed on the body torso. To mount the maximum durable, use the adhesive gun. It needs to be gently applied, not leaving traces from glue on the torso. To make the tail and the rest of the body, which will be located at the bottom, you need to use plastic bottles of dark color. This container is sold, for example, beer.
The beak can be obtained from the blank of the plastic bottle, since the stork has a red beak, the base is wrapped with a red tape. Neista and legs are needed. For their manufacture, you can use a thick wire. For the eyes take a large bead, which is attached to the head with glue. On this stork for the garden can be completed. It can be put near the flower beds with flowers or some stand.
The details of the manufacture of the second option
To perform a bird-talisman for the garden with your own hands, materials and tools should be prepared:
- empty plastic bottles;
- 2 wooden bars: fat and wide (will serve as a base);
- aluminum thick wire (can rod) to make the lower limbs;
- polyfoam (thickness 10 cm);
- corrugated hose;
- plastic canister (2 pcs., Capacity 5 l);
- metal grid (under the wings);
- stapler.

How to make a stork with your own hands? The procedure will take a little time, but the algorithm of work is simple. A stork will appear on the trails of the household site or in the garden after several hours of execution.
First you need to proceed to the manufacture of the head and the beak of the bird. These parts are cut out of foam. On the surface you can either draw the eyes of black paint or glue 2 black buttons (you can use beads).
The beak itself must be cut out of a plastic bottle of dark color. It will consist of 2 parts, sticks to the head. To make a body torso, you need to cut off the knob from the canister.
Overseas tightly contour canister, bend the metal grid. Excess material to remove. Perform the lower limbs if you bend the rod, the ends of which should be fixed in a wooden bar. Plastic feathers are cut out of bottles. They are fixed to the base of the canister. Fasten the tail first.
You can put the neck AISThe using the fastener of the wire to the valve. The next step: put on a wire harvested hose. Since the necks should be small, they are attached to scotch. Feathers on the torso are fixed on a metal grid.
Since the bird in the garden will be located in a vertical position, the wings will be folded. They must be fixed by the stapler. Feathers should be located so that the details of each subsequent row on 1/3 overlap the previous row. This will give the craft of naturalness and naturalness.
The master class is completed by fastening individual elements. To give a product of maximum attractiveness, you can perform a decorative tint of beak, eye, legs. The cauldron can stand on the street throughout the summer, she is not afraid of bad weather.
Alternative product
The original stork for the garden can be supplemented with a baby in the nest. Performing this option will help make a housing happy and bring wealth to the house, well-being. For the manufacture of a stork sitting in the nest, the poultry patterns are used as the basis. This is quite modern and fashionable to date a homemade toy made of fabric matter. Patterns for her uncomplicated.
From dense and durable fabric, separate elements of the crafts are cut out. Details stitched with a thread. To give the body to the volume, it needs to be fill it with any filler, so it is not necessary to separate the bird at once. As a filler, skumps, sawdust, straw, feathers, unnecessary flaps, etc. can perform. After performing the filling stage, the hole is completely sewn.
Beak do separately. To create it, you will need a durable cardboard of red. The finished detail is attached to the already made head. You can sew clothes. To do this, you need to remove the measurements from the finished bird. At the final stage, the eyes are glued, the baby wrap in a light fabric and placed next to mom.
If you set the craft on the branches of trees in the garden, during the rain it needs to be removed from there so that the appearance of the product does not deteriorate. Another bird is placed on the windowsill, it will be perfectly harmonized with indoor flowers.
Taking the base of the stork from the fabric, feathers are obtained from plastic bottles of white, in which milk or other dairy products are sold. They are bonded among themselves. In the end, the wings are out.

Unusual option
The master class on the manufacture of a stork, which is based on a large plastic bottle of 6 liters. To make your head, you need to use a foam that needs to be carefully cut. No need to forget about the form of beak and eyes. Black pebbles, which fix glue, can act as an eye.
The beak can be made from a conventional plastic bottle. It also glues her head. A big plastic bottle will act as a torso. It needs to cut the neck. Special metal grid - wings. If the bird's wings are bent, it is necessary to make the appropriate bends on the grid.
Legs are made of wire, which is folded into several layers. Feathers will be made of plastic bottles of a light shade. They are cut so that individual feathers looked realistic. Fixation is performed using wire to the wings themselves.
So that the neck looked at volume, the bottles need to chop finely, it turns out the fringe. They are located rows. Small bottles are put on the paws, which are also cut at the base. If the fixation of parts seems weak, then the fastening process can be carried out using screws.
Production of a stork is not a very long and difficult event. To embody an idea of \u200b\u200blife, you can use the recommendations given. However, it is necessary to introduce into ideas and certain adjustments that will create a unique and original product.
Each cottage is a small paradise for its owner. And if this for some reason is not the case, you need to change something. For example, make a plot more cozy, alive. For this perfectly suitable garden sculptures And wonderful if they are made independently.
One of the keepers of the plot is a stork. At the very least, this idea has liked many dachensors, because the stork nests only where good people live. This bird is a symbol of well-being, peace, calm, family nest.
Materials and tools
Let's try to make a stork on your own plastic containers. We will need the following materials:
- five-liter plastic bottle (for example, from drinking water);
- styrofoam;
- mounting foam;
- wire;
- scotch;
- paint;
- brushes.
In the decoration process, we can take advantage of other materials. This stage is completely dependent on your imagination and creative skills.
And now we will proceed to step by step instructions.
- Plastic container is a torso. We will fix the rest of the rest to it. The neck is a wire that is covered with pieces of foam, fixed with scotch. Scotch, I will attach the neck to the body, that is, to the bottom of the plastic bottle.
- A piece of foam plastic on the neck is a head. We try to round it.
- Thighs also make out of foam, inserting equal pieces on both sides of the neck of the bottle. All fix scotch.
- Feet will be from the exhaust electrodes already. But the metal rods of equal length are also suitable, and just a few times neatly folded wire.
- As a beak there will be a long nail. You can put a piece of wood on it.
- On top of the resulting layout we apply the mounting foam with your own hands.
- Grind. All unnecessary needs to trim.
- Acrylic paints need to paint sculpture.
- You can insert the real feathers in the tail and wings.
So our garden bird!
We will need:
- opaque black and white plastic containers;
- plywood sheet for template;
- self-tapping screw;
- glue pistol;
- red tape.
From plywood, cut the body of the body and wings of a stork. Templates are bonded with each other with self-tapping screws. Feathers are plastic bottles from milk. They will be cut into stripes, make a fringe. Strips should be one width. We take the adhesive gun, fans creating to the body of the bird. The tail and lower part of the body, the bottom of the wings are made from black bottles (for example, from under shampoo). The beak simply wrap the red tape. Legs can be made of wire and paint. The eyes can be drawn, and you can buy special decorative, in any needlework store there are such (for toys).
The process is time consuming, but it turns out very beautiful.
Compositions with a stork
Of course, the garden stork can be quite self-sufficient sculpture. But you can do everything more interesting by setting a whole composition.
For example, you can construct with your own hands Aist nest. On the wheel from a bike or old cart put dry branches. If necessary, fix their threads with each other. Often the branches are also sharpened by paint from the title for the strength of the structure.
Stork from plastic bottles (video)
And your bird can be a pillar of a bird family at the cottage. For example, to open the bird gallery can stork, but will continue its homemade flamingo, Peacock, Heron ... Fantasy is limitless! Some craftsmen simply paint the plywood blank, covered with her lacquer. It turns out such a peculiar painting on a tree, where fantasy images are combined with your creative abilities.
Your garden is really a place of miracles.
What else can I make a stork
We will list only the most popular options.
- car tires (perhaps the most popular version);
- forged details;
- plastic covers (but this is jewelry);
- wood;
- shells;
- disks.
The easiest option is a stork from plywood. You just make it yourself a template for which you cut the future sculpture. I paint your bird of happiness on both sides with acrylic paints. Or those that you have, covering the pattern with a construction varnish.
Decor for giving with your own hands (video)
Stork in the country can only be the beginning of your creative experiments. As practice shows, the appetite comes during the meal: even the distant of artistic labor, people are tastefully, and other interesting characters appear on the plot over time. And it's great, they please not only the owners, but also guests who are becoming more and more in connection with such dacual art.
It is said that when luck and happiness do not go to the house, they must be brushed. Put some positive, bright sculpture. In this case, everything is going to move: Bunches, fun and, of course, a stork from a plastic bottle. After all, he is always associated with a peaceful sky, a ringing child laughter and love.
Master class: stork from plastic bottle
Materials and tools:
- plastic canister for 5 liters;
- white and black 2-liter plastic bottles;
- large diameter wire;
- corrugated plastic sleeve;
- a piece of foam;
- small chain grid;
- scissors, stationery knife, nippers;
- furniture stapler, sandpaper;
- acrylic paint, glue for plastic.

For making a stork requires a lot of preparatory work. It is necessary to cut a large number of feathers: long - for future wings and tail, medium - for the body, small - for a slim long neck and head. It is desirable to lay out all the billets into separate packages, it will be easier to work with trim.

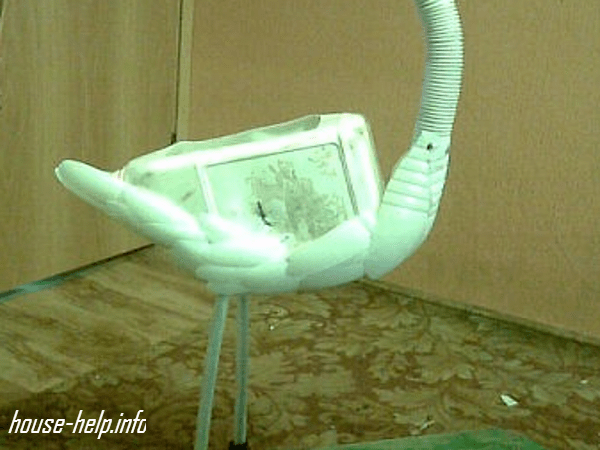
After the plumage is prepared, you need to make a frame of the shape. The role of the body is performed by a plastic canister, which is cut off the handle. A wire or rod is overseas in the neck, after which you need to fix the position of the "neck" and put on it a corrugated sleeve. From a piece of foam, it is necessary to cut a stork head, proportional to the body. So that the bird looks more accurate, the head is necessary to take the sandpaper, and then paint.

Next, on the body you need to attach a piece of a fine grid, to which feathers will be attached. So that your stork has a beautiful plumage, overlap plastic flames and checkers. Smaller feathers, for example, for the neck it is desirable to flick slightly, choking the tips of the billets in the form of a fringe and breaking the strips in different directions.


Usually the stork has a white plumage with black edging at the edges of the wings. Therefore, you can either use bottles of different colors when creating a bird, or color it at your discretion. It is important not to forget about the red paint, which is needed for beak and legs. The limbs are performed from the bent twice the metal rod, which is done in pre-prepared holes in the bottom of the plastic canister - "torso." Foot fingers are easy to make two brown plastic bottles, which are cut and bend outward.


There are other options for creating a stork, some of them are easier, others are much more complicated than the above. Usually, the birds are only decorated with feathers made of plastic bottles, and there is a rigid and dense frame from wood, plastic, mounting foam, metal, etc.


In this case, first prepared the sketch frame, and then the individual parts are connected together. Only after that the feathers in several rows are glued onto all the torso. Do not forget about the beautiful finished eyes that you can buy in all stores with sewing fittings. Then your beautiful flirting Ayutiha with long eyelashes settles on the site, which will definitely bring love and peace to the house!
The old legend states that God gathered all reptiles from the paradise garden to one bag and ordered a man with his own hands to throw him into the sea. And the curious Homo Sapiens wanted to look at the creatures, untied the bag, and, of course, missed everyone. Vladyka was angry and turned this person in Aist to protect other people from all sorts of toads and snakes. Since then, storks are always settled near the person, feed on the shoes and bring us happiness.
On many old pictures, a stork with a baby is depicted. Slavic peoples are considered to be that this bird is responsible for childbearing and well-being. If storks settled on the roof, the house will be full of happiness and children's laughter. And if you did not settle, then a wonderful stork with a baby can be made with your own hands from the girlfriend and installed on a horse or an apple tree in the center of the garden.
Happiness from bottles
Need
To get a stork from plastic bottles for the garden, we need to prepare the following materials:
- empty bottles;
- thick wide board for the base;
- rod or thick lap;
- a piece of foam of a thickness of 10 cm;
- corrugated hose from vacuum cleaner;
- 2 plastic canisters with a volume of 5 liters;
- metal grid for wings;
- stapler.
Master class for the manufacture of happiness
In order for almost real storks on your garden tracks, you will need only a few hours of enthusiastic work with your own hands.
- Cut out a foam from a piece of foam with a beak, draw eyes or stick black beads with your own hands.
- Cut from a dark bottle with a beak of two parts and take it into place.

- The master class on the manufacture of the body is starting with the cutting of the handle in the canister. Then you need to bend the grid on the shape of the canister and cut the unnecessary.

- In order to make legs, bend the rod and fasten its ends in the board.

- We carry out a master class on the preparation of plastic feathers.

- Attach feathers to the canister, starting with the tail.
- The master class on the embedding of the neck begins with the fastening of the wire of the reinforcement. Then the hose is put on it.

- Attach small "feathers" on the neck of Scotch.

- Fix feathers on the grid.

- Stork for our garden will stand, folding the wings, so it's just with your own hands that all feathers with a stapler, overlapping each previous row on a third.

- We finish the master class with the connection of all parts and decorative tints, beak and legs. This bird can be installed in the depths of the garden for all summer. It will not deteriorate from the rain and will not fly away.

Tilda Aist.
Fashionable toys that are stitched with their own hands from ordinary fabric along simple patterns. We will not fully describe the master class in their manufacture.
- Cut from the fabric the details of the crafts, sew and type any filler.

- Separately, it is necessary to make the beak (from the cardboard) and attach to the head. It remains to make clothes, glue eyes, wrap the baby and hand it with Aista.

Of course, you will not set such a wedral bird on the garden branches, but she can decorate a flower pot on the windowsill.
Stork with baby on the nest
Another way to make your home rich and happy - make a stork on the nest. As a basis, you can take patterns of the poultry tilde. Cut from plastic white bottles from the milk of feathers, secure them and make wings, decorating the ends with real feathers. Several white feathers place on the top. Form from real feathers, visiting or stick your eyes and tie and put the bird into the nest.

It can be made from ordinary twigs, covering them with wire. To make a stork with a baby, put it in the wings of any doll. Master class on making a happy overag is complete.

Simple happiness

You will not leave these two rag birds on the garden tracks, and the master class on the manufacture of the first stork requires a lot of time and materials. Do not be discouraged and just get the socket and cut out a flat bird from textolite or plywood. Coloring it, let me in the beak with a poupping and everything, a stork with the baby has already settled on your roof.
Well-groomed and attractive garden will always delight the eye. To make your garden more cozy, you can decorate it with various, manufactured personally. Today we will talk about how to make a stork for the garden And what materials can be used for this.
Let's start with the simplest - with PET bottles.
Option number 1. Manufacturing a stork of plastic bottles
Before getting to work, you need to take a small sheet of plywood and make templates from it. Templates should be performed in the form of a body and wings of a bird, as shown in the image. Opaque plastic bottles (preferably white or black color) are also required, a red and selflessness isolate. The procedure is as follows.

Step 1.Initially, it is necessary to connect the templates taken earlier with the help of screws. As feathers will be used plastic bottles of milk. Bottles should be cut to the same strip in the width, and then make a fringe on the edges of each of them.
Step 2. Further finished feathers need to be fixed on the "body" of the stork using a glue gun. It is characteristic that PET bottles of already black will be used for the bottom of the body and the tail (usually it uses tanks from under shampoo).
Step 3. The beak should be wrapped with a red insulating tape.
Step 4. For the manufacture of legs, the usual wire is used. Bird's eyes are bought at any shop for needlework. Everything, a stork is ready!


Option number 2. Making a stork from the mounting foam
Now let's talk about another embodiment of a stork for the garden with your own hands. Now it is necessary to pre-prepare a plastic container for 5 liters, a mounting foam, foam and tape. The algorithm of action should be as follows.

Step 1. Initially, the body parts are attached to the bottle using a container. For the neck used the usual wire, covered by pieces of foam. The hips must be made in the same way (using foam and wire). The usual nail of large diameter is quite suitable as a key.
Step 2.The billet will look at the preliminary step as it is shown in the image below.
Step 3. For the feet of the bird (at least in this execution) used the exhaust electrodes. In the absence of electrodes, you can select similar material - for example, a thick wire twisted in several turns, or metal bars from thin reinforcement.
Step 4. So, all parts of the "body" of Aist are assembled, but before starting to the next step, it is necessary to thoroughly check the strength and reliability of fasteners.
Step 5. After that, the whole layout should be covered with mounting foam.
Step 6. All unnecessary is neatly cut.
Step 7. Now the sculpture is practically ready. If the mounting foam is already completely dried, then the bird need to paint acrylic paint.
Step 9. Natural feathers are inserted into the wings and tail, so that the stork looked as realistic as possible. See which wonderful garden stork you will come out (if you do everything right, of course).


Option number 3. Production of a stork for a garden from the canister
Before getting to work, take care of the presence of the following consumables:
· Five liters canisters;
· Plastic bottles (black and white color);
· Plastic tubes;
· Thick wire;
· Polyfoam;
After that, you need to perform such a sequence of actions.
Step 1. Cut the blanks from the foam, with the help of a knife, give out the head outline. Cut the socket, make the beak more flat.
Step 2. Using sandpaper, make the surface as smooth as possible. Place the toy eyes in the eyeballs (about where they can be taken, we have already spoken).
Step 3. Cut from a plastic bottle of beak and secure it with glue.
Step 4. From plastic canister make a bird torso, cut the handle.
Step 5. Cut out a piece of this size from the grid so that with its help you can wrap the canister. Several fright grid, so she looked more like the wings.
Step 6. Fat metal rod need to bend and make legs from it.
Step 7. Feathers for storks are cut from white bottles.
Step 8. After that, you can proceed directly to the assembly of all items. Work should be started with the "tail".
Step 9. For the "neck" on the wire put on corrugations (for example, from the vacuum cleaner) or something similar. Feathers are attached with the help of self-tapping screws. Due to the fact that our bird wings are folded, feathers can only be consolidated on the stomach and a little bit on the sides.
Step 10. White bottles are cut in half, fringe is formed on the side of the cuts. Bottles are attached to the "neck" with the help of tape.
Step 11. "Wings" must be made from one edge of the prepared grid. It is important that the second row closes the first to 1/3. The third row uses already plastic white.
Step 12. For the "paws" of the stork cut out the corresponding blanks of 0.5-liter bottles.


Step 13. It remains only to paint the "beak" and "paws" of birds in red. All, garden stork is ready!
For more detailed familiarization with this method of manufacture we advise you to see the thematic video.
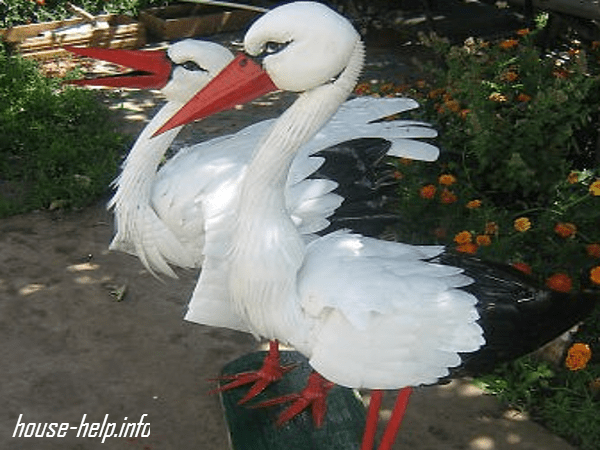
We all have long known a song from the childhood "Stork on the roof - the world on earth." And we have already familiar to Alena Zinoviev from the village of Freedy Dubrava decided to settle in his garden a couple of lovers of white storks that symbolize the world in her friendly family. These beautiful birds are made, also from sound material: foam plastic, metal mesh, plastic bottles and plastic canister.
For the manufacture of storks we will need:
1. Two cans of 5 liters
2. Metal grid for wings
3. Durable wire
4. Plastic Tubes for Foot and Neck
5. Polyfoam for the head
6. White dairy bottles
7. Dark beer 1.5l
8. Hose from the vacuum cleaner (can be replaced by corrugation)

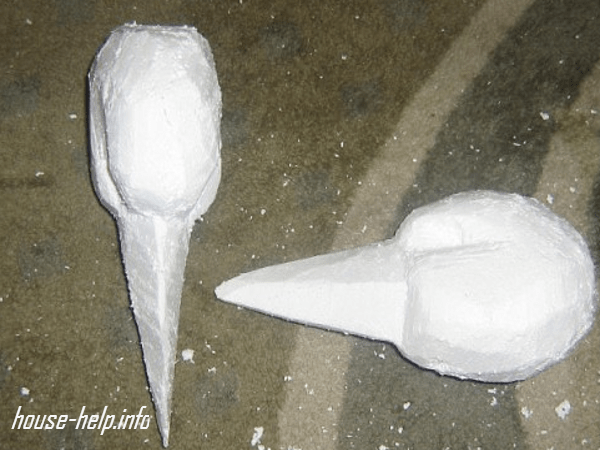
1. For head I use construction foam width 10 cm

2. I cut out the workpiece, select the socket, make a flat beak.

3. Grinding to smoothness sandpaper, insert your eyes (or beads)

4. I stick the eyelids, strengthen the beak part of the plastic bottle, sticking to the "Titan". The second stork beak is disclosed.

5. For the body take 5 liters. canister.

6. I cut off the handle.

7. Bend the mesh in the form of the canister-from this stork will be folded wings.

8. I spin the "wings".

9. Flexing the wire for the legs.

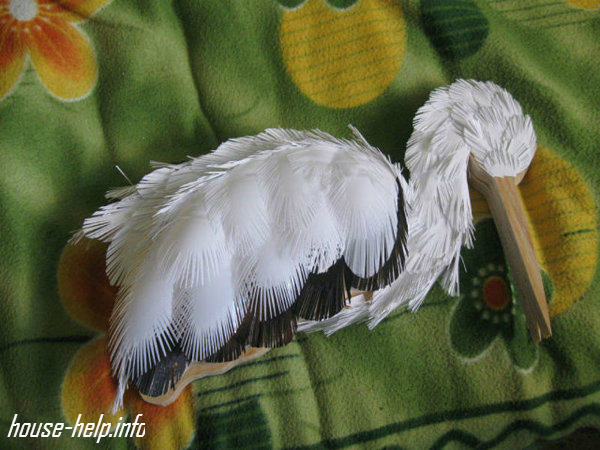
10. The liter dairy bottle cuts into 6 feathers.

11. Cutting feathers.

12. I begin to screw the feathers from the bottom of the body.

13. Strengthen wire for the neck and put on her hose.

14. A row of feathers screw to the hose with self-draws.

15. Side view.

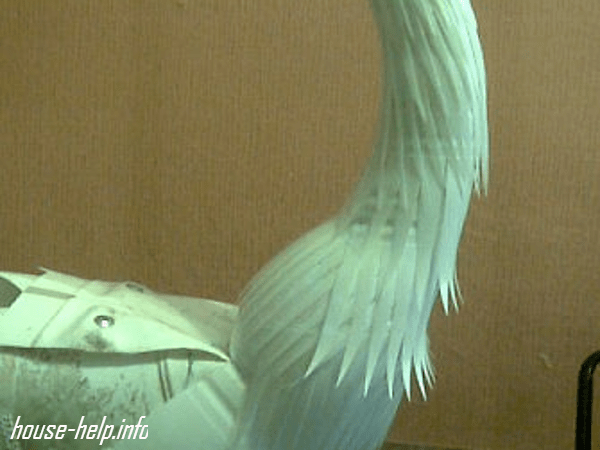
16. Halves of dairy bottles cut with fringe and strengthen on the neck with a tape.

17. I start with flying feathers on the edge of the wing.

18. The second row overlaps the first one-third.

19. Third and subsequent ranks of white bottles.

20. Paws out of 0.5 l bottles.

21. I make a torso for the second stork.

22. As in the first cut from above, the part of the canister is needed to screw the feathers.

23. I closes the body with feathers, but, unlike the first, feathers screw to the entire canister.

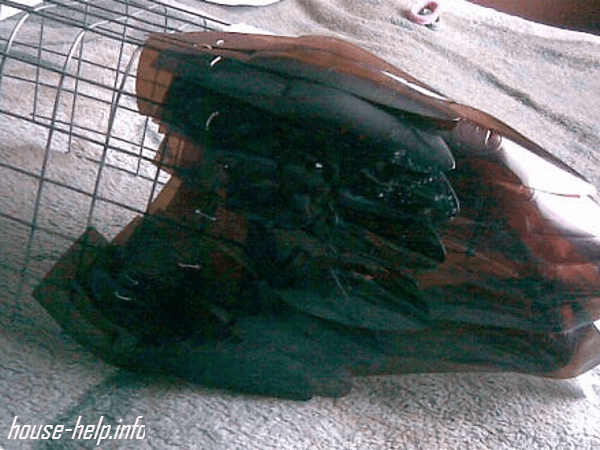
24. This stork has a little wings open. The first series of feathers from 1.5 l bottles (6 pieces of one)

25. The second row is screwed only on the wing rounding.

26. Third-on all wing.

27. I do the tail-he short, the feathers are slightly divorced.

28. I turn the wings to fasten feathers to the bottom side.

29. The last row, which closes the edge of the wing, make feathers frightened from both sides bent.

30. Approximately it looks like this.

31. Each of the subsequent feathers closes the place of connection of the previous one.


And soon we will meet again with Alena and its new works.
Copyright © Attention!. Copying text and photos can only be used with the permission of the site administration and indicating the active link to the site. 2019 All rights reserved.
 Why you can not give icons
 Is it possible to give icons as a gift: Signs, the opinion of the Church
 A year ago left her husband, and now I do not know what to do