Wardrobe with your own hands - drawings and schemes, layout, how to make the door coupe. Wardrobe with your own hands: Drawings, diagrams and photos of functional systems Simple wardrobe with their own hands
The presence of a wardrobe room in the house contributes to the release of residential space from bulky furniture, optimizes life and allows you to quickly find the desired thing. You can equip such a room by contacting professionals by ordering a ready-made storage system for individual sizes. Less costly and at the same time an interesting decision - a dressing room with your own hands: drawings, schemes and photos with useful arrangement tips will help make the process easy and fast.
For those who intend to collect the wardrobe system with their own hands, it is necessary to pay attention not only to the size of the room itself, but also on the possibility of compact and rational internal filling. To achieve maximum accuracy, it is recommended to pre-develop drawings and schemes of the future storage system. Ready design projects of wardrobe rooms with their own hands, photos and schemes will be a visual example when creating your option.

The exclusiveness of the angular layout is that under the dressing room you can use places that are usually not involved and difficult to access. For example, it can be an angle where the doors or windows are located in the walls of it at a short distance from the center of the corner. Such space is usually empty, therefore, to take this zone under the corner dressing room is the most successful and practical option.

Depending on the area allotted under the dressing room, the angular space can be separated from the main premises in several ways. If the area is sufficient, it is suitable for a plasterboard partition, and in the case of minimal dimensions, the project of an open storage system is suitable. Many are used in the hallway an angular wardrobe, which is a decent alternative to a separate room. Photo of the dressing room with their own hands will serve as a visual example of creating a storage area.

Helpful advice! When cutting off an angle under the dressing room, it is best to use plasterboard plates: this material is quite lightweight, it is well linked and simply mounted.
If you give preference to the angular dressing room in the hallway, which will be separated from the main premises, then you can equip the internal content in two ways: one or two walls. The first option circuit is a storage system, compactly assembled along one wall. Racks and shelves are recommended open, which will give savings area. The remaining space is used to move on the dressing room, as well as under the design.

In the second embodiment, the location of the filling is planned along two walls. The main advantage of such a filling is compactness at maximum capacity. However, it is necessary to take into account that in such a dressing room you can just enter, but it will not be possible to use it as a fitting room. This method of filling is suitable for families from several people, where the main task is to limitly fit the things of each household. To fill, storage systems are used with a set of angular components that provide good ergonomics of a small space.

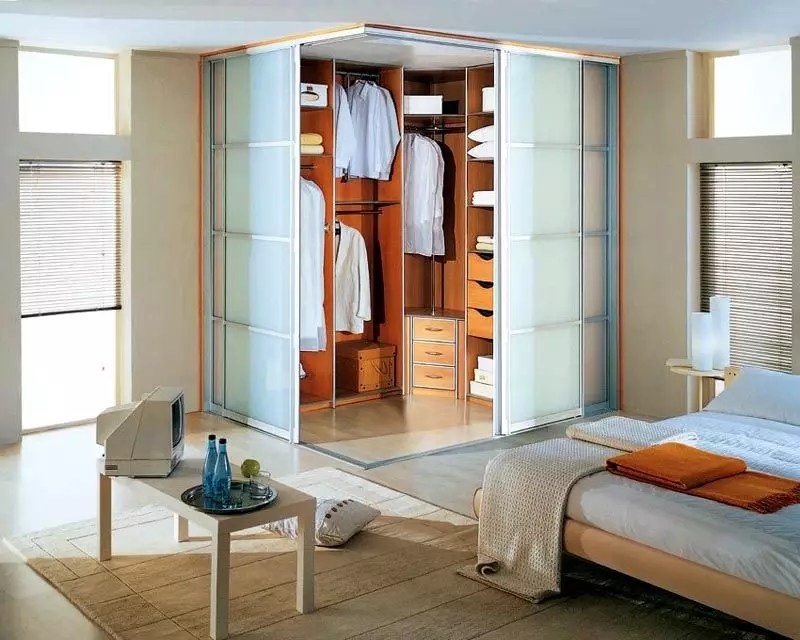
Corner wardrobe in the hallway can be burned with the help of hinting doors, the doors-harmonic chops or light sliding partitions, however, it is worth considering the features of the hallway. If the room is quite modest, the swollen option is absolutely not appropriate. Speeciously look at the radius sliding systems, the filling of which is chosen in unison to the general interior.

Arrangement of the dressing room in the bedroom
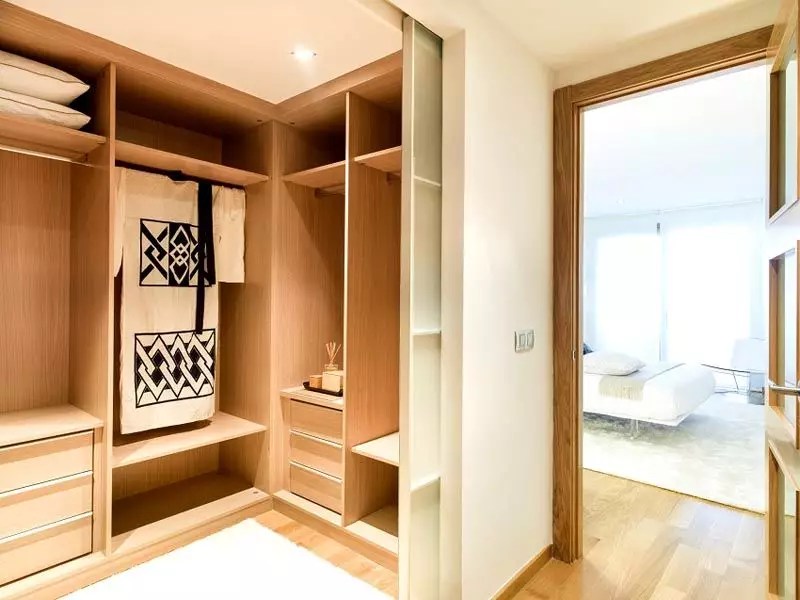
Photo of the wardrobe systems with their own hands, equipped in the bedroom, indicate that this is one of the most common and convenient options. The feasibility of creating a dressing room in the bedroom can be determined by calculating the area of \u200b\u200bthe sleeping zone. If the size of the bedroom significantly exceeds this parameter, you can safely begin to independently erecting the wardrobe room.

There are several internal space organization schemes in the dressing room. This can be a project of a linear storage system, the location of the modules in the form of the letter "P" or "G", as well as parallel placement of racks and shelves. The most optimal version is a P-shaped dressing room. This layout contributes to the maximum filling of the room and at the same time allows you to leave a place to move on it. As a rule, for P-shaped wardrobe, it is necessary enough in a pattern, however, they will be able to accommodate both in modest squares.

Helpful advice!An interesting idea to arrange a dressing room in the bedroom behind the headboard: it is separated by an easy fixed partition or sliding systems.
For small bedrooms, where to burn 1.5 - 2 meters from the room is not possible, limited in the bedroom wardrobe. Such furniture is compact, it does not take away a lot of space and is distinguished by a thoughtful stuffing. Methods for filling wardrobes-wardrobe can be found in the catalogs of sites engaged in the sale and manufacture of furniture. The finished sets of storage systems with a narrow specialization for clothing, shoes and accessories are distinguished by unsurpassed ergonomics.

If the layout is such that the wardrobe room is a passage, as it is impossible, the scheme is suitable for parallel placement of storage systems. Drawings of racks and shelves in the dressing room with their own hands indicate that with this method of filling it does not make it difficult to move around the room, and the storage system can accommodate everything you need. The most convenient is a combination of a bedroom-dressing-shower. But there may be other options.
Article on the topic:

Projects of small premises. Places for storage in the bedroom and hallway. Room projects 3 sq.m. Storage systems and furniture for dressing rooms.

Wardrobe design from storage room 1.1 at 1.5 m
Many professional designers believe that it is impractical to use under a dressing room less than 2 sq. M. However, the photo of the wardrobe from small storage rooms indicate that such a small space can be successfully planned for a functional storage system. It is in such works that the professionalism of designers is checked. After all, it is necessary not only to transform the storage room in the dressing room, but also to take into account the interests of everyone who will enjoy it, in the conditions of a shortage of square meters.

Projects and drawings of such wardrobe require accuracy of calculations and optimal internal filling. Extremely relevant for the wardrobe stuffing room with a size of 1.1x1.5 m are shallow shelves. If you do not cut the door to the door, the shelves can be reached out of the storeroom and then they will become part of the room furniture and effectively complement the interior. In this case, the shelves and racks are designed in such a way that they smoothly flow from the dressing room into the room.

The photo of small wardrobe rooms from the storage rooms clearly illustrates the options when the entire length of one of the walls is used under the storage system. With this project, you can carve additional space so that you can enter the dressing room to find the necessary things. However, so that the space of mini-dressing room to use maximum, it is recommended to arrange them by the type of niche, which is comparen from the main room with a door-accordion or sliding door-coupe.
Helpful advice! Filling a small dressing room, it should be placed so that the most frequently used ones are located in the middle.

Wardrobe in Khrushchev instead of storage room
The main difference between modern dressing rooms from storage rooms - the presence of an ordered shelf system, antlesole, boxes, hangers and other components for convenient storage of not only personal belongings, but also different in the form and appointment of objects and inventory. In addition, such systems are designed in such a way that all items and things are foreseeable and easily accessible. There are hundreds of wardrobe room options, the layout and filling of which depends on the area and budget of their owners.

Before making a dressing room with your own hands, it will be worth familiar with the main planning solutions of the dressing room. The fact is that in large-sized apartments, as a rule, separate rooms are already provided for the dressing room. The owners remain only to equip them with suitable storage systems. But in the apartments of the old residential fund under such needs, storage rooms are dismissed, the size of which is very small.

In order to make the most correctly organize the space of a small room, designers offer various methods of arrangement of wardrobe from storage rooms in Khrushchev. For independent implementation, many different projects are offered. You can choose the most suitable, familiarized with the drawings, diagrams and photo of the wardrobe in Khrushchev instead of storage room.

If it is initially in the layout of the apartment, there is no wardrobe, the dressing room can be equipped anywhere. It can be a combination of dressing room with a bedroom, hallway, hall, children's and other rooms. Experts recommend to allocate under storage systems several zones, for example, in the bedroom and hallway, if such an opportunity is available. In a conventional Khrushchev, the space for the dressing room is determined at the redevelopment stage, which is pre-coordinated in the relevant authorities.

Depending on the location in the apartment, configuration and square, the dressing room can be arranged along one wall, to form an angle or give it g-or P-shaped formatic. The newest technologies make it possible to plan the optimal storage system for any, even a modest, dressing room. After all, the main advantage of internal filling is a huge range of components for every taste.

Wardrobe room circuits from storage rooms: Photo Examples
How to make a dressing room from the storage room? A photo selection of various transformation techniques demonstrates many options for setting up storerooms. There are two main conversion methods. For the first characteristic disassembly of partitions pantry and setting the place of the cabinet of the corresponding sizes. Usually, such cabinets are equipped with sliding doors-coupe that have a mirror filling.

Another option involves completely freeing the contents of the pantry and equip the room with modern compact storage systems. Updating internal filling will allow the maximum to use space to store various in the form and sizes, shelves, baskets, rods and other elements. The presence of a plurality of special hooks, holders will increase the level of comfort of the former storage room and will prolong the service life of many things.

Before you make a dressing room from the pantry, you should thoroughly think over and make a scheme of its filling. Having made the appropriate measurements, it is necessary to calculate the number of shelves, tremers and boxes for small items, special holders for trousers, ties, hats and other accessories. The presence of a detailed project will help to avoid errors and the unreasonable consumption of materials when converting a dressing room from the pantry with their own hands.

Helpful advice! Make a wardrobe as comfortable as possible, you can use a system of metal frame filling, thanks to which you can adjust the height of the shelves, baskets and tremers.
The choice of a suitable design of the dressing room depends on the plan of the apartment itself. In many Khrushchev buildings, the standard planning of the apartments provides for a storage room in the bedroom. This room is formed by burning part of the bedroom partition on the entire width of the room. The entrance to the storeroom can be on the side of the bedroom or from the side of the adjacent living room. In some apartments, the pantry is located at the end of the long corridor, part of which is cut into the partition. For an example, you can find a lot of suitable projects and photo of dressing rooms from storage rooms in Khrushchev.

How to make a dressing room from storage room with your own hands
Before you make a dressing room in the room from the storage room yourself, you should choose the project optimal for such an area. In addition, the choice of option depends on the number of tenants whose things will be stored in the future dressing room. You can find drawings and schemes suitable on the dimensions of your room, you can view the selection of photo of dressing rooms from the storage room. In the drawings, all the necessary dimensions are given, as well as samples of internal filling systems.

Re-equipment of the wardrobe room from the storage room with their own hands: photo ideas
Those who want to become the owner of a spacious and convenient dressing room with minimal financial investments will suit the option of re-equipment under these needs of the storage room. To perform work, a set of tools will be required, which is probably available in the arsenal of any host:
- construction roulette, level, pencil;
- screwdriver, hammer, pliers;
- drill or perforator;
- screwdriver;
- electrolovik;
- saws.

The selection of the material for the internal filling of the wardrobe depends on the proposed storage system. It is calculated according to the drawings and diagrams of your project. Usually for these purposes acquire:
- furniture pipes (metal and wooden) for a dressing room of a rod or frame;
- durable lumber for shelves, antlesole, Tumb (can be used, for example, chipboard with laminated coating);
- furniture accessories: guides, corners for connecting, handles, loops and other;
- boxes, baskets, storage boxes.

At the first stage, it is proposed to dismantle all the contents of the pantry: remove the old shelves, remove all hooks, hangers, nails and other devices. Wall clean from old wallpaper or paint, and then thoroughly align. For the new design of the walls, you can apply staining in light tones or pasting with wallpaper. In the photo of the dressing room in the storage room having swing doors, it is shown that they can be fixed a large mirror from the inside.
Helpful advice! In the presence of a project with drawings and internal wardrobe filled circuits, collect storage system is completely simple.

As soon as the wall design will be completed, proceed to the manufacture and installation of internal storage systems. Purchase of materials are produced according to the developed drawings and sketches. It is calculated by the required amount of chipboard, furniture pipes, accessories, fasteners, screws, as well as additional elements of storage systems.

Assembling the wardrobe system with your own hands: Basic principles
Filling a wardrobe storage system completely depends on the specific requirements of its owners. In addition, playing the role and budget allocated under these needs. The wardrobe stuffing can have several constructive options. Those who have certain skills in the furniture assembly can independently assemble and install cabinet modules in the dressing room. Most often, such filling models are manufactured by order by individual sizes.

Cabinet designs are quite spacious, flawlessly fit into space and contribute to the accurate storage of things. Elements of body modules have standard dimensions. They are equipped to choose from various accessories that are assembled by the type of designer. But it should be borne in mind that shelves and racks in the body performance are quite cumbersome and occupy a lot of space, because of which they are not recommended to be used to fill the wardrobe rooms of modest sizes.

For small wardrobe, the assembly of mesh structures will fit. This type of filling is distinguished by compactness, ease and possibility of transformation. The elements of the design are easily mounted with their own hands, we visually do not overload space and inexpensive. For those who make a choice in favor of such a filling, it is worth considering that cellular storage systems cannot be overloaded too heavy objects.

Frame storage systems are appropriate both in small dressing rooms and in rooms with weighty dimensions. The assembly scheme is a metal racks that are mounted between the ceiling and the gun. Next, they are fixed to the shelves, drawers, racks and crossbars, which practically "soar in the air". For such a filling, the simplicity of installation, the ease and strength of the structure itself is characteristic.

Helpful advice! Whatever storage system you have chosen to achieve maximum comfort when using a dressing room, the principles of ergonomics must be observed.
You can get acquainted with the photo of the wardrobe rooms with your own hands using various storage systems on the Internet, where users are divided by their works. In addition, it will be useful to ask the filling options from professionals.

Basic rules for organizing storage of things
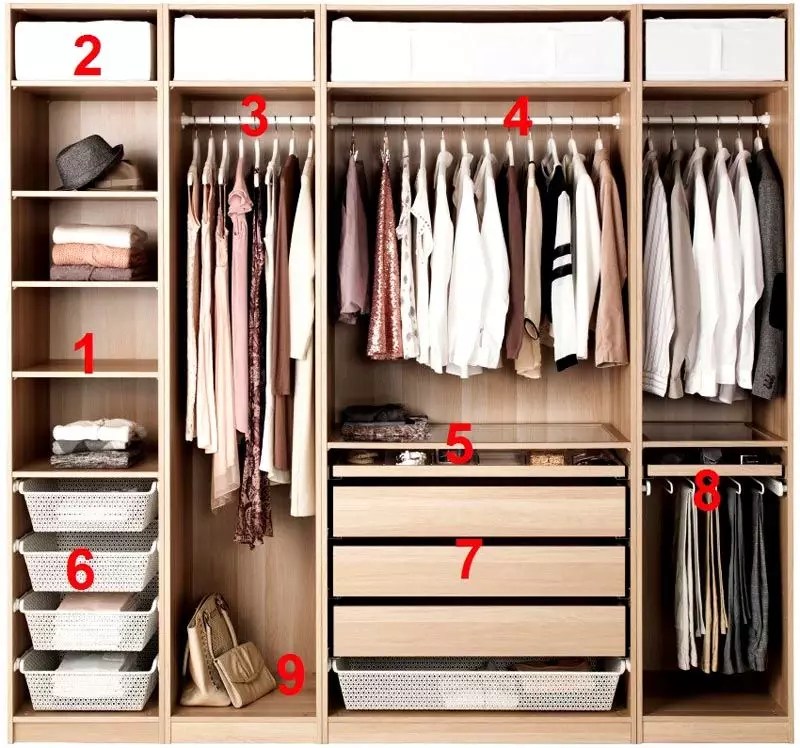
From how correctly things will be placed in the dressing room depends not only the fast and convenient search, but also the service life. Therefore, it is very important to competently organize the inner space of the dressing room. To do this, it is necessary to plan the storage zones of various things and items in advance. The wardrobe is recommended to divide into several functional sections:
- the bottom compartment - shoes must be stored here, small accessories (umbrellas, bags) and pants. The floor height should be no more than 70-80 cm. Shoes are better stored on special inclined sliding shelves (height is about 30 cm - for summer shoes, 40-45 cm - for winter);

- the middle compartment is used mainly to store frequently used things. Here are equipped with rods, pantographs, as well as retractable shelves for storing small toilet items. Depending on the length of things, the height of the middle zone varies from 140 to 170 cm. On the storage compartments of the shirts, the jackets are allocated approximately 100 cm. Knitted products are conveniently stored in baskets and boxes installed on the shelves;

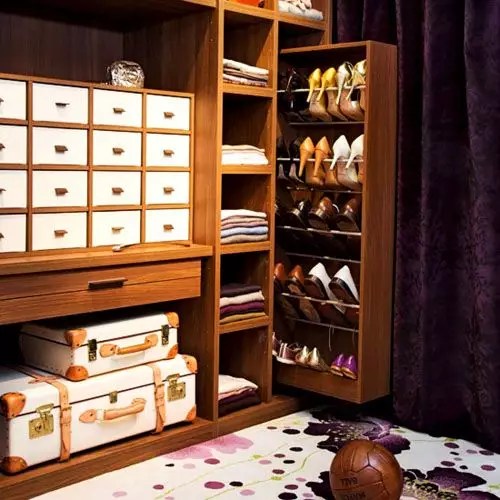
- the top compartment is equipped with racks for storing overalls and seasonal items: blankets, pillows, bulk bags, suitcases, as well as sports and economic equipment.
Modern storage systems are difficult to imagine without innovative components. These include various holders for trousers and skirts, belts, ties, scarves, drawers for different trifles, textile holders for bags and much more. Very easy to use Press-hanger for trousers: It is equipped with a jacket hangers, a strap hanger and a tie. All holders are equipped with special soft clips that are not leaving traces on clothes.

Independent re-equipment of the storage room allows with minimal investments to acquire a practical and functional dressing room for storing the necessary things and items. In addition, the proprietary transformation process will give the possibility of incarnation of personal interpretation to meet individual needs.
When it comes to storing things in the apartment, the best solution is the wardrobe room. It, as a rule, does not take up much space, which is relevant for small apartments, but at the same time allows you to make clothes and shoes on one area with convenience, which saves the space at the same time. You can order it from professionals, but then you will have to accept in advance with what you get not exactly what expected: the end result rarely meets all the wishes of customers. But to do, with your own hands it will be much easier - a little effort.
Wardrobe room from storage room with their own hands

With a properly planned wardrobe room, you can free apartment from bulky chiffios, chest of drawers, bedside tables
First of all, it is necessary to determine the place. For a wardrobe, a sufficiently small space is up to one and a half square meters. But where this place will be located - to solve the owners. Alternatively, it can be a bedroom, angle between the walls, a balcony or loggia, attic - or pantry, the presence of which is already provided for by the planning of the apartment.

When all things are assembled on one area, less time goes to find the desired
Views of the wardrobe room
Depending on the location of the location, there are several types of dressing room.
- Angle
The angular wardrobe room is located at the junction of two walls. Effective in terms of ergonomics, overall design of the apartment, visually smoothes the sharpness of straight lines. To separate the part of the angular room from the rest of the room, it is better to use drywall, it is easily amenable to non-professional and help save money. To fill an angular dressing room, a M-shaped shelf layout system is used. The optimal location is a bedroom.

The angular cabinet is always practical direct and allows you to use a large free angle.
- P-shaped
This option is suitable for owners of Penal's bedroom - oblong narrow room. The P-shaped system visually equals the space, make it more harmonious. Separate the desired part from the bedroom will help the wall, wardrobe, or shirma. The layout of the shelves immediately will save space on three walls.
![]()
This layout allows you to maximize all the free space.
- Parallel
Located in the passing premises, as a rule, these are narrow long corridors. The parallel wardrobe room is two cabinets located against each other. Cabinets must be closed by a mirror wall, sliding doors or shirma. This location is especially convenient for storing street clothing and shoes.

Parallel location Suitable for passing rooms
- Linear
It is an oblong wardrobe, located at a deaf wall without windows. Corrected by sliding doors across the entire width of the wall, opaque curtain or plasterboard. Alternatively, you can leave without the facade.

Linear layout resembles a very long and large wardrobe
Material and tools
To separate the dressing room, it is better to use plasterboard sheets. It has low weight, flexible, plastic, elastic. Gigroscopicity will not allow air to be aligned, so you can not be afraid of unpleasant odors. The flexibility of drywall will make it possible to realize additional interesting ideas: cascades, arches, small niches. When working with plasterboard minimum garbage, so many hours can be excluded. With the subsequent decoration, he has no equal, but the shelves should not be attached to it - may not withstand weights.

Plasterboard Partition for Wardrobe Room
To cut down the wall, it is enough to have the following tools:
- metal profile 50-100 mm;
- plasterboard sheets;
- primer;
- insulation;
- putty;
- fastening details;
- screwdriver.
Creating a dressing room
The plan is ready, the drawings are discharged, the necessary materials are collected, the tools are selected - it's time to begin construction. If a separate room is not allotted for the dressing room, you will have to degrade the wall yourself.
- Secure the top guide on the ceiling. Use the most appropriate fastener type: dowels, anchor, butterflies, etc.
- Stick to the profile double-sided adhesive tape for a more dense fit to the plane.
- Attach the segments of the guides to the floor.

On the perimeter of future walls, install Mon-profiles on the floor and the ceiling
- Attach vertical guides to the walls so that both profiles are connected. Vertical elements can be attached immediately on the wall or on special suspensions.

Install the vertical edges of the future design from PS profiles
- Mount the doorway. The racks are also performed from a metal profile, which is fixed in the upper and lower guides using self-tapping screws.
- To vertically fixed profiles, set the transverse, determining the height of the doorway. The horizontal bar should be copper for rigidity from the top guide.
- In a step of 600 mm, add the rest of the vertical elements.

Then set the horizontal ribs of stiffness from Mon-Profiles

Installation of supporting construction made of metal mills for suspended ceiling
- We cut the frame of plasterboard, install soundproofing material between vertical profiles.

We are wearing plasterboard the inner surface of the walls
- Apply a putty on the seams, as well as the hats of self-tapping screws, pre-sticking the fiberglass grid-sulfyank on the joints of the sheets.

After the whole design is ready - proceed to the putty
- Cross to decorative coating.

Having finished all draft work, proceed to staining the ceilings and wallpaper sticker

Final stage - Install interroom doors
In addition to the plasterboard wall, false walls, partitions, arches, ornamental structures, furniture, vertical racks, etc. can be used for a septum of a dressing room.
To date, the global market offers the most diverse stuffing for the dressing room: from budget Chinese organizers for things to world-famous furniture brands. However, given the average area of \u200b\u200bthe city apartment, the furniture is better forgotten, because it threatens to fill the space, where every span. The best organization option is open shelves, drawers, hangers.

A convenient modular system allows you to install any item at any height.
Together, they can be combined in three different types of structures.
- Cabinet. Wood panels are used in the housing design. This type of structures is characterized by the presence of angular elements and rigid fixation.
- Cell. In the cellular construction instead of wooden boxes, mesh baskets are used. They are convenient to rearrange. The main advantage is the transparency of such a design.
- Loft. A good option for large areas. Different with an abundance of metal parts. Boxes with baskets for things can be used from any material.
Each type of construction should be subject to the general rule: under the rods with hangers, you need to take three times more space than under the shelves.
Shelves for the dressing room with their own hands.
However, an option with purchased racks may not be suitable for those whose wardrobe is distinguished by a non-standard form - or those who want to create their own unique, unique design. In this case, you can make the shelves for the dressing room with their own hands. In addition, the manufacture of homemade shelves will cost cheaper than the purchase of full cabinets for clothing.

Wall-mounted wardrobe shelves do it yourself
Shelves for things can be made from the following material:
- plastic;
- plywood;
- wood;
- metal;
- woodcutboard;
- plasterboard.

Wardrobe equipment from round furniture pipe
If the main material is chosen a tree, it is worth repelled from its breed (it is better to use pine or fir), type, quality, purity and humidity. The boards must be perfectly smooth, without cracks, cracks, emptiness and irregularities, besides absolutely dry.

Wooden shelves in the dressing room
There are the following types of shelves:
- classic;
- corner;
- hinged;
- outdoor;
- modes;
- exclusive.
Decide with the type of shelf, location. Choosing a place, remember that there are three zones in the dressing room: the lower (up to 0.6 m), the average (from 0.6 to 1.9 m), the upper (1.9 m and higher). Think out the size of the shelf, based on the total area of \u200b\u200bthe room. Prepare the tools: grinding, jigsaw (hand saw), screwdriver (screwdriver), electric drill, screws or screws, wood varnish, brush, carbon, hand mill.
When working, remember that each item must be treated with grinding. It follows to work in gloves, they will protect their hands from injuries and will allow the tree not to make a tree.
Manufacturing process
Take for example a standard rectangular shelf with parameters 250x300x1100 mm.

It is advisable to make open shelves to simplify the search for clothing. Alternatively, you can make a shellf with glass doors.
Wardrobe room design
What you need to remember when decorating a dressing room?
- Shine. The main rule of lighting - the light should be as close as possible to the natural, especially if there is no window in the dressing room. The most convenient version of the lighting is ceiling. For a small dressing room, you need to install dotted lamps or LED ribbon. For a large suitable chandelier, and for the corner dressing room - lamps on clothespins. Ceiling lighting can be combined with backlighting bras, lamps. As an option - lamps with a built-in motion sensor or lamps as a decorative element.
- Ventilation. So that things do not rejoice in order for them not to start the mold, it is necessary to ventilate. To the dressing room without the window you need to bring the exhaust channel by setting the fan from its input. It will provide the necessary influx of air masses.
- Mirror. One of the main attributes of the wardrobe is a mirror. For a dressing room, it is optimal to choose a mirror in full growth to see your own image completely. The mirror can be hung on the wall or integrate the cabinet door for clothes, which will significantly save space. In addition to the main function, the mirror adds a dressing room light, helps to visually increase the space.
- Furniture. If the space allows, in the dressing room you should put a small table, a ottoman or a light chairs. They are not only elements of the decor, but also carry a functional load. It is important that furniture objects are not cumbersome, but fit well into the decor of the room.
- Accessories. Small decorative accessories will bring brightness, make it more elegant, aesthetically attractive. A small carpet in the center, glass vases with flowers or decorative stones or air figurines will give an additional gloss.
The design of the dressing room should not be independent. It must be done in the same style as the design of the entire apartment. To do this, you can choose the same color gamut or general, binding all rooms interior elements.
Rules for storing things in the dressing room

DIY Wardrobe Room - Project Development
The following storage rules for clothing and shoes should be followed.
- Get individual shelves for male and women's clothing. It orders the search for things, will avoid confusion.
- For outerwear, highlight the place at the entrance. They are most of all microbes from the street.
- Do not mix underwear together with bedding. Take the split shelves or baskets for them.
- For storage of shoes, it is advisable to use a rotating shoe wardrobe. More pairs of shoes will enter such a wardrobe than on ordinary shelves.
- For small items of clothing (underwear, ties, belts, etc.) Take the shelves with special cells.
- Use under the shelves for things all space: from floor to the ceiling itself.
- In the upper zone it is convenient to store hats, bedspreads, seasonal things.
- The middle zone is removed to store the most frequently used things. There must also be all the rods with hangers.
- Lower zone Adjust for bed linen and shoes.
Video: how to make a dressing room
50 photo ideas for a convenient organization of the dressing room:

Do not know how to use the space optimally? Where to fold things that have already accumulated a lot? The perfect solution is to make a dressing room from the storage room. Examples of registration, secrets of arrangement, thanks to which your things will always be at hand.
Fine when you have your own dressing room, or at least a convenient shipping for dressing up. I still have only an angular bedroom with an uncomfortable niche, which I would like to adapt to homemade wardrobe. But encountered with a large selection of frame furniture on the one hand, and the inspirational DIY projects on the other, I began to doubt what to spend my strength to embody what is already in my head. And what about you? If you intend to make a wardrobe in the minimum budget, using only the blanks from Lerua Merlen (Amazon, IKEA, the list can continue), then you are here.
Wardrobe from storage room in Khrushchev
The presence of a storeroom in the apartment is an invaluable treasure for those people who always lack the place. Make from the storeroom cozy space for changing in several ways. For example, in Khrushchev, the storeroom can be replaced by the cabinet.
To do this, you need to perform the following actions:
Council
If the door will open inside or move on the rollers, then such a design will allow you to save space even more, try making a mirror door.
Wardrobe will be no less attractive if it is done in another plan. To create a new functional space from the pantry, you need to draw a drawing and update the design of the inner surfaces of the walls. It is worth repairing the ceiling. You can make a wardrobe lit and conduct electrical wiring inside.
If you are planning to add light to the closet, find an electrical unit that can provide a power supply and plan the cable route. If you do not know how to do it, call the licensed electrician so that it helps you connect and set the light. Buy a large mirror that is installed on the door. Now you need to think over different compartments.
More space should be allocated for long things, you can not forget about the plank for the hangers. In addition, you need to pick up special footrests, the upper shelves on which the caps will be stored. When everything is done with your own hands, the design can be changed according to personal preferences.
The wardrobe must take into account the female comfort, handling the box for small items. For example, brushes, threads, needles and other devices can be stored in them.
How to make a wardrobe of wooden rails?
Need more space in the closet? If you have a sufficient occupied area and some basic joinery skills, you can build a wardrobe in the bedroom, a guest room, a room or a corridor that will look as if he stood there all the time.
The first step is to build a cabinet frame and attach it to the surrounding walls. Next will be the finish of the doorway and install the door (doors) according to your taste. Finally, the rod will be installed or you set up the interior with the help of rods, racks, boxes and any other accessories you want.
Planning the construction of walls of the cabinet
Plan to build a cabinet frame 2 to 4 m using 2/4 inch slats, making a depth of at least 70 cm. You can build a frame with one of two ways: to build walls on the floor, and then raise them into place or build them in place.
It is much easier to connect all the elements together on the floor, if there is a large free area in the room.But using this method, you will have to make a small modification in the height of the walls of the cabinet, because it is impossible to raise the wall with a height of 2m in the 2m height space. So, build the wall on 1 cm shorter the height of the ceiling, and then install the gaskets or thin blocks between the top panel and the ceiling.
Beginning of work
First, check the position of the upper strip (in the "Top Plate" image) and the bottom (SOLE PLATE). On the ceiling, mark both ends of the central line of the new wall of the cabinet. Measure 1 3/4 inches (half of the upper strip 2 width of 4) on both sides of each tag. Fix parallel lines between the corresponding marks using chalk to show the position of the upper bar.
Basic structural elements
Then, hang a plumb from each end of the lines and mark these points on the floor. Secure these lines with chalk to connect the floor points, indicating the position of the sole. If the cabinet has a side wall, lay out its upper and lower bar as well.
Council
Use the frame rectangle to make sure that it will be perfectly perpendicular to the front wall. Cut the lower and upper strips to the desired length.
Mark the top bar and sole for the location of the pins using the kitchen and pencil.
Put each edge of the top plank to the edge to its sole to be cut off both ends. Starting from the end, which will be attached to the existing wall, measure 1 1/2 inches, and then make lines on both straps as in the picture. Starting from this end, measure and draw a line after 15 1/4 and 16 3/4 inches. Further, starting with these signs, move 16 inches each time, until you reach the far end of both slats.
Wardrobe with your own hands from the storage room
Wardrobe, regardless of whether it is built or classic, should have a functionally developed arrangement of shelves, boxes, clothes hangers, etc. Drawers must be placed in the lower zone, at a distance of 120 cm from the floor to see that in them. Wardrobe may be short and long, depending on the length of things. Shirts, pants, jackets, blouses are enough to install in a closet 90-100 cm high, or create two floors with hangers - one over the other.
The long part of the cabinet includes coats and dresses that require about 150 cm. Shelves can be placed in any part and at any height in the closet.
The small-sized storage room easily turns into a multifunctional wardrobe and will become an excellent option from the point of view of small apartments, which lack space for comfort. It can be stored clothing, household items, different little things and everything else that creates visual interference. Now all this will be hidden from the eyes in a convenient storage room, transformed under the cabinet with a set of shelves and niches, which will be fairly spacious for any needs.
Special systems consist of a variety of elements:
- pipe products;
- brackets;
- shelves;
- a door.
You can order this design in the furniture cabin, pre-specifying the required size. Then there will be only to collect pipes. In this way, not only the wardrobes are assembled, but also exhibition stands, racks for office space and much more.
The advantage of the frame design is the ability to change the position of the shelves at any time.
Wardrobe options
Wardrobe can be done using drywall. This option involves performing drawings at all stages of work. Before assembling and ordering items, it is necessary to accurately calculate the size of all parts and place the data on the drawing scheme.
Create a design - professionals will help
Necessary steps
- apply the layout on the wall;
- make frames from wooden beams;
- to arrange a wardrobe, you need to start with beams that will be located horizontally next to the ceiling. They will serve as a guide element;
- then make vertical beams. Their distance from each other is determined based on the size of the sheets of plasterboard. It must be no more than 70 cm;
- the shelves will be attached using transverse beams;
- cut the frame of plasterboard;
- very convenient to separate both sides, not forgetting about thermal insulation. Hide inside the wire to provide high-quality lighting;
- at the final stage, it is necessary to separate the drywall from the outer and inside, fix the shelves.
In small pantry racks can be done by himself. Make the design design using a sticky film, varnish, paint, or cutting the veneer.
How to install a wardrobe system?
Cabinets are all forms and sizes, but they all have one common property, is that they are not sufficiently large. Regardless of whether a small or big cabinet we have, we will inevitably manage to fill out every available centimeter. As a result, it will still be enough space.
The best solution to the problem is seen in the following steps:
- minimization of our best accumulated (good luck!);
- installing the storage organizer, which will better use each available cubic centimeter;
- use a wardrobe system to improve storage.
Wardrobe systems allow you to maximize the use of space and ensures the availability of things. What, in turn, greatly simplifies us life.
They are a few species:
- modular;
- professional;
- suspended.
Modular systems can be installed by specialists in the cabinets, or you can go on your own route and install your own sets of ready-to-assemble melamine or wooden panels.
Professionally installed systems can be extremely rational, efficient and expensive. The assembly systems are more accessible, and most of them are relatively easily collected and installed if you have several basic DIY skills.
Suspended wardrobe systems are also relatively simple in the installation and can be an excellent solution for some types of organizations. The best solution is often a combination of several types of systemic wardrobes that allow you to use even non-standard or uncomfortable space.
Planning
Develop a plan for your closet. Choosing the best types of organizations, focus on what you want to store it. Using the roulette, check the length of the dresses, coats, shirts, blouses and trousers in a suspended state. Then find out how much you need a shoe location, hanging rods, shelves for clothes to achieve a state when they are not overflowing.
Council
Plan to post items that you often use, on open shelves. The upper shelves are perfect for bulky products, sweaters, hats, and the like.
Make a draft drawing on graphic paper, including main dimensions. It will be as a guideline to study your needs. To do this, you need to know the size of the storage systems that you can use.
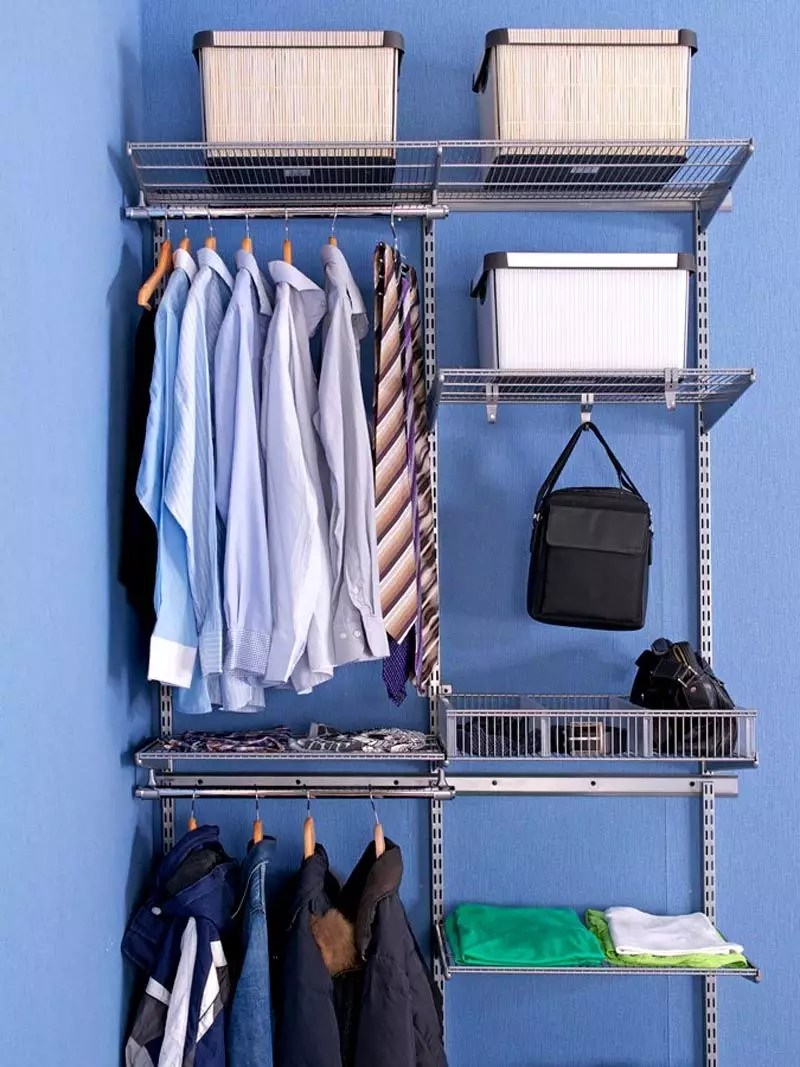
Suspended wardrobe systems: how to make with your own hands?
In a simple suspension organization, the shelves are attached to the wall through the hooks, and the diagonal metal supports are attached to each end of the shelf to provide high support.
Start with cleaning.If elements remained in the wardrobe, pull them out with a nail or a similar tool. Before any installation, it is necessary to close the holes with putty and paint, since this stage will be significantly difficult if you start it after installing the shelves.
Often, the sets save your time and money. If you buy a set, make sure that it has everything you need, and it comes with all the necessary details. If you are confident in your dimensions, drill the shelves and brackets drill to just hang the purchased set on the wall. Otherwise, it will have to trim parts with a hacksaw.
There are two main types of suspended racks:
- some use a horizontal suspended track with a vertical mount with equal intervals between standard shelves, which can be adjusted;
- another type is an unregulated system on the suspension, in which brackets or brackets are used.
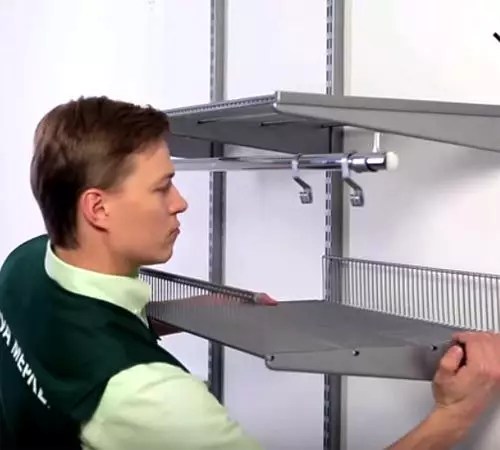
Installation of wardrobe racks
With a simple suspension system, the shelves are attached to the wall through the hooks, and the diagonal metal supports are attached to each shelf to provide high support.
Before installing, draw on the wall where you are going to place the design. It is normal to attach the shelves to drywall, but keep in mind that it is important to attach the shelves to the pins if they are exposed to extensive loads. Change the shelves size as needed using nippers or hacksaws. Attach the rubber plugs to the cropped ends.
Drill holes along the fastening lines using the level.
- Place the level on the wall where you want to attach your first shelf. Draw a line along the level to mark this position.
- Using a drill Make a hole for an anchor hook that will attach the shelf to the wall. The manufacturer of racks must specify the size of this opening.
- Place an anchor hook into the hole. Tighten it firmly. Duplicate this step to insert another hook at the opposite end of the shelf. (Please note that you do not need to use anchor hooks if you drill directly with screws in the wall).
- Secure the shelf so that it is sitting on two anchor hooks.
- At the front edge of one end, the shelf secure the diagonal reference part using the bracket. Make sure that the shelf is smooth, and then drill a hole for an anchor hook, where indicated at the base of the diagonal support.
- Install an anchor hook into this hole and secure the screw to fix the support for the wall. Repeat this process for the opposite end of the shelf. (Again, the anchor hooks will not be needed if you drill directly).
- Repeat these instructions to set the remaining shelves.
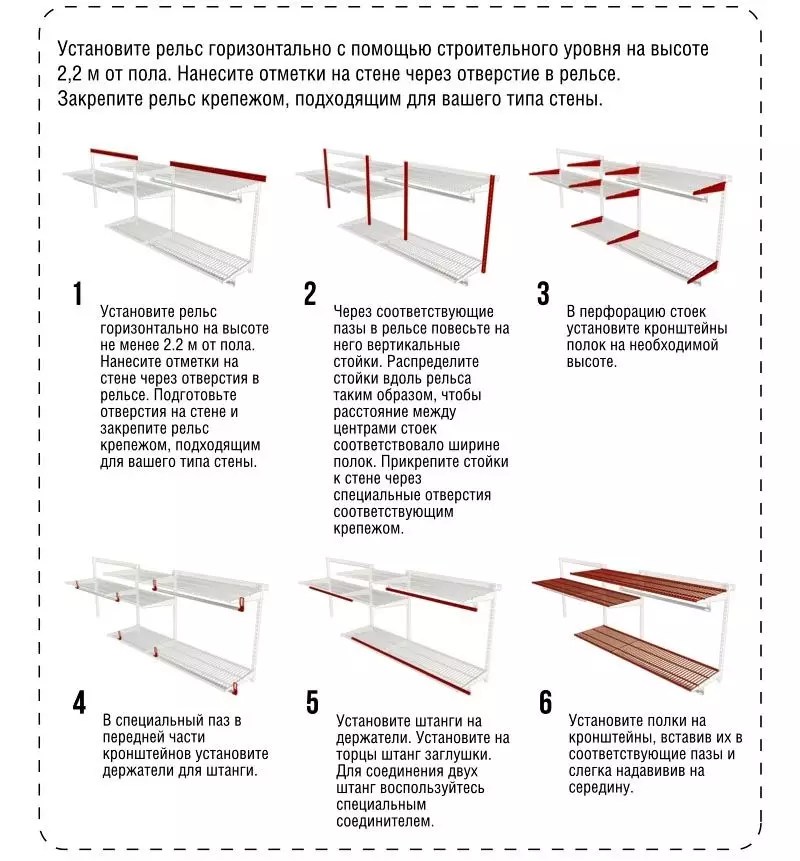
Installation of guide racks
For the mounted cabinet, also start with the drawing on the wall, where you want to be the top track of the shelving system. Plan to attach the upper shelf at an affordable height and track over it, horizontally, about 15 cm above.
- Use the level and pencil to draw a line by 15 cm above where you want the upper shelf. Using the fastener, mark the location of each mount on the wall.
- On each wall, cut the suspended (horizontal) track so that it corresponds to the width of the storage area in the closet. Take the assistant to keep the track in a fixed state while you insert the screws into each accessible opening. Make sure the track is securely installed.
- Place the standard shelf (the long vertical track to which you attach the shelves) to the position on the track. It is best to leave the distance not more than 10 cm between the end of the shelf and the first holder (the same rule refers to the last holder) and, if possible, install holders over the place for fastening. Make sure that the holder is set vertically, and then insert the screw through its center and in the pin (use elongated anchor hooks, if you can not attach to the pin, but keep in mind that they will withstand smaller weight).
- Position the additional holders at a distance from 40 to 80 cm from each other, simply shifting them along the track. If necessary, cut them along the length with boltulasses or hacksaws and cover the cropped ends with rubber end plugs.
In a small room there will be a good choice of the corner cabinet. It can be done using a rectangular rack with sliding doors. You will only have to fill it with shelves. Thus, you can use any space in a very small apartment.
Ideas of using a small wardrobe:
- place for ironing;
- rooms with lots of mirrors;
- workplace with multiple integrated places;
- comfortable organizer for socks, ties, belts, decorations.
This part of the apartment will enjoy all family members to not only choose an outfit and stroke it there, but also to retire. It is enough to place a comfortable chair and lamp in the dressing room.
When the dressing room turns out too small in the area, during the repair you can perform its complete or partial modification (make it a P-shaped or linear form).
How to be with the doors?
Installation of doors in the opening of a storeroom does not always provide for all our desires, as it is limited to corners and a small metrar. Therefore, most convenient option here - sliding doors - infrequently suitable. I would stop at the version of stylish textile doors - take it with the opening of the curtains in the color of the walls or contrast. This output comes to any decor, soften the space and will perform the main entrusted role - to close the room from the views and allow it to be convenient to pass inside.

Agree, quite convenient when all things are placed in one place. No need to run around the apartment in search of individual items, everything can be viewed and trying in one place. You can even arrange on a small area. The rationally arranged wardrobe with their own hands (drawings, schemes and photos will be presented below) will serve a good service for many years.
Our comfort depends on the properly organized storage system. Agree when each thing is in its place, it is easy to find it. The main rule is space and convenience. But in small-sized apartments it is difficult to achieve this. Modern technologies come to the rescue, thanks to which modern decreases in size, miniature flash drives came to the place of books. All this frees extra area.
Before planning a stationary storage system, it is necessary to paint things. Objects that have not been using it for a long time, can be disposed of or selling, and for the rest of the optimal dressing room.
Storage rules divide things into two rotations.
- Hot - Things daily or frequent use. This is not only clothes. This can be attributed here, boxes with shoes. The size of the storage zone depends on their dimensions;
- cold - It is seasonal or rare items. For example, travel bags, household items.
Installing a separate wardrobe much more practical acquisition. It is performed by an individual order, which allows you to most effectively use the entire space with perfect filling. You can install on ready-made drawings and diagrams with your own dressing rooms. Photo skills on the Internet will help to determine the choice.
Wardrobe do-it-yourself drawings, schemes, photo
After determining the main parameters, you must perform a drawing and placement scheme. It will help to accurately determine the location of all designs. The main parameter in drawing up the plan is the area. It is she who determines the filling of the dressing room.
Minimum sizes should start from 4 sq.m. First you need to determine the installation location. You can allocate a separate room for this. However, such an opportunity is not all. Little wardrobe from the storage room in small apartments is the perfect option.
For mounting the wardrobe room enough to arrange in any room. As a visual example, you can contact the finished solutions of the wardrobe rooms in photocatalogs and choose your ideal wardrobe option.

Corner wardrobe in the hallway
As we have determined, the placement will allow the average angle of the room as rationally. It is enough to allocate an island of 2 sq.m. for a dressing room. Photos of interesting projects are posted in our catalog.
Partition can be performed. This location obtains sufficient volume on the minimum area. Plasterboard is convenient in use, the design is easy, after installation there is practically no garbage.
Internal filling can be performed in two ways.
- All structures are built along one wall surface;
- filling is harmoniously installed along both walls. This is a more preferred location, as the space is used more rationally.
Designers offer several variants of angular elements with which the maximum ergonomics of a small space is ensured. The device of a spiral jumper will help increase the space and smooth the sharp corner of the dressing room.
Tip! Shelves in storage systems are better to leave open.
In the project of the dressing room in the hallway, it is necessary to provide input with the maximum width. As an option - a device that allows you to maximizely open with one movement to combine the storage area with a common space.

Linear location is a simple and public project. Constructions are built along the wall surface. This location is more reminded by a niche. The entrance can be performed using the harmonica door, which will easily go aside by opening a small world.
The use of retractable hangers will allow one hand moving closer to clothing. For a comfortable location, the dressing room is planning a depth of at least 1.5 m. The partitions are better not to arrange, they will take useful space without making any functionality.
For angular systems, racks are used. Ready ideas in the projects of dressing rooms can be found in the gallery on the Internet.

Parallel Type
For a parallel accommodation device, it is necessary to arrange only and fill the room with furniture along parallel walls. However, not all rooms are suitable for this type. For example, for passing rooms is the perfect option. It is quite another thing - a deaf room for which the placement of the P-shaped dressing room will be more practical.
For a comfortable location, parallel wardrobe must have a width of at least 1.6 m, otherwise there will be very difficult there. The racks should be located at least 80 centimeters.
Filling can be arranged end hangers and retractable panels.

Mr. Wardrobe
This location does not require partitions. It can be performed by an integral continuation of the room. Systems in the form of racks increase the area of \u200b\u200bthe room.
Since the main costs of the storage system can fall on the partition design, the M-shaped system allows you to significantly save money on the dressing room.

P-shaped wardrobe
The P-shaped system is arranged both in large and in small space. This is a separate kingdom of the owners. You can install all the elements of the dressing room: closed boxes, separate sections and racks.
The arrangement of the P-shaped system allows the designer to show the maximum creative when filling the area. At the same time, the main task is to create a room with a maximum expanser. For such a system, a narrow and long room is best suited.
To fill the dressing room, the upper shelves are made with a greater width, then there can be placed rare items, such as travel bags or large boxes.

Wardrobe in the bedroom
Wardrobe device is the most successful location of the storage system. If the area allows you to install one of the structures, you can safely begin to implement the project. Moreover, it is quite possible to perform it alone.
On the large area you can name the P-shaped design. She will unload the room as much as possible, leaving enough space to move.
An interesting solution will be a dressing room. Partitions can be performed in the form of sliding structures or stationary.
If the bedroom area is very small, no need to be upset. To the aid will come. It will take only about 1 meter of the width of the room. Competently selected filling will allow all items in it.
For narrow spaces, the angular dressing room in the bedroom is suitable. Photos of designs are selected according to the general design.
A parallel storage system is suitable for the passing room. You can perform preliminary drawings and clearly submit the final version of the project.

Device from the storage room in a wardrobe room, layout with dimensions
Architects of the last century, when designing areas of mass development, provided a small storage room in small-sized apartments. Designers offer to re-equip it in the dressing room of a small size. This is the most successful option for the device of the whole room for storing things.
Placing the storage room in Khrushchev was performed with the input along the long side of the common room or the end input. Consider both options for reorganization of storage rooms.
Long side of the room
Before filling the pantry should be dismantled by old arrangement. To increase the width of the pantry, you can transfer the wall structure deep into the room.
You should know! To transfer supporting structures, you need to perform a project and coordinate it in the architecture of the district. Unauthorized redevelopment is not allowed!
On an increased area, a P-shaped or linear design is placed. The useful option will be the placement of the two-layer design. Racks or shelves for open storage are fixed on a long wall surface. Before them - a barbell for hangers. In order to take things from the shelf, you should simply push them.
Accommodation on the end side of the room
It is impossible to transfer structures with this placement. In this case, the choice of the location system must be made based on the settings of the pantry. If the width of the room is up to 1300 mm, you can arrange a M-figurative system. By narrow side install open. Long - rack with shoulder, shoe storage boxes.
For a narrower space, an excellent solution will be a barn hanger. In the room on the end surface placed open storage shelves rarely
used things. The hanger rolls out into the common room.
You can find an interesting version of the device with your own hands the dressing room from the pantry in the photocatalogs and master classes on the Internet.

Proper viewing of a wardrobe room
Good important for all at home and, especially for dressing room. It is desirable if the storage system is organized with the window. But, unfortunately, this placement is not always possible. Consider alternative natural lighting options. It is important to choose a lamp with warm lighting.
| Photo | Description |
 |
|
 |
|
 |
|
 |
|
It is interesting! Furniture in small dressing rooms can be performed with glossy surfaces that will reflect radiation and create an illusion of volume.
Requirements for Ventilation of the Wardrobe Room
Storage system requires sufficient ventilation. Well, if there is a window in the dressing room. However, it is not always convenient to keep open. You can leave open doors. But, as practice shows, it is also not always convenient. In this case, the output will be a device of natural or forced ventilation. Trust this work is necessary to those skilled in the art that will pick up the equipment with the area of \u200b\u200bthe room.
Correctly relieve not only from unpleasant storage odors, but also will save on the occurrence of fungus or mold.

Wardrobe doors
Doors in the dressing room need to choose from the overall stylist of the room. The design must be comfortable and reliable, because it will use it several times a day. Manufacturers offer a large range of products, the choice of which can lead to a dead end.
For each storage system, there are recommendations for the choice of doors.
Swing
To install them, free space is required during the opening. According to the rules of fire safety, the doors must be opened inside the common room.
Sliding
This design is suitable for small rooms. For them, no need to provide additional space. Door canvases are fluent in horizontal guides. Constructions are installed quite simply with their own hands. Photo of the wardrobe systems are placed in the catalog at the end of our review.
Designs in the form of a book or accordion
In the first case, one part of the mechanism is fixed on the box, the second at the same time moves on the rollers. The system in the form of a harmonica or consists of several cloths connected by loops.
Door-coupe
The canvas move on the rollers on the guides. For storage room, one canvase is enough.
Door penal
This is the most complex system. The canvas hides in the drywall box or in the wall surface. Outwardly look very beautiful and unusual.

Filling a wardrobe room
Manufacturers offer a large range of filling for cabinets and dressing rooms. After all, not only a comfortable search for the necessary items, but also the service life depends on the proper placement. Therefore, it is important to rationally approach the internal filling of the storage system.
Clothing storage systems
For clothes, the middle compartment is selected. To accommodate the hangers, it is necessary to provide a height of up to 100 cm for shirts and about 170 cm for dresses and outerwear. Accommodation can be on rods and pantographs.
Small items are placed on the shelves or in boxes.
Shoe storage systems
The lower compartment is given to a height of no more than 80 cm. You can additionally install horizontal or under a slight inclination of the shelf. It will be convenient to install retractable structures, the height of which should be at least 30 centimeters for summer shoes and at least 45 centimeters - for winter.
Article on the topic:
In the publication of our portal, you will learn that they represent, which species can be, as well as it is possible to establish such structures in small apartments or for them is a separate room.
Description of structures
With proper storage of clothes and household items, we extend their service life. Consider in more detail the offer of manufacturers for the rational use of the dressing room.
| Photo | Description |
 | Rods for long (up to 170 cm) and short (up to 100 cm) clothing. |
 | Pantograph - sliding design. |
 | Fastening for trousers with a height of at least 60 cm. Can be single and double. For skirts are awesome hangers with funds. |
 | Large and small storage boxes for storage of bedding, linen, decorations, accessories. |
 | Retractable or stationary shelves up to 40 cm wide. To store things on the mezzanine, you can use shelves up to 60 cm wide. |
 | Boxes and baskets for storing various items that do not need to iron. |
 | Modular systems for shoes. Shoes are placed on them or hangs visual on the pads. |
 | Holders for ties, belts or scarves are usually offered with clips. |
Where you can buy filling
Many furniture stores trade in storage systems. It is important to start to determine the exact amount and size of products. There is a large product range in online stores selling furniture fittings. The price will depend on the material of the execution and complexity of the filling.
Can I install the stuffing on your own
Calling a professional wizard to install a wardrobe is not worth it. This work can even perform a schoolboy. From the tools you will need only drill and. All fasteners need to buy with the filling of the cabinet.
How to make your own wardrobe?
The process of mounting the wardrobe room is not complicated. It is important before starting work to perform a drawing with maximum accuracy and choose all consumables and filling. The step-by-step process of installing an open design will avoid errors when installing.
| Photo | Description of work |
 | Required tools in work. |
 | We place the carrier rail at the selected height, align it with the level of the bottom side and mark the holes of the holes. |
 | Drill drill marked holes. |
 | In the holes with the help of a hammer score a dowel. |
 | Fix the railway railway with a screwdriver |
 | Installation of vertical guides in the grooves of the horizontal rail. |
 | Fix vertical guides to the wall. |
 | Install brackets at the selected height. |
 | In the middle groove of the brackets, install horizontal shelves up to a certain click. |
 | At the edges of the bracket, install decorative plugs. |
 | We connect the barbell and the suspension, then the plugs should be installed on the rod and hang hooks. |
 | Similarly, set the basket with dividing straps and shoes. |
 | Finished wardrobe. |
You can see more detail in the master class on the video.
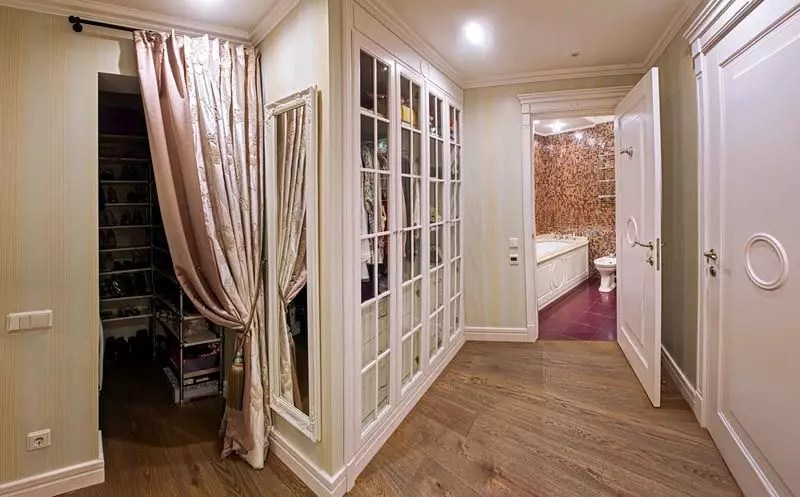
Hide storage locations from prying eye will help a dressing room behind the curtain. Photo Examples are posted in catalogs.
Wardrobe rooms: design, projects, photos
Wardrobe in the apartment is far from luxury, but the need for recent time. The speed of modern life does not allow spending time in search of missing things. Everything should be rationally and convenient. You can arrange a storage system in any room. With the latest novelties of dressing room designs can be found in the photo specification.
1 of 24.


A comfortable place to store your own things is easiest to create yourself. This approach eliminates multiple adjustments and coordination. It allows you to personally control all the important operating operations. It simplifies the task of the presence of a variety of components in the relevant market segment. This article is told about what kind of high-quality dressing room with your own hands. Drawings and schemes, photos and additional materials will help implement the most difficult ideas without errors and extra costs. Even with the decision to give an order to fulfill the specialists, this information will be useful at all project stages from the formulation of the task before accepting the collected design.
Read in the article
Rules for organizing storage of things, main provisions
Storage of clothing and shoes, accessories and decorations need to be thought out with regard to individual capabilities and needs. A young couple, planning frequent moving, no sense to think about. It may well be a set of cabinets. The difficulties occur when the selection of a separate room is simply impossible.
To search for a suitable case, you can find a profile store on the Internet. This article describes in detail the creative process of implementing unique projects using serial components.

Below are the basic rules and important nuances that must be taken into account for a qualitative organization:
- Didgets can be installed in a separate room, or allocate part of the passage, rooms for this.
- The corresponding volume should be used in the maximum way. Constructions are mounted from floor to ceiling.
- It is necessary to leave the passages sufficient for convenient use.
- For each type of things create suitable storage locations with dimensions, weight, requirements for.
- Provide conditions suitable for fitting: free space ,.
- Visible parts are created with improved aesthetic characteristics.
For your information! The cost is assessed taking into account the primary investment, the estimated period of operation, the cost of installation of furniture components, construction and finishing work.
Preparation of design documentation of the dressing room: layout with dimensions, drawings

This figure shows the sizes of the wardrobe room, the parameters of individual elements. The author of the project was able to organize storage locations in the corners. He installed guides for hangers at different heights to ensure convenient placement of long raincoats and short jackets. Even without careful study of the market, it is clear that such a design can be collected from typical boxes, other inexpensive standard components.
However, there is not enough data for a full-fledged project:
- There is no entrance group. Meanwhile, the usual in, or it will cost expensive. It is necessary to thoroughly consider the corresponding parts.
- The documentation needs to add finishing information. Here, for example, the rear walls of the furniture are not provided. Therefore, the side planes of the room should be coated with a layer of washing, or another non-grade material, resistant to mechanical effects.
- There is no artificial scheme. When equipped with ironing board, the installation of 220V power supply will be required.

The project should be viewed in the complex so as not to miss really important nuances. After the photo has been found to find a suitable dressing room with your own hands, drawings and schemes can be charged to prepare professionals. They know the range of component parts well. They have specialized software for creating bulk layouts that are convenient for attentive study of objects from different angles. Of course, the relevant services are free only when buying components in the appropriate store.
In a well-trained project, there must be the following components:
- Drawing of the structure installed in a certain place of the apartment (at home).
- List with dimensions, prices and other parameters of individual parts.
- Information about electrical wiring, general construction and finishing works.
Article on the topic:
At a certain point, all this ceases to be placed in a traditional wardrobe. There is a logical question: is it not necessary? Planning with dimensions, types of wardrobes, lighting features and many other nuances - in this material.
What a wardrobe can be installed with your own hands: drawings and schemes, photos of typical designs
Preparation uses a preliminary study of well-worked in the practice of engineering solutions. Please note that the dressing room in can be supplemented with a similar design in ,. It is permissible to use various combinations, the creation of unique modifications, taking into account the architectural features of a certain real estate object.

Corner wardrobe in the hallway

It should be noted that at the entrance to the residential object should be paid to the external attention of the interior. The system of sliding doors has the necessary functionality and aesthetic characteristics. In order not to upload into the closed volume, it is recommended to install nearby. To remove moisture, usefully use it not to overheat the shoes from genuine leather.


The last project is suitable for equipping a relatively small hallway. Removing the septum, increase the passage and free space. It is useful for fitting. To simplify this mandatory procedure, the door is often installed with the upper backlight.
Linear type of dressing room and wardrobes

Such solutions are used when equipped with niches, for mounting several functional parts between columns. If necessary, the facade is overlapped with sliding doors.
Parallel Type

The same solution is used in broad passages. To create the impression of a larger volume apply light tones for finishing. In the rooms without windows, they are especially carefully developed.
Built-in parts of the dressing room with their own hands can be perfectly combined with architectural elements. With accurate calculation and high-quality installation, it will visually align the flat surfaces of the room. Typical furniture, with straight corners, on the contrary - highlights the slightest irregularities.
Mr.
The figure shows an example with a protruding column that the panels had to be seen. In the standard embodiment, the recess is used for its intended purpose. Since access to the long part is difficult, there are rarely used things.
P-shaped

Pay attention to the lack of wide gaps. Unlike standard cabinets, here architectural parts are used as separate walls. Wardrobe with your own hands can be accurately embedded in a complex form. During operation, offset is excluded. It is permissible to use solid loads (with proper calculation of supports and shelves).
For objectivity it is necessary to note the shortcomings of embedded structures:
- They are designed for stationary use in a particular place. Disassembly and transfer to another object is difficult, or in general is inexpedient.
- The perfect docking of all the nodes and rooms is obtained from experienced specialists. Creating a high-quality dressing room with your own hands will cause certain difficulties.
- Fixation of structural elements spoils in the wall room. This item is not too important, as stationary long-term exploitation is supposed.

Wardrobe in the bedroom

With this layout, you can study the design from different points, check the width of the passages, make sure that no interference with open doors.

Such solutions are quite suitable for private premises. This option involves the following advantages:
- quick search for things;
- free access;
- good ventilation;
- democratic cost of components;
- simple installation.
For your information! Such details, in contrast to embedded furniture, you can easily move around the room, to transfer to other places.
This project does not provide for construction, special finishing works.
Wardrobe room with storage room in Khrushchev

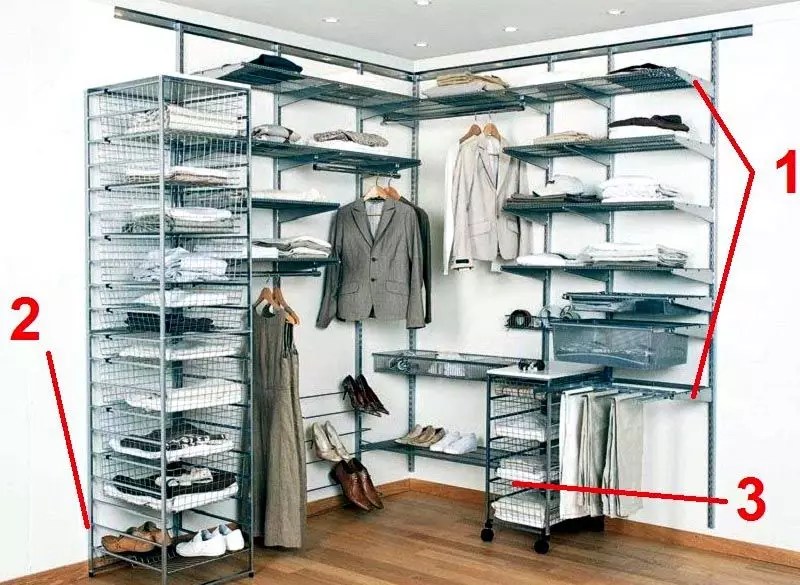
Below are comments that will be used when specifying the parameters of the Dressing Room of Small Size Project:
- The upper shelf (1) may not need if it is supposed to put boxes.
- This support (2) must be designed for future loads. With a large weight of things, it is necessary to establish reinforced cantilever fasteners.
- To lift heavy items to a large height (3), you can apply microlift, but it will complicate the design.
- It's easier and cheaper to use the stepladder. Its, skiing, fishing rods, other long items are placed in a special wide slit (4).
- The dimensions of this place (5) are set to the dimensions of certain techniques.

Requirements for individual parts of the design
Paul in the dressing room do not need to do from if there is supposed to be a full-fledged fitting area. Scrolling heels will damage quickly the durable flooring. It is better to choose a more resistant mechanical impact option. It should not be selected too vivid types of decorative trim to minimize distorting external influence. Such an approach will simplify the formation of a harmonious image during the selection of individual components of the outfit. A suitable surface should not be slippery. In some situations, installation of the system is useful.

Similarly, taking into account the functionality, convenience and future operation choose other components of the project with their own hands.
Features of power carcass
The reference parts of the structure are created from different materials, with various types of finishes. This table shows the distinctive parameters of popular options:
| Material / finishing | Benefits | disadvantages |
| Steel with powder painting | High strength, variety of colors. | Large etching, the formation of rust fluxes with incorrect installation / operation in conditions of high humidity. |
| Nickel Plated Steel | Impeccable appearance. | Poor or complete discrepancy between classic directions in design, high price. |
| Aluminum | Eases, resistance to corrosion processes. | Ligger compared to steel load capacity. |
| Chipboard and fiberboard with veneer | Excellent aesthetic characteristics at a reasonable value. | Some manufacturers apply outdated technologies. Their products contain unsafe for health ingredients deteriorating the composition of the atmosphere indoors. |
| Chipboard and fiberboard with lamination | Low price, magnificent appearance, resistance to moisture and temperature drops. | "Cons" - as in the previous paragraph. Variety and high quality drawings is not provided in all products. |
| Natural tree | Unique aesthetic parameters. | Products made of natural wood are damaged by temperature differences, humidity. They cost more than artificial analogues. |
| Polymers | Easy, variety of colors and forms, resistance to high humidity. | Limited strength. |
| Glass | Durability, ease of removal of contaminants, impeccable appearance. | Good visibility of dust, small defects. Fragility. |
The definition with suitable details is due to a complex of factors, a specific targeted purpose. So to ensure transparency in prominent places, install parts made of glass, plastic. Inside - lattice designs.
Choose the door for the dressing room
The easiest way, if there is enough space. The use of a standard web with a swollen system is not necessary to consider in detail. Below are other engineering solutions with comments on the advantages, features and disadvantages.
Storage systems in the dressing room

| Product | Depth / width, cm | Notes |
| Built in furniture | 45-90/- | Too deep design is not needed, so as not to complicate access to distant areas. |
| 30-40/- | Separate seats for storing children's and adult shoes, shoe boots with long-panels. | |
| Hangers | 50-70/- | With a small depth, you turn over the hangers parallel to the doors, set the retractable designs. |
| Shelves for linen | 40-65/80-100 | Sizes can be clarified based on set parameters. |


Hooks, rods, shelves are inserted into such surfaces. If necessary, you can quickly change the location, remove extra and add the necessary functional elements in the dressing room with your own hands.
They rigidly join the wall with the fixation of the distance in width. However, the shelves can be installed at different levels as needed. The appropriate transformation, any user will perform quickly without applying additional fasteners.
Console mounts (1) provide versatility, convenient access. The structures with a support on the floor (2) are characterized by high strength. They are intended for storing heavy things. Mobile modules (3) equipped with wheels.
Clothing storage systems
Requirement for the wardrobe room

To improve efficiency, installed with an electric fan in the channel.
Where to purchase components and ready-made sets, prices, current market status
| Photo | Brand / model | Overall dimensions, cm | price, rub. | Notes |
 | Pats / GS 450 | 53,5 × 117 × 40 | 7200-8650 | In the set of the dressing room there are racks, rails, shelves, crossbars, fasteners and stubs for the end parts. |
 | - / Miolla | 88 × 160 × 45 | 2480-4500 | Inexpensive collapsible design with a cover from nonwoven material. It is not difficult to assemble it in a few minutes. |
 | - / Orlando 1 | 210 × 250 × 50 | 18200-21300 | In this set of the wardrobe room, the manufacturer turned on pantograph. This furniture microlift facilitates the rise and lowering of heavy and large things. |
 | ELFA / Comfort 1 | - | 64200-67800 | The kit for equipping the dressing room with their own hands. |
 | Tatkraft / Saturn. | 84-121.5 × 42,5 × 113-198 | 2280-3650 | Universal rack on wheels. |
 | Amethyst / GR128S.300CP. | 6.2 × 30. | 70-120 | Clothes rack 128 Retractable L300 mm GR128S.300CP |
According to the individual design of the draft Wardrobe rooms placing domestic and foreign profile companies. This process does not differ from the manufacture of ordinary furniture.
How to make your own hands a dressing room
The project implementation consists of the following steps:
- choosing a suitable place, refinement;
- determination of the functionality and design of the wardrobe room;
- drafting a package of project documentation (drawings, list of necessary purchases);
- purchase of products, delivery, installation and commissioning;
- performing construction and finishing operations.
At each stage, you can seek help for professionals.
Design projects of dressing rooms, photos with comments
 Why you can not give icons
 Is it possible to give icons as a gift: Signs, the opinion of the Church
 A year ago left her husband, and now I do not know what to do