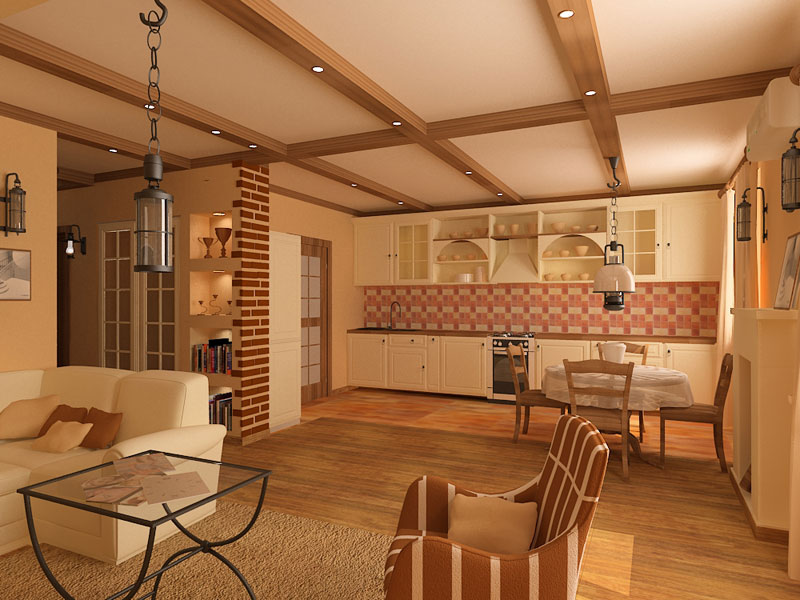
Decorative beams on the ceiling
Previously, beams under the ceiling solved a completely functional task - they supported the ceiling. Now this extremely decorative element is most often found in interiors made in a rustic or old English style, in Provence, country and chalet styles. It is not bad to integrate beams into modern interior styles: loft, modern, minimalism, hi-tech.
The most advantageous decorative look in rooms with high ceilings, which dictates their placement mainly in houses with a ceiling height of three meters. Wooden beams under the ceiling are a stylish element of home decoration, emphasizing the spaciousness of the room, and in some cases also carrying a functional load (for example, they are used to hide communications). Most often, beams are placed in kitchens, halls, halls and offices.
Types of beams
Of course, modern houses are rarely decorated with real wooden elements under the ceiling. Although there are connoisseurs of the natural, who prefer real heavy beams for decorating the ceiling, as a rule, of a country house.
Building materials stores offer a huge selection of false beams made of lightweight and easy-to-install polyurethane. Visually, such elements are indistinguishable from natural wood, and in practice they even surpass it in some way.
The advantages of polyurethane false beams include the fact that they:
- not afraid of dampness, do not swell from excessive moisture;
- do not crack or deform;
- very easy to mount under the ceiling (including tension).
However, lovers of naturalness can opt for false beams made of MDF or chipboard, hollow inside. Veneers made of valuable wood species are glued onto such beams. You can find options made from lamellae. Beams come with sharp and rounded edges, U-shaped and L-shaped (for decorating joints).
Table. Comparison of polyurethane and wooden false beams.
To design a high-tech style, some designers use metal beams, but such elements are more difficult to install and professionals need to be involved in their installation.
How to make decorative beams on the ceiling with your own hands
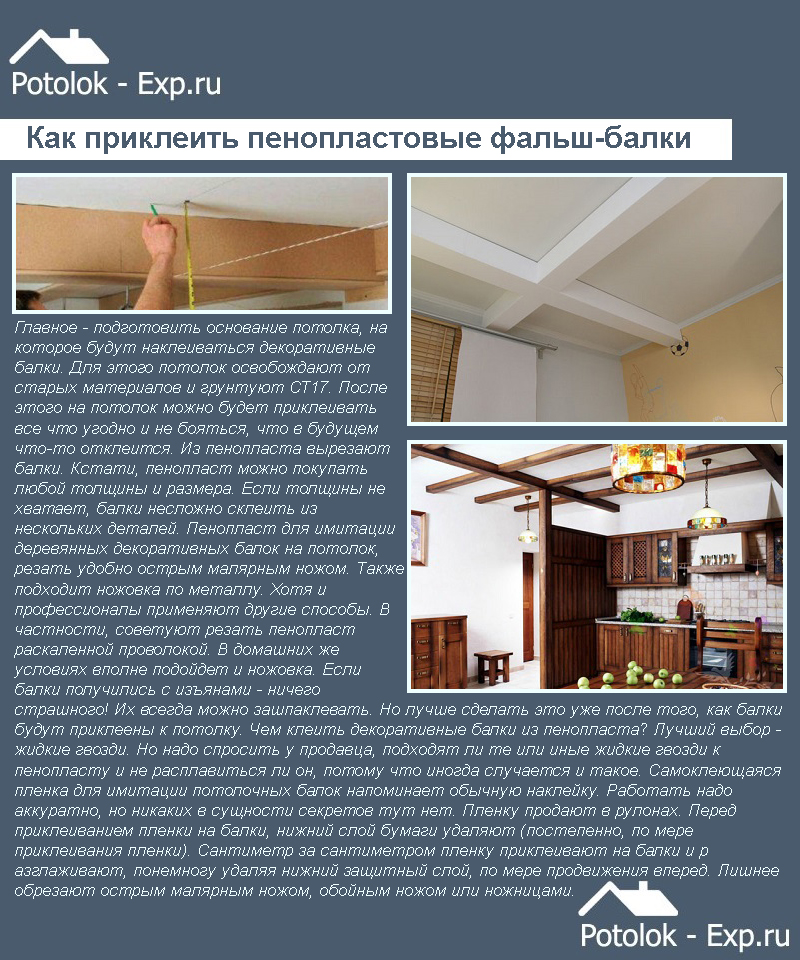
Some craftsmen make beams with their own hands, which takes a minimum of time and is inexpensive. For example, in order to make false beams, you can use ordinary foam plastic, which is left over from the insulation of a garage or loggia.
Step 1. Sheets 4-5 cm thick cut into strips of the desired width.
Step 2 Glue the strips with liquid nails into a U-shaped beam.
Step 3 After setting, cut the beams into segments of the desired length.
Step 4 Paste the beams with a self-adhesive film under the tree (except for the side that will be glued to the wall).
![]()
Using the same technology, you can make beams from plywood or even from ordinary boards. The boards can then be aged, stained and varnished.
If there is a desire to make beams from natural timber, you can buy edged polished timber, for example, 70x50. When choosing, be sure to check that it is even and dried. Then you need to process the stain and varnish and cut to the required length. It is also an inexpensive and affordable option.
Beam decoration
Each interior style will require its own style of beam design.
- For classic and Victorian styles, you can decorate the beams with gold carvings, decorate with patterns and vignettes. You can find such ready-made polyurethane beams for sale.
- White, black, brown, as well as colored beams are the perfect solution for modern interiors.
- For high-tech style, the design of metal-like beams is suitable.
- To create a country style, wood will need to be aged.
- The rural style (country) is characterized by an emphatically rough texture.
Options for placing beams on the ceiling
False beams can decorate any type of ceiling: stretch, plasterboard, plain painted, etc. With their help, you can zone the room or create such a popular decorative element as a false window on the ceiling with imitation of stained glass. Decorative beams can imitate window coverings, between which a canvas with photo printing, mosaics, frescoes and even mirror panels are glued in the process of work. The modern European trend is very interesting, when the beams go to the walls.
Beams can be decorated with LED lighting on top, which will give a special decorative effect. The beams in which the ceiling lights are mounted look amazing. All wiring in this case is hidden inside the hollow structure.
In general, the beams on the ceiling will give a feeling of warmth and comfort to the living space, bring a twist to modern interior styles and allow you to create the necessary authenticity in public places such as clubs or pubs.
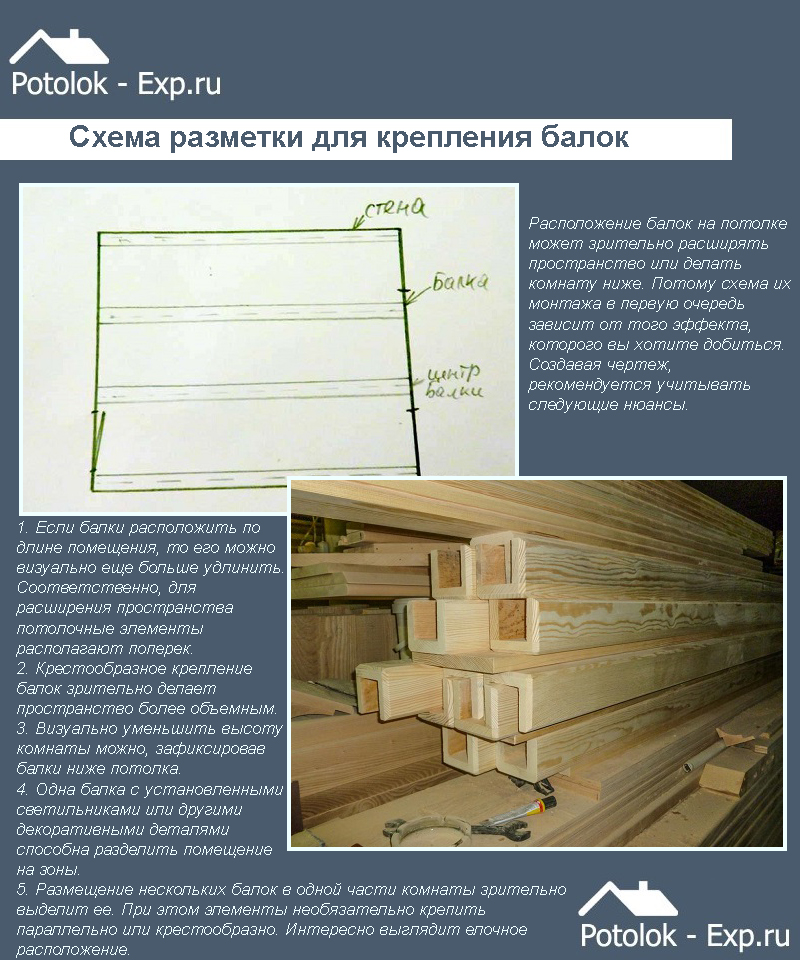
How to position the beams
If the room needs visual expansion, then the following points should be considered when arranging the beams.
- If you need to make the room wider, then the beams need to be placed on the short side.
- If you need to increase the length, the beams should be placed along the entire length of the ceiling.
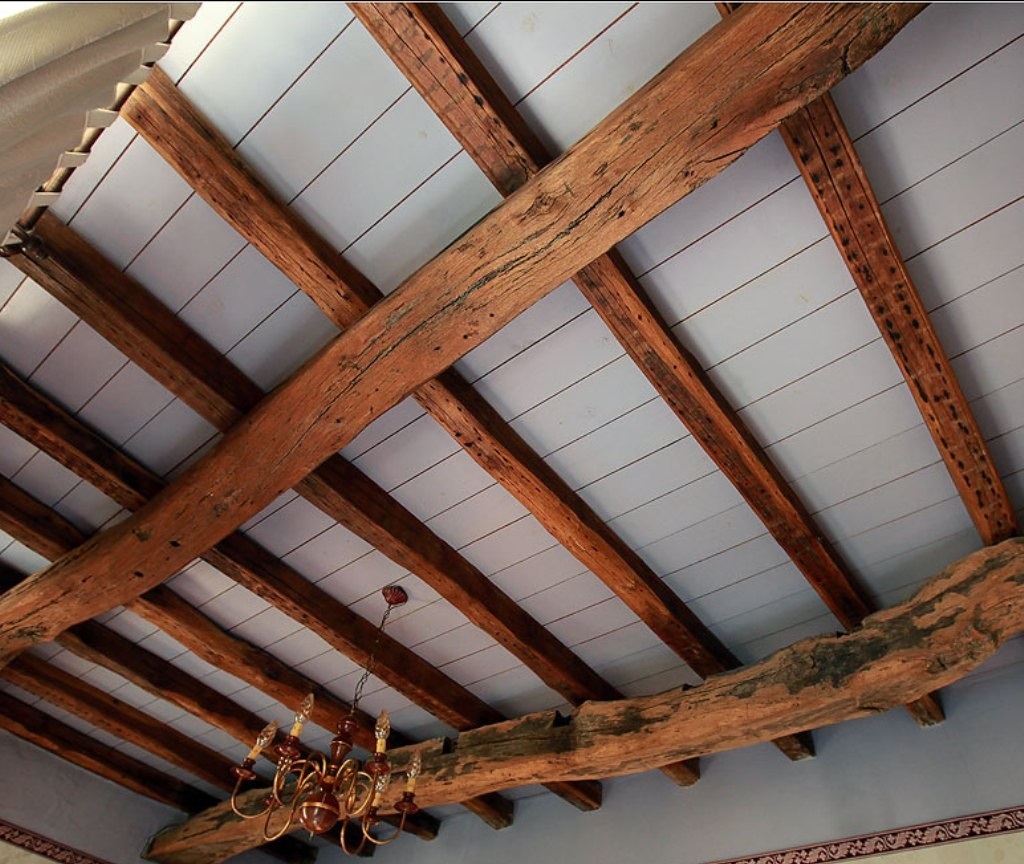
- The criss-cross arrangement will give the room a visual dimension.
- With one beam, you can select a separate zone: for example, a bar counter.
Location frequency also plays a big role. For example, if the ceiling height is very high (which happens on the first floors of buildings), the close location of the beams to each other helps to reduce it a little. If the ceilings are of medium height, the beams should be fixed at a greater distance from each other. Also, beams can be laid "herringbone". Attic rooms without a ceiling look especially impressive if the ceiling beams pass through the columns and the ends are attached to the walls, creating a hut effect.
How to fix beams to the ceiling
The features of the procedure depend on the material from which the false beams are made. Let's take a closer look at each of the options.
How to glue foam false beams on a regular ceiling
This is the easiest option for placing false beams in a modern apartment. If you want to decorate a kitchen or hall quickly, inexpensively and on your own, you won’t find a better option.
Step 1. First, marks are applied on the ceiling and on the walls to indicate the places where the false beams will be glued. Places of the sticker must be primed for better adhesion.
Step 2 Then the beam is smeared with liquid nails and glued to the required place. Styrofoam products are almost weightless, and liquid nails seize literally instantly.
Some instructions advise to spread the wall at the same time, but in case of excess glue, the beam may begin to slide down the wall. Therefore, the golden mean must be determined empirically.
Step 3 If the room is narrow, you can stick 2 beams along the long walls of the room, and simply place the cross beams perpendicular to them. Such a simple ceiling will help hide the irregularities of a conventional concrete ceiling and will look very advantageous.
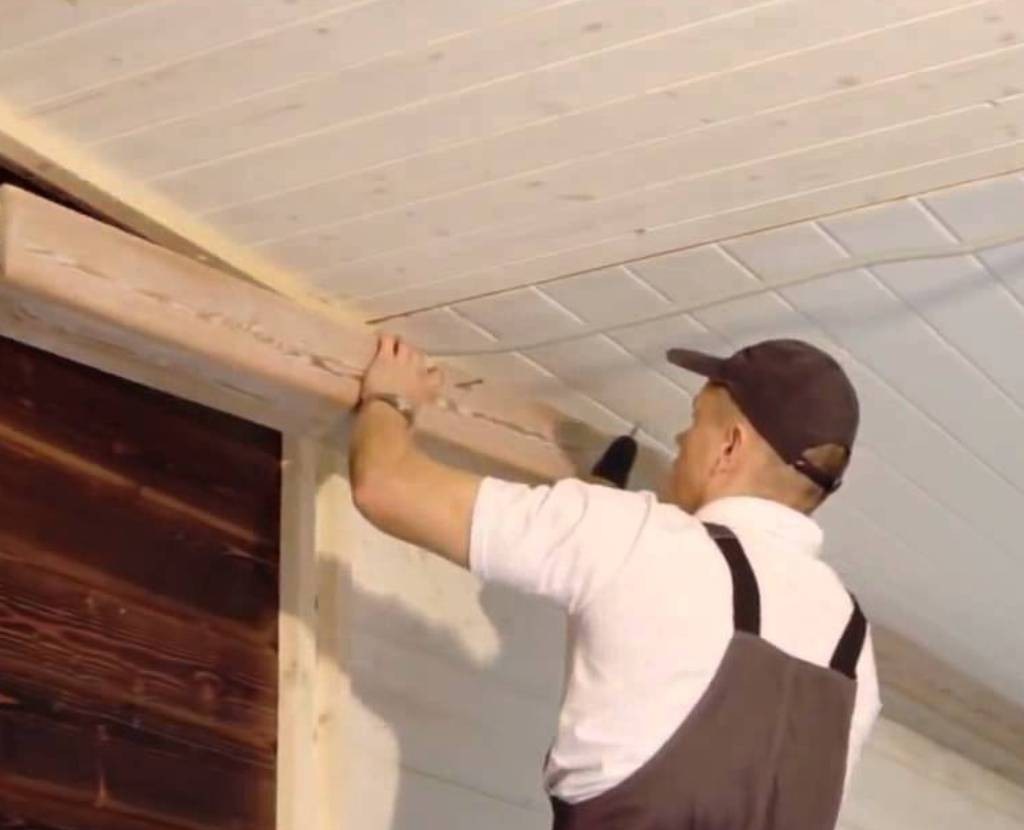
How to quickly fix wooden beams to a wooden or concrete ceiling
This is also not very difficult and not expensive to do.
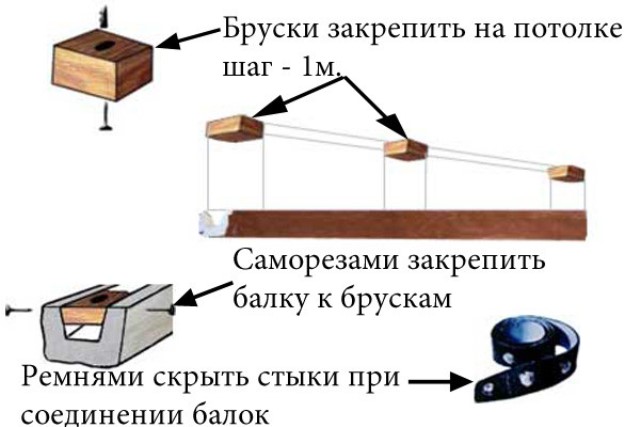
Step 1. On the ceiling we draw lines for placement.
Step 2 We drill holes in the beam with a 12 mm drill with a depth of not more than 0.5 cm every 30 cm.
Step 3 In the same holes we drill 8 mm holes, into which we drive 120 mm self-tapping screws.
Step 4 We apply the timber, mark the places for the holes on the ceiling.
Step 5 On the ceiling in the marked places with a perforator, we drill holes of 8 mm.
Step 6 We drive chopsticks into them.
Step 7 We fasten the beam.
Since the head of the self-tapping screw goes in, we cover these places with putty on wood. After drying, tint with stain, then with varnish. You can cover the caps of the self-tapping screws with wooden corks or special decorative overlays imitating the caps of forged nails. You can attach nails to ordinary dowels - this is an even faster option.
If you plan to cross-distribute the beams, then unevenness may occur at the joints. The design of these nodes depends on the style in which the room is designed. If this is country music, for example, then these places can be covered with leather decorative belts or large string glued in several rows.
Installation of polyurethane decorative beams on beams
This is a professional installation.
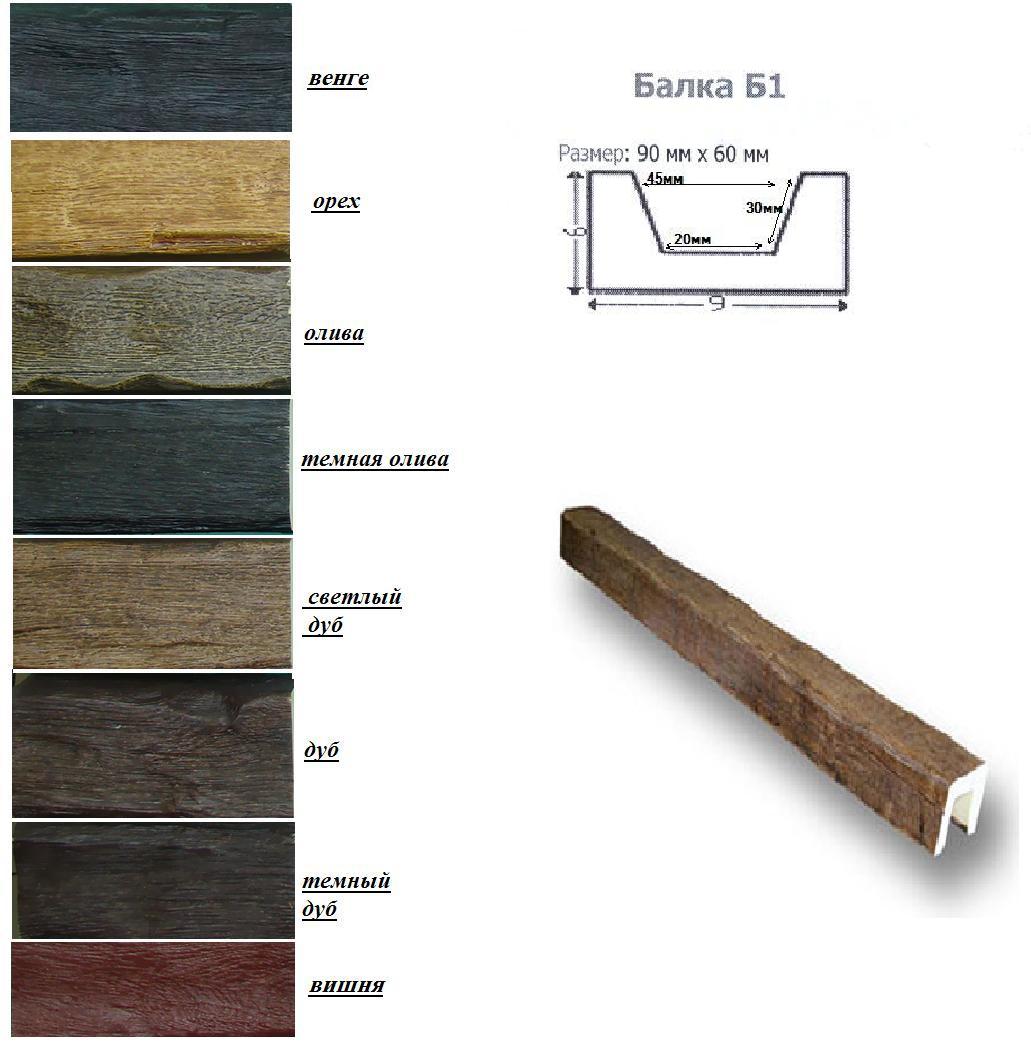
Decorative beam B1 made of polyurethane (wenge, cherry, oak, olive, walnut, light oak)
Step 1. For a polyurethane false beam, wedge-beams are made of wood, which fully correspond to the internal cavity of the beam.
Step 2 The ceiling is marked: lines are drawn along which the beams will be attached.
Step 3 Wedge bars are installed along the line every 1 meter on self-tapping screws or dowels.
Step 4 When installing a false beam, glue for polyurethane is applied to the ceiling. This is necessary not for fixation, but for a tighter fit to the ceiling so that there are no gaps left.
Step 5 The beam is tightly put on the bars and screwed through the sides with screws.
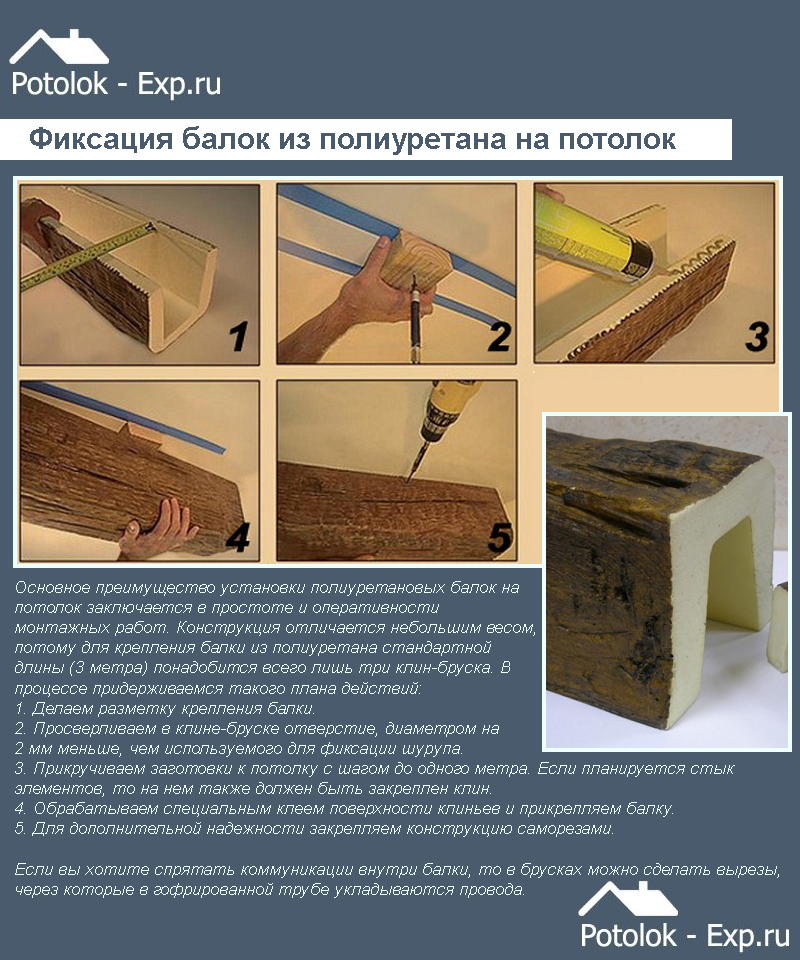
Step 6 The screws that fasten the false beam to the beam and the joints of the beams are covered with decorative leather straps with rivet imitation.
Features of the installation of beams on a stretch ceiling
To make a stretch ceiling and decorate it with decorative tanks, you should install embedded parts similar to those installed for hanging chandeliers. A mortgage for a decorative false beam is just a wooden block of the required thickness. It is attached to the main ceiling, and the stretch ceiling is stretched so that it passes touching the lower plane of the bar. Then false beams are attached through the ceiling to the timber.

You can use the fastening of beams with suspensions. Hangers are attached to the base. and after stretching the ceiling, cuts are made in the canvas. The specific steps depend on the type of material.
If the stretch ceiling has been hanging for a long time, but you want to somehow diversify the interior without dismantling the canvas, you can use external consoles with fasteners to the wall or internal bars screwed to the walls. Beams will be attached to them with self-tapping screws.
Features of the installation of beams on a plasterboard ceiling
Since the plasterboard ceiling is suspended, you can’t just attach beams to it. You will have to remember / tap the places where the frame profiles go, and attach the beams to them. You can fasten it in any convenient way: with a long anchor through a beam, gypsum board and profile or on a bar attached with a self-tapping screw to the gypsum board and profile. A self-tapping screw screwed exclusively onto drywall will not hold the beam for a long time.
Some nuances
The joints of the beams or the exit points of the self-tapping screws are covered with various kinds of decorative overlays, among which the following can be distinguished:
- masking with a decorative rope;
- masking with a wax pencil;
- masking with forged copper plates;
- decorative leather belts.
To decorate the space, you can use decorative consoles that are sold with beams and create an imitation of supports on the walls. If cables for lighting devices pass inside the polyurethane beam, they must be hidden in a corrugated protection.
Video - Installation of wooden decorative beams on the ceiling
In this way, you can get a very beautiful unusual interior with an emphasis on wooden beams under the ceiling. This interior does not require a large investment of money, and you can fix the beams with your own hands in just a few hours.
("config":("idpartner":29","siteId":162))
 Facade design of a country house: a variety of stylistic trends
 Wooden ceilings - 25 interior examples
 How to make a children's playhouse with your own hands