How to make a faster with your hands a greenhouse. How to build a greenhouse for growing vegetables all year round. Selection of material for frame
Having even a small plot of land, it is difficult to do without a greenhouse. Seedlings to grow, get an early harvest, cover them from possible freezing, from the heat, to force plants to flourished before - all this can be done with this device. And make a greenhouse with their own hands easy. There are completely simple designs, there are more complex, but the manufacture of any of them does not require special education.
The frame for the greenhouse can be made of wood (boards), metal (corner, profile pipe or fittings) or PVC pipes (round or square). Shelted the greenhouse the same materials as : film, spunboode (called still agriched or nonwoven underflowing material), polycarbonate and glass. Since the size of the greenhouses is less (plants in greenhouses are served outside), then the requirements for them are not so tough: even a strong wind is unstable.
Dimensions of greenhouses
Since in the greenhouse plants are serviced outside, its width is selected at the calculation to be comfortable to handle plants landed towards the middle. We define it with an experimental way: please yourself, and you are trying to reach some kind of hand. Measure the distance. Get a width of a greenhouse with a unilateral approach. This is if the greenhouse is located so that from the second side it is not to get to him (in the wall, for example). If you can come from two sides, you double this result.

The distance for each person it turns out different: affects growth and physical condition. Do not chase savings, making it wider than necessary. You will have a lot of time to spend on weeding, loosening, fertilizer, other works. A couple of hours in an uncomfortable position, and no strength remains. Therefore, it is better to make a greenhouse a little already, but to work it is convenient: getting pleasure from work, you spend less strength.
And the length of the greenhouse is chosen based on the planning of the site. She is arbitrary.
Simple greenhouse from arcs under the film or spunbond
This greenhouse is made of several boards, knocked down by the required dimensions, arcs from PVC pipes that are attached to a wooden base. The tops of these arcs are connected at the top of the timber or the same pipe. If it is a bar, it needs to be processed well, rounding the edge so that the film does not rush.

How to fix the arcs
How to fix arcs from PVC pipes on a greenhouse frame. Most often using a metal perforated tape. Take a small piece of centimeters of 5-6, self-tapping screw and screwdriver. And fix from two sides. For reliability you can double.

In exactly the same way, you can fix them from the inside to keep stronger, add bars.

Another option: near the carcass, drive the segments of the reinforcement, and on them to put the pipes and only then fix it with clamps to the frames of the frame. This option is more reliable.
How to mount a film
It is possible to mount the film to PVC pipes on bilateral scotch. But only if the film was used inexpensive polyethylene: it is impossible to tear it off without fail, and the polyethylene serves no more than a year. So for a seasonal greenhouse, this option is from the discharge "cheap and angry". The second method is special clips to fix the films and all that they can replace - a piece of the old hose, cut along, the fixator for pipes that are used for mounting pipelines, stationery binders, etc.

It makes sense from two sides along the edges of the film to fix the bar. To do this, the film is cut off more than it is necessary in length, the lumps wock the bar and fastened the film on it. Now you have a piece of film, for the short sides of which bars are attached. One leave on one side, the second throw on the other. Now you do not need to press the film to the ground with stones: it is not bad for a bar. It is also convenient to open a greenhouse to ventilat with it, screwed the film, put up.

You can use small carnations for fastening the film, but under the hats to put the washers. Faster work with a construction stapler with brackets. So that the film does not break into the places of fastening, they are packed with something. It is possible - a dense braid or just a strip of fabric, and already clog fasteners.

More powerful option
If there is a need to make a greenhouse with PVC arcs more reliable, to the base of the short-sided board, wooden racks nourish. The board is attached to them on the edge, in which the holes in diameter are previously drilled than the outer diameter of the pipes.

When installing the pipe is done through the hole. It is possible to fix it on the sides as proposed above, or to do something else: in the bars to install the studs, and to wear a pipe.

The easiest greenhouse
The good PVC pipes are that they are easy to bend. Another thing that weigh little. An ideal option for a lung portable greenhouse, especially if you combine it with spunbond. This material can be sewed. Take a piece of density from 30 kg / m2, with a step of 50 -60 cm made snacks in it. For the scene, tumble across the strip of the same material with a width of about 10 cm (it is stitched from two sides). Inside insert sliced \u200b\u200bon the desired pipe cuts.

Now all this can be installed on the bed: sticking the pegs in two rows from one and the other side of the bed, they are planted with a pipe. Immediately it turns out a ready-made greenhouse. And what is still convenient: open and close the plants simply by collecting or installing spunbond on the arc. This is a very convenient temporary greenhouse: as soon as he is not needed, in a couple of minutes it can be removed and folded.

Greenhouse is easierless
This guy is good for seedlings, but you can do it for pepper, eggplant. In the middle of the base, a rack is nailed. To her - two inclined boards. In the section it turns out a triangle. If the greenhouse is needed long, approximately each meter is installed the same design. All tops are connected by a long bar or pipe. Simple and comfortable design of this greenhouse.
Cucumbers are grown with it only until they start to melt. Under the cucumbers, the covering material is removed, they nourish the sidewars (screw) the racks, between which the twine is tightened.


Greenhouse "Lubacle" and "Butterfly" - Photo
This design is called "Lubble" due to the fact that one in one is similar to the plastic container for bread. Her lid also rises up, hiding behind the second half. If you look at the photo, you will understand everything.

There are two types of such products: opening with one or both sides. If he is shallow, it is possible to work with a lid opening on one side. If the width is more than a meter, it will be easier to work if access is available on both sides. This design with two opening parties has its own name: "Snail".
On the manufactured frame stretch the film, spanbond, but polycarbonate is more popular for this design.
The second design is characterized by the type of door opening. Its arch is also made on arcs, but opens on the loop up (see picture).

They can be installed directly on the soil or on the prepared base of bricks or timber. In some cases, the lids open not immediately from the ground, but there is a small side of 15-20 cm.
From girlfriend materials
To turn unnecessary things into useful products - there is no equal in this people. Make greenhouses from such things that never think.
For example, it is easy to make a greenhouse with your own hands from old window frames. When replacing windows, do not hurry to throw them out. Of these, you can make an excellent greenhouse. And the designs can be different. The easiest is the housing, shot down from the boards to which the window frame (with glass, naturally), is coming from above.

In order for the plants to receive a maximum of light, one of the sides of the frame makes higher (which is facing south or east). Frames exist different, any of them can be used for these purposes. In the proof - the photo gallery of greenhouses from the frames that were made with their own hands with the laundric owners.
Make greenhouses from barrels. Cover the old umbrella from the transparent film or cropped plastic water canes.


A homemade greenhouse can be made of a plastic or foam box. Although "make" - it says loudly. Total then you need to pull the film.


Mini-greenhouses for seedlings
For those who grow seedlings for their own garden or flower bed, large volumes of anything. Looking small guy. Moreover, many grow seedlings on the balconies. All the above designs can be used for a balcony in reduced sizes. For all minor landings, you can generally take plastic trays for eggs. On the one hand, it turns out a container for the soil and, and the lid will be instead of shelter. Other ideas consider in the photo.
 The use of plastic bottles is already familiar, non-standard only form. A bottle is only caught in and inside the glass is inserted with a seedler, and you can plant right into the lower part ... And this is a portable mini-greenhouse for plants
Greenhouse with your own hands can be collected in a few hours. No complex structures will not have to build. Everything is very simple, economically and practical.
The design of polypropylene pipes is different Availability and acceptable value of a material that, moreover, has light weight and strength, does not rot like wood and is not subject to corrosion like metal.
These indicators can add a whole a number of features inherent in plastic construct:
- simple installation;
- the possibility of transfer to another place if necessary;
- greenhouse can be built almost any shape and size;
- the material is not affected by high and low temperatures and high humidity;
- polypropylene is environmentally friendly for soil and plants;
- PVC pipes are distinguished by a long service life, due to which the greenhouse framework from this material will not have one year.
How to make a simple greenhouse yourself for giving up to the girlfriend?
Types of frame of plastic pipes
On the form of design frames can be double and arched. Each option has both positive and negative sides.
Arched frame
TO benefits This structure can be attributed to the following indicators:
- quality lighting is better than in other types of buildings;
- stability with strong winds, snowstorms and other atmospheric phenomena. Reliably reinforced design confidently withstands snow loads and wind gusts;
- the ability to increase the greenhouse length by adding additional sections;
- easy to install the coating, which can be used both both the film and polycarbonate. The coating can be solid or present separate fragments in the form of large sheets;
- the presence of a minimum amount of seams requiring high-quality sealing.
Here is the most simple greenhouse with an arched frame you can build your own hands at the cottage and in the garden (photo above).
disadvantages:
- if necessary, the greenhouse equipment is needed by multi-tiered beds, install racks and shelves in it will be very difficult;
- difficulties with the arrangement of the ventilation system. For high-quality ventilation, greenhouses often need a side fraumug in it, the installation of which entails some difficulties, due to the characteristics of the arral construction;
- limited possibilities for choosing a covering material. Only soft and flexible products will be suitable as the coating.
Double frame
pros:
- with severe rains, water flows freely on the pitched roof;
- the room can easily be equipped with high-quality ventilation by installing the necessary number of vents, which will ensure the yield of hot air accumulating under the roof;
- the ability to grow high cultures, having planted them even along the side walls;
- the bartal roof prevents the snow accumulation, and when sliding down the snow cover does not prescribe on the frame and coating.
Minuses:
- the assembly of the bantal construction is a more complex option compared to the arched structure;
- for installation, you need more building materials, which, accordingly, entails more significant costs.
Purchase material
Cover options for today there is a lot. But to keep in the framework of the budget project, it is worth considering the most acceptable materials for this purpose, namely - polyethylene and small thickness Cellular polycarbonate.
Film coating
 Do you want the simplest greenhouse with your own hands? This material is characterized by high elasticity and tensile strength.
It is well stretched in width and length and has a good transparency that allows you to pass up to 80-90% of sunlight.
Film must be sufficient for confrontation with natural phenomena densityTherefore, it is desirable to use high-resistant material.
There is a film coating and their own limitations:
- simple unstabilized polyethylene is susceptible to aging and destruction under the influence of high temperatures and ultraviolet rays;
- with an increase in moisture content in the room, the film is covered with condensate, which creates a reflective screen, as a result of which the light-resistant material is worse;
- falling condensate droplets cause harm to plants, and the wet surface of the film is covered with dust, which also causes the deterioration of polyethylene transparency.
Cellular polycarbonate up to 4 mm thick
In the greenhouse, covered with a thickness of 4 mm thick only seasonal cultivation of plants. The construction period is limited in this case late in spring and summer. However, it is the most transparent and inexpensive polycarbonate. In such a room, grow early vegetables, but it does not fit the seedlings.
The design with a thin polycarbonate coating is an excellent option for those who do not plan to landfasting crops in the cold season.
Do not use the "four" to cover the winter greenhouse, as it is not able to protect the room from the cold.
As for a more subtle polycarbonate (3.5-3.8 mm), it does not belong to the category of structural materials, so it is suitable except for vertical installation.
Preparation for construction
It all starts with choosing a place for construction, which should be well lit and protected from drafts. It should be borne in mind that the buildings are better to arrange in such a way, so that his ends watched north and south. This will provide better lighting and natural room heating.
- foundation type;
- design type (portable or stationary);
- step value between carrier elements.
If planned construction of winter greenhousesFor such a design, it is important for the presence of a solid foundation, which will ensure the structure of reliable stability in heavy snowfall.
For a temporary design A wooden base is quite suitable as a foundation. Next - in more detail about each form.
Types of foundations for greenhouses
 Browst base. As a material for the construction of such a foundation, a timing is used by a cross section of 120x120 mm.
Before laying a bar, you should dig under it shallow grooves (5-10 cm), in which the rubberoid is stacked. It will protect wood from dirt moisture.
A plus of such a foundation is the ability to dismantle the design with the onset of the winter season. The disadvantage is that after a few seasons, the bar as a result of rotting will be unusable.
Block foundation. It is a reinforced version that is quite suitable for unintended winter structures. This design includes the following steps:
On the aligned soil stacked a pillow of a gravel with a thickness of about 10 cm.
The stacked block is exposed exactly with a level.
In the same way, all other blocks are put.
Upon completion of the installation of the joint between the blocks close with a solution.
For the greenhouse foundation, the hollow blocks are fully fit, which are filled with cement mortar after installation.
Whatever goals pursued the owner of the country area, whether it is seasonal or year-round cultivation of cultures, the use of PVC pipes will allow significantly reduce construction deadlines and save money.
The greenhouse is essentially a unique part of your garden, because it is not domineed by nature whiskers. The greenhouse will allow growing vegetables in winter or all year round to admire the plants and flowers of their winter garden. And it is especially nice when it is made with your own hands. After all, the crop collected in it will be particularly tasty, and it is important that by building a greenhouse with their own hands, you will save a considerable amount. Of course, a number of questions immediately arise. What greenhouses come and what of them to choose? Where is it better to put it? What material to choose? But do not worry, we will answer all these questions and not only. So, how to build a greenhouse with your own hands.
First of all, it is worth noting that buildings intended for the cultivation of plants are divided into greenhouses and greenhouses. Greenhouse is a more solid and complex structure. It usually has a foundation, walls and a roof made of various materials. The greenhouse design is much easier, it is small and mobile. The greenhouse is in principle not provided for the entire growth cycle of plants. It is designed to grow seedlings, which after that is planted into the ground.
Greenhouses are primarily divided into summer (seasonal) and winter (capital).
Winter greenhouse
Winter greenhouse is better to have closer to the communications of your home. Since the heating system needs to be done from them. Of course, you can dump a greenhouse with a stove, but it will be too troublesome. The stove must be constantly drowned to maintain a stable temperature level. Capital greenhouse will necessarily require a strong foundation and supports to confront all weather factors.
Here you should also mention the greenhouse-thermos, deepened to the Earth a few meters. But these greenhouses are an order of magnitude less often due to the lot of laboriousness and cost. For it, it is necessary to dug a pit, make a strong foundation and walls of thermoblocks, bring the heating system and much more.
Summer greenhouse
Under summer usually imply greenhouses covered with dense polyethylene. This is the easiest and cheapest coating of the greenhouse, which will serve a couple of seasons with gentle use. Usually either a wooden framework, or a frame of PVC pipes, to which the film is fastened in the spring. A large selection of inexpensive seasonal greenhouses is also available. They have an easy-fold, the uninstalistic design, which will be easy to hide if necessary at the end of the season.

By their form, the greenhouses are divided into:
- arched
- single-car
- double
- greenhouse Mittlider
- dome-shaped greenhouses
- polygonal
Arched Teplitsa It has a arc-shaped roof, due to which the sun's rays will be evenly distributed over the entire area and, accordingly, the plant will receive a maximum of sunlight and heat. Also, such a form prevents the accumulation of a large number of snow, so the deformation does not threaten it, and you will have a job.

Single Teplitsa Usually attached to one side to any thorough building construction. Perhaps the ideal option will be, if you attach it from the south side of a residential, heated at home. In this embodiment, you will save not only the place on your site, but also the energy for heating. But in this embodiment, in contrast to the previous one, snow can accumulate, so that during the snowfall it is worth being attentive.

And the most common to date - double greenhouses. They can be both winter and summer. The main advantage of these greenhouses is their size. Here we have enough space and you and your plants. In such a greenhouse, some part of the area can even be distinguished under the seating area.

The form greenhouses Mittlider It is usually based on a bunk design (less than arched). But still we allocated it in a separate look due to its unique two-level roof, allowing to make a fraum (windows in the figure below). Framuga in this case is a full-fledged ventilation system that eliminates all flaws of ventilation of other types of greenhouses. It not only ventilate, but also delivers the plants with a carbon dioxide for nutrition.

Dome-shaped greenhouse It is more element of the design, rather than a full-featured greenhouse. However, it is perfect for growing colors and will be perfectly looking at the snowy garden. It should still be noted that the dome-shaped form gives a number of weighty advantages. Among them, it is worth noting strength and stability, and most importantly, good illumination throughout the day. The disadvantage is a small size, which is often often not very convenient to work. Such a greenhouse is complex for manufacture, therefore, ready-made designs usually buy.

Polygonal greenhouses It is usually an eight-marched form, which gives them a number of advantages, but also makes them erection more expensive and time consuming. The advantages include an attractive appearance, which makes them a real decoration of the garden, as well as a number of practical qualities. They are conveniently installed racks and work, but, and most importantly, at least one of the eight faces is constantly under the best angle to the sun.

Children's choice
The efficiency of the greenhouse will largely depend on its location. Pay attention to the following:
- If you are planning a solid greenhouse, then to ensure the necessary conditions of plants (lighting, wind) build it from west to east.
- The amount of soil plays a big role, as well as its slope. The greenhouse is placed only in the same place. If the soil is clay, first it must be sprinkled with gravel, and then pour a layer of fertile land. Do not install a greenhouse in the lowland, on the sandy soil, on the swampy terrain.
- Given the need to supply communications, remember the proximity to the house. As mentioned above, a good option can be an extension of greenhouses to the house or another structure near him. This, for example, will facilitate heating and wind protection and will be beneficial with a small area area. The main thing, do not forget that this building should not interfere with the access of the sun.
- To improve the temperature regime, deepen the greenhouse by 70-80 centimeters. In the deepening, it is worth remembering the lowest plants, since with an excessive recess, they may not be lost light.
- Do not put the greenhouse close to the trees, they will create an unnecessary shadow for plants.
Frame greenhouse
One of the key elements of the greenhouse design, ensuring its strength and stability is a framework. There are three most common and popular types of frame: metal, wooden, plastic (PVC). Briefly about each of them:
- Plus wooden carcass It is the convenience of its construction and more opportunities for improvisation. To protect against weather factors, wood will require compulsory processing, but despite this, the wooden frame will still give way to two others in terms of durability. The main advantage of this material is its environmental friendliness.
- Metal carcass stands out for its strength. It is not necessary to worry about him during a strong wind or snowfall. There are different options for metal frames, but if you select a steel profile, remember the need for an anti-corrosion coating.
- PVC carcass It is considered reliable and safe. The strength of this frame will first depend on the thickness of the selected profile. Using polyvinyl chloride (PVC), you can create an absolutely hermetic system in your greenhouse and adjust the microclimate in it at its discretion.
Coverage for greenhouse
For reliable protection of plants, it will be necessary for a good coating material for the greenhouse. The most common are glass, different types of film and products from the same PVC.
Choosing glass for greenhouses, keep in mind that it should have high strength to withstand all weather cataclysms. The best choice will be tempered glass or triplex. In the event that not one of these options is not possible, as an option can be setting several glasses.
Film - The most popular coating of the greenhouse today. With the right choice and the corresponding care, it can lastly serve. Now specially for greenhouses and greenhouses are produced various types of film. For example:
- The reinforced film is a particularly productive material that helps in protecting plants from frosts. Most often, gardeners choose it.
- The light-forming film - converts ultraviolet radiation into infrared, which in turn contributes to the growth of plants.
PVC products - This is a cell and monolithic polycarbonate and a well-transmitting light acrylic plastic. Polcarbonate uses the greatest demand. He has a number of noticeable advantages:
- relatively low price;
- material flexibility;
- does not dull and aesthetically looks;
- good thermal insulation due to air layer;
- resistant to temperature differences and other weather factors;
- ease of material, which allows not to build an impressive frame and foundation for it;
- well scatters solar rays;
- ease of installation and dismantling;
- durability.
How to build a greenhouse with your own hands
Before building the greenhouse, you must have a clear idea of \u200b\u200bthe future building. To do this, make a greenhouse scheme, calculate the number of necessary material and, of course, prepare a place. In order for you to have an idea of \u200b\u200bthe progress of construction, let's consider the visual generation of the construction of one of the greenhouse options.
For carcass, greenhouses use aluminum pipes.

To give the pipes the necessary form we use a simple pipe bender.

It is clear if you use PVC pipes, this step will not be needed.

As a result, the following should be obtained.

In our example, pipes of larger diameter are used to secure the arch of the carcass. They are clogged to a depth of 40-50 cm. The height of the pipes above the surface of the Earth should be about 30-40 cm.

Instead of larger diameter pipes, ordinary fittings can be used with the same dimensions. It is also clogged into the ground, and the arches of the frame are put on top.


By perimeter, we install the boards (plinth), previously treated with an antiseptic. Then we drill the hole through the board and both pipes. After that, reliably fasten the bolts. Boards to each other secure metal jumpers.


Using a wooden bar, we collect the frames of "fronts".

We fasten the transverse arcs by a longitudinal pipe.

We are wearing a wooden frame siding or a simple plywood, after which it can paint it.

We cover all the potentially sharp and coarse edges in order not to break the film.

It remains to put the door and cover the greenhouse with a film. On the options for fastening the film, let's talk more.

Filling film on greenhouse
We list the most popular mounting options:
- Wooden rails, navigable or screwed by self-drawers. As an option, instead of the RECEK, you can use a sliced \u200b\u200blinoleum or packaging tape, and attach them to a building stapler. But it is better to use this option for a reinforced film, as other views in time will inevitably break from the gusts of the wind.
- Clamps, clips. There is now a large selection of such fasteners, so that there will be no problems in the acquisition. But if desired, they can be made independently, for example, from PVC pipes. It is completely simple, and a little experimenting, you will definitely make suitable. If you acquire metal clips, do not forget to put something under them, since heating in the sun, the metal can spoil the film.
- The grid is the safest fastening option. After we cover the greenhouse with a film, lay the grid on top of it, which is attached to the case. Of course, any additional fastening for the film, at least minimal, must be present. Otherwise, after each heavy rain, you will have to correct it. Instead of a grid, a rope can also be used, although it is more troublesome.
We looked at you, we hope that this article was useful to you.
The greenhouse is a special zone, on the internal climate of which no weather whims and negative environmental factors affect. Growing inside the greenhouse cultures are not afraid of cold or heat, wind, snow or hail. Thanks to the microclimate created there, the plants get all the most necessary quantities in sufficient.
Everything that is done personally is much cheaper than alternative options.
Create a greenhouse with your own hands is not as difficult as it may seem. The main thing is to know about the basic elements of its design, the general rules for normal functioning and have a desire.

What should be considered at the initial stage
First you need to choose a place to accommodate and determine the cultures grown in it. The choice of the location of the greenhouse is an extremely important stage, because in one place the soil can be too wet, and in the other plants there will be not enough sunlight.
Choose primer
The structure should be the highest quality soil, which is located on the site - with a flat surface and moderate humidity. On the marked zone, dig a deepening to test the quality of the soil. If clay appears in the recess - there is no place for us. For the device of the greenhouse, you need to choose the soil in which there is a layer of sand.
If there is no suitable plantation on the site, then you can solely dig the pit, fall asleep it with the bottom of gravel and make a layer of sand. A fertilous and disinfailed soil is already fitted with this drainage.

Choose a place
The place should be sunny. Most often, greenhouses are used in the spring-summer period, where there is no heating system, and the heating of the greenhouses perform the sun's rays. You need to pick up such a place on the plot where the sun shines the whole day and the shadow of trees or arranged in the proximity of the surplus buildings does not fall on it.
Wounded greenhouse
Drafts are a big enemy of greenhouses. Incorrectly, or deficiently installed coating entails winds into the greenhouse. But even if everything is done correctly, the wind whiff will cool the coating, and the cooling walls are known, absorb part of the heat indoors.
The optimal option for the steppe regions, for which the presence of a permanent impaired wind is characterized, will become a notched greenhouse, the design of which is attached to any non-residential structure from the south side.
After you have decided on the placement location and its area, it's time to think about its configuration.

What are the greenhouses
Before making a drawing of the future greenhouse, you should decide on its configuration and appearance. A wide selection of modern building materials allows you to create unthinkable masterpieces of various forms in this direction. The design can be two varieties:
- Collapsible. It is built in the event that the seasonal use of the greenhouse is planned.
- Inseparable. It is erected for year-round use.
By configuration, greenhouses are:
- Wounded single-table
- Traditional
- Polygonal
Other form options are mainly different combinations of these three main forms: often build tent or arched greenhouses, the framework of the framework of which the traditional or polygonal variety is taken.

Design elements
In order to build a greenhouse with his own hands, you need to know about its structural elements. Any greenhouse consists of three main elements that differ from each other in the form and materials of the manufacture:
Basis of greenhouse
It does not matter if you are doing a temporary or permanent design, almost for any greenhouse need a foundation. The only difference is that under the temporary greenhouse you can not make a particularly solid foundation (some even use plastic bottles for it). For greenhouses, the use of which is planned all year round, the foundation is needed more solid. Thanks to a reliable support, the design will serve for a long time. The base of the foundation should be lower than the level of primerization of the soil. About the foundation for the greenhouse will tell .

Greenhouse with your own hands (video)
Frame greenhouse
The construction of the frame, perhaps the most difficult stage of construction of the greenhouse. You can purchase a ready-made metal frame, you can order a metal-plastic or aluminum glazed design, when assembling which is a ready greenhouse, and you can mount the frame with your own hands. The frame is the main part of the whole design. Planning the shape of the frame and choosing materials for its structure, you need to take into account the fact that the fortress of the entire structure will be dependent on the strength of this element. For the manufacture of a frame, such materials are most often used as:
Wooden bar
The wood frame is easily mounted, but the wood is not durable, so when building a permanent design, a wooden frame requires careful processing and regular care during the operation of the greenhouse. But if you decide to build a greenhouse based on this material, then you will be useful for information contained in the article.
Steel
Steel frame will be strong and wear-resistant, withstanding any load. Often, instead of a steel corner for the construction of a carcass, the greenhouse is used. If your choice fell on the steel frame, it should be remembered that the metal is subject to corrosion, so the material requires pre-processing.
PVC
The degree of strength of the frame of PVC directly depends on the fortress and thickness of the profile used. The main advantage of polyvinyl chloride is its flexibility, which allows you to create structures of any forms completely sealed, giving the owner with your own hands to adjust the microclimate inside the greenhouse.
Coverage of greenhouse
To protect grown cultures from the negative impact of overbound environmental factors, it is necessary to take care of a durable coating for a constructed greenhouse. Today's construction market is overflowed with a variety of relevant goods, so it will be easy to find a coating that is optimally suitable for specified selection criteria. To cover the greenhouses most often used:
Glass
To cover the solid greenhouse, the operation of which is planned over long, the glass of increased strength is used. Many choose tempered glass for their greenhouse or triplex. If it is not possible to use a durable glass to cover the greenhouse with its own hands, you can set the usual glass into several layers. Protect the glass from wind loads and the possible effects of precipitation, as, for example, hail, can be installed on top of the glass beating protective coating.
Glass perfectly passes the sun rays, and with them and ultraviolet.
Penka
To cover the greenhouses of seasonal purposes, the film is the most inexpensive and popular material.
She perfectly misses the sun's rays, dissipating them, and does not give plants to burn. At the end of the season, the film is neatly dismantled with their own hands and, if there are no clear flaws on it, it can be left to reuse.
Polycarbonate
This flexible high strength roller material looks aesthetic, protects cultures from ultraviolet, passing the maximum amount of sunlight. The material is durable, therefore it is not amenable to precipitation and wind loads. Polycarbonate coating is designed for long-term use, its transparent color remains unchanged over long years.

Build a high-quality greenhouse on their own forces will help you some advice of professionals:
- The construction of a permanent greenhouse begins in the fall, so the selected site should be prepared correctly: we remove the soil on the bayonet, removing the plants from the top layer, and fold it into a separate place for storage until the next summer. With the help of any sheet material, we make boards to protect the soil from weeds.
- With collapsible frame of pipes are easy to transport, but complex in montage. Fast assembly will provide only a frame from ready-made welded modules. The smaller the compounds in the carcass system of the greenhouse, the smaller the backlash and other reduces the strength of the construction of defects.
- If you install a greenhouse from polycarbonate, it is not worth removing the coating for the winter. Polycarbonate is not afraid of loads. You can remove only the system of watering and forwarding.
- The fastening reliability directly depends on the choice of fasteners, a successful version - a frame with a frame having a woven loop, allowing you to fix it both in the ground and the foundation.
- If the greenhouse is fixed with the help of pipes-piles, it should be scored not to the end, since the soil is floating over time and settles, and the fastening can relax.
- With two longitudinal sides, the greenhouse should be supplied with framugs for ventilation. In addition, plastic partitions can be installed, eliminating cross-pollination, system and automatic forms.
Knowing the structure of the greenhouse design, relying on the councils of specialists and observing the rules of selection of space and soil for the future of the greenhouse, you can make a greenhouse and grow plants in a favorable microclimate for them.
In order not to lose the material, be sure to save it to your social network VKontakte, classmates, Facebook, simply by clicking on the button below.
Why from wood?
Wooden structures have several important advantages and in particular:
- cheapness - the frame of this material made by your own hands is cheaper than the finished version of the galvanized profile;
- durability - the design serves at least 5-7 years, and in regions with temperate climates, three times longer;
- ecology - Wood favorably affects the microclimate inside the greenhouse and does not distinguish harmful substances into the atmosphere.
How to cover?
We did not mention such pluses of wooden frame Both reliability and stability, i.e., the ability to withstand any coating, from light agrifyes to a rather heavy glass.
There are many different coating options for greenhouses based on a wooden frame.
Each type of coating has its own "for" and "against", we will dwell on them in more detail.
Polyethylene film
Pros:
- accessibility - goods can be found on any market and in the building of building materials;
- low cost.
Minuses:
- low use;
- insufficient permeability for sunlight;
- low strength (quickly robbed);
- weak insulation indicators.
Glass
Pros:
- excellent traffic frequency;
- resistance to sharp change change;
- good thermal insulation;
- resistance to aggressive media;
- easy care.
Minuses:
- a certain complexity of the glazing process;
- considerable weight and, accordingly, increased frame requirements;
- fragility and defenselessness in front of a strong wind, hail;
- insufficient protection against UF radiation.
Polycarbonate
Pros:
- ease;
- strength;
- ability to skip up to 80% of solar radiation;
- universality (it can be bent and covering them the frames of any form).
Minuses:
- quite complicated installation;
- in hot weather heats up strongly;
- pointy polycarbonate after 1-1.5 years of operation becomes fragile as glass.
IMPORTANT! The choice of concerning material depends on the region of residence, species of grown vegetables, preferences of the owner and its budget.
Choosing a bar
 In the nearest joinery workshop, you can buy a wooden bar for the construction of a greenhouse frame.
Better if he is from wood industrial varietiesFor example, pines or larch.
Dear woods (oak, beech) are heavy in processing, it is expensive, and it is not much more than coniferous.
Even cheap wood can be closer to the characteristics to the ideal, if it is correct to choose and prepare it.
Timber selection criteria:
- lack of cracks, chips, large bitch, as well as signs of rot;
- humidity indicators not higher than 22%;
- the perfect geometry (the timber must be even and direct).
In compliance with these requirements, the greenhouse framework will be solid and resistant to temperature drops. The ram for the base must have dimensions of 100 x 100 mm; For racks 50 x 50 mm.
IMPORTANT! All wooden elements of the greenhouse need to be carefully stitched, to treat the antiseptic composition to avoid rotting and the appearance of insects. Before assembling the frame, they can be soaked with oil so that they look beautifully. Ideally, the finished wooden design is preferably painted.
Choosing a place
One of the main issues to which gardeners are set, - where exactly to locate the greenhouse. The optimal option is an outstanding place, which is at a sufficient distance from country buildings and large trees. In other words, it is impossible to assume that the shadow falls even for the same hour per day, since it will negatively affect the yield of vegetables.
IMPORTANT! The door should be placed from a leeward side (not from the northern and not with that where the wind is often blowing).
Sizes of greenhouse
It is time to decide what we will build. So, it will be a stationary greenhouse with the following parameters:
- dimensions in terms of 2 x 5.4 m; The height of the walls is 1.5 m;
- the roof is rafting, 2-stranded;
- the foundation is ribbon, reinforced;
- film coating.
Design is designed for use in the warm season. Sizes are selected at the calculation of the width of the sleeves of the polyethylene film - 3m. When shelting the finished frame, the film does not have to cut and customize.
Fundament device
Question: How to build a greenhouse with your own trees? Not so simple. It is necessary to solve many intermediate tasks - from the location of the greenhouse to the selection of underfloor material.
 What is the foundation to choose, concrete or brick, arranged on the toned manner, each decides itself.
In our case, this is a monolithic belt foundation.
A small trench of 55-60 cm deep is digging under it, along the perimeter of the future design, which poured concrete M 200 or 250.
With the help of formwork, it is necessary to lift the ribbon above the ground level height 25-30 cm.
Foundation you can and need to reinforce To increase its strength characteristics and protection against seed. You should also take care of waterproofing So that in the future the design can be used not only with a wooden frame and a film coating, but also, for example, with a metal frame and polycarbonate coating.
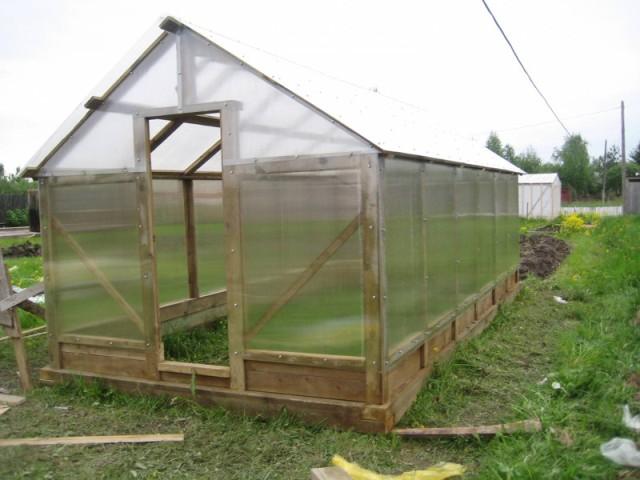
Wooden greenhouse with her hands
Wood - Material, Traditional for Russia, and the ability to work with it from our bloods in the blood. Therefore, problems in the manufacture of the frame should not occur. That's how it should look:
Circassia scheme
Photo of phased construction of a wooden greenhouse from a bar with their own hands are presented further in the article.

(Fig. 1 Wooden greenhouse carcass scheme)
The design has a trapezoidal form ( common and easiest to implement an arched form version). Please note: in the figure in the greenhouse, there are two butts, in one of which the entrance door will be installed in the future. To this end, the upper board of the end wall will be cut. Here is what the frame looks like a collected form in the country area:
Construction of greenhouses on the plot

(Fig. 1a Construction of greenhouses on the site)
Step1: Fastening the bearing timber to the foundation
Before the foundation will be attached thick bars as the basis for the framework, we recommend put under the future greenhouse a small-scale grid Rabita to protect against moles And other rodents. Little mouse can make a big stir and frighten with their sudden appearance. A few words about the carrier bar - it should be a little wider than the one from which the frame itself will be manufactured. It is also necessary pre-treated with antiseptic compositions. Its fastening to the foundation is performed using metal corners (they are installed at the stage of fill), anchor bolts, reinforcement.
IMPORTANT! The base must be composed of a solid bar, and not from the segments connected to each other. This depends on the sustainability of the future design.
Step 2: Wall Making
After the wooden base is attached to the foundation, go to the frame assembly and begin it from the compilation of the wall. This is a rather laborious process., in particular, for those who do this for the first time. However, if the material is high-quality, and the measurements are made exactly, the installation turns out to be simple.
Wall of greenhouses assembled

(Fig. 2 Wall of greenhouses assembled)
In the picture in front of you, the diagram of the inner wall assembly (dimensions of 5.4 x 1.5 m). As you can see, the grooves were chosen for the convenience of assembly. Not only more convenient to them, but also safer, since they increase the stability of the finished frame to wind loads. To fasten the walls to other frame elements (rafters, fortifications, lags ceiling), self-tapping screws, metal profile, corner, clamps are required. The number of walls with the parameters specified above is two.
Step 3: Device system rafters
In the manufacture the rafter system can not do without grooves. Moreover, they will need more than for walls. However, you should try to perform them all so that the plane of the roof turns out to be smooth, and the wind load on the film coating was the smallest.
Now we define a long-range leg. If the greenhouse will be used by middle-height people, it should be 1.27 m. If you are high, increase the length of the rafting leg to 1.35 cm.
So accurate numbers and strict restrictions can cause surprise. In fact, everything is simple: the width of the sleeve of the plastic film is 3 m, that is, in the deployed form 6 m. Consequently, the sum of the length of the two rafter legs and two racks should be about 5.8 m. This will make it possible to do with the number of applicable film 6 x 6 m, without remnants and waste.
On the one hand, each pair of rafters is attached to a wooden corner (fastening item) and a rigleel. The number of rafters corresponds to the number of racks. Thus looks like a rafting pair:
Rafyla

(Fig. 3 rafters)
Step 4: Installation of the skate and wind boards
The rafter system is considered completed and acquires the specified strength only after installing wind boards and the ridge of the roof. They are attached at the very end and must necessarily be made from a solid bar (like bars base under the frame). In the diagram below, these three boards are highlighted with dark brown color:
Fastening of solid material wind boards

(Fig. 4 Fastening of solid material wind boards)
IMPORTANT! Horse and wind boards need not only to position correctly, but also thoroughly process (oscillate and sand) so that the polyethylene film adjacent to them does not rush about the poorly prepared surface.
Step 5: Door and Footing Device
Since our greenhouse is small, just 5.4 m in length, for it there is enough one inlet door (in the end) and one window (in the same or opposite end).

(Fig. 5 Door and Fortochka)
Very detailed and thorough construction of greenhouses from a wooden bar you can see on this video:
It is impossible not to mention another advantage of a wooden frame with a rapid roof system. The design allows not to spend time and means for the manufacture of a steller, but to tie the plants directly to the rafters.
Without greenhouse it's hard to achieve a good cropheat-loving vegetable crops. Despite the fact that on sale today you can find a rich selection of ready-made sets of greenhouses and greenhouses, interest in creating them with your own hands is growing from the year.
If you have found a mistake, please select the text fragment and click Ctrl + Enter..
 Why you can not give icons
 Is it possible to give icons as a gift: Signs, the opinion of the Church
 A year ago left her husband, and now I do not know what to do