Cardboard drawings. Technology for creating furniture from cardboard with your own hands, and visual diagrams and patterns. Tools for work
Paper modeling can be classified as an activity that never ceases to interest a person. Many orphanages for creativity always organize design clubs, because paper models not only provide an opportunity to get a new interesting figurine or toy, but with their help you can improve your knowledge of physics and mathematics.
Tools for work
To learn how to fold basic paper models, you will need simple tools such as scissors, a utility knife, PVA glue and a brush for applying it. Give preference to PVA construction glue - of all varieties, it has the thickest consistency; it does not spoil the paper, making it wet and sticky, like regular glue.
Different models are folded from different types of paper - from tissue paper to thick cardboard. Beginners are advised to start with 200 grams per m2 watercolor paper for large elements and drawing paper with a density of 140-160 grams per m2 when developing small parts.
Craftsmen create individual parts, such as masts, railings, small finishing elements, from polymer clay, plaster, plasticine and self-hardening plastic. If you also complement your work with molded parts, stock up on various stacks and molds - like those used in ceramic floristry.
How to make a paper model
The workflow for creating a paper model takes place in several simple steps. Before starting the process, the master decides what kind of figurine he wants to design. In fact, almost any product can be made from paper, but paper modeling often involves the following options:
- geometric figures, polyhedra with convex and concave corners;
- scaled copies of famous buildings;
- luxury car models;
- models of military equipment: tanks, armored vehicles, heavy guns;
- vehicles: airplanes, ships and submarines, trains.
Figures of humans, animals, and plants are constructed much less frequently than others. After determining the product category, the main part of the work process begins.
Creating a Layout
Three-dimensional paper models are made from several large and small parts - the diagrams of the elements must first be drawn on paper sheets of the desired color. A person cannot cope here without understanding certain knowledge of geometry and the ability to represent a three-dimensional image.
To make it easier for beginners to learn, many specialized magazines began to publish drawings of ready-made developments for paper models, by gluing them together to create a figurine.
You also need to cut out the layout according to the rules. For example, a solid line along the contour indicates the location of the cut, and a dotted line indicates the fold. But in each diagram the designations are individual, so before cutting you need to read the explanations for the figure.
Assembly
After the drawings of the paper model are ready, the model is glued together and finishing work is carried out, if necessary.
To make the surface of the product look realistic, craftsmen use different coatings: glossy varnishes, matting sprays, craquelure liquids, stains, etc.
Paper car models
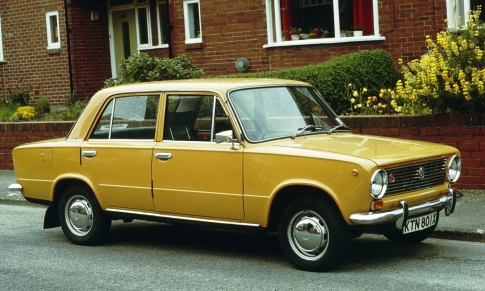
A beginner in the business of paper modeling will enjoy this master class, which contains information on how to construct the famous model of a VAZ 21011 sedan car in just half an hour.
Stock up on thick drawing paper or a coated sheet if the figurine is being created as a gift for a friend.
- On an A4 sheet of paper using a color printer, print out the finished layout of the paper model with your own hands. If you want to enlarge the diagram, make sure that the proportions of length and width are maintained - changing the parameters may interfere with the correct joining of the parts.

- Have a picture of a real car of that brand in front of you to use the picture as a guide during assembly. Bend the development in the required places.
- Shape the blank into the shape of a car to mark the gluing areas for yourself. Only after this can you sequentially lubricate the white valves with glue and glue them to the necessary parts from the inside, fastening the parts of the machine to each other.
Please note that the tread strips need to be glued together to form rings that will be attached to the wheels in order to obtain the most voluminous paper models.
Paper tank models
Designing military equipment from paper is somewhat more difficult than creating civilian vehicles because the guns consist of many small parts that form the body.
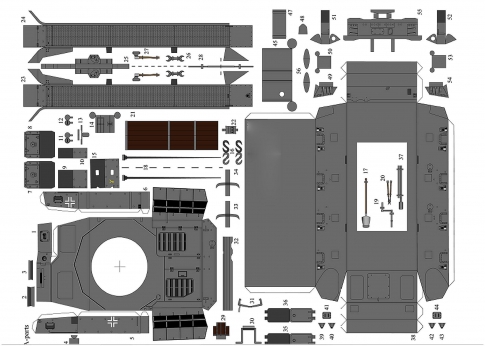
To see this, try to create a difficult but very interesting model of the German Panther tank.

- On a thick A4 sheet, print drawings of the tank components using a color printer. It is better to cut out small parts from thin cardboard so as not to bend the narrow curled elements.
- You need to cut out the parts with sharp scissors to make the work easier.

- It is better to glue in blocks - separately connect the parts of the hull, propulsion system and turret, and then fasten the large elements together.

To glue the parts of the tank in the correct order, follow this video tutorial during assembly.
Sometimes the joints are connected with small errors, which is why white paper stripes appear on the model. You can get rid of them using felt-tip pens or pencils of a similar color to the armor.
Paper airplane models
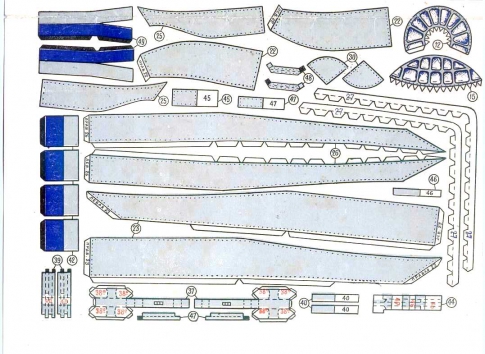
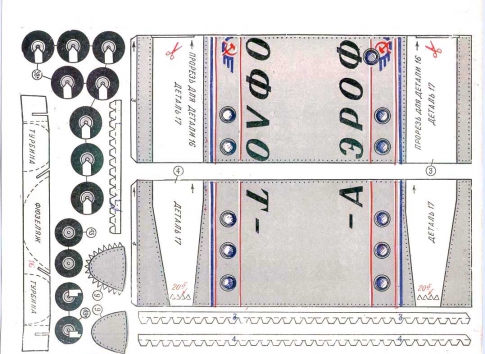
If you already have some skills in building paper figures, you will probably enjoy constructing a paper and cardboard model of the Tu-104 passenger aircraft.

- Print out the airplane drawings on thick paper.
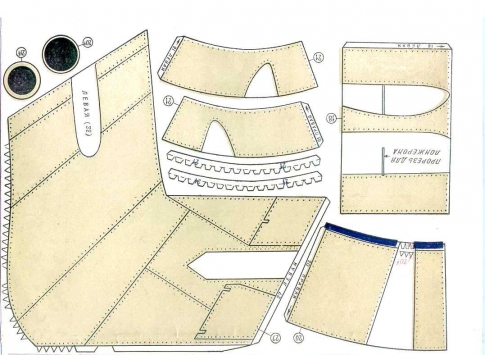
- Glue the elements of the internal frame of the product onto thin cardboard - they are marked with red numbers.

- The parts marked with a cross - frames or frame - are transferred to the cardboard using a compass. In this case, you can calculate the radius of the circle by placing the needle of a compass in the middle of the cross and a pencil on the circle. Patterns of paper frames need to be glued to these cardboard blanks.

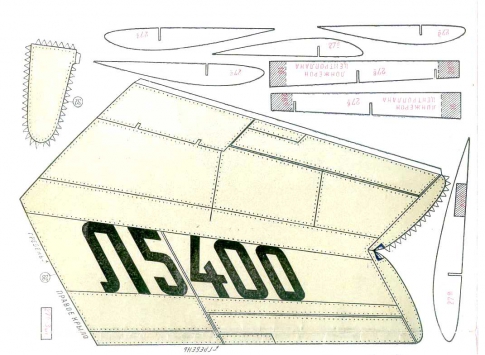
- After developing the frame, start creating the fuselage, or body of the aircraft. Please note that, unlike previous products, fuselage sections #1-8 do not have white securing flaps. They are connected to each other with special ribbons, represented on the patterns by the corresponding numbers in blue.
- The frames are glued into the joints between the fuselage sections.

- While the glue in the airplane body is drying, glue the tail parts together.

- The engines of the device are assembled like a fuselage.

- Next, the wings are formed using cardboard and paper.
- Connect together the parts of the hull, wings, bow and cockpit.
- Assembly of the chassis takes place in several stages - initially the wheels and their components are formed, after which the chassis is glued to the wings in a specially designated place.

- You can also use the pattern to cut out a wooden chassis - it will be stronger and last longer than paper and cardboard.

To avoid bends and creases on the body and tail, stuff the parts with cotton wool during assembly. Decorate the plane as desired using decoupage sprays and paints.
You can make a simpler paper airplane model with your own hands, following this video.
Take it for yourself and tell your friends!
Read also on our website:
show more
To creatively decorate your apartment, as well as add personality to it, you can make furniture from cardboard with your own hands; the patterns and diagrams are so simple that even a beginner can make the products. A variety of options will allow you to choose the right piece of furniture and make it, involving all family members in the process.
At first glance, you might think that cardboard is a fragile material that requires special handling. On the one hand, this is correct, on the other hand, having chosen the desired type of cardboard, you don’t have to worry about its further use. Cardboard furniture will be durable and practical if you follow the sequence of work and recommendations for using tools.
To choose an option for making a furniture product yourself, you need to consider several proposals:
- Toy furniture made of cardboard - it is profitable and creative to make your own furniture for dolls. If children require the purchase of a new house for Barbie with all the accompanying accessories, the solution would be to produce this option with your own hands;
- Book shelves are considered one of the simplest cardboard products. They don’t take much time to make, and the books don’t put much stress on the cardboard;
- The original table will not be a dining table on which dishes are constantly located, but a small coffee or coffee table. A child can perform developmental tasks on such a piece of furniture, because it is designed for a light load;
- Chest of drawers - this kind of furniture is convenient for storing documents or papers; children’s accessories will also fit here. It is easier to make a chest of drawers from cardboard boxes from large appliances, such as a refrigerator;
- Shoe rack - an original shoe stand in the form of triangular cells will fit comfortably into any hallway. Entering the room, all guests will be surprised at how convenient and practical the rack turned out to be;
- A small chair for children - since cardboard is not intended for heavy loads, furniture for children is what you need. A small chair for your baby will become his favorite object, where he can draw or play.
As you can see, furniture made of cardboard is easy to make. To make it you need the simplest material and a minimum of tools.


Shoe rack


Toy
Required materials and tools
Regardless of what type of furniture is chosen for self-production, the list of materials will remain the same. This necessarily includes the main raw material - cardboard.
To make the products durable, you should give preference to three-layer cardboard. The quality of the material can be checked by cutting.
If you purchased a single-layer analogue in advance, do not be upset. This option works well for making a dollhouse and furniture for dolls. If you use it to work on real furniture, you need to glue several layers of cardboard to give it greater strength.
List of materials and tools for work:
- Scotch tape - it is better to buy paper, regular and double-sided;
- Stationery or sharp construction knife;
- Scissors;
- Tape measure and long ruler;
- Pencil and rubber band;
- Sandpaper – for cleaning cuts;
- Kraft paper;
- Glue – depending on the type of cardboard, you may need PVA, hot melt glue or Moment.
If all the listed materials and devices are prepared, you should proceed to the manufacture of the selected furniture. Experienced cardboard craftsmen recommend that beginners choose simple work to start with, for example, shelves or a table.

In order for furniture made with your own hands at home to turn out not only beautiful, but durable, a number of rules must be followed. They will help you make high-quality products that will appeal to all household members:
- Gluing layers - when working with single-layer cardboard or to strengthen furniture, it is necessary to glue the material. When gluing cardboard together, try to place the layers perpendicular to each other - this is how they give increased rigidity;
- Choice of glue - people who have already made furniture from this material recommend using Moment glue. It does not get wet after application and instantly holds product parts together. You can also purchase a glue gun and thermal sticks, which melt when heated, creating a glue trail;
- Why do you need kraft paper? Kraft paper is used to cover the edges and joints of furniture. With this move, the furniture looks neater. Before gluing, the joints are cleaned with sandpaper. You need to remember that the paper cannot be cut - it must be torn with your hands. This way the layers will become smooth, without transitions;
- Features of cutting - during the manufacture of cardboard furniture, special attention is paid to cutting the material. Usually a stationery knife is used - it is important that it is always sharp, because the accuracy of the parts depends on it. If thick cardboard is difficult to cut, you can use a jigsaw.
Using a jigsaw, the work goes much faster. It is important to carefully cut the parts and avoid mistakes, because the tool is too powerful for cardboard.

Cut cardboard with a knife

Select the type of cardboard you need

Use kraft paper

Choose your glue carefully
Step-by-step instruction
To ensure that production goes quickly and is not accompanied by problems, there are step-by-step instructions; a master class on cardboard furniture consists of a step-by-step description of each action. It begins with the creation of a drawing, followed by the formation of parts and their strengthening. The final stage is the assembly of furniture. Each of the stages must be considered separately.
Create a drawing
The first thing you need to do is make a drawing of the furniture. To begin with, draw it on a regular A4 sheet so that you can see a smaller version. In such a sketch, it is important to write down all the dimensions and respect the scaling. If you have the skill to work in special programs that allow you to develop product models, you should use them.
The first drawing must show the product in a general three-dimensional form. Next, you need to draw a projection of the furniture with a top, side, and rear view separately. The next step is to depict the details of the product: each detail must be drawn separately.
When the drawing is ready, it must be transferred to sheets of cardboard:
- Using a tape measure and a long ruler, draw on the surface of the raw material with a pencil, measuring the required dimensions;
- For work, you may need a square so that the corners of the future furniture are even in the drawing;
- When drawing on thin cardboard, try not to leave scratches with a pencil, and when making furniture from corrugated cardboard, draw clear and deep lines;
- It is necessary to cut out parts in compliance with all indentations and possible distance margins.
You can use ready-made patterns or come up with your own product that meets specific sizes and preferences.


Forming parts
It is worth noting that when cutting out parts there should be no visible bends. If the work is done on a box of household appliances, it is better to cut on smooth edges. From six-layer cardboard you can make your own furniture of increased strength, for example, a shelf for shoes or books.
The details of the product are formed using a sharp stationery knife. Craftsmen advise using a construction knife if you plan to work with multi-layered raw materials. As the knife becomes dull, its blade is replaced. A dull knife will not be able to cut the required part smoothly and along the contour - you will have to redo the pattern.
Depending on the type of furniture assembly, parts may be:
- Plug-in;
- Glued;
- Stackable.
The latter option involves gradually increasing the cardboard to achieve optimal thickness. This move will further strengthen the model, preventing it from sagging under loads. It is beneficial to use cardboard sleeves in the design - special tubes with a high density. They are suitable for the production of furniture legs, as well as for assembling structures in an original style. For example, a chair made of cardboard tubes looks creative and can support a person’s weight.

Plug-in

Glued

Building up
Strengthening structures
Each part must be processed after cutting with a knife. This happens in the following way:
- Cleaning up. The cut edges of the module must be sanded. This technique will give them smoothness and prepare them for further processing;
- Pasting. Kraft paper is used for this. It must be torn by hand, and then carefully glued over the edges using PVA glue. You can apply paper to the entire surface, which creates additional reinforcement.
Furniture assembled using grooves will be durable and reliable. In the photo below you can see the principle of making such furniture: during the cutting process, oblong holes are additionally outlined, which are subsequently cut out. An additional structure is inserted into the grooves, which fastens the frame on both sides. Thanks to this, the furniture becomes stronger.
Stiffening ribs are often used, which additionally secure the base of the furniture. Using them, you can independently strengthen a cardboard tabletop, a shoe shelf, or a bookcase. The stiffening ribs and grooves must be coated with glue. By strengthening the structure, you won’t have to worry about the durability of the furniture in the future.

Sand the surface

Cover the surface with kraft paper
Build process
All prepared parts are glued together using a glue gun or Moment glue. If assembly is carried out using grooves, they are also glued for strength. It is recommended to repair all unevenness on the surface of thick cardboard using putty - it will not leave marks, and the excess will be hidden under the finish.
Parts that require gluing in layers must be placed under a press. Books or other heavy objects are good for this. After gluing, they are left for several hours, or better yet, for the whole day, until completely dry. All resulting ribs must be masked using craft paper. Carefully paste over the resulting corners to give them roundness. Next up is the small matter - decoration. There are several options:
- Decoupage - pasting with napkins;
- Painting with acrylic composition;
- Wallpapering;
- Using self-adhesive film;
- Decorating with mixtures.
Finished furniture can be used for its intended purpose within a day after production. Anyone can make furniture from cardboard with their own hands; how to find patterns and diagrams will be discussed below.

Apply glue to the coating

Pressing the elements

We putty cracks
For comprehensive learning, children need to have a creative approach to any task. Do-it-yourself crafts are a great way to keep a child busy, as well as develop his abilities in thinking, perceiving objects, textures, colors and, of course, teach the child to use available tools such as scissors, glue, brushes and others. To help children, there are diagrams of DIY cardboard crafts, which include patterns or templates. It is enough to cut them out or glue them or fasten them in the indicated way and the craft is ready.
Cardboard crafts are the most common type of creative development for children in preschool and school institutions. But if at school or kindergarten children are shown how to create a craft, then at home it will be much more difficult for the child to decide on the process of creating a craft and choose the necessary materials and tools.
Below are several diagrams of crafts made from different types of cardboard, the principle of operation is explained, and a master class for children on creating interesting products is described.
Easy crafts
Even a three-year-old child can make such a bear:
The craft diagram looks like this:
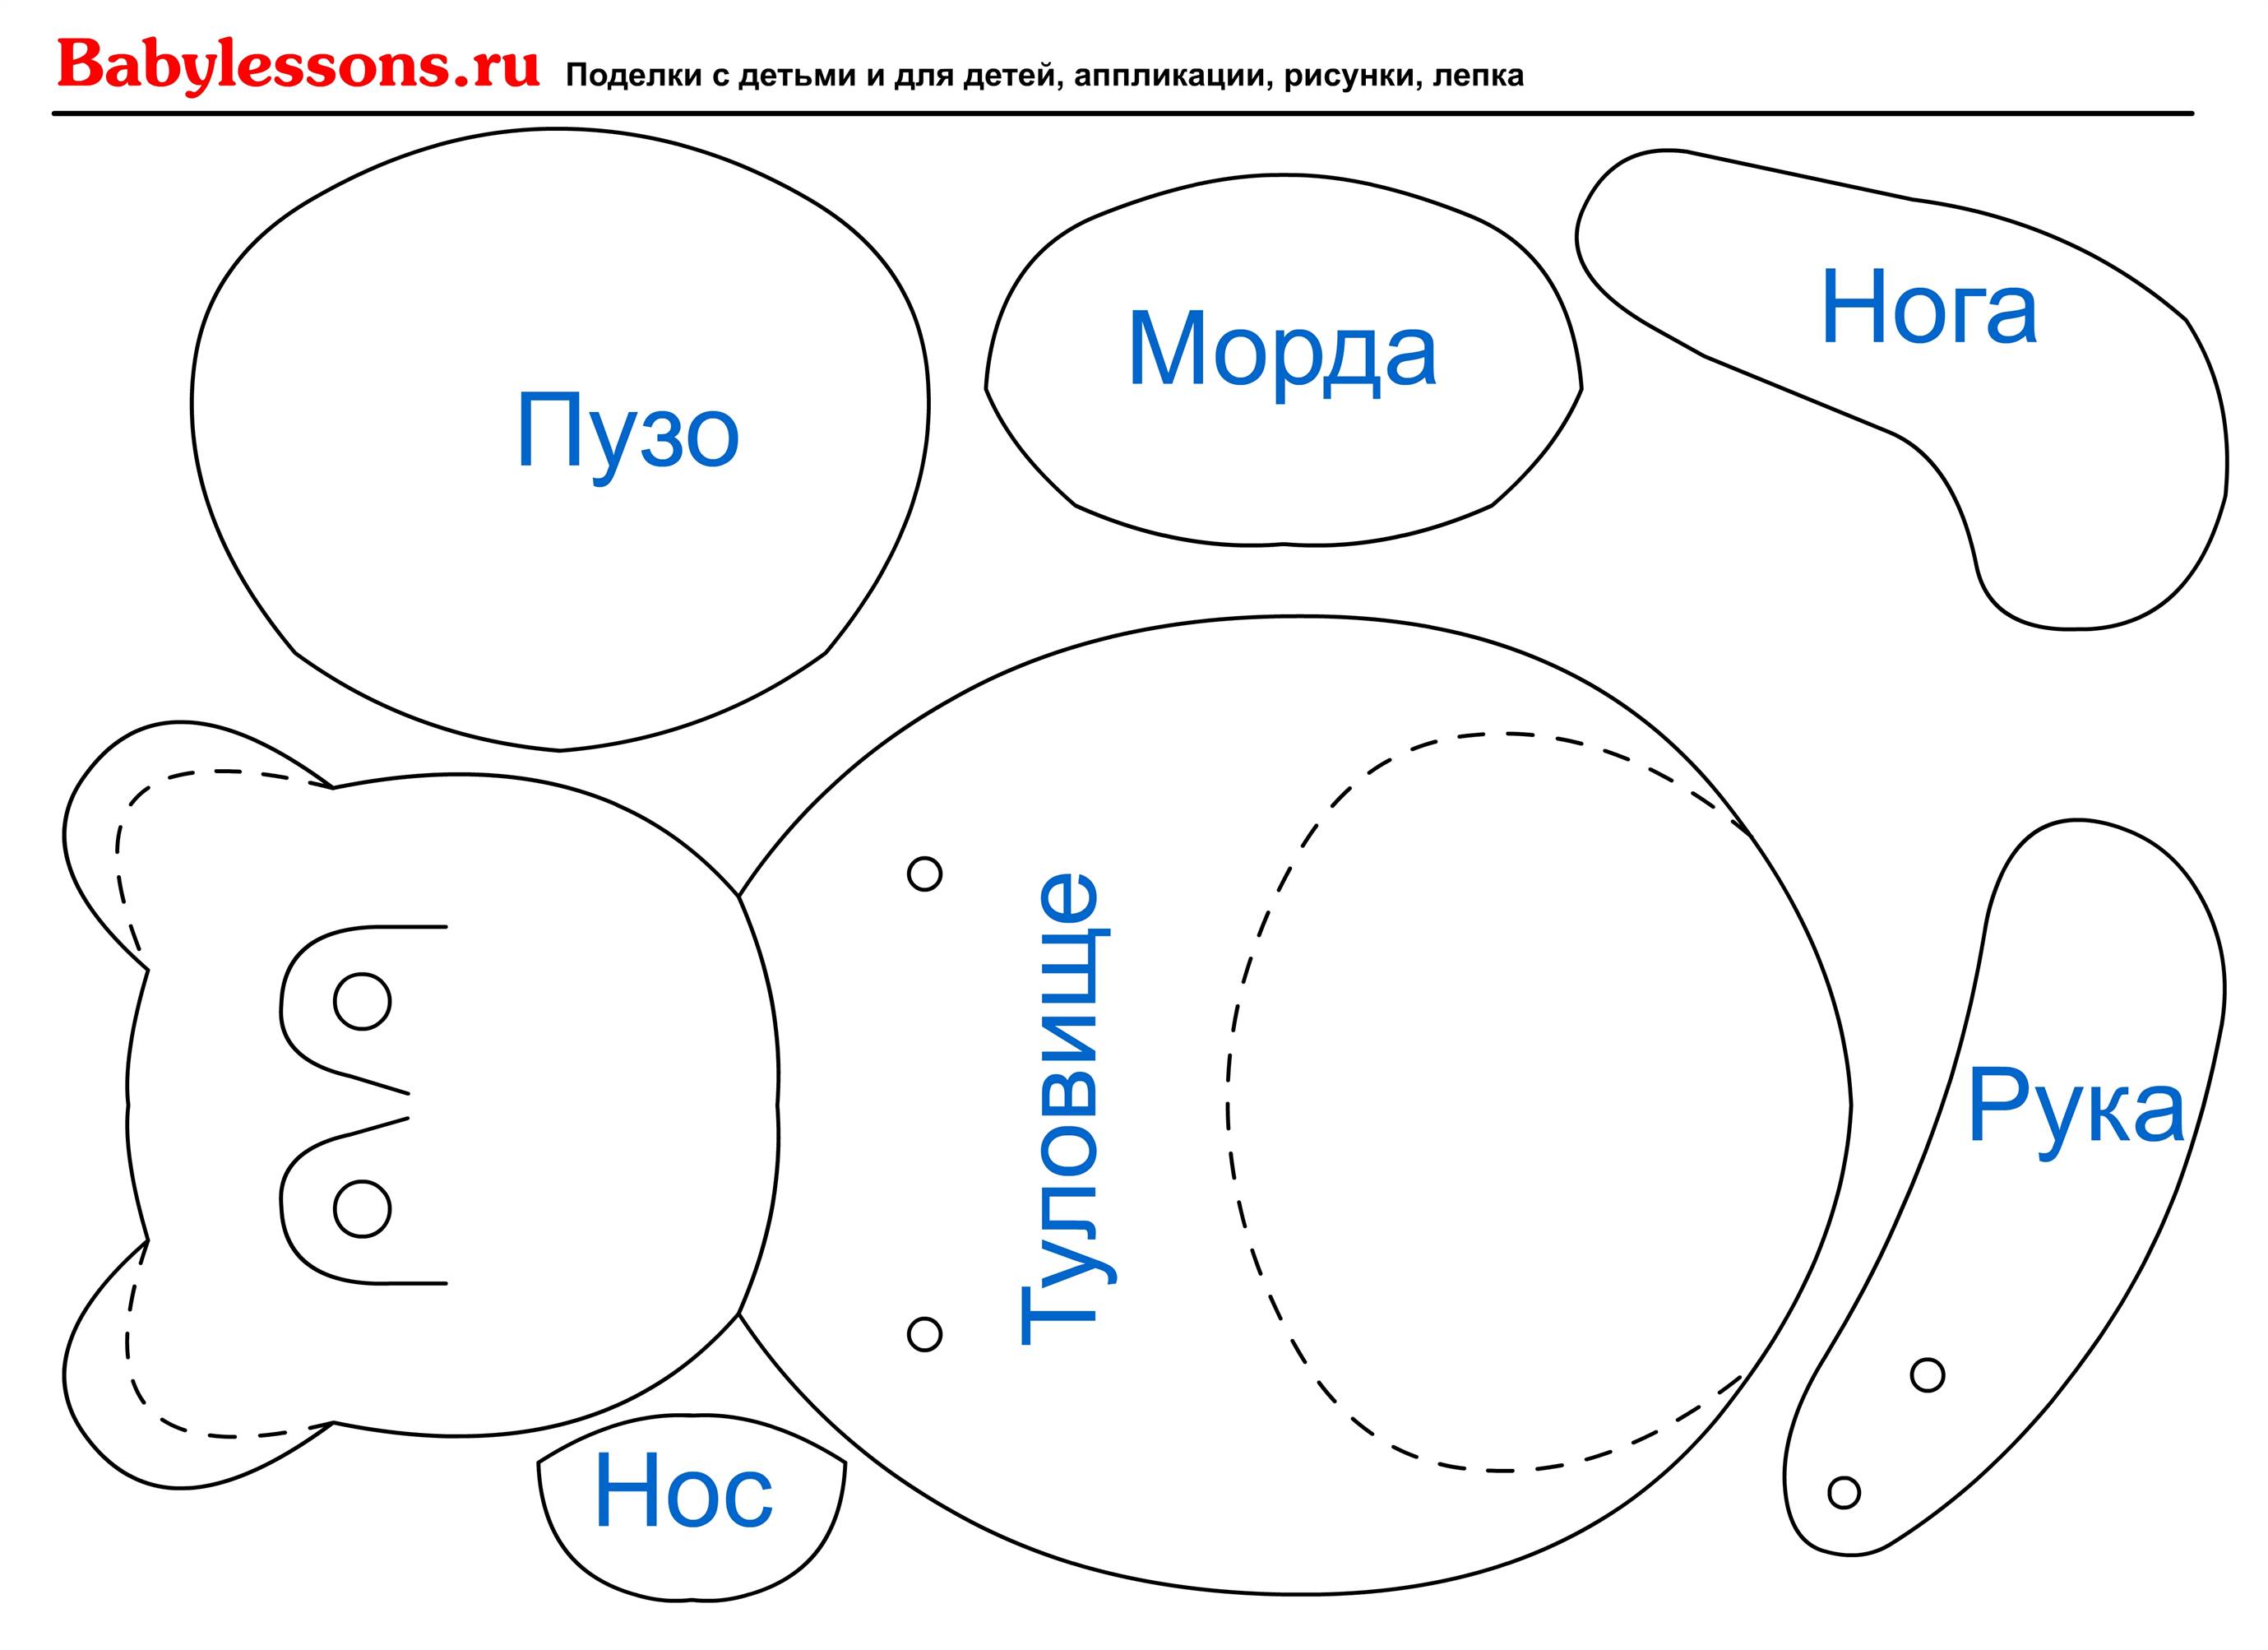
Simply transfer the patterns onto cardboard, carefully cut out and glue all the parts.
Of course, you need to remember to paint the bear or glue fabric or faux fur onto the template, then the animal will look like a real one.
For older children, there is a diagram according to which you can sew and fasten the parts together, and the bear will move its paws.

And here is the diagram for making the chest:

To create it you will need thin cardboard, scissors and glue. It is necessary to transfer the diagram with dimensions to a sheet of cardboard, cut along the edges, and carefully press the dotted lines. The bent side edges need to be smeared with glue, folded along the dotted lines and the chest glued together.
Recently, crafts made from corrugated cardboard have become increasingly popular. This material is very flexible and pliable, which allows you to create any shapes from it.

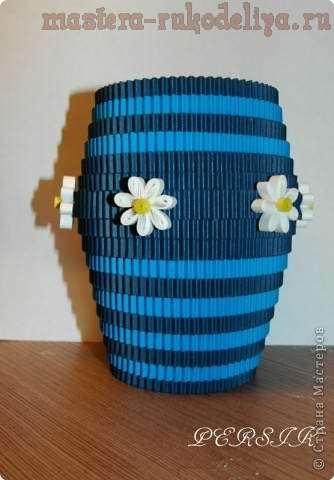
To create three-dimensional crafts from corrugated cardboard, there are basic schemes and operating principles.
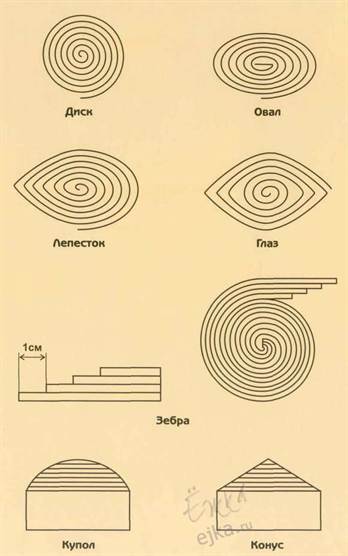
However, the essence is quite simple - strips of cardboard are rolled into the desired shape and the end of the strip is glued. It is possible to use several colored strips of cardboard - this is a zebra pattern. And the dome and cone schemes allow you to create three-dimensional figures on which you can place other parts.
Learning to work with cardboard
Below is a tutorial for children on making postcards from colored corrugated cardboard.

A child can make this card in kindergarten or at home and please his loved ones.
To work you will need corrugated cardboard of different colors, glue, scissors, colored paper, pen
1) Create the background of the postcard. To do this, simply take an existing sheet of cardboard in your favorite color or cut out a rectangle, which will be the base of the postcard.

2) Cut long strips of green cardboard for the leaves and stem and orange for the flower core.
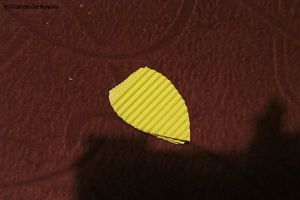
3) You need to cut out 8 petals from yellow cardboard.
4) Glue the petals to the card in any order and form, it all depends on the child’s imagination.
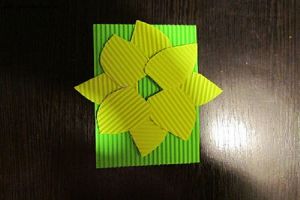
5) From a green strip of corrugated cardboard, fold a sheet of any shape and glue it to the bottom corner of the card.
6) We twist the orange strip into a disk shape and stick it in the center of the flower, like a core.
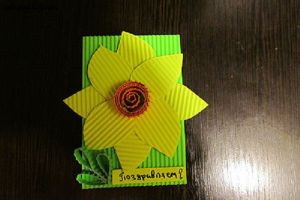
7) The postcard is almost ready, all that remains is to write kind and warm words of congratulations.
In the same way, you can place several flowers from different cardboard on one card, and you will get a very bright and joyful craft.

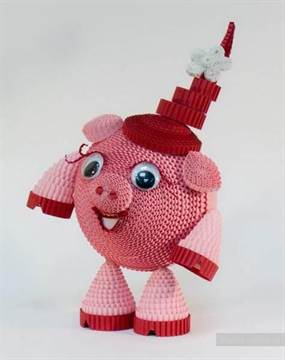
Older children 6-7 years old will be interested in creating crafts from corrugated cardboard in the form of three-dimensional toys or characters from their favorite cartoons.
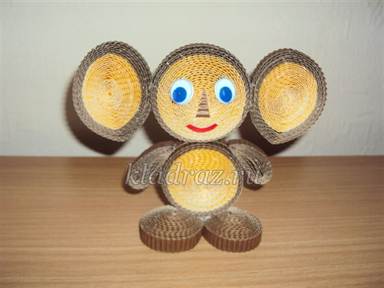
You can make a Cheburashka like this quite simply:

Let's consider the process of creating such a toy.
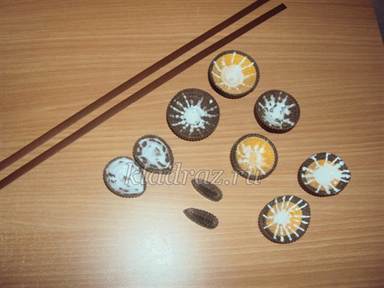
To create the craft, you will need strips of corrugated cardboard measuring 50 cm in length and 1 cm in width. Required 21 pcs. brown cardboard and 11 yellow.
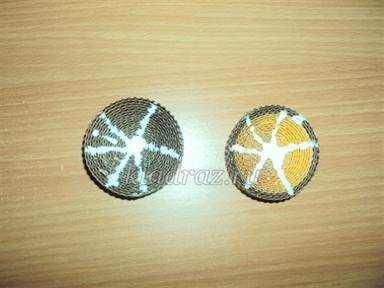
1) Create a head - glue 5 strips in a row into one long strip (4 yellow and 1 brown). We twist it into a tight disk, starting with the yellow strip, and secure the end with glue.
2) Glue together 5 strips of brown cardboard in the same way.
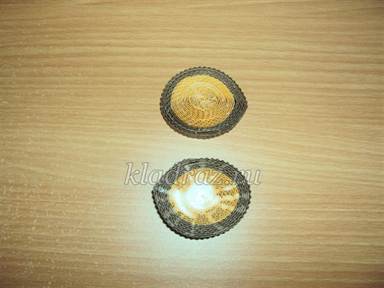
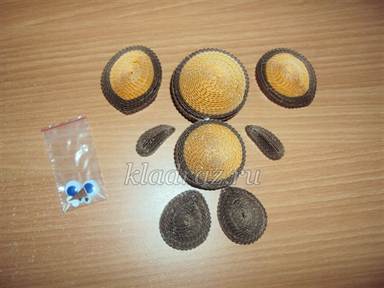
3) Then we give the twisted parts the shape of a dome; to do this, carefully pull out the cardboard from the center and fix the product with glue.


4) Similarly, parts for the body are created. Only the number of stripes is 4 pieces - 3 yellow and one brown. For the second part - 4 brown ones.
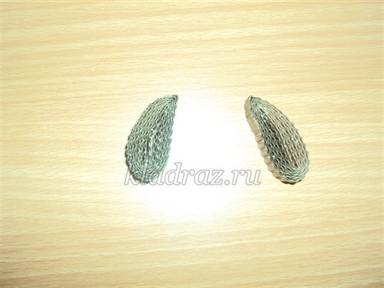
5) To make one ear, take 2 yellow strips and 1 brown strip, glue them sequentially into one long strip and twist them in the same way as the rest of the parts, giving it the shape of a drop (you need to pinch the finished disk on one side). The second ear is created in the same way.
6) We make the paws (legs) in a similar way from two drop-shaped brown strips.

7) We make hands from one brown strip in the shape of an oval.
8) All necessary preparations for further work are ready.
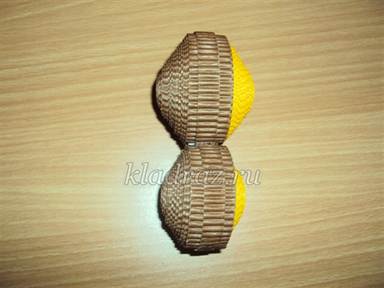
9) Glue the halves of the head and body together. To do this, coat the edges of the parts with glue and glue them together. Cover the joint with brown cardboard.

10) Glue the head to the body.
11) Attach and glue the remaining parts to the toy.
12) Eyes, roses and notes can be carefully cut out of cardboard or found plastic blanks. We decorate the face and the Cheburashka is ready.
Such crafts are quite easy for a child to make on their own. They look great, and children are happy to exhibit such creations at competitions and exhibitions.
Video on the topic of the article
You can watch more details about creating crafts from plain and corrugated cardboard in the following videos:
Content
Recently, decorative items that are made from recycled materials or from materials that are conventionally called garbage, for example, cardboard boxes from appliances, have been in fashion. On the other hand, it has become fashionable to create various figures and models of equipment from paper. In this article we will try to create some interesting ship models from cardboard. For some of these models you will need ready-made templates, and some products can be created without diagrams, using your imagination. At the end of the article you will definitely find a video tutorial that will help you consolidate your knowledge and create an interesting product from available materials. Let's not waste time, prepare the materials and start creating.
Templates
Let's first try to create a ship using templates. They are easier to work with. What you will need:
- thick cardboard (you can use an old box);
- scissors;
- pencil;
- ready-made template;
- glue or tape;
- colored paper and other decor.
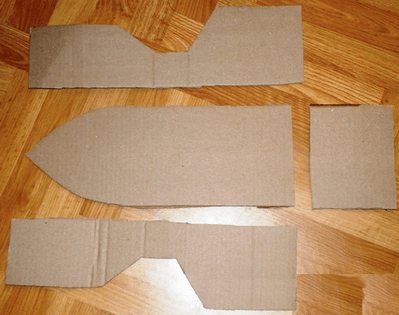
First you need to print the template and transfer it to the main material. By the way, if you are using cardboard that is not too thick, you can print the template directly on it.
You should get something like this:
Next, you need to dilute a little PVA glue with water, cut plain paper into pieces and dip them in the solution and glue them to the base of the ship. Remember the papier-mâché technique. It is better to connect the ship parts themselves using tape.
All that remains now is to decorate the blank with the prepared decor. This can be colored paper, wrapping paper, fabric. The ship can also be painted with ordinary watercolors.

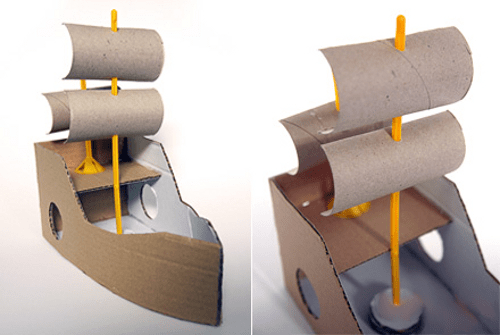
You also need to make a mast for the ship. You can use an ordinary twig and several round pieces of thick cardboard.
Every boat must have a flag. For it, use fabric and applique made of paper or material. The sail can also be made from cardboard; use toilet paper rolls.
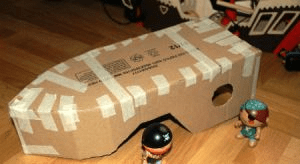
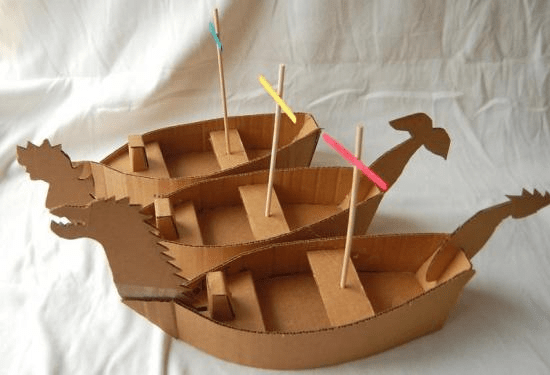
Making a big ship
This option is suitable for young children who love exciting games. For such a ship you will need a large box. This could even be packaging from under a refrigerator or from a large TV.
First you need to connect the valves of the box and make a sharp bow of the vessel. On the sides you need to cut out several round timbers to make improvised portholes. Use a thick stick and fabric to make a flag. Use paints to decorate the ship.

Don't forget about details such as the anchor - it also needs to be made of thick material and decorated. A large do-it-yourself cardboard ship is ready to sail across the endless expanses of the apartment.
We use matchboxes
Let's call this modeling, because we will create a whole ship from several matchboxes. What you will need:
- cardboard;
- glue;
- matchboxes;
- wooden skewer or thick paper;
- colored paper;
- markers;
- scissors.
First you need to glue two matchboxes together with the short sides. Glue another box on top in the middle.

Now you need to cut out a rectangular piece of paper and glue it to the structure on top.

Now we need to cut out a strip from thick colored cardboard, with which we will form the bow of the ship.

Now you need to cut out a piece of cardboard that will correspond to the contours of the ship, look at the photo:

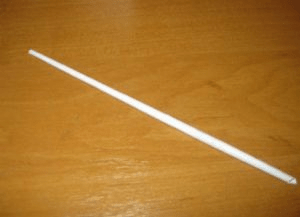
Now the bottom and top of the ship need to be fastened with glue. Next you need to make the mast. You can use a wooden skewer or roll up an A4 sheet very tightly and secure the tip to prevent the sheet from unwinding.
A hole needs to be made in the top matchbox of the ship so that the mast can be inserted. Don't forget to use glue.
Now all that remains is to cut out the sails from colored paper, paint them and attach them to the mast.

The matchbox ship is ready! It can be made wider and higher if you use more matchboxes. If you use very thick cardboard for the bottom of the ship, then it is quite possible to float it on the water and participate in competitions for the title of the fastest boat.
DIY cardboard spaceship
We suggest using a fairly simple option that will allow you to literally create a 3D model. To do this, you need to cut out several identical parts from cardboard, but of different sizes. The parts need to be fastened together, but either a thin piece of foam rubber or a small piece of thick paper must be placed between them. It will look something like this:

Or like this:

An entire space station can be made using cardboard rolls from toilet paper and tape.

Use silver foil, a compass, a black marker and a pencil to give the spaceship a realistic look.
Cardboard is a fairly convenient and easy-to-work material, but if you know a few nuances, the work will seem even simpler, and the product itself will turn out neat:
- When working with very dense material, use fairly sharp scissors, or even better, a stationery knife;
- before bending the cardboard parts, it is better to draw along the dotted lines with the non-sharp side of scissors or an old pen that does not write, then the material will bend neatly and evenly;
- Not in all cases you can use a glue gun. For example, if you are working with thin material, then it is better to use office glue or PVA;
- work in a room where the humidity is not too high, otherwise your products may delaminate or parts may not stick together;
- the room should be light, it is advisable to have a window that can be opened and ventilate the room;
- We also always advise you to work only in a good mood.
How to make a ship out of cardboard with your own hands - a few more interesting options
We would like to offer several more interesting and beautiful options for ships that you can make with your own hands.

In this case, a milk carton, cardboard boxes and a sleeve are used.

And this is a luxury boat made from an ordinary cardboard box.

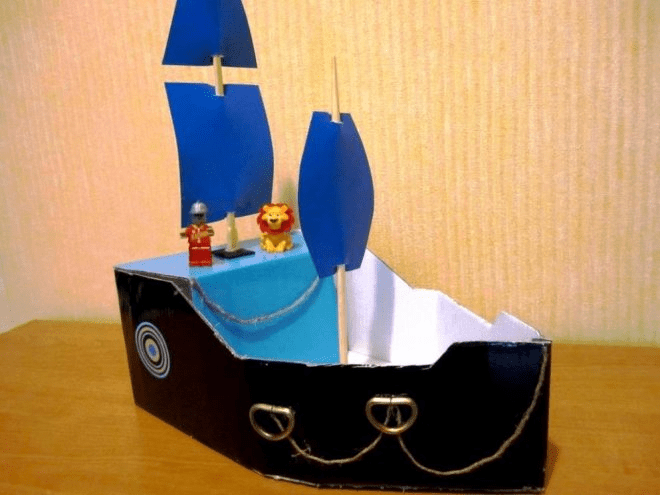
With a little practice and imagination, you can create such a beautiful pirate ship made of cardboard with your own hands. We always advise you to involve children in creativity. They will be especially pleased to know that they are creating a boat just for themselves. At the same time, you can think about a pirate costume, and also make a spyglass, a hat and a cardboard knife out of cardboard. Such participation of children in creativity helps to develop their imagination, attentiveness, perseverance, and the desire to create something with their own hands for themselves. Be sure to involve children in cleaning too. Explain to them that after themselves they need to fold all the materials, put them in their places, and also need to clean the work area so that later they can get back to creating.
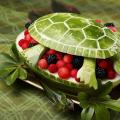 DIY watermelon crafts for an exhibition at school
 How to build an airplane out of wood How to make an airplane out of wood
 DIY paper machine (diagrams, templates)