How to make a birdhouse with your own hands. DIY birdhouse made of wood: drawings, materials, decor and installation. Titmouse: drawing and dimensions
In the article you will find drawings, diagrams, photos of birdhouses for different birds. Recommendations for building a birdhouse.
Every spring, birds fly from warm countries. It can be difficult for them to find housing: old birdhouses are often destroyed and trees are cut down.
Birds help nature and people. They fight insect pests and their larvae and protect trees. In addition, they make people happy by singing and give joy. Our job is to take care of them. The simplest thing we can do for them is build birdhouses.
Birdhouses not only serve as homes for different types of birds, but are also a decorative element in garden and park landscapes. You can find birdhouses made of a variety of materials and bizarre shapes.
What materials are birdhouses made from:
- The most famous and reliable material is wood.
- Plastic.
- Cardboard.
- Metal.
- Plywood.
The right birdhouse: what is it?Important: The right house for birds is one that is made of wood. Other materials are not suitable for providing comfortable living for birds. Birdhouses made of chipboard, cardboard, and plastic serve for decorative purposes and are located in places where rain does not penetrate.
Dimensions of birdhouses and hole diameters for wagtails, titmice, and various birds: table
Wood is the only natural material that can provide birds with protection from the cold and rain. Let's not forget that birds are part of nature, and they are not adapted to life in an artificial environment.
What characteristics should a tree have:
- The most suitable types of wood for birdhouses are birch and oak.
- Pine trees are not suitable for these purposes because they emit resin.
- The thickness of the boards must be at least 2 cm to retain heat.
- The inside of the birdhouse must be rough so that it is convenient for birds (especially chicks) to get out of the house.
- Boards should not be fastened with glue; it can release harmful substances.
- There should be no nails or screws protruding from the boards, as this could injure the birds.
Let's talk separately about the size of birdhouses. Birds come in different sizes, which means that houses must be the right size for different species.
Table 1 “Sizes of birdhouses for different birds”
| Bird species | Taphole diameter (cm) | Bottom Width(cm) | Front wall height (cm) | Back wall height (cm) |
| Tits | 3-3,5 | 10-12 (square) | 22-25 | 28-30 |
| Wagtails | 5 | 40*15 (rectangle) | 15 | 18 |
| pikas | 6 | 16-18 (square) | 22-26 | 28-32 |
| Flycatchers | 4 | 10 (square) | 7 | 14 |
Features of bird houses:
- Wagtails will choose a house in the form of a rectangle with a threshold in front of the entrance, because this bird likes to trample in front of the entrance to the house.
- Pikas settle in birdhouses with two entrances. This helps them escape if cats attack.
- The flycatcher likes to settle in a semi-hollow - a house that looks like a natural hollow in a tree.
 How to make a nest box step by step
 Flycatcher house
 Birdhouse for wagtail
 How to make a birdhouse for starlings with your own hands from wood: drawing with dimensions, step-by-step instructions, photo
Birdhouse size for starlings:
- Bottom width - 15 cm;
- Height - 30-40 cm;
- The diameter of the tap hole is 4-5 cm;
- A round perch in front of the entrance is 5-6 cm long.
Important: The roof must have a small canopy (edge) over the entrance. Then rainwater will not be able to get inside.
When making birdhouses, you must adhere to size recommendations. Otherwise, the birds may simply not settle in the house. From birdhouses with a large diameter entrance, starlings can drive out small birds. If you make the entrance diameter too small, the starling may not fit into the hole. The correct internal space of the birdhouse helps to create favorable conditions for hatching healthy offspring and creating a warm nest. Typically, starlings hatch 5 chicks, rarely the number reaches 7.
To make a birdhouse you will need the following materials:
- Dry boards;
- Nails or screws;
- Wire (to hang the birdhouse);
- Hammer;
- Hacksaw;
- Drill (d=50, d=4 mm);
- Pencil;
- Square;
- Screwdriver, screwdriver.
 Instructions for making a birdhouse
 Birdhouse project
 Drawing of a classic birdhouse
 Drawing of a birdhouse-house
 To quickly clean the birdhouse, you need to make it with a removable roof. At the same time, make sure that the roof holds up well and does not fall from the wind or the invasion of “uninvited guests” - cats, crows.
How to do it? Answer: A sleeve identical to the dimensions of the bottom must be attached to the removable roof. Additionally, the roof is secured with wire.

 What does a removable roof look like?
 Video: DIY birdhouse
How to make a birdhouse from 8 mm plywood: drawing with dimensions, step-by-step instructions, photo
Important: For the birdhouse, you can use unsanded waterproof plywood. Water resistance means there is no need to treat the walls of the birdhouse additionally. If you have sanded plywood, make notches on it.
The process of making a birdhouse from this material is standard:
- Draw a drawing of the parts using a simple pencil and a square.
- Cut out the parts with a hacksaw or jigsaw.
- For the tap hole, drill a hole so that a jigsaw file fits into it. Next, cut out the entrance in a circle. You can drill out the tap hole with a file.
- Sand the cut lines with sandpaper.
- Mark the locations for the screws and drill holes.
- First, assemble the front wall of the house by attaching a perch to it.
- Then connect the walls together.
- Finally, attach the bottom and roof.
- Nail a long piece of wood to the back wall for further installation of the birdhouse.
 Birdhouse project
  Taphole cutting
 Assembling birdhouse parts
 This is what a plywood birdhouse looks like
 How to make a birdhouse from a 5 liter plastic bottle: drawing with dimensions, step-by-step instructions, photo
Important: A plastic birdhouse is most often made for decorative purposes. You can make such a craft with children and brightly decorate it so that it is pleasing to the eye.
Reasons why birds will not settle in a plastic birdhouse.
- Birds will not settle in or reproduce because the plastic is transparent and does not promote a sense of protection.
- Birds are also unlikely to settle in a birdhouse that is too colorful, in order to protect it from predators. And colorful will attract cats, forty.
- Plastic does not allow air to pass through and releases toxins in the sun.
If you want to make a decorative birdhouse, plastic will do. This material can be found in every home and is easy to work with. Bottles of different sizes are suitable for a decorative birdhouse, it all depends on your imagination.
All you need is: cut out the entrance, decorate the birdhouse and hang it in a visible place. There are many decor options:
- You can paint the bottle and draw patterns and ornaments.
- Glue on beads and buttons.
- Decorate with thick yarn and colored rope.

 Birdhouse made from a plastic bottle
  Decorative birdhouses made from small plastic bottles
 It’s better to make a feeder out of a plastic bottle; it will bring much more benefits.

 Plastic bottles are suitable for making feeders
 Feeders made from large plastic bottles
 Video: How to make a birdhouse from a bottle?
How to make a birdhouse from a cardboard shoebox: step-by-step instructions, photos
As you already understand, birds are not stupid creatures. They choose a reliable home that will protect them from rain, cold, and predators. It is for this reason that a birdhouse made of cardboard should not be taken seriously, but as a decoration, yes.
If you have a cardboard shoe box lying around, don’t rush to throw it away. You can give it a second life by building a decorative house. Compliance with the dimensions is not important here, because birds will not settle here.
Step-by-step production of a birdhouse from a cardboard box:
- Cover the edges of the cardboard box with tape to prevent the edges from falling apart over time.
- Mark the taphole with a pencil.
- Cut it out using a utility knife.
- Decorate the box.
- Attach it to a tree or under a roof.

 Cardboard box bird house
 Cardboard bird house
 It is quite possible that birds will choose your cardboard house as a feeder if you regularly put treats there in the form of seeds and bread crumbs.

 Feeder out of the box
 How to make a birdhouse from a juice or milk carton: step-by-step instructions, photos
You can very quickly and easily make an analogue of a birdhouse from a bag that contained juice or milk. To do this, you will need an empty juice or milk carton, scissors, rope or wire for fastening.
Step-by-step production:
- Cut two holes in the box. Two holes are made so that the bird can quickly fly away if it is in danger.
- Make small holes for the rope or wire and thread the rope through.
- Secure the tree house.
If you apply diligence and use your imagination, you can make a bright, colorful, original house. Ideas in the photo below.

 A milk carton feeder that even kids can make
 Decorative birdhouses made from juice boxes
 How to make a birdhouse from wine corks: drawing with dimensions, step-by-step instructions, photo
Wine corks are a good material for making a birdhouse. Due to their density, they allow the house to remain dry even during rain, and also serve as additional insulation.
- The easiest way is to glue corks onto the finished birdhouse using hot glue, which also serve as original decor.
- It is not advisable to hammer the plugs into the birdhouse with nails - the sharp ends of the nails can injure the birds.

 Birdhouse insulated with wine corks
 You can make a decorative birdhouse. For this you will need:
- Traffic jams;
- Hot glue;
- Cardboard.
Step-by-step production:
- Glue the corks together with hot glue. Take an equal number of corks on each side of the house.
- In your design, leave room for a tap hole.
- To make a roof, glue corks onto cardboard.
- Attach the roof to the house.
- Decorate the birdhouse as you wish.

 Birdhouse made from wine corks
 Decorative birdhouse attached with wire to a tree
 How to make a birdhouse from newspaper tubes: drawing with dimensions, step-by-step instructions, photo
Another material for decorating birdhouses is newspaper tubes. You can find out how to make them at.

 Wicker bird houses
 Tube weaving
 How to make a birdhouse from a toilet paper roll: drawing with dimensions, step-by-step instructions, photo
A toilet paper roll is a cheap improvised material for decoration. You can paste the sleeve over the frame of the birdhouse, and then paint it or decorate it with paper.
A simple toilet paper roll also makes excellent feeders. To do this, dip the sleeve in peanut oil and then sprinkle with seeds.

 How to use a toilet paper roll
 How to protect a birdhouse from cats, squirrels, magpies: tips
- Experienced people advise placing birdhouses away from trees, on poles.
- The birdhouse should be located at a height of 4.5 m.
- A tin collar attached to a pole can serve as protection against cats.
- You can also make a barrier on the pole in the form of a roller of barbed wire.
- The design of the birdhouse must be correct: a long canopy will not allow a magpie, squirrel or cat to stick its head into the entrance.
- The perch in front of the entrance should not be made too long, otherwise a predator will easily settle on it.
- The diameter of the taphole should be no more than 5 cm, and it should be located almost at the roof. A large canopy will thus protect the predator from entering the house.
How to protect a birdhouse from moisture, how to cover it: tips
There are several ways to protect a birdhouse from moisture:
- Make the roof with a slope, then drops of water will roll down.
- You can paint the birdhouse with paint or open it with varnish.
- Treat the birdhouse with linseed oil.
- Wood also needs to be treated with water-repellent agents, because over time fungal stains can form on it.
Is it possible and how, what color to paint a birdhouse with gouache, what to draw on it?
If you want birds to live in your birdhouse, do not paint or decorate it with colorful decorations. Feathered friends do not care about beauty; for them, protection comes first. A bright birdhouse will attract cats.
A decorative birdhouse serves primarily for beauty. Therefore, when creating it, it is appropriate to use all kinds of decorations and paint.
For painting you can use acrylic paints, gouache, and oil paints based on drying oil. Gouache is very easy to use as it dries quickly.
In order for gouache paint to lay flat on the surface, you need to follow a certain sequence:
- First, use sandpaper to sand the surface on which you will apply the paint.
- Then apply the base - white acrylic paint. Wait until completely dry.
- The next stage is drawing a sketch of the drawing and painting with gouache.
- Wait for the gouache to dry completely, and then open the drawing with varnish.
- It is advisable to apply the varnish a couple of times.
If you don't know how to draw, you can use stencils. Simply transfer the pre-prepared templates onto the birdhouse using a pencil, and then paint with a brush.
What can you draw on a birdhouse? Everything your imagination tells you - birds, flowers, patterns, butterflies, grass and trees, abstract patterns. There is no limit to perfection. You can see examples of drawings on birdhouses in the photo below.

 Birdhouse with drawings
 How to paint a birdhouse with gouache
  Painted birdhouses
 How to make decoupage birdhouse with your own hands: ideas, photos
Even a beginner can easily decorate a birdhouse using the decoupage technique. You will need the following materials:
- Preparing a birdhouse;
- Napkins for decoupage;
- Scissors, decoupage glue;
- Brushes, acrylic paint;
- Sandpaper.
Step-by-step master class:
- Sand the birdhouse with sandpaper to ensure there are no rough spots on it.
- Then wipe with a damp cloth to remove dust.
- Apply a layer of paint and base. If necessary, apply a couple of layers for a more thorough coloring.
- Wait for the paint to dry completely.
- Now, from decoupage napkins, cut out rectangles for the sides of the birdhouse of appropriate sizes.
- Glue the blanks.
- Now all that remains is to glue the cut out elements onto the facade of the birdhouse. In this case it is a gnome, mushrooms, a ladybug and an inscription. You can choose whatever you like.
- At the final stage, all that remains is to open the birdhouse with varnish to protect it from moisture and dry it. Now the birdhouse is ready to delight passers-by with its elegant appearance. Beautiful birdhouses

 Decoupage birdhouse
 Video: Decoupage birdhouse
What beautiful and unusual do-it-yourself birdhouses are there: possible birdhouse options, photos
You can find original birdhouses that are so unusual that you won’t immediately understand that this is a house for birds. In the shape of animals, with colorful stones, painted, in a rustic style.
Summer residents decorate their plots with birdhouses to the delight of themselves and their neighbors, but they are no less active in decorating parks. You can find entire towns made of birdhouses.
We have collected a selection of original birdhouses for your inspiration.

 Tree house
  Bird town
 Birdhouse with an unusual entrance
 Birdhouse decorated with stones
 Birdhouse design
 Birdhouse name for the competition: list
Every year, many botanical gardens, zoos, kindergartens and schools hold competitions for making birdhouses. The purpose of the competition is to foster respect for nature and the environment, and care for birds.
In addition to the design of the birdhouse, its correct construction, as a rule, you need to come up with a name. One of the requirements of the competition is a card indicating the name. We have collected possible names of birdhouses that you can take note of or as an idea:
- Bird House;
- Teremok-breadwinner;
- Miracle House;
- Eco-lodge;
- Bird Cafe;
- A hut on chicken legs;
- Titmouse;
- Hotel for starlings.
An original name will help your birdhouse stand out from others.
Video: How to make a birdhouse for birds to live in?
Birds are indispensable helpers in the fight against pests of green spaces. The best way to call on them for help and attract them to your site is to make a birdhouse with your own hands. By giving the birds comfortable houses, the owner of a country plot provides himself with peace of mind about the harvest and an excellent mood from a pleasant neighborhood. The birdhouse will be in demand in any case: swifts, nigellas, flycatchers, tits and sparrows are also happy to settle in comfortable apartments.
When thinking about how to make a birdhouse with your own hands, you should first of all worry about procuring the material for building the house.

The material for making a birdhouse can be hardwood boards, for example: aspen, maple, oak, birch, alder
Coniferous wood is absolutely not suitable for building a birdhouse, since it can secrete resin, which makes the inside surface of the birdhouse sticky.
To build a birdhouse, it is also not advisable to use chipboard and fiberboard, which emit toxins harmful to birds. Plywood is far from the best choice: the material does not transmit sounds well, the sufficient audibility of which is necessary for birds in case of danger, and does not retain heat well, making it difficult for birds to nurse their helpless chicks. The inner surface of the wooden boards should be slightly rough. You can add unevenness to a smooth surface by applying horizontal notches with a chisel, which will make it easier for the birds and their chicks to get out of the house.
Before making a birdhouse, you should decide on the dimensions of the future structure. Standard dimensions of a birdhouse: 13-15 cm bottom width and 30 cm height of the birdhouse, and the diameter of the entrance is 3.8-5 cm. Spacious apartments are not always good: in a large house you can shelter more chicks, but will their birds be able to do this? parents?!
Numerous offspring are much more difficult to go out and feed. The chicks, weakened by insufficient food, grow up sick and unable to withstand long-distance flights in the fall to warmer climes. In a compact house, capable of accommodating only two or three chicks, the offspring grow up healthy, capable of further maintaining the strength of the species population.

Ornithologists say that the interior space of bird houses should not be too spacious, but at the same time too cramped
The simplest version of a wooden bird house
The configuration of the birdhouse depends on where it will be attached. If the house will be suspended under the roof of the house, to a balcony or pole, then the design should include additional perches in the form of a thin stick or a triangular shelf, necessary for the “walk” of the feathered owners.
When deciding how to make a birdhouse from wood, which will be placed in natural conditions and suspended on a tree, you can do without arranging a “walking” perch. On the branches adjacent to the nesting site, the starling will rest, delighting others with the pleasant tints of its singing.

When making the simplest birdhouse, you can use the given drawing of a birdhouse with dimensions, which even a schoolchild can figure out
To build a compact and convenient house for the bird family you will need:
- edged unplaned boards;
- two blocks (for hanging the birdhouse on a tree);
- screws or nails;
- steel wire d=1mm (for hanging the house);
- wood glue.
Tools you will need:
- a simple pencil with a ruler;
- (with middle tooth);
- drill, wood drill;
- hammer;
- chisel.
The work is carried out in several stages:
Stage #1 – preparation of wooden elements
Using a simple pencil on the boards according to the drawing, the dimensions of all wooden elements are noted: bottom, walls, roof and perches.

As a result, you should get 7 blanks
The bottom is made in the shape of a square with a side of 13 cm. The difference in the heights of the front and rear walls is 4 cm, this allows you to create an angle of inclination of the roof. For the same purpose, bevels are provided on the upper cut of the side walls. To arrange the roof, you should prepare two parts of different sizes: the first part is shaped like the bottom of the house, the second is a large rectangle to create a canopy.
Some craftsmen believe that a more successful option in arranging a house is a roof tilted forward, which is formed by a shorter front wall.
Stage #2 – cutting out structural parts
Sawing off elements should be done sequentially so that paired parts have the same dimensions. To add beauty to the product, the outer surface of the boards can be additionally planed.

Using a drill or chisel, a hole is made for the flight of birds d = 3.8 cm (can be increased to 5 cm)
A round hole for the entrance to a house is more preferable than a rectangular one, since in nature birds prefer a round hollow, and they are more likely to settle in a house with a round entrance. The location of the hole 5 cm from the top edge allows you to protect the chicks from the grasping paws of cats.
Stage #3 – assembling the birdhouse
The side walls and front façade of the structure are first fastened with wood glue. As the glue dries, the parts are fixed with nails or screws. Using the same principle, the side ends of the bottom are connected to the front and side walls. Lastly, the back wall of the birdhouse is glued and hammered. There should be no gaps.

The roof parts are fastened together. There is no need to attach a roof to the house itself.
Stage #4 – installation of a bird “apartment”
The finished birdhouse can be nailed or tied with wire. For additional protection and to make it easier for the chicks to exit along the surface at a slight angle to the outside, the structure should be tilted slightly forward.
When placing a birdhouse on a tree, it is preferable to use wire to hang the structure, which, unlike nails, will not damage the tree. Additional protection for the tree bark can be provided by wooden blocks, which will act as a kind of lining that absorbs the tension force of the wire.

The house should “look” towards the east or southeast. The optimal placement height is from 3 to 5 meters
Decorative birdhouses
When planning how to build a birdhouse with your own hands, you want to get not only a functional design that is convenient for birds, but an attractive house that will become a bright touch in the design of the site.
There is a misconception that starlings do not occupy houses painted with bright oil paint. But as practice shows, the bird family feels very comfortable in such colorful apartments.
Material on how to build a decorative windmill for the garden may also be useful:

Houses decorated with decorative details look interesting. Some craftsmen create real palaces for birds with balconies and fences
Fantasizing about how to build a birdhouse that will become a real decoration of landscape design, you can take the simplest version of the house as the basic basis of the design, which is only complemented by original decorative elements and played up with color schemes.
Birds may not immediately inhabit the “apartment” they have prepared. It can take a year or even more to settle into new housing. Don’t worry and be patient: your good deeds will definitely be rewarded over time.
Birds are indispensable helpers in the fight against harmful insects. But in order to “agree” with the birds to provide all possible assistance, you need to attract them to your site. And for this we will learn the basics of building a birdhouse. By the way, the ability to build such bird houses will also be useful for introducing a child to caring about the world around him. So, if the age and development of motor skills of the baby’s hands allow it, take him as an apprentice. In the article you will find different ideas for making bird houses from wood.
What you can do: birdhouse, titmouse and other houses
Much is known about the benefits of birds on the farm, but some figures are still impressive: during the season, a small starling destroys up to a thousand cockchafer larvae. This allows you to keep root crops safe and sound.
If your main goal is to attract birds to the site, then, depending on the planned result, the birds should be of a specific species. But even if the birdhouse is built simply as a feeder, you must take into account that not only starlings populate hanging apartments. So it’s worth first familiarizing yourself with the types of these dwellings, and at the same time some of the engineering features of their construction.
Dimensions for drawings of wooden houses for different birds
Its shape, size and some other nuances will depend on what birds you are building a house for.
- Nesting. A house with a vertical wall at the rear, a long roof slope that joins this wall at an angle of 30–40 degrees, and triangular sidewalls, as well as through entrances. Such structures are built no higher than 1–1.5 m from the ground and are intended for pikas.
- wagtail. This house should be located horizontally at a height of 3–5 m from the ground, since the birds do not fit in a classic birdhouse, the dimensions of the bottom of which range from 14–16 cm, and the walls from 20 to 30 cm.
- Titmouse. This is a habitat for small birds. Height 30 cm, dimensions 10 x 10 cm, entrance 3–4 cm.
- Duplyanka. A kind of “tourist” house for different birds, 2 m from the ground, which can be made from a log with two plugs on top, bottom and an entrance hole in the middle. Outer deck diameter - from 15 cm
- Poluduplyanka. Built for flycatchers. Outwardly it looks like a smaller copy of a birdhouse - 12 x 12 cm and 15 cm high. This house needs to be equipped with a wide rectangular entrance and a sloping roof overhanging it.
- Birdhouse. It has a square bottom 14 x 14 cm and sides in the shape of a rectangular trapezoid. Moreover, the back board should be higher than the front so that the roof rests on them at an angle. It may also have a gable roof.
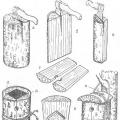
Photo gallery: types of wooden houses for different birds
Gable birdhouse  Single-pitched birdhouse
  Titmouse
  House for small birds
  Nesting area for owls
  Nesting area for small birds
  Duplyanka
Materials and tools
To make a classic birdhouse you need:
- boards, preferably pine, or a log of suitable width;
- screws, nails of different sizes;
- acrylic weather-resistant paints - if you will paint the product;
- wood putty - fill cracks if necessary.
As for tools, you need:
- hand hacksaw or jigsaw;
- drill with a cutter for cutting out a taphole;
- screwdriver;
- screwdriver;
- hammer;
- pencil, ruler, protractor, compass.
Safety precautions
When designing a birdhouse, you will have to deal with piercing and cutting objects. So you can’t do without following safety rules.
Let's list the main ones:
- When deciding on the housing issue for birds, you need to be focused, attentive and not be distracted by extraneous matters.
- You should work at a comfortable and sturdy table so that you can place all the tools and materials on it.
- If you decide to trim a tree before marking, do it with glasses so that sawdust does not get into your eyes, and with gloves so that you do not have to remove splinters.
- After assembly, make sure there are no nicks left in the bird house, otherwise your feathered guests may be injured. For the same purpose, you need to bend or file the protruding ends of nails or screws.
Birdhouses with step-by-step manufacturing descriptions
Let's consider options for bird houses from traditional to original.
The first attempts to build houses for birds were made by the Hindus in the last millennium. Gradually, this innovation moved to Europe, from where it came to Russia through the efforts of Peter I, who appreciated all sorts of funny things.
Classic birdhouse with a gable roof
Materials and tools:
- 2 rectangular pieces for the sides, 15 cm wide and 22 cm high;
- 3 parts 19X37 cm for the front and back walls;
- 2 pieces 15x15 cm as the floor and one part of the roof;
- pole stick;
- roof part 15x17 cm;
- nails, hammer;
- glue for fixing the pole;
- drill with an attachment for cutting round holes 5 cm in diameter;
- ruler, pencil.
Instructions:
- We draw out all the details on the board and cut them out.
- Don't forget to cut an entrance hole in the middle of the front wall with a diameter of 5 cm at a distance of 19.5 cm from the bottom.
- On the front and rear parts we make a 15 cm bevel under the roof with an angle of 90 degrees.
- We connect the facade and walls.
If necessary, we bend the protruding parts of the nails so that they are pressed tightly against the walls and, to seal, treat the joints with hot wax or a special putty for wood.
- We attach the roof parts to the back wall and facade, joining them well to each other (it is worth puttingtying the seam). Only so that the roof can be raised and the birdhouse cleaned. To do this, it is better to use self-tapping screws that can be unscrewed and then screwed in again.
- We check again to see if there are any protruding nails or screws inside the birdhouse. We fasten the bottom.
- Glue the pole.
Attention! The same model can be made with an easily removable bottom. To do this, we fasten it not with screws, but with long wooden “studs”. By the way, the remaining parts can be attached with wood glue.
Birdhouse made of rectangular parts
A simplified variation of the classic birdhouse, which a schoolchild can make on his own, assumes that all the details of the house are cut out in the shape of rectangles.
Instructions:
- We cut out the details. Please note that all vertical parts are the same, and the bottom is equal in length to the width of one vertical part + two board thicknesses, and the length is equal to the width of the facade. The roof has the shape of a square with sides equal to the length of the bottom.
- In the front part we cut out a taphole with a diameter of 5 cm and a small hole for the pole.
- We connect the vertical parts with nails or self-tapping screws.
- Attach the bottom and roof. Glue in a pole stick.
- We nail the birdhouse onto a long narrow board, using which we will attach it to the tree.
Video: boy makes a birdhouse with a flat roof with his own hands
The original version without a diagram - a bird house from a deck
Materials and tools:
- a deck of suitable size;
- chainsaw;
- drill for removing wood.
Instructions:

Video: log birdhouse - folk method
Light house made of wood and tube
Materials and tools:
- tube;
- a small board with a width no less than the diameter of the tube, a length of at least two diameters;
- jigsaw;
- pencil, compass;
- drill and screws or hammer and nails, long and short.
Instructions:
- Cut off about ¼ of the tube.
- We measure the inner diameter of the hole.
- We make 2 circles of this diameter from the board.
- We fix the first circle on the tree with screws or nails.
- In the second we cut out a round hole-tap.
- We drill a hole in it just below for the pole and insert the pole.
- We place the façade in a tube. We nail it around the circumference with small nails, “drowning” it slightly into the depth, so that the house has a canopy.
- We put the workpiece on the second circle fixed to the tree and also nail it with nails.
If you do not want to damage the tree, you can try not to cut out the back wall from the board, but simply leave the bottom of the tube and then thread a belt or wire through its hole for the handle and secure it to the trunk.
Photo gallery: bird houses made of other materials
 Birdhouses made from plastic bottles can be painted with acrylic paints so that the house is not transparent, but even then there is no guarantee that birds will settle there
  Birdhouses can be made from the most unusual things, for example, from a propane tank
  Birdhouse boots can be decorated with a bright pattern
  This model can only be a feeder, birds will not feel comfortable in a transparent house
  The disadvantages of cardboard “apartments” are their extreme impracticality, as well as their low weight, which creates problems in rainy or windy weather
Building birdhouses is a long-standing and very useful tradition. Step-by-step instructions on how to make a birdhouse with your own hands will help you make it quickly and easily. You can also start building houses with children; this is a great way to keep your child busy and teach him to do manual labor.
How to make a birdhouse with your own hands from wood
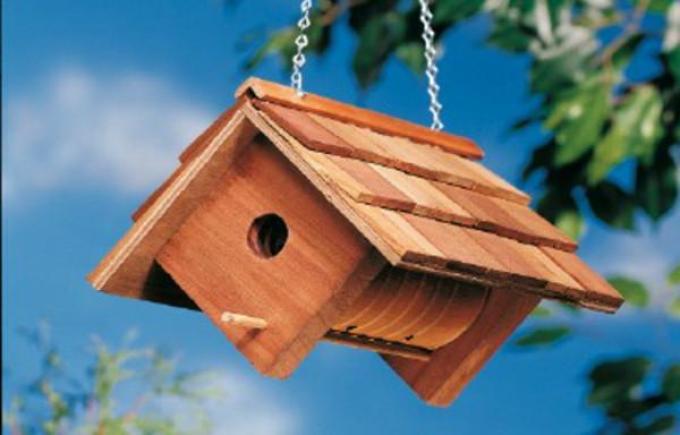
This is what classic wooden birdhouses look like
A wooden birdhouse is the most durable and reliable house, but the work to create it is also the most labor-intensive. But the result can exceed your wildest expectations.
To build a wooden birdhouse, you will need:
- pine planks 1.5–2 cm thick and 12, 16 and 20 cm wide;
- round rail for the perch;
- electric jigsaw or hacksaw;
- drill;
- Phillips screwdriver or screwdriver;
- sandpaper or sanding machine;
- ruler;
- marker;
- self-tapping screws;
- carnations;
- hammer;
- paints, varnish and brushes (for decoration).
It is better to take hardwood boards
Manufacturing instructions
How to do:
- Create a drawing of the future house and mark the wood according to it. First make markings for the front and back walls.
If you decide to trim a tree before marking, do it with glasses so that sawdust does not get into your eyes, and with gloves so that you do not have to remove splinters
- Then - the side walls.
These are the optimal birdhouse sizes
- Mark the roof. This birdhouse has a gable roof; you need to make two parts. All parts are cut out using a jigsaw or hacksaw.
The future roof of the birdhouse can be gable or single-pitch
- Mark the mounting holes. The boards are quite thick; the center of the holes should be 7–10 mm from the edge. In this case, the screws will accurately hit the middle of the end of the adjacent part.
Sawing and marking of parts should be done sequentially
- On the front wall, mark a place for the entrance (entrance to the birdhouse).
The diameter of the tap hole should not be less than 4.5 cm, and the height from the bottom edge should not be less than 20 cm
- A little lower, mark a hole for the pole-perch on which the bird sits before entering the house. Using a drill with a drill bit of the same diameter as the self-tapping screws, drill the intended holes.
- You can start assembling. First, the pole is attached using a thin self-tapping screw.
Instead of a perch, you can make a shelf
- Assemble the walls of the birdhouse, fastening them in any order with self-tapping screws.
The boards must fit tightly together
- Install the bottom.
The assembled structure must be checked for strength
- Assemble the roof and attach the pipe using a self-tapping screw screwed in from the inside.
Screws or self-tapping screws are used
- Reinstall the roof.
A pipe on the roof of the house will look elegant
- To attach the birdhouse to the tree, attach two loops to the back wall. Decorative details are attached using nails and narrow slats. For reliability, you can glue them with moisture-resistant glue.
It is best to attach a birdhouse to a tree with wire
- Paint the product as your imagination dictates.
It is best to use odorless paints
By the way, bird houses first appeared in Russia during the time of Peter the Great, and the idea of artificial nests was discovered in Western Europe.
Making a birdhouse out of a box
A cardboard box may become wet when exposed to rain, so you will have to additionally cover the surface with laminated paper or varnish.
Such houses are easier to make than wooden ones
Required tools and materials
It is better to take very thick corrugated cardboard
To create a birdhouse from a cardboard box you will need:
- corrugated cardboard;
- glue;
- carpenter's tape;
- self-adhesive laminated paper;
- stationery knife;
- scissors;
- ruler;
- marker;
- compass or circle with a diameter of 4.5–5 cm.
Manufacturing instructions
It is easier to make a birdhouse out of cardboard than a wooden one, but the cardboard house will also serve less.
How to do:
- In accordance with the selected dimensions, all parts are cut out of corrugated cardboard in duplicate.
Such blanks are made faster than wooden ones, but require no less attention
- Using glue, identical parts are connected. This is done to increase the strength of the structure. An entrance is cut out in the front wall with a utility knife, and holes are made in the back wall for string, with which the birdhouse will be hung from a tree.
Finished parts are glued together in pairs
- The body parts are glued together. To increase strength from the inside, the joints can be glued with carpentry tape.
The walls are glued together end-to-end
- The roof is assembled from two parts. The smaller one is located inside the case. It should protrude 1.5–2 cm beyond the body. For strength, cover the edges of the roof with colored plastic tape.
Be sure to cover the roof; in this case, the birdhouse will honestly serve until the end of the season
- To make the house last longer, it needs to be covered with self-adhesive paper or varnished.
You can entrust the finishing to your child
You can also make a bird feeder at the same time. The photo below shows an example of the simplest feeder. While you will make a birdhouse from more complex materials, a child can make such a feeder.
Tell your child what feeders are for and how important they are for birds in winter.
The entrance to the birdhouse should be directed to the south, east or southeast so that the wind does not blow into the house.
This option is the easiest and most affordable
If you don’t want to tinker with wood or cardboard, then in a few minutes you can build a bird house from a plastic bottle. Of course, it will not be as cozy as the options described above, but the birds will be quite comfortable in it. Three- or five-liter containers are best suited for making a birdhouse. But if there are none, then you can get by with a standard one and a half liter bottle.
Required tools and materials
A plastic bottle is one of the lightest and most affordable materials.
It's better to remove the label
You will need:
- two one and a half liter and one liter bottles;
- about two meters of wire with a diameter of 2 mm;
- scissors or stationery knife;
- dye.
Manufacturing instructions
How to do:
Make sure that the top does not block the entrance
Don't forget to use odorless paints
This birdhouse is a great idea for a craft for kindergarten or school.
The total height of the birdhouse should be from 30 to 35 cm. The size of the bottom should be made from 10*10 to 15*15 cm. The distance from the bottom to the tap hole should be 15–20 cm. The diameter of the entrance hole (taphole) is 30–40 mm. It is worth noting that different sizes of the entrance will be optimal for different birds, so for a starling it is 32–35 mm, for a nuthatch it is 28–30 mm, for a tit or sparrow it is 25–29 mm.
Despite the general opinion that wild birds can eat anything, birds should be fed with caution, since they absolutely cannot eat some foods.
Ideal for feeding birds:
- sunflower seeds;
- millet, millet, oats and wheat;
- unsalted lard and meat;
- dried rowan and hawthorn;
- maple or ash seeds;
- nuts, cones and acorns;
- pumpkin and watermelon seeds.
You can give calcium supplements, for example, crushed egg shells.
It is strictly forbidden to feed birds rye and wheat bread, as the yeast in them can ferment. Birds should not eat seeds or skins of citrus fruits. And also you should not feed the feathered inhabitants with salty, fried, spicy and sour foods.
Making a bird house is not difficult, especially since modern industry provides a wide selection of materials. Making a birdhouse with your own hands is a fun activity. If you and your children liked to do construction, then you can provide housing for many inhabitants of the park or forest.
I have made a birdhouse with my own hands at least once in my life. In Rus', the singing of starlings near the house was considered a good omen, so with the arrival of spring, the tradition comes to life in many families and manual creativity begins. Sometimes this hobby gives rise to a work of extraordinary beauty and the starlings can only choose a house or a castle. The singing of these birds is associated with spring, however, they do not sing for long until they call a female, and then they cease to be heard completely. When making a birdhouse, you need to think about safety so that cunning predators do not eat the eggs or chicks.
A wooden birdhouse can be of any type: birch, pine, larch. For example, it is easy to make simple houses for birds from logs. If you decide to place starlings in your yard, then it is important to take into account the length of the house, approximately 35-40 cm.
You need to select or saw off a log of the required size; pine is used in the photo.

Now we need to hollow out the inside of the log, and for this you can use a drill and a long wood drill, which we use to make an outline, and use a chisel to remove the inside.

It is most convenient to use a jigsaw to cut out the entry hole. We focus on diameters up to 50 mm.

The dimensions of the living bottom can be approximately 13*13 cm.
We nail the roof and bottom with self-tapping screws.
The roof of the birdhouse can be flat, with one slope or gable. If you want to protect the chicks from predators, such as cats, then you can extend the roof like a cornice.

There is no need to make the entrance hole large so that birds of prey cannot get inside and destroy the nest.
There are also different drawings with dimensions. Below I offer photo instructions on how to make a birdhouse. For the material you will need untreated hardwood boards.

So we cut it to the dimensions of the workpiece. We remember that they cannot be sanded from the inside so that the birds can cling to the wood with their claws and get out.

We screw the entire structure with self-tapping screws. We make sure that the sharp tip does not stick out anywhere.

And we’re going to choose a southern location to place such a house there.

How to make a birdhouse with your own hands from plywood
Plywood is also an excellent material for a birdhouse. All pre-prescribed dimensions must be transferred to the sheet.
If you are not making a house for starlings, then the dimensions may vary. For example, sparrows can build a nest in completely different conditions. But for singing starlings, a birdhouse depth of 35 cm is required.

We make a drawing on plywood from 6 mm, cut the plywood with a jigsaw or saw.

The front side can be sanded.

The inner wall should not be planed, because the chicks cannot then get out, so starlings do not live in such birdhouses.
We cut out a hole for the bird and sand it with sandpaper. You can glue it with PVA glue and treat it with stain. After 2 hours, after the first layer has dried, apply the second layer.
Use a drill to make a hole for the perch, apply PVA glue inside and insert a stick.

If a stick-perch is made, then it is a birdhouse for sparrows, and without a perch - for starlings.
How to make a birdhouse from a bottle
We will need: a 5 liter bottle, 1 skein of twine, double-sided tape, cosmofen, a piece of wool, two beautiful large buttons.

You need to wrap the bottle with twine. To do this, apply double-sided tape to the bottle and glue the end of the twine.

We make a hole in the bottle for the bird. Cut it out with scissors.

We decorate the roof of the birdhouse with fabric.

We decorate the roof with grass, which we sew on with thread and decorate the entrance hole by attaching the braid with double-sided tape.

Buttons are glued and millet or grain is poured inside.

How to make a birdhouse from a cardboard box for kindergarten?
Often in the spring, older groups in Russian kindergartens are given the task of making houses for birds. And sleepless creative nights begin for parents. We look at a lot of ideas, but we are always looking for something simple and aesthetic.
Therefore, I propose to make a birdhouse from a cardboard box for kindergarten.
Of course, it will be more decorative, because outside it will quickly get wet and become unsuitable for habitation.
We make a pattern according to size on cardboard.

Cut it out and cover the front side with fabric or paper.

We also cover the hole. We connect all the parts of the pattern using cardboard strips and glue. For strength we use a clothespin.

We measure and glue the roof and install it with PVA glue.

It turned out to be a very cute birdhouse. Any decor can be used: from decoupage to painting and rhinestones. I think kids will love making this craft.

Birdhouses should be attached on the south side so that the chicks are warm and feel comfortable.
Many people nail a birdhouse to a tree trunk, thereby injuring it. It is better to tie it around a tree or hang it from a branch using wire or rope. It is advisable to do this very firmly so that under gusts of wind the birdhouse does not dangle.

It can be screwed to a branch or to the trunk itself; be sure to check the integrity of the rope.
Photos of birdhouses made from scrap materials
Craftsmen make birdhouses - feeders from ice cream sticks.

Do you have an old boot? Great! It will also become a house for birds.

Anyone who has an old basin or ladle can also adapt it to house birds, the main thing is to lure them there.

An old chandelier can add an interesting touch to your garden, and if birds love it, you won’t want to take your eyes off such beauty.

Photos of original DIY birdhouse ideas
Wood is a very malleable material and real masterpieces can be made from it.

You can make not only a birdhouse from a log, but also a bird feeder, simply by placing it horizontally.

If you paint the birdhouse correctly, it will become a bright element of the garden.

Using the decoupage technique, you can make unique drawings. And such a birdhouse will look great and is absolutely harmless to birds.

Do you want to shelter a flock of birds? Combine three birdhouses into one apartment building.

An unusual version of a suspended house.

Quite a simple but interesting design of a birdhouse in the shape of a cat. Option for pet lovers.

Option for a designer bird house.

Hanging birdhouse. 
The entrance is shifted to a corner. 
Wooden green birdhouse.
 DIY birdhouse made of wood: drawings, materials, decor and installation
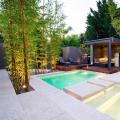 How to build a swimming pool at the dacha with your own hands Water pool at the dacha
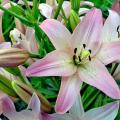 Subtleties and nuances of planting lilies and caring for them: a complete overview of growing technology