How to make a watermelon craft. DIY watermelon crafts for an exhibition at school. Crafts from watermelon seeds DIY crafts from droppers watermelon
Watermelon is not only a tasty and healthy berry, but also a fertile material for making various crafts. They can be prepared to beautifully serve fruit salads on a holiday table, or you can make DIY watermelon crafts for school at the autumn fair.
In order to work with this large and thick-walled ball, you need a sharp knife and a little imagination. Sometimes you can see entire works of art carved from watermelon pulp. Children, of course, will not be able to make such sculptural paintings, but the easy DIY watermelon crafts presented in the article will help you make beautiful work and surprise the children in your class.
Bunny
To complete such a simple craft, you will need an elongated watermelon. To cut out only what is needed at once, you first need to draw the outlines of the picture.
In front of the watermelon, draw a rounded head with two long ears. The tail is located at the back. Connect the head to the back with a semicircular line with a slight rise in the middle. This is necessary so that the fruits and berries that will be placed in this basket do not fall out.
When all the excess is cut out and the pulp is completely cleaned, you can start decorating the hare figurine with small details:
- The eyes are made from blueberries or blueberries; you can also use blue grapes, cut in half. You can strengthen them with pieces of toothpick.
- On the front of the muzzle, two large teeth will look interesting, which can be cut out on the peel using a cutter or chisel.
- The mustache and nose can be made from any materials. This could be the light green part of the peel, celery sprigs, or carrots cut into strips.
Turtle
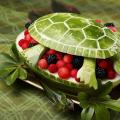
A DIY watermelon craft in the shape of a turtle will look interesting. The figurine consists of several separate parts. To make it, the watermelon will need to be cut in half lengthwise. Clean out the bottom half and decorate the edge with any geometric design.
The top part will take a little longer as it consists of several separate elements. This is a shell on which hexagonal plates are drawn, characteristic of most of the shells of these animals. The lid should be smaller than the bottom.

The remaining parts are made from the peel that remains after cutting out the middle of the watermelon. These are paws, tail, head.
Once the bowl is filled with filling, the turtle is carefully placed on top. To prevent small parts from falling, they are strengthened with toothpicks. That’s it, your DIY watermelon craft is ready!
Stroller
To make a baby stroller from a watermelon, you must first draw with a marker the outlines along which the cut will be made. After the main part is cut out, we begin laying out the core. Then all that remains is to make the handle and wheels.
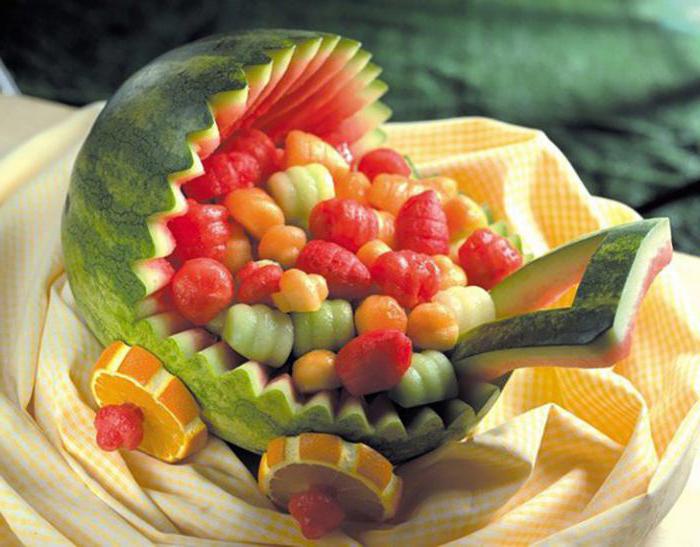
The handle is also cut out along the contour from the peel remaining from the main part. We attach it to two toothpicks from the inside. The wheels are made of round pieces of orange and berries. You can take any other fruit for these purposes, for example, an apple or a pear. They are also attached to wooden sticks.
Basket
You can make a watermelon craft with your own hands in the form of a simple basket. To do this, you need to draw outlines with ribbed triangles on the edge of the main part and a simple, even handle. And after the peel is separated, you can begin to separate the core.

If this work seems too simple to you, then you can add a design on the handle and decorate it with a geometric pattern.
Crafts from watermelon seeds
You can make crafts with your own hands not only from the berries themselves. By removing the pink pulp, you will get a large number of seeds, which can also be used to make pictures for the autumn holiday at school. They are painted with gouache in any color, combined with other seeds, for example, pumpkin or sunflower, and cereals or beans are added.

The simplest version of the picture will be autumn trees. You can draw their trunk, and use the painted seeds to create leaves. You need to glue them using PVA.
Even a first-grader can complete such a panel, but older children must present more complex work to the judges’ attention. For example, a stork sitting in a nest. The bird's body is made from white seeds, and its wings are made from black seeds. Since its beak is red, it can be made from lentils, which have a bright orange hue.
The nest is made from dry grass or sticks. Natural material is glued either on thick paper or on fabric. In order for the picture to have a finished look, you can make a frame, for example, from millet or beans.
Conclusion
Before making crafts for the fall holiday at school, look through several proposed options, get creative and be sure to add your own creative ideas. Then your work will be unique and the only one at the exhibition. Creative success!
Watermelon is the most delicious berry on earth. However, many people do not know that interesting things can be made from such berries, which come in handy in certain situations. Therefore, if you consider yourself a creative person and you like everything interesting, then you should find out about what kind of crafts to make from watermelons. Remember that with such crafts you can surprise all your guests and other people around you.
Watermelon crafts for table decoration
Today you can easily use a ripe and juicy watermelon to decorate the table. Remember that in this case your holiday table will become even more beautiful. Such crafts will especially appeal to children who adore everything bright and interesting.
We should start our review of watermelon crafts with an original and simple craft. It's very easy to do. The watermelon is simply cut into pieces and placed on ice cream sticks. First of all, this craft looks unusual. Then it is very convenient. Your hands won't be sweet after eating.


To make the following crafts, you should prepare baking dishes, which can be plastic or tin. With these molds you can easily make various figures out of watermelon.

From watermelon you can make not only simple crafts for table decoration. If you dream up a little, you can end up with a beautiful and also edible composition. To create it, you also need to use berries, fruits, Turkish delight and marmalade. It is recommended to cut all the ingredients into cubes. Watermelon is also cut into cubes.

And if you really want to get creative, then you should create unusual drums out of watermelon. Is not it? This composition looks very unusual. Yes, and it’s very easy to do. In addition to watermelons, you will need toothpicks to create this craft.

Watermelon figurines
Crafts made from watermelons can be very diverse. These interesting crafts are created not only to decorate the table, but also to lift your spirits. Look, you can make such an interesting frog from a fairly large watermelon.

Perhaps such a basket, which was carved from a watermelon, could take its rightful place on your table.

Another interesting idea is a watermelon snowman. Indeed, if you want to please yourself with the winter mood, then you can treat yourself to an interesting idea that you can create with your own hands. And to create such a masterpiece, you need to take 3 watermelons, which will have different diameters. However, the smallest watermelon should not be cut. This watermelon will be the head of the snowman. You need to work with two other watermelons. The flesh of these watermelons is cut into small pieces. This is done to make it convenient to take. You can decorate the filling with berries and fruits.

You can also make an interesting ship from a watermelon. It looks very nice. However, here you will have to work hard. At the same time, the inside of the craft is edible.

If you are ready to create an original and also useful craft, then remember one more useful idea. So, we propose to create a keg containing a watermelon drink. It is worth noting that this craft does not look like a dummy. This is a real watermelon. And to do it you need to do the following:
- you need to take a watermelon and cut off the top,
- Next, the pulp is selected from the watermelon,
- after which a glass bottle with a tap is placed inside,
- The barrel should be filled with juice, which was prepared from watermelon pulp.
That's the whole process of work, which you can handle on your own.

Watermelon carving
From this article you will learn about what crafts from watermelons you can create with your own hands. It is worth saying that a variety of images can be cut out on a watermelon. Moreover, there are two types of threads.
- The first type is a carving on the rind of a watermelon,
- The second type is carving on the flesh of the watermelon.
See what interesting ideas you can make.


And this is already considered a deep carving. It looks very unusual and attractive.


Finally
In this publication, we were able to list many interesting ideas. And it’s worth saying that you will definitely like all these ideas. In general, turn on your imagination and start making the most interesting crafts.
At the very end of summer, watermelon season begins. Both adults and children love bright, juicy, striped watermelon. In addition to eating delicious watermelon slices, you can also get creative. Children can draw a watermelon, make it, cut it out of paper. And at the same time find out how to correctly call a watermelon - a berry or a fruit?
Is watermelon a berry, a fruit or a vegetable?
Even adults cannot always answer this curious question. Usually, watermelon is called a berry, but this is not entirely true. It is indeed similar to a berry in many ways: pulp, seeds, peel, which protects it from damage. The only thing that distinguishes a watermelon is its large size.
But berries are different from berries. There are subspecies among them, and watermelon belongs to the pumpkin family, so its fruit would be correctly called pumpkin.
10 watermelon crafts
Application made of colored paper
Watermelon garland made of felt (you can also make it from paper)
Watermelon slice made from buttons
Paper pendant
Watermelon painted using volumetric paints. You can make your own paints. See recipe
From a child's palm
How to make a watermelon out of paper
Summer party card or invitation
Watermelon from disposable plates. Can be hung on a hook and used for various small items
Watermelon is a beautiful, healthy and incredibly tasty berry. Its pulp is perfectly refreshing on hot summer days and quenches thirst well. And the thick, rich green peel can be used to make interesting children's crafts.
The berry everyone loves

Watermelon Firebird
What crafts can be made from watermelon
Crafts made from watermelon can be divided into two large groups:
- intended for decorating the festive table;
- prepared for the exhibition.

Carved watermelon basket
In the first case, the watermelon is transformed to make it more interesting to eat. Various berries can be used for this purpose. In the second, it must be cleared of pulp, the peel is washed, dried with newspapers, and only after that they proceed to creating a creative masterpiece.

Watermelon allows you to create
You should not take a cut watermelon with juicy pulp inside to an exhibition in a garden or school for one simple reason - it will spoil very quickly and become a source of an unpleasant odor. Such a craft will not last even two days.
Watermelon crafts for children's table
If you are planning a children's party, you can decorate the table with a watermelon. Here are interesting ways to transform this berry:

Watermelon turtle

Funny hedgehog


Fruit stroller


Merry vessel

Pig with a juicy treat

Submarine
There really are a lot of options. And most importantly, most of them are very simple to do. You just need to have a sharp knife with a thin blade and a well-developed imagination.
Using watermelon, you can also prepare desserts that are sure to please little guests.

Fruit treat
The berry goes well with bananas, kiwi, oranges, peaches, and melon. You can cut an interesting-shaped depression in the center of the piece and fill it with a “filling” from another fruit. It will turn out very beautiful:

Watermelon transformation
It's no secret that children love junk food, one of which is pizza. You can also make this dish from the largest berry. True, it will look unusual, and the taste will pleasantly surprise you.

Watermelon pizza

Delicious fruit pizza
Watermelon is also suitable for making canapés.

Children will definitely appreciate this treat.

Watermelon canapé
Chefs even thought of making birthday cakes from it. Here are the most interesting but simple options:

Three tier cake

Unusual birthday cake

Watermelon cake that looks indistinguishable from the real thing

Healthy cake for kids
To make such a pie look beautiful, it needs to be decorated with other berries and fruits, cream, and chopped chocolate. But it is important to remember that watermelon cake does not last long, so it should be prepared several hours before the start of the event.


Beautiful fruit salad

Watermelon salad with blueberries
It turns out that almost any dish, or at least its imitations, can be prepared from watermelon. And all because the juicy pulp of the berry is easy to process and quickly takes the desired shape.
Crafts from watermelon for the garden and school
If you need to make a craft from watermelon, which should be stored for several days, then it is better to use only the peel. A small child will not be able to independently make something interesting from solid green material, since the use of a sharp knife is required. Therefore, parents should help him.


Making a turtle shell

Watermelon peel turtle

Another version of turtle made from watermelon peel

Watermelon carving
Speaking about watermelon and crafts made from it, one cannot fail to mention such a direction as carving.

Watermelon carving

watermelon decoration

Using a watermelon knife you can create a work of art

Of course, not all adults master this technique of carving fruits and vegetables. But it's still worth a try. Armed with a Thai knife, you can decorate children's crafts with intricate patterns. It will immediately take on a more original look.
Marina Vasyukovich
The material is designed for music directors and teachers of preschool educational institutions.
Purpose: attribute production, for a surprise moment at a holiday or classes at a preschool educational institution.
Target: creating an image watermelon using papier-mâché technique.
Material: base, egg cells, methyl and PVA glue, self-adhesive gouache film, acrylic varnish.
1. Take 2-3 (depending on the volume of the base) cells for eggs, tear them smaller and fill them with methyl glue diluted in advance, you can add PVA glue there too. It is necessary that the paper pulp is well wet; for this you need to thoroughly knead it several times until it becomes a homogeneous mass.


2. Take the base watermelon, in this case, of the required size, I had a basketball under my hands. Using tape, we wrap the base with any waste material (I had a lot of cellophane packaging from toys, so as not to cut through the base in the future and to easily remove the form from it.


3. Apply the adhesive mixture evenly to the base, 0.5 cm thick, carefully smoothing it so that the layer is even. Since the shape is round, first spread one half of the base, dry it in a warm place, then do the same with the other half.


4. When the forms have dried well, you need to remove them from the base and glue them together with an adhesive mass, and dry them thoroughly.


5. Next step: Using a knife, cut a triangular hole for making a piece of watermelon. Size - so that the fist can penetrate freely. Using the rest of the paper pulp, you need to make a border 2 cm high along the inner edge of the cut hole and along the edge of the cut triangle, stepping back 1-1.5 mm from the edge of the triangle in order to insert the walls of the piece into this groove. It is necessary to make a hole in it, into which to insert and secure from the inside a piece of wire for the tail. watermelon. Give the wire the desired shape, cover it with adhesive and dry it.

6. Now making a piece of watermelon. I just cut it out of thick (but not fat) three triangles of cardboard, glued them together and glued them to the base. The bottom of each triangle should match the shape of the corresponding side of the base. So that the glued edges of the piece are not visible watermelon, cover them with red self-adhesive tape and draw seeds with a black marker. It is important that the piece watermelon fit tightly into the hole and at the same time could open easily!


7. Let's start painting attribute: first apply a light tone to the base, then shade the stripes with a darker one watermelon. Paint the inner border in a lighter tone and let the paint dry.
8. And the final stage is to coat the product with acrylic varnish from a can if you painted with gouache.
Publications on the topic:
"Autumn time is a charm of the eyes." Autumn has arrived, a beautiful time of year, and I wanted to create my own autumn tree. Topiary now.
Application "Bunny". Templates. Master class with step-by-step photos. Goal: making an applique from colored paper using templates. Tasks.
I would like to present to your attention a master class on making macaras. Maracas are the oldest percussion and noise instrument of the indigenous people.
DIY postcard for May 9th. I suggest making carnations from napkins, colored cardboard and paper. The peculiarity is the division of the flower into.
I bring to your attention a master class on making an Easter egg with your own hands. The master class is designed for older preschool children.
Useful tips
There is always time for children to do something.
There are a huge number of beautiful and unusual crafts that you can make for children or with them.
For such crafts, you don’t always need to prepare a lot of tools and parts, but rather just have paper, thread, glue and scissors.
Read also:
- 20 creative ideas for kids
- Crafts made with a glue gun and hot glue
- Children's crafts for kindergarten
Here are a few you can do with kids:
Crafts for children with photo instructions: homemade cinematograph

1. Take some photos using heart-shaped sticky notes stuck to the wall. Glue one heart for the first photo, 2-3 hearts for the second, etc.
![]()
2. Print the photos. You can take small photos, smaller than 10x15.
3. Stack all the photos and secure them at one end with a stapler or tape.

Paper crafts for children: piñata in the shape of a watermelon slice

You will need:
Thin colored paper (corrugated paper)
Pencil
Stationery knife (if necessary).

1. Prepare two sheets of cardboard of the same size and draw a watermelon slice on each.
2. Cut out the slices.
3. To make the slice voluminous, you will need to cut out several strips of cardboard, 10-15 cm wide.
4. Start gluing all the parts with tape - connect two slices with cardboard strips (step 3). The bottom may need to be folded or cut into smaller strips. Leave some room for sweets to fill the insides of the slices.
5. Fill the inside of the slice and seal it with the last cardboard piece.
6. Cut thin colored paper (yellow, red and green) into strips 2 cm wide. Cut fringe on each strip. Think about exactly how much paper and what color you will need.
7. Begin carefully gluing the strips onto the cardboard piece. Start at the bottom and work your way up, wrapping the cardboard in this crepe paper.
8. Cut out watermelon seeds from black tissue paper and glue them to the piñata.

New crafts: Mr. Toast


Crafts for beginners: a cup of tea with a small note
![]()
You will need:
Tea bag.
Paper crafts (master class): Cardboard hat-cake

You will need:
Paper plates
Colored cardboard
Wide braid
Compass or other tool for creating a circle
Stationery knife
Pencil
Regular and double-sided tape.

1. Cut out circles from a cardboard plate for each layer of the cake. For the first layer, simply cut a small circle from the plate (bottom of the plate).
2. Cut three strips of different lengths from colored cardboard - the length of each depends on the circumference of each circle (layer of the cake).
3. Glue the ends of the strips together to make rings.
4. Apply glue around the circumference of the plate and attach a ring of colored cardboard.

5. Apply glue on top of the ring (along the edge) and glue a circle cut from a plate (bottom of the plate). You have completed the first layer.
6. For the second layer, apply glue and attach the second ring. Glue a circle on top of this ring as well. You have completed the second layer.
7. If you wish, you can create a third layer in the same way (4-6)
8. Cut a long strip from the braid, tie a bow in the middle and glue it to the top of the cake.
9. Make holes along the edges of the plate that is at the base of the cake and tie an elastic band so that the cake hat can be put on.
Crafts for children: small crown

You will need:
Felt in two colors
Braid (golden)
Thread and needle
PVA glue (fabric glue)

1. Cut two rectangles from felt. In this example, each size is 7 cm x 15 cm.
2. Place the rectangles on top of each other and glue them together.
3. Cut out the tops for the crown.

4. Glue gold braid to the bottom of the felt. Leave a little ribbon to hang down.
5. Sew the tops of the future crown along the edges.
6. Use a thread and needle to connect the ends of the felt, and glue the ends of the gold braid one on top of the other.

7. Cut out the number 1 from felt of a different color and glue it to the crown.
8. Make two small holes in the felt, one opposite the other, and insert the ends of the elastic into them. Tie knots at the ends. For reliability, you can sew an elastic band to the first layer of felt, thereby hiding any unevenness that could be on the outside of the crown.

Craft "Skates" (master class with photos)

You will need:
Safety pins
Felt or colored cardboard
Knitting thread
Chenille needle
Pencil and paper
PVA glue (for cardboard), fabric glue or hot glue (for felt)
1. Draw a skate on paper and cut it out.

2. Use as a template, trace the skate onto felt folded in half and cut out one shape that matches the two skates (see image).


3. Insert a safety pin and begin “tying the laces” of the skates using thread and a needle. Make the laces long so that the skates can be hung as decoration.


4. You can glue the ends of the felt.

DIY children's crafts: soft animal

You will need:
Cotton balls
Toy (plastic) eyes
Colored pompoms
PVA glue.
Take a cotton ball, glue toy eyes and a small pompom for a nose.


Simple crafts: thread spool in the shape of a cat

You will need:
Pencil
1. Draw a cat on cardboard. It is advisable to make its body rectangular to make winding the thread more convenient.
2. Cut out your cat from cardboard.

3. For the eyes, it is enough to make two small holes.
4. Make a small cut in the upper part of the body to insert the end of the thread into. You can make another cut for the other end of the thread (when you start winding it).

DIY spring crafts: flowers made from pompoms

You will need:
Knitting threads of different colors
Paper clips.

1. First you need to decide what size you want to make your pompom. From cardboard, cut out 4 semicircles with elongated “legs” on which you will wind the knitting threads.
1.1. Bend the legs of the arches to create the folds you will need later.
1.2. Cut out smaller cardboard arches and glue them to the larger arches (see image). This is necessary so that later it will be easier to insert the scissors when creating pompoms.

2. Glue together the part on the right (with a small semicircle glued) and on the left, so that the small semicircle is between the two large arches. Each piece received will be used to create half a pom pom.
3. Try drawing out your pom pom design on paper and draw a dotted line down the middle - this line shows the top view of your cardboard piece. Based on the picture, you will know where and what thread to wind.
Start winding from the center line, adding new layers of thread of different colors. When winding the threads, move slowly towards the outside of the part.

4. Repeat with the other cardboard half. You can wind it the same way as on the first half, or you can make a different design. If both halves have equally wound threads, then the flower will turn out with the same pattern on both sides.

5. Bend the legs of each arch with wound threads and glue these arches to make a complete circle. Use a paper clip to press down the bent legs.

6. Insert scissors into the gap between the cardboard pieces and begin cutting the wound threads in half. As a result, your hidden pattern will begin to appear.

7. Slide one thread between the cardboard pieces, tie a knot at the base and a knot at the ends of the thread so that the flower can be hung.

8. Remove the clamps. The pom pom will not be completely symmetrical, so you will need to trim it a bit with scissors.

* If you wind the threads in a certain order, you can make animals from pompoms. In some cases (when you need to make animal ears, for example), you need to insert pencils between the cardboard parts.

When creating animals, it will be very important to trim off the excess ends of the threads after you have created the pompom. This is necessary so that the animals turn out neat and symmetrical.
*You may need to practice a little.
Here's what you can get from pompoms:


We will need: a hook, threads (dark green, red, white, black), cardboard, scissors, pencil, foam rubber.
1. We collect 4 air loops with red threads and connect them into a ring. Row No. 1: 6 sc in circle. Row No. 2: 2 sc in each loop (12 in total). Row No. 3: 2 sc in every second loop (18 in total). We continue to knit, adding 6 loops in each row (in row No. 4 - in every third, in row No. 5 - in every fourth, etc.) We knit 16 rows (96 loops in total). This is what we end up with:
2. We tie a white thread and make another circle with it, knitting 2 sc in every 16th loop. We tie a dark green thread and make 3 circles, adding 6 loops in each. (Here we used marsh-colored thread with regular dark green sewing thread woven in).

3. Break the thread, leaving thread for sewing. Cut out a circle from cardboard with a diameter equal to the diameter of the red part of the watermelon.

4. Fold the cut out circle along the diameter and cover it with a circle of watermelon on top. We start sewing from the corner, while pushing a little fabric inside. The knitted watermelon will take the shape of a real one.

5. First, we sew up both corners, then we put padding polyester or foam rubber between the cardboard halves and sew up the remaining hole so that our workpiece takes the shape of a slice.

6. Embroider randomly arranged seeds with black thread.
 DIY watermelon crafts for an exhibition at school
 How to build an airplane out of wood How to make an airplane out of wood
 DIY paper machine (diagrams, templates)