How to make a USB fan from remedies. USB fan from computer cooler fan from cooler
The most logical use of a computer fan is not for the purpose is of course the wind generator. Simplicity and availability of a computer cooler inspired many homemade. The idea of \u200b\u200bcreating a portable charging with your own hands for mobile devices does not give rest to many. So the author of this wonderful video language has long wanted to check - what is this turntable?
We take any cabinet fan, the more in the diameter, the better. Many naively believe that its electric motor will immediately turn into a generator, it is necessary to twist it. However, the maximum, to which he is capable of such a performance is to ignite the weak LED. Is this limit? Why so few? To understand the cause, you need to look inside the device. The whole focus is that in such coolers there is a non-micolster engine. It is not structurally adapted to work in the opposite mode as a generator, and that is why: its windings are wound consistently with a double wire, and also opposite to each other, and the magnet poles alternate. Therefore, when rotating a fan in coils, anti-EDC will occur and such a generator will be ineffective.
The first method of reconstruction of the cooler to the current generator
The first way to exit this situation is to try to cure a native motor, that is, rewind the stator with a new wire. Of course, this procedure is very painstaking, but for those who know how to work with their hands - quite sat.
And in educational purposes even useful. The main thing now is to alternate the winding directions on each core. Thus, we will have the simplest single-phase alternator alternator. Between themselves coils are connected consistently. The greater the number of turns and thinner wires, the better. The beginning of the first coil and the end of the latter will be according to the conclusions of our generator. Now you can collect everything and check. But do not forget that the voltage will be variable. Therefore, you need to make a simple rectifier or buy ready.
After all this treatment procedure, the indicators of course improved, but not radically. The reason for this may be both too much a gap between the stator and the rotor and the weak ring magnet. Its actually magnet can be called with a big stretch. Plus, the rectifier still eats from one to two volts. Unfortunately, such a remission did not justify itself.
Second version of the alteration of the cooler in the windmill
Well, we go to the plan "b". Take the usual brush motor from the printer. It is easily turning into a generator without alterations. And thanks to the mechanical collector, when rotating immediately gives constant current. And no rectifiers need. His power is minimal, which is important for a small impeller. However, it should be noted, for effective work it requires high revs, and therefore wind speed. Let's see what will be able to survive from it by conducting a test series. It can be concluded that in the wind at a speed of up to five meters per second, there is nothing to catch at all, but in the range of five to ten meters per second it is quite possible to power a large LED flashlight and in practice to apply for duty lighting of small rooms, corridors, street tracks or As a bench. You can abandon the batteries in a small radio, and if you add a drive in the form of an ionistor in the chain, then a problem with wind gusts and the design will become more practical. If you live in a high-altitude house, it is ideally to place such a wind generator on the balcony and find it your application. But about charging mobile phones with such a windmill, you have to forget. Just not enough power. To dial the voltage is not a problem, what will work the phone diagram and how it would show the charging process, but the current will be at the same time no more than 50 mA with winds about ten meters per second. And this is a meager power. For normal charging you need ten times more. Alas, this is possible only under the hurricane wind. By the way, the big plus of a small windmill is that it is not afraid of strong wind gusts and it does not need protection, and the cheapness and simplicity of design are able to wake up the fantasy much more self-delicacies who are capable of doing wonders with their own hands.
Detailed process of manufacturing a windmill from a cooler from the computer is shown on the video.
Summer came, and therefore heat, heat and eternal deficiency of the coolness. But this problem is fixing, and quite easily. You need only a few details and a little free time, so that your own hand to ease your life, fill it with a light cool, which you will certainly get, making a USB fan at home. Of course, you can go and buy a fan in the store, but how pleasantly will sit near the same computer, and you will blow a light breeze from the USB fan you created. Yes, with his own hands, the thing always pleases not only the eye, but also itself develops.
We offer watch video homemade - USB fan:
Fan USB Tools:
- the usual CD disk (not necessarily new);
- tube from silicone glue empty;
- wooden bar;
- mini drive;
- USB cord;
- Motor;
- holder;
- adapter;
- Silicone gun glue.

In the tube it is necessary to do three holes, one in the lid, and two on the sides. Holes are easy to do, using the usual nail, which must initially heat.
In a wooden bar, it is also necessary to make a slot or deepening. Make it easily taking advantage of emery.
Mini drive easily turns into a propeller. To do this, it must be flashed on uniform blades, then heat the stationery knife and cut through in advance drawn lines. And after that, the foundation of each blade is heated using a lighter and with the help of hands a little every blade is wound up to get a propeller.
Motor, holder and adapter take from a non-working seal.
Now proceed to the USB fan assembly.
Adhesive gun heating. The holder along the axis is lubricated with silicone glue-gun glue. This glue needs to plant a propeller tightly. Put from all sides. Then, on the other side of the holder, dripping the glue and glue an adapter. We are waiting until the glue dries well. Usually for this you need only a couple of minutes.

Now we take a tube from silicone glue, remove the cover and lubricate inside with silicone glue. And insert the motor so that the part that we connect, sticking out of the hole, which we initially did.

Then the USB cord is asked to the side opening of the tube from under the glue and connect the ends of the wires with the motor.
In the deepening in a wooden bar, it is necessary to pour silicone glue, and there are tightly the wire from the USB cord, and the tube itself with a motor inside is glued to the base of the bar. And on the other hand, Bruska glue a CD disk on silicone glue.
Now the propeller is necessary from the side of the adapter glued to it, to put on the sharp edge of the motor, which sticks out of the hole in the tube from under the glue.
Finally, our USB fan can be included in the network and get such a long-awaited coolness.
Cool, who can!
Summer heat can get anyone. Especially in combination with a dead calm. When it seems that everything is moving around at a pace of slow motion, and the air can already be drunk, and not breathe them. Immediate cooling! But the wind is not foreseen, slaves with appeals, as in Eastern films, too. And if it is not possible to buy a motor with a propeller or means to it, nothing remains except to make a fan with your own hands. Do not bend from the heat, in fact! And will help us in this noble business. Undress computer spare parts.
If there is one cooler
This fan substitute is easier to connect to the USB connector on the computer by a piece of cable with the appropriate connector. On both devices, you can crop all the wiring except red and black. They must be interconnected (lady or twisted) - of course, the same colors. It remains to insert the USB connector to the port - and ... not too rejoice. Because it is possible to make the fan in this way, but if the cooler will be more powerful 5 in, it will blow much slower.
If there are several coolers

Optimally, if the coolers are the same sizes, and their number is multiple two. Let's say four. Follow the sequence, how to assemble the fan of this kind, and speake time. We connect the "magnificent four" with a superclaim (10 minutes). We connect them in parallel to the charger from the mobile phone (10 minutes). The design is put on the edge on the table and powered by the network (10 seconds). If charging is designed for 5 V, and the coolers are 120 mm, you will be a gentle breeze. If on 12 V - a powerful thread simply fans a homemade fan from the table! If, of course, it should not be fixed. And if you are not afraid to be botheted, because the draft will be overhaul. An even more powerful unit is obtained from fans freed from old computer power supplies. They can be transferred in the usual package, and you can install directly in the opening opening instead of the air conditioner.
If there are no coolers

Just do not say that you will not have two unnecessary CDs or DVDs! To them, however, to solve the problem, how to make a fan, you will need a plastic or cardboard tube, a cork from a wine bottle, a motor from a children's toy and a cable for its connection. One disk should be placed on equal eight parts with a pencil or needle. Then, exactly on the markup cut it, not reaching a little to the unpainted median ring. The next operation must be done carefully. It is necessary to heat the base of each fan blade in order and bend it in the desired side to a small angle. Do not overheate the disk, otherwise it will be squeezed, the center of gravity will break, and the fan is unpleasant to vibrate. Just in the center of the traffic jam, a hole is made under the motor of the electric motor; She herself connects to the blades. The motor is glued to the tube, and the tube is to the second disk (based). The blades are put on the motor. It connects to the power source through the cable. That's how to make a fan not only for yourself, but for everyone, who needs coolness in the middle of the heat!
The fan is not characterized by a complex device. It consists of a motor, blades, various adjustment buttons and coasters. There are additional elements, type of backlight, hours, but these are already options that are not so important.
It is not necessary to buy a fan at all, because it will be quite possible to make himself. Especially, for this you do not need special masters.
With the proper ability, the self-made model will not be able to get rid of old things, and the ability to show a fantasy and, possibly hidden talents. Some craftsmen are quite simply and functional and extremely attractive options. They harmoniously complement the interior and become the center of attention not worse than any art object.
How to make a fan from a conventional electric motor
Probably the easiest and fastest way to get a self-made self-made fan itself, it is to find an ordinary motor who is most often found in toys.
Standard electromotor from toy
Order such a thing is not difficult. Moreover, today, without stopping for a minute, the caravans of various baubles from the Middle Kingdom. And if not, it is enough to buy an inexpensive toy machine and remove the motor from it.
But it is definitely not worth waiting for the impossible from such a device. Rather, it can only slightly drive the air. But for the desktop model will completely come down. He will get to blow a face sitting at the computer.
For such a fan, you can use absolutely anything. The main parts will be:
- blades;
- motor;
- on / off button;
- stand;
- supply system.
Otherwise, the limit of the idea will be only within the limits of fantasy.
After the motor is ready to use, it makes sense to take care of nutrition. It can be batteries, as in a toy, for which the motor was intended. But, definitely, this energy will not last long. However, there is also a plus - the device will retain compactness and mobility.
The second option is power supply. But in this case you need to no longer rearrange. Direct connection through the plug is the right way to ensure that the motor is burned. So do not experiment, trying to promote the engine to large revolutions. On toys, electromotors are usually designed for 3-4.5 volts, and the desire to give more rotation due to powerful energy sources, firstly, the source will quickly plan (if it is a battery), secondly, the fan resource will seriously reduce until breakdown. The engine will begin to warm up, brushes can be mounted.
But here the modern chargers convert the voltage on the network, reducing it to the specified parameters. You can find a power supply, including on sale that is suitable for the motor perfect.
You can already take any material to create blades. The main thing is that it is light. Due to the weakness of the motor, the less the blades will be wearing, the faster there will be rotation, and, it means, the efficiency of work.
- The easiest option is to take a plug from a conventional plastic bottle that will serve as a fastening of the blades. In the bottle to do a hole in the size of the rotating axis of the electric motor.
- The blades can be made from the usual CD. The center is burning over the size of the bottle cork. The disc circle is divided into 8 sectors. They cut at a certain distance, but not to the center. After the disk, you need to heat the fire to easily bend the blades. For this suitable lighter.

Creating blades on a CD disk
- Attach the disc to the plug can be glue. The second option is when the hole will stay in the middle for the plug - immediately connect the design. Plastic melted hardened and will be firmly held.
- After all this design is connected to each other. Wire is suitable for the stand. This is perhaps the easiest option. Yes, and for such a lightweight device, you will not think better. You can get the axles in such a way as to imperceptibly hide the batteries there. Or carefully put the power supply wire that goes to the motor.
- The circuit should not be always closed, if you use batteries, so you need to secure the button on the housing. It is inexpensive. You can use it from the toy with which the motor was shot.
Another option of the propeller device is the use of paper, only dense. The method is even easier, but less practical.
Tip!Experimenting, remember that the larger the fan blade area, the more noisy it will work. On the other hand, small blades are not so effectively chased air.
How to make a fan from paper
Paper is not the most suitable material for the home fan for the simple reason that it is very impractical. Any water ingress, even a banal humidity - and the device will rapidly start losing weight.
But even despite all the cons, folk craftsmen, even from paper make quite cute samples. Of course, we are talking about tight paper or cardboard. Good fit strong material from boxes. Another motor or cooler is still useful, the on / off buttons and wires.

The simplest desktop fan using cardboard
An exemplary design plan is that the device can be easily simplified. The impeller is easily cut and can have both a lot of blades and a little. All at the request of the wizard. The motor can be fixed on a wooden or cardboard bar. The stand will also go from a paper or an old computer disk.
It is just important not to forget that such a fan is very easy, which makes it in work shaky. Therefore, it is necessary to further enhance the housing. It is good for old batteries, bolts or nuts.
How to make a fan from a plastic bottle
Favorite raw materials "crazy handles" - plastic bottles - almost perfect to create their own fan. For propeller, the upper part of the standard round bottle is well suited. You need to cut off the part with a plug just above the glued label.
- Part of a bottle with a plug will be blades. For this plastic, the plot must be cut so that several different petals are obtained. After one petals are cut off at the base. The remaining are future propeller blades.

Plastic bottle fan blade
- To give blades shape and twist a little, you can use a candle or lighter. The main thing is not to overdo it, because the plastic is soft and can light up. The task is to warm it a bit, and not set fire.
- The plug will be the base of the propeller. It makes a hole in the size of the axis of the motor. So that the connection is tightly kept, you can put it on the glue.
- Now time to think about the foundation. For him, the remaining part of the plastic bottle will also fit. It cut the hole in it to rigidly put the plug with the blades at right angles. You must not forget to drag the base - nuts, bolts or any other metal objects.
- Based on the button for the button and the chain is going. There is enough space for the power supply.
The field for fantasy when working with a plastic bottle extensively. You can use several bottles at once. One will become a propeller (more precisely, its part), and the second is a good basis. But then there will be additional materials. For example, ordinary drinking tubes.

Simple and easy bottle fan
How to make a USB fan
But the most comfortable and simple fan is the old cooler, which can also be used. For example, put it on the table, and it will cool, only no longer a processor or a video card, but a person.
The advantages of such a design are obvious: the cooler is very reliable, because it is his work - constantly twist the impeller and cool something. Yes, and get the coolers easily. It is enough or find an old computer, or order a new fan or buy it in the store.
The device of the cooler is simple. This is a ready-made fan in a plastic case. Two wires depart from him (usually red and black flowers).

Conventional computer cooler
Make a USB fan - case of a few minutes:
- The wires on the cooler are cleaned by 1-2 centimeters.
- An ordinary USB wire takes, at the end of which you also need to get rid of isolation. The USB-cord has four wiring. Of these, you should choose black and red. The rest of the cut, so as not to be interfere with, and the necessary clean it.
- Red cord wire connect with red on cooler. Black - with black. Carefully insulate plots without winding. Ready.
- It remains only to think about the retaining device. Here it can be useful already familiar wire, which takes any form. Even a cardboard box will completely fit for the fan housing, and even to spend a little more forces and time, you can even build a real designer object.

Designer approach to fan design
Very convenient when the fan turns on when the computer is started. In addition, modern blocks have several outputs to USB at once. It turns out that such a device will not be interpreted.
Another point - sometimes you want to turn on the fan regardless of the computer (especially, the device with a cooler is quite powerful, good and useful). Then you can use adapters. For example, the phones today are charging, which are easily turned into a USB cord when the connector is disconnected with a fork. Such equipment can also be used for a fan by making it universal: working from the network and from the USB port of any computer. Another plus of such a design is the simplest electrket. The cooler-based fan can do without even unnecessary buttons: only wire and fork.
Neckless fan do it yourself
But a slightly outstanding use of a free cooler (but you can do the electromotor) is a blind fan. Modern, interesting, with proper ability - no less effective - a solution that exactly attracts look. The thing turns out completely non-standard, spectacular.
For example, here is the perfect appearance of a fireless or channel model of the fan:

Approximately so you can make a fireless fan and do it yourself
The most important thing in flawless models is definitely their appearance. Therefore, if you do such a device yourself, you need to try to think through the frame in the smallest details. Uneven edges, roughness - all this impression will ruin.
The housing of the fine fan is almost entirely a work area. Do not think that some space technologies are implemented here.
Air circulation is performed quite prose - with the help of rotating blades. They hide into tub-base. If you take a cooler from the computer, you can make a stand in its form. Here, as they say, at the discretion of the author.
Differences from the classics in the location of the cooler - it is placed in a blind fan horizontally.

Couple location in a fireless fan
The upper ring is made inside the hollow, two-layer. There is a major redirection of air in the desired side.

A hollow cavity is visible in the top ring of the fan, where the air blows
You can make the joint fan core from plastic, wood, dense cardboard. Use the material is better flexible so that you can easily give it the rings. Alternatively - apply a combined structure. For example, make rings from cardboard or plastic, and a frame rigid is made of wood.
You need to cut off:
- four faces for a stand;
- Two circles of the same radius;
- Two rings of different diameters twist.
Then everything connects together if necessary - paints.
Power can be organized different. Universal option - a combined wire for a USB connector and a connected plug for a socket.
The device can also be complicated a little. For example, make a light strip from a diode ribbon along the edge of the rim. Energy backlight consumes a bit, but will add a beauty fan. And the power supply and wiring, if necessary, easily hide in itself the stand.
How to make a powerful fan do it yourself
When it comes to powerful fans, it should be understood that completely different engines are required for them. Starting from the motors of old fans, ending with other household appliances. Well fit:
- unnecessary ceiling chandeliers with a fan;
- old lawn mowers;
- drill;
- hood.
The only one, you need to get into the voltage corridor, which is required to power the motor. For example, for drills most often need 18 volts. But for ventilation purposes, there will be enough less than half of such a voltage. Even 12 volts fans work very loudly and extremely unstable due to the strong inertia of rotating blades.
Food for powerful electric motors should be made from the network. Therefore, it is necessary to think about installing the power supply or connected charger. The power supply can be complicated by adding light bulbs, electronic clocks, radio, a toggle switch or a fee to switch operating modes. But it is easier, of course, limit the fan only with the button if it is enough.
In any case, such homemade versions of self-timer fans are sometimes much better even purchased options. With proper ability, it may turn out a very good thing, the real pride of the owner.
Periodically, the need for a kind of fan occurs, but small models are relatively many. You should not hurry to get up, because a small fan can be safely made with your own hands. In efficiency, it is not inferior to purchased counterparts, and its creation will require the minimum amount of materials.
Creating a fan from a cooler
The most simplest way to make a fan will make an unnecessary cooler (such are used in the computer as a cooling system of components).
It is not surprising that this method is the easiest, because the cooler is a small fan. It remains only to make some simple steps to give it the final form and performance.
The cooler itself is fully operational, but it is necessary to prepare it to a non-standard method of use:
- Wires.
If the fan is located next to the computer, the usual unnecessary USB wire is suitable. It must be trimmed and remove the insulation (the same with the wires of the cooler):

We are only interested in two wires: red (plus) and black (minus). If there are other colors in the cooler or USB cord, we boldly cut them off and insulated, since they are absolutely not needed and will only interfere.
- Compound.
After cleaning, the wires need to be combined with each other (it is enough to twist them with each other). Do not confuse colors. It threatens serious complications in the process of creating a fan.
For twisting, 10 mm length is enough. If necessary, it is possible to clean most of the wire, it is not scary, however it will be much more to isolate.
- Safety.
Remember that the correct isolation is the key to success and the warranty that the computer or the outlet does not burst. It is necessary to glue the bare wires with a tape (exclusively in the absence of nutrition), and the thicker it will be, the better.
There is no particular sense to explain than it threatens the fall of "minus" to "plus". If the red and black wires come into contact during electricity transmission, not only the USB wire / port, but also components of the computer can burn.
In principle, computers are not afraid of such moments, if they are equipped with protection against voltage drops. But when the socket is used in the wall, then repair the wiring in the apartment will be much more complicated to create a small fan.
Therefore, seriously take care of the insulation of the cereal parts of the wires. Extra complexity is rarely needed.
- Latest strokes.
Do not forget that the computer cooler is very easy, but at the same time very fast. Even at a voltage of 5 volts, the speed of its revolutions will be quite high. This voltage we consider no reason: the cooler will be perfectly cope with its task, and the work will be as silent as possible.
Because of the insignificant dimensions of the device from oscillations and vibration, it can fall. To allow for this not worth such reasons:
- there is no way to cause lethal cuts such a cooler even during work, but there is no guarantee that the device does not jump and will not fly away, for example, in the face;
- having not fallen onto a flat surface (on a pencil, pen, lighter) its blades may be damaged: fragments that broke down at such a velocity can cause irreparable damage;
- other unforeseen circumstances.

Therefore, it is important to fix the cooler (tape, glue) on some more stable surface: a box, wooden bar, table.
- Additional functions.
Optionally, a ready-made fan can be updated externally, add a switch (so as not to pull out the cord each time), etc. It is worth the way that the method relatively well increasing the efficiency of the device is.
It is enough just to cut the top of the plastic bottle and glue it (a wide hole) to the frame of the cooler. Thus, the air flow will be more accurate and directed: the power of air movement will become stronger by about 20%, which is a fairly good indicator.
On this, the creation of the fan is completed, and it is ready for full work.
Fan from disk
If the previous version does not suit you, and I want something more difficult, then consider the independent creation of a fan from computer discs:
- Engine.
T. K. We do not use the cooler, you need to get a motor that leads the blades of our future device in motion. In fact, you can use the motor of the already mentioned cooler of the cooling system, but it is too simple.
You should find or buy a motor with a moving defined part (for example, a sticking iron rod). Once we make a fan from the disks, then the presence of such a rod will be the best option. Motors from the old video recorder or player are also perfect, because they spin discs and cassettes - what is needed for a knife propeller in our fan.
You should not use the engine from a washing machine or even the past fan - they are extremely strong. In terms of self-harvesting, it will be very harp. A strong motor in the first seconds will split fragments of the blades on the room and flies from the base.
In the presence of a working motor, it must be copped with wires on the previously mentioned form.
Having an engine on the hands, you need to concentrate on the disks that are the main components of our fan. First of all, cut one on 8 equal parts:
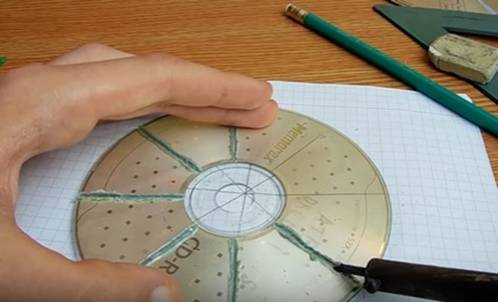
In order not to be mistaken during the procedure, you can pre-mark the disk with a pencil. It is best to use a soldering iron (there will be no sharp edge, so safer), but conventional scissors are suitable.
After the disk, he should be slightly heated with a lighter so that the material becomes militant, and to bring the wings on the manner of the blades, like the conventional fans:

Exactly this can be done with a conventional plastic bottle:

In the center of our propeller you need to shove a wooden tube from the bottle. If the size is large - it can be overtaken.
- Other parts.
As a center holding the entire design, you can use the usual toilet roll sleeve:

It should be fixed in the center of the second disk, which will be the foundation for the fan. From above, you can arrange half the second sleeve, as you can see in the photo so that the motor inside it is. On it and you need to hang blades from the disk / bottle.
The fan is ready to work. Optionally, you can add decor elements so that the device looks presentable.
And see clearly how such a fan makes from the bottle, you can in this video.
Additionally, it should be reminded of extremely important points when creating a self-made fan:
- To fasten the parts with each other you need to use high-quality "superciles".
It is the same, to rejuvenate which will not work even if desired. The whole design should be maximum sustainable and not to succumb to vibrations and vibrations. Delivered with responsibility and fill with glue all that you will see except the blades and inner parts of the engine.
- Do not hurry.
You risk skipping an important detail, and this significantly increases the chances that in the process of work of the finished fan something will go wrong. The consequences can be very serious.
- Do not use bad components.
If the motor that is used to create the engine, you do not need - it is possible its performance in doubt. Make sure it will still serve some time and will be effective.
Creating an engine from scratch is a very highly specialized process and requires good knowledge. Take care so that the motherboards are in order, all the necessary compounds were rude well, etc. It is better to check more than once again than to do another fan.
- Insulation.
Once again we remind: Do not forget about the high-quality winding of the wires with a tape. It is not worth saving it, because short circuits and their repair will be forced to sacrifice large spending. Perhaps even in a monetary sense.
The personnel fan is quite compact, efficient and well copes with its task. It is not difficult to make it if the procedure is responsible and follow the instructions. There are no restrictions and on dimensions: if you feel strength, boldly start assembling the larger fan.
In contact with
 Why you can not give icons
 Is it possible to give icons as a gift: Signs, the opinion of the Church
 A year ago left her husband, and now I do not know what to do