How to build a brick stove with your own hands. Heating furnaces with their own hands: schemes, features, basic materials. "Buslaevskaya" oven: projects
The need for warmth and comfort in a private house occurs already in the middle of autumn, and well, if the house held central heating. The same, who has to go through their home autonomously, will have to thoroughly prepare for the autumn-winter season. Today, modern boilers or electrocheamines can solve the problem today, but they will not create the special unique atmosphere of live fire in the furnace, accompanied by crackling firewood. Therefore, it is quite right if such a question arises for you: "How to fold a brick oven with your own hands?" In this article, we will consider the process of creating a brick furnace in stages, taking into account the schemes and all the materials and tools you need during the stacking process. You will only have to repeat all the processes described correctly, and you will become the owner of a good home furnace, which will warm you with cold winter evenings.
It is very easy to make a brick oven if you have a clear concept of what exactly the oven will perfectly fit into the conditions of your structure. To do this, you need to familiarize yourself with the brief characteristics of private houses, and already pushing out of the information received, make the right choice. So, the types of furnaces regarding the type of buildings.
- Oven in a wooden house. The furnace of this type needs a very reliable basis. It is better to provide an oven at the stage of building a house, then you can significantly reduce the cost of creating a foundation for furnace equipment. If the furnace was not laid in the construction project of the house, you will have to spend money on the partial dismantling of the floors and subsequent finishing works. There is no other way out. The best option for a wooden house will be a compact brick furnace of the heating and cooking type of medium heat capacity, as well as a trap or option with bread maker.


- Classic Russian oven for cottage. This option is losing popularity due to the massiveness and complexity of masonry. Such a large oven with the functions of cooking, heating water, heating and a sleeping place, that is, a sun bed is very convenient, but will not fit into the house of small square, and also requires the mandatory creation of an individual monolithic reinforced base.

- Oven in a rustic house.An ideal option for a country house will be a stove with a cooking panel and a heating tank for water.

- The furnace in the cottage or in the country. Cottage and Cottage imply a visit only at a certain season or on weekends, which means that in such a structure, a small brick oven with a cooking surface will be sufficient. In this case, it is worth seeking a furnace structure, folded along the summer option, when warmed air will be directed directly into the chimney, and not to heat exchange channels.


- The furnace for the house with a bath. If the bath is attached to your home, it is quite aware of the construction of a brick stove-stove with a built-in boiler for the heating of residential premises.

- Barbecue oven. Such aggregates are usually installed on attic, in arbors or summer kitchens. They may have modest sizes or be very impressive, but equally used only for cooking, so they are equipped, for example, cooking panels, ovens, mangals, barbecue grills, cast-iron caulders, etc.


Barbecue cooking with a brass cabinet
This is all that you need to take note in order to correctly determine the type of suitable furnace equipment. You can move on.
Soviet Council. Determining with the choice of furnace structure, first of all, pay attention to such items as the comfort of use and fire safety!
Stage 2. Building material: choice
When choosing bricks, it is necessary to consider how much it will be resistant to the effect of high temperatures, and the main emphasis must be put on the integrity of the material after repetition of the heating and cooling procedure. The characteristics of the brick as a building material will determine the deadlines for the operation of the furnace. It is important!
Choose brick

Any brick has labeling. One of them denotes density. For furnaces, optimally acquire a brick with marking from 75 to 250, it should be remembered that the more dense product, the more slowly you will have to pull the furnace, and the slower it will be heated. On the other hand, a well-drowning oven of a dense brick will slowly cool down, giving his soft heat into the atmosphere.

If you plan to build a furnace in a bath, it is better to choose the least dense brick (but above M100) so that there is no time to get a lot of time. And for devices intended for the heating of residential premises and cooking dishes, it is worth purchasing a brick more dense.

It is worth knowing that the density indicator is not a brick quality sign. However, it is better to clarify the composition not to purchase goods with hazardous health chemical impurities.
The next marking is frost resistance of the product. This indicator is especially important (and must be the highest) for the part of the chimney, which is above the roof. Frost resistance itself is a product of the product to absorb moisture, which during crystallization deform the material. The best indicators of frost resistance in bricks of facing hollow, the inner part of the chimney can be postponed from full-length red brick. High-quality products with a high level of frost resistance are produced in the Novgorod region, the city of Borovichi.
It is advisable to purchase red bricks made by plastic molding. There are few pores in these products, they are well withstanding the temperature differences, the laying does not crack even after a long downtime. Silicate products, extruded, cast by the method of slip casting, raws are not suitable for the construction of furnaces.

The chammatory brick, manufactured by GOST, withstands up to 1350 degrees. From such a brick, you can build all the furnace or use it only for the lining of the inner working surfaces of the furnace. For masonry, the furnaces can be used straly-yellow with dark splashes of the product of the sh8 brand, chamotte bricks sh22 - sh45 are suitable for the filling arch. However, this recommendation does not apply to bunny furnaces, because chamotte brick is operated only with humidity less than 60%. In the bath, it is better to use clinker brick or ceramic refractory.


Prices for chamotte brick
chamotted brick
How to check the quality of bricks:
- if you drop the product to the floor, it will split into large pieces. If the brick crumble into the crumb, give up the party;
- if the brick touch, it is not dust;
- if a quality product is hammer, there will be a clean ringing long sound;
- the face of a good brick is smooth, color saturated and smooth.

GOST 530- 2012. Brick and stone ceramic. File for download
GOST 8691-73. Products refractory general purpose. Form and dimensions. File for download
Choose a mortar

The choice of building mortar is an important point. If the solution is incorrect, the furnace will smoke, and cracks may appear on the surface surface.
Most often, the masonry solution is prepared from a river fine-grained sainted sand (the sand is 1.5 mm maximum) and clay, which is necessarily soaked before kneading for several hours. Pushed clay overwhelmed through a sieve to get rid of lumps, because the masonry seam should not exceed five millimeters in thickness.

Clay solution - preparation
The proportions for the clay solution depend on the quality of clay - than it is greater, the more sand, but it is important not to make a too skinny solution that dries and cracks. It is recommended to make several test mixing solutions to determine the desired proportions of sand and clay, while it is important to stir sand thoroughly by adding it to several techniques.
The sample for fatty is made by taking half the fist of the material, silent it and sprinkled, having rolled the ball, and then putting and squeezing it between two smooth plates. If the ball managed to squeeze it into a third of its diameter and the crack did not appear, the solution is suitable for masonry the furnace. Additional quality check - drying the ball with a diameter of 5 cm in air for 20 days. The dried ball of good quality will not be frozen when pressed on it.


How much water pouring? Again, we make test zones and check the degree of fluidity of the solution. We carry out a celma by a mixed solution and look at the next:
- if it is torn, then the water is not enough;
- if almost instantly swim, - the oversupply of moisture;
- if the trace is clear, and the edges are smooth, then the solution is suitable for masonry furnace.
Figures 5 and 6, the Kelma was demonstrated, which was dipped into the solution. In the first case, he is too fat, in the Kelma, the jet divorces remained, it is necessary to add a little sand, and in the second case (Fig. 6) the solution is good, slightly shines the metal, and the divergent divorces.
Note! To mix the masonry mixture, it is desirable to use soft water. Too tough, that is, 8 degrees and above, reduce the degree of strength of the solution.
The last suitability test is carried out by flashing 3 mm layer on the brick bed. The second brick is glued to the first, stick to the image and wait until 5-10 minutes. For the specified time, both bricks must stick. If the bricks do not bloom even when shooking, the oven is guaranteed a hundred years.


Note! To masonry, the furnace in the solution is added either chamogeny sand, or a mixture of equal shalper and quartz sands.
Video - Preparation of the clay mortar for masonry furnace
The clay solution for laying the foundation and the flip of the chimney is not used. For these elements, a classic cement is used or with the addition of a lime test solution (M500 or M600 cement - 1 part, a limestone dough - from 9 to 16 parts).

Important! If you think that you will not cope with the preparation, testing and kneading of the clay solution, purchase ready-made stoves, for example, terracotta (20 kg 306 rubles). A mixture of red clay is suitable for red bricks, and refractory mixtures of gray color are ideal for both red and chamotte bricks. Do not take ready-made mixtures with cement content.

Cement prices M600
cement M600.
3 stage. Selection and calculation of the amount of bricks for masonry

At the second stage, it is necessary to carry out the optimal calculation of the sizes of the brick furnace. By setting the final size of the oven design, you can set the required amount of brick. A red full-length brick is a fixed size 250 (length) x 120 (width) x 65 (thickness) mm with deviation +/- 2 mm.

Fireproof chamotte bricks, from which the furnace lay out almost all stoves, are manufactured and marked according to GOST 8691-73. Size information is given in the table.

For one square meter of masonry in Polkirpich, you will need:
- excluding the dissolve seam - 61 bricks;
- taking into account the dissolved seams - 57 pieces and 0.011 cubic meters of masonry solution.
Accordingly, 122 or 113 bricks of full-scale red, and the estimated amount of consumed solution will be 0.022 m3, will be needed for two meters of square brickwork.
Note that when laying in one brick, that is, if the thickness of the furnace wall is not 120, and already 250 mm, then 128 or 115 bricks will be used for each square meter, respectively and taking into account the dissolves, and the amount of masonry mixture will increase up to 0.027 m3.

How to make a simplified calculation of the approximate number of bricks for the entire furnace:
- the number of bricks in the first row is calculated;
- the resulting value is multiplied by the number of rows of the furnace;
- the found number is multiplied by 0.8 (for heating devices) IL 0.65 (for instruments with a heating shield).

For example, we calculate the amount of brick on the oven with dimensions of 90x90 cm. 900 mm accounts for 3.5 bricks. That is, in the first row there will be 24.5 pcs. We multiply on the number of rows 24.5x30, we get 735 pcs. We accept the coefficient of 0.65x735 pcs. \u003d 477.75 pcs, round up to 480 and add 10% for rejection.
The amount of brick on the pipe is considered separately. Its height and design are accepted in accordance with the SP 60.13330.2012 ("Heating, ventilation and air conditioning") and SNiP 2.09.03-85 ("flue pipes"), as described in detail below. For a direct four-meter pipe, you will need:

We consider: 4x56 \u003d 224 pcs. On the otter, the cut and the flush is added to 56 bricks and multiply the result by 10%. It remains only to sum up the amount of bricks for a furnace with similar quantities for the chimney.

You can more accurately calculate the amount of material, to make up the already existing scheme-order, which shows the longitudinal and transverse cuts of the furnace, provide recommendations on the chimney masonry and the size of all elements, including doors.
This information can be used in practice by forming an individual plan for brick material costs.
It is worth noting: if you wish to get a perfect brick oven, perfectly fit into your home, be attentive, starting with the choice of furnace equipment and ending with its commissioning. This approach will allow you to enjoy personal creation in the future.
4 stage. Choosing a location of the furnace
So, after you have determined with the type of oven, identified the area of \u200b\u200bthe furnace structure, and also chose building material and the solution, go to the selection of space for mounting the furnace.
Typically, the furnace is installed in one of the corners of the room or at the wall, it allows you to save precious meters of living space.

The heating furnace can be located in the center of the house, at the same time different in its own faces while immediately in several adjacent rooms, for example, a firebox will go into the kitchen, and three other walls will heat the rooms.
Bath stove is better to build near the door to the steam room. This will ensure proper temperature and humid mode and will allow air masses to be effectively circulated (provided that the exhaust and supply ventilation opening is properly located).

However, you need to remember about the distances between the surfaces of the furnace, chimney and walls, ceiling. According to SNiP 2.04.05-91, it is worth following the following distances:

Heating furnaces, smoke and ventilation canals of residential and public buildings. Rules of production and acceptance of work
Stone and oven work. Files for download PDF
Stage 5. Fundam
The furnace created from the brick has a greater specific mass, so without a reliable foundation it will not work the design.
The foundation for the furnace can be monolithic reinforced concrete, pile, columnar, posted from blocks, pile-screw.


Regardless of the type, the foundation of the furnace should not be associated with the foundation of the house. The form of the foundation is chosen as for the house, pushing out from the type of soil.
- Gravine-sand soil allows you to equip a finely brewed base.
- If the soil is clay or sedimentary, it is better to fill the foundation on a rubble pillow, while deepening it to the level of freezing.
- In the zones of permafrost, the pile-screw base is equipped, special attention is paid to the thermal insulation of piles.
- On dry rock soils, the foundation may have a minimal thickness or absent at all.
- The bulk is not suitable for installing a brick oven.

Consider a method for arranging solid bases for a brick furnace.
Step 1. Depending on the type of soil and the level of its freezing, digging the pita. The width and shape accept, based on the oven dimensions and adding to its length and width of 10-15 cm, respectively. Immediately pay attention to the location of ceiling beams of overlapping - the chimney pipe should pass between them, and taking into account the decisions regulated by SNiP. It is also recommended to make drainage (drainage) from the Fundament of the furnace to reduce the humidity and the soil.

Step 2. The bottom of the trambam and most possibly aligned horizontally. We fall asleep a decheatimeter layer of small broken bricks, boob stone or rubble. We repeat the procedure for the tamper.
Step 3. We prepare a liquid cement solution (the ratio of cement and sand 1 to 3) and pour them mound.

- combine Destinetimetime layers of rubble fridge with cement fill. This option is acceptable for the bases of a small depth, namely up to 50 cm;

- install the reinforcement frame and pour it with concrete. The frame knits the wire from the reinforcement with a diameter of 10 mm. The size of the cells is 10x10 cm. The formwork is installed in the pita, the frame must defend from its walls and the bottom of 5 cm, for which plastic locks or brick pieces are used. The concrete is poured inside, the mixture in the fill process is compacted with a deep vibrator or a metal strut. The upper point of the fill should be below the level of the first floor by 15 cm;


- pour a concrete reinforced plate, on top of which to lay out of silicate or red brick walls of the foundation, and pour into the inner part to pour concrete with a stunt (a bulk aggregator should be less than or equal to the volume of concrete).

The first and third base options are completed by a layer of cement mortar. The flooded layer is verified by the level and, if necessary, is leveled with a rule or other suitable tool.
Further work is made after complete drying of the solutions used in the process of filling the foundation.
Step 5. We lay waterproofing with three layers, fixing with mastic (for roofing, we use the deregious, for rubberoid - bituminous).
Step 6.. Lay out a solid row of bricks. Whole bricks put on the edges, halves - inside. The brick base should be 5-7 cm already existing foundation, but by 5-7 cm wider than the oven itself.


Do not use cement for bricks with each other. On top of the masonry, which also check for horizontal, put another layer of waterproofing, then lay out the second layer of bricks, observing the dressing between the two rows. The brick basis ideally should be exactly attenuating with a clean floor or tower over it for 3-4 cm.
Important remark! Do not use the brick for construction, which has broken on the street all winter and repeatedly exposed to wet and freezing. Such products are able to quickly collapse, which will repeatedly reduce the service life of the furnace.
The space between the foundation of the oven and houses fall asleep with river sand.
Stage 6. Construction of the Kamenka stove with their own hands. Step-by-step instruction

This project can be implemented both in a separate bath and in a steam room attached to the residential house. The oven has no tank for heating water and heat exchanger, but there is a cooking panel, which is easy to heat the water for 4-6 people. At the same time, the oven cools very slowly, so warm water will even be the next morning after the procedures, and in the room even in winter the temperature does not fall below +15 degrees. The furnace will ensure steam sizes of 3.3x5 meters and with a ceiling height of 2 meters to eighty degrees for about 5-6 hours.

The Kamenka itself will be in the steam room, and the loading of fuel will be made from the rest room. Bath stones, which are approximately 40 kg (talco chlorite), are loaded into a special oven, where they are evenly warming up, due to which pairs in the bath turns dry and sufficiently thick, hot.

The height of the furnace will be approximately 1.33 meters. Square oven, side 0.89 meters. Operating these data, calculate the size of the foundation and put it in advance / fill it.
When building a furnace (chimney does not take into account) will be used:
- 269 \u200b\u200bred bricks;
- 63 Fireproof Bricks Sha-8;

- fire door cast iron with dimensions 0.21x0.25 m;

Head door - example
- the door for pushed 0.14x0.25 m;
- two clearance doors 0.14x0.14 m;
- grate grate 0.38x0.25 m;
- cast iron cooking panel 0.51x0.34 m;

- cabinet ovens for laying by stones with dimensions 0.25x0.25х0.44 m;
- one valve for the "summer" mode with dimensions 0.13x0.13 m;

- one catch for chimney, size 0.13x0.25 m;

- the sheet is a precipitated steel size of at least 50x70 cm.

- key in brickwork is a construction seam. It should be uniform for each row, carefully wrapped. Only so you get the monolith of the furnace structure, and eliminate the leakage of smoke from the fuel chamber. Perform the process extremely carefully;
- before laying a brick, it needs to be well moistened. To do this, prepare water container and lower the bricks for 5 to 10 minutes into the water. This time is enough to ensure that the adhesion of clay and bricks, in the future it was at the highest level. The wet brick after drying excludes the occurrence of cracks in the finished oven design. Bricks are kept in the water until the air bubbles come out. Refractory bricks are not soaked, but only wetted with water;
- before laying each subsequent series, use the construction level and plumb - the use of these tools in the working process is a guarantee that the design will be delivered from geometric curvatures and distortions.

The first row is laying out of the red brick. Total will need 24 whole and one brown brick. Singing a row very smoothly, check the horizontal level on the sides and axes of the masonry. Roulette Check rectangle and alight. Customize bricks with rubber hammer. Seams make no more than five millimeters.

The second row is no different from the first brick nor its quality. It is necessary only to carefully observe the dressing between the two rows. The laying is better to start with the corners, gradually filling the middle.

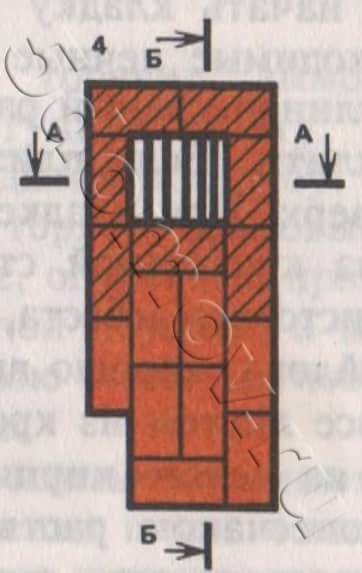
For the third row, take twenty red bricks and the coil chamber door. Sixteen bricks are placed entirely, four more collapse with a grinder or a metal with a tungsten carbide (see the drawing to accurately cut the elements).

Brick in front of sharp wet and securely fix. Observe Safety Technology !!!

Cutting Brick Bulgarian - Photo

Video - How to cut brick
Video - Bulgarian chimney brick
Do not rush to apply a solution, first post the whole range! Bricks are forbidden to lay the crane (cropped) side inside the furnace or chimney. It is also strictly forbidden to lubricate the inner surfaces of the channels and the furnaces.
If the brick is unsuccessful, removing it, we clean from the solution, reinstaluate, the Kelma is applied a new solution, after which it is re-producing fit.
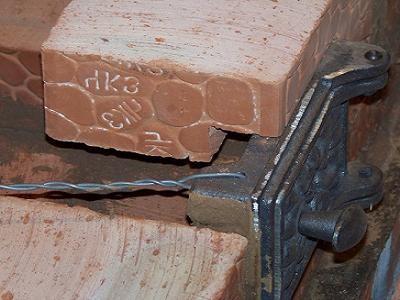
In the same row, we fix the door, for this, the frame of the door is wrapped around the perimeter asbestos cord, they smear it with a solution, insert and twist the steel knitting wire (diameter 3-4 mm, length 1-1.2 m, the number of rods for twist from 3 to 4 ) In the openings in the corners of the frame, and the resulting wire twists pass between the rows of bricks.


Fastening the door with wire - the top ends of the wire are laid between bricks
Installing a furnace door - Photo
Video - How to attach a wire to the door
Video - how to fix the furnace door pissed
The clay solution and severity of bricks will reliably hold the door frame.
Another way to install the door - using metal strips or plates extended at the ends. Elements are attached to the door frame by riveting, after which they are fixed in the masonry seams. If the plates are too thick, it is better to squeeze the grooves on bricks.

The accuracy of the installation of the door is tested with a plumb and level.
Council. In order for the clean door to get more neatly and accurately, remove the rectangular chamfer with bricks, which will be located around the perimeter of the door frame. That is, the hole for installing the door must be 5 mm longer and wider than the frame.
Do not worry if the day you will be able to lay out only three rows. Soaking, trimming, fitting and laying require time, patience and accuracy.

In the fourth row, we continue to form an ash chamber, additionally laying out the lower horizontal channel. For the entire row, 16 bricks will be required. For the channel, we immediately put the door 0.14x0.14 m. The door can be mounted without asbestos, simply to the solution, since in this place the temperature will be low, and the thermal expansion of the metal is minimal.


For the fifth row we take 16 and a half red bricks. Four of them we are shying the formation to make the door overlapping by the "Castle" method. Bricks lay the crane side up. Two more bricks shook the eye, forming overlap.

Row 6.
In the sixth row will be used chamotte brick in the amount of six and a half pieces and red brick - 12 pcs. In the diagram it is shown in yellow. From the chamot lay out the base of the fuel chamber. We make slots for laying a grate grid. The lattice hole must be 5-7 mm more than it so that the expanding metal does not destroy the masonry. The space between the grid and bricks (chamfer) fall asleep sand.


Experienced cooks advise a grate grill with a little, up to three centimeters, a bay in the direction of the furnace door.

One brick overlap the door is clear.
In this row of 9 red and 5 chammatory bricks we form a fuel cell. The brick that is put in the back of the fuel can be shredding at an angle of 45 degrees.

Install the door using asbestos cord. Door size 21x25 cm.
Also placing a welded oven from steel 8 mm thick. The cabinet will be in the fuel cell on its rear. The door cabinet has a little less than its height, that is, raised, due to which bath stones will not fall on the floor.

Masonry perform according to schemes. To work, take seven bricks of red and chamotte.

For the ninth row, you will need 6.5 red and 7 chammatory bricks. We build the walls of the fuel.

In this row already discussed above by the method of "in the castle" overlapping the flue door. The whole range will leave 7 red, 8 chamotte bricks and another 1 chamotted wedge.

Take 10 and a half chamotte and 6 and a half red bricks. We cover the door and the back of the oven. We are placing bricks by connecting the fuel with the nearest vertically located channel. Another channel is formed above the closet - we install the door there.

We take 12 red and 9 chamotte bricks. We produce shy, as shown in the diagram, also make a recess for the cooking panel, taking into account the necessary five millionth gaps. We lay the cooking panel 51x34 cm, do not use the solution.


Install the valve in the near vertical channel. To install the metal element, we make a slot in the brick, as shown in the schemes. The far vertical channel, starting from this row, splits.


Latch in the furnace - Photo
For work, we take 9 chamotte and 6 and a half red bricks.

We begin to form a decorative niche, for which we use 15.5 red bricks. Shamot do not apply.

We combine the near canal and central. We use 13.5 bricks.

We continue the laying in order. We take 14 and a half bricks.

We overlap the long-range channel and the central one. Two bricks over the niche put out the scene to make the castle overlap. Also, they put the brick over the cooking panel. We are placed by a wedge brick in the castle. Consumption per row - 18 pcs.


Overlapping the furnace completely, with the exception of the near canal. In this channel, make cuts to set the valve 13x25 cm. Over the slab one more bricks wearing the formation. Consumption - 16 pcs.


From 17 and a half bricks, we make re-overlap, leaving only a smoke channel with a size of 13x13 cm.

Of the four bricks form the base of the chimney pipe.

With dressing put the second row of pipes.

Video - Description of the construction of the furnace
The inner surface of the furnace should be as smooth as possible so that the soot do not accumulate on them, therefore, in the process of masonry, the clay will necessarily believes or scrape.

How to dry the oven? Approximately a week we leave the unit with open valve and doors. Without closing the door, put quite a few fuel in the furnace to heat the walls. The next day we repeat the operation by increasing the amount of fuel. At the same time do not close the doors. When wet traces remain on the walls, and on the valve - condensate, the furnace is ready for the first real furnace.
Video - stove in a bath with your own hands
Video - Drying Furnace
After drying, the furnace can be protected and check in it, opening the valves, then brings the burning match to the open door of the fuel. If the flame is dismissed inside the furnace, it means that there is a craving.

The thrust depends on the chimney, which in turn should be at least five meters long, if you count from a grate grid. More precisely, the height of the chimney over the roof can be defined in the picture. But remember that raw pipes will be somewhat weaker.


The brick tube is recommended in two layers to play with chalk or lime so that the leakage of stoves immediately become noticeable. Faulty pipe is immediately repaired. Over the roof, the chimney pipe is necessarily plastered, and for masonry, a mortar is a cement, cement-limestone or simply lime, the most qualitative, without chipping, cracks, other defects is selected.


Do not forget to clean the oven - in the spring, if you plan to heat the bath in the summer and twice a year, if you are constantly. In the event of cracks, immediately close them with clay mortar, causing and resurrecting it to the cell.


Video - how to fold the oven with your own hands
Video - laying of the first row of bricks
Cookies include kitchen stoves of various designs. They are different sizes and serve only for cooking. Connect kitchen furnaces to indigenous or nasadny tubes.
Brick kitchen stoves
Kitchen plates in their design can be divided into ordinary, medium difficulty and complex.
A simple kitchen cooker has a fiber and configuration door, a grate grid and a smoke valve. It is the simplest of all household stoves.
Kitchen plates of medium difficulty have an oven, and a compound and a hot water box. The ovens are made of black steel with a thickness of at least 1 mm, and the water-heating boxes are from galvanized steel. The housing of the hotlery box is made of black steel with a thickness of at least 1 mm. The thicker steel, the more durable the devices.
Furnace with two-nodescoat and oven
In a simple kitchen cooker, hot flue gases from the fuel can be sent under the cast-iron plate, and then through the hole under the pipe is discharged into the smoke pipe.
In the rest of the kitchen stoves, hot flue gases are sent under the cast-iron slab and further, dropping, warm the walls of the oven or one wall of the hot water box, and then discharge into the pipe, while warming up the bottom wall of the oven, the bottom and other wall of the hot water box.
The above-mentioned kitchen stoves do not have a cooking chamber, so pairs and smell are highlighted during cooking in the room, which adversely affects the room microclimate. This article provides drawings of cuts and co-plate coils of an improved design, in which the cooking chamber is provided connected to the pipe with a ventilation channel overlapped by ventilation valve.
Simple kitchen stove
A simple kitchen stove has dimensions, mm: 1160x510x630 (without foundation, i.e. without two rows of brickwork on the floor).
The following materials are needed to masonry the kitchen stove:
- brick red - 120 pcs.;
- red clay - 50 kg;
- sand - 40 kg;
- grate grille - 28 × 25 cm;
- fake-up door - 25 × 21 cm;
- door confused - 25 × 14 cm;
- cast iron plate for two burners - 70 × 40 cm;
- stovetage (corner 30x30x4 mm) -3.5 m;
- sheet of roofing steel under the stove - 1160 × 510 mm;
- felt construction - 1 kg;
One live shop can fold a simple kitchen plate for 3 hours (not counting the masonry of the chimney), additionally, 1.5 hours are required for the material and the preparation of the grinding solution. For the construction of the chimney, additional time is necessary: \u200b\u200bdepending on its height, it is necessary to calculate the time from Half an hour calculation on 1 m pipe masonry (when laying pipes in a quarter of bricks).
The heat transfer of a simple kitchen plate with a biennial cooking is about 0.7-0.8 kW (660-700 kcal / h).
Figure below shows the vertical and horizontal cuts of a simple kitchen plate. Next will be given the drawings of the masonry in the ranks (spokes). From the cuts and drawings of masonry in the ranks it is clear that the laying of a simple kitchen plate does not represent difficulties.

Sections of a simple kitchen furnace: A - facade; b - cut A-A (longitudinal vertical cut of the furnace); B - section B-B (transverse vertical section). Designations: 1-fuel; 2 - ashnon chamber; 3 - grate and grate; 4 - smoke valve; 5 - cast iron stove (flooring).
Before starting the masonry of a simple kitchen oven, you should purchase the necessary furnaces.
Preparing the grinding solution, proceed to the laying of a simple kitchen plate. If the plate is put on the foundation, then align it up. When laying the plates on the wooden floor it is necessary to cut a sheet of roofing steel in the size of the plate. On the floor, put a layer of sheet asbestos, and in its absence - two layers of building felt, well-membered in the grinding solution, cover everything with a sheet of roofing steel and nail to the floor. Then, from a whole brick, make a platform into two rows of masonry on the grinding solution. After that, it is embarked on the laying of the plate from the first row strictly in the orders.
First row Putting, following the rules of dressing of seams from selected whole bricks, as indicated in the figure below. Completed masonry is checked for rectangles.

The first row of a simple kitchen oven
During masonry second row it is satisfied attended, install a pensive door, which is fixed to the masonry with the help of a furnace wire. The temporarily configuration door in front can be maintained by bricks, which are stacked with a stack on the floor in front of the subepent door. The bottom of the coil chamber is 380 × 250 mm.

Second row of the kitchen oven
Third row It looks like the previous one, however, you should teach the seams well.

Third row
Fourth row It covers the subdivine door, while only the hole of the ashtop chamber is 250 × 250 mm in size, which is placed in a grate grid. If possible, masonry from the fourth row is desirable to carry out from refractory brick, as shown in the figure below.
Masonry fourth row. Shaded bricks are refractory. The arrows indicate the directions of movement of hot flue gases in the heating furnace.
Fifth row Forms 510 × 250 mm under the fifthlist. The brick adjacent to the grate to the grate grid is shy, to form an inclined plane, along which the fuel will roll onto the grate of the grid (see the section B-B C O A-A). When laying this row, you need to install a flue door, after attaching the paws from roofing with rivets.

Fifth stove masonry
Sixth row locked the same as the previous one, but should be tied up with seams.

Masonry of the sixth row of oven
Seventh row Put according to the figure below. This is close to the chimney under the stove, which connects the fuel pipe with the chimney.

Seventh row of the furnace
Eighth row Perform strictly horizontally, this next to overlap the flue door. On the eighth row laid out with a thin layer of the grinding solution, they laid a cast-iron slab. Cast iron factory manufacturing plates from the bottom side have protrusions, or rigidity ribs that retreat 15 mm from the edges of the plates.

The eighth row of the furnace
The internal dimensions of the masonry of the eighth row should be such that the stove with their fins freely enters and had a gap on all directions of at least 5 mm, designed to expand the metal when heated it. If you do not observe this, then the cast-iron stove, expanding, destroy the oven layer. So that the masonry was durable, on the eighth row, lay the strapping from angular steel. The frame is desirable to cover with refractory varnish, which protects steel from rust.
After masonry ninth row With the help of a thin layer of the grinding solution, the smoke valve is installed. This row is the final, then the smoke pipe is underway.

Completing a row of a simple kitchen oven
The kitchen stove works as follows. The flue gases from the pop-up fall under the cast-iron slab, then through the hole under the pipe through the smoke valve is discharged into the smoke tube.
In the kitchen cooker, the clean hole is not provided, since it is possible to clean the chimney through the hole under the pipe where it is easy to shove the hand through the cast iron plate.

Example of masonry of the hob
First, in the kitchen cooker, the cooker is installed on the same level with a grasp grille. In the slab, flue gases are constantly maintained in the chimney high temperature, as a result of which it is not necessary to put the large thickness fuel on the grate grille. Secondly, with such an installation of the furnace door, the distance from the grate grid to the cast iron plate will be equal only 280 mm, which makes it possible even with a small fuel consumption quickly cook food.
After the end of the masonry of the furnace, it is necessary to dry it, opening the flue and configuration doors and the valve in the pipe.
The longer the oven is dried, the stronger the masonry. Kitchen stove can be dried with small trials, but after testing floors, the valve in the pipe and the confusion door must be left open.
After complete drying, the kitchen stove is plastered with a mulling solution with a subsequent whitewash.
Outdoor finish, it is better to produce as follows: After the masonry of the eighth row and the installation of the cast-iron stove, as well as before installing the strapping from the corner steel, the kitchen plate is littered from all sides into the case of roofing (can be used galvanized steel). Pre-cut the corresponding holes in the sizes of the furnace and subdivine doors. Floor case is fixed with a plinth that is naked around the plate. The outer surface of the case is purified and covered with a chicken varnish that is well withstanding high temperature.
Before the furnace door, the surface sheet is nails with nails after 50 mm from each other. If the plinth was nailed earlier, then the prestituct sheet should be beatened to the plinth.
Kitchen stove with oven
The kitchen stove with oven has dimensions, mm: 1290x640x560 (without foundation, i.e. without two rows of brickwork on the floor).
For masonry of the kitchen plate with oven, the following materials are needed:
- red brick - 140 pcs.;
- red clay - 60 kg;
- sand - 50 kg;
- grate grille - 26 × 25 cm;
- fake-up door - 25 × 21 cm;
- door confused - 14 × 25 cm;
- clear doors 130 × 140 mm - 2 pcs.;
- pig-iron plate of five composite plates with a size of 53 × 18 cm with two burners;
- smoking catch - 130 × 130 mm;
- oven - 45x31x28 cm;
- slab strapping (30x30x4 mm corner) - 4 m;
- the prestituct sheet of roofing steel - 500 × 700 mm;
- sheet of roofing steel under the stove - 1290 × 640 mm;
- felt construction - 1.2 kg;
- metal camp for collecting ash in the Kolnikova chamber - 350x230x100 mm.
One live shop can fold this furnace for 3-4 hours, in addition to the belief of the material and the preparation of the grinding solution, about 2 hours are required. The heat transfer of the plate with two-time cooking is about 0.8 kW (770 kcal / h). Figure below shows a general view, longitudinal and transverse cuts of the kitchen plate with an oven. Next will be given pictures-co-orders of each row. The masonry of the kitchen plate with oven also does not represent difficulties and looks like a laying of a simple kitchen plate, but here you have to install the oven and the clean doors.

Kitchen stove with oven: a - general view; b - cuts of aa, b-b (vertical cuts), B-B, Mr. (horizontal cuts). Designations: 1 - Solnic chamber; 2 - grate grille; 3 - fuel; 4 - cast iron stove; 5 - oven; 6 - smoke valve; 7 - cooker; 8 - a confusion door; 9 - Clean holes.
When laying the plate on an independent foundation before starting work, it is equalized to the top of the layer of the grinding solution.
When installing the slab on the floor before the start of the first row masonry, it is necessary to carry out the same works as when laying a simple kitchen plate.
Masonch first row made from selected whole brick, strictly adhering to the rules of dressing of seams. The length of the kitchen plate should correspond to the length of five bricks, the width is 2.5 bricks. With the help of the cord check the equality of diagonals.

Masonry of the first row of the kitchen stove with oven
Second row lay out, strictly following the order. Here we leave the coil chamber with a size of 380 × 250 mm, installed and fasten the subepent door, the clean holes are left on the rear wall (the width of the holes should be equal to the width of the brick, i.e. 12 cm). With the ability to establish the cleft doors with a size of 130 × 140 mm. At the extreme from the ashpan chamber of the clean hole laid a brick on the edge, as shown on the laying coach. For better attachment of the oven in the middle of its place, it is placed on the side of the brick on the edge.

Masonry of the second row of plates
Third row It looks like the previous one, only the seam dressing rule should be observed.

Masonry of the third row of plates
Fourth row Overlapping configuration and cleaner doors. After the end of the fourth-row masonry on the fine layer of the grinding solution on a pre-marked place is installed an oven. After that, the grille is installed. By the same next to the edge brick, the chimney into the smoke tube is overlapped.

Masonry fourth row stove with oven
During masonry fifth row Install and fasten the flue door, the brick before installing the grille is shred in order for the fuel in the combustion process gradually rolled into a grate grid.

Stove fifth masonry
Sixth row Looks like the fifth.

Masonry of the sixth row of plates
Seventh row lay out in order. The resulting channel of the chimney from the front side is laid by three bricks, as a result of which the inner size of the channel formed under the flue pipe will be 130 × 130 mm. In the image of this row, the oven shows a steam pipe with a diameter of 10 mm and a length of 160 mm, which connects the oven with the rising channel. This pipe is designed to remove steam and smell.

Laying seventh row of plates with oven. The arrows indicate the directions of movement of hot flue gases in the heating furnace.
Eighth row
Perform strictly horizontally by level. This is nearby overlapping the oven and flue door. The upper wall of the oven is deprived by a layer of clay solution with a thickness of up to 10-
15 mm, which will protect the oven from fast exercise.

Masonry of the eighth row of a brick oven (before installing the cast iron plate)
In this case, it is necessary that the distance between the top of the clay coating and the cast-iron plate was at least 70 mm. Thereafter, they are installed on a thin layer of the grinding solution a cast-iron plate and an angular steel squeeze.

The eighth row of a brick oven (after installing the cast iron plate)
After masonry ninth row Only the masonry of the vertical channel remains. The ninth row is put according to the image below.

Ninth a number of stove
After masonry tenth rows Install the smoke valve.

The tenth of the furnace
Masonry eleventh row Begin the smoke tube. Further laying of the pipe does not represent difficulties.

Final row of oven (chimney masonry is not taken into account)
Kitchen stove with oven works like this. From the fuel, flue gases are sent under the cast-iron slab, from where they, heating the oven from behind on both sides, are lowered under the oven and are directed to the hole under the smoke. Lifting up the vertical channel, they enter the smoke tube through the smoke valve and are removed into the atmosphere.
Kitchen stove with oven and hot water box
For masonry of the kitchen plate with an oven and water-heated box of 1290 × 640 mm, the same materials are needed as for the previous stove. Additionally, it should be purchased a water-type 510x280x120 mm in size.
Figure below shows a general view, a horizontal section of a-A and a vertical section of the B-B plates.

Kitchen stove with oven and hot water box: A - general view; b - cuts. Definitions: 1 - fuel; 2 - cast iron stove; 3 oven; 4 - Water Box; 5 - smoke valve; 6 - ashpical chamber; 7 - corner steel strapping
The kitchen plate with an oven and a hot water box is put in the same order as the kitchen stove with an oven. The only difference is that after laying the third row instead of a partition brick on the edge between the oven and the vertical channel, the water-heating box is installed in the case. The height of the water-heating box should correspond to the height of four rows of brick masonry plastics. The rest of the laying is completely similar to the masonry of the kitchen plate with an oven.
Kitchen stove with oven and water-heated box of improved design
In the kitchen stoves in the countryside are preparing not only food for people, but also boil the feed for livestock, boiling underwear when washing. During the firebox to the room there is a lot of steam and strangers are distinguished. Because of this, the humidity of air indoors increases, which adversely affects its microclimate. Therefore, to remove strangers and steam in the kitchen stoves it is desirable to provide a cooking chamber, which is connected to a flue tube with a ventilation channel. In the ventilation channel you need to install ventilation valve.
Installing a two-dimensional door in a cooking chamber allows you to save food in it hot for a long time and thus prevent its zaking.

Cooking chamber in a brick oven
The pop-up and pondered (the coil chamber) outside closed with appropriate doors. The top surface of the brass cabinet is protected from hot gases with a layer of clay solution with a thickness of 10-12 cm. Kitchen slab from the fourth to the ninth row is desirable to put out refractory bricks (especially the fifth).

An example of the overlapping of ash bar
Kitchen stove up to a ninth row of masonry It is advisable to make from sheet steel, and to enhance its strength after mounting the frame on the grinding solution, set the cutting of the corner steel. Since the mass of such a plate will be more than one ton, it is installed on an independent foundation.
If the device is not possible, the floor must be strengthened with additional beams, which are mounted on brick columns. Instead of brick columns, you can apply poles from solid rock logs, reinforced concrete poles, iron pipes with a cross section of at least 180-200 mm.
In the kitchen plate of the improved design there is a "direct" stroke. During the long-term firebox, the plate is possible evaporation of water in the water-heating box. To stop this, it is necessary to add some cold water into it and open the "direct" stroke. In this case, flue gases from under the cast iron slabs do not fall down, and immediately go to the smoke pipe. As a result, the water-heating box ceases to warm up, the evaporation of water in it stops.

Example of a "direct" stroke
For the convenience of cleaning the coil chamber from the ash in it, a special box of roofing steel 350x230x100 mm is installed. This prevents pollution of the room when cleaning the ash-shepheric chamber from ash.
The kitchen plate of such a design has the following advantages compared with the previous kitchen stove with an oven and a hot water box:
- during cooking in the room there are no couples and extraneous smells that are removed into the atmosphere through the ventilation hole;
- food cooked on the stove in the cooking chamber is saved by a hot long time and does not waste during the day;
- with the help of the "direct" stroke gate, it is possible to cook food, without having warmed the hot water box and thereby prevents the further evaporation of the water in it.
Figure below shows a general view of the kitchen stove in front, there are drawings of slab cuts in the most difficult places. Drawings of masonry in the rows will be further, and they give an exhaustive idea of \u200b\u200bthe internal device of the slab. Using coaches and drawings in the rows, you can fold the slab yourself, without the help of the binder.

Kitchen stove with an oven and water-heated box of improved design: A - facade; b - cuts Aa-A, BB, B - cuts in-B, Mr., Dr., E-e. Definitions: 1 - a pensive door; 2 - cooker; 3 oven; 4 - the door of the cooking chamber; 5 - smoke valve; 6 - ventilation valve; 7 - the "direct" stroke label; 8 - Water Box; 9 - Cute holes; 10 - cast iron stove.
The kitchen stove with an oven and a water-heating box of an improved design has dimensions, mm: 1290x640x1330.
The following materials are needed for masonry:
- red brick - 250 pcs.;
- brick refractory - 80 pcs.;
- red clay - 180 kg;
- sand - 90 kg;
- door coil - 250 × 210 mm;
- door confused - 250 × 140 mm;
- grille grate - 280 × 250 mm;
- wardrobe oven 250x280x450 mm;
- cast iron plate with two burners - 700 × 400 mm;
- water Box - 250x140x510 mm;
- foremost sheet - 500 × 700 mm;
- steel strip size 400x250x6 mm;
- the door to the cooking chamber is 750x350x5 mm;
- steel Angle for strapping plate size 30x30x3 mm - 4.1 m;
- steel bandage for overlapping a hob size 450x45x4 mm - 4 pcs.
The kitchen plate can be added to one bubble for 18-20 hours, for the preparation of a solution and a material belief, an additional 6 h is required.
To fold the slab with a furnace on the left side, you need to consider drawings with the help of a mirror assigned to the refrigeration.
The kitchen plate is laid out as follows. Masonch first row Produced by the foundation erected to the floor level. The first row determines the main sizes of the plate. The length of the plate is equal to the length of the laying of five bricks on the grinding solution, and the width is a length of 2.5 bricks.

The first row of an improved kitchen plate with an oven and hot water box
During masonry second row Two cleaner doors and a confusion door are installed in front. They are fixed to the masonry with the help of a furnace wire.

Masonry of the second row of the furnace; 1 - a subelevant door, 9 - cleaner holes.
Masonch third rows They produce according to the coach, it looks like a previous row. After masonry, the third row is installed a water-heating box.

Masonry of the third row of the furnace; 11 - steel sheet with a thickness of 3 mm.
Topial fourth row Putting from refractory bricks, with its absence sorted first-alternate red bricks. The fourth row overlaps the clean holes and the confusion door, forming the beginning of the submission. After the masonry of the fourth row, the grille and oven are installed.

Fourth stove
Masonry fifth row no difficulties. The brick adjacent from behind the grate of the grille is half shred to form an inclined plane.

Masonry of the fifth row of the furnace; 3 oven.
Before masonry sixth row prepare a flue door, for which the rivets are attached from above and bottom, which should be longer than the coaching door in both directions by 10 cm. For greater strength, the ends of the strip steel are screwed to the stove, the ends of which are close in the masonry. The door is installed on the grinding solution, pre-wolving the asbestos fiber frame of the flue door.

Masonry of the sixth row
Masonry seventh row fasten the base of the coil door.

Laying seventh row
Eighth row Overlapping water box.

Masonry of the eighth row
Ninth rivers overlaps the flue door and oven. The top of the oven is protected from a layer of a clay solution with a thickness of 10-12 mm. This series is preferably putting completely from refractory brick.

Laying of the ninth row
After the end of the masonry of the ninth row above the fifth, the cast-iron plate is installed on the grinding solution. A large plate burner is placed over the fuel. Next to the main stove is added extra, made of steel sheet of 400x200x6 mm. After that, they laid the corner steel to which the lower frame of the door of the cooking chamber is welded. For the strength, the corner steel is desirable to tie through the special holes in it a stove wire, which is fixed to the masonry.

Installation of pig-iron plates on the ninth row; 12 - steel sheet with a thickness of 6 mm; 13 - Corner steel.
Tenth row Put from an ordinary red brick. On the right side, leave the window to clean the channel "direct" stroke. Part of the bricks that overlap the stove, beolate the blades before masonry so that in the event that the slab can be easily replaced with it.

Laying of the tenth row
Masonry eleventh row It does not represent difficulties, you only need to follow the rules of dressing of seams.

Eleventh stove
Twelfth overlaps the cleaning window.

The twelfth row of the furnace
After masonry t.rynignant On the grinding solution, the "direct" stroke valve is installed.

Thirteenth stoves; 6 - Ventilation valve.
Masonry fourteenth row Must match the level of the upper door frame to the cooking chamber. Next to the upper door frame to the cooking chamber, an angular steel is 45x45x800 mm in size.

Fourteenth row of the furnace
Fifteenth row Overlaps the door to the cooking chamber.

Fifteenth Furnaces
Sixteenth row Overlaps the channel "direct" stroke.

Masonry of the sixteenth row of kitchen oven
Masonry seventeenth row Provides a ventilation channel for disgusting odor and steam from the cooking chamber.

Masonry of the seventeenth row of the kitchen oven
After grapete eighteenth row Over the cooking chamber, four cuts of strip steel with a size of 4x45x500 mm for overlapping a cooking chamber are installed.

Masonry of the eighteenth row of kitchen oven
Nineteenth row overlaps the cooking chamber. After the end of the masonry of this series, install ventilation valve.

Decorating a nineteenth row of a kitchen furnace; 6 - Ventilation valve.
Masonry twentieth and twenty first The series does not represent difficulties, only should be good to tie the seams.

Masonry of a twentieth row of a kitchen oven

Masonment twenty first row
Masonry twenty Second row Reduces the size of the chimney, it will be 130 × 130 mm.

Laying twenty second row
Twenty-third and twenty fourth rows put according to my friend.

Twenty-third stoves

Twenty fourth rows
After masonry twenty fifth row install the smoke valve, which is simultaneously adjusting.

Masonry twenty fifth row of furnace; 5 - smoke valve.
Masonry twenty-sixth rows begin the smoke tube. The masonry of the chimney does not represent difficulties.

Masonry of the final series (not counting the chimney)
After the end of the masonry of the furnace before it is coating, chimneys from fallen residues and rubble through the cleft holes are purified. Holes for cleaning after that laid brick halves on the grinding solution.
When installing the clean doors, they are tightly closed, the looseness is lubricated with mensing solution.
After that, the slab can be dried in two ways: opening the movement and configuration doors and valves or small trial fireboxes. After a complete drying, the slab is placed with ancading solution, and after drying the plaster produce a two-time blotch. Before the flue door, a pre-floor sheet is nourished.
Brick cooking oven with your own hands: Step-by-step instruction of masonry + photo
The diagram of the heating furnace from the brick depends on what you want to obtain ultimately. It may be heating, and maybe just the cooking products.
After all, functionality can be different. Today we will look at the furnaces heating brick drawings and rules for performing work.
You will also learn about the types of this design and their appointment. Also on the video in this article, see the manufacturers and use of each species.
Correct climbing scheme
Heating brick furnaces: drawings will need to be done before starting work. After all, depending on the species, a different amount of brick and finishing material will be required. Any of the proposed species can be made with their own hands, and in this case the price of the product will be significantly lower.
Types of stoves
Brick heating furnaces: Schemes are divided depending on the application.
Depending on the design, the furnace can be divided into such types:
| Heating stove | Its main purpose is to heating any premises.
|
| Cooking furnace | Her destination is cooking. For heating, it is simply not effective.
|
| Heating and cooking | It has all the advantages and disadvantages of the two previous species.
|
So:
- The furnace for the house should have a number of mandatory characteristics: heating the room, be safe to others, create comfortable living conditions.
- Not everyone can fold the oven with their own hands, which would have similar characteristics. The slightest error in the calculations may be expensive, as well as not quality work. As a rule, the masters are invited to this.
- Nowadays, the task is somewhat simplified by the presence of a huge amount of information about masonry furnaces on the Internet. Here you can get acquainted in detail with the furnace masonry technique, looking at the corresponding video.
Schemes of heating furnaces
Before the choice should be familiar with the options of the device of each design.


Immediately need to consider the installation system. After all, for each design there are its own requirements. For severe, a large foundation will be required. For cooking, it will be possible to do with a small slab.
Preparatory work
To begin with, it should be deciding on the construction site of the future furnace. The first time the oven is being built when housing is built, which means that the shape and dimensions of the furnace have already been identified, as well as its location.

So:
- The location of the furnace largely depends on the layout of the entire building, and its location should be such that it effectively heated all residential space.
- If the place is determined, you can start building the foundation. Its sizes must be somewhat more geometric furnace sizes. When it is construction, it is necessary to put waterproofing.
- Performing masonry, it should be remembered that the seams should be minimal, and the least maximum.
- When the internal surfaces of chimneys are laid out, there should be no surveillance of the solution, and the surfaces must be even. Extraly released from seams is preferably removed. Carefully must be laid out both side surfaces and corners.
ATTENTION: The foundation must withstand the weight of the structure. Therefore, it will be necessary to rein. This will give extra hardness.
It will be needed tool
For such work, you will need the following tool:
- Stretch (Kelm).
- Putty knife.
- Building level.
- Plumb.
- Lacing.
- Tara for solution.
- Shovel or drill.
- Soft wire.
- Roulette.
Methods and order of masonry
Making Mason
Masonry furnaces can be performed in various ways. It may be masonry with empty seams or laying in trimming.
ATTENTION: These methods differ dramatically. When laying in trimming, the seams are filled completely, and such a furnace is not plastered. The thickness of the walls of the furnace can be made in a brick or in the Pollipich.
For masonry furnaces, only a red full-length brick should be applied. At the same time, it is impossible to use a brick, used, slit brick or other building materials that are not intended for this.
Masonry technology consists of several stages:
- Cover the foundation of the waterproofing layer. It can be a simple runner. We make the basement. Its height is determined individually. Just do not make it too high. Made by solid masonry without voids.

- The first row can be lined with bricks, without the use of solution. After that, the bricks are aligned and the location of the front wall and the location of all the doors is determined. After that, the masonry continues, but using the solution. As a rule, a solution of ordinary clay is used for masonry furnaces.
- Then you can install vertical lighthouses using plumbing and rope or fishing line.
- Such furnace elements, as pondered, the ash bar or the furnace chamber are located depending on the design of the furnace. As a rule, it was implanted after the third row of masonry, but after one row after it is a roller.
- Then the firebox is laid out. Fastening the door of the furnace and pondered by using a soft wire.
- The next in turn is a furnace arch, which is formed after the second row of bricks laid out above the furnace.

- The furnace chamber is laid out with refractory bricks. To increase the efficiency of the furnace, it must be equipped with various valves regulating the flow of heated gases.
Technological order of masonry
The order of laying the furnace is the following:
- Without a solution, the first row is laid out and is leveled using a construction level.
- Bricks are laid out at the corners with a solution and strictly horizontally. After that, the space of bricks is filled using a solution. It will be the first row.
- After laying out the first row, the smooth side of the furnace with a roulette is checked. If there is a disintegration, they are corrected with the help of a queen, having a picking one or another angular brick.
- After that, you can start laying out the second row. The calculation starts with the corners and continue the masonry throughout the perimeter. After the perimeter is laid, the middle of the second row is laid.
- Then, on the corners, between the first and second next, nails are clogged, 80 mm long and an angle on the ceiling is design.
In the place of projection of the corner, a nail is clogged and the rope is stretched from below to the ceiling. Such an operation is done with all angles.
- Stretched cords will serve as a reference to further work. Subsequent rows, relative to the vertical, will be controlled by stretched cords that determine the contour of the future furnace.
- All subsequent ranks are laid out in a similar way, controlling horizontality using a construction level. During the masonry, it is necessary to ensure that there is no excess solution, and the chimney walls every 4-5 rows should be wiped with a wet rag. It is necessary to ensure that the solution in these places completely filled the seams.
- Suts of brick masonry for the furnace are made as thinner, and the filling of the seams is 100%. Masonry with thick seams is less durable, as they may be partial loss.
- The masonry of the furnace is performed with the ligation of bricks, otherwise it will not hold on. The meaning of the dressing is that the vertical seam of the subsequent row is somewhere in the middle of the previous row brick. It does not always come out and the vertical seam "walks" from the center of the brick is left, then right. This should constantly monitor and adjust the laying with such a calculation so that the center of the vertical row does not go beyond the limits of the part of the brick.
- The cutting brick lies with the outward channel, since the cut surface is considered weaker and can be collapsed under the action of temperature.
Use chammed bricks
Chamotal brick has excellent resistance to high temperatures and therefore is used to form a heat chamber.
- Because of the various coefficients of temperature expansion, the chip chamber bricks are not bandaged with brick furnaces. Between them should be a gap of about 5 mm.
- When you lay out the firebox from chamotte bricks, you can post a completely row or after the layout, make a lining of the firebox with chamoten brick.
Before installing the door, it should be checked on the quality of the adjustment and freeness of rotation on the hinges.

So:
- In the presence of distortions or the absence of smooth rotation, such defects should be eliminated, and if there is no such possibility, then replace new ones. It should also be determined whether there are openings for fastening.
- For fastening, a soft (knitting) wire with a diameter of 2.5-3 mm and about 50 cm with a length is rolled into the hole and twisted.
- Install the door after performing the masonry is not possible, so it is installed during the masonry process. To keep the door well, the wire should sit in the seams, between the rows of bricks. Because the melting falls down-up, then the mounting of the door occurs in the same order. First, the lower ends of the wire are molded, and then the top.
- After booking the lower fixing ends, the door must be set strictly vertically and horizontally followed by fixation. After the door is exhibited, you can continue further work.
- Such installation equipment can be used to fasten the door of the fiber chamber, the door has pissed other metal objects, such as valves, sozhotruci, etc.
- A very important stage is the installation of the stove. It is installed on a clay solution. The consistency of the solution should be so that the excess solution freely comes out from under the plate, as a result of pressure of its own weight. His quantity should be so that it fill out all the free space. It is impossible to allow it to be enough. In the future, under the action of high temperatures, the clay hits and reliably hold the plate on the surface.

- After the end of the work, you need to give the stove to dry completely. It is not less than 14 days, after which the stove can be stirred.
- So that the furnace has become attractive, it can be found with a tile. Here, the quality of masonry can be useful, especially if it was done with their own hands. It will easily put a tile on a very smooth surface, especially since high demands are also presented to its laying due to the presence of high temperature.
Brick heating furnaces: drawings we select depending on the selected design. The laying of the working part is best done on the clay solution. You have instructions and, by photo by choosing the desired model, you can start work.
The question of how to fold the furnace for a brick house with your own hands, does not cease to be relevant today, as comfort and heat have always remained important conditions for a person for a full-fledged rest after a busy day. Therefore, in recent times, more and more urban residents are moved from panel high-rise buildings to private houses, where you can create a comfortable environment at any time of the year.
Due to the demand of various stove models, engineers continue to develop all new options that are acceptable to buildings with different areas. It should be noted that even in the case when all the "benefits of civilization" are present in the house, a small cozy stove will never be superfluous and will help out in various situations. For example, it can be protected into cold spring or autumn evenings when it is wet on the street or rain, not the launch of the heating system. Such a construction will help create in the house the optimal balance of temperature and humidity, which will be comfortable for a person. In addition, the furnace will become an excellent assistant in cooking or drying vegetables, herbs and fruits.
Since there are a large number of different models of heating structures, it should be chosen for self-laying oven with the most accessible, easily readable schemes, especially if the experience in this craft is small or even not even. Naturally, it is necessary to take into account other factors that directly affect the efficiency of the furnace work is its power, dimensional parameters, functionality, and also important is the aesthetics of the appearance. And in order to choose the right furnace model, you need to consider the criteria for which you need to navigate by defining the desired option.
How to choose the optimal furnace option?
Choosing a Furnace Installation Place
For the furnace to be fireproof, efficient, and its power was used as much as possible, this construction must be properly installed, given some nuances.
- First, it is solved what area can be allocated to install the furnace.
- Then, you need to decide on a specific place:
- The furnace is installed in the center of the room, separating it into separate zones;
- embedded in the walls, between two or three rooms;
- It is erected near the wall, with an indent from it 250 ÷ 300 mm, if you need to heat only one room. However, it is necessary to consider that this option is the most losing, since most of the heat released by the rear walls will not be fully used.
- By choosing an approximate place, it must be immediately placed, starting from the ceiling, with a plumb, since the pipe should pass through the attic overlap between the beams and rafters, and at a distance from them at least 120 ÷ 150 mm.
- Having highlighting the area for the furnace, it is taken into account that for its foundation it is necessary to provide places more than its base, 100 ÷ 150 mm with each of its parties.
- So that there are no problems with controlling organizations, when choosing a place of installation, it is necessary to take into account not only the above presented recommendations, but also the norms developed by specialists and indicated in SNiP 41-01-2003.
Calculation of the required power and evaluation of firewood
The furnace will not be effective and will not be able to warm the house if its power is not enough for a specific area. It is also taken into account the winter temperatures of the region, where there is a heated structure, the number of windows and doors in it, the level of insulation of walls and gender, the height of the ceilings and many other conditions ..
For example, the higher the ceiling, the greater the amount of air will have to be warmed, and the greater the area of \u200b\u200bglazing, the faster the heat will go from the house, which means you will have to choose a furnace with high power. Usually, for structures with non-standard glazing and other parameters that do not fall under the average level, the calculations must produce a specialist individually, based on the specific characteristics of the house.
But in general, you can rely on the averaged values. So, for well-insulated houses with conventional glazing, with an area of \u200b\u200b50 to 100 m², with a height of ceilings from 2.5 to 2.7 m, the following thermal power standards per unit area (Wood) are valid:
This value can be found more accurate in the local construction organization. And for lovers of independent calculations, a more detailed and fairly accurate algorithm can be recommended.
How to carry out the exact calculation of the necessary thermal power?
Each room in its own way is unique, and for heating two, it would seem equal to the area of \u200b\u200bthe room, a different amount of thermal energy may be required. The method of calculating the power of the heating equipment is set forth in a special publication of our portal dedicated to.
Having data for a specific region and the size of the heated area (S), the power of the furnace is calculated by the formula:
WSUM \u003d S (m²) × Wood (kW / m²)
For example, you can consider the power of the furnace for a brick house located in the central part of Russia and having an area 75 m².
WSUM \u003d 75 × 0.14 \u003d 10.5 kW
Usually, stove developers immediately indicate the thermal power of their designs. True, there are often other units of measurement - kilocaloria per hour or megalhal. Not scary - they are easy to translate them to Watta and Kilowatts:
In our case, for example, the calculated power in kilocaloria will be equal to:
10500 × 0.86 \u003d 9030 kcal / hour
Now you can calculate the economical of the future furnace, which largely depends on the quality and wood of wood used as fuel. At the same time, it is impossible to forget that usually brick wood furnaces are not distinguished by high efficiency. It is usually estimated at about 70%. If there is data on a specific furnace model, then a specific value is substituted.
Each type of solid fuel has its own calorific value - the amount of thermal energy that is released when burning 1 kilogram. It is clear, in kilograms and tons, only bulk fuels are usually estimated - coal or, and firewood is usually measured in warehouse cubic meters. This indicator thus depends on the specific density of one or another variety of wood. Indicators of energy potential (mass and from warehouse) of the main types of solid fuel are shown in the table.
| Wood breed | The average calorility of dry wood for mass, Qm (kW / kg) | The average calorie dryer in the warehouse volume, QV (kW / m³) (for coal and briquettes - kW / t) | The same - for wet wood (not held at least a year-old drying cycle) |
|---|---|---|---|
| Firewood: | |||
| Beech | 4.2 | 2200 | 1930 |
| Oak | 4.2 | 2100 | 1850 |
| Ash | 4.2 | 2100 | 1850 |
| Rowan | 4.2 | 2100 | 1850 |
| Birch | 4.3 | 1900 | 1670 |
| Elm | 4.1 | 1900 | 1670 |
| Maple | 4.1 | 1900 | 1670 |
| Aspen | 4.1 | 1750 | 1400 |
| Alder | 4.1 | 1500 | 1300 |
| Iva (Verba) | 4.1 | 1400 | 1230 |
| Poplar | 4.1 | 1400 | 1230 |
| Pine | 4.4 | 1700 | 1500 |
| Larch | 4.4 | 1700 | 1500 |
| Fir | 4.4 | 1600 | 1400 |
| Spruce | 4.3 | 1400 | 1200 |
| Coal and briquettes: | |||
| Anthracite | 8.1 | 8100 | - |
| Charcoal | 8.6 | 8600 | - |
| Coal | 6.2 | 6200 | - |
| Brown coal | 4.2 | 4200 | - |
| Fuel briquettes | 5.6 | 5600 | - |
| Peat briquettes | 3.4 | 3400 | - |
Indicators of the non-disassembled fire saws are shown for contrast - how much the power produced is lost. Naturally, it should be counting on the firewood that has passed the necessary drying cycle.
Preparation of firewood - a serious question!
For the furnace justified its purpose and served as long as possible, it should be "feeding" the right fuel. About the main characteristics, rules of workpiece, drying and storage - in a special publication of our portal.
The average daily weight consumption of fuel to provide the necessary heat transfer is determined by the formula:
V (kg) \u003d (WSUM /Qm) × 24 hours
To calculate the volume - all the same, but instead of calibration by weight Qm. The value is substituted QV..
Knowing the daily flow rate, it is easy to determine the weekly, monthly and even on the entire estimated heating period - to have an idea of \u200b\u200bthe coming costs for the purchase or preparation of the required amount of firewood.
To facilitate self-calculation, the convenient calculator is located below, in which the necessary relations are already laid. The calculation is carried out for the dried wood.
For heating houses, completely different elements and equipment are currently used. However, the most traditional choice is a furnace that can work from a variety of fuel, and may also have different sizes and other parameters. Even fireplaces can be created, but they are not intended for constant heating of the structure. Especially often, the furnace heating is created in a private house, because often the structures are built in a fairly large distance from central heating systems.
The autonomous oven is considered an excellent choice, and at the same time a special heating and cooking surface can be formed, with which the furnace can be used not only to heat the structure, but also for cooking and warm-up.
Also various furnace options can be made with their own hands, so the cost of this process will be minimal.
Basic varieties of equipment
There are many varieties of stoves that differ in various parameters. The most popular are considered:
- which can be applied not only for a private house, but also for a bath or other small construction in need of heating, and they can be equipped with various elements for comfortable sleep or cooking;
- which can be used exclusively for room heating;
- rude, which are a fairly interesting option, are available in them, which allows them to apply them both for cooking and as a heating system.
What are the products equipped with coarse
This furnace has interesting parameters and features. This refers to the first place that the most popular material for creating a design is excellent parameters. These include magnificent heat transfer, so there will be such equipment in the house provide fast and uniform heating.
This material is considered very attractive, so the products received from it perfectly fit into any interior. Particularly relevant is the stove created by do it yourself from ceramic brick, rustic style. Well this furnace approach buildings made of wood.
If desired, such equipment can be additionally decorated with the help of the same heat transfer indicators as brick from this material. However, due to a more attractive and interesting appearance, the resulting design will be perfectly fit into a completely any interior. In this case, you can build equipment that will have the desired color and texture.
Stove structural elements
 Furnaces with rude are advanced structures compared to the direct-flow elements. But, at the same time, they are not so difficult to create them, but their the device is considered simple. However, to actually make a high-quality and reliable design, you need to accurately follow the instructions, as well as have at least initial skills work with brick.
See also: Chimney heating in a two-story house
To fulfill all the steps with your own hands, you need to have an idea of \u200b\u200bwhich structural elements are included in the equipment. These include:
- Infused, which is a special chamber intended for air passage. Usually there is suitable doorwhich allows a person to adjust the air supply. As a rule, between this element of the stove and the camera, where fuel is combustion, there is a grate grid.
- The player is the most working chamber that is designed to load and combust the fuel, in it there is a door.
- represented in the form of vertically located channels for which it passes heated gas from burnt fuel.
- Rude, which is used for cooking, can have different sizes and parameters.
- The chimney performs the function of the convector, but its main purpose is the derivation of exhaust gases from the room into the street. It is important that there is a door to allow cleaning the pipe, as well as the damper.
Before creating a design, a scheme of future equipment should be developed and drawn, and it is necessary to approach to this issue with full responsibility and seriousness. After all, it is drawings that are the basis for creating the stove itself. If they are errors or shortcomings, it may lead to the fact that with their own hands it will be a design that will not cope with its main tasks, and maybe dangerous for use.
What materials are used to create a stove
 You can make this design from completely different materials. These include:
- Brick, which is used for masonry, not only stoves are created from it, but also fireplaces. It is best to choose a ceramic brick, from the appearance of which depends the attractiveness of the final construction.
- Clay and sand, which are used to create a solution used to masonry bricks in the house.
- The cast iron grate grid used to lay fuel, it can be used for both firewood and coal.
- Ruberoid that allows you to create high-quality waterproofing of the furnace.
- For different design elements.
See also: How to turn the furnace coal
To build good and reliable equipment, all materials must be high-quality and beautiful, so they should be treated extremely serious.
Stops of creating stoves with rough
Make this design is not really so difficult, however it is important to know which stages must be produced and for each need to pay a lot of attention:
- A scheme of a future design is created. Drawings can be formed independently or with the help of specialists. They need to pay a lot of attention, since they depends on the reliability and safety of the final construction. The scheme must contain the sizes and others. the main parameters of the stoveAnd in it must be distributed in detail. Even if standard fireplaces or rough structures are created, there must still be drawings. The scheme is usually formed using special computer programs, but if there are any skills and experience, you can make it on paper.
- Creature foundation stove. Since fireplaces and stoves are most often formed from bricks, they should only be installed on a reliable and solid base. It should have the optimal dimensions and parameters for the furnace, which you plan to erect. The place for the design is determined, the trench of the desired thickness and depth is broken, then the bottom is talked, and the pillow of sand and gravel is stacked. Next, the concrete solution is poured, after which the trench is filled with brick. The foundation obtained should be covered with reference to high-quality isolation. All work is easily executed do it yourself without problems.
- The formation of the designs themselves. The stoves or fireplaces are stacked from ceramic bricks, and cement mortar should be used. When creating structures in the house best use during working chamotte powderwhich will not allow the stove to heat up too much during its use. The furnace can be created using different types of masonry. Before use of bricks, soak about 10 minutes in water. During the masonry it is important to do so that there are no cracks and spaces, but it is also not necessary to apply too much masonry solution, and you can also get a poor-quality and uneven furnace.
- Installation of rude. On the created row of bricks, the housing has confused, and the door is attached to it.. Best of all, all elements wrapped with a cord from asbestos, after about 4 more bricks. It is necessary to overlap the furnace door. Next are mounted by trees, and after laying the last row of bricks, you can proceed to the installation of the slab, which stacked with the application of the solution.
- Installation of chimney, which is usually the tube coming out. It is important at the site of the element through the wall to apply a thermal barrier.
 Why you can not give icons
 Is it possible to give icons as a gift: Signs, the opinion of the Church
 A year ago left her husband, and now I do not know what to do