How and from what can you assemble a moonshine still at home? How to make a moonshine still at home What does a moonshine still look like at home
In the word “moonshine” there are two parts: “self” - that is, independently and “boiling” - an outdated name for the distillation process. When we decipher the term, we get “independent production of distillates” - in an artisanal way, at home. But most moonshiners put an additional meaning into the concept: not just distilling alcohol at home, but also using a homemade moonshine still made with their own hands.
 DIY moonshine still
 Assembling such a unit is not so difficult. There are many simple circuits that a person without an engineering background can understand. On specialized forums, experienced moonshiners willingly share their assembly experience; following these tips, beginners will be able to solve the problem without much labor.
Making one yourself will cost less than buying ready-made equipment. In addition, the artisanal version can be customized to suit your needs and the assembly can be supplemented with elements that increase the productivity of the process and the quality of the drink. With its help you will receive a distillate that is safe for health, with a pleasant taste and aroma.
Components of the structure
The moonshine still diagram includes the required elements:
- distillation cube (reservoir);
- steam line;
- steamer;
- refrigerator (condenser).
 Moonshine still diagram
 The central element is a distillation cube
The heart of a moonshine still is the still or tank. When assembling a homemade moonshine still with your own hands, you need to start with it. It is a container into which mash is poured and then heated. Since the tank undergoes an intense thermal reaction, its reliability should not be in doubt.
 Alembic
 The best option is a copper or steel still. An aluminum container will not work - the metal will react with the mash and spoil the taste of the final product, and such a tank will not last long. Copper is considered the most preferable, but it is quite expensive, so purchasing such a container will be expensive. Typically, artisanal moonshiners use dishes and kitchen utensils - stainless steel or enamel pots, milk flasks or beer kegs, pressure cookers and even multicookers.
A homemade distillation cube from an ordinary enamel pan will last about 4 years. A stainless steel container is even more durable. For a device you assemble with your own hands, you can choose a tank of the desired volume - from 5 to 100 liters. But according to experienced moonshiners, the best option is a 25-35 liter container, which produces an average of 1.5-3 liters of moonshine.
Connection system - steam pipeline
A homemade moonshine still, made with your own hands, uses a system of tubes through which alcohol vapor and the liquid itself are transmitted. Their choice also needs to be approached wisely, because the taste of the drink depends on the quality of the auxiliary elements. It is better to buy tubes made of stainless steel - this metal remains neutral to the effects of heated alcohol vapors and the alcohol itself and does not produce harmful impurities.
 Branch (steam line)
 The steam pipeline must be sealed, so additional elements are used to assemble it - fittings and fittings, with the help of which individual tubes of different diameters are connected into a single system. Complete tightness can be achieved using insulating compounds, for example, the most common dough, which is used to cover the joints.
Homemade steamer
The quality of artisanal distillate depends on how many harmful impurities it contains. To clean the drink from them, during the process of assembling a homemade moonshine still, a steamer is installed with your own hands. The easiest way to make it is from a regular 0.75-1 liter glass jar. It is closed with a lid, two holes are made in it and two hoses are connected to them, which are secured and sealed.
Refrigerator for moonshine still
The most complex part is the refrigerator or condenser, whose task is to cool the alcohol vapor so that it turns into liquid. You can buy this element ready-made, or you can make it yourself.
The refrigerator includes two components - a coil and a cooling source. A homemade coil for a moonshine still can be made from glass or an aluminum tube. The first option is preferable. But if finances allow, then it is best to buy a copper coil, which cools quickly and does not in any way affect the flavor and aroma characteristics of the finished drink.
 Do-it-yourself refrigerator for a moonshine still
 There are several requirements for the coil tube:
- the cross-sectional diameter should be in the range of 9-13 mm; if it is larger, the device will be too bulky;
- the optimal length, according to experienced moonshiners, should be 1.6-2.2 m; if made longer, the resistance force will increase and the distillation process will slow down;
- The wall thickness should be 1-1.2 mm; with a smaller value, the cooling of the system will be more intense, but the element will wear out much faster.
How to make a refrigerator with your own hands:
- The flexible metal tube should be filled with sand to prevent it from accidentally being crushed.
- We wind it onto a cylinder with a diameter of approximately 30-35 mm, making turns in increments of 10-13 mm.
- We remove the sand and rinse the inside of the tube well with water.
- We insert the coil into the body - a piece of plastic pipe, and install pipes on it for supplying running water.
- We seal both ends of the structure hermetically.
The simplest homemade moonshine still
The easiest way to make a structure is from an ordinary pan. For such a moonshine still you will not need a drawing. If you make a steamer and a refrigerator in advance, the entire assembly process will take no more than half an hour.
 Homemade moonshine still from a saucepan
 Making the simplest homemade moonshine still from a saucepan:
- To ensure tightness, we use a silicone gasket made from a silicone hose cut lengthwise and stretched over the top of the pan.
- We make a hole in the lid with a diameter of 12 mm, insert an adapter into it, which we secure from the inside with a nut with a rubber gasket.
- We attach a steam line to the adapter from the outside.
- To ensure that the lid fits as tightly as possible to the pan, we fix it with ordinary paper clips.
- We attach a steam tank and a coil to the pipeline.
- We seal the joints.
- We test the device and proceed directly to distillation.
Moonshine still from a flask
You can make a homemade moonshine still with a larger volume steamer with your own hands from an old-style flask - the kind that were common in Soviet times. Now they can be purchased through private advertisements. This container has a tight-fitting lid that you don’t have to press.
 DIY moonshine still from a flask
 The assembly process is not much more complicated compared to the option that uses a saucepan.
- We drill a hole with a diameter of 20 mm in the lid of the flask.
- We put a brass fitting into it, pressing it from the inside with a gasket and washer.
- We put a hose on the adapter, which we connect to the steam tank, and from it we take the pipeline to the condenser.
- We check all connections, seal them and do a test distillation.
Instead of a Soviet-style flask, you can take a modern can for transporting dairy products or a keg barrel for beer. In the second case, you get a very large volume moonshine still, which allows you to expel a lot of distillate at a time. But the process of making a structure from a keg is quite labor-intensive - you will have to work with a grinder and a welding machine.
A pressure cooker or miracle pan is a Soviet prototype of a multicooker, but with more limited functionality. But for moonshiners, this unit is of interest because it is more airtight than a regular saucepan. However, there is also a significant drawback - the small volume of the tank, which allows you to ultimately obtain no more than 1.5 liters of distillate.
A moonshine pressure cooker is also an economical and simple option; such a device is assembled using the same algorithm that is used in the case of a saucepan. So if you have an unnecessary Soviet pressure cooker at home that you never bothered to throw away, then you can put it to work.
 Moonshine from a pressure cooker
 Homemade moonshine still with a column
It is possible to obtain alcohol at home not only by distillation, but also by rectification - this method is used in industrial enterprises. It has the main advantage - it allows you to automatically separate fractions, resulting in a purified, high-quality product without fusel impurities. The rectification process proceeds at a continuous pace, due to which the efficiency of distillation of alcohol vapor into liquid increases.
 Moonshine still with distillation column
 The principle of rectification is similar to distillation. In this case, the mash is also heated in the reservoir cube. Vapors are released, which enter the reflux condenser, which acts as a steam vaporizer, are cooled in the condenser, and the resulting liquid flows down, where it meets a new portion of alcohol vapor and mixes with it. As a result, more saturated alcohol vapors are formed, which are concentrated in the upper part of the column, and then enter the refrigerator and fall into the receiving chamber in the form of a finished purified product.
It is also quite possible to assemble a moonshine still with your own hands. It includes the following required details:
- tank made of steel or copper;
- body - is a vertical steel or copper tube with a diameter of 30-50 mm and a length of 1350-1400 mm, the wall thickness must be at least 2-3 mm;
- reflux condenser (analogue of a steam steamer) - can be made from a glass jar, thermos or pressure cooker;
- capacitor - in the housing;
- contact element - mesh grater for dishes;
- connecting elements - nuts, washers, adapters, silicone tubes.
 DIY moonshine still-column diagram
 How to assemble a homemade moonshine still-column with your own hands
- It is best to purchase a copper pipe for assembling a makeshift structure. We cut it into two pieces, the ends of which are cleaned and connected using an adapter.
- We put dish mesh sponges in one part; you can replace them with small steel springs or glass balls. Meshes are necessary to improve the quality of heat transfer. When purchasing these parts, be sure to make sure that they are made of stainless steel. Before using, it is advisable to boil them in water with 5 tablespoons of table salt, and then cut them into 5 cm pieces.
- A mesh plug with washers is installed at the end of the pipe to prevent the contents from falling out.
- We connect the distillation column to the tank.
- At the other end of the copper tube we insert a piece of foam rubber 4-5 mm thick, which will act as a heat insulator, and connect it to the reflux condenser by soldering.
- We close the top of the column with a cork and seal it. You should first make a hole in the lid for the atmospheric tube. We fix it with a fitting.
- To remove the distillate, a hole is made for a pipe with a diameter of about 14-20 mm in the lower part of the pipe. A plate for filling with condensate is mounted under it.
- We attach the refrigerator to the column using a silicone hose. It is convenient to clamp it with a clothespin for a dropper, which allows you to regulate the speed of condensate movement.
- It is recommended to connect a tap from a gas burner to the refrigerator so that it is convenient to regulate the temperature of the water inside the case - around 50-55 degrees.
- It is also worth mounting a thermometer into the column, for which a separate unit is made.
After the bad moonshine of the 90s, many people were turned away from this drink for a long time, but recently traditions have begun to be restored. People began to understand that bad moonshine is made only from bad raw materials, and from good, high-quality raw materials, excellent alcohol is obtained, superior in quality to the same vodka.
However, it is very difficult to prepare high-quality moonshine without a special apparatus, and it is not always possible to buy it. Let’s put it this way: it costs a lot and it’s difficult to find a normal one.
Therefore, many lovers of homemade alcohol are inclined to think that they need to make a moonshine still with their own hands. What is needed for this?
Firstly, understand the essence of moonshine brewing technology, and secondly, understand which fragments must be present in the apparatus.
The principle of moonshine technology
Despite the variety of all available methods for producing moonshine, the essence of the process comes down to the fact that the raw material is heated in a sealed container, and its vapors containing alcohol are cooled as they pass through the pipe. In the form of condensation, they flow into another container. The resulting distillate is the moonshine we need.
This process is clearly shown in the figure:
Thus, we can clearly see that the moonshine still must have a container into which the raw material (mash) is poured - a distillation cube or evaporator, a pipe through which vapor will pass, a cooler and a container for collecting the distillate.
Despite its simplicity, the combination of these elements gave rise to many designs of moonshine stills. Craftsmen have long figured out how to make a moonshine still using available materials.
Moonshine still designs
Any design has its pros and cons, as well as parts that, like a designer, are put together into a specific model of the device. By the way, the quality of moonshine depends more on the accuracy of its preparation than on the complexity of the apparatus itself.
Model 1. Isothermal distillation apparatus
In the picture below you can see two almost identical moonshine stills. These are the simplest schemes that do not require any special skills to create them.

You will need: a gas or electric stove serving as a heat source (5), a large saucepan or stainless steel pot (evaporator) (3), mash (4), a dish (deep bowl) for collecting moonshine and a stand for it (2), a basin , the size corresponding to the width of the pan (entering it to the middle) (1).
The essence of working with such a device is simple: you pour the mash into the evaporator, install a stand for the moonshine collection container and place an empty container on it. Next, you install a basin that should partially fit into the evaporator, but not touch the moonshine bowl. Ice water is poured into the basin, and the entire structure is installed on a heat source (stove). To ensure tight contact, the place where the basin enters the pan can be tied with a towel soaked in cold water or a layer of fresh dough. When heated, the mash vapor comes into contact with a cold basin, and, as a result of condensation, falls in drops into a container for collecting moonshine.
This method has many disadvantages:
- there is a possibility of mash getting into the moonshine collection container
- you cannot determine the strength of the moonshine that is formed until you disassemble the device
However, this device can be improved with the help of a funnel and outlet tube (2), which replace the container for collecting moonshine in the design:
Such a device allows you to collect moonshine outside the evaporator, which reduces the number of disadvantages of such a device and improves the quality of the alcohol itself.
The funnel, like the container for collecting moonshine in the earlier model, must be placed on a stand. This stand can be a tripod or a wire basket.
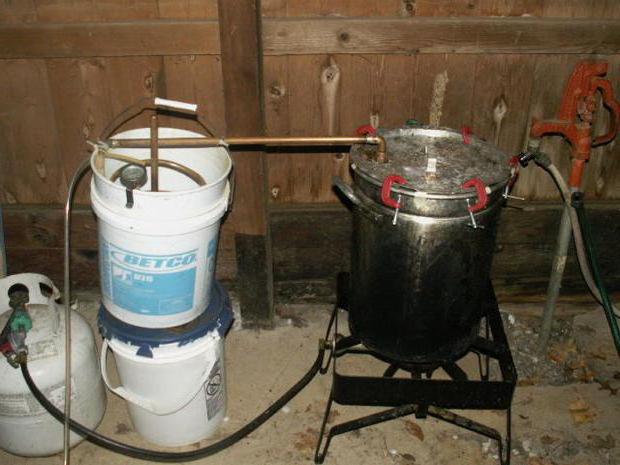
Model 2. Moonshine from a pressure cooker
Do you remember Soviet pressure cookers? Nowadays they rarely cook in them, but any moonshiner who owns this treasure knows that making a full-fledged moonshine still from it is not too difficult.
How to make a moonshine still from a pressure cooker is shown in the figure:

You will need: gas stove and pressure cooker.
The technology for assembling the device is that the two valves on the cover (1) are replaced with rubber plugs, into one of which a thermometer (2) is inserted, and into the other a fairly long tube (3).
A tap (4) and a device for cooling the vapor with ice water (5) are installed on the tube. The water inlet and outlet are shown in the figure using arrows.
Sometimes a coil is inserted into the vapor cooling device (5) (as a fragment of a tube (3)). How to make it is described in detail below, and now we will tell you how to make a tube - a cooler (as in the photo).
We insert the coil or tube (3) into a piece of plastic or metal pipe:

We prepare fittings for water supply and drainage:

They will need to be glued to the cooler; for this you will need to heat them up and press them against the pipe.


Irregularities may form inside the pipe where the drill inserts. They need to be cleaned with a knife or sandpaper.
The result is a design like this:

To close the pipe on the sides, you need to cut out lids from tin from beer cans or seaming lids. You need to make slots in them for the coil tubes and glue them inside with superglue.

To completely seal the seams, you can use a hot glue gun, first forming a border around the seam using simple baking soda. You will end up with a fairly reliable design.
Next you will have to seal the coil tightly. This is done using epoxy glue, which is used to fill the entry and exit points of the coil. Sometimes, to save glue and make the structure look noble, epoxy is mixed with silver.
Attention! The second edge of the coil is sealed only after the first has completely dried. Only diligence and patience will allow you to create a high-quality cooler.
A glass tip (7) is placed on the outlet end of the tube (3) or coil, through which the moonshine enters the moonshine collection container (6). It must be installed in such a way that the distillate falls into the container, but the tip itself does not lie in it.
The collection container (6) can be a glass jar with a screw cap, in which a hole is made for inserting the tip. This container (6) must be placed in a saucepan with cold water (8).
The essence of working with the device: after the mash is poured into the pressure cooker, it is put on fire, and the cooler (5) is connected to running water. After boiling, the mash should bubble over low heat. Alcohol vapor, rising through the tube, will be cooled by the pressure of running water in the cooler and flow into an additionally cooled receiver.
Design advantages:
- minimum modifications
- Due to double cooling, a higher degree of alcohol is maintained
- there is no chance of mash getting into the moonshine collection container
Design disadvantages:
- when making a large amount of moonshine, you will have to disassemble and reassemble the structure many times
- you cannot separate the “heads” and “tails” of moonshine, which reduces its quality and requires additional purification of the product
Model 3. Alembic with coil
This is the most common model. Using it you can get 0.6-0.8 liters of moonshine per hour.

You will need: a gas stove, a large container for mash (1) with a tight-fitting lid (2), a thermometer that determines the temperature of the mash (3), a tube for removing alcohol vapors (4), a valve (tap) (5), a coil (6 ), a capacious container with inlet and drain (locations indicated by arrows) of cold water (7). In addition, you will need a container to collect the resulting alcohol.
The essence of working with the device: fill the mash container 2/3 with it and wait for it to boil (78°C). It should boil gradually and evenly. This is achieved using low to medium heat. The best option would be to lower the heating temperature after the mash reaches 75°C. Excessively violent boiling can throw mash particles into the outlet pipe and ruin the entire moonshine process.
Passing through the coil, the steam cools and enters the moonshine receiver as a ready-made distillate.
A similar moonshine still can be made from a flask in which milk is usually transported. Let's consider this option in more detail.
During the creation of the apparatus, a 40-liter flask will serve as a distillation cube. To begin, remove the lid from it and disconnect the bar that presses the lid to the flask and the lever with the clamp on the flask itself.
In addition to the dough, the fit of the lid to the flask can be ensured by “fum” tape. It will also work if, for example, you start using not a flask, but a large saucepan:
For cooling, you will need to choose a 30-liter tank made of stainless steel, galvanized iron, hard thick plastic or aluminum. A coil will be located inside it.
How to make a coil.
At home, the coil is made from a copper tube. Its diameter should be 10-12 mm, and its length should be about 3 meters.
To create a coil, a tube is wound around a pipe to form a spiral. The diameter of the spiral matters only in the sense that it should easily fit into the tank for
cooling.
The number of turns can be arbitrary - sometimes it is enough to make only 2 or 3 turns.

The coil must be bent carefully so as not to break it. To do this, a copper tube is tightly filled with sand before bending, with its ends flattened.
The finished coil is inserted into the tank vertically, and its lower end must have an exit from the tank. In this case, the tightness of the outlet can be ensured in different ways, for example, using a brass bushing with a thread along the outer diameter, a nut and a paronite gasket.
From above, the coil is attached to the tank with a clamp.
In addition, the tank must have 2 drilled holes with pieces of tube soldered into them for supplying and draining water (hoses are put on the tubes for this purpose).
It is very good when the water supply to the tank is regulated by a tap.
Model 4. Moonshine still with steamer
The design of this model almost completely duplicates the previous one, with one exception - between the container for mash and the cooler, a steam tank is installed in it (a sealed container that separates fusel oils from alcohol vapors).
In the picture this device looks like this:

The essence of the operation of a steam steamer is that when steam enters it, the pressure inside a container larger than the pipe drops, the temperature decreases, and fusel oils with a small part of the distillate precipitate. Typically, out of 10 liters of mash, this sediment is about 200 ml.
The action of the steamer is well reflected in the figure:

Creating a still with or without a steamer depends on personal preference, but you should know that when assembling a moonshine still with your own hands, it will not be difficult for you to build a steamer.
It is made from a regular 1-3 liter jar with a screw cap. Two holes are made in the lid into which fittings are inserted. They are secured with nuts and additionally treated (outside) with hot melt adhesive.
After the structure is ready, it is connected by hoses to a mash container and a cooler. At the same time, try (if possible) to ensure that the incoming tube of the steam tank is slightly lower than the outgoing tube (by 1-1.5 cm).
There is another design for a home steamer. Everything about it is also simple: one wide hole is made in the lid of the jar into which the coupling is inserted. It needs to be secured with a nut, and the tubes from the coil and mash containers must be placed inside. Before being placed in the coupling, they are cleaned and tied with threads.
Inside the lid, you need to stuff cotton wool into the gaps and fill it with epoxy glue on top. When it dries, the cotton wool is removed.
When assembling a moonshine still with your own hands, you can install a steamer on almost every model (except for the first, simplest one).
There is a similar model of a moonshine still, but still differs from the previous version.
Model 5. Device with two containers
In order to make this moonshine still with your own hands, you will need to study in detail the structure of previous models.
The disadvantage of this option is its complexity and lower alcohol yield, but the big advantage is the high quality of the resulting moonshine.

You will need:
- gas stove with two parallel burners
- large mash container (1) with a tight-fitting lid
- two thermometers (2) - to determine the temperature of the mash and water,
- tube to protect the device from pressure surges (3)
- valve (4)
- tube for removing alcohol vapors (5)
- water container (6)
- tube – cooler with coil (7)
- container for collecting the resulting alcohol, installed in a vessel with cold water (8)
The essence of working with the device:
- We heat the water in the container (6) to 80-82°C and use a thermometer to constantly maintain it.
- Heat the mash to 78°C. At this temperature it boils and the release of alcoholic vapors begins.
- The vapors leaving the heating container (1) enter a container with water (6), where some of the water and fusel oils settle, while the alcohol vapors continue their journey through the cooler into the distillate collection container.
Model 6. A device created from a multicooker
This model is dictated by modernity, but not everyone likes it. Its main disadvantage is that moonshine in it can only be prepared from sugar mash, i.e. absolutely pure liquid.
The design of the device is simple, it contains only 3 elements: the multicooker itself, a glass distillation tube from the laboratory, 3 medical tubes (but better than silicone ones) of 1 meter each. In addition, you will need an outlet and a tap with running water.
The assembled device looks like this: 
You need to use the device like this: after installing and securing the hoses (based on the photo), you need to set the “multi-cook” or “cooking” mode on the multicooker. The initial heating temperature should be 120°C, but when steam begins to form it will need to be reduced to 100°C.
The moonshine obtained as a result of this experiment is quite transparent, but many complain about its low strength.
P.S. The models of moonshine stills presented in the article are given as examples of their possible options.
When making a home brewing apparatus, we recommend that you use only stainless steel, glass and silicone as materials for its elements.
If you use other materials, we do not guarantee you the complete absence of harmful compounds in the moonshine produced using these machines.
The chemical composition of the distillate obtained at home can be checked in any chemical laboratory.
Few people will undertake to make a moonshine still from scratch on their own - it is much easier to buy a ready-made assembled model, and I know this from personal experience, but this material will be of interest precisely to those who are not looking for easy ways, but want to be independent in everything. I will attach drawings of the moonshine still, but you can completely do without them. Let's start with the fact that it makes sense only for a specialist in the field of argon arc welding with his own equipment to undertake the independent manufacture of a distillation cube, because this is the method used to cook food-grade stainless steel or copper. This is quite complicated, but for general development we will attach these drawings below. Now to the point.
DIY moonshine still - drawings of “components”
So, a moonshine still consists of only two main parts - a distillation cube and a refrigerator. Steamers and bubblers are used as additional accessories. Let's take a look at the schematic drawings in turn, in which I, to the best of my talent and giftedness, tried to clearly depict the components of the moonshine still and show their operating principle.
Alembic
In this incomparable picture we see a classic aluminum flask, which consists of the following parts:
- Actually - an aluminum flask
- Hermetic lid with seal made of food grade rubber or silicone
- Outlet pipe - you can simply drill a hole in the lid and use a threaded tube of a convenient diameter, which is secured with nuts on both sides. The nuts are screwed onto the rubber seal
- Thermometer showing the temperature of the vapors - can be built in exactly the same way as the outlet pipe
- Fermented and ready to distill mash
- Vapors generated by heating
Absolutely nothing complicated - a primitive and reliable device for all times.

Refrigerator or coil
The second important element of the device is the coil or refrigerator. Below you see a unique illustration of a static type refrigerator.
It consists of the following elements:
- Inlet end of copper tube
- Spiral twisted coil
- The outlet end of the tube is where the condensed moonshine will flow from
- Any plastic or metal container
- Cold water
The flow-type coil differs only in that water is forced into the cooling compartment, which makes it possible to significantly reduce its size.
Now let’s look at additional accessories that you can make yourself without any problems. You can make a steamer for a moonshine still in 3 minutes.

Sukhoparnik
This wonderful device is nothing more than an ordinary glass jar of canned peas. I think if you take pickles or mushrooms from under, then nothing bad will happen either. Components of this device:
- The glass jar itself
- Outlet pipe
- Inlet pipe
- Hot alcohol vapors
- Fusel oils and water
As for the pipes, you don’t have to install them at all, but simply drill two holes in the lid - I personally did just that. From a flask, on the outlet of which I have a special nozzle for a hose, I run a small piece of silicone hose into the steamer, and seal the entry point with bread crumb. A small-diameter silicone hose also goes into the second hole of the steamer, the second end of which I put on the copper tube of the refrigerator. Preparing for the haul takes as much as 1.5 minutes, and making such a steamer takes 30 seconds.
The function that this device performs is additional purification of the resulting product from fusel oils. A steam chamber is installed in the area between the distillation cube and the refrigerator.

Bubbler
As you can see, the bubbler is structurally not much different from the steam steamer, and it consists of the following elements:
- Hermetically sealed lid
- Glass jar
- Outlet pipe
- Inlet pipe
- Fusel oils rising closer to the surface
- Alcohol-laced water
- Hot vapor passing through a liquid
- Purified and saturated alcohol vapors rushing into the refrigerator coil
The main design difference is the mandatory installation of pipes in the lid, and one of them must reach almost to the very bottom of the can. The point is that the container is gradually filled with condensate, vapors begin to pass through it, giving away fusel and harmful impurities, taking away ethyl. As a result, the strength and purity of the final product are significantly increased.
That's all, actually. In principle, you don’t need a drawing of a moonshine still with dimensions. The only thing that still needs to be mentioned is the optimal length of the coil, which should be about 1.5 - 2 meters for household devices, provided that a copper tube with a diameter of about 3-4 mm is used.
A water distiller is a special equipment that allows you to purify liquid as efficiently as possible. Then it can be used for its intended purpose.
What is a distiller used for?
Distilled liquid has a certain feature: it is completely free of any impurities. That is, there are not even microelements in the treated water. The purified liquid is used quite widely:
In medicine (for the preparation of medicines);
In industry (for operation of devices that can only be used with treated water);
In car batteries;
At home. Some people use this water for food. Although it is not recommended to do this all the time.
Advantages of the presented device

A household distiller has certain advantages:
Made from safe materials;
Effectively cleans liquid from any impurities;
Easy to use;
Does not require a lot of energy;
May have additional filters and functions (automatic adjustment of water supply and purification);
It works almost silently.
Naturally, such devices also have certain disadvantages. For example, to operate the simplest device, you need a gas burner that can heat water to evaporation temperature. Naturally, such a unit must be closely monitored. In addition, the device may have large dimensions.
The design of the device and the principle of its operation
You can make a distiller very quickly with your own hands; you just need to understand its design and collect the necessary materials. So, the simplest model consists of a container in which water is boiled, a tube where the steam is cooled, and a receiving vessel where the already processed moisture is collected.
Naturally, there are more complex models that have additional cleaning elements - various filters. In addition, you have the opportunity to automate your homemade device.
How to make a distiller with your own hands? First of all, you need to understand the principle of its operation. So, an outlet tube is inserted into the container where the water will be boiled, and its second end is attached to the receiving vessel. When a liquid begins to heat up to a high temperature, it turns into steam. As it passes through the outlet tube, it cools and turns into droplets of water, which are collected in the receiving vessel. That's all the wisdom.

What materials and tools are needed to make the product?
Now let’s look at what you can use to make a simple distiller with your own hands. You will need:
1. A small diameter tube made of any safe material. It will play the role of a cooler, a steam condenser. Brass or copper is best for this.
2. A container for boiling water. It must be sealed. In principle, you can use a regular kettle, but you will have to close the spout. When choosing a container, pay attention to its volume.
3. Vessel for receiving purified water. This can be an ordinary glass jar.
4. Connecting elements: clamps, wire, rubber hose or other fasteners.

As for tools, all you need are pliers. Please note that it is best to use high quality stainless steel pipe. The fact is that the presented element will often be exposed to the negative effects of high temperature and moisture, so the metal must be protected from corrosion and rust. In addition, this metal will make the device as durable as possible. Moreover, stainless steel does not require periodic cleaning of limescale.
By the way, to make a distiller with your own hands, you can use a faulty pressure cooker instead of a kettle. Its huge advantage is that it is hermetically sealed. The only thing is that you will have to make a hole in the lid so that you can insert the tube there.
Features of the device manufacturing
Now let's see how to build a vacuum distiller with your own hands. All work consists of several stages:
1. First, you should make a coil from the pipe. To do this, it needs to be turned into a spiral. If the pipe is plastic, then bending it will not be difficult. It's another matter if the element is made of metal. Here you need to try or buy a ready-made coil. In this case, constructing the device will not require much effort; you will not need to use welding or a soldering iron.
2. Now, using the clamp, you should connect the pipe to the containers. You can use a regular rubber hose for this. And to seal the connections, use regular wire or a clamp. Please note that there should be no traffic jams in the system, otherwise the device will simply explode during operation.
That's all. Now you have learned how to make a household distiller with your own hands. Naturally, the manufacturing process has some peculiarities.
When you make a household distiller with your own hands, do not forget about basic safety precautions and following certain rules. For example, during operation, try not to touch the elements of the device, as they will become very hot. Please note that all connections must be well sealed.
Also pay attention to the direction of the steam. It should come from top to bottom, which will contribute to more efficient operation of the device. The presented unit does not require special care. Naturally, it is advisable to keep it clean. During manufacturing, try to be as accurate as possible in your calculations. The distiller must be constructed according to a previously drawn drawing.
To further cool the tube in which the steam will condense, you can use regular ice. To do this, put and secure a regular plastic bottle on it. The inlet and outlet openings must also be carefully sealed. To do this, simply heat the plastic. That's all the features of making a distiller. Good luck!
A distiller in moonshine is needed to purify the liquid from harmful impurities. Every moonshiner can make such a device with his own hands. Making a distiller is not difficult, but you will need some tools, items and a little time. But the output will be a high-quality, purified product.
A moonshine still is used to distill liquid to produce a strong alcoholic drink. As a rule, it consists of the following parts:
- Distillation cube. This is a reservoir where mash is poured and it is heated in it. For it, you can use any container that is hermetically sealed and is not afraid of high temperatures and pressure. A can, a pressure cooker, or a saucepan are perfect.
- Capacitor. Here, various tubes are used to condense the gas.
- Containers for the finished product. Typically, moonshiners use glass jars for the final liquid. But you can take other containers, the main thing is to be able to monitor the level.
Types of distillers
Distillers come in different types:
- Industrial. In industry, special rectification columns are used to produce pure alcohol.
- Household. The devices have a less complex design, but with multi-stage distillation, high-quality moonshine is obtained.
- Homemade designs. They are more economical, and with a properly structured process, the product turns out no worse than the factory one. At the same time, the moonshiner knows what elements he used for it.
The operating principle of distillers is the same. But the dimensions, materials and design itself have significant differences.
In addition, moonshine stills are:
- Flow-through. Such structures are connected to the water supply.
- Not flowing. They are filled with distilled liquid and do not require connection to a water supply.
Some distillers are equipped with steamers, reflux condensers, and thermometers, which allows more precise control of the distillation process.
DIY moonshine distiller
There are a lot of different moonshine stills from the store, but if the moonshiner makes the design himself, he knows exactly what parts are used, how strong and reliable they are.
It is not difficult to make a distiller with your own hands. To begin, select a container for distillation. It must be completely sealed. Many people use large milk cans. They are equipped with the necessary lid that is easy to close and open. The can has a wide neck and has handles for carrying.
An enamel saucepan with a lid will also work. It can withstand high temperatures. The container differs in displacement, so you can expel as much moonshine as you want. Make a hole in the lid of the dish through which steam will escape.

Moonshiners often use a stainless steel pressure cooker for the still. It has a convenient lid and safety valves.
Choose the container based on your needs and capabilities. For a small amount of moonshine, a pressure cooker or small container is suitable. In order to expel a lot of moonshine, use a can or large-capacity pans.
A coil is attached to the cube. Copper tubes are suitable; they have good thermal conductivity and are less oxidized. Glass tubes are fragile and difficult to make. An aluminum tube can be used, but it will oxidize over time.
Prepare a container for the finished product. It is more convenient to use glass jars; in them you can see how pure the product is and you can monitor the level.
After the necessary parts have been prepared, we proceed to assembling the distiller:
- Remove the rubber bands from the cube. For safety, the lid is attached with reinforced tape, silicone sealant or dough (flour and water). Check that everything is dry and firmly in place.
- Make a hole in the lid of the distillation container and insert the adapter there. A plumbing pipe of suitable diameter, a copper pipe or a wooden cylinder is suitable for this. Screw a capacitor onto it.
- To connect the coil with water, rubber or. Check the tightness! Using a hose, water is supplied, steam is removed and the finished product is discharged. Silicone hoses are of higher quality, resistant to high temperatures, fungus, durable, and elastic.
Our distiller is ready, you can start brewing moonshine.
Non-traditional distillers for moonshine
Some moonshiners use unconventional parts for their moonshine still. Distillers are made from an aquarium, old samovars, and metal pipes. Condensers from refrigerators are used to cool the coil. But we must remember about sealing, thermal conductivity, high pressure and temperature.
A distiller is easy and inexpensive to make. In this case, experienced moonshiners will monitor its reliability, strength and regulate the quality of the product.
 How to make a moonshine still at home What does a moonshine still look like at home
 Distilled water: how to get clean water in different conditions
 Use of a Panchenkov nozzle in a moonshine still Regular Panchenkov nozzle operating principle