How to make a bathroom in a wooden house: communications, waterproofing and finishing. How to properly make a bathroom in a wooden house The floor and walls of a bathroom in a wooden house
Buying a new wooden country house usually involves many problems and worries. However, if your home design includes a bathroom, consider that the lion’s share of all problems have already been solved. A bathroom in a wooden house is the most difficult part of construction; no other living space requires as much attention and labor. Literally everything matters: the location of the bathroom and shower, the size of the room, proximity to water, good ventilation. In addition to designing sewerage and ventilation systems, it is necessary to carefully consider the design of waterproofing and issues of further finishing of the room.
The main stages of building a bathroom with your own hands
The location of the shower plays an important role: firstly, it must have access to a water source, and secondly, it must be connected to a sewer system, or, at worst, a cesspool or treatment facility.
A bathroom in a wooden house (no matter what it is made of: profiled timber or logs, or chopped by hand) is equipped in several stages:
Bathroom in a wooden house: location and dimensions
No matter how much you would like to bring your share of creativity into the construction of a bathroom, it would be more correct to do this without going beyond the professional rules for its placement:
 If one of the walls of the bathroom is external, it will be easier to ventilate it
 - one of the walls of the bathroom should be external, this will greatly facilitate its ventilation;
- if the house has several floors, you can also equip several bathrooms, placing them one above the other;
- optimal location - next to the bedroom or dressing room;
- inappropriate place for a bathroom - next to the place of eating and preparing food;
- if you want to save space, consider making a main or additional bathroom under the stairs.
As for size, the bathroom, together with utility rooms, should not occupy more than 20-25% of the area of the house. In any case, if the owner wants a huge bathroom, no one will stop him from doing so; it is only important to worry about careful waterproofing.
Rules for constructing a bathroom in a private house
The functionality and durability of the future bathroom depends on careful adherence to all installation rules.
The main problem facing the builder is the shrinkage of a wooden house. If a brick or reinforced concrete house does not create such problems, then a wooden one, due to its material, is subject to seasonal changes.
 Use metal-plastic or plastic pipes to drain water
 Therefore, it is worth taking this fact into account when laying communication networks, making a reserve of free space or using damping devices.
To drain water, it is best to use metal-plastic or plastic pipes, because they do not deform when exposed to walls and partitions that have changed due to precipitation. When fastening the pipeline, it is necessary to use clamps with rubber gaskets.
The design of a bathroom in a wooden house is best done on the basis of a sliding frame system - a self-sufficient load-bearing structure, autonomous from the walls of the house and therefore not affected by them during shrinkage.
The sliding frame is a system of metal profiles attached to the wall.
The main requirement during installation is to ensure the mobility of the profile. To do this, elongated, oval holes are made in the wall using a drill, so that the screws entering them do not touch the wall covering. The screws are not tightened tightly so as not to interfere with the mobility of the entire structure.
Paneling, installation of ceiling and floor in the bathroom
After installing the profile, you can begin covering with plasterboard. First, you need to prepare the base: using rivets, the same ones are attached to existing U-shaped profiles, modifying them so that it is convenient to attach sheets of drywall.
 Drywall is attached to the wall using self-tapping screws
 Drywall can be secured using self-tapping screws. It is worth deciding in advance on the placement of the wiring and, when installing sheets of drywall, drill holes in them for the wires. You can lay tiles on top of the drywall.
It is better to make the ceiling in the bathroom suspended: this way you can conveniently disguise all the ventilation elements.
 Scheme of waterproofing a bathroom floor in a wooden house
 The floor is arranged in different ways: depending on the type of base. If the base is concrete, the floor is made the same as in a stone house. If the base is wooden logs, then first thickened waterproof plywood is laid, then hydroglass insulation, reinforced screed and, finally, tiles.
In addition, a bathroom in a wooden house needs careful waterproofing. If funds allow, you can lay a polymer floor, but if your budget is limited, you can apply a water-repellent mixture with your own hands or glue a waterproof floor covering.
Preliminary finishing of a bathroom in a wooden house must be done carefully: it must be leveled, cleaned, soaked with an antiseptic and cracks in the floor must be repaired before directly laying the waterproofing layer and finishing coating.
Wooden houses easily become damp and are extremely susceptible to mold. To avoid these unpleasant consequences, you should take care of proper ventilation of the room.
If at least one of the walls of the bathroom is external, then the room itself is ventilated. Additional ventilation requires expensive, fire-proof equipment.

It is better to entrust the installation of ventilation to a professional, because incorrectness in this matter can cause a further fire in the system. In addition to the fact that all materials used must be non-flammable, the entire structure should not come into contact with wood, but should be mounted on special brackets. The system also needs fire dampers and reliable protection from moisture.
Supplying water to a bathroom in a wooden house
The final stage of work is supplying water. Before supply is established, all systems, from sewer to ventilation, must be installed and thoroughly checked. To avoid water freezing in the pipes, all drainage networks must be insulated, and the base of the floor must be equipped with a vapor barrier film.
 Diagram of water supply to a wooden house
 Thus, equipping and preparing a bathroom for use with your own hands requires a lot of effort, building materials and special equipment (take the ventilation system, for example). You can’t get hung up on the aesthetic side of the issue: it’s better to spend less on a beautiful finish, but carefully consider waterproofing and ventilation of the room, not to mention the main thing - proper sewerage.
The convenience and ease of its operation depends on how correctly you design a bathroom in a wooden house. In addition, following certain rules when designing will allow you to save your budget and time. In addition, the selection of design, finishing materials and arrangement of the finished bathroom is of great importance.
In this article you will find a design guide, as well as useful tips regarding the arrangement of a bathroom.


Bathroom design
A bathroom in a wooden house can be designed without any special reference to SNiP and SanPiN, but certain rules must still be observed here. This way you can avoid all sorts of surprises and problems in the process of organizing a bathroom in your dacha with your own hands.
Where to begin?
First of all, we need a floor plan of the entire house, with the location of sewer risers, ventilation ducts and water pipes indicated on them. This is if the house is almost completed and the wiring of all systems is completed. If the house is in the design stage, then you will have more freedom when designing the bathroom.
Here are the questions that need to be decided at this stage:
- The number of people, and, accordingly, the number of rooms into which bathrooms must be distributed.
- Your own wishes regarding the filling of a restroom or bathroom in a log house - the presence or absence of a bidet, replacing a bathtub with a shower, etc.
- Does any of the future residents have needs in connection with which the restroom or bathroom should be enlarged or specially equipped?
- The maximum budget you can allocate for all work.

Installation of a bathroom in a wooden house: preliminary planning
Choosing the location of the bathroom
First of all, it is necessary to say about several rules that should be followed when choosing a place. The order in the list corresponds to the degree of importance of the items:
- The bathroom should not be located above the living quarters if we are talking about a two- or three-story house. Failure to comply with this point may lead to problems when registering a finished home.
- Bathrooms located on different floors in a village house should be located on top of each other. Here we are talking about the convenience of connecting to sewerage, water supply and the use of ventilation ducts.
- The toilet is installed no more than 1 m from the riser, and a bathtub or shower cabin - no more than 3 m. This should be taken into account when installing a separate bathroom in a log house. This distance ensures optimal flow of water into the sewer. Increasing it may require the installation of pumps for forced outflow.

Bathroom in a house made of timber: location on the plan
Attention: There are also nuances that are responsible for the comfortable operation of bathrooms in the house. It is best to organize a bathroom in a frame house next to the bedroom if we are talking about the second floor, where sleeping areas are most often organized. The ideal option is to enter directly from the bedroom. And if we are talking about the first floor, where the kitchen and dining area are usually located, then here, on the contrary, the bathroom and the entrance to it should be located away from these rooms. But this question rather concerns ethical standards.Dimensions of a bathroom in a private house
Size standards exist only for restrooms: 80 cm width and 120 cm depth. For a bathtub and a combined bathroom, standards exist only if there is a disabled person in the family. The numbers are as follows: a restroom with a washbasin - 160 cm by 220 cm, a combined toilet or bathtub - 220 cm by 220 cm.
Also, when calculating the size of the bathroom, you should include the following figures:
- The distance between the axes of washbasin drains is from 70 cm, the free space in front of the sink is from 70 cm.
- From the wall to the washbasin - from 20 cm, from the washbasin to the toilet - from 25 cm.
- The distance from the bath to other objects is 70 cm.
The minimum numbers are given here, and if you have large areas, you can increase them at your own discretion.

Installation of a bathroom in a private house, in the village: distance between plumbing fixtures


Decoration and design of a bathroom in the house
In this section we will look at the most popular finishing materials used for bathrooms in private homes. In addition, you will find here three design options for these rooms.
Finishing a bathroom in a wooden house
The most budget-friendly and easiest-to-install option is PVC panels. They are used for finishing walls and ceilings. A wide range of panels will allow you to choose the desired finish. Even a small store will most likely be able to offer many options in color, pattern and texture.

Bathroom in a private house. Photo of PVC panel finishing
Ceramic tiles are no less popular than PVC panels, but this is a different price segment that cannot be called budget. This finish is used for walls and floors. The tile always looks solid, and if installed correctly, it lasts a very long time. True, installing tiles is a complex matter, and very often requires the involvement of a specialist.

How to decorate walls in a country house
And one more material that is not very often used for finishing bathrooms in houses is moisture-resistant plasterboard. It is universal, allowing you to change the shape of walls, ceilings and doorways. The final finish for drywall is usually paint or, less commonly, self-adhesive film. When choosing plasterboard, you need to remember that the material requires good ventilation in the room.

Bathroom in a log house: finishing with plasterboard for painting
For a country house, wall decoration with clapboard will be relevant. Wood is environmentally friendly and creates a healthy indoor microclimate. Well, don’t forget about the high decorative qualities of natural wood. It’s difficult to talk about price here, since it all depends on what type of wood will be used. For example, a budget option is spruce or pine, higher quality and more expensive is oak. Teak has higher resistance to moisture, deformation and rot than oak, but it also costs more.

Photo of a bathroom in a wooden house: clapboard finishing
Design and arrangement of a bathroom in the house
A wooden house suggests a country style. For wall decoration, plumbing and furniture, it is better to choose the simplest ones that imitate antiquity. In addition, the rustic style does not tolerate excessive pretentiousness. Even partially finished external walls can come into play here. In the photo you see that the caulked timber is not covered with anything. No polished surfaces: it is better to take a slightly rough stone for finishing, and apply a varnish to the walls that does not hide the texture of the wood.

Bathroom in a country house: country style
A chalet-style bathroom will look organic in a wooden house. When designing, we try to get closer to the image of a log hunting hut. In the example in the photo there is no additional decoration on the walls; the ceiling and interior partitions are left in their original form. But if the walls in your bathroom are made of a different material, then the problem can be solved with a block house. This material will imitate a log. We try to use furniture and accessories to a minimum, only the essentials.
Attention: A solid finish with natural wood will look good only in a large room. And in a small restroom, the advantages of the texture and color of the wood turn into disadvantages; the room visually “shrinks.”
Bathroom in the country: photo of design in chalet style
And of course, a wooden house does not at all oblige you to decorate all the interior spaces in styles similar to those given above. Here you can use design options similar to what you see in the photo below. The design in color and interior is close to the Provencal style. Airy, light design, well suited for rooms that do not have windows to the street.

Bathroom in the country: photo of a design close to the Provence style
A place to perform hygiene procedures is necessary in every residential building. The times when the bathroom in a wooden house was located in the yard are far in the past. A person should feel comfortable, which is why today almost every residential building in the village is equipped not only with a toilet, but also with a bathroom.
From this article you will learn how to properly design a bathroom in a mansion, decide on and. A photo of a bathroom in a wooden house will be shown in our gallery.


Basics of designing a bathroom in a country house
When building a wooden mansion from scratch, a toilet and bathroom are already included in its design. But installing a bathroom in a private house after its construction is also possible, although this will require changing the building plan, financial investments and labor costs. The fact is that to install a toilet you need a sewer system, and it is not available in all areas.
Please note: if there is no sewerage system in the area where your home is located, it is necessary to provide an alternative method of arranging wastewater - a cesspool, or local treatment facilities.Choosing the location of the bathroom in a village house
To make a bathroom in a wooden house beautiful and functional, it is important to choose its location correctly. Since the normal functioning of the bathroom and toilet requires the supply and drainage of water, the bathroom in a wooden house must be located close to the water source and also have access to the sewer system.
Important: According to SNIP, the minimum distance from the house and cellar to the external latrine must be at least 12 m, from the well to the sewer or composting device - at least 8 m.
Approximate layout of a mansion on a suburban plot
Choosing the optimal type of bathroom
The method of arranging the sewerage system and toilet is determined by how much time per year you plan to live in the cottage (permanently or seasonally). There are several types of toilets for country houses or dachas:
- a dry closet is a compact portable device consisting of a toilet seat and a reservoir underneath it. The tank contains a special liquid that exposes human waste products to chemical or organic influence, turning them into water, powder, or compost.

Compact dry toilet - bathroom in the country, photo
- backlash-closet - a waste disposal system, which is an insulated restroom at home, when the toilet is connected to a cesspool using a pipe system;

Design of a backlash closet - a bathroom in a country house, photo
- powder-closet is a dry method of waste disposal, in which the toilet in the house is directly connected to a box-type cesspool. A periodic layer of waste is covered with peat to neutralize it. In this case, the reservoir box should be cleaned regularly.

Installation of a powder closet in a country house
Advice: If you live permanently in a country house, the most convenient and practical way to arrange a toilet would be a backlash closet. The remaining options are more suitable for periodic or seasonal use.Determining the size of the bathroom
A bathroom in a private house can be organized in several ways:
- as a full bathroom (with shower, tank-tub and toilet);
- like a toilet (only toilet and sink).
In a private house, it directly depends on what kind of plumbing and household appliances are planned to be installed there. If the hygienic room includes only a toilet and a sink for washing, then its area can be 2-3 square meters.

Layout of a small toilet in a private house
If you plan to install a shower stall in the bathroom, its optimal area should be 3-4 square meters. Corner plumbing will save space, but all fixtures must be placed at a certain distance from each other to make them convenient to use.

Layout options for a combined bathroom in a wooden house
If a bathtub, washing machine, and cabinets for storing various bath accessories are installed in the room, then the size of the bathroom should be from 5 square meters.

Options for how to rationally plan a bathroom in a private house, photo
Features of arranging a hygienic room in a wooden building
The installation of a bathroom in a wooden house has some features. The linear dimensions of a wooden structure constantly change during shrinkage; this should be taken into account when building a bathroom and toilet. How to make a bathroom in a house from timber?
For this, a sliding frame is used. The technology for constructing the base of a bathroom in a log house consists of installing metal or wooden profiles in the vertical grooves of the logs, which will allow the base of the bathroom structure to be rigidly secured. The floors are reinforced with wide joists located at a minimum distance from each other. Then flexible water and sewer pipes are laid, electrical cables are laid, and at the end all communications are covered with plasterboard sheets or clapboard.
On a note: the use of a sliding frame when constructing a bathroom allows the room to resist shrinkage of the house without damaging the plumbing.
Arrangement of a bathroom on a sliding frame - a bathroom in a log house
Design and arrangement of a bathroom in a wooden mansion
When thinking about a country wooden house, you should give preference to the country style, Provence. They perfectly emphasize the natural texture of wood and preserve its special energy.
It is better to decide on furniture and a washing machine in the bathroom in advance, even at the stage of drawing up a design project. This will help you select plumbing and household appliances of the required sizes and compactly place them in the room.

An example of how to decorate a bathroom in a frame house
Our selection of photos will clearly demonstrate interesting bathroom designs for private homes.


Types of finishing of walls, floors and ceilings of a bathroom in a country house
Give the room a finished look. It is first necessary to hide all communications - hide the cables in special boxes, and fill the pipes in the floor with a movable cement-sand screed. A layer of waterproofing should be laid on top of the screed, and then you can begin laying the flooring and covering the walls and ceiling.
To decorate a bathroom in a wooden house, you can use various materials. So for wall cladding it is used:
- drywall;
- tile;
- wooden lining;
- PVC panels.

Beautiful and spacious bathroom in a country house, decorated with wooden paneling
To finish the bathroom ceiling, you can use the same materials as for the walls. Various decorative effects can be achieved by using suspended and tensioned structures.

Methods for decorating the ceiling when arranging a bathroom in a wooden house
Bathroom floor finishing can be made from the following materials:
- ceramic tiles (preferably with anti-slip coating);
- linoleum;
- wood (terrace board);
- waterproof laminate.

A high-quality floor sets the mood for the entire room
Bottom line
To make your vacation or stay in a country house comfortable, you should equip a bathroom there. It must be properly planned, sewerage, and high-quality waterproofing and surface finishing must be provided.
From the point of view of finishing, the bathroom is the most difficult room in a wooden house. Changes in temperature and humidity damage floor and wall materials; building structures need reliable protection. And it is quite difficult to provide it, especially when the house made of timber is new and still “settling”.
Traditionally, most homeowners finish the bathrooms in their frame and log houses with clapboard and tiles (tiles are laid in “wet” areas). This article talks about the intricacies of finishing bathrooms in wooden houses.
- Finishing a bathroom in a wooden house: tiles on a floating frame.
- Tiling a framed bathroom.
- Finishing a bathroom in a wooden house with plastic panels.
- Finishing the floor in the bathroom of a wooden house.
Bathroom tiles in a wooden house on floating guides
The decoration of bathroom walls in a wooden house is perfectly illustrated in the example from FORUMHOUSE. In the house of a FORUMHOUSE member with the nickname, recently built from hand-cut logs Vikta The bathrooms are finished with tiles and larch paneling.


All bathrooms have windows, all have forced ventilation. When the bathroom of a wooden house has forced exhaust ventilation (ideally, if there is also a window), it removes excess moisture from the room and prolongs the life of the finish. A number of mistakes in finishing with good ventilation will not be fatal, but without it it will be.

The tiles are laid on two layers of waterproof plasterboard, mounted on a frame made of metal profiles. The larch was mounted on a wooden frame. The log still shrinks, so the finishing of all four walls was done on floating guides. How this is done is clearly shown in the diagram.

In a row of logs with a pitch of 60 cm, wood grouse fastened a 50x50 block into the slot. The slot was made with a margin of 10-15 cm from the capercaillie fastening.
The fastening is just screw-on, you have to turn it all the way, but without fanaticism. Along the entire length of the slot and to the width of the washer and to the depth of the head, the wood was removed with a milling cutter so that it would not stick out .
The point of a floating frame is that the drywall will be able to “slide” along the slots during possible shrinkage of the house. Therefore, it is recommended to screw wood grouse without fanaticism.
If the house was built a long time ago and does not shrink, then there is no need to be tricky with the slots: it is enough to lay a material like a sealing tape between the elements of the house and the frame, similar to that used in frame house construction and when installing plasterboard partitions.
It is better to mount tiles in such finishing options vertically; they visually raise the ceiling.
A good example of finishing is the bathroom of user FORUMHOUSE with the nickname Kirsan in the photo below: the upper part is larch covered with sauna tiles, the lower part is tiles with a wood texture. (The bathroom is not yet finished, the cracks have not been filled, and the layout has not been made).

Tiling a bathroom in a frame house
If the house is frame and there is no risk of shrinkage, then plasterboard under the tiles can also be mounted on wooden blocks. The wall pie looks like this:
- insulation;
- film (should not touch the insulation);
- frame for fastening drywall;
- two layers of moisture-resistant drywall;
- glue;
- tile.
This finishing scheme can only be used in a heated house - temperature differences for drywall are unacceptable.
Finishing the bathroom of a wooden house with varnish

One of the bathrooms in a log house user FORUMHOUSE with nickname mixail50100 I laid it out with tiles, and the second one, with a shower stall, was finished with varnish.
Finish scheme:
- coat all seams with acrylic sealant;
- treat the entire room with an antiseptic;
- paint with covering acrylic paint;
- apply two coats of varnish.
There are tiles on the floor and a suspended ceiling.
Finishing a bathroom in a wooden house with PVC panels
Wall panels made of plastic, aqua panels made of fiber cement, etc. in the bathroom of a wooden house they are mounted on a wooden sheathing.
The sheathing pitch cannot be less than 50 cm and more than 60 cm.
The sheathing can be either only vertical or only horizontal.

The first panel is nailed to the block according to the level, the second is inserted into the groove of the first, etc. At the end of the work, a plastic profile is put on the structure, which will protect against water penetration into the grooves.
Finishing the floor in a wooden bathroom
Waterproofing the floor in the bathroom of a wooden house is carried out at the stage of laying communications. The scheme is selected for each specific building. There are several strategies that work, each using different materials.
Let's look at a few examples of well-functioning floor waterproofing.
Using coating waterproofing
Member of FORUMHOUSE with nickname Semsey I waterproofed my wooden floor in the bathroom like this:
- The logs are made of larch 200mm, between them there is insulation to their height.
- Subfloor - 40 mm board.
- Sheet material: two layers of plywood (can be MDF or DSP) glued with screws. The seams are staggered.
- Two layers of coating waterproofing.
- The finished floor is tiles. You can use a cork, etc.
Such waterproofing is presented in the diagram (here the numbering is in reverse order and instead of tiles - OSB).
Wooden houses have multiple advantages, which is why such buildings are becoming increasingly popular. But for modern people, it is important to ensure comfort in a country house that is no worse than a city one. To create comfortable and cozy living conditions in any home, you cannot do without a bathroom.
Experts classify the installation of a bathroom in a wooden house as a separate category. This is associated with the following negative properties of natural wood:
- high sensitivity to moisture with the formation of mold and mildew, leading to a musty odor and gradual destruction of the material;
- drying and shrinkage that inevitably occur in the first years after construction of the building;
- seasonal change in geometry.
Let's look at how to make a bathroom in a wooden house.
Construction layout
Initially, it is necessary to draw a floor plan of the building on a scale, which indicates the location of risers and pipes for water supply, sewerage and ventilation. The sketch can be made manually or using special computer programs.
At this stage it is determined with the following data:
- the number of people who will use the bathroom and toilet;
- the required number of bathrooms for convenient and comfortable use by residents and visiting guests;
- location in the building;
- what sanitary fixtures and fittings will be needed: bath or shower, toilet with return or direct flush, bidet, sink, hanging or floor cabinets;
- preferences of each resident regarding the size of the room and its equipment;
- the size of the maximum funds allocated for the arrangement.
When choosing a location, follow the following rules:
- in houses with several floors, it is unacceptable to arrange a sanitary room above the living rooms; failure to comply with this rule will lead to problems when preparing registration documents;
- for ease of connection to utilities, bathrooms on different floors are located in the same vertical plane, one above the other;
- it is recommended to install it near the sleeping quarters and dressing rooms, away from the kitchen and dining room, this is dictated only by aesthetic considerations;
- distance from the sewer riser of the bathtub and shower cabin is ≤ 3 m, toilet bowl - ≤ 1 m. If these parameters increase, forced outflow using pumping equipment may be necessary;
- if one of the walls of the room is external, then this significantly facilitates the ventilation arrangement;
- placement under the stairs leading to the upper floors saves useful living space.
The location of ventilation hoods, water and sewer pipes, installation locations for a bathtub or shower, toilet and bidet are immediately planned.
Placement of sanitary devices and necessary furniture when installing bathrooms in a wooden house with your own hands
Existing regulatory documents provide for the following minimum room sizes:

- restroom: width - 80 cm, depth 120 cm;
- The sizes of bathrooms and combined rooms are determined only if there are disabled residents among the residents. The standards are as follows: a toilet with a washbasin - 160 by 220 cm, combined with a bath - 220 by 220 cm.
In bathrooms, their dimensions are of great importance:
- In small rooms, it is recommended to install wall-hung sinks and use niches instead of shelves and hanging cabinets. Pile up of cosmetics, swimwear and household items should be avoided as much as possible. It is better to place them in hidden niches rather than on side tables.
- In spacious rooms there is another problem - empty zones should not form. You can select a seating area, which contains a glass table with several chairs, vases or tubs with living vegetation, and a small bar counter. In a separate place you can place a wall with closed shelves for storing cosmetics and bath products or several cabinets. The small pool looks good.
- distance from washbasins to walls ≥ 20;
- between the axes of drain pipes of washbasins ≥ 70;
- free space in front of sinks ≥ 70;
- from bathrooms to nearby objects ≥ 70;
- from toilet to sink ≥ 25.
Bathrooms, together with toilets and utility rooms, should not occupy more than a quarter of the total area of the building.
Do-it-yourself bathroom in a wooden house, step-by-step instructions

- arrangement of water supply and sewerage networks;
- installation of a ventilation system;
- waterproofing device;
- installation of plumbing fixtures;
- room decoration.
The functionality and durability of sanitary facilities is determined by the care and correctness of the work.
- to avoid direct contact with wooden structures, the units are mounted on stands with fastening using special brackets;
- fans must be provided with reliable protection from moisture;
- materials for the manufacture of ventilation ducts must be non-flammable;
In wooden buildings, the use of metal pipes for supplying water and draining sewage is not recommended; preference should be given to plastic or metal-plastic pipes, which are more resistant to elastic deformation and low temperatures. To avoid sealing failures in joints during building settlement, their fastening to the building structures is carried out using clamps with rubber gaskets, special clips and flexible hangers.
When passing through the walls, gutters with protective metal frames are installed. On the floor of the first floors there is a rigid base that is not connected to wooden frames. Pipe insulation is carried out using generally accepted technologies. If you do not live in the house permanently, it is necessary to install a tap at the lowest point of the water pipeline to drain the remaining water from the system.
Ventilation in the bathroom of a wooden house. To protect wood from moist fumes, forced ventilation is necessary; installing ventilation holes covered with decorative grilles cannot completely eliminate this problem. It is recommended to install ventilation units in attics with ventilation ducts laid through the ceilings with the creation of compensation gaps during fastening. The following basic rules must be observed:
It is advisable to equip the ventilation system with motion sensors combined with lighting to automatically turn on when the lighting is turned on and people enter the room.
Waterproofing a bathroom in a wooden house is carried out in a comprehensive manner; all wooden structures must be reliably protected from moisture influences by creating a waterproof and vapor-tight shell. The wood is pre-treated with antiseptics to prevent rotting.
Waterproofing of walls and ceilings is carried out with liquid insulating compounds with the addition of linseed oil. Application is done with a brush and in several layers. The walls can be finished with moisture-resistant plasterboard.
Ceilings are preferably suspended or suspended. Particular attention is paid to the insulation of the floor, on which all plumbing fixtures are mounted, and where the greatest amount of moisture accumulates. On the first floors it is desirable to make a concrete screed. The surface must be strong and level. The construction of polymer bases is often practiced.
Next, insulation is carried out using bitumen-containing coating mastics (liquid rubber), which form waterproof membranes. The floor in the bathroom of a wooden house is lowered a few cm below the level in other rooms and a threshold must be installed; this is necessary to protect the living space from water ingress in emergency situations. The finishing coating is done with ceramic tiles, thermal boards, and cork slabs.
Installation of plumbing fixtures is carried out similarly to installation in houses made of other materials, but in places of contact with wooden structures it is necessary to use hanging fasteners and be sure to provide compensation gaps.
Finally, finishing work is carried out using waterproof materials.
The use of high-quality materials and adherence to construction technology will allow you to build a bathroom that will be similar in functionality and comfort to that installed in a brick building or a city apartment.
 DIY brick foundation: strip and columnar
 How to lay parquet: methods, necessary tools and step-by-step process for proper installation
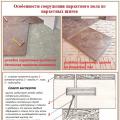 How to lay parquet: methods, necessary tools and step-by-step process for proper installation