How to properly install parquet in an apartment. How to lay parquet: methods, necessary tools and step-by-step process for proper installation. Stage IV. Getting ready for installation
No matter how the developers of innovative flooring try to improve the material, the eye of a reasonable residential property owner invariably turns to parquet and solid classics. Despite the enormous number of advanced achievements in this area, the question of how to properly lay parquet with your own hands is still relevant. After all, the number of home craftsmen who are trying to independently lay an amazing patterned floor from wooden planks has not yet ceased and is unlikely to cease.
The main secrets of laying parquet
Parquet flooring is a complex structure consisting of one or more underlying layers and a top covering made of wooden blocks. Dies are also called planks, parquet flooring or staves. They are represented by wooden elements of a predominantly rectangular configuration in plan, front and profile. Along the perimeter the dies are equipped with grooves and ridges for fastening.
Observable components of a parquet floor
The width of the riveted strips is usually a multiple of the length, thanks to which a variety of geometric patterns can be created without any problems. The standards for the width of parquet flooring are 5-7.5 cm, length 21-49 cm according to GOST, numbered 862.1-85. The thickness values indicated in the data sheets start from 14 mm and end at 22 mm.
Note. The optimal thickness of a parquet floor for furnishing residential premises is considered to be 15-18 mm. For thinner planks, the working layer is quickly erased, especially if sanding is carried out frequently. Thick parquet flooring is not elastic.
The material for parquet flooring can be supplied not only in the form of rectangular planks. On sale are ready-made panels with parquet floor fragments assembled on a coniferous base and modules fastened on top using the principle of ceramic mosaic with cardboard or paper.

Base hidden from view
The number and technical characteristics of the underlying elements depend on the type and condition of the rough foundation, which most often includes:
- concrete floors: prefabricated or monolithic floors with or without screed;
- wooden beams with joists installed for laying the flooring;
- a plank floor, the floorboards of which, after repair and sanding, serve as a rough base.
According to the instructions of SNiP number 3.04.01-87, it is allowed to lay rivets or finished parquet panels on a prepared base. Within 2 meters of the completed preparation, deviations in height of no more than 2 mm can be recorded. Those. when installing a 2-meter strip on a subfloor in an arbitrary vector direction, the maximum clearance between this control device and the surface can be only 2 mm, preferably less. The slope is permissible, but its size is limited by the same reference book: max 0.2%, not exceeding 5 cm.
The primary goal of a do-it-yourself parquet installer is to form a rough subfloor that meets technical requirements. The number and type of upcoming operations determines the material from which the rough base is made and the degree of wear.
Objectives of using moisture-resistant plywood
The second stage, the result of which you will admire and show off, consists of individually laying the elements on the prepared base. The top layer of preparation, according to the vast majority of technological schemes, is a moisture-resistant plywood substrate, because it:
- serves as a reliable module for fastening small-caliber parquet floor rivets;
- compensates for the difference in temperature expansion of the concrete base and wood covering;
- eliminates the leakage of moisture from the ceiling and from the subfloor, which can render expensive natural material unusable;
- performs the function of a cutting element in the case of a floating floor;
- plays the role of a leveling layer.
If it is possible or necessary to reduce the height of ceilings by 5 cm or more, you can simply purchase sets of adjustable floors with the Knauf brand and carry out the preparation for both concrete and wood in one day. Products from the same manufacturer should be used if you are going to use expanded clay as insulation over a cold basement.

This means that we have found out that plywood should be used. There are plenty of ways to level it with its help. Let's forget for a moment about the existence of factory kits for dry screed and look at budget preparation options, the implementation of which will require inexpensive building materials and our own efforts.
Three preparation options
The quality of leveling carried out before installing a parquet floor affects the number of finishing operations and the service life of the coating. Those who want to lay parquet flooring reliably and aesthetically with their own hands should know that due to defects in the base:
- the ridges of the parquet flooring will become loose, crack, and break after a very short period of time;
- the floor will creak mercilessly;
- additional grinding will have to be carried out, thinning the working layer of the material. As a result, the number of scraping and sanding operations required for subsequent restoration of the parquet floor is reduced.
To avoid such unsightly consequences, let's look at how the three types of bases for parquet are leveled.

Conditions and schemes for pouring screed
The screed is poured mainly to eliminate defects in concrete floors:
- Height differences and defects within 1-2 cm are removed by grinding the concrete floor followed by pouring either cement-sand or polymer leveling mortar. Before installing the screed, the base is primed twice with a penetrating compound. A two-component polyurethane primer will stabilize and strengthen the top layers of the subfloor and act as a waterproofing agent.
- For defects of more than 2 cm, the leveling layer will need to be re-filled with the installation of polyethylene as a waterproofing and cut-off layer. From strips of polyethylene you need to build a kind of pallet with 10-centimeter sides. Because The thickness of the layer is usually 3-4 cm; mainly sand-cement mixtures with reinforcement are used for leveling. It is more economical and convenient to reinforce with polypropylene fiber, but you can also use mesh.
The cement-sand leveling layer under the parquet should harden for at least 4 weeks. According to rounded popular calculations, 1 week is allotted for hardening 1 cm of screed. Upon completion of the specified period, you should also not rush into installation if you plan to attach the dies directly to the leveling layer. You need to wait more than 5-6, or even better, 7 weeks, until moisture stops escaping from the screed.
Attention. If you plan to glue parquet flooring directly to a primed screed, you need to use cement mixtures with grades M150-300 to fill it. They are characterized by high compressive strength. The adhesive for parquet flooring will need to be elastic.

There is no need to wait for complete hardening if moisture-resistant plywood is laid on top of the fill. 28 days are enough, and it can be fastened with self-tapping screws or dowel nails to a leveled floor. To do this, sheets of plywood are cut into 4 parts and laid at intervals according to the principle of brickwork. Cut to minimize expansion and eliminate undulations. Gaps of 2-3 mm are left between the quartered segments for linear compression and expansion. The hardware caps are recessed 3-5 mm into the plywood so as not to later damage the grinding machine disc.
Attention. If, in addition to self-tapping screws, glue is also used to fix plywood sheets to the screed, it is recommended to purchase it with the same brand and properties as the primer to optimize adhesion.
When using glue, the process of laying parquet on a plywood base will need to be postponed. You will have to wait for the curing period specified by the manufacturer for the binder. After that, the plywood preparation is sanded along the seams in order to remove differences in height of adjacent sheets, as well as dirt and factory flaws.

Between the walls and the plywood layer around the perimeter you need to leave a technological gap of 0.9 - 1.2 cm. It is formed using spacer wedges. The spacers are not removed until the parquet flooring is completely laid. Only after installation is complete should they be pulled out and the gap created by the wedges filled with foam to prevent moisture from getting onto the side faces in the future. The foamed seam is covered with a plinth on top.
Attention. The plinth is attached only to the walls; its slats do not fit tightly with the parquet. There should be at least 1 mm between the parquet flooring and the baseboard.
Logs as a method of leveling
It is also the dry screed method, which allows you to avoid stretching out the floor construction process for many months due to long technological interruptions. For the construction, timber with sides of 4 and 5 cm is used. The work is carried out according to the following algorithm:
- Install logs every 30 cm, fasten them with screws or corners to a concrete or wooden rough base. Between the ends of the beam and the walls you need to leave a traditional gap for linear expansion.
- Level in a horizontal plane by adding sand if the rough base is made of concrete, by placing wedges, roofing felt or parchment inserts if the base is made of wood. The excess is cut off with a plane.
- In the plywood cut into 4 equal parts, 9 holes are drilled in advance, through which they are fastened to the joists with self-tapping screws. The principle of brick laying is observed by default, as is the deformation offset around the perimeter. No cross connections are allowed.
- By analogy, the second layer of plywood base is constructed. Only quartered sheets are laid offset so that the seams of the first row do not coincide with the seams of the second. The first layer of plywood is treated with primer, then with glue. Then screws are screwed in, the size of which depends on the total thickness of the plywood layer.
- After the glue has dried, sanding is performed.
The plywood backing is laid on the joists in two layers, the total height of which should be approximately 30 mm. The thickness of the plywood laid on the screed is determined by the thickness of the parquet flooring. Usually it is 5 mm smaller than the equivalent parquet size.

Preparing the plank floor
It consists of repairing and sanding the floorboards if their thickness after processing with a sanding unit does not become less than 30 mm. Otherwise, the boards will have to be dismantled and new material laid on top of which the parquet strips will be attached.
If the board simply replaces the first layer of plywood, its thickness combined with the thickness of the substrate may not exceed 3 cm. And it can be laid with centimeter gaps to ensure ventilation and temperature movement.
Note. It is advisable to choose a primer for adhesive for wooden floors with antistatic properties.

Technological procedure for laying parquet
Parquet installers have a lot of options for laying out the tiles: from the simplest “deck” with a herringbone pattern to complex artistic designs with mosaic modules and borders. In anticipation of the work, a layout plan is drawn up, which can be directed along any of the walls or at a 45º angle. It is recommended to start corner laying from the central row. The same should be done if you cannot get complete rows of the selected pattern.

To orient the first row, they construct something like a mooring cord. Two nails are driven into the plywood on opposite sides of the row planned for laying, and a fishing line is pulled over them.
It is not forbidden to use one-component glue, but it is better to spend money and buy a two-component one. It will definitely not emit water harmful to the parquet.
In principle, the technology for laying parquet is not at all complicated; it consists of sequentially performing the following steps:
- the prepared surface is carefully covered with soil;
- Using a spatula-comb, glue is applied to a small area, because the binder dries extremely quickly;
- A pre-assembled fragment of two or three dies is placed on the glue, taking into account the mooring reference. Parquet flooring is glued with some effort. Excess glue squeezed out from under the parquet flooring should be removed immediately;
- Each installed plank can be secured with two or three nails or studs through the ridge. Hammer the hardware at an angle of 45º. The nail heads should be sunk into the ridge with a parquet tamper. Parquet flooring can be fixed through three elements;
- the fully laid parquet is left for the period of glue curing;
- then they sand in two or more steps, changing the sanding paper at each stage to an analogue one with smaller grain sizes. Grind until the defects that appeared during work are cut off;
- open with stain if there is a desire to change the color of the floor, then with varnish in 3-9 layers.

There are many intricacies in the technology of constructing a parquet floor. However, there is nothing prohibitively difficult. Of course, the first time parquet is laid will hardly look like the floors in Versailles, but it’s worth a try. What if it turns out better?
Parquet is a time-tested floor covering. This is an environmentally friendly, reliable material that allows you to make the floor high-quality and beautiful. If you have the strength, time and desire, then you can completely cope with laying parquet flooring yourself. The wide selection of parquet boards presented today allows you to create original floor compositions that are far removed from the usual Soviet herringbone.
Preparing the room
Laying parquet is always the final stage of renovation work in an apartment or house. Doors, windows, ceilings, walls, heating and other functional systems are already installed and working.
Leave the purchased parquet board unpacked in the very room where it will be installed. This acclimatization period should last at least two days.
We remove the packaging from the parquet board right before laying the parquet. Carefully inspect the boards for defects and sort them by place of use.
Laying parquet on a concrete floor
The concrete floor on which the parquet board will be installed must not crumble, must be free of cracks and be a smooth and clean surface.
According to modern standards for laying parquet boards, the permissible deviation along the plane should not be more than 2 mm for every 2 m. Otherwise, the parquet board will creak unpleasantly.
To implement the “Running” pattern, it is optimal to choose parquet boards 350-400 mm long and 35-40 mm wide. Of course, at your discretion, the planks can have different lengths, but their width must be the same.
If you want exclusive figured parquet, contact specialists. Just be prepared that such a desire is quite expensive.
We lay parquet using “floating” technology
“Floating” technology is a type of parquet installation accessible to anyone. The main thing is to carefully follow the instructions and have an assistant.
If suddenly some board in the finished parquet turns out to be damaged, then disassembling the parquet assembled using the “floating” technology and replacing the board will not be difficult.
The indisputable advantage of this technology is that the room can be furnished immediately after laying the parquet.
Just remember that such a floating floor is installed in a room with an area of no more than 50 m2? For rooms with a larger area, additional expansion joints should be planned.
So, we lay a special substrate on the prepared concrete surface: composite (quite expensive, but will perfectly protect against moisture), cork or cheaper synthetic.
The underlay is needed to protect the board from moisture and provide sound insulation. The maximum height of the material used for the substrate should not exceed 2-3 mm. Otherwise, over time the floor will begin to creak.
We lay the first row of parquet boards with the top part of the lock against the wall, making sure to leave a gap of 10-12 mm between the walls and the edges of the boards (not exceeding the thickness of the purchased plinth). First, we strengthen them with special wedges, which we take out at the end of installation, and close the gaps with plinths.
Begin laying each next row of parquet boards with the remainder of the previous row, provided that its length is at least 50 cm. To finish the boards after joining, use a wooden block or a special installation device, but under no circumstances assembly belts.
Parquet boards are connected to each other using a proprietary locking system. You can additionally glue the joints of the boards - this way you will protect the parquet from damage by water or other liquid accidentally spilled on the floor.
Many owners choose parquet boards as flooring. And this is quite understandable. This coating looks great in the interior. If the technology for laying parquet boards is followed, the floor will last for many years. An undoubted advantage of the coating is its ease of maintenance. Many people think that laying parquet boards on their own is difficult. Later in the article we will figure out whether this is so.
Tools
Of course, laying parquet boards is carried out using special devices. It must be said that every owner has most of the tools. Cutting panels is best done with a jigsaw. If you don’t have this tool, then you can easily use a hacksaw with fine teeth (for metal). The parquet board is knocked down using a hammer. Its weight should be about 1 kg. A specially prepared piece of plastic acts as a tamping block. It is included in the standard kit for laying laminate or parquet. A plastic block is not as rigid as a wooden one. Thanks to this, chipping at the edges of the panels can be avoided. During the installation process, you will also need plastic restrictive wedges. They are necessary to fix the gap between the coating and the walls. These wedges can be made independently from wood. Another device included in the parquet installation kit is a metal bracket. With its help, the last panel is fixed. If there is no metal bracket, it can be replaced with a clamp. You will also need a tape measure, a level and a square.

Laying parquet boards: basic methods
Depending on the dimensions of the panels, one or another version of the covering flooring is used. Among the most popular are the following:
- On the logs.
- Using nails. The panels are nailed to the wood subfloor.
- Glue method.
- Floating method. In this case, the panels are connected using a special lock.
The latter option is considered the most popular today, since laying parquet boards in this case is convenient both in a small room and in a large room. Flooring using the glue method is used less and less today. This is due to the greater labor intensity of the entire process. In this case, laying the panels requires perseverance from the master. Fixing with nails to a wooden subfloor is usually used for solid parquet. But it must be said that this type of panel is gradually disappearing from stores. When laying parquet on joists, it is necessary to arrange a distance between them of no more than 30-40 cm. This is not very economically profitable. That is why in 90% of cases today the floating flooring method is used. This option is considered ideal for those who intend to do the work themselves. In any case, regardless of the chosen method, before laying the parquet board, it is necessary to prepare the base. It must be clean, level and dry.

Preparatory stage
Before laying the parquet board, it is kept for two to three days in the room where the work will be carried out. It is necessary to lay a backing under the panels. It can be cork or synthetic. Thanks to the backing, the parquet board will be protected from excess moisture. The strips of material must be glued together with tape at the joints. The more closely the parts fit together and the more thoroughly they are closed, the more airtight the base. Laying parquet boards with your own hands can be done using both parallel and diagonal methods. The selected option will not affect the performance characteristics of the coating. However, it should be remembered that diagonal laying significantly increases the consumption of parquet boards. It can range from 2 to 7%. As a rule, the diagonal method is used in those rooms where it is necessary to smooth out the effect of unsuccessful placement of furniture.

First row
Let's take a closer look at how to properly lay parquet boards. The first stage involves laying the 1st and 2nd rows. They should be located parallel to the light falling from the window. Therefore, before laying the parquet board, you should install wedges against the wall to provide clearance. The gap between the coating and the wall is at least 10 mm. This distance is necessary to protect the panels from mechanical damage when changing temperature and humidity conditions in the room. The first two panels are pressed tightly against the spacer wedges.
Optimal distance between seams
Many beginners do not know how to properly lay parquet boards. Experienced experts recommend that when laying the second row, the panel closest to the wall should be sawed off to a length of at least 80 cm. It is considered ideal that the transverse seam in the first row would be located opposite the middle of the board of the second. However, in any case, a minimum run-up must be maintained. The transverse seams of parallel rows should be located at a distance of at least half a meter from each other. Otherwise, the connections will be weak.

Second row
Many craftsmen find the floating method very convenient. If there are any errors during the installation process, everything can be corrected. The panel from the second row must be inserted into the groove of the first. To do this, the board is tilted at an angle of approximately 20 degrees. The panel snaps into place, but is not fixed. The second board is inserted in the same way. It also snaps and is tapped to the first one. After the panels are tightly joined, they are fixed in the groove of the first row. To completely eliminate the seam, the boards are beaten using timber. Using this method, the covering is laid over the entire floor.
The last row
Many, especially beginners, craftsmen may have some difficulties at the final stage of flooring. By following these recommendations, you can make your work much easier. First of all, you should measure the distance from the wall to the penultimate row. The width of the panel that will complete the flooring should be 1 cm less than the obtained value. This ensures the necessary compensation gap. In the groove of the penultimate row it is necessary to cut off the locking edge. After this, the finishing boards are inserted. For a tight insertion, a mounting paw or clamp is used.

Shutdown
The final stage is the installation of skirting boards. The wedges must first be removed from the expansion gap. The baseboards are attached exclusively to the wall surface. In this case, it is necessary to ensure that it is not pressed tightly against the parquet. The width of the plinth should be enough to hide the expansion gap.
Diagonal method
Laying parquet using this method is carried out in the same way as described above. The only difference is that the panels are not located straight, but at an angle of 45 degrees relative to the axis of the room. It is best to determine the direction of the flooring while standing with your back to the doors. This option is not suitable for a rectangular narrow room, as it will look very colorful.

Finishing
Previously, traditionally, after laying parquet, it was sanded. This made it possible to achieve a perfectly flat surface. For modern parquet flooring this procedure is not required. But during operation, in some cases it becomes necessary to refresh the surface. To do this, scraping is carried out to a depth of no more than 0.5 mm and additional coating with several layers of varnish. A three-layer parquet board is tidied up using a belt sander. Powerful drum units are not suitable for this work. This is due to the fact that they create quite strong vibration, which, in turn, negatively affects the internal structure of the coating. Sanding begins with 40-grit sandpaper. The process is completed with 150-grit abrasive. The completion of the work can be checked by running your hand across the floor. If there are no roughnesses, then grinding is complete.
Even the highest quality and most beautiful material can be ruined by poor editing - this is the bitter truth of life. Although not everyone wants to pay almost the same price as for a replacement purchase to a construction team: is laying parquet boards really that complicated? Not at all - the main thing is to know the important nuances and do everything step by step. And how exactly – we’ll figure it out now.
If after watching you still have questions, read on.
Laying technology: step by step
Let's say right away: laying parquet boards is not laying parquet or laying laminate. There really are some subtleties and nuances here.
Stage I. We purchase quality material
Today, more than a hundred types of wood are used to make parquet boards, and the initial quality is completely different. Therefore, we will give you valuable advice: purchase parquet boards only from those companies that themselves carry out such repair work. They will not order material from manufacturers that then does not fit together and creates a lot of problems. Such is the subtlety. As for the type of parquet board, the most popular today is three-layer. From the name you already guessed that it really has three layers: top, also called front, middle and bottom:
- The top working layer has a thickness from 1 mm to 6 mm (the thicker one will always withstand more grinding than the thinner one). This layer must be coated with varnish or special oil.
- The middle one usually consists of short plates of coniferous wood, or less often - of special moisture-resistant plywood. It is in the middle layer that all the connecting elements for adhesion of parquet boards are usually located.
- The bottom layer is already made of pine or spruce plywood 2 mm thick. The main task of the bottom layer is to prevent the parquet board from bending or deforming.
If you are going to lay a parquet board so that it resembles a massive one, then take a material with a solid face layer. The planks of such a parquet board can be glued in the form of “herringbones”, “braid”, “squares” or “deck”. But the most durable is considered to be the locking connection of the Swedish parquet board - the company Khars. The manufacturer claims that such a connection can withstand up to one and a half tons of tearing.
Stage II. Preparing the base for installation
The most important thing in this matter is to properly prepare the base for the board. Thus, according to unverified data, up to 90% of subsequent problems with the appearance of laid parquet are caused by the quality of the subfloor, and not by defects in the material itself. So, what is still permissible:
- 1-3 mm difference per linear meter
- humidity up to 2-3%. To check this value, use a modern moisture meter.
If the base is clearly not level and even has bulges, use special leveling compounds (only based on dry mixtures). Carefully inspect the old screed and work on peeling areas, defects and dirt. If the humidity value turns out to be higher than permissible, then lay a vapor barrier film overlapping on the floor, then sealing the joints with construction tape, or apply a special primer.
Experts recommend laying parquet boards at a humidity of 40-60% and a temperature of 20-25°C. Note that parquet boards behave more stable compared to solid wood: less responsive to changes in temperature and humidity, more resistant to static and dynamic loads.

Stage III. We put a special backing
To lay parquet boards in this way, you definitely need a backing that will separate the boards unprotected by glue from the base. It will immediately perform several important functions:
- It will even out small unevenness and defects in the base.
- Will serve as additional waterproofing.
- It will make the parquet floor even warmer.
- It will become a useful shock-absorbing layer, valuable while walking.
And finally, the underlay performs another valuable function that is rarely mentioned: it prevents the parquet board from sliding along the base in case of temperature changes. After all, screed or plaster has its own expansion temperature, and it differs significantly from the same parameter for the coating. This is the danger of not having a backing on the screed: literally a year after such movements invisible to the eye, accumulated cement or gypsum dust begins to seep through the cracks.

As a substrate you can use foamed polyethylene, extruded polystyrene foam, sheet cork or felt cardboard. This is made from materials that have been known for a long time. But today professional ones are already gaining popularity. Here is a master class on installation on just such a base:

Parquet boards are also often laid on. After all, this natural and environmentally friendly material also has excellent noise insulation. And the technology for gluing such a substrate is extremely simple - just like with wallpaper: polyurethane glue is applied to a clean, dust-free surface and the cork is rolled with a roller. After this, you can immediately lay the boards. However, during such work, do not overdo it with glue - otherwise the cork will warp and swell with bubbles.
Stage IV. Getting ready for installation
When laying a parquet board on an old wooden floor, be sure to measure its humidity - this material is hygroscopic. You can direct the parquet boards in any way you like, but more often they are oriented along the length of the room for the sake of the organicity of the entire interior design. Although designers themselves often use floor texture to visually expand or lengthen the space. If the room is perfectly square, lay it in the direction of the light. You can even do it diagonally - however, there will be a lot of waste later.
Advice: if in a box with parquet boards you find specimens with defects or uneven coloring, leave them for trimming.
Stage V. Learning to connect boards
Different manufacturers produce their own parquet boards and give preference to a certain type of fastening:
- By insertion method;
- Lock connection, also called “click”;
- Using fixing brackets or tightening straps.
The most convenient, of course, is a locking connection. The grooves and insert ridges are joined in this case without any other means - you just need to insert the ridge of the board at an angle into the groove of the other, and smoothly lower the first board to a horizontal position. After that, a couple of light blows are enough, and that's it. 
Here are the main advantages of this method:
- Quick installation;
- There is no need for additional equipment or facilities;
- Wood has room for thermal expansion.
If in some place in the room you cannot lift the board for joining, then simply use a hammer and a block. Yes, this will require considerable precision and accuracy. Tip: when joining the covering to the door frame, start laying with the board placed under the jamb.

The insertion method, of course, is inferior to the previous one: with this installation you constantly have to use a block and a hammer, and replacing damaged boards in the future will take a lot of time. But it is easier to place such boards near heating systems and door frames, and the grooves and insert ridges are less likely to be defective.

But laying parquet boards using staples or a belt fastening system is more used for parquet boards that have a thickness of 15 to 21 mm. The boards themselves still need to be glued together, and it will be difficult to disassemble the floor in the future.
Stage VI. Laying parquet boards
So, parquet boards are laid today mainly in two ways: glue and floating. Glue The adhesive method involves fixing the boards to the base by gluing. This is how they are placed on a cement-sand or concrete floor, on a gypsum screed and leveling compound. If you choose this method, be sure to pay attention to the recommendation of the board manufacturer himself - what requirements he puts forward. All this can be found in the attached instructions. Here's how to lay parquet boards using the glue method:
- Step 1. Prepare the base: check for evenness, completely remove dust and treat with a synthetic primer (water-based is undesirable). In total, you should need a little more than a kilogram per square meter (it all depends on the screed and the quality of the primer itself).
- Step 2. Lay out the parquet boards from the first two boxes in the order in which you will install them. Apply glue.
- Step 3. Place the first board. It must be longer than it is wide. We leave an expansion gap of 6-12 mm between the wall and the floor.
- Step 4. We tap the second board to the first - through a special block. The boards need to be glued within ten minutes.
- Step 5. When you cut the last board, immediately use the remaining part to start the next row.
- Step 6. Insert small wedges or spacers into the expansion gap between the wall and the floor (you can see them in the photo).
- Step 7. After gluing a few rows, carefully check to see if there are any gaps.
- Step 8. When all work is completed, seal the seams with acrylic sealant or cork chips. As an option, you can also install a special metal threshold.
Tip: for convenience, use a square - only with it you can draw really straight lines.


The so-called “floating” method of laying parquet boards has many advantages. The most important thing is that important gaps remain for ventilation and invisible changes in the shape of the board when the temperature changes. As evidence: in winter, with good heating, you can notice small gaps between the boards - but in summer they are not visible. Moreover, the wider the board itself, the more noticeable. These are important processes! And, if you chose a parquet board with a high-quality lock, it will last much longer than a regular glued one. You can see the process in more detail in this photo instruction: 
A “floating” parquet floor is laid in two ways: using the same glue and “locking”. In the first method, the boards are glued not to the base, but to each other, and in the second method, they are connected without glue. Lock connections also have subtypes: “turn and click” or “blow and click”. Let's say the speed of such assembly is really impressive - just a couple of hours.
You can install everything yourself:
- Step 1. Start from the left corner of the room with the so-called “catch side” facing the wall.
- Step 2. Take the board with both hands and, holding it at an angle, place it on the edge of the board of the first row. The edge board that will be adjacent to the walls should not have grooves - cut them off with a plane.
- Step 3. Start the second row with the remainder of the first row. But, if it turns out to be less than 30 cm, cut the new board in half.
- Step 4. When you lay the parquet board at the threshold, constantly check whether the doors open as easily as before.
If necessary, simply trim the bottom. In addition, there should always be at least a centimeter of distance between the door threshold and the wall. Another important thing is to tightly connect the boards together, use a wooden or rubber hammer, only tapping it lightly. Don't use the regular one - you'll damage the floor.

For fairly large areas, this installation method is not very suitable - the integrity of the entire coating is compromised. The floor will creak and even bend. Therefore, in spacious rooms and halls, parquet boards can only be glued. That's all!
Complex installation - warm floors and logs
If you are going to lay a parquet board on a warm floor, first of all, find a material on sale that would be suitable for the future temperature regime. After all, not all species are sufficiently resistant to deformation, especially maple and beech. It is better to give preference to oak or walnut. But keep in mind that the maximum temperature for which any parquet board is designed is 26°C. And to understand whether the parquet board you have chosen is generally suitable for heated floors, look on its packaging for a special “suitable for heated floors” icon and instructions for such installation.
A salesperson or sales manager can help you find and consider all this. If there is nothing like this on the material, don’t take my word for it. If you have the opportunity to choose, then electric is better for such a coating - heating occurs evenly, and the wood expands more quietly. True, the floor level will have to be raised high.
If you still decide to install it, you will be pleased with the ease and speed of installation. You will place the cable on a heat-insulating material (preferably foil), and you can immediately attach a parquet board on top. Convenient to place under a parquet board. Also popular: minimal thickness, perfectly smooth coating and easy installation. But not many people like its radiation. In any case, laying a parquet board on such a base can only be done in a “floating” way - because the heat will cause the wood to slightly change its parameters. Below is the installation process in the photo.

If you are laying parquet boards on beams or joists, be sure to ensure that they are dry and as strong as possible. Miss this moment - over time, the floor will creak unpleasantly and even become deformed. It is also important that there is good ventilation under the joists and that water vapor does not accumulate. In general, these are all difficulties. The best way to lay parquet boards on joists is this:
- Step 1. Prepare the logs, check for moisture and integrity.
- Step 2. Lay a layer of durable plywood.
- Step 3. We lay the parquet board: using glue or on a cork, which will help to slightly relieve the static load on the logs themselves (prevention of squeaking).
Less commonly, but this method is also practiced: the parquet board is attached directly to the joists themselves using staples or nails. Then the logs should go in increments of 60 cm, and take the parquet board itself thick enough.

And finally, we’ll tell you about a newer technology for preparing the base for laying boards - this is. Minimum time and costs: special logs on plastic bases are simply used, which not only raise the floor a little, but also allow the necessary communications to be installed underneath it. Thermal insulation is, of course, much better than a conventional concrete base. Feel free to experiment!
The range of floor coverings is regularly updated with new products. Often these are modern materials created using the achievements of the chemical industry, but there are also solutions that can be described as “well forgotten old”. A striking example is parquet boards. In terms of its aesthetic appeal, durability and reliability, it is comparable to parquet, but laying parquet boards is simple and does not require highly qualified workers.
Parquet board, what is it
Parquet boards as a type of flooring appeared in the early 40s of the last century. It was created as a cheap and practical replacement for expensive parquet that requires skilled craftsmen. These days it is experiencing a rebirth. The main reason for this is absolute environmental safety, because the coating is made exclusively from natural wood.
Externally, the parquet board is similar to the usual laminate, but differs from it in its internal structure. If you look at it in section, you can see three layers of planks of different thicknesses, the direction of the fibers of each of which is perpendicular to the previous one. This design ensures the strength and reliability of the material.
Upper layer
The top (front) layer primarily creates the floor pattern. The lamellas from which it is assembled are selected according to pattern, shade and texture, and boards are selected without defects or damage. Some types of boards are covered with valuable wood veneer. In a sense, this is a piece product that allows you to create a luxurious and unique floor without any special investment.
In addition to its purely decorative function, the surface is resistant to abrasion and insensitive to constant pressure. That is why the top ball is made of hardwood, the layer thickness reaches 4 mm or more.
An additional advantage of the material is that it is completely ready for installation and operation. The front side is sanded from the factory, impregnated with protective compounds and varnished. All that is required from the consumer is to prepare the subfloor and lay the covering correctly.
Middle layer
The job of the middle layer is to distribute the load evenly. The best material for this is coniferous wood. Longitudinal fibers give the material bending resistance, which ensures the durability and reliability of the coating as a whole.
The middle layer is assembled from planks about 7 mm thick. The width of each of them is up to 30 mm, the package is assembled with glue. Among other things, connection elements are formed in the middle layer, thanks to which the parquet board will be installed.
bottom layer
The entire layer cake rests on the base. These are one or two solid boards up to 4 mm thick, laid along the long side, which provide stability and prevent the floor from sagging under pressure.
Advantages and disadvantages
There is no ideal material, parquet boards are no exception. When planning to lay this covering, it is worth familiarizing yourself with its main advantages and disadvantages.
You need to start with the obvious advantages:
- absolute environmental cleanliness;
- a skillfully laid board is comparable to parquet in appearance and characteristics;
- the board is much cheaper than parquet;
- easy to install, no experience or knowledge required;
- allows for the possibility of replacing a section of the floor without completely dismantling it;
- does not require subsequent surface treatment, scraping, or varnishing;
- A wide range of textures and colors are on sale.
With good care, the service life of the coating is 20–30 years. This can be considered a disadvantage, because the same parquet will last much longer. True, the obvious advantages outweigh this conditional disadvantage. And besides everything, you can lay a parquet board with your own hands, but for parquet you will definitely have to invite specialists.
Preparing the subfloor
Parquet boards are not too picky about the base material. It can be laid with equal success on a leveled screed, on a base made of wood or plywood, moreover, it can be used to renew an old ceramic tile floor. The only condition is that the base must be reliable and necessarily level.
In any case, before laying the tiles, you need to do a number of preparatory work. First, you should visually assess the quality of the floor using a simple building level. Identify problem areas and take measures to level the surface. The hills are smoothed out, the cracks are widened and sealed with concrete mortar, and the depressions are also filled with it.
Note! Such “pothole” repairs are only possible if the surface is close to ideal and the height difference does not exceed 2–2.5 mm per square meter. Otherwise, you will have to think about creating a new subfloor.
The easiest way is to prepare the base for parquet boards using self-leveling compounds. They are easy to work with; just dissolve the mixture in water, following the instructions, and pour the solution in an even layer, of course, not forgetting about waterproofing.
You can also consider using wood-based sheet material. Multilayer plywood, chipboard or OSB sheets are excellent for this. Using this material, you can create a new floor on joists or patch up an old one that is quite durable, but with a large difference in height.
The concrete floor must be primed and allowed to dry. It is necessary to lay a backing between the base and the board. Cork seems to be the best material for these purposes. It will smooth out possible unevenness in the foundation, help conserve heat in the house and protect from noisy neighbors.
Preparing to lay the coating
The technology for laying parquet boards is not particularly complicated; even a novice master can handle this task, but in any case it is easier to work with an assistant. And yet, before getting down to business, it’s worth preparing the tool. You will need:
- hand or electric saw;
- hammer with rubber striker;
- level and plastic rule;
- spatulas (smooth and serrated);
- tape measure, square, pencil;
- screwdriver;
- bracket for tightening rows.
In addition to the tools, you need to prepare the room itself. It would be a good idea to go over the floor with a vacuum cleaner again, paying special attention to the corners; a stray pebble can ruin the whole job.
Methods for installing parquet boards
Once the tool is assembled and the work front is prepared, you can proceed directly to installation. It’s worth mentioning here that there are three main installation methods:
- floating;
- glue fastening;
- using additional fasteners.
According to the installation method, a distinction is made between the longitudinal and diagonal method. When laying longitudinally, the boards are placed parallel to the wall, moving in the direction of the door, in the second case, diagonally from one of the corners. The longitudinal method is simpler; there is not much waste left during the work, but the diagonal method looks more impressive.
Floating installation
The peculiarity of floating installation is that the boards are not attached to the floor. The rigidity and immobility of the coating is achieved only through reliable locking connections. It is from this that all the pros and cons of such a configuration emerge:
- easy to install;
- it is easy to correct mistakes made during work;
- it’s easy to replace several damaged boards;
- it is possible to dismantle the floor and literally move it to another room;
- the coating is immune to changes in humidity and temperature;
- saving on adhesive composition.
As disadvantages, it is worth noting the need to carefully level the subfloor, the limitation on surface area; you should not use this method if the room is more than 50 square meters. Also, you cannot lay the board in this way in a room where a high load on the floor is expected.
Step-by-step instructions for carrying out the work are as follows.
- First, lay the board along the longest wall of the room, from left to right. The part of the castle that will face the wall is cut off from the board. A complete row is assembled, the end board is cut to fit.
- The coating should retreat from the walls by 10–15 mm; to achieve this, spacer wedges are used. Many people recommend completely assembling three rows before installing them, then placing wedges and using a bracket to pull the finished canvas, setting it in the desired position. The boards of each subsequent row are laid with a shift, selecting a pattern if necessary.
- The following rows are assembled sequentially; if necessary, the canvas is tapped with light blows of a rubber hammer. The hardest part to lay is the outermost row. Each board must be precisely adjusted in width, and it is important not to forget to leave a gap along the edge to compensate for thermal expansion.
Once the covering is completely laid, the wedges are removed, baseboards and door thresholds are installed. It is advisable to turn on the floor heating or any heating device to raise the temperature in the room and the board to sit in place.
Glue mounting
The essence of this method is reflected in its name - the parquet board is glued to the base using special adhesives. This method is more labor-intensive, but it also has a number of significant advantages:
- there are no restrictions on the area and purpose of the room;
- Can be used in conjunction with water heated floors.
But this is a labor-intensive installation, and in the future it will be problematic to correct the mistakes made and replace the damaged area. The floor will cost more due to the need to purchase glue. You will have to wait until the glue hardens before you start using it.
It is worth noting that you need to buy the right glue, the composition of which is suitable for the specific board chosen. In addition, you need to work extremely carefully to prevent glue from getting on the front side of the coating.
As in the first case, installation is carried out along the longest wall. Before applying glue, the board is laid out and the outermost one is cut off to create a full row.
A layer of glue 80–100 mm wider than the width of the board is applied to the prepared surface. The glue is evenly distributed over the area using a notched trowel.
Spacer wedges are placed between the first row and the wall. When laying the boards, they must be joined immediately using locking joints. Each laid plank is pressed for better grip. After laying the entire row, it must be additionally secured with self-tapping screws. They are screwed at an angle into the grooves of the lock.
The operation is repeated. Apply glue and lay the next row with a shift of half or a third of the length. First, the ends of adjacent boards are connected, then they are attached to the previous row. If a gap has formed, you need to get rid of it immediately, move the row forward using a wooden block and a hammer.
The finished coating is left for several days until the glue dries completely. After this, the baseboard and thresholds are installed. It would be a good idea to treat the floor with a special compound that will fill the joints and create a perfectly flat surface.
Installation using additional fasteners
The third option is ideal for creating a floor on a wooden base. These could be logs, a base made of plywood or OSB, or old floorboards. A special feature of the method is that each board is attached to the base using screws or staples.
The optimal floor created using this method seems to be a structure on joists. The advantages of this approach are obvious - heat-insulating or sound-insulating materials can be laid in the space between the beams.
Parquet boards can be laid directly on the joists; in this case, you need to choose thick (at least 22 mm) material. The logs should lie at a short distance from each other (less than 0.5 m). The board is fastened across the joists, the joints should be located in the middle of the joists.
There is another way to create a floor on joists; it will take more time, but will help save on material. An additional advantage is the fact that owners are not limited to simple longitudinal laying; they can lay the board diagonally, creating complex patterns, for example, a herringbone pattern. In this case, sheets of plywood with a total thickness of about 20 mm are attached directly to the logs, and a parquet board is already attached to it. This significantly simplifies the installation work and removes the limitation on the thickness of the board.
Parquet boards are a good choice for a beautiful and practical floor covering. The board is perfect for a stylish apartment or country house. It is easy to work with, its installation does not require special equipment and skills, even a beginner can handle it. Parquet boards are not that expensive, and when laid with trowels, they are in no way inferior to noble parquet.
 DIY brick foundation: strip and columnar
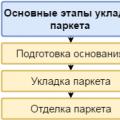 How to lay parquet: methods, necessary tools and step-by-step process for proper installation
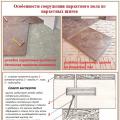 How to lay parquet: methods, necessary tools and step-by-step process for proper installation