Connecting RGB LED strips. Device and connection diagram of LED RGB strip LED strip rgb 20 meters
Unlike a monochrome LED strip, connecting an RGB LED strip is a little more complicated. The difficulty lies in the need to connect four pins instead of two and install a special RGB controller. Of course, you can do without a controller by connecting the RGB channels to the power supply via switches, but then you will miss the opportunity to obtain all available color shades.
An RGB controller is an electronic device that allows you to control the intensity and colors of a multi-color LED device.
The simplest connection diagram for a 12-volt RGB LED strip, designed for a length of up to 5 meters, is presented below. In addition to the RGB LED strip itself, you will need two more devices for connection: a power supply unit (PSU) and an RGB controller. The power of each should be at least 30% higher than the power consumption of the LED strip.
For example, a five-meter LED RGB SMD 5050-12V-60 reel will take 72 W from the network during operation. Therefore, the power supply and controller should be rated at approximately 100 W.
The terminals located on the functional blocks have a standard designation, and the wire insulation is painted in the corresponding colors. Therefore, the connection task comes down to performing operations with a screwdriver in accordance with the symbols:
- L – 220 V network phase;
- N – zero of the 220 V network;
- PE – grounding contact;
V, -V – positive and negative terminals from the 12 V DC power supply. The input terminals of the RGB controller have a similar designation. It also has 4 output contacts for powering the tape:
- B (blue) – for blue wire;
- G (green) – for green wire;
- R (red) – for the red wire;
- +V – yellow wire.
3 wires from a 220 volt network are connected to the input of the power supply: phase (L), zero (N) and ground contact (PE). The output from the power supply is connected to the input terminals of the controller, the output of which, in turn, is connected to the LED strip. All pins in the circuit must be connected strictly according to the markings on the contacts.
If during installation work you accidentally mix up the terminals, the LEDs will light, but will not match the color markings on the remote control (remote control).
To connect an RGB LED strip with a length of 5 to 10 meters, you should follow the diagram shown in the figure below.  The RGB LED strip is divided into two sections with independent power supply. This forced measure is caused by the fact that the second segment cannot serve as a continuation of the first due to electrical losses in the printed conductors. As a result, at the end of the five-meter segment, the supply voltage will be slightly lower than at the beginning, which is reflected in the brightness of the LEDs. In practice, implementing the second option is not much more difficult than the first, since both segments are connected in parallel. The number of parallel sections is limited by the power of the RGB controller and power adapter.
Most controllers are designed to connect a load of up to 200 watts, that is, they are capable of working with an RGB LED strip approximately 10 meters long. Using a high-power controller is not always wise due to its high price. Therefore, if it is necessary to connect a lighting structure of more than 10 meters, signal amplifiers are usually used. 
An RGB signal amplifier is needed to maintain the same brightness of all segments, maintaining synchronicity in color management.
The signal amplifier can be connected from the same power supply (in this case, a device with high output power is required) as the color controller. But a more common and practical way is to use an additional power adapter.
Important! The signal amplifier must be connected to the R, G, B and +V pins opposite the connected ends of the RGB LED strip.
To obtain high-quality white color, it is not enough to combine the light from green, red and blue LEDs. The only way out is to embed an additional crystal with a white glow into the RGB LED chip or install an additional white LED on the strip. LED strips based on such light-emitting diodes have an additional fourth White contact and are designated as RGBW or RGB+White. The advantage of such products is the additional ability to emit pure white light or more subtle color tones. The connection diagram for the RGBW LED strip is carried out similarly to the above diagrams, the only difference is the connection of an additional White contact. 
Connection diagram for LED RGB strip. Connecting an RGB controller and an RGB amplifier.
I described in detail what a multicolor LED RGB strip is in this article. Now, I'll tell you about electrical connection diagram.
In principle, the connection diagram for an RGB tape is the same as the connection diagram for a regular one-color (monochrome) tape. The difference is that between the power supply and the tape, it is installed RGB controller(tape color control device).
Controllers vary in appearance, power, color management programs and remote control. But the essence of them all is the same. The controller received 2 wires from the power supply, four wires went to the RGB strip.
Connection diagram for RGB controller for LED strip
Whatever controller you choose, it is always connected according to the same circuit. Connectors and power supply are designated “ V+" And " V-" Accordingly, the red wire of the power supply goes to the positive contact, and the black wire goes to the negative one.
Connectors for connecting RGB strips are designated:
- R(red)- red color control
- G (green)- green color control
- B (blue)- blue color control
- V+ common wire (it may be designated differently on different controllers, but you still won’t confuse it with others)
Do not mix up the tape wires! Nothing bad will happen, of course (nothing will burn), but your colors will be mixed up. Press red on the remote control and blue will light up.

RGB strip control panel: whichever button you press, it will glow that color
How to connect more than 5 meters of tape? The current-carrying paths of the LED strip are designed for a length of 5 meters (which is why the strip is always sold in this length). You can’t just take and connect two tapes in series. Even if it works, it will not last long (tested in practice).
The principle of elongation is the same as with regular tape. There are two ways. Here's the first one

Connection diagram for RGB strips with one power supply
This circuit requires a four-core extension wire with a cross-section of 1.5 mm and a length of 5 meters. I use this circuit to connect RGB strips with 30 diodes per meter. But because This strip shines dimly (due to the small number of LEDs) and there are few people who want to use it, so I rarely use this circuit.
With RGB strips of 60 diodes per meter, you can also use this scheme, but at the same time, you will need a power supply and a controller with 2 times more power.
Let's do the math. Two RGB strips consume 140 watts. A power supply of such power is a heavy piece of iron, of quite considerable size. Of course, you can hide it in a ceiling niche. But for this, it is necessary to plan a place for it in advance (at the ceiling design stage).
140 watt controller. As my experiences show, controllers fail after a while. Although the technical parameters indicate that they are designed for such power and pull 10-15 meters. In fact, they are burning. I have already had several cases, although according to calculations, everything seems to be working.
Therefore, I recommend choosing a controller with a power reserve of 2 times, i.e. for this case, it is 280 watts. But here, its cost increases sharply, and it’s not easy to find which controller. Therefore, I like this scheme better

Connection diagram of LED RGB strips using an RGB amplifier
In this connection diagram, an additional power supply is used and RGB amplifier.The end of the first tape is connected to the input of the amplifier (it says “Input”), and the beginning of the second tape is connected to the output (it says “Output”).
Do not confuse the colors of the wires: each wire is connected to the corresponding connector. Connect the wires from the power supply to the power contacts.

Connecting an RGB amplifier
This scheme is a little more complicated and the cost is a little more expensive than the first one, but at the same time:
- Power supply sizes are significantly smaller
- Almost all commercially available controllers can be used
- You can connect an unlimited number of tapes
If you find it difficult to understand electrical circuits, then here is a photo that shows everything. Again. If you need one tape, then use a power supply and a controller. If you need two or more tapes, then add an amplifier and another power supply.
The photo shows a ceiling with multi-color lighting. The dimensions of the niche are 3 x 4.5 m. Accordingly, the total length of the illumination is 15 m.
What is needed for 15 meters of backlight?
Here is the list of components:
| № | Name | Quantity |
|---|---|---|
| 1. | LED RGB strip | 15 meters |
| 2. | Compact 100 W power supply. | 3 pcs. |
| 3. | Controller | 1 PC. |
| 4. | Control panel for controller | 1 PC. |
| 5. | Remote control holder | 1 PC. |
| 6. | AAA batteries | 2 pcs. |
| 7. | Repeater (signal repeater) | 2 pcs. |
| 8. | Network cable ShVVP 2 x 0.5 | 11 meters |
| 9. | Wire holder | 20 pcs. |
| 10. | Vago 12 volt connectors | 8 pcs. |
| 11. | Vago 220 volt connectors | 6 pcs. |
| 12. | Wire 4 cores | 1 meter |
| 13. | Screw with dowel | 10 pieces. |
Electrical connection diagram
Connection diagram RGB LED strip divided into 3 sections of 5 meters each. Each section is powered by a separate power supply. This power supply allows you to get away from bulky powerful units that do not fit inside the niche and require good ventilation.
Click on the picture
First tape connected to RGB- controller, which controls brightness and color. The next two connected to repeater. The purpose of repeaters is to synchronize two tapes. The second tape has exactly the same brightness and color as the first.
Installation diagram in a ceiling niche
Imagine going up to your neighbors, one floor above. Now, imagine that the floor below you is transparent. And now you look down and see a niche in the ceiling ABOVE. This is exactly the view shown in this picture. This is how the tape and blocks are placed in the ceiling niche.
Installation starts from there, where the network connection point is located. The power supply and RGB controller (green box) are installed at this point. The network is connected via a connector.
After 5 meters a second power supply is installed and repeater(blue box in the diagram). And so on. To connect the repeater is used connector(for ease of installation).
From the connection point there is a network cable to three power supplies (orange line). The tape is glued to the back wall of the niche with tape. Because Since all the blocks are compact, they easily fit into a niche.
When connecting a regular monochrome tape, you should adhere to three basic rules:
- connection is made in parallel in sections of no more than 5 meters
- the tape is mounted on an aluminum profile
- The power supply is always selected with a power reserve
The same rules are fully applicable for multi-color RGB tape. However, there are some peculiarities here. They are connected with the use of an RGB controller in the connection diagram.
RGB controller
 In addition, be sure to remember that full-fledged rgb backlighting can be made using SMD 5050 LEDs. They are the ones that implement the ability to change colors in one light source.
This is achieved due to the fact that the LED is assembled from three crystals. In all other types of SMD 2835, SMD 3528, one LED can shine in only one color. 
Because of this, small dips in illumination may occur in the backlight, when neighboring LEDs simply will not light up and the strip of light will not look solid and continuous. Examples and disadvantages of such models can be found in the articles “” and “”.
 The RGB controller is connected after the power supply. With its help, you can change not only colors, but also the brightness of lighting, different operating modes, the intensity of color changes, etc.
For the light-music mode, when colors run in different directions and replace each other, special controllers will be required. They are called DMX. 
A certain length of LED strip can be connected directly through the controller. The maximum is 5 meters or 10 meters when connecting two sections of five in parallel. 
 What to do if you have multi-colored lighting more than 10 meters away? For the monochrome version, everything is solved by parallel connection of individual pieces. For example, you connect 3 sections of 5m each and have full illumination 15m long.
For RGB strips, it is possible to solder and connect 5-meter sections in parallel, but there are some nuances with direct connection to one controller.
Connection diagram for RGB LED strip 5m or 10m long
 First, let's consider the option when you have a total length of LED backlighting of only 5m or 10m, that is, two solid strips connected in parallel, 5m each. What is needed in this case?
- power supply that converts 220V from the network into 12 or 24V necessary for the backlight to operate

- RGB controller
 Unlike the power supply, it can be selected without a power reserve, which is called back-to-back. The main thing is to correctly calculate the power of the tape itself.
For example, if 1m consumes 14.4W (data can be found on the packaging or from tables, according to the type of LED), then 10m will respectively “eat” 144W. This is the power you buy the controller for. 
How to connect all this correctly? Firstly, 220V must be supplied to the power supply itself. Usually on the left there are two terminals marked L (phase), N (zero) and ground. Here the polarity of L and N is not necessary. 
- Light with BGR V+ contacts
They are deciphered as:
B (blue) – blue
G (green) – green
R (red) – red
V is the common plus on the LED strip. Directly on the tape it can be signed as “+12” or simply “+”. All other three rgb pins are negative. 
- Power with “+” and “-” contacts
Unlike monochrome tape, the RGB version has not two contacts, but four. And sometimes all five!
The fifth is responsible for white light, since normal white natural light cannot be obtained from a combination of RGB colors. These LED strips are called RGBW or RGBWW. 
Therefore, check in advance how many contacts for soldering wires the tape has and buy the appropriate controller. This is especially true when shopping through online stores.
The Power contacts are supplied with 12 or 24V voltage from the power supply. 
Look for terminals on the block labeled “V+” and “V-“. Instead of “V-“ they sometimes write “COM”. 
If you mix up the order, connect red to green or vice versa, nothing bad will happen, the colors on the control panel will just get confused. 
By the way, in extreme cases, an RGB LED strip can be connected without a controller at all, directly to the unit.
To do this, you need to twist all three rgb wires into one and apply a minus wire to it, and a positive wire to the second one. 
True, in this case, there can be no question of any multi-colored lighting. However, it can be considered as one of the lighting options if the controller fails.
If you correctly connect the RGB strip according to the first option, you should have the following sequence: 1 Power supply
2 Controller
3 RGB LED strip 


RGB tape 15-20 meters long
If you need to connect 15, 20 meters or more, this option with only one controller will no longer work. There are two options:
- use two controllers
- use RGB amplifier
The first option is inconvenient due to higher costs. And secondly, you will have two control panels, each of which is responsible for different sections of the tape. And how you synchronize them is another question. 
Therefore, the best option is when everything is controlled from one controller and one remote control. This can be easily achieved using an rgb amplifier. 
From the name it is clear that its purpose is to amplify the signal from the controller. True, some are mistaken in believing that it is needed for a brighter glow of the tape. And it can be used for this purpose even for 5-meter sections. This is wrong.
It is selected based on the power not of the entire length of the LED strip, but only of the section that is connected to it, in addition to the first 5 or 10 meters. 
Amplifier connection diagram
The amplifier has input-input and output-output terminals. The input and output have the same contacts as the controller - a common plus and colors. 
 There are also power connection terminals:
- VDD or "+"
- GND or "-"
Voltage 12-24V can be supplied either from an additional unit or from a general one, if its power allows. 
To connect, place the common ends of the previous section of the LED strip into the input terminals of the amplifier.
After this, place the power conductors from the unit under the VDD and GND screws. 
As a result, you should get the sequence: 1 Power supply
2 Controller
3 LED strip No. 1
4 Amplifier
5 LED strip No. 2
 The assembled lighting according to this scheme will work and be controlled from one remote control.
If you need to connect another 5-10 meters of tape, another amplifier is added to the circuit, and possibly an additional power supply (depending on the lighting power). 
Just keep in mind that the power supplies themselves cannot be paralleled directly with each other. This must be done through a diode bridge. Therefore, they must be separated from each other through separate sections of tapes. 
This way you can assemble multi-colored lights of any length to suit your needs. The main thing is to find a place to place all this equipment. 
When there is not enough space, a micro model can be used instead of a large amplifier. 
It resembles something like an adapter, and its size is appropriate. At the same time, it copes well with its task of signal amplification. 
In addition, it can be used if you lack the power of your controller. For example, the power of the entire LED strip is 110W, but the controller is only 70W.
In order not to change it, just buy such a mini amplifier, connect the two elements in series and enjoy the lighting.
By the way, the controller itself may be of the same miniature size. 
LED strips have long been used for local lighting and as main lighting. But in addition to monochrome (one-color) different colors, there are controllable RGB tapes (Blue, Green, Red) that can change their color. One of the manufacturers of such devices is Apeyron.
RGB technology
There are a number of features in the design and operation of the multicolor strip.
Differences from regular tape
Like a regular one, RGB tape is a printed circuit board in the form of a narrow strip along which conductive strips are applied. Unlike the standard one, on the RGB tape there are not 2, but 4 or 5 such stripes - common and one for each color.
Resistors and LEDs are installed on the board using the SMM (Surface Mounted Mevice) method, which vary depending on the type of tape:
- Monochrome. Can be of any size and required color.
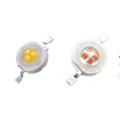
- RGB. It uses SMD 5050 LEDs. This diode consists of three LEDs in one package. In a monochrome ribbon they are one color, in a multicolor ribbon they are different (red, green and blue). This combination allows you to change the color of the device or make it white. Black color ensures the absence of light.
- RGBW. In addition to colored diodes, white ones are installed in the strip. This gives additional control over the brightness and color of the light.
In addition to devices in which all LEDs of the same color are controlled simultaneously, there are devices with chip diodes. They contain a chip that allows you to control each LED individually. This makes it possible to implement effects such as “running lights” or “star rain”.
Example of an RGB strip boardBenefits and uses
The advantage of such LED devices is the ability to change the color of the lighting, both manually and according to a predetermined program, as well as the organization of various lighting effects - color shifts, flickering or, when connecting the controller to a computer or music center, light music.
Such devices are used in a variety of places:
- in the illumination of shop windows;
- advertising signs;
- creating a romantic atmosphere in the room;
- lighting of the corridor or bedroom - blue light turns on at night, and bright white light in the evening or when signaled by a motion sensor;
- aquarium lighting.
In addition to these options, many others are possible. The use of such devices is limited only by the designer’s imagination.
 Multi-colored ribbons give scope for design possibilities
 Tape selection
One of the questions that needs to be answered when organizing LED lighting is which strip to use.
Illumination level
First of all, you need to decide in what capacity the LED backlight will be used:
- Decorative lighting. The functionality of the controller is of primary importance.
- Zone lighting. This is additional lighting in the room. Its power is only a fraction of what is needed for the entire room.
- Workplace lighting. It is difficult to find out the required power, since it is usually used in conjunction with the main lighting. Determined by selection method or using online calculators.
- Main lighting of the entire room. The power is determined by the area of the room and its purpose - in the bedroom it is 2 W/m2, in the kitchen or children's room - 3 W/m2, and in the brightest room - 3.5-4.
When drawing up the project, light loss in the diffuser or in the ceiling plinth is taken into account. They reach 50%. The option of two-zone and multi-zone illumination is possible.
 An example of using zone backlighting. Such a tape will not provide illumination of the entire room, but it can highlight the desired part
 LED type
The multi-color strip with LEDs contains SMD5050 crystals measuring 5 * 5 mm, consisting of three diodes and having 6 pins. In a single-color strip they are the same color, but in an RGB strip they are different (red, green, blue). A roll of such tape is 5 meters long and has a power of 144 W.
In addition to regular diodes, there are chip diodes, WS2812B and WS2812S. Outwardly, they are similar to ordinary ones, but inside they contain a PWM controller that allows you to control each LED individually. They implement a variety of effects, such as “running lights” or “star rain”. From such devices you can mount an LED screen. The disadvantage is the high price and the need to use a special controller.
Diode Density
The brightness and price of an LED strip depends not only on the size and type of diodes. The density of the crystals is no less important. In RGB tape it is 30–60 pcs/m. For greater brightness, two, three or four rows are used with a density of 120, 180, 240 pcs/m, respectively.
Ribbon color
The color of the RGB strip is adjusted by the brightness of LEDs of different colors. If the diodes turn on completely, the tape emits white light. By decreasing the brightness of one or two colors, the overall color of the tape changes. This is done using a controller.
 The controller allows you to adjust the brightness and color of the tape
 The RGB+WhiteRGBW LED strip is a two-row LED strip, in which one row is made of color LEDs and the second row is made of white LEDs. This makes it possible to obtain pastel colors, as well as increased brightness in normal lighting.
IP degree of protection
According to the level of protection from external conditions, devices are divided from unprotected (ip20, ip33) to partially protected (ip42, ip44) and sealed (ip67, ip68).
RGB strip power supply
The most common voltage of these devices is 12-24V. There are devices powered by 110 and even 220V, but they are not very common.
Selecting a power supply (driver) for a strip
The power supply for LED strips is selected based on the total power of the devices that will be connected to it. For example, if 5 meters with a power of 14.4 W/m and 3 meters with 7.2 W/m are connected, then the total load is 14.4*5+7.2*3=93.6 W. Considering the 20% margin (93.6+0.2x93.6= 112,32) , the power of the unit must be at least 112.32 W.

Expert opinion
Alexey Bartosh
Ask a question to an expertImportant! When connecting LED devices with long cables, larger cross-section wires are used to avoid voltage drop. Therefore, it is advisable to take several drivers instead of one and install them near the connection point.
Like the strips, power supplies come in dc12-24v as well as 110v.
How to control RGB strip light
To control the brightness of a single-color strip, you need a dimmer, but to take advantage of the full capabilities of multi-color devices, you need a controller. Otherwise, you will have to adjust each color separately, and the lighting effects will not be available.
 RGB strip controller kit
 Selecting a controller for RGB strip
The selection of a control device depends on three factors:
- Power. It is calculated in the same way as the required power of a power supply unit - based on the total number of connected devices. Sometimes, as when choosing a power supply, it is advisable to purchase not one powerful RGB controller, but a smaller one and an RGB repeater.
- The desired set of functions. There are a lot of types of control devices, but, for example, to illuminate a product in a display case or an aquarium, you do not need a device with a large number of lighting effects, and for additional lighting of the room, it is desirable to turn on a timer or light music.
- Remote control. Just like selecting features, sometimes it's necessary and other times it's a waste of money.
When selecting, these points are taken into account so as not to purchase an overly expensive device, and at the same time its capabilities are quite sufficient.
Types of controllers
There are different types of controllers for controlling RGB LED strips: from the simplest, push-button ones, to those equipped with microprocessors and Wi-Fi.
Conventional devices can only select a specific color and provide simple lighting effects. Used to illuminate shop windows and other places.
More complex models can be programmed to change colors and effects on a timer. They can have a connector for flash memory and respond to lighting in the room and outside. There are also bluetooth controllers with a corresponding remote control.
The most complex devices can be connected to the smart home system.
Most bands have a remote control. It happens:
- on buttons;
- infrared;
- on radio signals;
- Bluetooth control;
- Wi-Fi control.
The last two can replace an iPhone or a mobile phone with Android.
 You can control the feed using your smartphone
 In addition to conventional controllers, there are homemade devices that operate on the Arduino microprocessor board. Such homemade products control simple or chip LEDs and create light or color-music effects. Motion or light sensors are also connected to the Arduino-controller.
RGB controller operating modes
LED strips are installed in two types:
- simple, controlled by changing the supply voltage simultaneously along the entire length;
- chipped, with digital control of the color of each diode individually.
Accordingly, the controllers operate in two modes – analog and digital. These are different types of devices and are not interchangeable.
Connection methods
There are two options for connecting an RGB strip:
- soldering;
- connectors.
Solder connection
In order to solder the cable to the LED strip, you must:
- Wire with a cross section of up to 0.5 mm2. A thicker one may tear off the contact pads.
- Soldering iron with power up to 25 W. A powerful soldering iron will overheat the soldering area, and the pad will peel off from the base.
- Solder and neutral flux.
- Heat shrink tube 30 mm long.
Expert opinion
Alexey Bartosh
Specialist in repair and maintenance of electrical equipment and industrial electronics.
Ask a question to an expertAttention! Active flux cannot be used. It will destroy the wire or contact strips, and also lead to a short circuit, after which the strip will have to be repaired.
Connectors for RGB LED strip
The modern connection method is connectors. These are small plastic devices with contact pads inside for connection to the tape. Their number should correspond to the number of conductive strips 2, 4 or 5.
These devices are available for various connection options:
- with leads for power supply;
- connecting, designed to connect two sections of strip;
- corner, for connecting at an angle;
- "T" or cross-shaped.
And many others. Using connectors, you can repair the device yourself.
Connecting to an RGB controller longer than its rated power
When controlling LEDs with a power exceeding the controller parameters, or when connecting devices located at a large distance, an RGB repeater is used.
The signal is sent to it from the controller via thin cables, and the device controls the glow of adjacent strips of tape.
Video review of the kit with remote control
📋 Take the test and test your knowledge

 LEDs for flashlights: characteristics, photos, diagrams
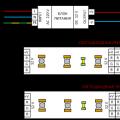 Device and connection diagram of LED RGB strip LED strip rgb 20 meters
 How to make a garage oven from a gas cylinder?