Cheops pyramid made of cardboard. How to make a pyramid out of paper? Detailed instructions. The final stage of the layout
Materials and accessories
- paper or cardboard;
- scissors;
- pencil;
- ruler;
- compass;
- eraser;
- glue.
Defining parameters
Any geometric body has certain properties. This figure has a regular polygon as its base, and its vertex is projected into its center. An equilateral triangle was chosen as the base. This condition determines the name. The side edges of the pyramid are triangles, the number of which depends on the polyhedron chosen for the base. In this case there will be three of them. It is also important to know the dimensions of all the components that will make up the pyramid. Paper developments are made in accordance with all the data of the geometric figure. The parameters of the future model are agreed upon in advance.
How to make a pyramid out of cardboard?
The choice of material used depends on these data.
Video on the topic

Layout assembly


Construction of a drawing

Completing the Simulation

Hobby
Hobby
home and family
home and family
home and family
home and family
home and family
home and family
Home comfort
Home comfort
How to make a paper pyramid
Paper crafts start with small boats and ships, airplanes and pyramids, which you can make together with your child, instilling in him perseverance, creative imagination skills, introducing him to the Japanese technique of origami, which can develop logic and thinking. Some things in our home are iconic because they are made with our own hands, because they have their own energy, they symbolize something for us. Initially, it was believed that culture on the planet originated in Egypt, where the pyramid is still considered a symbol of energy conservation. It is called a sacred figure, which can contain a huge stream of charged particles inside itself, so many people make pyramids out of ordinary paper, hollow inside, and put knives or blades inside that have become a little dull so that they become sharp and suitable for household use again.
Mastering the origami technique
- To make it, you need a sheet of paper 40/40 cm. First, we fold it from corner to corner, i.e. connect opposite sides.
Ways to make a paper pyramid
The craft is considered ready!
Hollow pyramid
This method is very simple and fast. For the pyramid, inside which you can sharpen scissors, knives and blades, taking into account the concentration of positive energy inside, you will need: a sheet of paper, PVA glue, scissors, pencil
or marker.
On a piece of paper you need to draw a square and all parts of the pyramid adjacent to it, as shown in the drawing. This pattern needs to be cut only along the contour; all internal lines are fold lines, which are marked with the blunt side of the scissors and bent inward. Don’t forget that the pyramid will stick together, so leave 1 cm of space for the backing, which is then coated with PVA glue and connected along the contour on all four sides.
The craft can be decorated with various Egyptian symbols (eye of Horus, ankh, rod, etc.) to attract even more energy inside.
Children's pyramid
Under sensitive parental guidance, children can also cope with the pyramid, let's try to take charge of this process, you just need to look at the photo and correctly bend the edges of the future product.
- We draw the lines of the square diagonally: to do this, we bend the opposite edges and straighten them out.
Answers 100 to 1 answer who created the pyramid
Making a pyramid, how to build a pyramid correctly, how to make a pyramid out of paper, building pyramids.
How best to draw a pyramid
How to build a healing pyramid.
Pyramid energy - How to build a healing pyramid at your dacha with your own hands
Pyramid - development.
Development of geometric shapes
Rectangle, square, triangle, trapezoid and others are geometric figures from the section of exact science. A pyramid is a polyhedron. The base of this figure is a polygon, and the side faces are triangles with a common vertex, or trapezoids. To fully represent and study any geometric object, mock-ups are made. They use a wide variety of materials from which the pyramid is made. The surface of a polyhedral figure, unfolded on a plane, is called its development. The method of converting flat objects into three-dimensional polyhedra and certain knowledge of geometry will help you create a layout. It is not easy to make developments from paper or cardboard. You will need the ability to make drawings to specified dimensions.
Materials and accessories
Modeling and executing multifaceted volumetric geometric shapes is an interesting and exciting process. You can make a large number of different layouts from paper. To work you will need:
- paper or cardboard;
- scissors;
- pencil;
- ruler;
- compass;
- eraser;
- glue.
Defining parameters
First of all, let's determine what the pyramid will be like. The development of this figure is the basis for making a three-dimensional figure. Completing the work will require extreme precision. If the drawing is incorrect, it will be impossible to assemble a geometric figure. Let's say you need to make a model of a regular triangular pyramid.
Video on the topic
How is a regular pyramid unfolded?
The basis of the model is a sheet of paper or cardboard. Work begins with a drawing of the pyramid. The figure is presented in expanded form. A flat image on paper corresponds to pre-selected dimensions and parameters. A regular pyramid has a regular polygon as its base and its height passes through its center. Let's start by making a simple model. In this case, it is a triangular pyramid. Determine the dimensions of the selected figure. To construct a development of a pyramid, the base of which is a regular triangle, in the center of the sheet, using a ruler and pencil, draw a base of the given dimensions. Next, to each side we draw the side faces of the pyramid - triangles. Now let's move on to their construction. We measure the dimensions of the sides of the triangles on the lateral surface with a compass. We place the leg of the compass at the top of the drawn base and make a notch. We repeat the action, moving to the next point of the triangle. The intersection obtained as a result of such actions will determine the vertices of the side faces of the pyramid. We connect them to the base. We get a drawing of a pyramid. To glue a three-dimensional figure, valves are provided on the sides of the side faces. We finish drawing small trapezoids.
Layout assembly
Using scissors, cut out the completed design along the contour. Carefully bend the development along all the lines. We tuck the trapezoid valves inside the figure so that its edges close together. We lubricate them with glue. After thirty minutes the glue will dry. The volumetric figure is ready.
Development of a quadrangular pyramid
First, let's imagine what the geometric figure looks like, the model of which we will make. The base of the selected pyramid is a quadrangle. The side ribs are triangles. For work we use the same materials and devices as in the previous version. We draw the drawing on paper with a pencil. In the center of the sheet we draw a quadrilateral with the selected parameters.
We divide each side of the base in half. We draw a perpendicular, which will be the height of the triangular face. Using a compass solution equal to the length of the side face of the pyramid, we make notches on the perpendiculars, placing its leg at the top of the base. We connect both corners of one side of the base to the resulting point on the perpendicular. As a result, we get a square in the center of the drawing, on the edges of which triangles are drawn. To fix the model on the side faces, add auxiliary valves. For reliable fastening, a strip of centimeter width is enough. The pyramid is ready for assembly.
The final stage of the layout
We cut out the resulting pattern of the figure along the contour. We bend the paper along the drawn lines. The three-dimensional figure is assembled by gluing. Lubricate the provided valves with glue and fix the resulting model.
Volumetric layouts of complex figures
After completing a simple polyhedron model, you can move on to more complex geometric shapes. Unfolding a truncated pyramid is much more difficult to perform. Its bases are similar polyhedra. The side faces are trapezoids. The sequence of work will be the same as that in which a simple pyramid was made. The sweep will be more cumbersome. To complete the drawing, use a pencil, compass and ruler.
Construction of a drawing
The development of a truncated pyramid is performed in several stages. The side face of a truncated pyramid is a trapezoid, and the bases are similar polyhedra. Let's say these are squares. On a sheet of paper we draw a trapezoid with the given dimensions. We extend the sides of the resulting figure until they intersect. The result is an isosceles triangle. We measure its side with a compass. On a separate sheet of paper we construct a circle, the radius of which will be the measured distance.
The next stage is the construction of the side ribs that the truncated pyramid has. The sweep is performed inside the drawn circle. Using a compass, measure the lower base of the trapezoid. On the circle we mark five points that connect the lines to its center. We get four isosceles triangles. Using a compass, measure the side of the trapezoid drawn on a separate sheet. We put this distance on each side of the drawn triangles. We connect the resulting points. The side faces of the trapezoid are ready. All that remains is to draw the upper and lower bases of the pyramid. In this case, these are similar polyhedra - squares. We add squares to the upper and lower bases of the first trapezoid. The drawing shows all the parts that the pyramid has. The scan is almost ready. All that remains is to finish drawing the connecting valves on the sides of the smaller square and one of the faces of the trapezoids.
Completing the Simulation
Before gluing the three-dimensional figure, the drawing along the contour is cut out with scissors. Next, the development is carefully bent along the drawn lines. We tuck the mounting valves inside the model. We lubricate them with glue and press them to the edges of the pyramid. Let the models dry.
Making different models of polyhedra
Making three-dimensional models of geometric shapes is a fun activity. To master it thoroughly, you should start by performing the simplest sweeps. Gradually moving from simple crafts to more complex models, you can begin to create the most intricate designs.
Hobby
How to make a paper book for a doll
Most girls love to play with dolls. They are happy to dress them in beautiful outfits, do their hair, and decorate their homes. Particularly creative people can even create some of the interior details of a doll’s house…
Hobby
How to make a pyramid out of paper? detailed instructions
Many people flock to Egypt to see the pyramids with their own eyes and touch them. They captivate the eye and fill the body with some kind of healing energy. Scientists around the world have agreed that pyramids are capable of…
home and family
Vitamins with calcium for children: which ones are better?
All parents know that their baby needs calcium to grow. Indeed, it is a kind of “builder” of the human body. But besides growth, calcium is responsible for cardiac activity,...
home and family
A machine for pitting cherries is an indispensable device for home canning.
Nowadays you can find the most unusual devices that make the everyday life of housewives easier.
One of the latest inventions is a machine for pitting cherries. You can learn more about this device from our...
home and family
Applications for children 3 years old. Paper applications for children 2-4 years old
During classes with paper, one of the favorite activities for kids is appliqué. For 3-year-old children, it is very important to learn how to perform simple operations with scissors, to perform work in accordance with the task assigned to them...
home and family
What litter is best for cats? What to choose from
How to determine which cat litter is best? An assortment of any de…
home and family
Bromhexine syrup for children is one of the best cough medicines
Quite often, children who are not sick at all at home, when they start attending kindergarten, simply do not come out of sick leave. And for many, the main disease becomes bronchitis or tracheitis, since babies are not yet fully…
home and family
Curtain hooks are one of the types of devices for securing curtains to the eaves
Of course, in any room of the apartment, be it a kitchen, bedroom or children's room, there are windows. It is simply impossible to imagine a living space without them. The space will look closed and “uninhabited”. ABOUT…
Home comfort
Rubber crumb coating for playgrounds: features and installation
When setting up a playground in their country house or in their own yard, parents first of all try to make their child’s games as safe as possible. But is it possible to imagine children who don’t like to run, jump and do kicks...
Home comfort
Pump for pumping water from the basement: review, characteristics, choice
One of the important devices for a summer house is a pump for pumping water out of the basement. After all, it often creates a huge number of problems that can negatively affect the structure located above it. All this …
Making a pyramid, how to build a pyramid correctly, how to make a pyramid out of paper, building pyramids.
If you have not yet imbued with the benefits of healing pyramids.
If you still have doubts and are not convinced that you will be provided with truly unique and popular material on the topic: making a pyramid, how to build a pyramid correctly, building small or large pyramids with your own hands in the yard, at the dacha or at home, as well as how to make a pyramid from paper.
Then read and watch some more.
I hope this convinces you!!!
With the help of a pyramid, it is easy to obtain so-called charged water, which is useful for washing your face if you have problem skin, and drinking it for diseases of the gastrointestinal tract (you can simply use it as a preventive measure). Can charge creams and foods (eg oil). One friend assures me that vodka left overnight in a pyramid does not give a hangover, and brine instantly relieves hangover syndrome.
The pyramid is good for treating diseases that have pain syndrome (you can clearly feel the pain being pulled out of you). With its help, you can normalize sleep and blood pressure, and restore many body functions. Fractures heal faster, as do postoperative sutures. Enuresis and hemorrhoids are treated jokingly. The range of applications of pyramids is very wide, and has not yet been fully exhausted. Not all the possibilities of healing pyramids are known.
The onset of otitis media (inflammation of the middle ear) is cured in one session (about thirty minutes), the emerging rotation of the nails goes away in two sessions (a total of three hours), all signs of food poisoning disappear ten minutes after you place the pyramid on your stomach etc. Everything is very simple if you manage to capture the very beginning of the disease. Then 1-2 sessions are enough for it to stop progressing and leave you alone.
It is more difficult with chronic ailments, however, many of them can also be cured with the help of the pyramid. You just need to treat them not so much during attacks (by the way, pain during attacks is well relieved with a pyramid), but rather to be patient and treat them every day, say, while watching TV. Eventually, the disease goes away.
This way you can get rid of osteochondrosis in one and a half to two months. You can learn to stop attacks of congenital heart disease and angina at the very beginning, without waiting until the pain becomes severe.
The more often you use the healing pyramid, the more convinced you are that it saves nerves, money and time. Treating any, even the smallest ailment with the help of today's healthcare system is a complex, troublesome and expensive matter. Therefore, before running to the clinic, you can conduct an experiment and see if you can’t cure it yourself?! And in the overwhelming majority of cases, it is possible to do without doctors and pharmacies.
Do you want to know how a pyramid is made, how to build a pyramid correctly, or how to build pyramids with your own hands at home? Or, for example, how to make a pyramid out of paper? In general, it’s not difficult - you need to download and study my collection The correct healing pyramid with your own hands at home.
Detailed instructions on how to properly build a pyramid are in the collection. Making a pyramid yourself according to a drawing using instructions is not at all difficult, including making a pyramid out of paper.
What can you use to make a pyramid with your own hands at home? Any thin sheet material can be used, except metals. These are plastic, plywood, hardboard, plexiglass, thick cardboard, you can even make a pyramid out of paper. You can even get by with ordinary drawing paper, but then the pyramid will turn out to be extremely short-lived.
P.S. This is only a small part of the reviews for this collection. Download it and you won't regret it. It will help not only cure incurable diseases, but also make your life easier. It will save a lot of time and money, and you will know how to properly build or make a pyramid with your own hands, or, in extreme cases, how to make a pyramid out of paper.
It's your choice!
Do you want to learn even more about the properties of the Golden Section pyramids (this is exactly the pyramid I offer you), about their effect on living organisms and humans? About the effect of pyramids on the structure of Space? About the effectiveness of the effects of pyramids in nuclear waste burial sites, in seismically active areas, in areas of chemical and bacteriological waste disposal, in areas with anomalies of the ozone layer, in areas with a difficult epidemiological situation, in solving the problems of drug addiction, alcoholism, and in agriculture? Do you want to learn about the experiments, conclusions, hypotheses of our scientists (in recent years, dozens of experiments have been carried out with such pyramids at the Research Institute of the Russian Academy of Sciences, the Russian Academy of Medical Sciences)?
Then go to the information site www.carole2.narod.ru - everything is described in detail there. In order to save your traffic, you can download my zip archive (148 KB) and then read it. This archive contains the contents of the above site.
Look at some screenshots from the instructions for making a pyramid, how to properly build a pyramid, how to make a pyramid out of paper, building pyramids.
Of course, I won’t give any explanations here.
All detailed explanations of how to make a pyramid, and a much larger number of diagrams and drawings are in the collection itself. Moreover, you do not need to be a mathematician or have a construction profession. Everything is shown and told, as they say, “on the fingers.” You need to download the collection The Correct Healing Pyramid with your own hands at home and study it.
Just look at a small portion of the drawings presented here and decide for yourself whether the necessary information is in this collection?
Personally, I have no doubt!
In addition to the technique of how to properly build a pyramid or how to make a paper pyramid with your own hands, you will be given practical advice on using the pyramid and how to position it.


Well? Did I manage to convince you?
Hope so.
And I also want to add a very important detail:
My collection “Correct healing pyramid with your own hands” includes not only practice on how to correctly build a healing pyramid with your own hands, but also theory. As you know, without theory there is no practice. And before you start building a healing pyramid, you need to know at least a little theory about the subject, why it is this way and not otherwise, and what comes from where.
In the collection “Correct healing pyramid with your own hands” I included:
- shapes and properties of pyramids, use, methods of treatment;
— pyramids of precious and semi-precious stones;
— shungite pyramids;
- geometry of the pyramids of the Golden Section - complete description, theory,
formulas, calculating dimensions to make a pyramid with your own hands;
- how to make a pyramid out of paper, 50 cm in size. - the correct healing pyramid of the Golden Section (an example is given of how to make a pyramid out of paper, but you can, of course, make a pyramid from other materials);
- book by Olga Sukhova.
Unique Technology
"The correct healing pyramid with your own hands at home"
Right Now, and Get your exclusive SUPER BONUS included Absolutely Free!
Download "DIY Pyramid"
To the beginning of the topic: Correct healing pyramid with your own hands
Pyramid - development. Pyramid development for gluing. Paper scans
Rectangle, square, triangle, trapezoid and others are geometric figures from the section of exact science. A pyramid is a polyhedron. The base of this figure is a polygon, and the side faces are triangles with a common vertex, or trapezoids. To fully represent and study any geometric object, mock-ups are made. They use a wide variety of materials from which the pyramid is made. The surface of a polyhedral figure, unfolded on a plane, is called its development. The method of converting flat objects into three-dimensional polyhedra and certain knowledge of geometry will help you create a layout. It is not easy to make developments from paper or cardboard. You will need the ability to make drawings to specified dimensions.
Materials and accessories
Modeling and executing multifaceted volumetric geometric shapes is an interesting and exciting process. You can make a large number of different layouts from paper. To work you will need:
- paper or cardboard;
- scissors;
- pencil;
- ruler;
- compass;
- eraser;
- glue.
Defining parameters
First of all, let's determine what the pyramid will be like. The development of this figure is the basis for making a three-dimensional figure. Completing the work will require extreme precision. If the drawing is incorrect, it will be impossible to assemble a geometric figure. Let's say you need to make a model of a regular triangular pyramid.
Any geometric body has certain properties. This figure has a regular polygon as its base, and its vertex is projected into its center. An equilateral triangle was chosen as the base. This condition determines the name. The side edges of the pyramid are triangles, the number of which depends on the polyhedron chosen for the base. In this case there will be three of them. It is also important to know the dimensions of all the components that will make up the pyramid. Paper developments are made in accordance with all the data of the geometric figure. The parameters of the future model are agreed upon in advance. The choice of material used depends on these data.
Video on the topic
How is a regular pyramid unfolded?
The basis of the model is a sheet of paper or cardboard. Work begins with a drawing of the pyramid. The figure is presented in expanded form. A flat image on paper corresponds to pre-selected dimensions and parameters. A regular pyramid has a regular polygon as its base and its height passes through its center. Let's start by making a simple model. In this case, it is a triangular pyramid. Determine the dimensions of the selected figure. To construct a development of a pyramid, the base of which is a regular triangle, in the center of the sheet, using a ruler and pencil, draw a base of the given dimensions. Next, to each side we draw the side faces of the pyramid - triangles. Now let's move on to their construction. We measure the dimensions of the sides of the triangles on the lateral surface with a compass. We place the leg of the compass at the top of the drawn base and make a notch. We repeat the action, moving to the next point of the triangle. The intersection obtained as a result of such actions will determine the vertices of the side faces of the pyramid. We connect them to the base. We get a drawing of a pyramid. To glue a three-dimensional figure, valves are provided on the sides of the side faces. We finish drawing small trapezoids.
Layout assembly
Using scissors, cut out the completed design along the contour. Carefully bend the development along all the lines. We tuck the trapezoid valves inside the figure so that its edges close together. We lubricate them with glue. After thirty minutes the glue will dry. The volumetric figure is ready.
Development of a quadrangular pyramid
First, let's imagine what the geometric figure looks like, the model of which we will make. The base of the selected pyramid is a quadrangle. The side ribs are triangles. For work we use the same materials and devices as in the previous version. We draw the drawing on paper with a pencil. In the center of the sheet we draw a quadrilateral with the selected parameters.
We divide each side of the base in half. We draw a perpendicular, which will be the height of the triangular face. Using a compass solution equal to the length of the side face of the pyramid, we make notches on the perpendiculars, placing its leg at the top of the base. We connect both corners of one side of the base to the resulting point on the perpendicular. As a result, we get a square in the center of the drawing, on the edges of which triangles are drawn. To fix the model on the side faces, add auxiliary valves. For reliable fastening, a strip of centimeter width is enough. The pyramid is ready for assembly.
The final stage of the layout
We cut out the resulting pattern of the figure along the contour. We bend the paper along the drawn lines. The three-dimensional figure is assembled by gluing. Lubricate the provided valves with glue and fix the resulting model.
Volumetric layouts of complex figures
After completing a simple polyhedron model, you can move on to more complex geometric shapes. Unfolding a truncated pyramid is much more difficult to perform. Its bases are similar polyhedra. The side faces are trapezoids. The sequence of work will be the same as that in which a simple pyramid was made. The sweep will be more cumbersome. To complete the drawing, use a pencil, compass and ruler.
Construction of a drawing
The development of a truncated pyramid is performed in several stages. The side face of a truncated pyramid is a trapezoid, and the bases are similar polyhedra. Let's say these are squares. On a sheet of paper we draw a trapezoid with the given dimensions. We extend the sides of the resulting figure until they intersect. The result is an isosceles triangle. We measure its side with a compass. On a separate sheet of paper we construct a circle, the radius of which will be the measured distance.
The next stage is the construction of the side ribs that the truncated pyramid has. The sweep is performed inside the drawn circle. Using a compass, measure the lower base of the trapezoid. On the circle we mark five points that connect the lines to its center. We get four isosceles triangles. Using a compass, measure the side of the trapezoid drawn on a separate sheet. We put this distance on each side of the drawn triangles. We connect the resulting points. The side faces of the trapezoid are ready. All that remains is to draw the upper and lower bases of the pyramid. In this case, these are similar polyhedra - squares. We add squares to the upper and lower bases of the first trapezoid. The drawing shows all the parts that the pyramid has. The scan is almost ready. All that remains is to finish drawing the connecting valves on the sides of the smaller square and one of the faces of the trapezoids.
Completing the Simulation
Before gluing the three-dimensional figure, the drawing along the contour is cut out with scissors. Next, the development is carefully bent along the drawn lines. We tuck the mounting valves inside the model. We lubricate them with glue and press them to the edges of the pyramid. Let the models dry.
Making different models of polyhedra
Making three-dimensional models of geometric shapes is a fun activity. To master it thoroughly, you should start by performing the simplest sweeps. Gradually moving from simple crafts to more complex models, you can begin to create the most intricate designs.
Hobby
How to make a paper book for a doll
Most girls love to play with dolls. They are happy to dress them in beautiful outfits, do their hair, and decorate their homes. Particularly creative people can even create some of the interior details of a doll’s house…
Hobby
How to make a pyramid out of paper? detailed instructions
Many people flock to Egypt to see the pyramids with their own eyes and touch them. They captivate the eye and fill the body with some kind of healing energy. Scientists around the world have agreed that pyramids are capable of…
home and family
Vitamins with calcium for children: which ones are better?
All parents know that their baby needs calcium to grow. Indeed, it is a kind of “builder” of the human body.
How to make three-dimensional geometric shapes from paper (diagrams, templates)?
But besides growth, calcium is responsible for cardiac activity,...
home and family
A machine for pitting cherries is an indispensable device for home canning.
Nowadays you can find the most unusual devices that make the everyday life of housewives easier. One of the latest inventions is a machine for pitting cherries. You can learn more about this device from our...
home and family
Applications for children 3 years old. Paper applications for children 2-4 years old
During classes with paper, one of the favorite activities for kids is appliqué. For 3-year-old children, it is very important to learn how to perform simple operations with scissors, to perform work in accordance with the task assigned to them...
home and family
What litter is best for cats? What to choose from
How to determine which cat litter is best? An assortment of any de…
home and family
Bromhexine syrup for children is one of the best cough medicines
Quite often, children who are not sick at all at home, when they start attending kindergarten, simply do not come out of sick leave. And for many, the main disease becomes bronchitis or tracheitis, since babies are not yet fully…
home and family
Curtain hooks are one of the types of devices for securing curtains to the eaves
Of course, in any room of the apartment, be it a kitchen, bedroom or children's room, there are windows. It is simply impossible to imagine a living space without them. The space will look closed and “uninhabited”. ABOUT…
Home comfort
Rubber crumb coating for playgrounds: features and installation
When setting up a playground in their country house or in their own yard, parents first of all try to make their child’s games as safe as possible. But is it possible to imagine children who don’t like to run, jump and do kicks...
Home comfort
Pump for pumping water from the basement: review, characteristics, choice
One of the important devices for a summer house is a pump for pumping water out of the basement. After all, it often creates a huge number of problems that can negatively affect the structure located above it. All this …
If you need step-by-step instructions on how to build a pyramid, then please take a look at our lesson. First, evaluate whether your pyramid is deployed in a similar way as in Figure 1.
If you have it rotated 90 degrees, then the edge marked in the figure as “known real values” in your case can be found on the profile projection that you will need to construct. In my case, this is not required; we already have all the quantities necessary for construction. It is important not to forget that in this drawing only the edges SA and SD in the front projection are displayed in full size. All others are projected with length distortion. In addition, in the top view, all sides of the hexagon are also projected at full size. Based on this, let's proceed.
1. For greater beauty, let’s draw the first line horizontally (Figure 1). Then, let's draw a wide arc with radius R=a, i.e.
Origami paper pyramid
radius equal to the length of the side edge of the pyramid. Let's get point A. Using a compass, we'll make a notch on the arc from it, with radius r=b (the length of the side of the base of the pyramid). Let's get point B. We already have the first face of the pyramid!
2. From point B we make another notch with the same radius - we get point C and connecting it with points B and S we get the second side face of the pyramid (Figure 2).
3. By repeating these steps the required number of times (it all depends on how many faces your pyramid has), we will get a fan like this (Figure 3). If constructed correctly, you should get all the base points, and the extreme ones should be repeated.
4. This is not always required, but it is still necessary: add the base of the pyramid to the development of the side surface. I believe everyone who has read this far knows how to draw a six-eight-pentagon (how to draw a pentagon is described in detail in this lesson). The difficulty lies in the fact that the figure needs to be drawn in the right place and at the right angle. We draw an axis through the middle of any face. From the point of intersection with the straight line of the base, we plot the distance m, as shown in Figure 4.
By drawing a perpendicular through this point, we obtain the axes of the future hexagon. From the resulting center we draw a circle, as you did when constructing the top view. Please note that the circle must pass through two points on the side face (in my case these are F and A)
5. Figure 5 shows the final view of the development of a hexagonal prism.
This completes the construction of the pyramid. Build your developments, learn to find solutions, be meticulous and never give up. Thank you for stopping by. Don't forget to recommend us to your friends :) All the best!
or write down our phone number and tell your friends about us - someone is probably looking for a way to complete the drawings
or Create a note on your page or blog about our lessons - and someone else will be able to master drawing.
Guys, thank you for helping out! Even the teacher doesn’t explain it that way! Thank you very much!8
Thank you, you made me happy! This is something I’ve been waiting for all these years :))) Let everything work out!
thank you very much
Large selection of developments of simple geometric shapes.
Children's first introduction to paper modeling always begins with simple geometric shapes such as cubes and pyramids. Not many people succeed in gluing a cube together the first time; sometimes it takes several days to make a truly even and flawless cube. More complex figures, a cylinder and a cone, require several times more effort than a simple cube. If you don’t know how to carefully glue geometric shapes, then it’s too early for you to take on complex models. Do it yourself and teach your children how to do these “basics” of modeling using ready-made patterns.
To begin with, I, of course, suggest learning how to glue a regular cube. The developments are made for two cubes, large and small. A small cube is a more complex figure because it is more difficult to glue than a large one.

So, let's begin! Download the developments of all the figures on five sheets and print them on thick paper. Before printing and gluing geometric shapes, be sure to read the article on how to choose paper and how to properly cut, bend and glue paper.
For better quality printing, I advise you to use the AutoCAD program, and I’m giving you scans for this program, and also read how to print from AutoCAD. Cut out the development of the cubes from the first sheet, be sure to draw a compass needle under the iron ruler along the fold lines so that the paper bends well. Now you can start gluing the cubes.

To save paper and just in case, I made several unfolds of a small cube, you never want to glue more than one cube together or something won’t work out the first time. Another simple figure is a pyramid, its development can be found on the second sheet. The ancient Egyptians built similar pyramids, though not made of paper and not so small in size :)

And this is also a pyramid, but unlike the previous one, it has not four, but three sides.

Development of a trihedral pyramid on the first sheet for printing.

And another funny pyramid of five sides, its development on the 4th sheet in the form of an asterisk in two copies.


A more complex figure is a pentahedron, although a pentahedron is more difficult to draw than to glue.

Development of a pentahedron on the second sheet.

Now we get to complex figures. Now you have to work harder, gluing such shapes together is not easy! To begin with, an ordinary cylinder, its development on the second sheet.

And this is a more complex figure compared to a cylinder, because at its base is not a circle, but an oval.

The development of this figure is on the second sheet; two spare parts were made for the oval base.

To accurately assemble the cylinder, its parts need to be glued end-to-end. On one side, the bottom can be glued without problems, just place the pre-glued tube on the table, place a circle on the bottom and fill it with glue from the inside. Make sure that the diameter of the pipe and the round bottom fit tightly together, without gaps, otherwise the glue will leak and everything will stick to the table. It will be more difficult to glue the second circle, so glue auxiliary rectangles inside at a distance of paper thickness from the edge of the pipe. These rectangles will prevent the base from falling inward, now you can easily glue the circle on top.

A cylinder with an oval base can be glued in the same way as a regular cylinder, but it has a smaller height, so it’s easier to insert a paper accordion inside, and put a second base on top and glue it along the edge with glue.
Now a very complex figure - a cone. Its details are on the third sheet, a spare circle for the bottom is on the 4th sheet. The whole difficulty of gluing a cone is in its sharp top, and then it will be very difficult to glue the bottom.

A complex and at the same time simple figure is a ball. The ball consists of 12 pentahedrons, the development of the ball on the 4th sheet. First, two halves of the ball are glued, and then both are glued together.

Quite an interesting figure - a rhombus, its details are on the third sheet.

And now two very similar, but completely different figures, their difference is only in the base.

When you glue these two figures together, you won’t immediately understand what they are, they turned out to be completely unresponsive.

Another interesting figure is a torus, but we have it very simplified, its details are on the 5th sheet.

And finally, the last figure of equilateral triangles, I don’t even know what to call it, but the figure looks like a star. The development of this figure is on the fifth sheet.

That's all for today! I wish you success in this difficult work!
Today we will learn how to make a pyramid out of paper. I think everyone has heard about pyramids, that this is one of the ideal figures. Our ancestors also believed that such a structure was capable of accumulating energy and even healing. It is not surprising that the Great Pyramid of Egypt is considered one of the seven wonders of the world. It’s hard to even comprehend how people without modern technology were able to build such a majestic structure. We, of course, will not build pyramids on such a scale; we will start with small paper ones.
Few people know that only one relic of the seven wonders of the world has survived to this day - the Pyramid of Cheops. Moreover, the Egyptian pyramid is the first of the seven wonders of the world. It was also the tallest structure from the moment of its construction and for a long time - about four thousand years.
A paper pyramid can be made using different techniques. There are schemes for making an origami pyramid; to create such a craft you don’t need anything other than a piece of paper and skillful hands. You can also make a pyramid from individual modules; such pyramids turn out bright and interesting, since they can be made from multi-colored paper. The next option is to cut a pyramid from a ready-made template, or draw the cut lines yourself and simply glue it together. As you can see, making a paper pyramid is not at all difficult.
Where can you use paper pyramids?
In fact, finding a use for a paper pyramid is very easy. They can also be used in decoration, as packaging for small gifts, and as a teaching aid. It will be more interesting for children to study geometry if they see a real three-dimensional figure.

If you make a pyramid from beautiful double-sided cardboard, it will turn out to be an excellent packaging for sweets or other pleasant little things. This gift can be given to guests. You can also decorate a room with these multi-colored pyramids.

In our article we will get acquainted with several ways to easily make a paper pyramid. Be sure that everything will work out for you. Such a pyramid can become not only entertainment, but also quite a useful thing.
Simple pyramid

You will need:
This is the easiest way to make a pyramid with your own hands. All we need to do is draw the outlines of the future figure with straps for gluing, all that remains is to cut and glue. You can also save the contours we suggested, print them and simply assemble them. You can decorate the finished craft with ribbons, as well as paint it.


Pyramid of modules
This paper pyramid scheme is quite complicated, but doable.

Time required: 30 minutes.
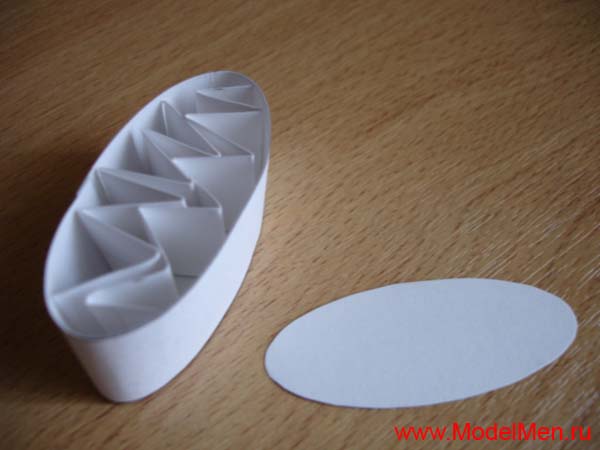
Paper pyramid made of modules
- Marking a paper pyramid
1.1. Take an A4 sheet and bend each side of the sheet in half (Figure 1);
1.2. Turn the sheet of paper with the short side towards you and bend the lower right and left corners of the sheet towards the center (Figure 2);
1.3. We bend the bottom of the figure to the inflection line (Figure 3);
1.4. Turn the sheet over (Figure 4);
1.5. We bend the right side of the sheet towards the center, then do the same with the left side (Figure 5); - Making a paper pyramid
2.1. We bend the figure, as shown in Figure 6 with a dotted line;
2.2. You should get a figure like in Figure 7;
2.3. We continue to bend the sheet of paper, also along the dotted line (Figure 8,9,10). - Pyramid assembly
3.1. We have ready-made modules, all we have to do is assemble the modules into a pyramid (Figure 11,12)
- Ready!
More paper pyramids


(There are two main types of pyramids: truncated and pointed. The latter can be closed - such as the Egyptian pyramids - or open, with a “emitter” at the top.
A similar type of pyramid is described by Carlos Castaneda - they were used by ancient magicians to “gather Power.” As for closed types, here the top serves as an outlet for a beam of energy, and it is not recommended to be on this path. It should be noted that a geopathogenic network is restored above the surface of a closed pyramid, therefore, to protect against it, one should use a pyramid designed by the Bulgarian Milev, the top of which is equipped with an antenna with a radiator of a certain shape. To protect against geopathogenic zones, he uses a structure based on the same Cheops pyramid. The only difference is from the top of the pyramid
a vertical antenna with a branched emitter emerges, which makes it possible to eliminate the effect of negative anomalies in the area around the pyramid.
The power of such a pyramid is very large: the radius of activity of a structure with a height of only 10-15 cm can reach 30 m, with the height of the favorable zone being at least 10 m. More accurately, the field of its activity can be determined using dowsing. When using such a pyramid, you should remember that it must be placed directly on the ground in order to avoid the possibility of a person getting into the negative part under the base. Typically, Milev's pyramid is made of metal wire.
As for the technique of making the pyramid itself, any model should be made based on the proportions of the Cheops pyramid: the length of the side of the base is 230.35 m, the height is 146.59 m. Thus, the ratio between these values is 1.572. At the same time, the triangle, which is the side face of the pyramid, has angles between the side
and base - 58°, angle at apex - 64°. The angle between the plane of the side face and the plane of the base in the Cheops pyramid is 5G52′.
A model of any pyramid can be built by reducing its linear dimensions by the same number of times.
Making a pyramid yourself is very easy. You need to cut out a 157 * 157 mm square from some hard material - cardboard, plywood or paper - and cover it with isosceles triangles 157 * 150 * 150 mm, converging at the apex. In this case, the angles at the base of the pyramid will be 58°, and at the top of the pyramid - 64°. All that remains is to make a stand inside the pyramid in such a way that it can be used to place objects at the level of one
a third of the height of the pyramid, counting from its base. Finally, the pyramid must be oriented using a compass to the cardinal points, so that its side faces are parallel to north and south.
The corners of the pyramid must be checked using a protractor, after which it is ready to perform its functions.
For economic and other purposes, which were mentioned earlier, you can build a plank, glass, plexiglass or other pyramid, keeping the indicated proportions, but increasing the dimensions themselves by the number of times you need. In large agricultural farms, industrial sites, etc., it is possible to make board “fungi” in the form of pyramids, a short rest in which will allow you to successfully combat fatigue.
Small pyramids made of paper have a short radius of action and it is enough to be located at a distance of at least 50-70 cm near them. With the help of such a pyramid, you can eliminate pain and bruise formation if you apply its base to the just bruised area for 2-3 minutes. You can also stop light bleeding from a cut in the same way.
If we are talking about a relatively large pyramid, in the upper part of which a person can be located, then it should be remembered that there are a number of serious medical contraindications (schizophrenia, cancer and a number of other diseases) that prevent one from staying in this zone. Therefore, it is necessary to first conduct a dowsing test or use rapid medical diagnostics using R. Voll’s method.
Thus, any pyramid design has a force of action, which is determined by the capture radius of the collection zone and the height of the cylindrical area favorable for humans. The active zone itself depends, firstly, on its size: the larger the pyramid, the greater the range of action, and, secondly, on the correct ratio of the lengths of the base and height: 1.572.
When putting a small homemade pyramid on your head, you should take into account the fact that the base of the pyramid will be located slightly below or at the level of the “third eye,” which breaks the energy flow. In this case, the personality is, as it were, deprived of the highest, divine principle and further functioning occurs at low levels.
Water placed in the pyramid is “charged” after some time and must be handled with care: if you drink such water, it will have the same effect as the active zone, and for a considerable time, so uncontrolled intake is unacceptable.
One of the most consistent scientists experimenting with pyramids in our country, Alexander Efimovich Golod, who has been involved in the practical use of the “pyramid effect” for more than ten years, in particular, warns: “Here’s something else that is important for those who build a pyramid to know: they should not have no dirty thoughts, the pyramid built by “bad” people is dangerous for others. “Communication” with this amazing structure requires a special state...
This kind of experimentation is becoming increasingly widespread. Romanian Mircea Sherban,
an economist by profession, he purifies tap water using a home pyramid he designed, made from ordinary copper wire. Its dimensions are taken as reduced proportions of the Cheops pyramid. He keeps a glass of ordinary water in his pyramid for 24 hours, after which, as laboratory studies have shown, the water receives an increased content of oxygen and phosphorus, and bacteria and other microorganisms almost completely disappear. Having fallen ill with a pulmonary infusion, he decided to completely abandon medications, testing the “pyramid water” on himself. After a few days, his lungs cleared and his fever and chest pain disappeared. According to his recipe, relatives and friends began to be treated with the same amazing effect: toxins came out, recovery occurred. The Romanian enthusiast himself does not try to explain the results obtained from a scientific point of view, however, according to him, he managed to save the daughter of a doctor he knew, who was in critical condition, using a similar method: after several “water” procedures, the patient got out of bed, she had an appetite, and there was no trace left of the serious illness...
And although Mircea Shcherban does not risk promising complete healing to everyone, he has already been invited to make a report at the Institute of Cosmic Fusion in the USA.
In another study, water aged two weeks under a pyramid was used daily as a facial lotion. Apart from water, no creams or rubs were required. After five weeks, the skin became elastic and youthful.
Watering plants with “pyramid water” also has a beneficial effect, increasing the amount of green mass and fruit yield. Excellent result
can be obtained by watering seedlings with such water when transplanting into the ground, and germinating seeds in this water. If you place a pyramid (base down) above each feeder, the animals get sick less, look better, and the cows increase their milk yield.
If you make a dog kennel in the shape of a pyramid, it will be good for both the dog and the adjacent plot of land - everything begins to grow better on it.
Pyramids are being built in the Swiss Alps, in the center of Paris... But, as is customary in Russia, we often do not notice our compatriots who are discovering new things, and, on the contrary, we admire foreign discoveries. In short, it has long been known: there is no prophet in his own country. But there are plenty of curious people.
Let us quote A. Golod again: “I think that they are trying to “correct” us earthlings with the help of this structure. In my opinion, the pyramid was based on a certain idea that was close to our moral principles, our moral ideal. We must have freedom of choice, freedom of thoughts, feelings and actions, and the pyramid helps a person through its information to move in the right direction. Perhaps the information contained in the pyramid returns a person to the state in which he was “conceived” and created. The man lived then for nine hundred years, knew no illnesses, and had a wonderful garden around him...”
Is it not this desire that drives enthusiasts of unraveling the mysteries of the pyramid?
The book by the Dutchman Paul Likens “Secrets of the Energy of the Pyramids” contains very detailed descriptions not only of the author’s own experiments proving the effectiveness of the pyramids, but also of methods for independently making pyramids for the home. First of all, you should clearly understand what kind of
the effect we want to get from installing the pyramid. If, for example, you decide, following the example of the author, to install it under your bed, then its height should be 1-2 cm lower than the base of the bed, and the material could well be ordinary cardboard.
When installing a pyramid in which a person can fit completely, its height should be approximately 3 m. At the same time, the very principle of making any pyramid remains the same. Let's say we decide to build a tetrahedral pyramid with a height of 20 cm. The initial value on which all other parameters depend is the height of the pyramid, i.e. the distance from the top to the center of the base.
For this pyramid you will need to cut out four isosceles triangles from cardboard. In our case, their base will be equal to: 20 cm (height of the pyramid) x 1.57075 (constant coefficient), which gives 31.415 cm or, rounded, 31.4 cm.
The sides of this triangle will be equal: 20 cm x x 1.4945 (constant coefficient), which gives 29.89 cm or, rounded, 29.9 cm.
Thus, only the height changes, but the basic numbers remain the same.
The author describes two ways to practically make a pyramid. First method (I): take a sheet of strong cardboard and draw a base line 31.4 cm long on it (from the example given). From a point located strictly in the middle of this line (“O”), using a drawing square, draw a vertical line 30 cm long. Then attach the ruler to the left extreme point of the base line and move the right end of the ruler upward until the mark coincides with the vertical “29.9” cm. Connect this point on the vertical to both ends of the base line. The result is an isosceles triangle, which should be cut out of cardboard and three more of the same should be made.
Now all that remains is to connect the three triangles so that their inclined sides touch, and connect the joints with adhesive tape. Then the pyramid is placed on the base and the fourth side is attached to it with adhesive tape.
The result is a pyramid that is an exact copy of the Cheops pyramid.
Second method (II): take a sheet of cardboard in the shape of a rectangle (length - 78.5 cm, width - 25.4 cm). From the bottom on the long side (as shown in the picture), measure 31.4 cm from left to right and again 31.4 cm. The same must be done on the top side, but start putting 31.4 cm on the right. Now all that remains is to connect points A and D, G and B, B and D, D and C, C and E, and cut out four triangles from cardboard.
If you need to use a more rigid material than cardboard, you should bevel the butt edges so that they stick together better.
Proposing another version of the pyramid, the conical one, the Dutch scientist Lykens notes that it was not for nothing that medieval magicians and astrologers wore cone-shaped caps. This type of pyramid is made simply: draw a circle on a sheet of selected material with a compass and cut it in half. Now you need to take one semicircle and fold it so that point A coincides with point B. By connecting the edges with adhesive tape, we get what we are looking for.
And the report of one newspaper that the owner of a financial firm in the United States has ordered his employees to wear... pyramid hats while working is not so fantastic! As reporters assured, the company's income tripled...
You can expect everything from this ancient miracle. For example, a purely technical effect to save gasoline. For this purpose, the same Likens installs a homemade pyramid 40 cm high directly above the gas tank in the trunk of his car so that the bottom field of the “virtual pyramid” is located 13.3 cm below the base of the real pyramid.
In this case, it will be located exactly in the center of the gas tank. The fact is that, according to Likens’ theory, above and below the real pyramid there is its virtual reflection, which looks like it is shown in the figure.
At the indicated position of the real pyramid, it is necessary to mix half a tank of “charged” gasoline with a new portion and leave it to “charge” for 72 hours, preferably not in a garage, but in an open parking lot.
Gasoline savings in this case, according to the author’s observations, reach 20%, which is quite easy to verify by repeating his experiment.
Among other experiments conducted by Likens, the previously mentioned effects of the pyramid are confirmed, such as improving the taste of water kept under the pyramid, removing dandruff and sweaty feet with its help, as well as removing wrinkles!
The effect of a pyramid without walls (a frame made according to the same rules) on plants is also interesting: the stems of plants are 35% longer than those of the control ones, and they also bloom much earlier.
According to the Dutchman's observations, water should be kept under the pyramid for 24 hours at a height of 2/3 of the total height of the pyramid. In this case, the vessel with water should occupy no more than 10% of the total volume of the pyramid.
As for sharpening razor blades, then, repeating the experiments of the Czech engineer Karel Drban, who back in 1948 managed to shave 200 times with one blade kept under a pyramid, Likens outdid the Czech, bringing this number to 260 times! At the same time, he oriented the blades under the pyramid strictly to the east and west.
Well, apparently A. Golod is right when he claims: “The pyramid has the ability to harmonize any substance. Crystals come to life in its energy field, and their stable parameters change according to the periodic law... For example, the growth of crystals is an informational phenomenon. At the physical level, the crystal will not change because it lies in the pyramid, but the information received by the substance from which the crystal is formed will undergo changes.
With the help of a pyramid, substances involved in physical and chemical processes can be equipped with information in a new way, and they will behave completely differently than before, that is, they will acquire new properties. Which? This needs to be studied, this is the technology of the future..."
And such studies are indeed being conducted, in particular, in St. Petersburg. Exploring the mystery of the origin of the pyramids, V. Babanin in his interesting book “Secrets of the Great Pyramids”, through very convincing reasoning, draws the following conclusion: “As is known, natural and artificial crystals grow independently in liquid, gaseous and even solid media. But the pyramids were built by human hands. This is how they differ from crystals. But how fundamental is this difference?.. Crystals are formed by periodically repeating blocks-cells of spatial
lattices, and in pyramids the crystal-like shapes are formed by blocks. Each cell in a crystal is a crystallization center, a crystalline nucleus. And in pyramids, almost all elements are of a crystalline nature... And, finally, the crystal has geometric shapes with faces, vertices, and edges. And the pyramids are no different from them in this regard. In general, it turns out that the pyramid is a model of a crystal capable of demonstrating its energetic properties.”
The significance of the pyramid shape has already been discussed. It should be noted here that the top of the pyramid focuses energy flows within itself, directing them out through the point of the top. Moreover, a pyramid with a square base has a very important property, working as a transformer and qualitatively changing the characteristics of subtle energies.
Karel Drban patented a paper pyramid with a base side of 157 mm, a height of 100 mm and a side edge length of 150 mm. All the corners in it coincided with the corners of the Cheops pyramid. This design is used for sharpening razor blades, for which it is first oriented so that the side of the base is parallel to the North-South line, and the blade on a special stand is placed in the upper third of the pyramid and is also located along the compass needle. This blade can be used up to seventy times.
The Bulgarian biolocator Ivan Milev uses a similar design to protect against the influence of geopathogenic zones, adding to it a vertical antenna with a branched emitter, which extends from the top of the pyramid. At the same time, the space around
the pyramid acquires positive characteristics and an energy region appears in the form of a vertical cylinder. Milev's pyramid is made of wire, its radius of action at a height of up to 15 cm is from 10 to 30 m, the height of the favorable zone is up to 10 m.
However, this type of pyramid can only be used for people who do not suffer from schizophrenia or psychopathy. In addition, approximately a fifth of people have a more subtle astral body compared to the energy of the pyramid, and for them this field will be rough. In this case, it is best to take advantage of the experience of specialists who can select strictly individual pyramids with the characteristics required by users.
The material from which the pyramid is made also plays a certain role. As I. Efimova, for example, who has been studying the influence of pyramids on the human body for many years, believes, pyramids carved from solid crystals (especially from diamond and rock crystal) can be very effective, and with the same other characteristics, the maximum radius of action, as already noted , will be for a golden pyramid, about three times less for a copper pyramid, and even less for structures made of other materials. Rounding out the row are dielectrics - substances that do not conduct electricity, and the weakest pyramids are made of paper.
It is also important how the pyramid is made: solid, hollow or framed.
Many people flock to Egypt to see the pyramids with their own eyes and touch them. They captivate the eye and fill the body with some kind of healing energy. Scientists around the world agreed that the pyramids are capable of exerting a healing and magical effect on the body. It has been proven that they harmonize energy, structure water, are able to preserve the freshness of food for a long time, and also rejuvenate people.
If you want to change the energy in your home, then a few tips on making paper yourself will help you. To make such a structure, you will need to calculate its proportions and strictly adhere to them when assembling.
To make a paper pyramid, you will need thick sheets or corrugated cardboard. This is due to the fact that it must be made from dielectric materials. First you need to draw four isosceles triangles on a sheet of cardboard. Remember that the base of each of them will be 460 mm, and the length of the side edges should be 439.5 mm.

So, how to make a paper pyramid? First you need to correctly draw the cardboard. Lay the sheet so that the corrugated strips are located not along the drawn triangles, but horizontally, that is, across. This arrangement will give the pyramid structure even greater rigidity. Now we carefully cut out our triangles, using a ruler, and trying to guide the knife so that it is located at an angle relative to the surface of the cardboard.
When you cut out the sides of your future pyramid, do not forget to make a small perpendicular cut. Then you need to step back two thirds of the thickness of the cardboard from the edge of the side edge and cut the paper using a ruler, but from the inside of the edge. Then you need to cut the corner to make a chamfer. Try to make it as smooth as possible.

Now we retreat 15 mm from the edge of each edge on the outside and draw a line with a pencil. This way we will mark the boundaries along which we will glue the tape connecting the parts of the pyramid. To cut out the connecting strips, you will need thick paper. They will be 30 mm wide each.
When the ribbons are ready, you need to fold them in half and cut off one of the edges on each. The cutting angle is 32 degrees. Next, we apply the tape, without unfolding it, to one edge of the edge of your pyramid along the fold line and glue it. Then we take the second half of the tape and glue it to the second edge.
The last step in finding the answer to the question of paper involves gluing all the remaining tapes with edges to combine into a common development of the pyramid parts. All that remains is to bend the edges at right angles in those places where there will be connections. Thus, we will make the base of the pyramid in the shape of an even square. Glue the extreme edges of the pyramid. Make sure that the bases of these faces are in the same plane.
A paper pyramid can be used either hollow or with a stand. To make it, you need to cut a square measuring 490x490 mm from two-layer corrugated cardboard. So you have learned how to make a paper pyramid.
 DIY brick foundation: strip and columnar
 How to lay parquet: methods, necessary tools and step-by-step process for proper installation
 How to lay parquet: methods, necessary tools and step-by-step process for proper installation