How to Align Walls
Most of the houses in our country were built, as they say "at the ambulance", and therefore builders did not bother the quality of their work strongly: the house was built, the deadlines were completed - everything is fine. The fact that the walls in such a house, to put it mildly, curves, builders were not interested. Yes, and by and large, the owners of the apartments did not particularly worry, they were glad new, and even more so free, apartment. Now, when there are beautiful repairs in fashion, the question of the alignment of the walls has become the most painful and without this process is not a single repair.
We do not deny, you can make repairs and without alignment of the walls, but in this case, be prepared for flaws that can be visible even with a naked eye. If you want to make high-quality repairs in your apartment, then the alignment of the walls is simply necessary.
Better to level the walls
To date, there are two most common ways of alignment of walls:
By mounting structures;
With building mixtures.
Consider the advantages and disadvantages of both ways, as well as how much is the best way to apply in one situation or another.
Alignment of walls by mounting structures, as a rule, is carried out using drywall. Thanks to the plasterboard, you will be unnecessary to spend a lot of strength on alignment, you can hide communication, significant irregularities and errors of the construction, but thereby the useful area will be slightly reduced. It is worth using drywall when you have very curved walls or you want to quickly solve this problem.
The mixtures for alignment of the walls do not take the useful area of \u200b\u200bthe apartment, are a better level of alignment, but require a lot of physical costs. Excellent suitable for alignment of walls of residential rooms: hall, bedroom, corridor.
About how to align the walls with your own hands, we will tell you below.
Many of us are mistaken in the concept of "wall alignment", puzzled with its level alignment. The alignment of the walls is the leveling of the entire wall area, and the alignment of the surface is the production of a smooth plane. These are completely different concepts. Therefore, before prepare the walls to repair, it is necessary to take into account this difference.
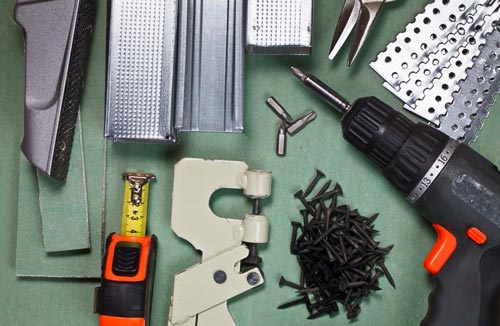
How to align the walls with plasterboard
To align the walls of the walls, we need a plasterboard:
Plasterboard;
Metallic profile;
Suspension;
Metal screws;
Self-tapping screws on plasterboard
Serpenta;
Grinding and grinding;
Putty;
Level.
Before sowing the walls of plasterton, you need to process the first primer. This needs to be done in order to exclude the appearance of the fungus on the wall. If you cover the plasterboard with a brick wall, which goes outside, then be sure to close the seams between bricks using a cement solution.
After the wall is prepared, it is retreating it with 5 centimeters and with the help of a dowel-nail rose-to-gun guide profile, then at the same distance from the wall kpripim the guide profile above. In this case, the exact distance from the wall is determined using a level by taking the guide bottom profile. With the help of these guides, the further framework for fastening the plasterboard will be built.
Next, on the wall, fasten the suspension at a distance of 50-60cm from each other, with the help of them we will be attached to the wall profiles themselves. Before conspiring the profile to the suspensions, check the evenness of its position using a level, and then they fix it to the suspension by self-drawing. The wall profile should be included in the rails of the upper and lower guide. The distance between the profiles should be exactly 60cm, since the standard width of the shepherd sheet 120cm, then the sheets of sheets must come to the middle of the profile. As a result of non-good calculations, you probably define the question that there will be an excess profile in the middle of the sheet. Yes, truly in the middle of the sheet will be a profile, but it is far from extra, as we need to fasten the middle of the leaf of plasterboard, for strength and reliability of the structure. After you have built a design for drywall, proceed directly to the fastening of sheets.
Fresh sheets with special self-samples for drywall, so that the hat is entirely in the sheet. The distance between the self-pressing should be no more than 20 cm. The standard length of the drywall is 250cm, if the ceiling height in your apartment is more than 250cm, then the sheets must be fixed in the disintegration, that is, the first sheet is fed by floor, and the next ceiling and then the same Just alternate them. Under the unclosed areas, cut the corresponding size of the slices of drywall and secure them to the design.
Now we proceed to the trim of plasterboard. The first thing we do - we embrace the seams of plasterboard sheets. First you need to brand the seams and give them to dry. Then, along all the seams, we stick a self-adhesive sulfyan. It must be done in order not to crack on the shocks of sheets.
Now we go to the shplotovka of the walls, for this we breed the putty in the proportions indicated on the packaging, conventional water temperature. With the help of a large spatula, we applied the shtlock on the seams, and with the help of a small one, we close the holes from the screws. The layer of the putty should be very thin. When the work on the shtclovania was fulfilled and the shplanke dried it is necessary to sand with a grinder and grinding to smooth out all the irregularities. Upon completion of the sand, we applied a thin layer of the finish shtlock on the seams.
The final stage of work is a complete primer of the walls of plasterboard.
![]()
Now we will tire a more acceptable option of the insulation of the walls - with the help of plaster. To begin with, we need to analyze the curvature of the walls and the presence of inclination. To do this, we will need a level or plumb. Find the most extreme and deepest point on the wall. Now, analyze which layer of plaster you will need to put on the wall to go to the level of the highest point. If the most extreme point takes a small area, and the wall itself is smooth, then it may make sense with the help of a perforator, to knock down the uneven plot and then simply sharpen the wall, thereby saving the means and time to align. If the wall alignment requires a more serious solution, that is, 2 options: if the wall has minor irregularities, then it must be aligned with a putty; If the wall goes into any side, it has significant irregularities or does not have any finishes at all ("naked" brick wall) - then it is necessary to align it with a cement mixture. Below we will tell you how to alone the walls in the first and in the second case.
How to align the walls of plaster
To align the wall with plaster, we will need:
Primer;
Plaster;
Level;
Spatulas.
First of all, we need to prepare the wall to align. To do this, we need to get rid of old wallpapers, paints and other finishing materials - we must get a "naked" wall. Make a disassembly of sockets, while well insulate the wires and hide them inside the box. When the wall is ready to go to its priming.
Grounding of walls, before alignment, is made so that the plaster reliably fixes on the wall surface and eliminated the appearance of mold and fungus. The primer is best to apply on the wall using a roller, and in hard-to-reach places, for convenience, use the tassel. If work is performed in the summer, it is possible that the primer will quickly dry, in which case it must be applied in several layers. After the wall dried, proceed to applying the layer of plaster.
It is worth noting one, a very important point. There are 2 ways to apply plaster on the wall:
First method: You align the irregularities of the wall in one layer;
The second method: Apply the plaster in a few thin layers, with each subsequent layer separately drunk.
The first method is the easiest and does not require excessive costs, but the second method is the highest quality and reliable. We will stop your attention in the second way, which describes in detail below.
In order to stir the mixture, we need: bucket, water and drill with a nozzle for stamping dry mixture. About what proportions need to stir the mixture will be written on its packaging.
As a rule, we will have to manage 3 layers of applying plaster to completely align the wall. If there is irregularities, small pits, grooves, recesses, and the like, then applied the so-called zero layer to get rid of these flaws. Before you begin to put the plaster, you must first check the wall and know its structure: in what places it acts, and in which it flows. We need it in order to navigate in which places and what layer of plaster to apply.
With the help of the first layer, we try to have plaster in such a way as to maximize the level of uneven places. To apply plaster on the wall Take a wide spatula and apply an edge on it, a second spatula, plaster and smooth, rounded movements we apply a mixture on the wall, smearing and rubbing it. If necessary, on the in-depth sections of the wall, we add a thin spatula, but it is necessary to rub it wide.
Thus, after the first applying plaster, we must get rid of irregularities and recesses. When the plaster is dry, we apply a layer of primer on the wall. When the wall treated with the primer dried, we applied the second layer of plaster, which should hide the entire wall under it, eliminating all the irregularities available on it. Then, on the second layer of plaster we apply primer and wait until it dries. Next, we cover the wall with a layer of putty, about how to do it correctly we will tell a little lower, but as long as we will tell you about the promised alignment of the walls with a cement mixture.
Alignment of walls with cement
As we already talked, we use the cement screed in the event that our wall goes into any side or does not have any finishes at all. In the first case, we will exhaust the wall in such a way as to bring the depression to the level of bulge and cover it with a whole solution, in the second case, simply apply the screed layer on the wall.
To do this, we need:
Rail guides;
Level;
Cement mix;
Putty knife;
Rule;
Master OK.
As in previous cases, be sure to drive the wall and only after that begin to align it.
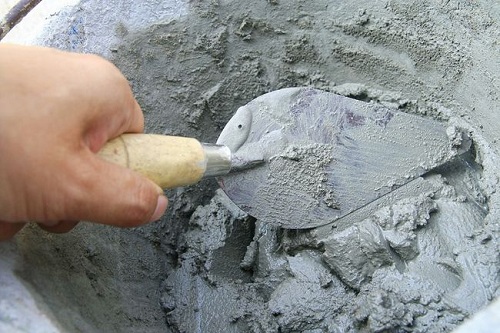
Before you begin to the main stage of the robot, count with the help of the level, which should be a layer of the mixture to align the wall. To do this, at the maximum point, attach the level and retreat it for 2-3 centimeters - it is in such a position that the so-called lighthouses should be installed in the form of guide rails. Due to the beacons, we will control the amount of the mixture of the mixture to align the surface.
Preparation of the mixture strictly according to the instructions. Next, with the help of a trowel, from top to bottom, at a distance of 20 centimeters with slaps we apply the cement on which lighthouses will be held. Give out other lighthouses at a distance of one meter from each other. It is very important to set the lighthouses correctly until the mixture has dried, otherwise you have to do everything again. When you strengthened all the lighthouses along the whole wall, check their evenness, both vertically and horizontally. If there are irregularities, we gently customize the rails by level. In case of installation of beacons at a distance of more than three centimeters, the mixture can start flush along the wall or crack, so once again we remind you about the need to properly install beacons. Then we give a mixture on which lighthouses are fixed, dry (for this you will need approximately 5 hours).
When the mixture is dried, and they are securely fixed, proceed to applying a cement mixture onto the wall, in a mixture of it. Cement must be thrown onto the wall in such a way that it fill in all the recesses and other irregularities on the wall. The level of the adhesive mixture should perform 2-3 millimeters from the level of beacons, it is necessary for alignment. When the first row is reserved, we press the rule to the beacons and lead it upwards up the beacons, thereby getting a smooth and smooth surface. Excess the mixture believes and send in a bucket with a diluted mixture. If there will be no mixture on the surface in some places, then apply it with a spatula and align the rule. When the first strip dried a little, proceed to applying the mixture to the second row and so on.
Before finishing, with the help of a putty, the wall must completely dry for 7-10 days, depending on the room temperature.
How to align the walls in the bathroom and in the kitchen
In view of the fact that both in the kitchen and in the bathroom is often humid, then align them best with a cement mixture, and in no case is not plasterboard and not plaster. Directly the alignment principle itself is the same as the alignment of plaster.
The only thing worth noting is that with a slight irregularity of the wall, if you put the tile, then make the alignment directly at the time of laying the tile, causing a slightly larger layer of adhesive mixture to uneven areas.
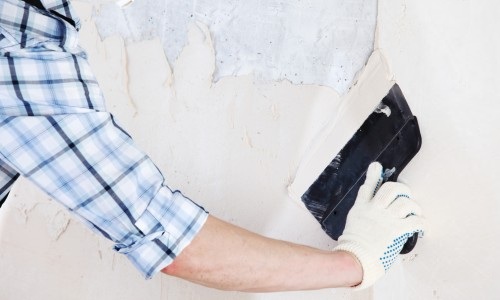
Alignment and decoration of walls with a putty
How to align the walls under the wallpaper and under painting
As mentioned earlier, with the help of the shtlock, the wall surface is aligned and prepared. The thickness of the putty layer should not exceed 2 millimeters, otherwise it can crack. Alignment of the plaster itself not to be done, only alignment of the surface. Thanks to its structure, the shp can with ease of passionate, bringing it to perfect smoothness and evenness.
How to align the corners of the walls
In order to align the external corners of the walls, use special metal perforated squares. For this, along the entire length of the angle, from the 2nd sides, we apply a thin layer of plaster mixture and superimposed the coal from above. With a spatula with a hide with ribbon, under the layer of the mixture, having achieved a flat and smooth surface.
How to lift the walls in a wooden house
You can align the surface of the Wooden House wall with the help of a flexible card, but at the same time consult with a specialist.
If the wall of a wooden house goes into one of the sides or bent, then for this we find the point of deviation and using wooden beams and clamps we guide it in the desired side.
How to align the walls video
For clarity, all that we told you above, below we added a video, which describes the alignment of the walls.
 Facade design of a country house: a variety of stylistic directions
 Wooden ceilings - 25 interior examples
 How to make a children's game lick with your own hands