Do-it-yourself apartment renovation: where to start and the main stages of project implementation (100 photos). Quick and inexpensive do-it-yourself home repairs Do-it-yourself home repairs
It’s rather stupid to invest in a big renovation at the dacha: we live there for several months at most, and even then - on short visits; the room is unheated, temperature fluctuations are inevitable in winter - neither normal decoration nor furniture can endure such mockery. On the other hand, the soul asks for beauty: what kind of cottage is this if it does not please the eye. Let's see what can be ways to quickly and inexpensively make summer cottage repairs.
Leave as is?
If you have a house made of timber - consider yourself lucky: you can not finish such walls at all. A tree in any healthy state has a chic “finish” appearance. The key word is healthy: no one has canceled fire and bioprotection. Treat the timber twice with an antiseptic (with breaks according to the instructions), and cover it with a colorless matte varnish on top - so that the dirt does not eat in and the sun does not sting.
Photo from Houzz.ru, author
To enhance the comfort of wood finishes. New curtains, covers, bedspreads are the easiest way to quickly transform the interior of a country house. Please note that the wooden background is quite active, so it is better to choose contrasting fabric colors: light wood - bright textiles, dark or medium intensity - light. Over time, the timber will begin to darken naturally - it will be possible to return the original color only with the help of grinding.
We paint timber, lining ...
Timber - for this there are paints, varnishes, waxes and stains.
Photo from Houzz.ru, author
They differ in composition (the most environmentally friendly - based on water and natural oils) and hiding power - that is, the degree of transparency. If you want to give color to the tree, but leave the texture - choose a translucent paint. For the street side of the wall, you should prefer elastic paints that are not afraid of temperature changes - alkyd, oil, and for the inside - breathable water-dispersion (more resistant) or water-based (cheaper). Better, of course, moisture resistant, with an antifungal component. It makes sense to spend money on silicate or silicone only in conditions of high humidity.
Before painting, prime the wood well - so the paint will go less (the primer will not allow it to be deeply absorbed) and the tan spots will not come out.
Advice: if your home smells desperately of dampness, and indeed your climate is humid, postpone painting work. First, the house should be dried, otherwise the result of painting is unpredictable. Heat guns and building hair dryers do a good job of drying. It is absolutely pointless to paint over pockets of mold or rot - the fungus will continue to destroy the walls and floor! The mold must be removed mechanically, the wood dried, sanded with sandpaper, treated with an antiseptic - and only then painted.
... and brick
A brick wall painted with a water-based emulsion is not only a fashionable element that came to us from loft-style interiors, but also thousands of rubles of savings on plaster and plasterers.
Photo from Houzz.ru, author
The invoice is there
OSP panels are also a fashionable element of decoration today. More precisely, it has been fashionable for many years, but now it has been decided not to hide the slabs made from wood chips. So if you did not have time to paste over them with wallpaper - and do not.
Photo from Houzz.ru, author All OSP panels retain heat well in the house, but some are afraid of moisture. For “damp” rooms, it is worth choosing plates of OSB-3 or OSB-4 classes. For interior work in dry rooms, cheaper “one” and “two” will fit.
We paint on plaster
Plastered walls (plasterboard-lined or plywood-lined) can also be painted; the cheapest is acrylic water-based paint.In order for the paint to adhere well to the surface, do not skimp on the primer. No primer - walls can be washed with water and detergent to remove dust and grease.
If there are small cracks on the wall, and there is neither time nor desire to putty, you can choose paint with latex filler - it hides cracks up to 2 mm. By the way, in small areas (for example, part of a wall), a brush is more profitable than a roller, and on large areas, on the contrary, a roller uses less paint per square meter.
Advice: do not be afraid of the “impractical” - firstly, this is the cheapest paint, and secondly, on a white background, any bright object (for example, painted cans or an old tray, as in the photo) will look like designer decor. And next spring, you can repaint.
Wallpaper: remove or leave?
Old wallpaper starting to peel off? Do not rush to rip them off the walls, assess the scale of the disaster. Spruces fall off with canvases - there is nothing to save, but if we are talking about several joints or corners - it is more profitable to glue them. little trick: add a little PVA glue to the wallpaper glue (about 1: 6) - the canvas will hold on tighter.Another situation: the wallpaper fell off, but there were areas glued tightly - thoroughly iron them through a wet cloth with an iron. After that, they can be scraped off.
Advice: in order to hide stains on the wallpaper, they produce special stickers in the form of birds, butterflies, airplanes, and the like.
Choosing a wallpaper
Wallpaper - the most budget version of the finish for a country house.Surely you have scraps left after repairs in the apartment in your pantry. The rest can be found with friends. So it's possible paste over the wall in the style of "patchwork"- either in assorted "panels", as in this photo, or in rectangular pieces - as in the next one. Thus, it is better to decorate only one wall in the room - the decor comes out too rich. Paint the rest of the walls a neutral color. If you don’t want to mess with paint, pick up a couple of matching wallpaper colors and alternate them.
Advice: in specialized stores there are baskets with sale wallpaper - as a rule, these are the remains of collections, one or two rolls. They cost pennies. Choose and combine by color and texture.
Since our goal is to save money, the temptation is great to choose cheap paper wallpaper. This can be done if you are satisfied with repairs for one or two seasons. Paper quickly burns out from sunlight, gets dirty, absorbs moisture. Yes, and gluing such a coating is the worst thing: a little overexposed glue - it breaks. If we take paper wallpapers, then two-layer ones - they are not much more expensive than single-layer ones, but twice as strong.
However, the trick is that for giving it just makes sense to purchase good vinyl wallpaper. You'll probably only need a few, so don't spend too much - especially if you pick up the leftovers. But vinyl can be safely washed, it is much more durable than paper and, as a rule, looks much more beautiful. In addition, thick vinyl wallpaper with an embossed texture will relieve you of the need to level the walls. On thin ones, every flaw will be visible.
If you want to save money - do not choose wallpaper with a large pattern: there will be more waste. Budget print - small and abstract. You can do without waste with wallpaper in a vertical strip.
Painting wallpaper
Wallpaper for painting they will cost less than usual (at a price per square meter), but most importantly, they will forgive the flaws of an unsuccessful docking: everything will be painted over. If the budget allows, choose non-woven vinyl wallpapers: although they are more expensive than paper-based counterparts, they hold better, stick easier and do not warp. In addition, dense interlining will hide small irregularities on the wall. The most expensive and durable wallpapers for painting are fiberglass and fiberglass. These are materials for perfectionists.Advice: it is desirable that vinyl wallpapers be of well-known (preferably European) brands - this is a guarantee that the polymer coating is made with pores. Cheap vinyl wallpapers do not “breathe”, so condensation can accumulate under them, preparing the ground for the invasion of the fungus.
With the world on tiles
Remaining tiles are also suitable for laying out a spectacular patchwork wall.And if you still have a box of tile scraps, beat them into small pieces and lay out the mosaic.
Wall newspapers, wall books and wall cards
Instead of wallpaper, you can use newspaper strips - we glue them like a regular paper coating, but cover them with a colorless varnish on top.The advantage of such a finish is that over time it will only look more interesting, and in a hundred years it will be possible to lead excursions here.
As wallpaper, you can use old geographical maps ...
... and even book pages. The latter is not a very fast way to decorate walls, but it looks impressive.
Film analogue
Self-adhesive film is a finishing material that has not taken root in our area, quite suitable for a lively summer cottage interior.wall of joy
If you know about the slate paint that is fashionable today, most likely you have already painted something in the apartment with it, and half a can of paint is idle. Make a wall-board in a country house - both children and adults will like to draw on it.happy metal
A pair of perforated metal sheets is not only a convenient system for storing frying pans in the country, but also an excellent finishing materialAnd roofing corrugated board is the easiest way to veneer a country bathroom. Neither water is terrible for him (the material has an anti-corrosion coating), nor frost. It will last at least half a century. Available in different colors, but you can paint yourself.
Photo from Houzz.ru, author So that a fungus does not register between a sheet of corrugated board and a wall, it is worth choosing a coated material on which condensate does not collect. In addition, at the beginning of the season, it makes sense to unscrew the screws, remove the corrugated board and dry the corners thoroughly with a building hair dryer.
Other budget material - plastic panels. They are also not afraid of humidity and temperature changes, easy to install. Standard size - 270 x 25 cm.
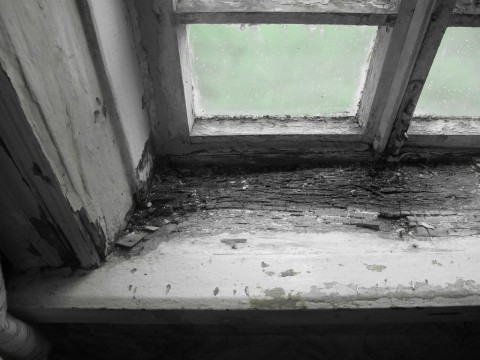
This is how it looked before the repair... Wooden rotten frames, closed from the outside with a double film, from cold and wind... To the left is an old veranda with a sagging porch canopy...
For those who have to do repairs in their home, it seems ...
These were the windows and window sills.
We began to put the house in order from the foundation.

We open the corners of the house one by one, remove the rotten logs of the crowns with a chainsaw, put up the formwork, lay large stones and rubble, lay the reinforcement so that its ends remain open (for subsequent fastening it with the flood foundation), wrap the crown log with roofing felt and fill it with concrete. finished cabinet.

And so all four corners of the house and its middle, along the perimeter. Total - 8 pedestals. The process is time-consuming, difficult, but the result is worth it ... When the pedestals were finished, we made a mound around the entire perimeter. The continuation of the outdoor work was postponed to the next summer. We've been renovating our home...
It's a big room and let's start there. It looked like this before the renovation:

This is her right corner ... and this, in the photo below, is the left corner. In the process of writing the topic, I will stick to these two angles...


First, all layers of old wallpaper were completely torn off. The windows were still old, but we were already waiting for the masters to install plastic windows.
The old stove was dismantled ... and the stove maker folded a new one.


AND THE RESULT DID NOT KEEP IT LONG TO WAIT ... I decided to close one window completely and make one big one - there will be a dining room.


After installing the windows, the men began to dismantle the old floor, level the logs and put brick pedestals under them...

Then they laid the floors with old boards (they will serve for a very long time, as they are thick and dry), and in places where they were rotten, they were replaced with new boards.

I installed a metal-profile frame for the walls and ceiling ... my mistake was that you first need to make the ceiling, and then the walls, and not vice versa. I found the technique for performing these works on the Internet, I will not dwell on it in detail. If you have If you have any questions, I'll be happy to answer what I know...

Mounting the frame on the ceiling is much more difficult, the neck hurts ...

When the metal frame is completely ready, you can sew plasterboard to it, preferably in a checkerboard pattern, starting from the ceiling! Do not forget to scatter the electrical wiring and hide it in the corrugated channel, behind the profile, and install the distribution boxes in a place convenient for you.

When all the walls and ceiling are sheathed with plasterboard, we putty with a spatula and level all the joints between the sheets and the places where the screws are screwed in with this composition ...

We lay a reinforced mesh at the corners and seams for the strength of the joints, and after everything is dry, we sand it, apply a primer on the walls and ceiling.
And now the most interesting moment - wallpapering. I took white vinyl for the ceiling and with delicate roses for the walls...

invited a team of craftsmen to finish their work in this room on the windows (slopes and window sills).

After that, I glued the ceiling plinth, hung the shelves on the wall, put my flowers on the window sills, which the guys from the company had already installed for us ...


The carpenter helped put the interior door in place, only then I found out that it was upside down ... (what's the difference!) If only it functioned normally ...

I pasted the doorways with a white corner on a liquid nail.

I put a substrate on the subfloor, then fiberboard and linoleum. Then I screwed the floor plinths with self-tapping screws and voila-beauty !!!

As for this big room...
Some of you wanted to see in more detail about concrete bollards, so I added details ... So, the layer of windows was inserted, the house was sheathed with flat slate from the outside and a blockage was made around the house, until next summer ...
Now let's move on to outdoor work, after the cold winter and spring...next summer.
When all the cabinets are ready, gradually, opening each side of the house from the blockage, we remove the rotten logs of the lower crown, dry, wrap it with waterproofing,

we install the formwork, lay the reinforcement, connecting it with the ends of the reinforcement of the corner bollards and pour concrete ...


On the finished foundation we make brickwork ...

We all work!!!

And as expected, a blind area was made ... not quite ordinary ...


This is all about outdoor work, home renovation. If you have any questions, feel free to ask, I'll be happy to answer. And everyone who is interested is waiting for the continuation of the internal repair-dining room!
Unlike the owners of city apartments, where repairs are limited to internal work, the owners of summer cottages and private houses must take care of the condition of the roof, facades, foundations and external communications. Timely detection and elimination of damage can extend the life of buildings, but requires regular financial investments. To save money, many people prefer to do a complete or partial repair of a private house or cottage with their own hands, without resorting to specialists. Where to start and how to get the desired result with minimal cost?
Inspection and analysis
First, a thorough inspection of the building from the inside and outside is carried out, the electrical wiring and existing engineering systems are checked and the identified damage is fixed. Then determine the nature of the repair, taking into account:
- financial opportunities;
- the degree of destruction and the type of malfunction;
- having the necessary skills.
The timing of the work is also an important factor. For example, in the summer it is advisable to repair the roof or put the heating in order, and interior decoration during space heating can be done in late autumn or winter. Depending on the complexity of the repair is:
- Capital. In this case, they replace window and door blocks, roofs, utilities, dismantle old and lay new floor coverings, restore the foundation, finish and insulate the facade,
- Cosmetic. It is limited to the elimination of minor damage and decoration of the premises.
With limited financial resources, it is advisable to make repairs in a combined-type cottage. It includes urgent capital works and interior and exterior finishes and will cost relatively inexpensive.

Purchase of materials
Having decided on the type of repair, they select materials, calculate their quantity and make a list of necessary tools and fixtures.
You can refresh the facades of a wooden house with an acrylic or latex coating, the cost of which varies from 3,000 rubles to 13,000 rubles per 10 liters. This will not only protect the surface from the negative effects of climate, but also preserve the texture of the wood.
Buildings made of rounded logs or timber are treated with impregnations, sealing all the seams and gaps between the crowns with jute fiber, linen. Or a polymer-based sealant.

Finishing the exterior walls of a cottage made of blocks or bricks is done using acrylic or silicone paint for outdoor use. At the same time, do not neglect the primer: it additionally protects the facade, improves its adhesion and reduces the consumption of the finishing coating.
Other options for facing external walls and their cost are shown in the table.
For additional protection against the penetration of cold, the roof and external surfaces of the house are insulated with mineral wool, polystyrene foam or sprayed polyurethane foam.
outdoor work
When carrying out a complete or partial overhaul of a private house, the list of actions is determined according to the type of damaged element and the degree of reconstruction required.
Foundation
With small defects in the base, it is strengthened with the help of additional masonry at the place of deformation. If the foundation has visible destruction around the entire perimeter, then it is performed as follows:
- clean the surface of contaminants;
- dig a trench along the base;
- reinforce the structure with anchors and metal mesh;
- construct formwork;
- pour concrete solution.

After curing, the surface of the foundation is covered with silicate-based compositions or lined with various materials.
Roof
Breaks or rotten sections of the truss system are eliminated using a suitable piece of board or timber. To keep wood and fasteners longer in their original form, they are treated with special protective agents. Further repairs depend on the type of roof, which happens:
- Metallic. For small scratches or defects, silicone putty is used, and in the case of significant deformation, the sheet is removed and a new one is fixed with screws.
- Cement-sand or ceramic. The damaged plate is removed, the surface is cleaned of old putty, the whole element is laid and the joints are filled with a fresh solution of sand, lime and tow.
- In the form of a flexible tile. If there are leaks due to the displacement of the sheets, they are updated or laid again, carefully fixed with adhesive or nails.


If necessary, in damaged areas, not only the roofing is replaced, but also other structural details.
Communications
Elimination of damage to engineering networks or their replacement are technically complex operations that require special skills, especially if the plumbing or heating system is made of metal pipes.

It is much easier to work with metal-plastic or polymer, and both special equipment and shaped elements can be used to connect them.
Interior decoration
When repairing a cottage inside, you should first pay attention to the condition of the floor. Rotten logs are replaced by pre-treating the wood with a protective compound. The deformed sections of the laminate or parquet board can be easily removed due to the special design. Natural wood floors are more labor-intensive: to remove the damaged floorboard, you need to carefully loosen the fasteners with a nail puller. The gaps between the boards are filled with putty or a synthetic cord impregnated with PVA glue.

Wall repair technology depends on the materials used. If wallpaper was used, then it is enough to glue them in the corners of the room and at the joints of the walls with the ceiling. In case of significant damage, it is advisable to purchase new ones, picking them up taking into account the interior design. To refresh panels made of wood and its derivatives, you will need putty to repair scratches and dents and various paint and varnish coatings.

Usually in the country, the ceiling has a simple design and is made of plywood, fiberboard and other panels of this type. When they are deformed, it is necessary to cut out the damaged area and fix the sheet of the desired size without defects. As a finish, wallpaper for painting, various paintwork, decorative foam boards and other materials are used. The color scheme can be any, but it is better to give preference to pastel colors. An interesting effect is obtained in the presence of open beams: painted in dark shades against a white surface, they visually increase the height of the rooms.
decoration
Sometimes the premises in the country house require some updating, which is easy to arrange using design techniques. Bright curtains and furniture covers, handmade pillows and blankets, self-woven rugs - and the rooms will sparkle with fresh colors. Carefully selected accessories will be the finishing touch to the formation of the interior, and competent lighting will visually transform the surrounding space.
Stylish, comfortable and cozy kitchen - every housewife's dream. Using various methods of decorating, you can even transform old furniture into an art object.
To make it comfortable and beautiful in a country house or in a private house, significant amounts are not always needed. Sometimes it’s enough to give free rein to your imagination and make a little effort.
Have you bought a new home or do you already have an existing home in need of renovation? Each of us knows that repair is a useful, but very lengthy procedure. It must be approached responsibly and conscientiously. Yes, and it’s definitely impossible to rush in this matter, because any defect can lead to irreversible consequences, which can, after a while, force you to carry out repairs again. But you want the repair to go quickly, efficiently and painlessly. Everything will be so only if you take the time and approach this issue with all seriousness, select the desired design and carefully make all the calculations.
Do-it-yourself repair private house
Where to begin do-it-yourself repair private house? First of all, you need to decide what kind of repair your home needs. And this can be determined only after a qualitative inspection of the premises.
As for private houses, it is imperative to look at the foundation of the premises at the very beginning. After all, the fate of your future home depends on its condition. At the slightest damage, you need to do-it-yourself house foundation repair. This may be a surface reinforcement of the foundation, or it may require a complete replacement. It all depends on his condition. The cost will depend on the type of work. Only after the foundation has been inspected and brought into proper condition, you can proceed to other types of work.

If you are interested in the question: "?", Then carefully read our article, in which we will reveal the sequence of work in a private house. After repairing the foundation, you need to carefully inspect the walls and roof of your private house. If the walls and roof leak, all internal repairs will be in vain, the wallpaper may fall behind, stains will remain on the walls or ceiling. And these are only the best variations of the consequences after the building gets wet. If necessary, you need to strengthen the walls and replace the tiles.

Private houses are usually colder than apartments in high-rise buildings. Therefore, you can not do without additional insulation of the building. First of all, it is necessary. Insulation in this case, not only will not let the cold into the house, but will also serve as an additional reinforcement. As we know, the roof of any house is subject to the greatest load and, accordingly, the greatest impact from the environment, therefore it is through the roof that the most cold air enters the house. This suggests that the ceiling and roof need insulation the most.

In addition to roof insulation, you will need and. In private houses and apartments on the first floor, moisture and cold come out from the ground and foundation. It will be very cold to walk on such a floor, and in the cold season a feeling of dampness may also appear. And after all, a wide variety of diseases can appear from frozen feet. Therefore, you should not delay with floor insulation, especially if small children live in the house, who love to crawl and lie on the floor.

You shouldn't give up either. Warming can be carried out both from the inside and from the outside. It is very difficult to judge which option is better. The only plus in the direction of external insulation is that it is carried out from the outside of the building and, accordingly, does not eat up the useful area of \u200b\u200bthe house. Therefore, it is better to focus on insulation from the outside of the building, especially if your house is not large. In this case, it is better to save square meters.
With the general repair of the house, the issue has been resolved, all internal types of work have been completed, now you can safely carry out do-it-yourself home renovation from within. The issue of repair is not easy, especially when a lot of effort, time and material resources have already been spent on the previous stages. But, most often, internal repairs are indispensable. How to start building renovations?
First you need to decide what type of repair you need: major or cosmetic? From the choice of the type of repair will be not only the total cost of the work, but also the time for their implementation. Redecoration is much simpler in terms of the type and amount of work required, and accordingly it is cheaper. This type of repair is a complete replacement of the interior decoration. That is, the old wallpaper, paint and other things are removed, the walls are plastered, prepared for a new finish. At the next stage, new wallpapers are glued, walls are painted, tiles are glued, and so on. If necessary, the flooring can also be replaced.

In the case of a major overhaul, everything is much more complicated. Here, it may already be necessary to replace the electrical wiring, air conditioning and ventilation systems, as well as sewage. Agree, the task is not easy, and even quite expensive. In addition, it will take a lot of time and nerves to replace all the equipment for normal life. Therefore, thinking about a major overhaul, immediately set yourself up for a lot of problems. Unfortunately, they cannot be avoided. Therefore, if you are just about to purchase a new home for your family, carefully review the condition of the house. Believe me, if the wallpaper peeled off the walls - it's not so scary than if the sewerage system in the house has worn out over time.
Starting to repair, almost each of us tries to save money. But, as they say: a miser pays twice. This applies to several stages of repair, on which it is definitely not worth saving. In some cases, savings will not affect the condition of the house and interior decoration, while in others it will result in irreversible consequences. So what is not worth saving when doing repairs?

Let's start with the fact that you do not need to save on the main building materials, which are the main responsibility. Among such materials, it is worth noting paint, putty, plaster and primer. Agree, it’s much easier to replace the wallpaper than to do a complete interior decoration if the plaster or putty starts to peel off? Therefore, we suggest that you better save on wallpaper by choosing not too expensive models. Wallpapers simpler and cheaper do not always last less or do not look so bright. If there is a taste, then it is possible to perform interior decoration with fairly cheap wallpaper, which will look an order of magnitude better than decorating the room with expensive and better wallpaper.

It is extremely important to purchase only expensive and high-quality plumbing items, which include pipes and all possible connections. This is especially true for those who are going to hide the pipes inside the walls. In the event that a pipe bursts from high pressure and poor quality, you will have to break the wall to find the problem, fix it, and then re-do the finishing work. But you can immediately choose high-quality pipes, the condition of which you can not worry about for a long time.
Wiring is also not a component of the house that could be saved on. Many people often use aluminum wires as wiring. But in fact, they are not so high quality and durable. Copper wires are considered much better, however, they are much more expensive. But, it's definitely not worth saving on them. In addition to wires, it does not hurt to purchase good quality protective devices that protect the building from voltage surges, as well as on the number of machines installed in the switchboard.

Do-it-yourself home repair video includes not only repair work of the foundation, roof, walls, replacement of wiring and pipes, as well as strengthening of floors. Repair is also a high-quality interior decoration of the premises, which is assigned no less important task than the building itself. Your home should bring you the pleasure of staying in it, give positive emotions and cheer you up. Having once spent a lot of money and time on repairs, you should not remember about it for many more years.
The interior space of the house should be cozy and comfortable for the household. Each room should be decorated in accordance with the purpose of the room, the location and wishes of the one who will constantly be in it. Design options have become even more recent. There are so many modern styles that it is very difficult to single out among them the one that is most suitable for decorating the rooms of a private house. Each is good in its own way, has its own advantages and disadvantages. Therefore, you should choose only according to your personal considerations and preferences. If you are more attracted by homeliness, warmth and comfort, then you should opt for a classic or country style. These two directions will bring to the atmosphere of the room all those components that you have long dreamed of. The classic has been loved by everyone for more than one century, and will remain popular for the same period. Therefore, choosing a classic style, you definitely will not lose.

Country also attracts with its cute, homely atmosphere. Many attribute this style to the countryside. The thing is that Country includes many handmade elements in its design, including a variety of blankets, chair covers, candles, vases and so on. And all this is done by hand. The interior is dominated by a lot of textiles in warm colors, soft toys and a lot of decor. Agree, such an interior will look very cute and comfortable.

In recent years, styles such as Minimalism and Modern have gained particular popularity. Of course, they are very fashionable and ultra-modern, but at the same time they cannot be called cute and homely. The fact is that they are quite strict, there is practically no decor here, everything is stylish, strict and concise.
Do-it-yourself house repair photo- the task is not an easy one and you need to approach it in good faith so as not to make mistakes and not to perform the same work several times.

But do-it-yourself wooden house repair a little more difficult than brick, but if you try, then there will be no problems. Never rush and then you will be able to equip a warm and cozy nest for yourself and your family. All your efforts will always pay off. The main thing is to take into account all our recommendations, to make repairs in good faith. And if there are no special skills in performing repairs, and even more so, complex work, it is better to seek help from specialists than to do it yourself, but not correctly.
For some, the need to renovate their apartment causes a reaction far from positive. The financial side of the issue comes first. A painstaking calculation of funds begins, with a distinction between the purchase of materials and payment for the services of specialized construction teams.
Repairs can be cosmetic and are limited to painting, wrapping and updating the appearance. And it can be capital with the replacement of electrical wiring, plumbing and the installation of a modern acrylic baths.
The process of repairing an apartment is perceived as a long period of time with many inconveniences. The result eventually turns from the desired to the suffered, and instead of a sense of satisfaction, there is a feeling of fatigue and detachment.

The situation is quite different for people with imaginative thinking. Having visualized what the apartment will look like after finishing, they part with money more easily, in the hope of quickly seeing everything with their own eyes.

People from the same category, who are not burdened with funds, often resort to the services of designers. A master home interior designer using computer programs can develop a view of an apartment in 3D format. In many ways, this method is considered a strong incentive to action, since it allows you to see the results of the work in advance.

However, purposeful people with high internal enthusiasm never give up even in a situation where there is a strong limitation of funds. For such people, the way out is to carry out partial or complete repairs on their own.

At the same time, someone chooses a thorough capital design of housing with redevelopment, and for someone it is enough to carry out inexpensive repairs in an apartment, which is often called cosmetic.

Stages in the repair
When deciding where to start repairing an apartment, some believe that it is necessary to purchase materials and tools first. In general, this is correct, but in order to spend money correctly and not to acquire too much, you need to make preliminary calculations. Calculate the basic geometric parameters of each room: height, length and width. Determine the dimensions of window and door openings.

The data obtained will help determine the exact amount of work and calculate the amount of each type of building material.

When deciding to carry out a global change in the internal appearance of the apartment on your own, you must first draw up a phased plan. It is a properly developed plan, including a phased apartment renovation, that becomes the key to successful work processes.

The first item will be dismantling work:
- demolition of enclosing internal walls and partitions to expand the space;
- dismantling of wooden windows to replace them with plastic double-glazed windows;
- removal of door panels or complete dismantling of door frames.
- removal of old floor coverings;
- dismantling of wall coverings or clearing walls from painting compositions;
- clearing or blurring ceilings.


Categories of complexity of work processes
The most time-consuming work is considered to be the installation of a screed on the floors and plastering the walls. It is especially difficult to deal with surfaces endowed with a large number of drops. Some of them are eliminated by knocking down with a hammer, but only a leveling screed or similar plaster layer can really save the day.

To carry out high-quality straightening of wall surfaces, plaster beacons are used. To do this, buy aluminum rails or metal pipes of a small square or rectangular section.

In the first case, the material is inexpensive, but when buying, you should know that when you remove the rails from the joints after the plaster has dried, they can no longer be reused in work.


Metal pipes are more expensive, but the percentage of their preservation after dismantling is much higher. In addition, some people prefer to leave them in solution for greater strength of the layer.

The most economical way to achieve evenness of the screed is the installation of mortar beacons on the floors. But this process is very painstaking and only those who have the appropriate skills can decide on it.

The simplest type of work is painting. At least that's what most people think. The opinion is both right and wrong. The truth of the statement lies in the final process, that is, the painting itself, using quality tools.

Paint rollers and brushes, plastic pans with nets for rolling rollers. Working with quality tools, you can avoid smudges on the walls and the selection of vertical paint stripes.

Capturing an impression
For the sake of interest and to confirm their personal participation, a large number of people take photos of apartment renovation before and after. Sometimes this results in a whole series of shots with separate initial and final views of each room.

Some amateurs post photos on the Internet, as today it is considered a fashionable activity, and someone simply uses them to view with friends and acquaintances. In any case, a photo of a do-it-yourself apartment renovation is not only a memory, but also a confirmation of personal skill.


DIY apartment renovation photo


 Presentation "September 1"
 Examples of funny, funny and funny New Year's scenes for holidays and corporate parties
 Last Call Scenario Ideas