Hang the chandelier in the plastic box on the ceiling. How to hang up the chandelier - practical advice and recommendations. How to hang a chandelier to a concrete ceiling with a plank and hook
Had a chandelier with your own hands is not so difficult. No experience in conducting such procedures of a person first can scare the need to work with electricity. However, no serious knowledge is required to fulfill this task. To install a chandelier on the ceiling, you need to carry out only two operations: connect it to the electrical network and secure.
Safety technique
Before you begin any operations of an electrical type, you need to take care of security. Fastening the chandelier implies contact with the wires for which the current of high voltage flows, so it is necessary to approach this question with complete seriousness. Here are the basic recommendations and instructions:
- all operations on the electrical installation must be carried out with a disconnected electricity (you can simply turn off the circuit breaker in the shield);
- after turning off the machine, it is necessary to progress and check the absence of light;
- after checking the lack of voltage in the wires with an indicator screwdriver, you can safely begin to mount;
- often the Chinese manufacturer in the manufacture of chandeliers resorts to the use of low-quality materials, so they should be selected more carefully.
How to determine the location of wiring in the ceiling?
Before hanging a chandelier to a concrete ceiling, you need to find out the exact location of the wiring. If this is not done, when drilling holes for fasteners, the chandeliers can be easily drilled wires. The search process must be performed at the moment when the current flows in the wires. Therefore, this procedure can be divided into the following steps:
- Disable electricity.
- Installing a temporary cartridge with a light bulb.
- Electricity flow.
- Turning on the time light bulb.
To determine the location of wires under voltage there are many devices from various price categories. This device must be carried out perpendicular to the line, along which the wiring is presumably passed. At the phase detection site, you must put a label, then continue to move the indicator. The following label is placed at the point of phase disappearance.
To control these actions should be repeated in the opposite direction. In the interval between the resulting labels and the wiring is laid. Now you can safely drill holes for fasteners and hang to the chandelier.

Methods of fastening chandeliers to the ceiling
If everything became clear with the wiring, then the question arises: what are the ways of fastening the chandelier? Today, the three most common technologies are most often practiced that allow you to quickly and simply hang the ceiling chandelier. Comparatively light products can be fixed on hooks. In cases with heavier lighting devices, the use of anchor bolts is provided. In addition, there are chandeliers attached to the bar (bracket). Another way is the mount directly to the concrete ceiling.
How to hang a chandelier on the hook?
The simplest mount for the chandelier to the ceiling is a suspended hook. To fix it in the ceiling, you must drill a hole with a diameter of about 8 mm. If the weight of the chandelier does not exceed one and a half kilograms, you can use the usual threaded hook, which is screwed into the dowel inserted into the hole. For more entertainment products, spacer anchors with a diameter of at least 10 mm should be applied.
If you plan to fix the hook in a dowel, it is recommended to choose a corrugated one. This fastener is better fixed in the ceiling. The screwed hook should be wrapped with two layers of insulating tape.
After these manipulations, you need to connect the wires from the chandelier to the power grid. This can be done both using the usual twist, and resorting to the use of terminal workers, which most often included in the package of most lighting devices.

At the next stage, you should attach the chandelier to the hook, after which the special decorative lining is as tight as possible to the ceiling surface. This bowl will allow you to hide all wire connections. This is completed on this installation. The main minus of such an attachment is the clearance between the ceiling and the lining. It can be both a pair of millimeters and 1-2 cm.
It is important to understand that the installation of chandeliers on the plasterboard ceiling in this case is fraught with unpleasant situations. If the light products can still hold out, then heavy lighting devices are plasterboard will not stand. The hook must be attached to the frame, so its installation should be planned in the process of facing the ceiling.

How to hang a chandelier with a plank?
There is a way to secure the chandelier without hook. This procedure is slightly more difficult, but quite performed.
Included should go a special mount for the chandelier to the ceiling. This fastener is called a bracket. This bar for chandeliers must be attached to the ceiling, after which put tags for drilling holes under the dowel. In the bracket itself you need to fix a pair of screws. At the same time, the distance between them should be equal to the distance between the holes on the decorative lid.
After fixing the bracket, connect the wires. It is possible to make a chandelier of this type only with an assistant, as it will be very difficult to do it alone. One must hold it, and the second is to be connected to the power grid.

At the next step, it is necessary to get fixed in the bracket with screws into the holes of the decorative lining, and then spin nuts. As soon as the lamp is installed and the performance has been tested, the procedure for fastening the ceiling chandelier can be considered completed.
Fastening the ceiling lights right on the ceiling
Often such fasteners are used for small chandeliers and lamps with a small weight. On the back of such products, there are always several holes intended for fixing to the surface. If the base is made of wood, you can fix the ceiling lamp immediately on the self-tapping screw. If you need to hang the lamp on the ceiling of concrete, you first need to drill holes under the dowel, and after fix it.

Setting under a classroom switch
If everyone can hang a chandelier for a concrete ceiling, then connecting to the power grid sometimes causes difficulties. In most of the chandeliers installed in our time there are two conductors. According to standard labeling, blue or white-blue wire is zero, and white or brown - phase.
If the wiring has not changed in your home for a long time, there will be two aluminum conductor in the ceiling. As a rule, they do not have labeling, but determine where zero, and where the phase is using an indicator screwdriver. If the wiring is relatively new, there will be three wires in the ceiling: zero, phase and grounding. We will not need the third, so it can be insulated and beaten to the side.
If there are two or more plafoons in the chandelier, which comes from them the wires must be combined with each other. Zero must be connected to the knau, and the phase to the phase. After that, zero from the mains is connected to the connection of the nole from the chandelier, the same with the phase. Next, you can already put the chandelier to the ceiling.

Having hanging the lighting devices, it is necessary to understand that it is not recommended to connect directly wires from aluminum and copper. Over time, such contact will begin to oxidize, and the connection itself will lose strength, as a result of which the twist will begin to overheat. At best, the chandelier arises, in the worst - wiring. In such situations, the chandeliers can only be hung when connecting wires through terminal shots.
Installing a two-block switch
If you want to install a chandelier under a two-block switch (i.e. one key turns on only a part of the bulbs, and two keys together - all the light bulbs simultaneously), the principle changes slightly. In this case, all the flans of the chandeliers are connected together and connected to the cooler of the power grid, and the phases are divided into groups.
In the first group, it is necessary to combine all phase conductors of the lamps, which should light up from the first switch, in the second - from the second. Next, the first group is connected to the phase coming from the first key, the second key to the phase from the second key. Installation of chandeliers can be considered completed after it is attached.

How to check the fastening for strength?
After completing all procedures, it should be checked. Small shortcomings can slip away from your view, so immediately it is worth visually determining the quality of work. Wires must be completely hidden under the decorative lid.
It is possible to determine the reliability of the attachment by a small loosening of the lamp. Well, the main indicator is to test for performance. If, after switching on all the keys of the light bulb, you caught fire, and the wiring did not appear, it means that you installed the chandelier on the ceiling!
Installation of a new chandelier - an event is quite important and significant. Before you hang it, you need to collect it correctly. However, most of the products have a fairly simple device, so this step can be skipped. To figure out how to hang a chandelier, it is necessary to determine the type of ceiling coating, as well as the method of fastening the lighting device.
Wire connection
It is worth starting with elementary actions. Before starting work, you should ask several questions:
- how many keys to install the switch;
- how many wires will go from the ceiling.
If you have only two wires, you can not think about the possibility of including individual parts of the lamp using a two-block switch. Without the presence of a third wire, this task will be impossible.

If there are three wires and desire to include light in different parts of the chandelier at different times, the wires that go to the cartridge, and the earth are collected in 1 bundle. The rest are divided into 2 other beams.
Attention! It is important to ensure good contact of wires. Otherwise, the wires will be very hot, and the housekeeper will fail.
In order to work, such tools should be prepared:
- small screwdriver;
- horn key at 12;
- screwdriver indicator;
- passatia;
- terminal block.

The key must be collected for one task - during the assembly of the chandelier itself. The indicator screwdriver will be needed to determine where the wire is connected. If the instrument will light up from touching her sting, it means it works.
After that, you need to touch the end of the screwdriver to the cartridge. Free hand is used to hold wires. If you touch the screwdriver to one of them, the indicator built into the tool will light up. Wires performed in the same color will be grounded.
Bundles that are separated, you must insert into the terminal block and fasten.

Installation of chandeliers
To understand how to hang a chandelier, you need to choose how to fasten it. There are 2 main options:
- on the fastening plate;
- on the hook.
Pendant chandelier on the hook is one of the oldest and most common options. Today, this method is used less often. However, the chandeliers who have such fasteners are still selling enough.
Some home masters can solve such a problem on their own. They simply change the plastic hook to homemade, which is made of a welding electrode.

The mounting plate is a special product mounted to the ceiling. It is usually sold complete with chandelp. Before installing the bar must be properly prepared. It needs to fasten the screws in such a way that the hats are in the inside of the plank. However, you should not clamp them. Then you need to insert a bar in the chandelier. This must be done in a certain way. The bar must be on the same level with the edges of the lamp bowl. An option is also possible that it will be lower than the edges of the bowl.
After checking, you must clamp the screws in the bar to avoid their twist. Then the bar is applied to the ceiling in order to mark the place of attachment. After that, the holes for the dowels are drilled in the ceiling. With their help, the plank is installed, and then the suspension chandelier is mounted. In the presence of a wooden base of the ceiling, a bar must be attached using self-samples.
Connection
Checked the presence of voltage is simple enough. To determine it, it is worth using an indicator screwdriver. When touched a staring for wires, it should not shine. After the power turns on, the indicator will show the voltage only on 2 wires. The remaining is "earth". It must be connected with a shared beam.
Attention! It is impossible to mount the housekeepers if the connection of the lamp was carried out through a special device that adjusts the brightness of the glow.
To figure out how to hang a chandelier to different ceilings, you should get acquainted with their views and features.

Power chandelier
Often the owners of apartments or private houses want to increase the brightness of the glow using more powerful lamps for this. As a result of such modifications, the suspended chandelier may stop functioning. To protect the transformer, it is necessary to monitor the total consumption of electricity with all lamps. It is necessary that it is less than the output power of the device.
For halogen lamas, the suspended chandelier connects to the transformer. This avoids overheating and explosion bulbs. This is explained by the fact that halogen products are designed for 12V.

Important! If direct connection is carried out, the bulbs must have a denomination of 220V. If the condition is not fulfilled, halogen lamps will simply explode.
It is worth remembering that all wires are carefully isolated. It is necessary to check their integrity all over. This condition is a mandatory security requirement.
Concrete overlapping
To carry out chandeliers on the bar, you first should be noted the locations of its installation. To do this, scroll holes for fastenings. When performing a ceiling of plates with emptiness, it should be checked as far as concrete is thick in the place where drilling will be performed. In some cases, you have to retreat aside to secure the dowel more reliably.
If it is impossible to score a dowel in a certain ceiling zone, you can simply change the position of the slats. You can also enter the slab slab from the tree from the tree. In this case, the bar is screwed with screws. To perform such work, you must prepare the appropriate tools:
- perforator;
- anchors, dowels or screws;
- winning drill;
- screwdriver.
Note! Before starting drilling, it is necessary to take care to the tool not dreamed. Also, garbage should not fall. To protect the perforator, you need to install a disposable glass on the drill. Also, half of the rubber ball can also be used.
It is worth remembering that the bar must be fixed carefully, without too much effort. Otherwise, it can be bent. The part is set depending on the selected fastening method. Instead of the perforator, you can use a shock drill. However, it is worth choosing it taking into account the capacity and volumes of alleged work.
Ceiling of plasterboard
What are the features of hanging chandeliers on a plasterboard ceiling? It is important to preserve its attractive appearance, as well as high mechanical strength. To do this, determine what will be the type of chandelier. There are several recommendations:
- The place in which the suspension chandelier of the large size will be installed using a metal profile. Such work is performed even when creating a frame of the finish ceiling.
- If a small chandelier is installed, special fasteners should be purchased. These include butterflies and folding dowels. Strengthening in this case is not required.
When working it is worth performing safety requirements. The electrical system must be de-energized, and the ceiling design is installed as strong as possible.
Attention! If it is impossible to de-energize the room work in rubber gloves. This will ensure the complete safety of the installer. Also, all work should be carried out only with high-quality instruments.
Plasterboard has high strength, which allows the installation directly to the material. However, this case establishes the corresponding limitations:
- Since the sheet of drywall is capable of withstanding the load to 6 kg / sq. m, it should be preferred to chandelier, which is characterized by a slight weight.
- It should also be noted that the plasterboard sheet can be deformed during the repair of the device. For example, when you need to change the lamp, it should be very careful to handle the chandelier. Also should not be able to change the suspension product. In addition, it is impossible to perform new holes next to the old holes for fastening the chandelier.
First, it is necessary to consider the main options for mounting the suspended chandelier. At first, a hole is performed in the ceiling material, which then insert a dowel.

Attention! Spring fastening element should be filled with nut. The butterfly pulls up with the help of self-press. It will be heard a click. Included with a dowel there is a hook. After such works, you can mount chandelier. Then the connection is performed.
The wiring is connected when the chandelier is held under the ceiling. Only after that the suspension device can be completely attached to the ceiling. Such work is better to perform 2 people. One will keep the chandelier, another - connect the wiring. If the help is not meant, it is better to make a small hook to hang the chandelier temporarily. This will eliminate mechanical damage to the suspension.
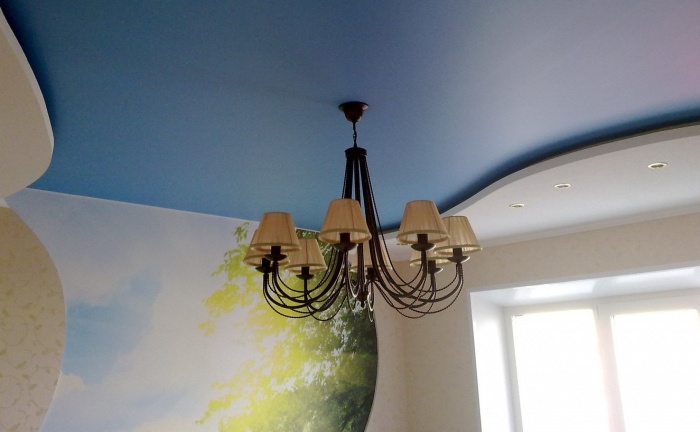
Stretch ceiling
If the ceiling is carried out tension, it is worth thinking in advance, the suspension chandelier of which type will be installed. It is also necessary to determine the fastening of the lighting device.
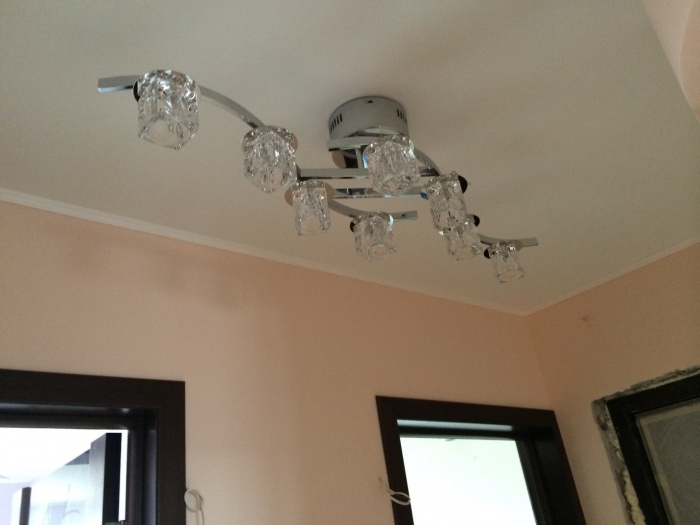
In order not to spoil the form of the ceiling, as well as not to break its integrity, you should correctly pick up the chandelier. It can be designed for both energy-saving lights, so for incandescent bulbs. In the latter case, the cartridges should look aside, and not up. Also, they should be hidden in the ceiling. In the case of an energy-saving option, the suspension chandelier will not warm up.
Attention! When hanging the lamp to the stretch design, it should be remembered that from high temperature its surface can be deformed. To avoid this, it is better to screw in the cartridges LED bulbs.
In addition, before starting work, check the base of the lighting construction. If it has sharp edges, the film can easily break. There are several ways to install chandeliers to the stretch ceiling:
- If the apartment has a stretch ceiling, the best solution is to hang a hook chandelier. This method will be the easiest and most reliable. However, this method can be used only in the case of suspended chandeliers.
- If a concrete slab is located above the stretch design, and the hook is already fixed by builders, it is necessary to determine the height of its installation. It can be chosen wrong.
- If necessary, change the arrangement of the chandelier hook, you should use an anchor to install a new fastener. Old cuts with a grinder.
- There is also another way - a wooden mortgage element is mounted in the seat of the chandelier. The hook is fixed on it.
One of the mandatory elements of any repair associated with the ceiling surface is the installation of lighting devices. Recently, the most different configurations have acquired the greatest popularity, however, most of their main function - additional lighting. The role of the main challenge is fairly taken by classic chandeliers. With their purchase in the store, all questions are not allowed - it remains to find out how to hang a chandelier on a concrete ceiling correctly, in case you have to deal with a clean ceiling base. We offer you a detailed article instruction with 51 photos and 2 videos that will help you with this.

Surface analysis, preparation of work plan

To begin with - look good enough. What way installation chandeliers Suitable for you most? Recall that you can do it through:
- anchor hook;
- mounting patch;
- movered suspension.


Of course, working with anchor hook Always easier. But only if it is already installed, as it often happens in old apartment buildings. In this case, it can safely consolidate a heavy and massive chandelier.

If the hook is missing, then first inspect the slab where it is planned to fix it. For hollow concrete bases, the perfect option is movered suspension. And although it does not provide such a reliable fastening as the same anchor hook, with a fairly dimensional chain, we will cope with no more than 7 kg without any problems.


Mounting Planckwhich is still often among the masters is called the invoice - the third option of how to hang a chandelier to the basic ceiling. It can be used most often when the use of two options discussed above is not possible. In most modern chandeliers, the package includes everything necessary in order to fix the lighting device in this way. So why not use this safely?

Necessary materials and tools

- perforator with a brown;
- set of wrenches;
- knife with sharpened blade;
- screwdriver;
- mounting foam for sealing of wiring;
- pencil;
- dowels;
- anchor bolts;
- terminal connectors.

- hook;
- overhead plank from the kit;
- movered suspension hook.


Installation of anchor hook

As mentioned above, it is the easiest and most reliable way to hang a chandelier on concrete ceiling base. In many old houses, it is already prudently mounted in advance, so the whole process occupies a modest amount of time and does not cause any difficulties even with an unprepared person.

If the hook must be installed, the work algorithm will be as follows:
- choose a fixation point on a concrete basis;
- drills the hole of the desired depth and diameter in a concrete base - we take into account the size of the decorative cap of the lighting device;
- insert an anchor hook into a concrete base and twist it with a wrench.

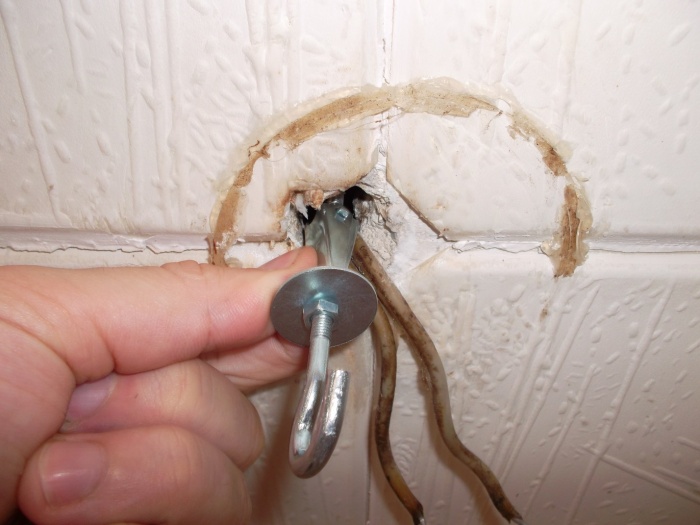
Installation of the module suspension


This option is relevant primarily for hollow concrete structures, as it provides good carrying capacity even in the case of bulky light sources. Movered suspension is a reliable construction consisting of a spacer rod and a suspended strip with all the necessary mounting holes.


The correct sequence of operations when working with the suspension:
- the harvested pad rod is inserted into the hole in the concrete base;
- the suspension bar is placed inside the concrete slab;
- the spacer rod is done through one of the holes on the bar: if you want to reduce the distance from the ceiling to the hook, then choose one of the end holes.


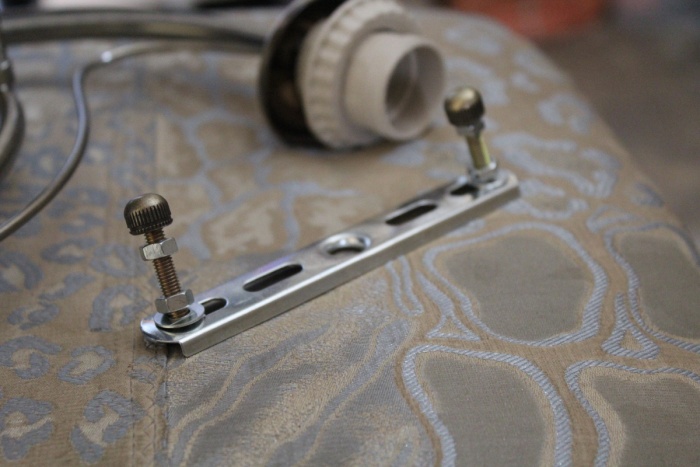
Installation of the overhead plank

In terms of reliability, this method of installation is not inferior to the two discussed above. Due to the fact that in a set with just acquired chaloss, there is always a variant of a similar plank, it is also noticeably easier - you do not need to spend time on the tedious search for the necessary materials.
Maybe in the form:
- crosses;
- narrow plate.


To the concrete ceiling surface, an overhead plank is attached to dowels and anchor bolts. Most often, there are a pair amount - either 2 or 4.
Installation and connect chandelier

The main condition that requires strict execution is to comply with electrical safety equipment. To do this, pay attention to the following recommendations:
- disconnect the supply of electricity on the distribution panel;
- check the location of the wiring by the usual tester;
- sealing the entry entry: for this you can use the assembly foam with active resistance
- fire or non-combustible mineral wool;
- do not allow copper and aluminum wires with a twist method.


If you are dealing with a metal hook, it will help to securely protect it from a short circuit insulation. To do this, use the usual insulating tape or a rubber case. Both can easily find in any construction store.


You also need to take into account some features of electricians of old houses - there is no grounding. In order to correctly hang the chandelier in such conditions, first need to determine the phase on one of the power cable wires and connect it with the end of the lighting device, and the second to what remains on the power cable. If the lamp never earned, then the very second wire is grounding. In this case, it needs to be disconnected and secured with another free end of the power cable.


Algorithm of direct installation chandelier on a concrete ceiling:
- remove all the decorative elements from it to avoid damage and possible drop when fixing on the ceiling;
- on a pre-grounded hook loop at the end of the chandelier outlet;
- connect the mounting ends of the chandelier to the power cable;
- if your chosen fastening method is an overhead mounting plate, then after the previous point, impose a plate plate in such a way as to get on the desired holes, and use nuts for reliable fixing;
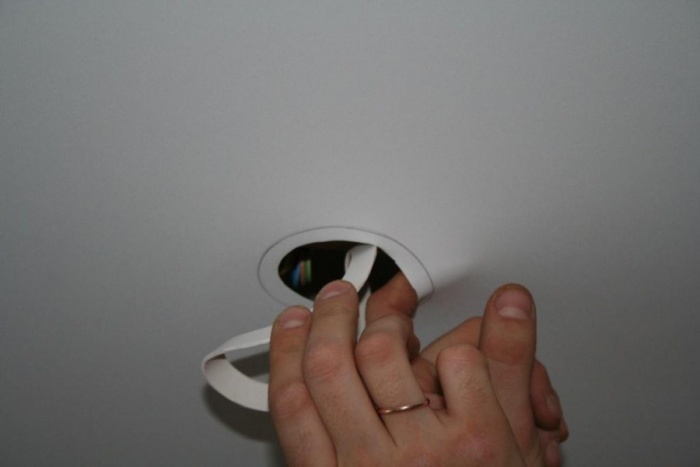
- fix the decorative cap so that it completely covers the mounting hole in the ceiling;
- check that the lighting device is valid.


All stages of mounting chandeliers on a concrete ceiling in one video
Conclusion
Carefully examining the proposed article of instruction, you will quickly understand how easy it is and, most importantly, to make a chandelier to a concrete ceiling, without spending a bunch of precious time. In comparison with other conditions of installation of lighting devices - for example, for stretching canvas - a clean base implies a simplified algorithm of actions (read about how to mount the chandelier to the stretch ceiling, if it is already stretched). In fact, the most difficult thing is not to be mistaken if the light source is directly connected to the electrical wiring. Only a serious attitude to the issues of electrical safety and the scrupulous follow of the proposed plan of work will help you easily overcome this stage and already after some time to enjoy spectacular lighting on your concrete ceiling.


How to hang a chandelier to the ceiling? Such an independent installation is a clapping case for many. In order to correctly implement installation, you will need some knowledge and a solid approach. Therefore, if you have never installed a chandelier, or you have a doubt in our own forces, then give up the venture and call the experienced electrician who will install the chandelier for half an hour. Remember, the main rule in this matter is not climbing where they do not ask. Jokes with current are inappropriate. But if you have experience in conducting such work, it means that you can easily repeat the result. Our article will help you in this.
To hang a ceiling chandelierYou will need a stepladder, voltage indicator, passage, thin screwdriver, mounting block with terminals for wires and nippers.
Installing the suspended hook on the ceiling
Initially, it is necessary to choose a "good" hook. To do this, it needs to be checked for strength. To make a hole in the ceiling, close to wires sticking out of the ceiling, you need to arm a perforator or a shock drill. The hook is preferably fixed using anchor systems. After installing the hook isolate double layer insulating tape.
It should be remembered that the installation of any lighting devices must be carried out in accordance with the instructions from manufacturers of these devices.
The instruction is attached to the lamp. If the chandelix setting assumes grounding, it must be connected in a mandatory order.
In one of our articles discussed in detail. After reading the material, you will get a complete understanding regarding the lighting norms and can make the conclusion about the illumination of the premises in which you live.
Please note that we have information about modern, called filters. After all, it is often necessary to think not only about the lighting of the premises, but also about the dimming.
Having understood with the question of how to hang a chandelier, it's time to pose a question how to connect it. Before starting electrical work, you need to turn off the circuit breaker, which is located in the meter on the staircase. To check the lack of voltage on the network, you need to touch the phase wire indicator (if there is a voltage, the red color will turn on the indicator). To do this, it is necessary to find three wires on the ceiling: two of them are phase, one wire is zero, there is no tension on it. Three wires are necessary for connect chandeliers to double switch. It is necessary to know that the zero wire is sent to the mounting box, and the two phase wires are displayed on the switch. From all wires you need to remove isolation. Then push them into different directions so that no closure occurred. To make sure that there is no voltage once again, turn on the light in the room in which you are going to install chandelier. Removing insulation from the wires, remove it about three or four millimeters.
Determine the stress in the ceiling wires
 Now it's time to find the zero wire, the other remaining, respectively, will be phase. To do this, go to the staircase, turn on the electricity, and then the switch in the room. Before each wire, take turns. Take the indicator. If the light bulbs burns, then, as mentioned earlier, it is "phase". If nothing has changed - this is "zero." After the zero wire is found, it must be mixed with insulation so as not to "lose."
To date, new rules of electrical installation devices are installed to facilitate work (PUE). Of these, it is known that the wires must have color marking along the entire length: brown / black is designated phase wire, blue - zero wire.
Determine the phase wires in the chandelier
Now it is necessary to determine the phase wires in the chandelier. At the same time, you should not forget that the wire chandelier must be marked. If it is missing, you will have to determine the zero wire and phase wires along the same scheme. Wire chandeliers will be laid in the tube and are displayed on the junction box. Just through it, you will connect the lamp to the wiring. Usually the box is hidden behind the decorative patron.
Now complete the following algorithm of actions: Alternately, turn in the outlet of any two chandeliers. Do not touch the third wire. When the first half of the bulbs turns around, remember the wires that you turned on the outlet. Leave one wire in the outlet, and then change with another nonconnected wire. The second half of the lamps will have to light up. If nothing happened, continue to change the wires until you achieve the result.
As a result, the following should be: one wire should always be in the outlet, while the other two wires, with alternately turning on them into the socket, should burn "their" row of light bulbs. The wire, which remains all the time in the outlet, is zero.
At this stage of the installation work, remember that connect to an electrical network It is performed at pre-de-energized wires!
Chandelier suspension
Now it's small. Stand on the chair and hang a chandelier on the hook. The zero wire, which on the ceiling, must be connected to the zero wire on the chandelier. The same needs to be done with phase wires.
Remember that the wires from different metal can not be twisted with each other.
Copper wire with copper, aluminum wire - with aluminum. The only way! If the ceiling is sticking out of aluminum wire, and the chandelier is copper wire, then to connect them, will have to take advantage of a special block. The wires in it are mounted on both sides with screws, and the voltage when turned on will go through the terminals, bypassing the direct contact of the wires, each other.
Check chandelier
Before screwing the cap at the base of the chandelier, it is necessary to check the quality of the work performed. The chandelier must easily turn on and in no case, not to spoke.
Installing Plafon
 To install the ceiling, the hook will not need. The ceiling is fixed on the ceiling using three mounts: it is screwed through the velocked holes in the bottom of the case. After that, the hook in the ceiling is cleaned.
If the ceiling is made of wood, then fix the ceiling can be ordinary self-draws. If the ceiling of concrete slabs, you will have to use anchor systems. If the ceiling is plasterboard, then you can attach a plate with metal dowels. They can withstand loads up to fifteen kilograms.
How to hang a chandelier photo
Below, we present photos on the topic of the article "How to hang chandelier." To open the photo gallery, it is enough to click on the thumbnail of the image.
Igor
How to hang a hook chandelier if the chandelier is with a plank?
In the process of replacement, it may be found out: the former lamp hung on the hook, and the new is attached to the bar. Such a retainer is usually equipped with modern designs. Hang a chandelier in this case is more difficult, but it will receive an extra shoulder strength.
Modern chandeliers equip placams. Brackets are screwed to them, which hold the lighting design. Screws move in special grooves. Before mounting on the ceiling, it is necessary to determine their best position, which will ensure a slight nozzle bowl of the lamp. Optimally located screws must be tightened with nuts and move to the installation.
Council. For installation, use conventional screws with dowels. Often in the set no fasteners. Self-tapping screw with a small hat. Stretch with washers.
On the usual smooth ceiling to hang the chandelier is easy:

Council. At the same time hold the chandelier and connect the wires difficult. Invite an assistant.
If a hook is built into the ceiling at the point of hanging, which is in a slight recess, it can be wrapped in your favor. With the help of a hook, you will be able to additionally strengthen the bar:
- take a durable steel wire to the hook so that the pair of free ends is on the sides;
- prepare the bar, mark the ceiling;
Grind the ends in the grooves for fastening on the rail; - press the bar to the ceiling and tighten the wire in such a position;
- fix the design on the ceiling with dowels and self-drawing.
Council. In this case, use self-tapping screws with a hat, which is less than the diameter of the opening. Put on them washers.
Having suspended in such a way a chandelier with a plank will not always. The hook can interfere or disrupt the decorative design. Of this situation there are two outputs:
- adjust it to the ceiling with a hammer;
- remove the hook at all.
Safety during installation chandeliers
All work under the ceiling must be performed on a stepladder or a well-fastened staircase. Frequent issues arise when hanging chandeliers on a plasterboard ceiling. But the material is sufficiently durable to keep the design of the standard value. In addition, it is convenient to screw the fastenings in it even without a drill. A suitable hole can be done manually by the usual drill. The subsequent installation technique is the same as with a concrete ceiling.

Installation of chandeliers
Before starting the chandelier, disconnect the voltage on the distribution panel. It is advisable to have a portable indicator device. Check before connecting the wire, whether there is voltage in it. It has a phase and zero. The first of them will show the measuring instrument.
It is important to carefully check the connection. Incorrect switching is possible: the switch on the wall opens zero, and the phase is supplied to the chandelier in constant mode. Such a lamp is dangerous because it can strike the current. In the new wiring 3-4 multicolored veins inside. Zero flows in blue, phase - on brown and white.
Council. If possible, connect also grounding. The corresponding lived in the wire is yellow or green.
You can carry the chandelier with a crochet or without it. To do this, strictly observe the technology of work.
How to mount a chandelier to the ceiling: video
 How to return the love of her husband to his wife - Tips of the psychologist
 Why you can not give icons