Water and windmills in the Middle Ages. Windmill - device, principle of operation, history, photo. Classic windmill
Extremely advise him to meet him. There you will find many new friends. In addition, this is the fastest and effective way to contact project administrators. The antivirus update section continues to work - always topical free updates for Dr Web and Nod. Did not have time to read something? The full content of the running line can be found on this link.
Likbez: How the mill is arranged
Have you ever thought how the flour gets from the grain? It was always interesting for me how the ancient mills worked. In Suzdal, we explained everything in detail.
It is clear that the wind rotates these blades. They have a wooden frame, and they were tangible to matter, a sail.
Do you know what these sticks are the milling mill? Do you think she does not get? ;)

And here are the features. With their help, the entire mill was turned to catch the wind to catch, well, not a joke? :-))
Mechanics of the work of the mill we were explained by this model, which was inside the mill's mill and, unlike the latter, was in working condition ;-))

Well, in the overall wind rotates the blades, the blades rotate this horizontal is fully:

Horizontal is full, with the help of ancient gear rotates the vertical vertical:

Vertical Pulled, in turn, with the help of the same gear rotates the edible stone pancakes - millstones, is there at the bottom, you see?:

And from above in the holes of the millstone, grain was hushed out of these boxes, similar to the outbound pyramids. Finished flour through holes in the woods of the front wall rolled into a special box called "Suscom".

Do you remember the fairy tale about Kolobka? ;) "The grandmother on the barn was dying, on Süsekamy screamed ..." I was in my childhood all the time wondered what kind of sowes are in which you can make flour on a whole bun? In our apartment, flour on drawers just did not fall so. ;-)) Well, now, no forty years old, as the mystery was solved! eight-)))
Mill - Wind and Water
The most ancient devices for grinding grain in flour and robbing it in the croup was maintained as family mills before the beginning of the twentieth century. And they were a manual millstone from two round in the cross section of stones of solid quartz sandstone with a diameter of 40-60 cm. The ancient type of mills is considered to be structures where the millstones rotated with pets. The last mill of this type ceased to exist in Russia in the middle of the XIX century.
Russians falling on the wheel with water blades learned to use at the beginning of the second millennium. Water mills have always been surrounded by a halo of mysteriousness, heated by poetic legends, testes and superstitions. Mills - wheels with pool and whirlpool themselves in itself are unsafe designs, which is reflected in the Russian proverb: "With any new mill, a water will take it."
Written and graphic sources indicate a wide distribution in the middle lane and in the north of windmills. Often, large villages were surrounded by a ring of 20-30 mills who were standing on high, outdoor places. Windmills per night wrapped in millstones from 100 to 400 grain pounds. They also had stupas (kernels) to obtain cereals. In order for the mills to work, their wings had to be turned under the changed wind - it led to a combination in every mill of fixed and moving parts.
Russian carpenters have created many diverse and witty versions of mills. Already in our time, more than twenty varieties of their design solutions have been recorded.
Of these, two principal types of mills can be distinguished: "Pobbins"

Pobbing mills:
a - on the pillars; b - on crates; B - on the frame.
and "tents."
The first were distributed in the north, the second is in the middle lane and the Volga region. Both names also reflect the principle of their device.
In the first type, the milling barn rotated on a pole in the ground. Support served either additional pillars, or a pyramidal log pad, chopped "into dign" or frame.
The principle of mills-rolling was different

Mills Towers:
a - in the truncated eight; b - in direct octagum; In - octo on the barn.
- The lower part of them in the form of a truncated eight-grumble was fixed, and the lower side of the upper part rotated under the wind. And this type in different areas had a lot of options, including mills-towers - chetver, monotherb and octal.
All types and variants of the mills are striking with an accurate constructive calculation and logic of wristbands that kept the winds of great strength. Folk architects also paid attention to the appearance of these single vertical economic structures, the silhouette of which played a considerable role in the settlement ensemble. This was also performed in perfect proportions, and in the grace of carpentry work, and in the threads on the pillars and balconies.
Water mills


Windmill scheme


Mill on donkey pull

Melnic


The most essential part of the flour mill-maker chopped or tackle - consists of two millstones: top, or runner, BUT and - Nizhny, or Lower, IN .
The millstones represent the stone circles of significant thickness, having in the middle of a through hole, called the point, and on the thick surface of the T.N. notch (see below). The Lower Gernov lies motionless; his point is tightly closed by wooden sleeve, steple g. , through the hole in the center of which passes spindle FROM ; On the top of the latter, the runner is affected by iron rod CC. reinforced by the ends in a horizontal position in the glasses of the runner and called paragago paragraph, or fill.
In the middle of the paragraph (and, consequently, in the center of the millstone) from the bottom side, a pyramidal or conical deepening was done, in which he entered into a pointed upper end of the spindle FROM .
With this connection of the runner with spindle, the first rotates when the latter rotates and, in the case of need, is easily removed from the spindle. The lower end of the spindle is inserted in a spike in the bearing, fortified on the beam D. . The latter can be lifted and lowered and thus increasing and reduce the lamination between the millstones. Spindle FROM It is rotated by the help of t. n. Pasting gear E. ; These are two disks, suitable on the spindle in a short distance from each other and bonded between them, around the circumference, vertical chopsticks.
The valve gear is rotated using the windshield F. Having on the right side of his rim teeth, exciting for wands of the valve gear and thus rotating it with Spherical.
On the axis Z. wear wing, which is driven by the wind; or, in a water mill, is a water wheel driven by water. Grain is introduced through the bucket but And the point of the runner in the gap between the millstones. The bucket consists of a funnel but and borea b.suspended under the glasses of the runner.
Grinding grain occurs between the top surface of the lower left and the bottom runner. Both millstones are dressed casing N. which prevents scattering grains. As it grows, the grains are accomplished by the action of centrifugal strength and pressure of the newly arriving grains) from the center of the bottom to the circle, fall from the lower and go along the inclined chute, into the pecple sleeve R. - For sieving. Sleeve E is made of woolen or silk tissue fabric and placed in a closed box Q. From which its underlying end is exhibited.
First, thin flour is sieved and drops in the back of the box; More rude sketches at the end of the sleeve; Bran delaying on Sitka S. , and the coarsest flour is going to the box T. .
Pulp

The surface of the jar is separated by deep gutters called furrows, on separate flat plots, called grinding surfaces. From furrows, expanding, smaller grooves, called plumage. Furrows and flat surfaces are distributed in the form of a repeating pattern called accordion.
Typical flour rim has six, eight or ten such harmones. The system of grooves and grooves, firstly, forms a cutting edge, and secondly, it provides gradual renuncing of finished flour from under Zhernov. With constant use of millstones? require timely fitting, that is, hanging the edges of all gutters to maintain the sharpness of the cutting edge.
Forests are used by pars. The lower row is installed inpatient. The upper rustling, it is the runner, - movable, and it is it that produces direct grinding. The movable millstone is driven by a cross-shaped metal "pin" mounted on the head of the main rod or the driving shaft rotating under the action of the main mechanism of the mill (using the wind or water energy). The embossed pattern is repeated on each of the two millstones, thus ensuring the effect of "scissors" when grinding grains.
The millstones should be equally balanced. The correct mutual location of the stones is critical to providing high quality flour grinding.
A special stone breed is the best stoneware material - viscous, solid and unable to polish sandstone, called millstone. Since stone rocks in which all these properties are developed enough and evenly occur, there are rarely, then good millstones are quite expensive.
On the rubbing surfaces, the fools make a notch, that is, a number of in-depth grooves pierce, and the gaps between these grooves lead to a rough-rough condition. The grain falls during grinding between the grooves of the upper and lower mills and is broken and cut into the sharp cutting edges of the grooves of notches on more or less large particles, which grind completely at the outlet of the grooves.

The grooves of notches also serve as the paths along which the grinding grain moves away from the points to the circumference and go from the millstone. Since the millstone, even from the best material, is erased, the notch must be renewable from time to time.
Description of structures and the principle of milling
The milling mills are called for the fact that their barn rests on the post, covered in the ground and covered outside the log cabin. It covers beams, holding a pillar from a vertical displacement. Of course, the barn is resting not only on the post, but on the Siruba-Troops (from the word cut, logs, cutted not tightly, but with proces). On top of such a row, a flat round ring from plates or boards is made. On him and relies the bottom frame of the actual mill.
There may be different shapes and heights in the column, but not higher than 4 meters. They can rise from the ground immediately in the form of a tetrahedral pyramid or first vertically, and with some height to move into a truncated pyramid. There were, the truth is very rare, the mills at the low frame.
The base of the rolling can also be in form and designs different. For example, the pyramid can begin from the ground level, and the design is not cutting, but a frame. The pyramid can rely on the connoisseur four, and the utility rooms can be attached to it, a melnik room, etc.
The main thing in the mills of their mechanisms.
In rolling, the inner space is divided by overlaps into several tiers. The message with them goes along the steep stairs of the attic type through the hatches left in the floors. Parts of the mechanism can be located on all tiers. And they can be from four to five. The mighty vertical shaft is served by a rod, piercing the mill throughout the hatching. It relies through a metal groove attached to the beam, which lies on a broomable frame. The beam with wedges can move in different directions. This allows you to give the shaft strictly vertical position. You can also do the same with the help of the top bar, where the shaft pin is embedded in a metal loop.
In the lower tier, a large gear with fists-teeth, fixed along the outer contour of the round base of the gear. When working, the movement of a large gear, multiplied several times, is transmitted to a small gear or a set of other vertical, already metallic usually. This shaft stitches the fixed lower millstone and rests on a metal bar, on which the upper movable (rotating) rails are suspended through the shaft. Both mills are dressed with a wooden casing with sides and from above. The millstones are installed on the second Mill Yarus. The beam in the first tier, which relies with a small vertical shaft with a small gear, is suspended on a metal rifle pin and with the cast washer with handles can be slightly raised or lowered. With her, the upper mill rises or falls. This is so adjustable grain grinding.
From the casing of the millstone down, the deaf milk gutter with a bay board at the end and two metal hooks, which is hanging on a bag filled with flour.
Next to the railway block is installed crane-bugs with metal gripped arcs. With it, the millstone can be filmed from their places to catch.
Above the housing of the millstone from the third tier is descended toughly fixed to the overlap of the bunker grain. It has a valve, with which you can overlap the grain feed. It has the form of a tipped truncated pyramid. From below the swinging tray is suspended. It has a juniper bar and a pin, lowered to the upper mill. In the hole eccentric, a metal ring is installed. The ring can be with two-three oblique feathers. Then set symmetrically. The pin with the ring is called a shell. Running over the inner surface of the ring, pin all the time changes the position and sinks a spherical suspension tray. This movement is referred to the grain in the yawn mill. From there it falls into the gap between the stones, grinds into the flour, the one goes into the casing, from it in a closed tray and a bag.
The grain falls asleep into the bunker embedded in the floor of the third tier. Grain bags are served here with the help of a "company and rope with a hook. The gate can connect and disconnect from pulley planted on the vertical shaft. It is made from the bottom with the help of a rope and lever. In the overlap board, the hatch is cut off, covered by obliquely supplied two-ring sash. Bags , passing through the hatch, open the sash, which then arbitrarily slam. Melnik turns off the gate, and the bag turns out on the hatch covers. The operation is repeated.
In the last tier, located in the "cap", another, small gear with beveled fists-teeth is installed on the vertical shaft. It makes the vertical shaft rotate and launches the entire mechanism. But it makes it makes the big gear on the "horizontal" shaft. The word in quotes is concluded because actually the shaft lies with some inner end slope down. It is concluded in the metal shoe of a wooden frame in the metal shoe of a wooden frame, the base of the cap. The elevated end of the shaft, which goes out, calmly lies on the stone-"bearing", slightly rounded from above. On the shaft in this place, metal plates, preventing shaft from fast erasing, are embedded.
Two mutually perpendicular bruses-bracket are cut into the outer head of the shaft, which are mounted with clamps and bolts other beams - the base of the lattice wings. Wings can take the wind and rotate the shaft only when the sail will be raped on them, usually rolled into the harnesses into the late, not working time. The surface of the wings will depend on the strength and speed of the wind.
The gear of the "horizontal" shaft is equipped with teeth embedded in the side of the circle. From above, it hugs a brake wooden block, which can be released or tightened with a lever. A sharp braking with a strong and impetuous wind will cause a high temperature when the tree frustzes about the tree, and even the depression. It is better to avoid it.
Before work, the wings of the mill should be turned towards the wind. For this, there is a lever with a pink - "drove".
There were small columns with a number of at least 8 pieces around the mill. To them "drove" and was attached to a chain or a thick rope. Silah 4-5 people, even if the top ring of the tent and part of the frame is well lubricated with solidol or something similar (previously lubricated with pork lard), it is very difficult to turn the "cap" of the mill, almost impossible. "Horsepower" here is also not suitable. Therefore, we used a small portable gate, which alternately dressed on the columns by its trapezoid frame, which served the basis of the whole structure.
A block of millstone with a casing with all parts and parts located above and below it, was called in one word. Usually the small and average windmill varies "about one post". Large windmills could be built with two podasses. There were windmills and with "crushes", on which linseed or hemp seed was pressed for obtaining appropriate oil. Waste - cake, - also used in the household. "Silent" windmills seemed to have not met.
The most ancient devices for grinding grain in flour and robbing it in the croup was maintained as family mills before the beginning of the twentieth century. And they were a manual millstone from two round in the cross section of stones of solid quartz sandstone with a diameter of 40-60 cm. The ancient type of mills is considered to be structures where the millstones rotated with pets. The last mill of this type ceased to exist in Russia in the middle of the XIX century.
Russians falling on the wheel with water blades learned to use at the beginning of the second millennium. Water mills have always been surrounded by a halo of mysteriousness, heated by poetic legends, testes and superstitions. Mills - wheels with pool and whirlpool themselves in itself are unsafe designs, which is reflected in the Russian proverb: "With any new mill, a water will take it."
Written and graphic sources indicate a wide distribution in the middle lane and in the north of windmills. Often, large villages were surrounded by a ring of 20-30 mills who were standing on high, outdoor places. Windmills per night wrapped in millstones from 100 to 400 grain pounds. They also had stupas (kernels) to obtain cereals. In order for the mills to work, their wings had to be turned under the changed wind - it led to a combination in every mill of fixed and moving parts.
Russian carpenters have created many diverse and witty versions of mills. Already in our time, more than twenty varieties of their design solutions have been recorded. Of these, two principal types of mills can be distinguished: "Pobbins"
Pobbing mills:
a - on the pillars; b - on crates; B - on the frame.
And "tents." The first were distributed in the north, the second is in the middle lane and the Volga region. Both names also reflect the principle of their device.
In the first type, the milling barn rotated on a pole in the ground. Support served either additional pillars, or a pyramidal log pad, chopped "into dign" or frame.
The principle of mills-rolling was different

Mills Towers:
a - in the truncated eight; b - in direct octagum; In - octo on the barn.
- The lower part of them in the form of a truncated eight-grumble was fixed, and the lower side of the upper part rotated under the wind. And this type in different areas had a lot of options, including mills-towers - chetver, monotherb and octal.
All types and variants of the mills are striking with an accurate constructive calculation and logic of wristbands that kept the winds of great strength. Folk architects also paid attention to the appearance of these single vertical economic structures, the silhouette of which played a considerable role in the settlement ensemble. This was also performed in perfect proportions, and in the grace of carpentry work, and in the threads on the pillars and balconies.
Water mills


Windmill scheme 

Mill on donkey pull

Melnic

The most essential part of the flour mill-maker chopped or tackle - consists of two millstones: top, or runner, BUT and - Nizhny, or Lower, IN . The millstones represent the stone circles of significant thickness, having in the middle of a through hole, called the point, and on the thick surface of the T.N. notch (see below). The Lower Gernov lies motionless; his point is tightly closed by wooden sleeve, steple g. , through the hole in the center of which passes spindle FROM ; On the top of the latter, the runner is affected by iron rod CC. reinforced by the ends in a horizontal position in the glasses of the runner and called paragago paragraph, or fill. In the middle of the paragraph (and, consequently, in the center of the millstone) from the bottom side, a pyramidal or conical deepening was done, in which he entered into a pointed upper end of the spindle FROM . With this connection of the runner with spindle, the first rotates when the latter rotates and, in the case of need, is easily removed from the spindle. The lower end of the spindle is inserted in a spike in the bearing, fortified on the beam D. . The latter can be lifted and lowered and thus increasing and reduce the lamination between the millstones. Spindle FROM It is rotated by the help of t. n. Pasting gear E. ; These are two disks, suitable on the spindle in a short distance from each other and bonded between them, around the circumference, vertical chopsticks. The valve gear is rotated using the windshield F. Having on the right side of his rim teeth, exciting for wands of the valve gear and thus rotating it with Spherical. On the axis Z. wear wing, which is driven by the wind; or, in a water mill, is a water wheel driven by water. Grain is introduced through the bucket but And the point of the runner in the gap between the millstones. The bucket consists of a funnel but and borea b.suspended under the glasses of the runner. Grinding grain occurs between the top surface of the lower left and the bottom runner. Both millstones are dressed casing N. which prevents scattering grains. As it grinds, the grains are accomplished by the action of centrifugal strength and pressure of the newly arriving grains) from the center of the bottom to the circumference, fall from the lower and go, on the inclined chute, into the hyplevual R. -For sieving. Sleeve E is made of woolen or silk tissue fabric and placed in a closed box Q. From which its underlying end is exhibited. First, thin flour is sieved and drops in the back of the box; More rude sketches at the end of the sleeve; Bran delaying on Sitka S. , and the coarsest flour is going to the box T. .
Pulp
 The surface of the jar is separated by deep gutters called furrows, on separate flat plots, called grinding surfaces. From furrows, expanding, smaller grooves, called plumage. Furrows and flat surfaces are distributed in the form of a repeating pattern called accordion. Typical flour rim has six, eight or ten such harmones. The system of grooves and grooves, firstly, forms a cutting edge, and secondly, it provides gradual renuncing of finished flour from under Zhernov. With constant use of millstones require timely fitting, that is, hanging the edges of all gutters to maintain the sharpness of the cutting edge.
Forests are used by pars. The lower row is installed inpatient. The upper rustling, it is the runner, - movable, and it is it that produces direct grinding. The movable millstone is driven by a cross-shaped metal "pin" mounted on the head of the main rod or the driving shaft rotating under the action of the main mechanism of the mill (using the wind or water energy). The embossed pattern is repeated on each of the two millstones, thus ensuring the effect of "scissors" when grinding grains.
The millstones should be equally balanced. The correct mutual location of the stones is critical to providing high quality flour grinding.
A special stone breed is the best stoneware material - viscous, solid and unable to polish sandstone, called millstone. Since stone rocks in which all these properties are developed enough and evenly occur, there are rarely, then good millstones are quite expensive.
On the rubbing surfaces, the fools make a notch, that is, a number of in-depth grooves pierce, and the gaps between these grooves lead to a rough-rough condition. The grain falls during grinding between the grooves of the upper and lower mills and is broken and cut into the sharp cutting edges of the grooves of notches on more or less large particles, which grind completely at the outlet of the grooves.

The grooves of notches also serve as the paths along which the grinding grain moves away from the points to the circumference and go from the millstone. Since the millstone, even from the best material, is erased, the notch must be renewable from time to time.
The milling mills are called for the fact that their barn rests on the post, covered in the ground and covered outside the log cabin. It covers beams, holding a pillar from a vertical displacement. Of course, the barn is resting not only on the post, but on the Siruba-Troops (from the word cut, logs, cutted not tightly, but with proces). On top of such a row, a flat round ring from plates or boards is made. On him and relies the bottom frame of the actual mill.
There may be different shapes and heights in the column, but not higher than 4 meters. They can rise from the ground immediately in the form of a tetrahedral pyramid or first vertically, and with some height to move into a truncated pyramid. There were, the truth is very rare, the mills at the low frame.
The base of the rolling can also be in form and designs different. For example, the pyramid can begin from the ground level, and the design is not cutting, but a frame. The pyramid can rely on the connoisseur four, and the utility rooms can be attached to it, a melnik room, etc.
The main thing in the mills of their mechanisms. In rolling, the inner space is divided by overlaps into several tiers. The message with them goes along the steep stairs of the attic type through the hatches left in the floors. Parts of the mechanism can be located on all tiers. And they can be from four to five. The mighty vertical shaft is served by a rod, piercing the mill throughout the hatching. It relies through a metal groove attached to the beam, which lies on a broomable frame. The beam with wedges can move in different directions. This allows you to give the shaft strictly vertical position. You can also do the same with the help of the top bar, where the shaft pin is embedded in a metal loop.
In the lower tier, a large gear with fists-teeth, fixed along the outer contour of the round base of the gear. When working, the movement of a large gear, multiplied several times, is transmitted to a small gear or a set of other vertical, already metallic usually. This shaft stitches the fixed lower millstone and rests on a metal bar, on which the upper movable (rotating) rails are suspended through the shaft. Both mills are dressed with a wooden casing with sides and from above. The millstones are installed on the second Mill Yarus. The beam in the first tier, which relies with a small vertical shaft with a small gear, is suspended on a metal rifle pin and with the cast washer with handles can be slightly raised or lowered. With her, the upper mill rises or falls. This is so adjustable grain grinding.
From the casing of the millstone down, the deaf milk gutter with a bay board at the end and two metal hooks, which is hanging on a bag filled with flour.
Next to the railway block is installed crane-bugs with metal gripped arcs. With it, the millstone can be filmed from their places to catch.
Above the housing of the millstone from the third tier is descended toughly fixed to the overlap of the bunker grain. It has a valve, with which you can overlap the grain feed. It has the form of a tipped truncated pyramid. From below the swinging tray is suspended. It has a juniper bar and a pin, lowered to the upper mill. In the hole eccentric, a metal ring is installed. The ring can be with two-three oblique feathers. Then set symmetrically. The pin with the ring is called a shell. Running over the inner surface of the ring, pin all the time changes the position and sinks a spherical suspension tray. This movement is referred to the grain in the yawn mill. From there it falls into the gap between the stones, grinds into the flour, the one goes into the casing, from it in a closed tray and a bag.
The grain falls asleep into the bunker embedded in the floor of the third tier. Grain bags are served here with the help of a "company and rope with a hook. The gate can connect and disconnect from pulley planted on the vertical shaft. It is made from the bottom with the help of a rope and lever. In the overlap board, the hatch is cut off, covered by obliquely supplied two-ring sash. Bags , passing through the hatch, open the sash, which then arbitrarily slam. Melnik turns off the gate, and the bag turns out on the hatch covers. The operation is repeated.
In the last tier, located in the "cap", another, small gear with beveled fists-teeth is installed on the vertical shaft. It makes the vertical shaft rotate and launches the entire mechanism. But it makes it makes the big gear on the "horizontal" shaft. The word in quotes is concluded because actually the shaft lies with some inner end slope down. It is concluded in the metal shoe of a wooden frame in the metal shoe of a wooden frame, the base of the cap. The elevated end of the shaft, which goes out, calmly lies on the stone-"bearing", slightly rounded from above. On the shaft in this place, metal plates, preventing shaft from fast erasing, are embedded.
Two mutually perpendicular bruses-bracket are cut into the outer head of the shaft, which are mounted with clamps and bolts other beams - the base of the lattice wings. Wings can take the wind and rotate the shaft only when the sail will be raped on them, usually rolled into the harnesses into the late, not working time. The surface of the wings will depend on the strength and speed of the wind.
The gear of the "horizontal" shaft is equipped with teeth embedded in the side of the circle. From above, it hugs a brake wooden block, which can be released or tightened with a lever. A sharp braking with a strong and impetuous wind will cause a high temperature when the tree frustzes about the tree, and even the depression. It is better to avoid it.
Before work, the wings of the mill should be turned towards the wind. For this, there is a lever with a pink - "drove".
There were small columns with a number of at least 8 pieces around the mill. To them "drove" and was attached to a chain or a thick rope. Silah 4-5 people, even if the top ring of the tent and part of the frame is well lubricated with solidol or something similar (previously lubricated with pork lard), it is very difficult to turn the "cap" of the mill, almost impossible. "Horsepower" here is also not suitable. Therefore, we used a small portable gate, which alternately dressed on the columns by its trapezoid frame, which served the basis of the whole structure.
A block of millstone with a casing with all parts and parts located above and below it, was called in one word. Usually the small and average windmill varies "about one post". Large windmills could be built with two podasses. There were windmills and with "crushes", on which linseed or hemp seed was pressed for obtaining appropriate oil. Waste - cake, - also used in the household. "Silent" windmills seemed to have not met.
The mill is a mechanism in which various grains are smoldering, for example wheat, in order to get flour, or small animal feed.
Mills are different forms and volumes.
There are several types:
Manual
Water
Windmate
Electric
All kinds of mills have grinding mechanisms called millstones. They are driven by various forces.
Manual mills Work from the applied force. While the person turns the handle, the mill works as soon as he is tired, and decided to rest, the mill is not grinding the grain.Water mills Use strength of water. Such mills are usually built near rivers with a rapid flow. The water mill on the wheel has special blades when water flows, it rests on these blades, thereby pushing them and leading all the wheel in motion, and they, in turn, rotate the millstone.
Similarly, works and

Windmills Work with wind. They have blades with beveled edges. When the wind blows, it slides about the inclined surface and repels them. They begin to spin.

Electrical mills Rotate the millstone with the help of special motors who work from electricity.
Currently, the electric mills are mainly used.
When a person wants to get a flour, he goes to the mill, pouring wheat into a special container, from which the grain is served in a small amount in the millstone. There they are grinding into small pieces that are cleaned and sieved. At the end, we get a clean white flour, from which our mothers bake our delicious buns and pies.
Mini Test
1. Why do you need a mill?
2. What types of mills are there?
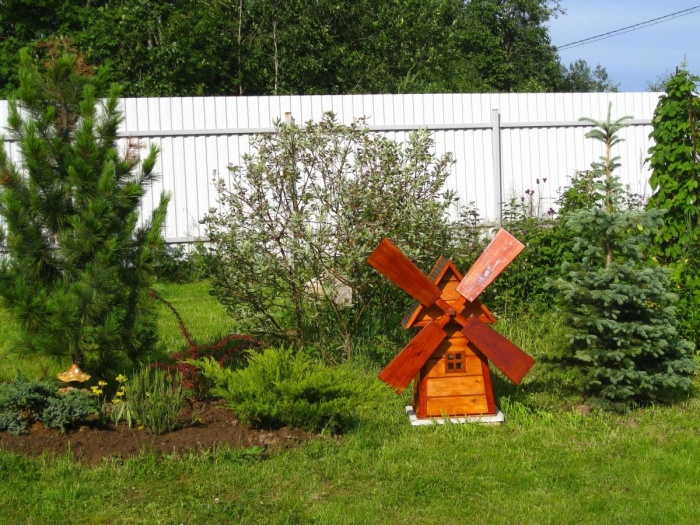
At one time, the windmill was an important structure that allowed a large number of operations. With its help, it was easy to crush the grain in flour or for livestock feed. Today, the mills that would work from the stream of wind or water, no one uses, but they are successfully used in landscape design. Cove the principle of work mill and can I collect it yourself? This will be discussed in the article.
Principle of operation
The principle of windmill work can be described quite simple. As a driving force, air flows are used that are constantly moving. The wind acts on three main nodes:
- blades;
- transmitting mechanism;
- working mechanism.

In the mills that were used earlier, the blades could reach a length of several meters each. This was done to increase the wind seizure area. The dimensions were selected depending on which function was performed. If the mill's power required more, then the propeller was more. The most large blades were equipped with mills that Moli Flour. This is due to heavy millstones that needed to rotate. The shape of the windmaster blades was improved over time, and they were created in harmony with the laws of aerodynamics, which made it possible to increase their effectiveness.

The next windmill, which follows the blades is a gearbox or transmitting mechanism. Sometimes this module served only the shaft on which the blades were mounted. At the second end of the shaft there was a tool that performed work. But such a windmill mechanism is not particularly safety and reliable. Stop the mill if necessary is simply impossible. In addition, the shaft could easily break if he swamped something. Reducer is a more efficient and elegant solution. It is suitable in order to transform the rotation of the blades to the useful work of a different character. In addition, disconnecting the components of the gearbox, you can easily stop the interaction.

Equipment that could be applied and applied with a mill is the most diverse. In addition to millstones, it can be various blades based on blades, thanks to which in a short time can be prepared for livestock food. On the mills could be installed joinery equipment, which was powered by the power of the wind.
Where you can use the mill

The mills are tested by the second birth, but this is not explained by the return to the production methods that were used earlier. More and more people are asked about the principle of action of such a design. Those who saw a small windmill with one eye, which was installed in someone in the garden, wanted to have a mill and in their site. The mill can be exactly the highlight that was lacking for the garden with trees. The mill attaches individuality to any site. It is difficult to find two identical mills that would be made with your own hands. Each master contributes its work.

The windmill can be finalized and engaged as an electrical generator. This will reduce the territory of the yard with the use of LED light bulbs and do not pay for electricity. This will require certain knowledge of physics and an email. A similar way can be engaged in a mill if a small stream takes place on the site.
The approach to landscape design should be moderate. Without special difficulties, you can put a variety of colors and other plants, but it will look like it will be tasteless. Each project should have its own highlight. Exactly trimmed lawn rarely can surprise. The mill on the plot will give the opportunity to stand out. Near her you can equip a small corner for relaxing after a hard day, it can be a cache for the expensive heart of smallest things. About other possibilities of using such a mill are described below.
Additional ways to use

Windmill may not only be a generator and a simple element that will decorate the site. She may have other practical applications. That is why it is worth thinking well, where it can be installed. For example, if a system of automatic irrigation was carried out in the gardening site, then the hatch is likely to be present in which all the waterways are located. Such a hatch is impossible to hide under the lawn grass, but if this is not done, then it will stand out and spoil the view. In this case, the mill will come to the rescue. It can be mounted directly on the hatch cover than it hits it. At the same time, visitors will not suspicion that something is wrong.

Not always sewage elements are hidden in hatches. In addition, there may be other items on the lawn to be hidden. Due to the fact that the material for the mill is selected light, it cannot damage the elements. Also, the housing is performed in the form of a cap, so it can be installed on top. If you build a mill of big dimensions, then the children will be inconclusive. They will be able to use the mill for games with friends. If the design will be applied in this way, it must be well strengthened so that it does not injure Chad. In addition, you will need the entrance to which you want to do from the reverse side.

To care for the garden and lawn, a lot of tools are used. It is more convenient if it will be directly on the plot and you do not have to return to the storage room near the house. This can also help the mill. Inside the mill, you can equip an excellent inventory storage room. So that it is kept as compacting as possible, you can build various garden organizers. The mill can be built from a natural stone or refractory brick. In this case, it is possible to think through it so that it serves by the Mangal. You can also build a small table for this.
Note!The problem for many are moles that constantly break the territory of the garden. You can partially solve this issue with the help of the mill. It is able to transmit vibrations from rotation. This is done due to the fact that the legs are bought into the ground at least 20 cm. Additionally, you can mount in the windmill design vibromotors that will scare animals.
Making your own hands

It is impossible to fit the mill. Although the design of the windmill and may seem quite simple, but it is necessary to calculate everything correctly. Only in this case, you can get a really worthwhile product that can decorate the site. First of all, it is necessary to choose the territory on which the windmill design will be installed. If you put the product between the trees, it is lost there and will not please the eye, in addition, the wind force between the trees is less, so the rotation of the blades can be practically absent, which will be bad in the presence of a generator inside.

Note! It is easier to deliver the required materials on the open area, and it is also easier to assemble the vane design of the windmill.
After the selection of the area under the windmill, it is cleaned and preparation. The first thing is cleaned from various elements that may interfere. This applies to old branches, shrubs or big weed. If a tree grew on the site, it will be necessary to emerge a penal. After cleaning, the grass is removed and a small portion of the soil is removed in the place where the mill will be located. Then the foundation is prepared to which the windmill will be mounted.
Drawing
There is no strict rules for the assembly of its own version of the mill. The main task will draw a good schematic drawing. It should be visible all the details of the mill. Depending on the selected area and goals that are assigned to the mill sizes are selected. They must be specified directly on the sketch. Example is visible in the photo above. The next step is the selection of material for the mill. It is suitable for wood in his quality, but it must be treated with an antiseptic, as well as to cover with varnish so that it does not swell from the exposure of moisture, and also was not made by pests.
Note!An excellent solution for the windmill design will be pine. It is impregnated with resins, so wicking up moisture perfectly. The cost of such wood is relatively low, so it is great for conceived.
Preparation of foundation

When everything is clear with the size, you can go to the manufacture of the foundation for the windmill. This is an optional procedure, but it is required if the windmill is significant and applied as a service room. A small pit is digging to a depth of 50 cm. The layer of 15 cm is made by the rubble plump, the sand of medium grain is stacked with the same layer. It is necessary to tackle and align so that the windmill stands smoothly. The formwork is exhibited at that height to which the foundation for the windmill will rise. In most cases, it is not required.
Inside the pit under the foundation of the windmill, the reinforcing grid is stacked. It is made of reinforcement, which is intertwined with a knitting wire. The top of the concrete is performed on top. It needs to be good to ravibly, so that there are no voids, because of which cracks could go in the foundation of the windmill. Installation of a windmill on a foundation can be performed after a few weeks.
Assembly

The first thing for the mill will need a framework. It can be made of a wooden bar with dimensions of 5 × 5 cm. It is necessary to mount it not to a concrete base, but to a small painter. It can be made of a bar with a size of 10 × 10 cm. A square or rectangle is made of the bar. Everything will depend on the selected design. Elements are firmly connected to each other. It is necessary to check whether each goal is 90 °. After that, a layer of waterproofing from the regularoid is placed on the foundation for the mill. It is necessary that moisture from concrete does not damage the wood. The rubberoid is laid on the wooden structure of the windmill base and is screwed to the base anchors.

The next step will be the installation of a log frame. On four corners are attached racks for a mill. Most often, the walls of the mill have a trapezoidal form, so the bars are attached not at right angles, but with a small slope. For this, they must be pre-trimmed. Fixation to the base is made by metal corners. When four racks for the mill are in their places, the upper strapping is made. Additionally attack the transverse spacers that will increase the strength of the entire mill design. It is just the moment when you need to strengthen the places where the window and doors will be located.

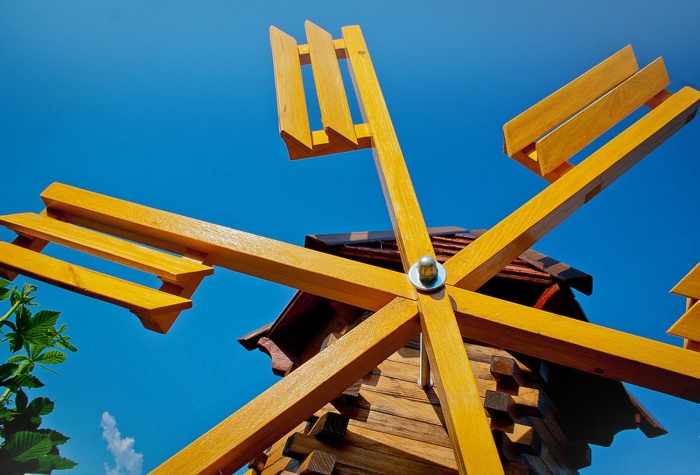
The next step is the roof of the mill. In the windmills, a small duplex roof looks perfectly. Brucks are constructed triangular farms that are mounted on top of the mill. After that, the cover of all wind turbine walls is carried out except facial. Windmill trim can be carried out with wooden clapboard or block house. Closer to the roof of the front side of the windmill, the mechanism to which the blades will be installed are recorded. It may be a pipe that presses several bearings. It is possible to fix it on the horizontal crossbars of the windmill frame using clamps. Metal shaft from blades is inserted into the bearings. It can be made from the segment of the reinforcement.
One of the most difficult elements of the windmill is a propeller. The above is the approximate design of the windmill blades. Dimensions can be proportionally increased depending on which dimensions have a specific windmill design. After that, the propeller is set to the previously prepared shaft. Now you can sew the front wall of the windmill. Next, a window and doors are mounted in the windmill, and the organization of the internal space is performed. A professional flooring or metal tile is suitable as roofing the windmill. Video about the assembly of the decorative windmill is lower.
Note! It is important to provide a mechanism that will stop the windmill shaft. It will be needed during a strong wind so that the windmill blades are not damaged.
Summary
As can be seen, a windmill or mill can be a rather useful addition of the garden. Due to its unique type, the windmill will definitely attract the attention of passers-by and guests. In addition, the windmill will significantly simplify the task of servicing the garden. Inside the mill, you can place the pumping equipment and the main control units, which will save them from adverse weather conditions.
The era of agriculture has sunk in the past many centuries ago, but this does not mean that all the events of that time now do not mean anything. For example, today it will be talking about how to make a windmill with their own hands.
Start standing with that why is it, in general, you need? It is unlikely that someone with her help will grind millet in flour. And professional farmers are engaged in the cultivation of milf, who have a modern technique for all production processes. Nevertheless, more and more dachots are wondering how to make a windmill with their own hands?
This excitement is explained quite simple - a windmill that can be easily made with your own hands is a magnificent element of landscape design, which makes a plot of truly unique. Sell \u200b\u200ba garden that has such a raisin is much easier than a plot like two drops of water similar to the neighboring.
In the modern world, uniqueness is valued above all. That is why if you decide to make a windmill with your own hands - this will allow you to transform your garden. In addition, with due diligence and a small excursion to physics, you can use this structure as a source of energy.
Attention ! Windmill can be used as an electric generator.
Windmill on your summer cottage can not only be an element of the landscape that you have done with your own hands, but also the wind energy converter. This will allow to significantly save the family budget.
Additional quality windmills

Before you choose a place to install a windmill, you must consider that this structure you will make your own hands can have several appointments:
- Windmill can hide a number of unsightly places of your site like a sewer hatch.
- Some windmills that can be made with their own hands are performed from lung materials. As a result, it is possible to minimize their dimensions. Therefore, these structures are often used as protective caps for pipe valves and other engineering objects.
- Building can be used as a house for children's games. To do this, you will need to consolidate a little, but there is nothing unreal. The main thing is to make it stable and do not forget about the entrance.
- In the construction of large sizes, made under the mill with their own hands, you can store a varied garden inventory. In fact, it will be a utility room.
- Stone mill can also be used as a brazier.
- This structure with a small modification can be used as scarecrow for moles. It is enough to wear the legs deep into 20 centimeters so that vibrations from the design that will occur when the blades rotate are transmitted to the ground.
As you can see a windmill that you make your own hands, you can find many applications as an element of landscape design.
The role of a windmill in landscape design

The modern world is so diverse that in order for the site to be the best, insufficiently easy care and smooth beds - it is necessary to stand out. At the same time you need to do everything with the mind. After all, landscape design is a complex science that takes into account the many nuances.
For example, when choosing vegetation, factors are taken into account as:
- shadow,
- humidity,
- combination with other cultures
- necessary irrigation systems, etc.
One of the most trend elements of landscape design is at the moment a windmill is considered. The most important advantage of such a structure is that the design can be made with their own hands.
Make a windmill do it yourself
Choose a place and prepare it

Building a windmill is a much more responsible event than it may seem at first glance. It is necessary to take into account many factors to get a truly worthy element of landscape design.
Best for installation fit open space. First, here the wind blades will almost always rotate, and secondly, it is much easier to collect this design in the open space, since nothing will disturb you.
After you select a suitable place for mounting, you will need to remove the site. Remove all embarrassed bushes and hemp. If the grass is too high - cut it with a lawn mower.
Earth before installing the design you need to carefully dissolve. Only after that you can proceed to laying the foundation, more precisely, the platform. To choose the right place, you must clearly represent how your future structure will look like.
Create a plan

As an example, take an elementary structure, which, with due dome, will be able to build every person. It all starts with the creation of a plan:
- Draw a sketch of the layout.
- Through the drawing, you will calculate what dimensions should each detail of the windmill that you want to make with your own hands.
- Choose the optimal material from which the main design elements will be made. Pine is considered the best choice. It has high performance qualities. At the same time, its value is at an acceptable level.
After with the plan and drawing, everything can be started to proceed to the direct assembly process.
Selection of the necessary tools and materials
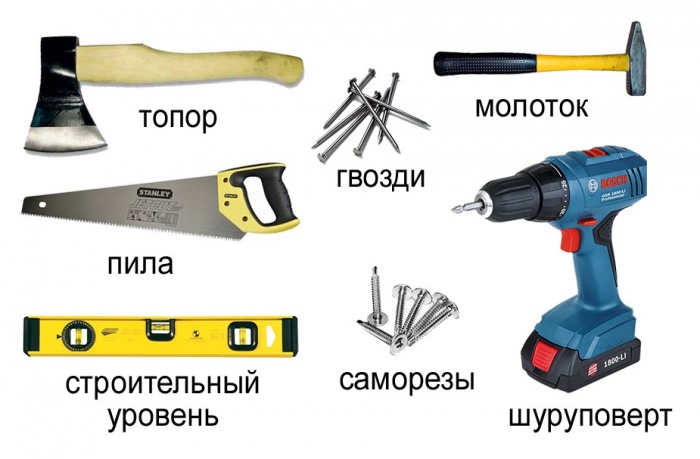
To create a decent building you need such tools:
- Rule for creating corners.
- Pens, markers, pencils, circulation, markers.
- Construction roulette.
- Drill with a set of different-caliber nozzles.
- Skuropholder or screwdriver. Also for this purpose you can use a conventional drill with a special nozzle.
- Hammer, saw, jigsaw.
- Bolts, nails, washers, self-tapping screws, screws. The length of the elements directly depends on how thick boards you will use.
- Sanding paper for grinding elements. You can also use a grinding machine.
With the help of these tools you can make a great windmill with your own hands, which will become an excellent addition to your concept of the country landscape. Also to embody the idea you will need such materials:
- To make a windmill with their own hands most often use Paneur or lining. Wide boards are excellent for the hull.
- To make the walls with your own hands, use bars.
- For the sheat, any material will suit.
- To make the blades, use metal racks or pipes.
- Corners.
- The roof can be made of plywood. Use racks as fasteners.
- In order to secure the paddle screw with their own hands you need a spire and bearing.
After all the materials and tools are collected, you can make a windmill with your own hands.
Marking design
After all the drawings are made, and the desired inventory is assembled, you can proceed directly to the design markup with your hands:

After you make a windmill markup with your own hands - carefully cut down all the items, pass them away, treat special compositions and only after that start the final assembly.
Treatment
For the impregnation of the tree it is best to use the following compounds: Pinotext, Aquatex, Belinka.
Important ! Impregnation must be made in 2-3 clips. This ensures protection resistance. At the same time, each layer must have time to dry.
Assembly
After you complete the processing of all parts of the windmill, it will be possible to start its assembly with your own hands. Just follow this instruction, and you can do everything yourself:
- Crerate lateral parts with the help of rails.
- To make the base of the windmill do it yourself, use two squares that have holes in the middle.
- Connect the base and the housing of the windmill with self-masses.
- Skolit two triangles whose bases are 38 cm, and the side 35 and a half.
- On both sides, screw to the triangles of Phaneur.
- The roof must be made of two parts. Each will go to five pre-elements prepared in advance.
- Hardening windmill Make your own hands using wooden plates.
- On the ends of the blades, fasten short rails and screw the circles in the center. Then drill in the middle of the hole and install the hairpins. You also need to do with the end.
- Secure the spire. Whole design with nuts.
At the end, put on the cover on the body that you did with your own hands and secure everything with self-draws.
The detailed process of assembling the windmill device you can see on the video below.
Decoration
After you made a windmill exclusively thanks to your hands, you need to give it an appropriate look. For this you can use varnish. He will give your construct completion.

Attention ! If the elements made of wood are processed not high enough, it is better to use paint.
To give a windmill additional entourage its elements can be painted with different colors. You can also add drawings like flowers, butterflies or insects. Each of them is easily done with their own hands, if you use a little imagination.
RESULTS
As you can see, make a windmill for everyone. The main thing, in the initial stages, draw the correct marking and choose a good place. Also, it is also necessary to decide in advance what kind of unique qualities will have a structure.
 How to return the love of her husband to his wife - Tips of the psychologist
 Why you can not give icons