Street labyrinth as a quick-reaching business. Mastery Unusual games from girlfriend how to make a ribbon maze do it yourself
Want to diversify the rest of your children, turning the remedies in the field for creativity? Then use when arranging the playground and the manufacture of game equipment that has served the economic inventory and not found natural materials on the farm. Be sure that the playground created by your hands will always be filled with laugh and ringing the voices of children playing on it.
Water games are one of the most favorite activities of children of any age. They are capable not only to entertain the curious baby, but also serve as a means of knowledge of the surrounding world.

To enjoy communication with the water element you can, having arranged on the grass in the playing area of \u200b\u200bthe site. Improved tap labyrinth
Collect the tap labyrinth can be from the containers of any size. For this purpose, boldly use:
- plastic bottles;
- old kettle with spout;
- flower vases and pots;
- metal bowls and piles.
But still, the most preferable to use plastic bottles with the labyrinth arrangement. It is convenient to cut both along and across, giving the desired shape. Some of the bottles can be plastic covers at all, the small holes are pre-drilled in them.
Capacities It is only necessary to place on the vertical plane so that water smoothly flows from one to another, going down to the footage. To create grooves and tunnels, it is convenient to use polypropylene rigid or corrugated easily curved pipes of different diameters.

As a reliable, but at the same time, the lightweight support for the placement of the design is the easiest way to use the fence, firmly attached to the holder or one of the walls of the house
Strict technology for creating a plumbing labyrinth does not exist: the tank can be placed on the vertical plane in any order. Fasten the bottles and piles on the shield is the easiest way with the help of clamps and screws. Elements can be made both stationary and removable. The second option is preferable in that it provides the possibility of children during the game to change the location of the cup, making new ways for flowing streams.
Hanging at different parts of the bowl remains only to connect the pipes from the pipes, having rubbed them at different angles so that when flowing, the water created interesting devices and unexpected turns.
To make the process of flowing water more spectacular, pre-tighten the liquid with watercolor or gouache paints to the desired shade.

Such a labyrinth created from her friend funds will certainly cause children a sea of \u200b\u200bdelight, giving an excellent opportunity to have fun at an interesting occupation
Water games will contribute to the development of the coordination of the movements of the child in the "Eye - Hand" system and tactile-kinesthetic sensitivity, in parallel with this removing the tension and providing a psychotherapeutic effect.
Option # 2 - Natural Designer
Small penets, sleepers-kreagashi and the remaining branches left after trimming can also be used on the playground. They will serve as an excellent basis for creating a natural building designer.

Carefully stripped lumps a child will be pleased to be taken in hand using multi-tier towers and high locks
From Pohenkov, young designers will be happy to build forest houses for dolls and reliable fortresses for guarding their soldiers, and from sleep-killy, children - lay out pyramids and multi-level structures.

Spreadts of thorough and fir bumps can be adapted under the material for laying out puzzles on the grass or to create geometric patterns
To protect the kids from scratches and the head of the game with a natural material, each workpiece must be carefully cleaned with sandpaper from jar and sharp edges.
The material about the crafts for the playground will also be useful:
Option # 3 - Twister on the grass
Young fidgets will appreciate the offer to play the active Twister game. The main task of the game is to maintain the balance, overlooking the feet and palms in the circles drawn on the game field at a certain distance from each other. The rules of the game are so simple that children are able to master them literally in a few minutes.

It is difficult to stay from laughter, trying to task the master and reach the feet or palm to the lined circle, without bolding at the same face in the grass
The charm of the game Twister and is that it is interesting not only to play. Watch from the part, as participants are trying to turn around, which take the position specified by the arrow, very exciting and fun.
To make any times not messing out with the laying of a large canvas, the playing field for the twister can be built directly on the grass. For work it will be necessary:
- lace and pegs for the markup of the site;
- cardboard stencil round shape;
- a set of strips of dense cardboard;
- 2 tin cans of small diameter;
- aerosol paint in 4 colors.
The circles of the playing field in the traditional twister set are painted in four colors: yellow, red, green and blue. For the absence of such shades, you can use any other color you like. The main thing is that he can contrast on the background of green grass.
Choosing paint for applying circles, give preference to the compositions on latex, vinyl acrylic or water-emulsion basis. They have bright saturated shades and do not bear danger to children's health.
To improve the playing field, select a flat area of \u200b\u200b4x2.5 meters. With the help of pegs and lace, mark the boundaries of the future field and take the 4 lines for placing color circles. Then, dividing each line into 6 equal sections, take a point for the placement of color circles. You must have a field consisting of 4 rows, each of which is placed on 6 circles of one color.

In order for color circles to be with smooth edges, and the playing field had a neat appearance, use stencils when staining "islets"
Spray the paint through the stencil, forming a row behind the playing field. While the paint dries out, proceed to the manufacture of a tape measure. It will indicate which position it is necessary to accept a particular player. You can make it from the same cardboard. But you can do much easier. This will require 2 banks. Strips will be invested in them:
- in the first bank - strips of the corresponding four colors;
- in the second - white strips depicting the right and left foot and, accordingly, the right and left palm.
In the process of the game, the presenter will just get out of the cans on one lane and form alternately "pair" task for each of the players.

A fascinating outdoor game will become a bright attribute for recreation sites and easily turns the usual day off in a fun holiday
Option # 4 - Music wall with xylophone
Noise instruments contribute to the development of the musical and creative abilities of kids, not to mention the joy that the guys organized by their home orchestra. By combining all sorts of "sculptures", "Gremelki", "stivery" in a single design, you can build a music wall.

Noise tools made from handicrafts with their own hands, make a child in a new way to hear the amazing world of sounds
To create a music wall will be required:
- empty tin cans;
- metal covers;
- plastic bottles;
- old cutlery.
In principle, any kitchen utensils can be used, which will get to extract sounds. Plastic bottles are easy to adapt to rattles, filling them with old buttons either bones of persimmon and apricots, and then hiding on a solid thread to the shield.
Somewhat on the old hanger of metal corners and old disks each time in contact with each other will be made of sound like bells.

To turn the shells from nuts in "Racks", and plastic covers from bottles in "Gremelki" will need at least forces and skills
Variating the ways of the game, the baby will explore the sounds, creating close to him musical images and making the first steps in musication.
To create more muted, but not inferior to the melodicity of sounds, you can make a xylophone at all. The tool externally resembles a small shield, including up to twenty wooden plates interconnected into a serial key.

Collect xylophone from 10-15 wooden bars. The longest plate can reach 50-60 cm, and each subsequent must be 3-4 cm shorter than the previous one
To protect the young musicians from the regionalo floor and scratches, each bar is cleaned with sandpaper. Each "notes" with the help of the marker is scheduled for the middle. Rates from the center of 4-5 cm in each direction, outlined points under the hole for fixing the rope. According to the outlined circuit, the rope is attached, fixing it with nails or paper clips so that the distance between the bars is at least 1.5 cm.
When hanging xylophone, pay attention to the angle of inclination: it solves the tool sound in many respects.

The game with sounds - the right path to the beginning of improvisation, thanks to which the child successfully forms a figurative-associative thinking
Such games in the fresh air will help develop the image of the perception of music by opening the kids wide space for the manifestation of their "I".
Option # 5 - Stone Cave "Elfs"
Everyone without exception, children love to spend time, building different shelters. They can dig in the garden for hours, from branches, blankets and curtains, and then equipping their own housing.
However, such buildings have one annoying drawback: with careless movement in the process of active games, they can literally collapse in their eyes. Take the initiative in your own hands and offer to build for the young fidget the lodge.

Building a fabulous house "Elfs", you will provide the children with our own space and give young fantasies the opportunity to develop imagination
A fabulous house, externally resembling a stone cave, to do easy and exciting. The place under its arrangement is better to choose on the site open and well-being viewed from all sides. Its surface is aligned, purified from stones and plant roots.
For the manufacture of the elven house, it will be necessary:
- custon of tarpaulin or dense polyethylene film with a size of 2.5x2.5 m;
- reinforcing wire mesh;
- wire screeds;
- plastic pipe D20 mm;
- m300 concrete, sacred sand and water.
For work, you can use both a metal reinforcing mesh and made of polypropylene.
From the materials you need to prepare:
- scissors for metal work;
- capacity for mixing the solution;
- stuccoaster;
- spray;
- insulating tape;
- protective clothing, gloves and glasses.
The prepared base is lined with a layer of tarpaulin. This will facilitate the process of cleaning construction residues and pieces of fallen frozen cement mixture.
Material will also be useful on how to create original garden shapes from cement:
The first thing is to build a circle of frame base. To do this, cut a piece of pipe with a length of 5 meters and connect its ends with each other.

Form the circle is the easiest way, closing the ends of the pipe jack using a smaller diameter junction tube, fixed edges by winding the isol
The vertical arches of the frame are erected using the same PVC pipe D20 mm. For this, there are 4 equal segments of 3.5 m long. Of the segments form the arches, setting them at right angles to each other. The edges of each segment are fixed to the base, evenly filling the gaps throughout the circumference.
Two horizontal crossmen are fixed on vertical arches: the lower 4.7 meters long, the top is 3.4 meters. The crossbars are placed on the outside of the frame, fixing them to the arms with a tape.
To form the walls of the cave, the finished frame is wrapped with a reinforcing grid. Provide reliable fastening will help wire screeds, which are necessary throughout the plane every 250 mm. To create a more reliable design, the grid is applied in 2-3 layers.
Note a place for the arrangement of the doorway, with the help of the wires for the wire, the excess part of the mesh is cut and the edges are bent. By the same principle, in front of the doorway, they make a small window.

The walls of the house "Early" from the cement mortar divorced in a separate container, laying it on a cellular mesh and evenly distributing on the vertical surface
Apply the cement mixture only in protective latex gloves, the dense structure of which will protect the delicate skin from "corrosion".
Laying the finished mixture on the grid, do not slowly push, otherwise it will fall through the cells. To create durable walls, the solution is laid out in several layers, withstanding before applying each subsequent time interval of 5-8 hours. At this stage, you should not hurry. The laborious process can stretch for several days. If the plaster dries too fast, wet the surface with a spray with a sprayer or a conventional hose before applying each subsequent layer.
If under the weight of the plaster mixture, the wire base will begin to be saved, until the walls are frozen the walls of the walls with wooden bars.
After laying out each layer of plaster, and waiting until it acquires the necessary strength, it should be adjusted by the surface of the surface with the help of a plaster workman.

After applying the last layer, it remains only to slightly align the walls of the cave, carefully reading the defects, trying to preserve its "natural" view
To protect the construction of atmospheric precipitation and give it a more presentable appearance, cover the outer and inner walls of oil or water-emulsion paint. Yes, to create such a cave you will have to make a lot of effort. But the result will fully justify: children's happiness will not be limit. Little fantasies and young fans of elves will be happy to spend time in their new fabulous "house".
If you wish, you can even build a few caves nearby, creating a small town for role-playing games with reincarnation in fabulous characters.
What is the difference between street labyrinths from labyrinths indoors?
There are no fundamental differences in the design. And you can choose a street labyrinth from a common catalog of labyrinths on the Odada website :. But it is worth remembering that street labyrinths must be protected from weather conditions. Therefore, street labyrinths are often put under a canopy, an awning or their design implies a roof and walls that protect the attraction against nature whims.Rain and straight sunlight can visually worsen the state of your labyrinth, and the moisture will create an additional risk of injury, since obstacles will be wet and slippery. Also, street labyrinths are more demanding of the observance of hygienic standards - follow the cleanliness of the complex you need more carefully.
What are street labyrinths?
Street labyrinths are divided into:
1. Removed street labyrinths with a canopy.Such labyrinths are disassembled when cold weather occurs and can then be collected on any suitable area;2. Not dismantled capital labyrinths.For them, a metal frame is created, a reliable roof and walls. Often, such labyrinths make thematic, with a unique bright design. An example of such a labyrinth is presented below not a photo, this is our project in Berdsk:


What are the advantages of street labyrinths?
Such a business quickly pays off. Already literally for the season you will return your investments.The main condition is to establish a labyrinth on a plot with high passability, where many parents walk with children. An excellent place for such an attraction will be family parks, places near children's institutions, sites near shopping centers, beaches, sleeping areas in which many families live with children.
No need to spend large sums on the promotion of a street labyrinth - he literally sells himself. Children, seeing a beautiful labyrinth, themselves will ask their parents to take them there, and parents will gladly agree. Very often, the parents, seeing the street labyrinth, they themselves offer to children to play it, as the children splash out the energy in the fresh air, and their parents themselves can relax at this time.
Are there any minuses from street labyrinths and how to make this plus?
The most significant minus street labyrinths is seasonality. To fully work such an attraction can only in the warm season. But from this minus you can make a big plus if you install a dismantled labyrinth for the summer, and with the onset of cold, pick up the room under it and install the labyrinth there. Then this wonderful attraction will bring income all year round.When should I order a labyrinth to open up to the season?
Now! Yes, yes, now is the time! The season begins in May, when nature begins to delight warm weather. To open such an attraction in May, you need to choose the type of labyrinth now and run it into production. It should be borne in mind that the production of such labyrinths on average takes about 30 days, it will also take time for shipping (from Novosibirsk) and installation.How much does it cost?
The cost depends on many parameters: from the chosen configuration of the maze (height, area and filling), its passability, as well as from the availability and type of decor. Our managers can calculate more accurate cost, since the number for each labyrinth is calculated individually.We also have discounts, interest-free installments and a loan offer. You can learn details from our managers.
Look, what unusual games you will make out of the priests. They can take children in the campaign, at the cottage, at home.
How to make a giant domino with your own hands?
Often, the urban residents catastrophically lack motion. You can fill this gap in the country, making unusual games. Domino is suitable for adults, but unusual.

To move the chips of this, you will have to work hard. But first you need to make diligence to make domino. For him you will use:
- boards;
- saw
- dark grinding;
- painting brush;
- white oil paint;
- circle pattern;
- grinding machine or sandpaper.

Now consistently, giving each layer to dry, apply two or three layers of the veil.
When the last dry, then proceed to an interesting markup process. If you do not strive for perfectly smooth form, then can draw separating strips with white paint brush. If you want them to be impeccable, then use stencils. This subject, but with a round hole, will help apply other elements on the domino.
Draw the circles on the figures, let them dry, after which you can try the game in action.

"Noliki cross" for children
Sometimes the idea for entertainment can be found almost under your feet. Look at how to make an even more interesting game in "Noliki cross", taking stones.

That's what you need to use to make such unusual games:
- board;
- saw
- paper sheet or cardboard;
- stationery knife;
- line;
- white oil paint;
- stones;
- scotch;
- tassel.
Now on this pattern attached to the ski pattern, apply a layer of white paint, let it dry, color the second time.
While the surface for the game is dried, stones. First, well wash them with a brush, dry. Then draw on some crosses, on other zolics.

You can diversify this entertainment if you paint stones in two types under insects. Ladybugs are issued to one player, another striped bugs. Wins the one who can quickly build their figures in a straight or diagonal line.

If you want to quickly play "cross-tick-tags", and there is no suitable base, then you can use squares cut from cardboard or tile.

Unusual games for children: master class
They can also make it possible to make something at hand.

For such you will need:
- polyethylene lightning bag;
- transparent hair gel;
- sequins;
- rubber figures of fish, algae or pieces of plastic.
- Use a transparent polyethylene bag in which pillows are sold, other products. If you do not have this, you will need 2 solid packages that you insert one in the other, take the hole with the hole of the tape from above.
- Pour into the prepared capacity of a transparent gel, pour sparkles there, shake several times.
- If there are residents of sea depths from rubber or similar waterproof material, place inside. If there are no such, cut them out of thin plastic.
- The child will be interested in dealing with such a toy, but pour the solution will not go to the top so that it does not succeed through the upper hole.

For her you will need:
- cellophane package with closing device;
- color tape of different color;
- scissors;
- dry peas, beans or beans.
Crafts from disposable plates do it yourself
They will allow you to get attributes for games in just a few minutes. The balloon can be transferred to each other not only by hand, but such interesting devices.

To create you need:
- two plastic disposable plates;
- glue;
- 2 sticks from ice cream;
- air balloon game.
Disposable plates will quickly turn into attributes for nolikov cross. For this, on the reverse side, the relevant signs are drawn with a marker. The game field you will quickly make from the belt from clothes or braids. These elements need to be decomposed in parallel and perpendicular to each other at the same distance, to sew the places of their intersection. After that, the original game is ready.

If you have a cardboard bushing from disposable towels or other material, use it for the next entertainment. Also, it is also necessary to cut down the bottom of one-time plates, paint the remaining rims that the child will do with great pleasure.

With the help of a scotch, stick the sleeve on the inverted plate, it is better to attach a weightlifier from the opposite side. Now you need to throw rings on the base, thereby training your accuracy. You can use and toilet paper bushings. Overlooking some distance, the child will throw a ring from one-time dishes of a certain color.

See what gorgeous decorations for young ladies create from the same cast material. If you have disposable plates left after celebrating some events, do not throw away, wash them, dry. From their lower part, it is necessary to cut the rim, and from the top: heart, sheet, ears, star or another item.
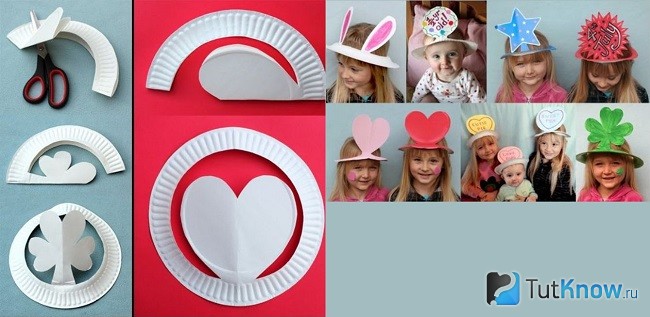
The schemes presented below will simplify your task, you can make such hats for girls who will certainly like these accessories.

But for boys, you can choose a suitable model using for this not a plastic, and a cardboard disposable plate. If so no, you can cut a hat from ordinary cardboard, decorate it with a stylish sticker, which is also easy to make.
If the children decided to play the princes or in the princesses, take:
- disposable paper plates;
- scissors;
- beads;
- glue;
- pencil;
- rule.

If you need to quickly make a carnival mask, this will also help disposable plates. Cut each in half, paint the right color, draw such details of the face like mouth, ears, eyes. But the latter is better to cut to be able to look through the mask. Wrap a wooden skeleton with a paper ribbon. Stick on one side of the mask.

Moving games for children in nature
They are also mastered almost from nothing. For the next you need to take:
- empty tin cans;
- drill or nail with a hammer;
- rope;
- scissors or knife;
- 2 horns;
- durable branch.
- Sharpen the ends of Rogatin, take them to the ground.
- Make two holes in front of each other in tin cans. If there is a drill, drill them with this tool, if not, then put the jar on the chumbach, put the nail on the inside, hit the hammer several times. It turns out the hole of the desired diameter.
- In such a glance, tie her ends.
- Suspend cans on a branch that needs to be fixed at the ends of the rogatin as a horizontal crossbar.
- Children will throw small balls here. Let more points be for entering banks that have a smaller diameter.
Such entertainment is well arranged in the campaign, using the cans taken with them, opening with the help of the ring so that their edges are not sharp. If there are no balls, take the crumpled pieces of the newspaper instead.
Similar entertainment in nature can be made from empty plastic bottles. Fold them in the released cardboard box tightly to each other. Let the children throw rings on them, competing in the accuracy.

For the next unusual game you will need:
- two plastic canisters with handles;
- two types of color tape;
- little ball.

In plastic containers, cut the bottom, if you wish, you can cover them with white acrylic paint. If not, then immediately attach a power strip to the bottom of the bottles. Moreover, one of them will close the sharp cut, framing it on both sides. Now children can transfer the ball to each other and catch it with such interesting fixtures.
Here are what other entertainment in nature can be invented using tin cans.

Collect them. Let a child build a pyramid from this material, and then children will compete at the accuracy, trying to get the balls in such a container.
If you drill holes in this material, but closer to the bottom, it's a solid rope here, fasten it well, then such small stilts can be made.

How to make a labyrinth with your own hands?
If the children tired a little behind the moving games, then offer them more calm, let the children rest. For the next you need to use:
- plastic or wooden tray with handles;
- wooden sticks or straws for cocktail;
- glue;
- small balls.

Speaking about how to make a labyrinth, it should be noted that it can be more voluminous.

Make such a cardboard strip from the box. If you want to make a hamster labyrinth, then use a subtle plywood. The child will be delighted with another cardboard labyrinth, create which will help the boxes.

Rush in some places rounded holes that the baby was able to pass. Connect the design with a tape. This is such an unusual game is waiting for a child if parents show fantasy. Do not leave it one here, because, not finding the exit, the child can panic. Therefore, stand nearby, direct it with a calm voice, encourage, praise and support.
Here's how to make a labyrinth using cotton wands.

For this you will need:
- cotton swabs;
- glue;
- cardboard sheet;
- colored paper;
- little ball.
To make it easier for you to create a labyrinth, look at the next two schemes, where the options for the location of its obstacles are presented.

Unusual racing route for boys
Having shifted to the secking, parents will make a road for loved in the country or right at home. Consider first outdoor options.

To embody this idea, take:
- shovel;
- cement;
- sand;
- water;
- thin brush;
- white oil paint.
- First you need to make the markup of the future track, for this outline the contour shovel, then with the help of this tool, remove the turf to the depth of 7 cm.
- Pour a little sand here, Moisten it. Top pour the solution cooked from water, cement and sand. When it completely freezes, the white oil paint apply the markup of the road.
- Even before that, when the cement grabbed a bit, but remained militant, you can put small pebbles on the edge of the road. Fasten half the tire from the wheel in the form of a mounted bridge.
- Make a pedestrian crossing on the road, put signs so that the child gets the first skills that will certainly be useful in life.

They can be studied not only on the street, but also at home. See what beautiful multi-tiered road will help create the remaining toilet paper bushings.

Some of them need to be cut along in half along, insert into whole elements, fasten with scotch, thereby connecting individual parts into a solid design. The road is drawn on the floor, the road is drawn, after which you can produce cars so that they are with the breeze to be used on this race track.
If there is little space on the floor, you can make unusual games on this topic right on the wall. To do this, you will need a magnetic car, then the machines will hold onto it.

The next racing trace in the child will appear, thanks to mom. Parentine needs to be prepared:
- a piece of burlap or other dense bodily color tissue;
- coversion of black canvas or a wide braid of this color;
- white threads for embroidery.

On the rectangle of dense bodily color fabric, cover or our brass strips in the form of car tracks. Previously, or at this stage, you need to embroider with white threads the separation strip. The child will be happy to play here.
If you need to quickly take the baby, come up with a new entertainment, then stick to the carpet coverage of the contrasting color to turn it into the road.

If you are not afraid to damage the sofa, then attach the tape not only to the floor, but also here. It turns out a two-level racing route.

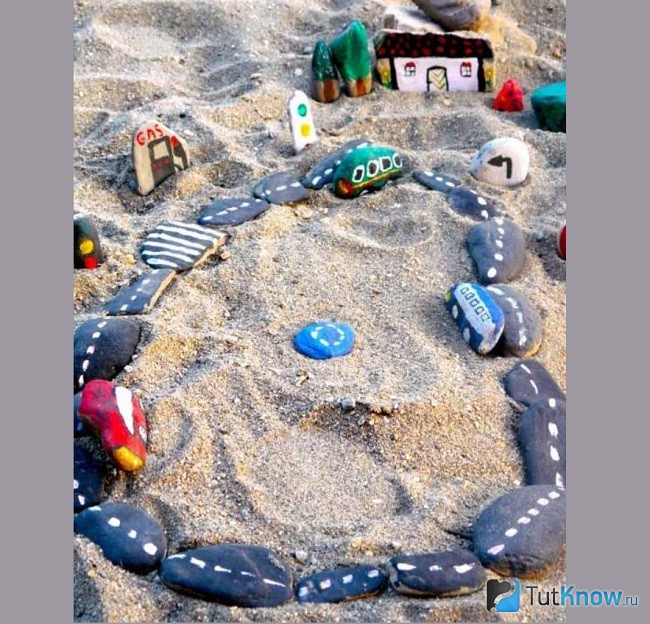
- If you relax with the child to the sea, it's bored on the beach, first grab the paint here.
- Find flat and bulk stones. Some of them need to turn into a road, others in cars, buses that will ride it.
- Other stones paint together with the child to make small houses from them, traffic signs.
So, almost from nothing, you can create unusual games, thereby take a child for a while. The main thing is to show a mixture or use the already proposed ideas. If you want to get acquainted with others, then see the proposed video.
The first tells how to make a fun toy that herself draws.
The second plot will tell how to quickly make an interesting game of thrusters, which even a child can create.
Traditionally, april is some not an outdoor month: (Well, it is impossible to ride in nature for various reasons as often as I would like ... But the soul asks something new and unusual, even in the city. And there are probably such places. This post begins a series of descriptions of places where you can visit Yekaterinburg and have fun. The first place where we visited on April 13, 2015 - the Labyrinth Mabyrinth. The price of the question is 200 rubles.
Since childhood, I love all sorts of labyrinths and all kinds of interest. In Yekaterinburg, there are integer four sites under the "single wing" on Weiner Street, there are labyrinths among them. We visited so far only in one - tape. Somewhere 30m 2 squares and approximately every 10 cm measuring the ceiling is tied with a tape. So you make your way through a lot of ribbons, which are an obstacle.

Nothing can be seen at the distance of an elongated hand, and you walk in the literal sense. And according to the general rule of finding out the labyrinth - we go along the left wall.

Come in. And so as not to lose each other, keep hands. And in order to take a picture or simply release the space, I had to "rake" a lot of ribbons.


A little lyrics. Googled what is "Moebiius" and where tapes are here. It turns out that there is so-called in nature. This is a mathematical surface, visually similar to a closed spiral ribbon, i.e., simply speaking, ring from the spiral. Sight of Infinity " ∞ "(a little later, a little later) is very similar to the Möbius tape. The Möbius tape was opened independently by German mathematicians by Augustus Ferdinand Möbiius and Johann Benedict Listing in 1858. Those. name by the name of the discoverer.


Such a harmless, bright and diverse labyrinth will like children very much. We liked - we are big children?!
 How to return the love of her husband to his wife - Tips of the psychologist
 Why you can not give icons