How to make a wooden stakenik. We independently make fence from the stakenik. Advantages and disadvantages of fence from the stake
Wooden stakenation fence on the summer site - Benefits and Installation
Most often, the wooden stakeholder preferences are preferred those owners who seek environmental purity in the environment. Such a fence is considered the cheapest and attractive extern.
The only drawback of the tree of wood is a relatively short term of use - up to 15 years. It is possible to extend the service life using special antiseptic agents that prevent wood from rotting.
Advantages of a tree stake
Wooden stakenik, along with other types of fences, has a number of benefits:
- versatility;
- low cost;
- attractive aesthetic appearance;
- environmental friendliness;
- a variety of different shapes of the planks;
- reliability;
- the possibility of quick installation and dismantling.
For many owners, an indispensable advantage of the fence is the ability to decorate the fence, "enter" into the decor of the garden plot.
In the presence of special skills, wooden stakenik prefer to combine with such materials as stone and brick.
Wooden fever
Selection and preparation of material
Before starting work, you must prepare the tools:
- hammer, pliers, screwdriver;
- nail holder;
- pencil and roulette;
- screwdriver;
- sandpaper;
- drill drill;
- capron cord;
- welding machine;
- level;
- primer;
- water corrosion resistant paint (can be lacquered);
- benzobur;
- shovel and scrap;
- self-tapping screws (you can galvanized nails);
- wooden stakes (metal stakes);
- metal brush.
In order for the fence you set for a very long time, you need to carefully treat the selection and materials. An important moment before installing the fence - the selection of the material: supports and other stakenice design elements. Best in the quality of the racks tree beams or metal pipe. For a positive result, you must take care of protecting the support pillars.
If you have chosen a tree, you need to cover the bitumen mastic that part of the rack, which we will bury the earth during the installation of a wooden stakenist. The beam itself must be impregnated with an antiseptic. 
It is worth considering that the profile tube is a more durable material, which is hurting to the loads and has a longer service life than a tree. It is noteworthy that we can protect the metal, you can simply remove rust using a metal brush for this. Then the pipe must be primed and painted with frost-resistant paint. From here it should be concluded that installation of wooden fence on metal racks - the most reliable option.
Note: The upper part of the profile pipe must be closed at any time of the year. To do this, to the end of the support, it is necessary to weld the metal plate or put a special plug. To protect wooden moisture supports, it is necessary to shrank the beam, and then cover the waterproof smear.
Preparatory work
Before mounting the fence, it is necessary to conduct preparatory work that are concluded in slap stroke, column processing and tips on a wooden stakenist.
Planed details are economical, more durable and comfortable for painting. End (stated) are carrying elements, they are produced from bars with a cross section of 50 × 80 mm. Also for manufacture, it can be used for the manufacture of 6-10 cm diameter. It is possible to carry out their splicing anywhere in the run in two ways: in half the width of a half or oblique log cabin. It is necessary to ensure that the joints in the lower and upper part of the alone coincide. Extlition is very simple: in the middle of the brackets with the help of impact hammer, it is first bent, and then pressed into the wood. 
Wooden fence bag is made on the cord and template. Any rope is suitable as a cord (it is pulled by two slats at the height of the top end of a wooden stakenice). The template is a specially made crossed, the rack which is made of the board. Its width is equal to the clearance between two straps of the stakenice. The transverse size of the bar is 40-50 cm. It is naked to the rack at right angles perpendicular to the cross. With this template, you can quickly fill the fence crate using only the cord for control.
The pillars themselves are definitely open, and then thoroughly drink their tops into two skates. So that the poles are better preserved, the earth can be caught in three layers of roofing or pour hot tar.
It is necessary to shut to one skate: so they will rot for less, because the water will flock from them. Before digging pits under the poles, you need to make marking on the cord. Ideally, the distance between the two supporting columns is equal to three meters, the length of 6 m.
Installation of fencing from a stuff
Wooden stakenik is erected by the same principle as other types of fences. For a start, we define the direction in which the future fence will be erected. Then we clean the earth from all bushes, weeds and branches, which may prevent the construction process of the wooden stake. Next, with the help of a lace, we plan space under the poles. Distance between them should not exceed 3 m. Otherwise, the crossbar under the severity of attached staketing will be saved.
Support poles are installed in the ground. To the resulting design is more durable, it is necessary egging poles using cement-sand fill. The depth of the dumped pit, in which the poles will be installed is 1.3 m. 
Prepared pillars install 20 cm pillow consisting of gravel. Her task is to prevent the squeezing of support in the period of frost. After installing the columns they need them secure alternate layers of soil and concrete solution.
After fixing, the columns can be started to install alive. You can attach them using self-tapping screws or nails. When they are connected to the columns, you can start installing the stakenice. You can also attach the planks using self-samples or with nails. Quickly carry out the installation of the stakeholder will allow cord and pattern.
The video contains the installation of a fence from a stakenist:
Finish and fence decoration
 Film-forming finishes are very bad on freshly tuned boards. To upload a fugotable surface, you need to clean the tree with a grain with grainy 60. Water-based wood coatings are not absorbed into the wood, as they contain acids.
Best of all on a wooden stakenik looks paint. However, so that it does not lose its appearance, it is necessary every five years to remove the old paint, then clean the wood and abandon.
If you do not like the paint, then you can use a translucent veil. It is strong enough, besides it looks quite beautiful. In the future, it will not be necessary to clean the wood from the vehicle: it is enough to cover the surface by another layer.
Useful tips:
- put paint better with a brush, and not with the help of a sprayer;
- the veil can be applied by spraying, and after losing the brush;
- it is best to apply paint or a sulfur in dry and warm weather.
The last year fashion for wooden buildings leads to the fact that increasingly developers think that the metal fence may not be the best solution. From the point of view of durability, maybe yes, but from the point of view of aesthetics, it is inferior to wood. The wooden fence somewhat lost its popularity due to their short life: wood, with constant exposure to the sun and water, quickly destroys. To increase the service life, the protective coating in the form of paint has to be constantly reproduced. With a lot of length, it takes a lot of time and requires a considerable amount of paint. This problem has become less acute, since the recently emerged new antiseptics make it possible to extend the service life of the fence, as well as ensure the durability of staining for several years. Different period - from 2-3 years, up to 5-7. It depends on the type of antisepting impregnation and the manufacturer, but it is not difficult to find "long-playing": in any more or less large store.
And these impregnations do not paint wood texture: All accommodation can be seen. They simply change the color, as a rule, to the darker. Such a fence of wood looks solid and rich. Even a simple stakenik, and not an easy, and suppressed.
What is important that you can put a wooden fence with your own hands alone, if necessary, even without attracting assistants. It is also important: a significant part of the work is to prepare wood - it is not possible to spend on the spot, but, say, in the garage or workshop. And start it long before the start of construction. For example, from autumn to spring, and the construction itself starts already with the established warm weather.
The tree is a very plastic material and the simplest thing you can make it so that it will look like a work of art. This is true for fences. If you wish, you can make such a "candy", which is expensive to see. Constructs of wooden fences are several.
Fence
The most simple is a stakenik. This set of edged boards or slats is the same, as a rule, the widths that are nailed vertically to two or more transverse guides.

Wooden fence diagram from vertically nailed boards - stakenice
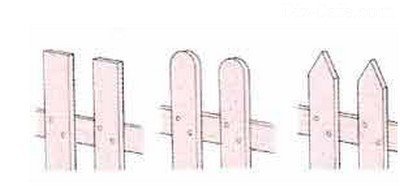
Different can the form of the top. Heat floor 90 ° is the easiest option, but not the best, and not only from the point of view of aesthetics. The top of such a stakeholdy, even painted, is subjected to intensely exposed moisture, as a result, the coating in this place is destroyed first. And wood pores in perpendicular sleep remain open. Rain, fog, melting snow / ice absorb them, which leads to the destruction of wood. To avoid this, the spill of the tops is not gender 90, but at 45 °. If you look at such a board in the profile, the top will be bevelled (see the picture below).

The distance between two neighboring stakes is chosen at your request. It is possible to make a solid fence that configuring one to the other close, it is possible - translucent, leaving the gap of 1-2 cm, and you can completely transparent - with a large distance equal to the width of the boards or even more. Such options are popular for internal fences that are more designed to separate zones and mark the boundaries than to protect something. For outdoor fences, which are usually selected, usually solid installation, can - with a very small distance so that the boards do not "bump into" wet weather.

Add diversity drunk tops. They can be sharpened in different ways - with rounded riding, in the form of peak, triangles, trapecies. All this in different versions and combinations.
Rounded top - the most popular thing is already the openwork fence, but decorative - exactly the tops in the form of lilies - beautiful will be the fence of peaks and triangles - in combination and independently
Some even do really works of art: a carved fence requires a big perfection. The work is painstaking, but the result is worth it.
Carved slats of the fence - Beauty beauty - a carved fence of wood
Make curly tops faster and easier using a template. Cut the sample from the plywood sheet, bring it to the perfect state. Then, on this templates cut all the others. You can cut with a jigsaw or on a milling machine.
Lobzik for such a case you can buy. All the same, even taking into account this article, the flow rate will be cheaper than buying ready-made carved stakes. The minus here is that time leaves a lot, and one and stakeholdy are different: it is a little right to go to the right, then a little left. The edges will still have to handle the sandpaper.
Buy the milling machine, if you do not plan to use it, unprofitable. And those who have he already have, can buy a floating head cutter and make a figured stakenik with its help. The height of the cutting part of the cutter is equal to the thickness of the board, which will be processed, and the head rests on the template.

In both cases, you will have to somehow fix the template on the workpiece. It can be done with thin nails or sticking the bilateral scotch on the template.
But if you approach the process creatively, you can even make a beautiful wooden fence from smooth thin slats: navigating at different angles.

Even easier made the authors of this wooden stakenik: they didn't only make altitude, emphasizing the relief to the slate brought from above. This, by the way, is the second way to significantly increase the life of a wooden fence - the plank is overlapped with water to the most vulnerable open transverse sections). Also, the nonlinearity is attached to the surface of the frame in the form of a frame, and wood inside painted into a brighter color. Agree, original.

Fence of wood "Chess" or "Chess"
In fact, it is one of the subspecies of the stakeholder. The boards are stamped alternately with one, then on the other side of the transverse crossbar. It turns out an interesting volumetric look.

Installation principle Staketin in the "Chess" fence or chess
If you look at such a fence exactly on the contrary, it looks like a deaf if there is a sideline, then at a certain angle there will be some part of the courtyard is visible through the gap. The degree of transparency is regulated by the name of one plank, for another. It can be done so that the viewability will be zero. For example, with a strip width of 10 cm, the distance between them is not more than 6 cm. Here, no matter, nothing can be seen. Disadvantage - high wood consumption. But very beautiful fences are obtained, especially in combination with brick or stone pillars and figurine-made tops.
Chess on the base - Looks like a fence gorgeous
Make from checker and horizontal fences. But here you need to keep in mind that this fence is very convenient to climb: boards, like steps. True, any fence is not such a serious obstacle. Rather, he is protected from curious eyes than from serious attempts.

Wooden fence - horizontal chess
Watching such "chess" is decent and solid. Pillars can be any: metal, wooden, stone, concrete. If you put metal pillars, they are made from a profile thick-walled pipe (3 mm). Above the level of land with the front and back side is sewn by boards (to the columns with bolts or self-drawing), which are more profile width: they should perform 3-6 cm. Thus, we obtain the guides in which the boards are inserted. The boards are then fastened from the inside to the posters.
Fence "Fir-tree"
Another type of horizontal fence is called the Christmas tree. Named so because the boards are stacked on close one to the other, but with the nas' located below. The profile looks like a Christmas tree, as children paint it.

Wooden fences "Fir-tree" create a solid coating
For such a fence, climb is more complicated. Please note that there is a protective visor from above. It protects the most vulnerable part of the fence, much extended its life, as well as handling the time of the next painting. After all, usually at the top and bottom coverage is the most damaged. From below, this fence is protected by the base, on top - visor.
Wooden fences "Blinds"
From the above described above the fact that the boards do not fit one to another. They are fixed at an angle, but with some gap. This type of fence does not create a solid wall and the courtyard can be viewed, although it will be necessary to sit down or even lie down - depends on the angle of inclination.

Fence called "Blinds" - Looking at its device, you will understand why
This type of fence is very uneconomical - wood consumption is usually large. Complicated and assembly: Under each board, mount a bar (corner) or stamping in the post.
But with such a construction, good ventilation of the site is ensured. This is important if the climate or the area is wet. We will not install a solid fence: there will be a puddle and dirt in the yard will never dry.
Playboard bracket - beautiful fence
Unusually looks like a fencing made of bends between the colls of the boards. They are intertwined between the columns by the type of traditional whites. Just make it from long boards.

Fence "Braided" from the board
Most often they are in horizontal performance. The junctions are smaller and bending long spans is easier.

There are also vertical braid. To give them a complete view, the planks are nourished at the top and below - they hold the edges of the boards, and protect them from bad weather.

How to make such beauty, look in the video. It is really easy, but the power is required decent.
Gold fences
From thin, and not very, slats make a variety of lattices: with different angles, the location of the planks, etc. These oscillate fences are more likely a decorative role and are used or for fencing inside - Water Thief, in the garden - or for the front entrance - to designate the boundaries, but not to close the beauty.
The fence from the wooden slats lattice "into the cage" the lattice fence from the boards - the double planks seriously looks - it is interesting to look like such a lattice fence
Photo of beautiful fences
Just the diva is given: what kind of beauty people can do from a piece of wood. Really beautiful. And some, while not very complex.


Maybe someone will inspire these photos of old wooden fences, they will be able to repeat ...

Adhesive beauty ...

Just 50 years ago, fences from a wooden stakenik could be seen around most country houses. But it was the same vertical designs. Now a reliable and durable fence from the stake can be erected by various configurations and even in combination with another material. Fences to build quite easily with the correct calculation and preparation of the material. He will serve as a reliable protection of the plot, and decorate it with its appearance.
Dignity
Everyone wishes to make their home beautiful, and the fence is the element of the country site, which pays attention to first. Therefore, it is important to give this element to the maximum aesthetics. One of the materials falling into the category of aesthetic and militant for unique buildings can be considered wood. If there are skills to work with a tree and the desire to independently build a fence around the plot, then the question is how to make a fence from the stakenice, it will be decided by itself.
The fence from the stakenice set by their own hands, with the attached fantasy and a little skill, will look great on any terrain and against the background of any structure.
The reliability of the wooden fence depends on the chosen wood breed for its manufacture, as well as from the size of one staketin. If you make the right choice, the fence will last for many years.
It is not difficult to maintain the right care for it. All that the owner should do is to input protective substances in a timely manner. It is important that the fence from the stake almost does not form the site and has excellent air bandwidth. Near it you can plant any plants that need sunlight.
Main types of laying

Vertically and horizontal
Traditionally, in the manufacture of wooden fence, odkers are installed vertically. But the horizontal laying is also possible. This design is made of several boards or stiffs. In a different way, this type of fence is called "Ranch". It is well suited for creating a rustic style.
You can also tilt the slack rails at all, and then there will be even more unusual fence. And considering that the angle of inclination may be different, the options for creating unusual structures are not considered.
In checkerboard
An attractive appearance has a "chess" fence. It looks beautiful not only outside, but also from the inside. The peculiarity of the location of wooden parts is that stakes are installed on both sides, but they are shifted relative to each other. The gap, on the one hand, is closed with a rail on the other, and vice versa.
Preparation and calculation of the material

The fence made of wooden stakenice is so easy to install that it does not even need a lot of tools for its installation.
For the manufacture of the stakeholder, in addition to the wood, will be needed:
- fasteners - nails or screws;
- hand hacksaw or jigsaw;
- screwdriver;
- protective substance for applying to the surface. These funds include water-repellent and antiseptic impregnation, as well as varnish, veil, and paint;
- shovel for digging pit under the support poles;
- hammer, if nails were chosen as the fasteners;
- construction level so that all the elements of the fencing are installed smoothly.
You can buy wood and make staketires from it yourself, but you can buy a stakenik ready. In the latter case, you will have to pay more, but it will be less work.
Note! Before making a fence from a stakenice, it is important to perform the correct calculation of the material from the wood. Based on the perimeter of the territory, as well as the width of the shockintin and gaps between them, the desired amount of wooden elements is calculated. For example, if the width of one postal 4 cm, and the width of the gap is 6 cm, and at the same time it is planned to make a fencing with a length of 30 m, then to calculate the number of 30 m, it is necessary to divide by 10 cm, that is, on the total width of one gap and one flip.
How much it takes odds depends on the selected design. For example, if the fence will be erected with gaps, then it will take less material for it than for the deaf structure of the same length.
It is important not to forget to calculate everything in the same unit of measurement. It is easier to express meters in centimeters, and then 3000 will need to be divided into 10. After the calculation, it turns out that it will take 300 pieces for such a fever. In addition to the material for the manufacture of the stake itself, there will be a bars for supports. Such pillars must be long enough and durable. It must be remembered that they will dive at least half the meters.
Stacking stake in chess

Install the fence from the stakenika can be operating in the following order:
- Marking. It is necessary to determine where the reference pillars will be located. In this case, a solid rope stretched around the perimeter. The optimal distance between the supports is 2-3 meters. Given this, it is necessary to make markers in the ground in those places where the pits will be fried.
- Digging of recesses. Their diameter should be larger than the diameter of the support pillar. The calculation of the depth of the pit depends on how much the height of the future fence will be. Most often it exceeds 1 meter.
- Installing columns in prepared recesses. If they are wooden, you can simply do with applying protective equipment on the surface. It is possible to lay a wooden stakeholder and using metal pillars in this case will have to lay in the deepening concrete mixture.
- After the supports are installed, it is possible to start to attach them alive or outstand - thicker boards, which should be placed parallel to the surface of the soil, that is, perpendicular to the supporting columns. At least you need two stations. Their quantity depends on the overall height of the structure.
- The calculation of the distance between them can also be varied. It depends on the height of the mounted fencing and on the method of fastening the staketing on them. The main thing is not to bring down the bottom item to the ground in less than 25 cm, and the upper should not be lifted too high, so that the edges of the stakes navigable to rise above it at least 25 cm.
- When the installation will be completed, you can start fastening the stakeholder itself. When installing the very first staketin, it is better to use the construction level so that the whole fence does not turn out to be curves. If there is no level, you can apply a plumb that is easy to make it yourself using a heavy load and thread. To attach all other staketin, it will only be enough to determine the width of the gap. You can make it equal to the width of the staketing and without any problems to measure the desired distance, applying one of the plates. But you can specifically make a rack of the required width to then use it only to make gaps.
- When the rails will be nailed along the entire length of the fence, you can be content with the work already done, since, in essence, the classical fence is already ready.
To make a "chess", you will need to go to the other side to install another row of staketin. In order to avoid curvature and inaccuracies, it is necessary to correctly install the first rake. It should be located strictly opposite the gap between two neighboring stakes on the other side. After installing this rail, only to navigate the rest, measuring the length of the gaps using the template.
Secrets Painting

Painting finished design
To paint the fence from the stake, with your own hands, but still it is necessary to treat it carefully. The durability of not only the paint layer, but the whole design depends on the quality of this work. For high-quality coating, it is necessary to clean the wood from pollution, and then trust the substance capable of penetrating deep into the structure.
You can apply several layers. Before applying the following must be waited until the previous layer is dry. Many manufacturers can assure that before painting, there is no need to primer surface. But, nevertheless, it is better not to pay attention to this statement, and to carry out the primer. This will have a positive effect on the durability of wood and on saving the main coating.
Paint also better in several layers. After applying the first layer, it is better to produce grinding with sandpaper. For coloring it is better to use a brush, not a roller, because it will allow you to get to hard-to-reach places. But if there is a desire to speed up the process, you can take a roller, but only at the same time it is necessary to keep in mind that then still you have to paint many places with a brush.
Ershtroker is a relatively new type of fences of houses and country sites, which is galvanized metal strips from a professional sheet coated with a color polymer for protection and beauty. Such a fence costs cheaply, mounted quickly, serves more than 30 years. The demand of Ershtroker is explained by its basic qualities: aesthetic attractiveness, durability, a democratic price.
How much is the fence from the euro stakenik: materials plus work
On average, the traffic point meter will cost one thousand rubles along with the installation work. If you mount a straight fence with your own hands, then its installation will cost cheaper. The price of fence depends on several factors:
- the view of Ershrester - affects the manufacturer's brand, manufacturer quality, coating thickness;
- plank height - from 1.5 to 2 m;
- width Staketin and the distance between them, which affects the number of slats on 1 p. m fence.
Calculate the number of material for the fence
Make a fence from the euro stakenice is easy. Before purchasing components, you will need to calculate their number. You will need:
- eurfacker;
- carrier support pillars, usually for these purposes, a professional segment 60 * 60 mm is used;
- frame cross lamps - Profiter 40 * 20 mm;
- fasteners - Self-tapping screws 4 pcs. On one bar (two on the upper lag and 2 on the bottom).
To determine the specific number of planks you need to know several rules for installing a fence from a stake.
The total fence length is measured along the perimeter of the site to be fencing.
From the overall indicators, it is necessary to calculate the length of the gate and gate (summed up their total length).

The number of support pillars is calculated taking into account that the distance between them is 2.5 m, according to the following formula:
The number of columns \u003d (the length of the fence around the perimeter is the length of the gate and gate) / the distance between the columns (2.5 m).
This indicator adds the required number of columns to set the gate (gate).
The calculation of the number of slats is made by the formula:
Number of EuroShtaktin \u003d Length of the fence / (strip width + gap width between the planks).
If a dual-sided stakeholder installation is planned, then this number is multiplied by 2.
Packs from the profile pipe for the fence
If it is decided to use as the reference elements profdrubAnd not to make brick poles, it can be of any kind - with a round or square cross section, 60 * 60 or 80 * 80 mm, with a thickness of the wall 2 or 4 mm.

Ershtroker, unlike a solid professional flooring, does not create sailboats from wind, power and wind load less, therefore not so tough on the support posts are presented. Their concreting into the ground in most cases is not required.
Install the support pillars
Installation of a staketal fence with your own hands begins with the mounting of the columns. Step-by-step instruction of the process is as follows.
Drilling (digging) well depth 1.1-1.5 m.
Installing a pillar. The bottom of the hole is better to strengthen, putting hard stones. The well fall asleep gravel, the ravenness of the earth.

Fence made of metal stakenik with their own hands. Photo step by step
Concreting It is only required if the soil is loose sandy (or at the request of the owner to enhance strength).

Install top-end protection against rain - plastic plugs.
Installation of transverse lag, fastening of the erupker
If the pillars are concreted, then the procedure for fastening the transverse frame lags are proceed only on the next day. The transverse lower and top lags are a frame for installing the Ershtroker. Their installation is possible in any sequence: first the upper, and then the bottom or vice versa. Coasts weld or fasten with self-draws. It will take the next set of tools: level, roulette, marking pencil, screwdriver. Step-by-step instructions for work as follows.

Installation upper transverse logs At a distance of 50 cm from the top edge of the reference pillar. The horizontal is monitored by level.


How to make a fence made of metal stakenik with your own hands. Photo step by step
Installation lower crossing By level at a distance of 30 cm from the surface of the Earth.


After framemounted, proceed to securing on it slats of the stakenik. Each plank is attached to the lag of 4 self-stakes: 2 in the upper and 2 in the lower transverse lag.

Fence from EvroShther. How to do

Ershtroker for fence. Photo


Distance between the stakenik. Types Staken
The distance between the planets of Ershtrokenik determines the degree of openness of the fence. It can be from 2 to 10 cm. The average indicator is 5 cm. With a bilateral location of the Ershrester on each side, a step of 8 cm is made - in this case, with a strip of a strip 11.8 mm, a practically deaf fence is obtained.
Council. In the garden plot or between the vegetable lights requires more light, so the gap between the Ershtroker is made great.

Fence made of metal stakenik with their own hands. Photo
According to the top of the top coating, the Ershrester is produced with a polymer layer or powder spraying (this is a more durable option, it is not subject to the appearance of scratches). Coloring is one or two-way. According to the processing of the edges, the slats are distinguished with curved edges (spilled) and unoccupied. The relief shape and upper edge can also vary. All differences and decorative "excesses" affect the price of the material.
The height of the fence from the European
The standard length of Ershrokel Planks is 1.5, 1.8 and 2 m. The height of the fence is determined by the owner of the site depending on its needs - if it is worth the task to hide the territory from prying eyes, it is advisable to choose a plank with a length of 2 m and make a bilateral deaf fence. For open gardening sectors, the height of the boom is 1.5 and 1.8 m with a large gap between separate planks.

Benefits of the fence from Euro Stakenik
Ershtroker - promising material with many advantages:
- wear resistance - the fence will last from 30 years and higher without changing the appearance;
- unpretentious in care - the fence does not require color, does not rot, so it does not need to repair or replacing elements;
- easy mounting - the fence can be installed independently for 1-2 days;
- neat appearance;
- low cost - This is one of the most inexpensive and durable materials.

In Russia, the tree has long been widely used as a building material. From it build log houses, frames for windows, interior items, kitchen utensils. This natural material allows you to create an atmosphere of internal comfort and coziness. Wooden fence from the stakenik is one of the most popular types of fences in country construction, which is simply indispensable when arranging a rustic area. Such a fence on the one hand delineates the boundaries of the site, and on the other hand, it does not shadow its territory.
Fencing from the stakenik can be given any height, shape, color, and even the distance of the lumen, so that they acquire the original look and their appearance complement the design of the country site.
The fence from a wooden stakenice is used as a reliable fencing of the household plot, the element of zoning the territory, the decorative framing of the bed and flower

Stems with flowers, filling the lumens in gaps between vertical strips, give the fence more attractive
The constant popularity of this type of fence is explained by a number of parameters and properties, among which:
- Universality. Wooden fences fit perfectly in any terrain landscape. They are perfectly combined with any other bases, organically fit into the interior, made of stone or brick, concrete or metal.
- Easy installation. Installation of fence from the stakenice can be done by any dacket and the owner of the country house independently, without resorting to the services of professional masters.
- Ease of care. Caring for the fence is only in timely staining of the surface and eliminate defects that may occur during operation as a result of mechanical impacts and seasonal precipitation.
- Reliability. A tall wooden fence will speak not only by a decorative element of landscape design, but also a reliable protection of the owners of the site.
One of the advantages of the stakeholder, in comparison with the traditional solid fence, is the possibility of planting plants right at its base.
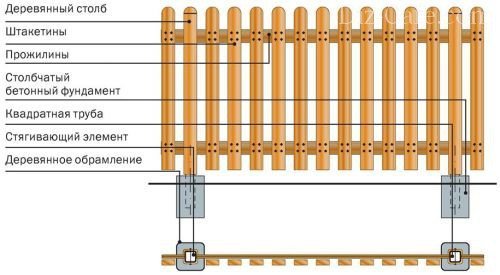
- Support poles. They can be made of metal pipes or thick bars.
- Staketina. Unbroken rails are made of edged or planed boards.
- Stated. The transverse slats plated horizontally between the support pillars, a length of 2-2.5 meters are made of 40 mm cross sections.
Choosing a material to make a fence from the stakenik, you can go in two ways: to purchase a ready-made stakenik or make it yourself from the boards. The first method saves time. The finished fence can be installed on the day of purchase. But a substantial disadvantage can serve as poor-quality raw wood, which protrudes the basis for the stakeholder, which in the process will "lead" the fence. Choosing the second path, the owner will need to make efforts to spend several days to make all the elements of the fence. But with the result, he will have a stakenik who fully corresponds to his ideas and wishes.

If the material is not succumbed enough, it is necessary to use special dryers for the forest, because in natural conditions the drying can stretch for several seasons
Forest drying service, as well as cutting alternate and staketin, can be ordered in a place where they are engaged in the manufacture of wood products. When preparing the material on its own, it is necessary to carefully stored and sand all the tops.
Wooden Stakenice Top
The bottom of the wooden support pillars should be wrapped with a hot water. This will prevent wood rotting and extend the life of the structure.
Installation and installation of fencing
Stakeholder arrangement is performed according to the same principle as the construction of other types of fences. First of all, the direction of the future fence is determined. It must be released from weeds, bushes and branches of trees that will interfere with construction. Then the beacons are tensioned on the cleared territory and the stretched lace is planned at the poles. The distance between the columns should not exceed three meters. Otherwise, long spans between supports can serve as a savage of across the severity of Staketin.
The reference pillars can be installed directly into the ground, but to create a stronger structure, it is better to erected with the use of fill with cement-sandy solution.
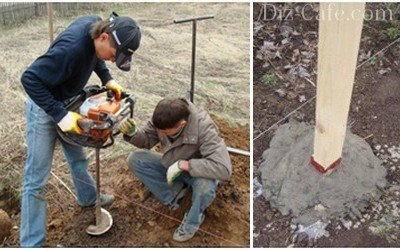
To install the columns, it will be necessary with the help of a bera. Eat a hole whose depth is determined by the height of the fence. On average, a depth of 1.3 m
Install the columns on a 20 cm gravel pillow, which allows you to prevent the squeezing of the support when the soil is freezing. Vertically fixed columns fall asleep alternately layers of concrete and soil solution.
After installing the columns along the line of the fencing, you can install between them stirred. In principle, it is possible to set the fence in two ways: when first first, the crossbars are attached between the columns, and after them the stakenik is nailed, and during the second, the spans are collected separately and fixed to the supports already blocks.
The first staketine is attached vertically, and the rest are aligned by the T-shaped pattern, in which the width of the leg letters "T" is equal to the step of the staketin, and nailed
On average, the distance between Staketins is equal to the width of the very well. Create transverse strips on wooden support pillars with the help of self-tapping screws, bolts or ordinary nails. Metallic columns are fixed on a specially welded corner for fastening timber.
Finishing and decoration of fence
The finished fence remains only other negatively affecting factors.

It is necessary to close all the cracks and chips with putty compositions, to increase the stakenik antiseptic, and then cover with varnish, veneer or paint
Freshly tireless film-forming drugs are bad and shortening. To "stubbind" the surface of the tree, you can clean it with medium-hearted emery paper.

Morilka is an excellent preservative, protecting wood from the development of microorganisms and mold
Varnish will protect the tree from moisture. Using the simulator and transparent varnish, you can also imitate various wood species.
 How to return the love of her husband to his wife - Tips of the psychologist
 Why you can not give icons