Wooden palter staircase with her own hands. Drawing of a wooden staircase on the second floor drawing of the stairs do it yourself
To decorate the house with a beautiful wooden staircase, it is absolutely optionally to spend a lot of money on it. If you like to make it, you can make it yourself. Next, we will tell you in detail how to build a wooden staircase at home.
Before building a staircase from a tree with your own hands, we are determined with the type of its design.

All existing stairs are divided into two main types:
- Screw - have steps located around the axis;
- Movie - The design consists of smooth steps forming a straight march.

It is not necessary to take a novice for the construction of a wooden screw type staircase, as it is difficult to make it enough. In addition, it is interesting to look, but at the same time very uncomfortable in use.
It is advisable to make a marching structure. Depending on the nuances of the device, it is divided into several subspecies:
- Single-hour - are the most simple designs, since they do not have a landfill;

- Two-Master - The design contains two march, between which there is a staircase or swivel steps.
Two-day stairs, depending on the location of the rigor, are also divided into several subspecies:
- Straight - both march are located along a straight line;
- M-shaped - marches are located at right angles;
- P-shaped - the angle between march is 180 degrees.

It must be said that there are still multi-hour structures, but in private construction they are extremely rare, as they do not need. As for the choice of form, then focus on the size of the room and its features.
In some cases, it is advisable to install a M-shaped structure, placing it along the walls, in others, in order to save space, it is better to arrange marches at an angle of 180 degrees.
Construction technology
So, with the types of structures, we figured out, now we build wooden stairs with our own hands.
We break the whole process for five steps:
- Design;
- Preparation of materials
- Assembly and installation of construction;
- Finish.

Design
Before building a wooden staircase to the second floor so that it is not traumatic.
Below are all the basic requirements that need to be considered when calculating:
- We make all the steps with the same parameters. Since, when moving on them, a person has muscle memory, therefore the steps of different depths or height will make the staircase extremely traumatic;
- The dimensions of the steps are selected with the step of the person. Therefore, the basic parameters must be within certain limits:
- height - 140-250 mm;
- depth - 250-330;
- Avoid long marches - if the design contains more than 14-15 steps, it is desirable to break it into two march;

- Do not save space due to angle of inclination. The march with an angle of over 45 degrees is inconvenient to use, and therefore it is attempted.
Getting Started by calculations, measure the parameters of the room, namely, the height of the overlap and the platform set down to the structure. For example, the height is 2.8 meters. This value is the source point from which the calculation is starting.
To begin with, we will find out how many steps will need, for this we take an arbitrary optimal height of the step - 18 cm. Now we will share the height of the structure to the height of the step - 280/18 \u003d 15.55 pcs.

Since the amount cannot be fractional, the height is adjusted - 260/16 \u003d 17.5 cm, i.e. We have 16 steps with a height of 17.5 cm. Please note that the last steps will not, instead we have the floor on the second floor.
We break the construction of two march on 8 steps. In fact, each march will have 7 steps + staircase or floor.
Now we calculate the depth of the steps according to the formula - 2b + C \u003d A, where:
- a - the length of the man's step, which is within 60-64 cm;
- b - the height, in our case 17.5 cm;
- c is the desired depth.
From this formula, we find the desired depth 62-35 \u003d 27 cm. This value is fully consistent with the above requirements.
Knowing the depth of the steps, we calculate the length of the march, i.e. Projections of each march to the floor - 27x7 \u003d 189 cm. Marsham width will make 1 m so that it is convenient to descend or climb to one person. As for the staircase, it should also have a depth either at least 1 m.

If the design is too big, i.e. It is not placed in the platform allotted under it, the main parameters can be corrected, i.e. Increase the height of the steps and reduce their depth, but within allowable values.
- a - march length;
- b - march height
- c is the desired beam length.
Now that with the calculations figured out, it is necessary to decide on the design and prepare the drawing, according to which the construction of the ladder will be carried out.
Note! The basis of the march is the beam. It can be smooth or with cutouts under the step. The first is called a guise, and the second is Kosourg.

Next, we consider how to build wooden stairs on two cosos, as they are more durable and, moreover, they look more attractive, however, it is somewhat more complicated. In addition to the stairs, the staircase will have risers that hide the space between the steps.
Note! If the march width exceeds one meter, the number of beams must be increased. So for a two-meter march will need at least three cosomes.

As for the staircase, this is a simple design on four supports, which is covered with boards from above. Also, the staircase must necessarily have a fence. In our case, it will be a handrail fixed on the racks (bales).
Tip! Deciding with the nuances of the design, depict it on paper and specify the dimensions of all parts.
Preparation of materials
Construction of a wooden staircase with their own hands requires the following lumber:

- "Society" 300 mm width for beams;
- Board 3x30 cm for steps;
- 2x20 cm boards for risers;
- Bar 100x100 for site racks;
- Paintwork.
For a fence, if you do not have a lathe, it is advisable to purchase ready-made balasins. The price of them starts from 200 rubles.

A set of tools will need standard:
- Hacksaw or electrolybiz;
- The chisel and the hammer, it is advisable to have a milling mill;
- Electric drill;
- Roulette and pencil;
- Screwdriver.

Tip! To install the design you will need a wooden construction staircase. If you have such a staircase, it is not difficult to make it. To do this, take two timber or two boards, and secure jumpers with nails or screws between them. As a result, the palter staircase will take place.
Of course, more comfortable in the use of wooden staircases of construction type "Firewall". They are made quite simply - for this you will need two appropriate stairs, the ends of which in the area of \u200b\u200bthe upper edge are connected by metal axes.

So that the stepladder is fixed, you can make jumpers from wooden slats with hooks. Their task will be to maintain the spacer load, without giving the stairs to "disperse".
Manufacture and installation
So, our goal is durable and beautiful wooden stairs - how to build them below:
| Illustrations | Actions |
|
|
We start with marking the beams according to the project. Apply the line of steps and risers. The angle between them should be 90 degrees. Lines of steps are watched at an angle equal to the slope of the stairs so that the cuts are located horizontally after installing the beams.
|
|
|
Cut the beams on the markup with a hacksaw or an electrolovka. |
|
|
Cut the steps of the stairs and risers from the boards. |
|
|
Install the platform racks. To do this, fastened to the semi glass under the bar with anchors or self-drawing, after which we insert the supports in them. All racks typing jumpers. |
|
|
We apply the layout of the location of the beams on the racks. |
|
|
Install the first march beams. Confirm to the supports of self-drawers and strengthen self-drawing. If there is a milling mill, we do in the rack of the groove, and in the beam milling the spike, for a more rigid and reliable dusting. |
|
|
Then we install the beams of the second march. Confirm them to overlapping and platform racks. We use for this corner, as shown in the photo.
|
|
|
Now we are wearing the beams by boards. Steps and risers are dripping with screws so that their caps are slightly deepened. Pre-under the screws necessarily drill holes. |


Tip! When construction, wooden stairs are preferably sick. To do this, you can use the usual joiner or, for example, epoxy glue. As a result, the design will not creak and turn out to be more rigid.
This is the main part of the work completed. Now it remains to establish a fencing and finish the stairs.
Installation of fence
Now we will make the fencing of the staircase from the tree - the construction of this design is carried out like this:
| Illustrations | Actions |
|
|
To install balusters, in each step, drill the holes on the diameter of the wrenches, and we glue themselves into them. All of them must be located on the same line so that the fence is accurate. |
|
|
In the end of Balyasin, we drill holes for the seasons and lubricate the glue. |
|
|
We ride the columns on the wanks and leave for a while until the glue is dry. |
|
|
Sut off the tips of the balusne so that the handrail was located parallel to the march. To do this, you can fix on them with clamps board or timber, as shown in the photo. |
|
|
Krepim to the balasins of the handrail in a hidden way. To do this, we screw the screws at an angle at the bottom. Pre-drill holes so that the balusters or the handrail are not cracked. |


Finish
So that you have beautiful and durable wooden stairs, building complete with high-quality finish. It is performed as follows:
| Illustrations | Actions |
|
|
We begin the finish from the inspection of the design. All existing flaws, such as cracks or chipsets, smear the putty on the color of the tree. |
|
|
Then we take place on the surface of a shallow eye or grinding. |
|
|
We get rid of dust on the surface of the product, for example, with a vacuum cleaner. |
|
|
Cover the product with varnish using a painting brush. We start working with fence. Then cover lacquer march. After frozen varnish, we repeat the work at least once. |


Note! If you use water-dispersive varnish, after the first layer is frozen, it must be seized, as the water raises the fibers of wood. If this is not done, the surface will be rough.
That's all the fierce instructions for the construction of stairs from a tree.
Output
Now you know how the staircase is designed and the staircase is the construction of the tree. The most important thing is to work carefully and carefully, and then the manufacture of the staircase will not cause you difficulties, even if you have little experience with the tree. Attached video in this article will give additional information.
The most popular staircase is a marching structure. The technique of its construction is the most simple and accessible. The march of direct staircase can be made even a newcomer for a relatively short period.
About how it is properly and qualitatively and let's talk in this article illustrated by a large number of high-quality photos and video instructions.
March stairs - design features
The march of direct staircase is low in production and is considered a good option for private country houses and cottages. Constructing such a system with your own hands, you need to remember two important requirements - about convenience and security.

The construction technique of such a design should be based on existing norms and standards.
The main elements of Marsha
For a clearer understanding, how to make a straight staircase, it is necessary to know its main components components. The ladder march includes such elements:
- beach beams - it can be a string or a platform;
- support poles - hold the entire design;
- steps - consist of a sticky and contemperation;
- fencing - includes balusters, handrails (railing) and decorative elements.

Kosoury
Kosomers - the main component of the march of the stairs, which is a carrier deck holding the entire system.
Kosomers can be made of wood, metal profile or reinforced concrete.
Marsh stairs can have:
- one Kosur - the carrier beam goes in the center of the construction and the steps are attached to it (see photo);
- two cowra - beams go on the sides of the march, as shown in the photo;
- three Kouryra - two elements on the sides, one - in the center.

ATTIV
The march of the stairs can also be made on the tutor, which in its function performs the same role as Kosur.
In the staircase, cutout cuts are made from the inside of the beams.

Steps
The step consists of two elements - coming and contemperation.
Apartment is a horizontal surface, wide with a width of 30 cm and about 90-150 cm long. The length of the sticky is determined by the width of the ladder march itself.
The approach is the vertical part of the step, 15-20 cm wide.
Fencing
The fence must necessarily be established on a march, consisting of more than three steps. A row of balaasine is called balustrade. Balasins determine the stylistics of the entire system. The railing is fixed on the fence. The main requirement for them is the smoothness of the surface, since they relieve a person when moving along the stairs.

Marsh Requirements Stairs
Movie-based construction technique with their own hands requires compliance with the following established guests and generally accepted requirements:
- Marche width - ranging from 80 cm to 1 meter.
- Height of enhance - at least 90 cm.
- The mass should be withstanding the march - from 180 to 220 kg.
- The load that the fence must withstand are at least 100 kg.
- The angle of inclination of the stairs is not cooler 38 degrees.

ENGLISH ENDERNING STEER MARSHAM
Before you begin to mount the march of the stairs with your own hands, you need to designate the stages of the upcoming work. The manufacture of the staircase system consists of such steps:
- Selection of manufacturing material.
- Design and calculation of the march.
- Booser production.
- Installation of steps.
- Installing the fence.
- Finishing work.

Selection of manufacturing material
At the very beginning of the production process, it is necessary to determine what material the staircase will be made. But, since it comes to march for a private house, then the best material for the manufacture of the staircase is a natural tree.
As for the breed, then on the advice of specialists, it is better to choose the wood of pine thorns. To build a march of the stairs, we will need:
- course beams;
- reference pillars;
- edged boards under steps and risers;
- ready bales and railing.
 The best material for the construction of the stairs is your own hands is pine
 Design and calculation of the march
Before performing practical work, it is important to competently calculate the future design.
First, it is necessary to design such basic elements - boosters, steps, risers and fencing.
Steps are calculated by the formula:
2a + b \u003d 64 cm, where
- A - width of the component;
- B - the height of the steps (usually received 14-17 cm).
 The design of the march is the responsible and necessary stage
 - First I measure the height of the stairs.
- We define the number of steps of the staircase march - for this, the height of the staircase is divided into the value of B. In case the height of the structure is 240 cm, and the height of the stage 16 cm, then the number of steps will be 15 (240/16).
- The calculation of the width of the steps is the parameter A. Understanding the number of steps (b) this is not difficult: 2a + 15 \u003d 64, 2a \u003d 49, a \u003d 49/2 \u003d 24.5 cm.

Production of Kosoury
For Kosomrov, a pine beam is suitable with a thickness of 40 mm and wood moisture not more than 13%.
The sequence of the production of Kosomov is as follows:
- Prepare leather repeating bends of steps.
- On the blank with ate pattern to put markup.
- Heck cut the teeth.
- The resulting disc can be used as a template for cutting the second rower.
- Install the Kosomers to the place where the march will be placed, following the ends of the parts to rest on the floor of the first and half of the second floor.

Installation of steps
Steps can be fixed to Kosomers using special wooden parts (kills) or directly. Before mounting steps, you need to prepare the necessary number of risers and coming, given the value of the protrusions.
First of all, contemses are set up. For this purpose, screws or nails are applied. Filkings are fixed by the wrenches. Next, the steps are mounted.

Installation of fence
When all the steps are mounted, you can proceed to the installation of balasine and rail. Screws and studs are used to secure them.

Finishing work
The final stage of the construction of the march of the stairs with their own hands is the coating of the ladder varnish. This procedure will shut off the system from malicious insects, mold and dampness.
Buy finished marching staircase in the online store
If you do not have proper carpenter skills or plenty of free time, then the best option for you will be the purchase of the ready-made staircase of the marching type in our specialized online store.
 Beautiful and stylish staircase system of modern design from our company will cost you only 44 290
rubles
Beautiful and stylish staircase system of modern design from our company will cost you only 44 290
rubles
 The magnificent system from the Solo model has a cost effective value in 70 858
rub
The magnificent system from the Solo model has a cost effective value in 70 858
rub The staircases presented with us are distinguished by high quality, stylish design, cost-effective cost and are able to satisfy tastes and the demands of all our customers.
 Another design of a straight type "solo" model on the central Kosoo has a price 70 858
rubles
Another design of a straight type "solo" model on the central Kosoo has a price 70 858
rubles
 Laconic and stylish staircase made of oak with decorative adhesive elements worth 75 136
rubles
Laconic and stylish staircase made of oak with decorative adhesive elements worth 75 136
rubles Make a staircase with your own hands.
You can do everything with your own hands, if you have hands from where you need, there is a set of tool and the most important thing - you want to make wooden stairs with your own hands. In this case, this article will allow you to try the manufacture of stairs with your own hands and make a simple staircase on the veranda, which costs the cost as a budget staircase, when you make a simple staircase, your own staircase will also be forces. In the course of the process of "Stairs do it yourself" you have to decide, a number of questions: the technical calculation of the stairs, it would be nice to draw a simple scheme of the staircase with your own hands the drawing of what you will do when decide to make wooden stairs with your own hands. To make the staircase you yourself need tools: Handsaw wood, construction level, plans, sandpaper, metal line, pencil, hammer, painting brushes, drill, screwdriver. From materials for the "Staircase in the house with your own hands" process: Wooden boards 100x20x2,5cm, the ram 150x25x5cm, the bar 100x5x5cm to make the balusters with their own hands, nails 10cm, 7cm, screws L \u003d 10.15 cm, olifa, stool, varnish, impregnation against rotting, impregnation against the woods. In the course of the work, some other tool may need, but in the construction of the ladder does not apply a very complex and special tool, so that you will not have any special problems (not provided). If you cannot independently make a drawing for the construction of a concrete staircase with your own hands And the concrete staircase you "not on the teeth", use the projects of wooden stairs Kiev, with their help you can make stairs wooden with your own hands, including you can get a wonderful modular staircase.
Stairs photo.  So, we build a staircase with your own hands. First of all, it is necessary to make the calculation of the stairs, consider the size of the stairs, the design of stairs and determine the terms. The calculation of the ladder for the wooden house is needed in order for it to be convenient to rise, in addition, the staircase must meet the well-defined security requirements that are written in regulatory documents. We will not hammer your head with studying these documents, and we give the basic requirements in the course of the story as make a staircase with your own hands. Now about the terms. Here are the main components that have any staircase detail: degree, under steps, Kosor, handrails. Kosur is the main carrier part of the stairs, it is the main load that people take place when people walk on the stairs, there are options for the staircase without under the steps, but it strongly weakens the design, so we will look at the option stairs in the house do it yourself (photo) under steps. Vividly about the elements of wooden stairs Photos below, you can immediately see the approximate design of the staircase.
Stairs photo.
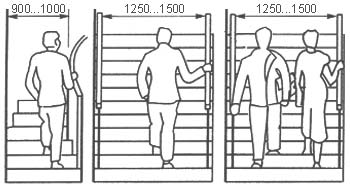
We decided with the terms. Now we need to set up wood stairs with their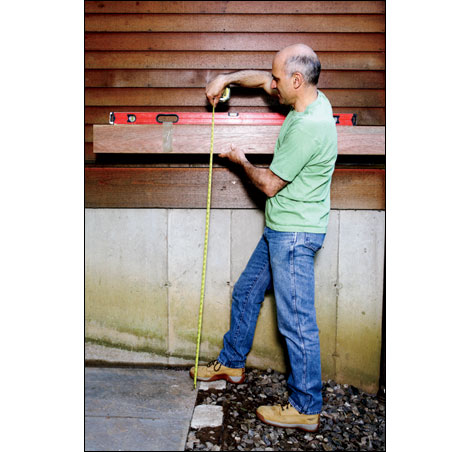 hands (photo): The width of the stairs, the width of the stage, the angle of inclination and height at the steps. If we talk about the width of the stairs, then there is usually a width of at least a meter, this is necessary for the house to put furniture, household equipment and so on. In our case, the width is set by the departure of the terrace or veranda. We recommend reading an article about the design of the bathroom.
Calculation of the angle of inclination of the stairs, widths and heights of steps wooden staircase with your own hands (photo).
We define the height of the stairs. To do this, on the terrace, the straight board is on the terrace, as the beginning of the photo stairs are shown below, check the horizontal, adjust the horizontal when necessary and measure the height of our stairs. To the level did not fall, it is fixed with a scotch on the board. In our example, the height of the stairs is 145 centimeters.
Production of the stairs do it yourself 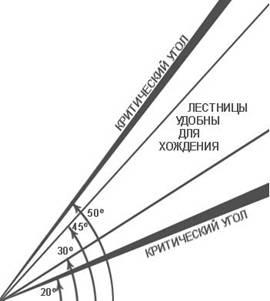 On the angle of inclination of the stairs. The angle of inclination of any staircase is regulated by the norms and has a range of angles from 30 to 45 degrees. If you start to retreat from these rules, then when you make a staircase, notice - an angle is less than 30 degrees, it is dangerous to walk, an angle is more than 45 degrees a staircase hire a lot of space. The angle of inclination of a particular staircase is determined individually, depending on the number of steps and their height. The approximate ratio is reduced to the ladder table for the house.
Go rosemiri convergent.
As practice shows, Lestnica with steps height in the 140/170 mm range with a sticking width 300 / 370mm is the most convenient and safest for movement. This is explained by this. The width of the stage is taken along the length of the step of the average person, and the height of the stage - corresponds to the height of the step of the middle man. The higher you will make steps, the more it will be its width and vice versa. But there is a rule - width 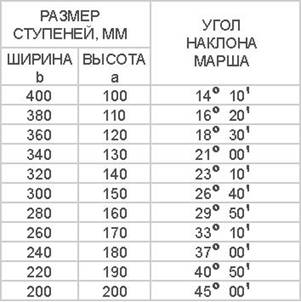 The level of minimum corresponds to its height.
If you have very narrow standard round steps, it is not quite good for security, but their width can be added another 20/40 mm at the expense of the protrusions. Do not forget that we spoke at the beginning of this article about the width of the entire staircase, the most comfortable width is 1 meter, but if you do not allow the conditions, it is possible to reduce it up to 70 centimeters, it is usually done under the projects at home on a narrow site, to make a width less Recommended. Our staircase has seven steps, the eighth step of the stairs in the cottages do the surface of the terrace.
Staircase with her hands. Photo and drawings scheme.
Making Kosource stairs in a wooden house do it yourself.
 It is necessary to see how you will mount the Koshor to the terrace. Mono opens it on the terrace beams, or make the departure of the beams from nearby. It must be done at the place. In addition, the best option under the platform to which the wooden staircase concrete will be relying. It is necessary to take a wooden bar, it is necessary to place it as shown on the first photo, and cut the grooves under the step, in no case do not kill them, the location of the stress is the staircase concentrators, the staircase can be collapsing. First, make one Kosuor and then, using them as a lecturer, place the rest, in our example four cosuer. As can be seen from the photo, the more Kososorov, the stronger will be the design. Corners of seats
 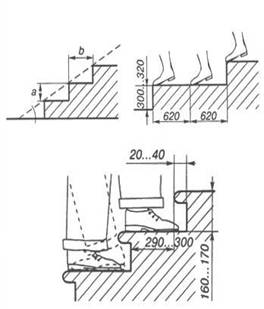 Under the steps, run off the plane for 4/5 mm. This is necessary for a good fit of the steps and under the steps to the coskora. By installing the boosters in place, you can mount the steps into the house, not forgetting about the departures of the steps, if they are narrow.
Stairs pictures.
Installing a baluster.
Balaasins from wood Drawings The sizes of options that are very much and handrail to mock the last place, you can make bales from metal, but this is another topic. How the sicks are very clearly visible on the second photo of the article there is also visible to the Balyasin installation scheme.  Finally, I note, it is necessary to impregnate all the wooden pieces of impregnation from the forever, rotting, to handle the planer and squeak the surface, to impregnate them with oil and after installation, open with varnish. Tree under Kosur, under steps, handrails - pine. Under the steps and bales and poles, the best option is an oak board and bars. The volume of our article cannot include various ladder options wooden in the interior photo can be found online.
If a wooden staircase is planned with her own hands - step-by-step instructions with photos, video and installation projects, placed on this portal will become an excellent guide in this matter. To prepare for the process, you need to stock up the necessary tool and materials.
Wooden march between the first and second floor
Materials and parameters
Lumber: board 40 and 25 cm wide, 4 to 2.5 cm in thickness, bars 5x5 cm, glue joiner, paintwork materials, rods for tie from galvanizing, self-tapping screw and corners. Among the equipment is used manual circular, screwdriver, tassels, abrasive skin, clamp, chisel, grinding machine.
For the correctness of the placement, the slope of inclination is determined equal to 25 - 40 grams. The gap between the steps is 19 cm. The width of the sticking is 25 cm and more. The height of the handrail is 90 cm. The constructions are made on the basis of pine edging boards with 40 cm parameters in width and 4 cm in thickness.

Wooden staircase
Installation of a conventional straight staircase
- Here you can find out the optimal way to create a wooden staircase with your own hands, video with step-by-step instructions will allow the construction as quickly as possible and correctly and properly.
- Marking of sections for installation of coming is provided by means of a circular using a template. To do this, it creates a depth of 1 cm. Using the chisel, the mass of wood is removed between the propyls. The finished action is mounted on the workplace.
- The tents are fixed using self-tapping screws to the floor surface. To do this, we should stock screwdriver and metal galvanized corners.

Massive staircase
- 25 cm widthled boards are cut down steps with a circular. The thickness of the steps is hampered under the width of the span, not less than 2.5 cm. The end parts for a more reliable fixation with the guilty are treated with a grinding machine.
- The assembly of steps and the theetics is carried out by carbon black glue. The end parts of the steps and the grooves in the tutor are smeared. The screed uses galvanized rods with threads at the ends. They are screwed with widespread nuts.
- Two boards are fixed to the installed rack. They will provide the function of the handrail.
- Rack of steel 3.5 inches.
- Charming array of 1 × 8.
- Wooden elements 1 × 12.
- Connectors in the form of racks.
- Supports for handrails.
- Handrails with specified parameters.
- Metal base for steps.
- Welding machine.
Screw staircase: Materials for manufacture

Ladder construction from timber
Phased mount
In the design under consideration, the distance between the ceilings is 3 m. Then the total height is divided into the selected size of the steps and the quantity is obtained: 300 cm ÷ 18 cm \u003d 16.6 pcs.
The upper position will end 17 steps (rounded result). The width of the steps along the inner edge is 10 cm. The calculation of the outer edge begins with the determination of the outer diameter of the staircase without handrail.
The average rack and 2 steps form a cross section of 172 cm. To determine the length of the circle, you must multiply the diameter of the staircase by 3.14. Then 172 cm x 3.14 \u003d 540 cm. Since the installation is subject to 17 steps, 210 ÷ 17 \u003d 32 cm. To create a ceiling of 2.5 cm, the width of the steps outside is 35 cm.

Staircase
Superior part
The screw device is created using a central metal support and bases for steps. For a central rack with a diameter of 20 cm, 400 cm is cut off. Of these, 300 are allocated for 17 steps, 90 cm for the fence at the top and 10 cm protrude for stock.
A post mark is made at points where the steps are planned, that is, every 17.64 cm. The upper part is crowned with a thick round plate welded to the post. At the bottom, a square spot is created in 1 cm high and parameters 30 by 30 cm. The gaps are done by each corner of the site for anchors and fixation to the base is performed.

Steps from the board
Placing steps
Stages are attached on the central support in the marked areas. Each subsequent stage overlaps the previous 2.5 cm so that the supports can be fixed for the connection. They fasten one step to another. This serves a metal or tree. Then all the foundations of the steps are fixed by the central support. They are superimposed on the tree on the ground. Cleaners are done in places connecting supports.
Then you can screw up 3 racks of the railing on the step so that between them the gap is formed not more than 10 cm. After mounting the racks, the handrails can be fixed. When buying a material, it is important to comply with the possibility to form bends in the direction of the stairs.

Steps of solid wood
When carrying out decorative treatment, you can salary metal support with wood materials. For decoration of steps, lacquer coatings are applied. They are applied on top of the primed surface.
Attention! Wooden steps are widely used in combination with glass, metal and plastic handrails.
For installation of structures, glue compositions are used with different types of fasteners. However, their device can take too much load on the product.
Wooden staircase with your own hands - Step-by-step instructions, calculations, photos and video mounting
If a wooden staircase is planned with her own hands - step-by-step instructions with photos, video and installation projects, placed on this portal will become an excellent guide in this matter. To prepare for the process, you need to stock up the necessary tool and materials. Wooden march between the first and second floor
Create a dream staircase yourself!

Swivel staircase made of pine steps
For any private house that has several floors, the staircase is a mandatory element. But in addition to the utilitarian function, this element also has an important aesthetic value. And if a wooden staircase is made with her own hands, it is also an extra argument in favor of talents and the wonderful taste of the hosts of the dwelling. This can be attributed to a beautiful porch, work on which is even easier and faster.
In this article, we will briefly introduce you to themselves and economically you can go through all the stages from the drawings and calculations and get the original staircase or porch in your home.

Construction with an invitation stage
Why it is wooden?

"Deaf" Screw Wooden Staircase
If you compare a tree with other materials for construction, then its advantages are immediately obvious. This material is relatively inexpensive, quite lightweight in processing even for beginner and allows you to vary well as the structural features of the porch or the inter-storey staircase and their color gamut. This is easy to make sure that I looked at the photos of finished products in our collection or training videos for their calculations and manufacturing in thematic articles on the site.
Economy option in home construction is usually pine. It is believed to varieties inexpensive soft wood. If you decide to make a wooden staircase with your own hands from this wood, keep in mind that she has disadvantages:
- it quickly loses the stability of the texture, because of which the levels during operation will constantly trust;
- it darkens and partially loses aesthetic appearance.
Most often, pine is used for making with their own hands a wooden porch. In the photo below, you can see what a porch is quite common in country houses with an overestimated foundation or in the country construction.
For the front span, it is customary to use more expensive wood varieties - oak / beech and larch.
The first constructions are strength and solidity, and the second is characterized by increased moisture resistance. The price of such wood will easily pay off its durability.

High porch on the foundation
What do you need for the stairs?
First of all, you should create the concept of future design. Any construction of wooden stairs with their own hands is reduced to 2 technological options:
- Screw stairs. This is the most ergonomic option, because it is even enough to accommodate the one and a half square meters of the floor. They won both in terms of stylish design, the option of which can be chosen from numerous photos available on our website and made with your own hands. The only problem is that to make competent calculations of such a design, billets according to drawings and mount it will be very difficult to mounted.
- Marsey stairs. This is a classic option with spans and railings. Construction of the route model forces to anyone who will not be lazy to see our thematic videos on wooden stairs created by their own hands. Such an indispensable for the porch or cottage house design can be attached on crouches or asserts (the first option is the easiest).
Deciding with the model, it will remain only stocking with the materials and the necessary carpentry tool, which requires a screwdriver in the kit.

The quarter-speed staircase of beech
The main stages of construction
For clarity, we have compiled a list of basic steps to successfully create a staircase march.
Calculation
Accurate calculations allowing to determine the size of a staircase or a porch, their location, quantity of building materials, and the correct drawings are already 80% of the successful result in the staircase! Here there are our registration truths that should always be followed by:

Drawing of a 2-mahedral span
- the slope of the staircase for a convenient lift should not exceed 45 degrees;
- the site should be equipped only if the number of steps of the span is greater than 10;
- standard appearance (width of the stage) ranges from 25 to 35 cm;
- the approach height should not exceed 16-18 cm;
- comfortable march width - 1.2 m;
- the safe height of the railing is about a meter.
In the manufacture of wooden stairs, with their own hands, calculations are much easier to use special computer programs from the category of "building calculators", guaranteeing the accuracy of calculations.
When calculating the parameters, you can start making with your own hands and drawings for the wooden staircase. If you do not have enough experience in this business, you can take photos of similar drawings for example.
Marking and manufacture of structural elements
Working with the billets of an inter-storey staircase or a porch should be started with applying markings on them using a ruler and a special corner. This procedure should be approached very responsibly, because even a slight calculation distortion can spoil the steps, railing or balusters.
After you can proceed to drinking steps and risers. Make it qualitatively and quickly better than a special electronics with adjusting the angles and the depth of the cut. Simplify the procedure will help the stall step, which will replace stencil. The thickness of the chalkboard for stickies and risers should not be less than 40 mm. Do not forget about sufficient width and good strength that should have a porch steps. If the steps are ready, you can enjoy kosomers or asserts for which the timber is used with a thickness of at least 50 mm.

Simple design without risers
Assembly and installation of the stairs
After all the elements are ready, the boosters are attached to the floor and overlaps and for strength (depending on the location of the ladder) can be additionally fixed to the wall or strengthen the board in the area of \u200b\u200beach third stage. Then, on the markup to the bars, steps and risers are attached. Here it is necessary exactly at 90 degrees to align all horizontal and vertical angles. Fix the parts with a joinery of stainless steel joinery and self-tapping screws, while the high-quality sizing of all joints will not allow the staircase to creak.
Completing part of the installation - installation of railings and balasine. Here you can snatch a little and get ready-made products in the store for the simple reason that it is impossible to make these elements, it is impossible to make these items. In order to secure, special attention should be paid to the strength and reliability of attaching these reference parts.
To have a complete picture of the sequence of work, the detailed installation process can be previously viewed on video or use the photo in step-by-step instructions.

Balaasins with a metal pin
Processing products
Completes the manufacture of stairs to protect its elements from rotting. This, after grinding the boards, can be done using paint, varnish or verses, thanks to which the staircase will be protected from the external environment and will not make an irritant violet. Internal designs are best to fit into the interior will help lacquer coating. The photo shows that beautiful screw staircases are always lacquer.
For the steps of the porch, it is good to use the processing of oil and paint into several layers. Also to prevent their wear and extension of life, the tree is desirable to protect special resistant to moisture and abrasion by non-slip coating. Not excess for the porch will be the equipment over it is a visor to protect against snow and rain. Both in the photo, and in life such visors give the design even more completion and unity of style.
We hope that the material presented convinced you that the independent manufacture of wooden stairs is not such a complex process. If the article was interested in you, please estimate or comment on it in the fields below.
Wooden staircase with your own hands: photo, video, drawing, calculation
Wooden staircase, with his own hands created, bring great satisfaction. Fueling with a good drawing and follow our instructions.
How to make a wooden staircase on the second floor with your own hands
One-story buildings in the private sector are elevated only to ensure economic activity, and are used as utility buildings. Full residential building at least in 2 floors. Consequently, without such a functional element, as a staircase to the second floor, can not do.
The problem of moving from one level to another can be solved simply - buy a finished kit and install yourself.
Its value begins approximately from 33,000 rubles (pine, 14 steps, staircase swivel with two spans). Montage do it yourself easy. The problem is different - how it will fit into the interior, do not have the fitting of individual elements or partial reconstruction of the 1st floor?

Many firms provide services for the manufacture of sets according to the customer's drawings, but as practice shows, such stairs cost 1.5 times more expensive. That is why most often the most acceptable option is to make a wooden staircase with their own hands, from "zero".
How to do what this article is dedicated to this.
Terminology
Before proceeding with constructive features, some specific definitions should be "decrypted". The main elements are shown in the schemes.
- Step. Its horizontal part is called a guide, vertical (it may not be) - a risk.
- Supporting beams. If the steps are adjacent to the end parts to them, then this is a string. If they are "superimposed" to the beam and their edges come for it, then it is called Kosur.
- Rail supports. They are more often called balusters or pillars. For screw construction, the term stand is used.
- Fasteners. In some varieties of stairs, the fixation of steps directly on the adjacent wall is made by special bolts - the hospitals.

Types of designs of stairs
For self-making the most simple - marches. For a private house, they are installed in one or two spans. Screw stairs for self-assembly are much more complicated (about it told here). In addition, the production of the necessary calculations for them has its own specifics.
Features of calculating the ladder parameters
Next, general recommendations are given, which are just desirable to navigate when designing the inner staircase. Since all houses (and rooms) are distinguished by architecture, dimensions, planning, then some single template cannot be in principle.

The optimal bias of the spans - ranging from 35 to 450. At a sharp staircase, it is much more difficult to rise (especially people with disabilities, advanced years or small children). Yes, the carrying of large, heavy things from the floor to the floor will also be complicated.
The design is more common inconvenient in that it will take more space for its installation, as the length of each span will increase. And what specifically the angle to choose - at the discretion of the owner.
It is unlikely that anyone in a private house will move from the floor to the floor as part of the group of comrades, therefore, when drawing up the scheme, it is advisable to navigate the dimensions of one person. The width staircase of about 1.2 - 1.5 m for a private house is a completely acceptable option. And walking on it, and even tolerate furnishing items will be quite convenient.

Steps parameters
- Appeal. It should fully fit the man's foot (based on the 45th size), therefore the optimal width of the step is within 250 - 300 mm.
- Risers. In order to be comfortably moving to people of any growth and age, its height is taken within 150 - 200 mm. It is enough, regardless of the design.
On a note! All specified dimensions are absolutely the same for each stage of one staircase. Otherwise, about the convenience of moving is not to speak.
Height of stairs
Determined as the distance from the floor covering the lower floor to the ceiling + overlap thickness. For example, 270 + 40 - 310 (cm).
Number of steps
The height of the structure (310) is divided into the term of the approach and thickness of the sharpening boards, after which it is rounded to the whole value (largely). For example, if "Society" is used, then 20 + 4 \u003d 24 cm.
Total - 310: 24 \u003d 13 (steps).
Recommendation - For stairs with the number of steps of more than 18 and steepness within 450, special platforms should be installed. Depending on the purpose, they are called differently rotary, observation, intermediate. Therefore, the staircase itself will already consist of separate marches (spans). They may be the same type, or are made in various schemes, since the playground is not necessarily located exactly in the center of the structure.
Length of stairs
It is easy to define, knowing the number of steps and the magnitude of each sticky. These values \u200b\u200bare multiplied. If the steps have protrusions, they are not taken into account.
Sometimes the calculations show that such a design "does not fit" in a particular room. In such cases, or increase the number of marches, or equip the so-called fatigue (rotary) steps.

The height of the spans relative to the floor
It is necessary to focus on human growth + a small supply. The optimal is the design in which the distance between the extreme steps and the ceiling is not less than 2 m. Otherwise, the rising person at the end of the span will have to bend a head.
In most cases, such a breed of wood is chosen like pine. It is inexpensive, but it is not characterized by durability. Larch is largely preferable. The presence of a special resin in its structure makes the material when absorbing moisture is even stronger. And this for home stairs, given the specifics of its operation - it is important. All other options, such as oak, cedar, maple and a number of other budget, cannot be called.
Before you begin working with wood, it is necessary to dry well. Further shrinkage of the material (including twisting) will lead to the fact that the staircase literally falls apart.
The procedure for installing the stairs
Consider on the simplest example - the stairs single-hour. This option can be considered basic, since the algorithm of action is the same, regardless of the number of spans.
Preparation of structural elements
- Kosouras. The main requirement - they must be absolutely identical. The board is only one-piece, without defects, no less "forty". Accordingly, the steps are made in advance.
- Stages. The edges must be curly, as the sharp edges increase the risk of injury. The board is chosen absolutely smooth, thoroughly treated (polished). The length is based on their edges for the boosters for no more than 2 to 4 cm. Thickness - within 300 - 400 mm.
- Risers. They do not experience a significant load, as it has to be mainly on supporting beams. In order not to increase the overall weight of the span, there are enough boards for them.
Tip - For the private house, the risers are better not to install, as it is much more complicated on the staircase of this (closed) type of cleaning.

- Handrails, balusters. Alone to make them so that the staircase becomes not only a means of movement, but also the decoration of the house, it is unlikely to succeed. Therefore, these structural elements are or purchased in the store, or order in the workshop.
Assembling stairs
Wall markup
In accordance with the installation and drawing scheme.
Fastening of support beams (cosomov)

Fixing the top of the march is made differently (as more convenient). Option number 1 - chipped in the ceiling beam. Option number 2 - Metal stops are used, which are fixed on the beam anchors. In any case, the place of connection of the structural elements should be as reliable as possible.
For mounting the bottom of the cosomes on the floor, the support timber is mounted. To the wall - fixation on anchor bolts.
Installation of precision
If they are mounted, they are screwed to Kosomers.
Laying a taught
They are fixed both on the support beams and on the risers (at least at one point, in the center).
For convenience, the installation of steps begins with the bottom. Options are shown in the diagram.

Installing Balyasin
First of all, the extreme - top and bottom of the march are fixed. Between them stretches the "ATTA", focusing on which, you can mount the rest of the rack.
Installation handrails
They are fixed on each of the racks that are located on the march. They can be made almost from any material - metal, plastic, and not just a tree.
The article outlines only the overall procedure and the basic recommendations are given. Deciding with the specific design of the stairs, the entire material available on this topic should be explored, since for different models there are nuances and installation, and the calculations of individual components. For example, swivel steps that can be rectangular or segmented.
You can watch video instructions for the manufacture of a wooden staircase:
But the overall work schedule is described in detail, and the author hopes that this article will help the reader in self-construct. Successes!
How to build a wooden staircase to the second floor - manufacturing technology - diagram and video
Modern private country houses grow like mushrooms, or rather as pine or even sequoia. Today is not the rarity dacha at home in two, or even in three floors. And there is still houses with an attic. Not to mention two-level apartments. In order to climb up the top of the necessary stairs or elevator. The latter, of course, pambling, although there is a place to be. We will talk about how to make a wooden staircase on their own.
It can be assumed that it is not so difficult, but in reality such work has its subtleties and requires knowledge of the case. After all, it is not necessary for any staircase, but such a structure that will be beautiful, durable and so safe so that it can be calmly exploited long enough.
 How to make a wooden staircase on your own
Stairs for a country house, cottage or cottage often make a tree. The right choice of durable wood is a guarantee that the staircase will slightly. At the same time, an environmental component has an important meaning.
Types and types of stairs for a private house
The choice of stairs is often limited by the framework of the existing space for its device, and of course budget. But, guided better than the convenience of location and aesthetic preferences. Among the existing structures of wooden stairs are the most common march and screws.
Screw stairs
 A sponge wooden staircase on the second floor of a private house version is convenient when space is limited. Such a staircase can be placed on the heel of 1.5 meters. True use it only for moving upstairs or down one person. Raise something large-sized, nr, furniture, no longer succeed.
In addition, a wooden spiral staircase has a complex design, and its construction requires more labor costs.
At the same time, it is necessary to take into account the set of nuances: check the structure for strength, first of all, the carrier racks must be reliable.
The complexity of the design is associated with the fact that the main parts have to count on taking into account all design features.
Experienced specialists will cope with such work. Without special skills and tools, do it yourself difficult.
Marsey stairs
Wooden stairs for home can be single-hour, two-hours, three-time and multi-party (each of them is used under certain conditions, which depend on the floor and area of \u200b\u200bthe building).
The marching stairs are divided into direct and swivels. Can be located along the wall or as an independent design in the middle of the room.
It is worth noting that the device direct staircase assumes the presence of sufficient free space, as it takes a lot of space. In general, this type of construction is much easier in terms of self-implementing compared to the screw option.
 Direct Movie Wood Staircase
If the number of steps more than 10, the staircase is recommended to divide into two parts by connecting them between themselves the intermediate platform. If necessary and saving space (it depends on the characteristics of the room) from the intermediate platform, the staircase can go up with a turn, the so-called staircase with rotary steps (trapezoidal steps that are also called quiet).
The staircase with a turn of 90 degrees is called a quarter-coordinate. The semoretum staircase has an angle of rotation 180 degrees.
When the rotation is 360 degrees, then this is an option of a circular or spiral staircase. Although, in principle, this is an ordinary marching staircase with running steps and turning on * degrees.
 Swivel marching staircase
Combined stairs
Depending on the planning and project of the house, a combination staircase structure is possible, which will consist of two or more types of stairs. For example, the marching staircase on a certain span is complemented by a screw element with a support on the growths or cosos. Of course, such a design is very complex and requires accurate calculations.
 Types of wooden stairs
Before choosing one or another design, you should need to appreciate your capabilities. It would be better if there will be a simpler straight staircase, but reliable and from high-quality materials than an intricate spiral or combined, to build the construction of the means or forces.
And of course, the space is of determining importance, so that it does not turn out that the staircase takes a large half of the house.
Start with measurements and calculations. Draw a drawing or order from specialists. You can even create a 3D model of the future staircase and clearly see the location in your layout.
Inter-storey wooden stairs - selection of components and carrier elements
It is possible that the staircase created will be the first to your experience, then the best choice will be a straight staircase. This option is easy to manufacture, its installation and installation is also not very complex, and the result resulting will meet all basic requirements for strength, convenience and durability.
 Making wooden stairs with her own hands
Production of a staircase from wood with their own hands is possible in the presence of appropriate tools, high-quality lumber and experience.
Material for the construction of the stairs:
- Bruks for steps, the thickness of which should be at least 40 mm.
- Boards are approximately the same width and size provided by the project.
- Beams for sticking 30-40 mm.
- Beams for approaches not less than 30 mm.
- Bar for Kosomrov or Testa 50x250 mm.
- Handrails, railing and balusters can be made independently, but better to buy ready.
- For fasteners, stainless steel screws are used.
Figures featured wooden stairs drawings
 Constructive elements of a wooden staircase
  Wooden staircase device diagram for second floor
  Scheme - Wood Staircase Fastening Methods
  Scheme - Wooden Stairs Kosher Marking
  Wooden staircase drawing on the 2nd floor of the house
  Parameters of wooden staircase
Installation of a wooden staircase with her own hands:
- As mentioned above, it is first necessary to think over the design, make calculation of the number of steps and determine the size of the stairs (width, length), you can download the finished drawing on the Internet or make a simple scheme yourself.
- Standard march can be built with supporting steps on the theettes that pass from two sides. Another option attachment assumes the support of the steps on the platforms, which are beams located below the steps.
- All steps are first connected with the assets, then the design is strengthened by supporting bars, which are placed under the staircase at an equal distance from each other. With a sufficiently high angle of inclination march, there is no need for bars, although it is still desirable to install them to ensure that security guarantee.
- The bottom and top of the testers should be mounted on the walls, sex or ceiling.
 Fastening the stairs of the stairs on the boosters
The operational and decorative qualities of the wooden staircase, its ability to withstand moisture and other effects, for example, woody pests are significantly increased when it is processed by a special varnish, a veneer. Such a staircase for a long time will not lose its initial appearance and reliability.
How to make a wooden staircase with your own hands - video instruction
Photos of wooden stairs for home
 Oak staircase with carved pyrils
  Rotary wooden staircase
  Wood staircase with a turn for a country house
  Print Wooden Staircase for Dacha
  How to make a wooden staircase on the second floor
Today, most country houses are built in two or more floors. And in this case, the question arises with the movement between the levels, or rather, with the construction of stairs. For these purposes, you can take advantage of various materials, both traditional and modern. But probably, a tree remains one of the most popular materials for the construction of stairs (and other designs). It is beautiful, relatively inexpensive, and everything can be done yourself. In this article, we are talking about how to make a wooden staircase with your own hands.
Preparatory stage
Before embarking on the construction of the ladder from a tree in a country house worth consider some details. First, it is worth deciding with the type of construction. In private housekeepings, most often use two types of stairs:
- march
- print.
Each of them has its advantages and disadvantages. So, for example, a spiral staircase from a tree will take much less free space. But at the same time such structures are complex. In addition, the stairs themselves are quite narrow, to go through it "the big" person can be difficult (not to mention the transfer of large-sized furniture or objects).
The most common option for a private house is considered wood staircase. Such designs can be easily made with your own hands. They are pretty spacious and easy to operate. The marching stairs, depending on the height of the second floor, can be with one or two spans. But there is no fundamental difference in the construction of each species.
Secondly, it is worth decide with some parameters. Namely:
- how much free space you can highlight the stairs;
- what is the height between the floors;
- what maximum load should be withstanding the staircase;
- from which parts will be a design (what type of steps to choose, what is their height and width, which fences are used, etc.).
With the appearance, you can decide, viewing numerous photos and form from the Internet. Here you can find original solutions, some of which can be completely implemented independently, with your own hands. Also from the video you can get acquainted in more detail with the instructions for the manufacture and installation of stairs from the tree.
After the form of a wooden staircase and its constituents decided, it is worth prepare all the necessary material. But for this you need to do the calculations of the future design and its drawing. at first thip all the indicators. Namely:

Also worth considering the width of the lumen over the staircase. When you climb the steps, then above your head should be free so that you do not hit. Also calculated the length of the Kourow or the Taitiv.
Preparation of the required material and tools
 Knowing all the design parameters, you can prepare the necessary material. Wooden stairs can be made of different breeds. Many experts recommend using oak, beech or larch. But such materials are quite expensive. Coniform are most often used. They are strong enough, easy to handle and cost inexpensively.
When buying wood, it is important to pay attention to its quality. On the boards there should be no places of rotting, dropped bones and deformations. Also trace the wood is well dried.
For mounting a wooden staircase in the house you will need:
- bruks for Kosomrov, their thickness should be at least 50 mm, and width in accordance with the dimensions of the steps. The length of the bar must be enough for the entire length of the march, sewing two bars is not allowed;
- boards for sticking with a thickness of 40 mm;
- boards for approaches with a thickness of 30 mm;
- balas, railing and other additions are better to purchase in the finished form, they will have a more aesthetic look;
- galvanized self-tapping screws, screws and anchor bolts for fastening.
In addition, it is necessary prepare a job tool. Namely:
- fixtures for marking and measurement (roulette, ruler, construction corner);
- to do the holes, you will need a drill (better electrical);
- wooden hacksaw (for large details) and a metal knife (for small parts);
- screwdriver or better screwdriver with set of nozzles;
- hammer and chisel to make grooves;
- plancock (better electric);
- grinding canvas.
Well, of course, a detailed drawing should be in hand.
Build a staircase
Now let's get acquainted with the installation instructions for the most wooden staircase in the house. The drawing is ready, materials and tools in place, you can start. Installation of stairs do it yourself in the following sequence:

On this assembly of the stairs is completed. Remains only cover all surfaces The protective layer in the form of varnish. If there is a desire, you can cover all the surfaces of the paint.
If there is a desire to build a staircase from a tree in a country house with your own hands, then this thing is quite feasible. The main thing is to carefully calculate, make a preliminary drawing and pick up a good material. And then a little effort and time spent and a beautiful and comfortable wooden staircase made by hand, ready. She will certainly decorate your home and will make comfort and comfort.
 How to return the love of her husband to his wife - Tips of the psychologist
 Why you can not give icons