Installation of plastic windows according to GOST - SETFULL ™ and the basic installation system - SETECO ™. What are the rules for installing plastic windows? Premises Requirements for Plastic Window
Installing PVC windows is simple, if you at least once kept building tools in your hands and even a little understand the materials. Installation of such windows will take a little time: half an hour to dismantle the old windows and 2 hours to install new ones.
Installation of PVC windows. Installation according to GOST.
GOST to install PVC windows, unfortunately, in most cases wears only a recommendatory nature, but some rules should be held during the installation of windows. First of all, it concerns the preliminary measurements. We define the type of window opening - with a quarter or without. Below is a visual example of a schematic view of the opening of a quarter (a), a quarter to (b).
Scheme 1 - window opening with a quarter and a quarter
Measurement of windows without a quarter
Installation of windows without a quarter occurs by mounting windows into the purified window opening. To order the window:
- from the size of the window opening vertical, take 5 cm - an indicator of the height of the window;
- from the size of the window opening horizontally, take 3 cm - the width of the window.
These gaps will be subsequently filled with mounting foam: i.e. 1.5 cm from each vertical side of the window, as well as 1.5 cm for the upper horizontal and 3.5 cm - for the bottom (for the mounting of the window sill).
We measure the length and width of the window sill, outdoor and add to the numbers received at least 5 cm - the windowsill should crawl into the wall with both sides of the window.
Still windows with a quarter
We measure the window opening horizontally in a narrow place. I add 3 cm to the resulting number (1.5 cm on the side of the window) is the desired window width. Vertical Measure the length from the bottom of the window opening to the top quarter is the required size of the vertical window.
The windowsill and the tump are measured similarly to an option without a quarter.
As a result, you must have:
- window height indicator;
- windows width;
- the length of the window sill;
- the width of the windowsill;
- low-length;
- locking.
Scheme 2 - window measurements
Installation technology
Technology installation of new windows in old houses is similar. The only amendment is the measurements of the new window on the outer sizes of the dismantled window frame.
When ordering the window, specify whether the delivery includes:
- windowsill;
- plugs;
- installation profile (mounting profile);
- anchor plates for mounting the window;
- installation instructions for PVC windows (some manufacturers are included in the kit).
When ordering the windows, you should also know the answers to such questions:
- What type of window profile do you want to order - 3, 4 or 5-chamber?
- What kind of glass package you chose - 1, 2, 3-chamber?
- The way to open your window is a deaf window, a window with opening, a swivel-fold window with air, or a combined window (swivel-folding window with ventilation and microwing).
By the way, if you want to get a quality product for a reasonable price, you should choose from, mostly German and, more than surprisingly, domestic window-based system manufacturers: Rehau, Veka, Kbe, Schuko, Aluplast, Kemmerling, Brugmann or Trocal.
Installation technology provides two ways: installation of PVC windows with unpacking and installing windows without unpacking.
Scheme 3 - Metal Flastic Window Device
The first method provides for preliminary disassembly of the window: pickups, removal of double-glazed frames from the frame, fasteners of the frame to the wall of the dowels, and the subsequent installation of double-glazed windows and staps.
The second glass removal technology does not require: the frame is attached using the walls fixed on the outer surface, and not a dowel through.
The installation method with unpacking can sometimes lead to fogging windows, also with a lack of experience, you can damage the strokes and double-glazed windows, and the installation process itself will take much more time. Of course, the correct installation will not lead to any negative consequences. However, be extremely careful!
The method with unpacking is considered to be more reliable, especially if the frame was fixed on large long anchors. If we are talking about mounting the window on the floor above the 15th, on the installation of large windows (2x2 m), the correct choice is to fix the frame through, disassembled the window.
Required tool
To install windows you will need:
- screwdriver;
- level;
- pistol (under the balloon of mounting foam and sealant);
- mounting foam (1- 3 cylinder 1 standard window);
- Psyms for external waterproofing;
- Primer;
- perforator;
- set of hexagons;
- lobzik;
- stationery knife;
- pencil;
- painting brush;
- roulette.
Install the windows. Stroke work
In the process of assembly work, you must navigate the previously intended plan: Mounting the windows (drew it yourself or it was filed as an example in the instructions from the manufacturer of window systems) will help to avoid mistakes and clearly follow the plan. If you doubt whether your calculations or ideas about the installation of windows are true, a technological map on the installation of windows - a universal set of rules and installation rules, guided by which you will be confident in the correctness of your actions.
We dismantle the old window and prepare the surface to the installation of the new window system.
Prepare a tool for work.
To improve the adhesion, waterproofing tapes to the surface of the opening are processed by its primer. Pricewer apply painting brush.
Removing the cellophane packaging of windows, the internal vaporizolation tape is glued to the frame by half-version.
Figure 1 - Watching the window frame with a vapor insulation ribbon by half-versioner
Frames are covered with outer vapor barrier-finding psyl on the outer surface of the frame. If you are saved, do not allow breaks between the junctions of the tape. Psuli - vapor-permeable tape will not allow the output of the mounting foam when processing the gaps outside, protecting not only the appearance of the design, but also the installation foam from environmental exposure - precipitation, ultraviolet and winds that destroy foam.
We set the frame in the opening, align and fix it, focusing on the installation rules:
- on the frame prepared for installation, we apply markup places of subsequent mounting;
- breeping with 4 sides of the frame with a step of 70 cm, while the indentation of the angle of the window frame to the first fastener should be not more than 15 cm;
- fastening elements are fixed to the window frame (the screw must be fixed in the metal inside the frame, therefore the proper installation technology provides for the use of screws for metal with a diameter of 4-5 mm, with a large size of the window, the diameter of the self-drawing must be 12 mm);
- as fasteners, use anchor plates;
- in places for mounting the fasteners, perform recesses in the window opening (the fasteners are combined by 2-4 cm for convenience of working with slopes after completing the window installation);
- the window must be exhibited (for a slight alignment of the horizontal window, wooden wedges can be used, placing them under the frame at the desired points);
- to fix the frame in the opening, we install wedges - first the bottom two, thanks to which you can set the lower and upper edge of the frame into the horizon (so that the window does not creeps appropriately fasten the upper anchor), then the wedges of the windows vertically are fixed;
- fresh window to the window to the window.
On the outer side of the window opening, the diffuse ribbon under the sow.
After adjusting the fittings (buying the manufacturer's accessories other than the manufacturer of the window system, it is not recommended, however, if necessary, pay attention to the offers from Winkhaus, Siegenia, Gu, Aubi, Schuko (Germany), Maco (Austria)) you can marry a window (assembled foam On the entire perimeter of the window frame, taking into account that this mounting material increases its volume up to 3 times) and 15-20 minutes after processing all gaps, it is necessary to beat the protective film previously applied around the perimeter of the window frame so that it completely closed the mounting gaps ( See Figure).
Figure 2 - Processing of mounting seams
Krepim sings. It is desirable to install it under the window - so you can avoid seeping water on the connecting seam of the low tide and the window frame.
Installing PVC windows with your own hands in winter
Many concerns the question: "Is the Winter installation of PVC windows possible?".
Of course, it is possible! And the installation technology is unchanged. The only thing that is worth paying attention is the temperature regime indicators for the materials used during installation. In particular - indicators of applying a mounting foam.
Developed special winter options, thanks to which you can work at -10 ° C!
When choosing a mounting foam for winter work, focus on Machroflex Profi (Finland) trademark products (Finland), Illbruck (USA) and moment (Russia).
Installation of the windowsill PVC
The installation of PVC windowsill completes the installation of new window blocks.
Length and width of most windowsill standard. In any case, you need to take a windowsill with a reserve in length and width. Surplus can be easily trimmed with a grinder.
Proceedings:
The windowsill start a window and set up the level using wooden wedges or any other durable girlfriend.
The windowsill must enter the wall at least 1.5 cm.
Before final installation, make sure the windowsill does not seek, pressing in several places.
The slope of the windowsill relative to the window should not exceed 3 °.
The cavity under the windowson belated by construction foam.
The surface of the window sill must evenly simulate at least 12 hours so that the mounting foam, expanding, did not affect the angle of the window sill.
A day later, the remains of foam are removed by the stationery, and the docking seam between the window and the windowsill is treated with a sealant.
Scheme 4 - Mounting of the window sill
Only the installation of slopes on the PVC windows remained - and everything is ready!
According to GOST! Installation of PVC windows: video
Installing PVC windows: video
$ Installation of PVC windows: Question Price
The cost of work will depend on how much your window is: firms that provide a complete package of services, often rates of installation of windows are output from the cost of the window - from 10% starting. Thus, when performing work with your own hands, saving on the window installation can be from 40 to $ 60 (for one window).
Installation of PVC windows. Price:
- Kiev - from 100-130 UAH. per m²;
- Moscow - from 1,000 - 1,200 rubles. per m².
The cost of plastic windows with installation:
The cost of plastic windows with a set is an average of 80-90 $ (a deaf window 1M 1.5 m) and up to $ 2,200 (glazing of a section of 3.4 m per 1.5 m sliding two-chamber window system). As you can see, the price variation is amazing. Installation of windows - the price is not always included in the total amount. Therefore, when signing an order for the manufacture of the window and the corresponding contract, make sure that it is included in the final price, and what you have to be spent.
Estimates - an extremely important document: upon receipt of it in hand, ask you to provide you with full price of work and materials - the check is never excess.
The cost of installation, paid separately, is different: Rates vary in the range of $ 30-70.
If you pay the full amount immediately the client is not able, some firms provide product and services of the brigade of their masters in installments.
Window business, by the way, a profitable business: for example, win a tender for glazing of high-rise buildings or a housing label - it's like to tear a kush in a casino. The company's profit can be calculated in hundreds of thousands of dollars.
Before starting installation work, it is necessary to completely free the window opening and space next to it:
- remove everything from the windowsill,
- remove the curtains
- free the approach to the window, moving away the furniture at least 1.5 meters from the window.
Protect the room from dust and dirt covering the floor and furniture to matter or dense glued.
For easy installation, move the power to 220V through the extension, prepare garbage bags.
Dismantling of the old frame
After the room is ready for the appearance of dust and garbage, they begin to dismantle the old window frame.
From the windows remove the sash. Disassemble window platbands. If necessary, dismantle (knocked down) slopes.

The old window frame is dismantled, while it is usually seriously damaged. If you wish to use old windows, for example, in the country, you should specify the option to save old windows when ordering.
It is dismantled by an old sampling, old window sill.
Installation of the PVC window

The flaps are removed from the plastic window, the double-glazed windows are removed. In the prepared opening, the window frame is inserted and fixed on anchor bolts or mounting plates. At the same time, it should be strictly observed that the frame stood in terms of level, and not on the way (in the homes there are cases when the horizon line of the window opening is far from the ideal, vertically should also be placed on the level in terms of level). Otherwise, the window will not function properly.

The gaps between the wall and the frame are marked by the mounting foam. Foam performs both insulating function and is a fastener. The overall result depends on the quality of this stage of installation. The foam should be applied evenly and fill all the excavations and cavities of the opening, and the degree of expansion of foam should be taken into account.

Installing a plastic window In most cases, it implies that together with the new window a new window sill and a new one will be installed. The exception is the case when repair work and the windowsill can be installed in the apartment (house, room) can be installed on its own.

If the mounting window goes to the balcony (as in this case), then it is quite advisable and functionally instead of low tide (from the outside of the window) to install the windowsill.
If you have a good old cast, then you can save it for a new window, but in this case it will be necessary for restoration (recovery) - a paid service, the cost of which is slightly different from the value of the new low tide.
The windowsill is cut under the opening and is attached to the window (to the coaching profile). If the opening under the windowsill is small, then it is married. Otherwise, the laying or sealing of the displacement is necessary. When installing the windows (windows, the windowsill) control so that it has a slope from the window within 5 degrees, and the Svet for the inner surface of the wall is not more than 60 mm.
By installing the windowsill should be taken into account that its edges have entered the finish of the inner slope to a depth of at least 15-20 mm.

Tip:when choosing a width (depth) of the window sill, it should be borne in mind that 2 cm windowsill "takes off" under the window frame, so the width of the installed window sill will be 2 cm less)

All the slots between the window and the opening are filled with foam, and in its drying is isolated. The outer insulation layer is intended to protect the layer of insulation (which is a layer of foam) from the penetration of moisture into it, as well as from the destructive solar exposure.

So, the bulk of the work is completed. However, for the finishing finish, the opening lacks slopes (which are both a decorative addition, under which you can hide the mounting foam and the functional element - increasing thermal insulation and sound insulation of the window opening). Plastic slopes will give the window a finished look, besides, this is the best combination with plastic windows.
Installation of plastic slopes

Plastic slopes are installed in one day with a window for panel and block houses and on the second day for Stalin's houses.

As a slopes, it is used or a Belgian sandwich panel (in the image) or German VEKA plastic slopes with removable platbands.
The differences between different plastic slopes are not significant, but they should be known.
The Belgian sandwich panel can be installed in the dawn (not at right angles to the window), which visually increases the window opening. The selection of VEKA plastic slopes is justified for a more accurate blowing of wallpaper with already installed slopes. Thanks to the removable platter, the edges of the wallpaper will be carefully hidden under it.
Tip: If you have a repair in the apartment, then the platbands on the slopes from the Belgian sandwich panel are better to install after sticking wallpapers on their own - it turns out more carefully and prettier).
Installing accessories on the windows

At the final stage, double-glazed windows are installed in the window frame and hang sash. The installation of additional accessories is made, fastening additional elements of fittings and components, such as: step ventilator, retainer, mosquito net, blinds, etc.

Window is ready. Upon fulfillment of all works, an act of acceptance of work is signed. In it, if necessary, the Customer points out its comments on the works performed, if any.
Almost immediately after performing all the work, the PVC window can be used. The exceptions make up windows with large opening flaps that are not recommended to open within 24 hours after installing the PVC window.
Plastic window on functionality on a lot better than old wooden windows. If you follow simple instructions for your care and operation, it will last you forever.
Do not forget to remove the protective film from the outside of PVC windows!
According to GOST 30674 "Blocks of window from PVC profiles":
Removing the protective film from the front surfaces of profiles should be made after installation of products and finishing of the assembly opening, given the duration of the effects of sunlight on the protective film should not exceed ten days.

If in the room where windows were installed, repair work is still underway, the protective film can remain on the product before they are completed. However, from the outside, the film should not be under the influence of sunlight more than 10 days.
The adhesive base of the protective film loses its properties in thermal and UV exposure and can spoil the aesthetic type of plastic profile.
General requirements for installation according to GOST
GOST 30971-2002 "Seams mounting units of window blocks to wall openings. The general technical conditions "was put into effect by the order of the Gosstroya of the Russian Federation from 01.03.2003.
Due to the need to adjust the project documentation for project and construction organizations, the transition period for the development of the GOST was set to 07/01/2003. The Republic of Azerbaijan, Kazakhstan, Kyrgyzstan, Moldova and Uzbekistan joined Russian standards.
What's new?New standards bring significant formalization of installation of windows and require numerous documents. Among them, it is necessary to note the need for each installation company "Instructions for installation of windows", approved in local authorities, the need to develop mounting units of windows for each object under construction and coordination of nodes with the Customer is recommended to carry out the thermal fields, and the execution of acts of passing - The windows of window openings before installation, acts of hidden work and the acts of acceptance of the completed installation of windows.
Of particular interest in the standards are applications:
- Appendix A (recommended) is drawings with examples of window mounting;
- Appendix B (recommended) puts out the requirements for fastening windows in openings;
- The application in (compulsory) is the actual requirements for the installation of windows as a whole and in essence is the main working document;
- Appendix G (recommended) describes the requirements for the method of calculating thermal fields (analysis of isotherm).
In general, Russian standards for installation closer to us to standards adopted in Europe, and, in particular, in Germany.
GOST requires a large number of formalities from the window firms and has more requirements for testing the designs of seams and materials used for them.
Formalization is justified by the struggle with Russian negligence.
Tests of materials and seams are generally justified by the fact that so far in Russia detailed standards for installation is not at all, there is no accumulated scientific experience in determining the properties of assembly materials and quality of seams. Of course, for the consumer there is no need to know all the provisions of this GOST is the responsibility of professionals.
Not linked in subtleties, you can talk about the three basic principles of the installation of windows to which you need to pay close attention.
Three layers of seam seam
The content of the main part of the norms is devoted to the rules for filling the assembly gap between the window blocks and the openings on the principle of "from the inside tightly than outside." Each mounting assembly must have three layers of sealing: outside - protection against climatic influences, in the middle - insulation, from the inside - vaporizolation. You can use different materials for external layers and different mounting foam, but, in one or another version, these three seal planes must be present.
Outer layer It is designed to protect the insulation layer from moisture from penetrating it, and should have vapor permeability in order to have ventilation insulation. That is, the outer layer should be water insulation and vapor permeable.

These requirements are due to the fact that when moisture penetration into the insulation, its thermal insulation qualities fall. In the best way, the current requirements for the outer layer correspond to the ps (pre-compressed sealing tapes). These are special mounting tapes that glue onto the window box before it is installed in the opening, and then, expanding, they fill out all the looser of a quarter in the opening.
With serious advantages: optimal building physics and technological simplicity, they have both disadvantages. It is convenient to apply these tapes in new construction when the opening has a good geometry. But when replacing windows in old houses, when the slopes are uneven, and even more so plaster, their use is difficult. Another drawback - the plaster does not lie down.
In a limited form, it is possible to use outside silicone. At the same time, certain rules should be observed: the thickness of the silicone layer should be half of the width of the seam filled, and the silicone must be glued only on both sides and work on stretching, the rest of it should remain free.
The sealant when the installation seam isolation device can be used. Although, it is not clearly registered in GOST, but there is no ban on its application, no matter how the supporters of the mounting tapes. An example of using silicone outside and from the inside of the room is shown on the A.14 node in GOST 30971-2002. It is unacceptable, of course, as you can sometimes observe on the objects, it is easy to anew silicone over foam - this is imitation of the protection of the seam, but not the protection itself.
Central layer - thermal insulation. Currently, polyurethane foams are used for its execution. It is best to use foams designed specifically to install windows. Such foams evenly fill the seams and they should not be trimmed after hardening. Other foams after the end of the installation are hanging by shreds from the room, and they are cut, disrupting the protective outer crust.
Inner layer - vapor insulation. Its function is to protect the insulation (foam) from the penetration of moisture vapors on the side of the room. For these purposes, steam-insulating tapes are used, mainly on the basis of butyl, as well as painting vapor insulation for moisture-resistant plasterboard. It is possible to use silicone according to the rules mentioned above.
No bridges of cold
Installation seam is a node where the walls of the walls and windows are docked, which have completely different properties, including in terms of heat engineering. And it is important to perform nodes in such a way that the cold bridges occurred on window slopes.
Basically, the problem of cold bridges is the problem of single-layer wall structures, which were used in the houses of past years (solid brick, ceramzite concrete, etc.). In this case, the weak zone is the wall around the window box due to its low heat transfer resistance. A section appears on the slope with the surface temperature below the dew point. In this area, firstly, high heat loss, secondly, condensate falls on it. If the condensation of moisture on the slope is often happening, then the fungus (mold) may be formed at these places. The same applies to the openings without quarters. With their absence, the risk of cold bridges increases seriously, and here it should be particularly carefully thought out the heating engineer of the adjoining nodes.
Important recommendation - in the absence of quarters, use window boxes with a width of at least 130 mm. With a narrow window box, the high-quality seal of the seam is difficult and high probability of cold bridges. The options given in Guest with false quarters from the corners or from the platband is possible only in the presence of outdoor plaster, and still remain problematic from the point of view of heat engineering.
If there is an effective insulation in the wall (mineral wool or non-combustible polystyrene foam), the window must be either in the plane of the insulation, or for a quarter from the insulation. In the walls where the aerated concubus with outdoor cladding and quarters of the brick are combined, as a rule, cold bridges also does not arise due to good heat-engineering qualities of aerated concrete.
Fastening the window block in the opening
The specifics of plastic windows is that they have significant thermal linear extensions. That is, when the windows are heated by sunlight, the bars of the boxes and sash are increasing in size. As the calculated magnitude of the thermal expansion for the white windows, 1,5 mm should be used for 1 mongor meter, for color windows - 2.5 mm per 1 p. (The difference in thermal expansion is due to the fact that white profiles of windows are heated significantly less than color).
In accordance with this factor, the windows fasteners are performed in the wall. The angles of plastic windows should remain free, the extreme fasteners are set at a distance of 150 mm from the inner corners of the frames. The remaining fasteners are set throughout the perimeter with a step for white profiles not more than 70 cm, for non-ferrous, no more than 60 cm. The fasteners are also placed at a distance of 150 mm from the angle. The gap between the box and the wall should be at least 15 mm. This is due to both the thermal extensions of the windows and the factor that the more subtle seam is very difficult to evenly fill the foam insulation.
Under the lower corners of the box and under the impress, bearing pads are put. The pads are also put on the sides as follows: if you look at the window from the inside, then at one turning flap, the pads are put on the opposite loop side up and on the same side as the loops at the bottom. With two sash, there are four pads, respectively.
Connecting Connection Schemes of Window Boxes To Walls

1 - windows board;
2 - foam insulation;
3 - vapor barrier tape;
4 - flexible anchor plate;
5 - Support block under the submap board;
6 - plastering solution;
7 - Dowel with a lock screw;
8 - an antisapted lumber liner or an aligning layer of plaster mortar (recommended only for the lower node);
9 - waterproofing vapor-permeable tape;
10 - noise absorbing gasket;
11 - draining;
12 - insulating self-insulating vapor permeable tape (psul);
13 - sealant thin layer

1 - foam insulation;
2 - insulating self-insulating vapor permeable tape (psul) or vapor-permeable mastic;
3 - frame dowel;
4 - sealant;
5 - vapor insulation tape;
6 - panel of finishing of the internal slope;
7 is a plaster leveling layer of internal slope.
Thermal gaps must be taken into account especially attentively when designing large-sized glazing elements: when performing erkers, showcases, glazing to the entire height of the floor. These are the three basic principles when installing modern windows, although, of course, there are many nuances and subtleties, which depend on the various designs of the walls and from the applied seam seed materials. And - as we have said at the beginning of the article - the human factor is very important - the responsible and high-quality work of the installers.
When you can install windows
With the introduction by virtue of the Law of Moscow No. 42 "On Silence", a breakdown of peace of neighbors is an administrative violation. Carefully read our instructions on conducting noisy work to comply with the requirements in force in Moscow and the Moscow region in various buildings.
How much is the installation of windows according to GOST
The cost is made up of two components: the cost of work (hours) and materials.
The installation seam will correspond to the GOST to install windows, when used as expensive and economical materials. The use of this or that will affect the etching (duration) of the work and the final cost of mounting windows.
Video instructions for installation of plastic windows
Installation according to standard
Installation of plastic windows involves following GOST standards. Household owners do not always prefer to mount windows on all necessary standards and rules.
Installation scheme of plastic window.
Experts strongly recommend all residents to adhere to these rules, especially those who have office premises, shops, various public institutions. Most buyers are confident that the quality and reliability of the entire design depends on the profile. But besides this, assembly plays a key role and, accordingly, installation. Sometimes the owners, hiring specialists, do not think if the installation will be done according to GOST. Profile Manufacturer always indicates that the assembly must be made in this way, but the installers can not make this rules.

Plastic window installation circuit.
Installation according to GOST is not mandatory. This is rather a recommendation.If the home owners decide to install windows, guided by the requirements of the standard, you need to invite qualified employees, preferably from a large construction company. This company consists of an agreement that includes a specific clause, where it is indicated that the installation will be made precisely according to GOST.
When buying, the seller must pick up a suitable profile that will correspond to specific conditions. The design should be tested for optimal air exchange and heat transfer, to sound insulation, dust penetration and so on. As a rule, well-known supplier firms have certificates that the window structures have passed the necessary verification. Accordingly, it is better to acquire the goods from them.
Basic requirements in the installation process
It is important to take into account the fact that most problems with plastic windows occur if the installation is incorrect. Therefore, if you decide to install plastic windows, it is not worth saving on the installation process. Today in Russia there is GOST 30971-2002. The rules are specified for the correct installation. First of all, the types of profiles are specified, also examples and various mounted options. In the process of installation, it is important to follow certain rules: There must be no gaps, openings. It is necessary for isolation from the cold. In places of fastening windows vertically and horizontal, three sutures are made: internal, external and medium. Moreover, to properly mounted the window, you need to take into account the expansion of plastic when heated.

Window installation circuit in the opening.
It is also necessary to remember that when choosing should be guided by sanitary standards and tightness standards. From this will directly depend on the optimal temperature and humidity level. In order to learn such standards, it is necessary to consider the requirements of SanPiN 21.2.1002-00, where the norms of ventilation and heating in the residential premises are prescribed. If you do not comply with these rules, a risk of infection with fungus or mold may occur, this may occur due to an excessive level of humidity.
It should be noted that the installation according to GOST is a guarantee of your safety and a favorable functioning of the window structure. In addition, the installation according to the required standards provides a favorable microclimate in the house.
When mounting the seams, you must arrange at 3 levels. The first is able to protect the room from the penetration of precipitation, water. The second (internal) level should be protected from vapor penetration. The third level is done using construction foam. Standards are prescribed and wall types, which also need to be considered. All rules Installation need to know. They are conveniently followed both when purchasing and in the installation process. Once again it is necessary to repeat that only high-quality certified products should be purchased. The seller must necessarily provide you with documents where all the technical features of the product are prescribed.
Installation requirements
The quality certificate should be assigned not only to the firm that is engaged in the implementation of windows, but also the one that is responsible for installation. It is important that qualified specialists be taken for the installation of the design. The emergence and implementation of the certification system will display a business at a high level. Today, the buyer places increased requirements for the quality of designs and maintenance in general.
Before installing, it is necessary to produce all the necessary measurements by comparing them. It is important to know what loads can withstand the design, the wind load is determined. From this there is a conclusion, whether an additional installation of a frame with metal plates is necessary. Some windows can pass the air. In this case, the frame is set to normalize thermal insulation.

Window installation circuit.
It is important before installation thoroughly prepare the room. It is necessary to remove all foreign things in advance. Furniture is recommended to cover with a wide cloth or film. Household appliances in the room should be isolated from dust. First, they pull out the sash and gently take out the frame. The opening should be free from unnecessary parts, all slopes are checked using a level.
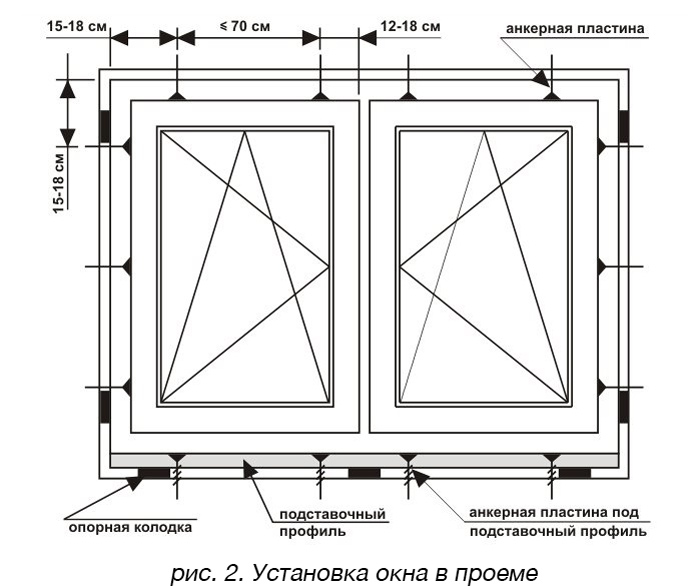
After the design is delivered, it is necessary to divide the frame and double-glazed windows. Rama is inserted into the opening with special wedges. Then make the frame marking and determine how it will be located in the opening. After the frame is fixed. For this use anchor bolts and screws. The glass is fixed using a stroke. In order to correct all the measurements, you will need a laser line. It is important that the whole design is firmly fixed. To do this, there are certain rules, for example, the distance between points of fasteners should be about 70 cm. The distance to fasteners from the inner corner should be a maximum of 15 cm.
The wall structures differ in each other. From the features of the wall depends on the choice of fasteners. Basically make fasteners with anchor bolts, anchor plates and screws. The most practical way is to use anchor plates. It is important to correctly install the slopes that cover the opening between the profile and the wall. To install, remove the remains of plaster from the old window, align the irregularities with a putty.
Instruments
- a hammer;
- perforator;
- lomik for pulling out old nails;
- building level;
- mounting foam and construction gun to work with it.
The installation of plastic windows should be carried out only by experienced specialists, it is advisable to install, following all the requirements and rules of the GOST. In firms that are engaged in plastic windows, there are quality control departments where you can contact if you have problems with the installation.
Load more
Investing considerable funds to the installation of plastic windows, people expect to seriously increase the level of comfort of their apartment. Carefully learn the model range, compare the benefits of profiles used in various designs. But all the advantages of PVC windows can be crossed by errors made by their installation. Most of the claims to firms setting the PVC windows are presented to the quality of installation of installers. Plastic windows will last long and will not lose their qualities, if the installers will navigate when installing at GOST, and not for purely personal considerations.
What document regulates the process of installing plastic windows?
In March 2003, GOST 30971-2002 was developed and adopted, which ensured the formalization of installation work. The adoption of this document contributed to the state program to increase energy efficiency and energy saving.
But not all companies in their work are guided by the provisions of this document. The high demands imposed by GOS 30971-2002 increase the cost of firms operating in the PVC windows market. Therefore, small companies often ignore its provisions, saving on the quality of the services provided. This contributes to the low professional level of employees of such enterprises.
An ordinary inhabitant acquaintance with this document will bring tangible benefits. Knowing the rules for installing windows from PVC, he will be able to control the entire installation process, and after its completion, it will be able to obtain detailed technical documentation on the work done and full warranty service.
What documents are made when installing?
The owner of new windows from PVC should turn out to be two documents, one of them - before installation, the other - at the end of the work on the replacement of window blocks.
- The contract is pre-issued in which the necessary calculations on the thermal properties of the window being installed in a particular wall should be present. On their basis, the best installation scheme is selected, which is consistent with the customer.
- After the installation of plastic windows is completed, the Customer is transferred to the installation passport with the installation scheme. There must also be listed materials used for sealing the mounting seams, and the guarantee of the contractor.
Preparation of the room
The process of replacing window blocks is accompanied by highlighting a large amount of dust. Therefore, before starting work, it is necessary to free the room from furniture and household appliances. What to be taken is impossible, as well as the walls and the floor, you need to close the film or newspapers to prevent contamination.
Tip: An old bedspread can be used as a peculiar screen, pulling it in a wet view at a distance of two or three meters from the window opening. It will take on a significant proportion of dust, and later it can simply be thrown away.
Preparation of window openings
Before mounting plastic windows, it is necessary to remove old frames from the wall opening. For this purpose, installers use a perforator, electric jigsaw and lomik. GOST 30971-2002 requires a contractor to pre-prepare openings under window blocks: to fully clean the surface and eliminate the existing defects. GOST also requires the presence of false quarters from the openings in which plastic windows are installed. They are necessary for the formation of a three-layer assembly seam.
Help: Quarters are protrusions designed to protect seams from external adverse effects. With their absence, the so-called false-quarters are created, usually manufactured from metal or plastic corners.
Three layers of mounting seam when installing windows from PVC
Regardless of the materials selected by installers of plastic window blocks, according to the rules, any installation seam must contain three layers.
- The outer layer must protect the remaining seam materials from moisture. At the same time, it should pass air to ventilate the insulation. In most cases, pre-compressed sealing tapes (psul) are used to form this layer. Before mounting the window box in the opening, it is covered with these ribbons. In the future, they expand and close all the lumeges between the box and the wall opening. The pips are ideally suited during installation work in new homes, where the geometry of wall openings is not broken. But if the slopes are uneven or plastered, then certain problems may occur when applying such a protective material. According to GOST 30971-2002, when installing window blocks from PVC, it is allowed to use different types of sealants, such as silicone.
Important! Sealant can not be applied directly on the mounting foam, and it must close only two sides of the seam.
- The middle layer provides thermal insulation. To fill it, use the mounting foam, which is selected based on the climate of the area. It is necessary to fill it with her seams in such a way that then it did not have to trim the excess from the street: such manipulations facilitate moisture from entering this layer. If there is a need to apply several layers of foam, then the time interval should be withstanding between the formation of each of them according to the rules defined by GOST.
- The inner layer protects the insulation from moisture from the room. It consists of vapor insulation tapes. It should be followed by the correct calculation of the allen such a tape, which should be at least half of the width of the material. Also avoid the formation of folds when laying the tape. Most often, the installers use a tape with a protective coating applied inside, but if the window openings are plastered, it is better to choose a tape with an outer coating.
How should the window block be mounted
When installing the window block, a sufficient clearance should be provided between the window profile and the wall opening. The clearance will not only allow all the work on filling the seams to qualitatively, but also compensates for possible changes in the geometry of the window caused by fluctuations in temperature.
There are rules for the location of the fasteners:
- for PVC white windows boxes, the maximum distance between them is no more than 700 mm;
- if the box is color, then this distance decreases to 600 mm;
- fastening elements should be located at least 150 mm from corners and joints;
- wooden pads used to pre-fix the window must be processed in advance by antiseptic materials, their height should be at least 20 mm;
- in most cases, window boxes are attached to dowels and anchors that ride into the wall to a depth of 40 mm.
Important! All fasteners must have an anti-corrosion coating, it is usually stainless or chrome steel.
What else should make a contractor after installing the window
Not knowing the rules of the GOST, many customers believe that the contractor's responsibilities end after the installation of the window block is completed. And firms that install PVC windows use this, facilitating their work. In fact, the Contractor is obliged to additionally perform the following steps:
- Check the operation of the window sash, if necessary, make their adjustment and eliminate possible throughout.
- Check the operation of all accessories installed on the window.
- Remove the protective film.
- Collect and endors the garbage formed during the removal of old window frames and install plastic window block.
The importance of the proper window installation
The correct installation of the plastic window will avoid characteristic problems arising from incorrect installation. These include:
- Insufficient heat insulation design, the formation of so-called cold bridges.
- The appearance of mold and fungus due to poor waterproofing or insufficient vapor permeability of the assembly seam.
- The appearance of skews or box of windows caused by an insufficient thermal gap or improper placement of fasteners.
In compliance with all the rules prescribed in Guest, the plastic window can last up to 20 years and not losing its characteristics.
Installation of PVC windows in compliance with the rules given in GOST 30971, adopted in 2012, will allow you to significantly extend the life of their operation, to avoid fogging glass and protect the windows from dampness. How to install a plastic window according to GOST, and which materials to use for this, you can find out by reading our article.
For high-quality and fast work, you will need the following set of tools:
- Perforator.
- Electric jigsaw.
- Drill-screwdriver.
- Nail.
- Sledgehammer.
- Level.
- Yardstick.
- Pencil.
- "Bulgarian".
- Silicone gun.
- Corolnic
- Scissors for metal.
- Putty knife.
- Slick.
- Rubber hammer.
- Pliers.
- Tassel.

Depending on the type of window opening and window model, you may need additional tools that are not included in the list.
In addition to tools, it is necessary to have the following consumables to install the plastic window:

- Psuli - pre-compressed self-insulating sealing tape. The cuts have a different thickness and width and is intended to hide the outer foam seam.

- Steam insulation tapes are needed to conceal the foam seam indoors. Ribbons are metallized and on a tissue basis. Metallized ribbons are used for "dry" finishing of window opening (plastic slopes, drywall or PVC panels). Steam barrier tape on a tissue basis is designed for water-based finishing materials (plaster, plaster and so on).

- Diffusion ribbon. - It is necessary as a lining under the cornice window. This tape has a feature to skip air, but not to pass water.

- Substrate under the windowsill - This is a ribbon on a metallized basis, with a layer of insulation, serves as a heat and vaporizolator.

- Anchor plates - Fastening for the window connecting the frame with the window opening. Anchor plates allow you to secure the window in the opening without through holes in the frame.

- Screws screws - attach anchor plates to the window.

- Dowel screws - connect the anchor plates with window opening.

- Composition for priming - Designed for surface treatment, on the site of gluing vapor insulation tapes.

- Wooden wedges - Need to intermediate securing the window in the opening and level level.

- Stand profile - The frame is mounted below and serves as a stand under the window and mount for the eaves and the windowsill.

- Plastic window sill - It comes complete with the window, but if desired, it can be replaced with window sills from other materials.

- Drain - rarely happens in the base set of the plastic window, usually ordered separately.

- Mounting foam - used to fill seams and as an additional fastening element.
Preparatory work
Dismantling
In cases of dismantling the old window, make the following:
- Remove all hinge flaps.
- Remove the strokes and pull the windows from the stationary sections of the window.
- Disconnect the platbands, drain and windowsill from the frame.
- Remove the solution and the mounting foam between the frame and the window opening.
- With the help of "Bulgarian", cut all the fastenings of the frame.
- Pull out the frame from the day.
- Remove the remnants of the mounting foam and the solution at the location of the frame.

Preparation of the window
Before installing the plastic window in the opening, it is necessary to produce a number of preparatory work:
- Remove the windows sash with the loops, knocking the rods of canopies using a hammer and screwdriver.
- Pull the double-glazed windows from stationary windows sections. To do this, you need to knock off the clocks from the fasteners, it is possible to do this with a rubber hammer and a wide chisel, or a spatula.
- Attach the string profile to the lower crossbar. When connecting the profile and frame, as a gasket between them, use - psyl.
- Install the anchor tapes around the window perimeter. Ribbons are screwed to the frame and the coaching profile with screws. For the convenience of installation, the ends of the anchor tapes output the room. Depending on the size of the window, on each side of the frame are set from 2 to 4 mounts.
- Shack the pips on the upper and side frame racks, so that the tape protects the outer seam after filling it with the mounting foam.
- Stick the diffusion tape on the coaching profile from the outside of the window.
- To protect the inside of the seams, stick to the frame vapor insulation tape.

Installation of the window in the open
After all the preparatory work, install the frame in the window opening:
- Secure the frame in the opening with wedges.
- Check the correct horizontal and vertical position of the frame level.
- Having placed the frame in the right position, through the holes in the anchor plars, tick the place under the dowel screw.
- Drilling hole perforator, secure the frame in the window opening on the anchor tapes.
- With the help of brushes and primer composition, process the places of gluing vapor insulation tapes and ps.
- Fill out the space between the frame and the window opening of the mounting foam with a low expansion coefficient.
- After drying the foam, cut her over.
- Enclose pips and vapor barrier tape to the window opening.

Installation of drain and windowsill
- Pour the diffusion tape and put the plums on it.
- Connect the plums to the coaching profile using self-screws.
- Cut the windowsill on the form of slopes of the window pass.
- In place where the windowsill will be located, labeled the metallized tape with the insulation.
- Insert the windowsill in the coach profile and secure it with screws.
- Plug the slots between the frame, drain and the windowsill with silicone sealant.

Final work
- Insert the double-glazed windows in the window sections, fixing from the strokes.
- Install the sash to their place.
- Check the operation of the handles and window mechanisms.
The plastic window is installed, it remains to make the breakdown trim and then remove the protective film.
View detailed instructions for installing a plastic window using GOST norms, you can also in the video:
 How to return the love of her husband to his wife - Tips of the psychologist
 Why you can not give icons