How to cover a 100 sq.m. canopy at the dacha. Photo of canopies attached to the house. Do-it-yourself canopy installation with a wooden frame
First, let's figure out what a canopy is and how it differs from a gazebo and an awning? This is a building that has long been built during bad weather to hide people, animals, and things. Distributed everywhere. It’s easy to build canopies for your dacha using scrap materials with your own hands.
Advantages of awnings
- The design is lightweight and easy to install.
- The structure is strong, but not as fundamental as a gazebo or building.
- A stationary roof, unlike an awning, is more durable. It will serve its owners for many years.
- Much cheaper than other similar structures, but it performs the function of protection from bad weather perfectly.
As for the shortcomings, we can name only one. This building is open to all winds and is well ventilated. You need to remember this during construction and make sure that your creation stands firmly on the ground, is especially durable, and can withstand any weather conditions. This condition is not difficult to fulfill; you, of course, can cope with it if you decide to build a shed at your dacha.
First, we decide on the type of structure and the necessary materials. 
Types of canopies
- As a continuation of the roof, attached canopies are built - canopies. On one side of such a structure there is a wall (part of the house), the other sides are open.
Used to cover porches, stacked firewood, verandas, barbecues. - Free-standing structures are the second type of such structures. In the countryside, at the dacha, an “umbrella” covers wells and summer kitchens; in the city limits, there are transport stops, parking lots, cafe areas, sports facilities, bus stations, and market stalls. At the dacha, a green hedge is planted near such sheds. The result is a wonderful garden gazebo.
The universal building protects the population from scorching sun rays, pouring rain, unpleasant wind, and snowfall.
The roofs of buildings also come in different types - straight or inclined.
- Direct. The simplest option is direct coating. Used for parking.
- Inclined. There are single and double slopes. Due to the fact that the roof has an angle of inclination, water drains from the roof in a timely manner.
- Complex. Sometimes in design projects non-standard, unusual, or original shapes are chosen. For example, with a semi-arch. It will also be easy to make such a canopy with your own hands.

Materials for hanging structures
Structures of this type are built from available materials that are sold everywhere.
- For the frame they use wood or metal, or combine wooden parts of the building with metal ones.
- Plastic pipes have been used more and more often lately as a base.
- For the roof, choose, at your discretion, a covering from the list:
- metal tiles;
- modern polymer material - monolithic polycarbonate, fiberglass, other durable coating;
- corrugated sheeting;
- slate;
- special fabrics intended for awnings;
- durable glass, plexiglass;
- durable polyethylene.

Preliminary work before construction
- We think over the canopy diagram, draw a drawing.
- We choose a place for the extension, clean and level it, and make markings for supports.
- To protect wood from mold and rot, we treat wood parts with an antiseptic. With a ready-made composition or, for example, we paint it with a primer and then with paint.
- Let's prepare supports for the structure. We take 5 blocks of wood (90x90 mm). Since the roof is planned to be sloping, the bars intended for the front supports should be 40-50 cm less than the height that is measured on the wall of the house. We prepare the rafters and blanks for the sheathing.
- We fix the vertical distance on the building with a horizontal block (2.4 meters).
We build a wooden canopy with a polycarbonate roof with our own hands according to the instructions
- We drill holes for installing a vertical beam. If there is no drill, we simply dig holes 0.5 meters deep.
- Pour sand and crushed stone (10 cm) into the holes to create a pillow. Then we insert the supports strictly perpendicularly, checking the correct installation with a plumb line and level.
- Fill the holes with concrete.
- We connect the horizontal beam and the corners of the support to each other.
- We mount the rafters on horizontally attached slats and the sheathing of the structure.
- We connect two polycarbonate sheets (1000x3000 mm) 8 mm thick to obtain the intended roof size (2000x3000). We suggest using an HP profile for this. To prevent the plastic from cracking during operation, use self-tapping screws with rubber washers.
- We install the roof on the sheathing. Due to the difficulty of access to the top with large plates, preliminary work can be done at the bottom, and then lifted, say, with an electric hoist and secured.
- The canopy for the cottage is ready. The result was something like a canopy, an extension of the roof of the house.
 Polycarbonate is a translucent, lightweight and durable plastic. A summer cottage canopy with a plastic roof provides good protection from rain and snow. It does not deform, although it is easier to bend the required shape from it than from other materials. A modern polycarbonate roof will last you for many years.
We install a free-standing canopy with a corrugated roof
Roofing made from profiled corrugated sheets is used in most cases for car parks in country houses. Mounted on metal stands.
The holes for the racks are drilled deeper - up to 1 meter deep.
The main parts of the structure are welded - you will need a welding machine. Side trusses and sheathing are prepared in advance, and then everything is connected into a single frame.
The roof is attached to the sheathing.
Canopies with fabric covering
Its advantage is the variety of colors and shades, fabric patterns. A fabric awning can become a work of art. It is chosen in cases of manufacturing exotic designer canopies. A roof made from this material will decorate your summer cottage and please the eye. Most often used for summer cottages.
The peculiarity of this design is that the fabric, in any case, is a short-lived material. During autumn bad weather, winter snowfalls, and during non-resort periods, it can become unusable and tear. Therefore, the fabric covering from such structures is removed for the autumn-winter period and put on in the spring, before the next summer season.
This canopy is built in the same way as the previous options. 
The simplest do-it-yourself canopy made from the simplest materials
If you urgently need to build a hanging structure for your dacha with your own hands, you can do it in a very simple way.
To build a canopy, take
- 2 five-meter PVC pipes (vinyl);
- 2 pieces of thick polyethylene (shower curtains are suitable);
- braid, strong threads.
Build the canopy according to the instructions:
- Sew the curtains into one large sheet.
- From the braid, make 40 loops on which the awning will be held (cut 40 suitable pieces).
- Sew the loops to the polyethylene.
- Place loops on the pipes.
 Then decide on the installation location of the structure. Mark with pegs on the ground the points where you will insert the awning pipes. Place your structure by digging PVC pipes into the ground. Your canopy is ready! Your imagination will tell you the colors of the curtains - and the awning will come out wonderful.
Modern materials also suggest other design solutions. Take plastic pipes and, using clamps (also PVC), assemble a rectangular frame (after drawing its diagram). Attach thick fabric or polyethylene on top. You will get a wonderful carport.
In the same way, you can make a universal structure from thin plastic pipes and durable polyethylene. Such pipes bend easily. Experiment with arched shapes. You will get a collapsible portable canopy.
Put in a little work and patience - as a result, you will have the much-needed canopy at your dacha.
Making a wooden canopy with your own hands is not at all difficult. In just a few days you will have an excellent design that will protect firewood, grain, a car, and a barbecue from precipitation. In order to save a lot of time, money and effort, it is necessary to develop a clear action plan. This is what we will do in step-by-step instructions.
Installation of supports - the basics
First of all, we need to think about what our structure will be supported on. Some craftsmen recommend simply installing wooden logs on the ground, onto which you can then nail the sheathing, reinforcements and roof. You can do this, but where is the guarantee that tomorrow it won’t rain and blow your canopy 50 centimeters away? Wet and loose soil is the main enemy of wooden structures installed on the ground.
That is why we will only consider supports installed on a concrete base. This is the only way the structure will be level after any rainfall. Let's start our construction from the "foundation", if you can call it that, and look at the step-by-step instructions for pouring it.
Step 1 Dig a hole.
To save concrete, we make a round columnar foundation. You can rent or borrow a hand drill from a neighbor to make holes with a diameter of 35 to 60 centimeters. 35 will be enough. The main thing is the depth, which cannot be less than 50 cm - this is necessary to avoid possible subsidence on loose soil. No drill? We take it and dig.
Step 2 Pour the foundation.
It is important for us to obtain a high specific gravity of concrete, and not its strength characteristics. Therefore, we mix 1:4 with sand and add another 3 parts of coarse crushed stone to bind the materials. Make it very rare and pour it into the hole.
Step 3 Make a base.
It is necessary to raise the foundation 10 centimeters above the ground so that the wood does not touch the wet soil. You can do it this way: select a suitable metal barrel according to its diameter (a 3-liter paint can will do), place it on top of the foundation and fill it with concrete. Remove after 2 days.
All that remains is to simply install wooden poles with a diameter of 20-30 centimeters and initially tie them together in a heap with the bottom strapping at the level of 80-90 centimeters. High precision is not necessary; you can estimate by eye the evenness of the pillars, since then we will measure with a level when installing the top trim.
Lathing, strapping, anti-corrosion treatment of frame
To make a canopy at the dacha with your own hands from wood, you need to master the level - this is the main tool. It will help make a smooth structure. Since the wooden log (25 cm in diameter) will be rounded, its shape is close to ideal, so leveling will be easy. Let's look at step-by-step instructions on how to properly make a harness.
Step 1 Align the pillars.
Take a level and lean it vertically against the support. If everything matches, then you can pile up the first 2 supports. After this, we lean the level again and measure. Repeat the procedure every time a new column is added to the bundle. After you have tied everything together, you need to measure the angle of inclination of the structure in all directions, since after nailing the rafters it will be too late.
Step 2 We install the rafters.
The easiest way is to make a lean-to building, then the rafters just need to be laid at an angle of 1 slope every 70 centimeters. But when constructing a gable roof, you will have to take into account another ridge. Using a plumb line and a tape measure, we determine the middle of the room, raise the vertical and attach the ridge to 2 slats. Next, we adjust all the rafters to it at an angle of 45 degrees. This is the ideal angle for a 4x4 meter canopy. Make lathing every 50 centimeters from 35x55 timber.
Step 3 We treat everything with anti-corrosion suspensions.
You can use standard wood stain and varnish, but we recommend treating with exterior stone varnish. It is characterized by maximum penetration into the material, protects the board for many years and protects against biological corrosion.
Pro tip: it is recommended to leave the rafters 30-45 centimeters after the top trim, since moisture can get on the wood during strong winds or snowfall. No matter how good the protection of the tree, it will still rot if it is constantly wet.
Roofing installation
If you don’t know how to make a wooden canopy with your own hands, and what kind of roof to install, then it’s worth evaluating all the advantages of the materials offered on the market. As a rule, to save money, ordinary slate, metal tiles or profiled sheets are used. The latter cost very little, are durable and are easily attached to the sheathing. Let's take a closer look at their installation!
Step 1 We measure.
Lay several sheets and check with a level along the bottom edge so that nothing is mowing. It can be attached with a self-tapping screw so that the material does not “run away” anywhere during its measurements.
Step 2 Screw it on.
Using the help, we make 2 holes per 1 sheet, and we must drill immediately with the sheathing. Then we take M8 bolts and nuts and attach them. We measure everything and only then tighten it with wrenches. It is advisable to use special plastic washers for the outside to limit moisture and seal the sheet well.
Step 3 We cut off everything unnecessary with a grinder.
If somewhere there is a corner on the last row or the skate does not please you with its curvature, you can trim it with a grinder.
If you do everything correctly and constantly measure the slopes, then you won’t have to level anything, the sheets will all become as they were.
Wooden awnings for a summer residence are one of the simplest designs where you can safely experiment, because even if something goes wrong, everything can be redone quickly and not difficult.
We will send the material to you by e-mail
An important part of the exterior of a country house is the canopy. It is designed to protect part of the yard from precipitation and ultraviolet rays, and also performs a decorative function. A small area, covered with material on top, consists of sheds attached to the house. Photos of similar structures can be seen in this review. In this case, the supports of the structure are brought to the required height. Attaching to the main structure involves attaching one side of the structure to the wall of the house.
The canopy structure allows you to create a magnificent outdoor recreation area
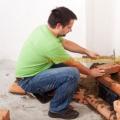
Sheds attached to the house can be made with your own hands. The photo shows the main stages of installation. The frame of the structure is often made of profiled pipe or timber. This structure is adjacent to the wall and takes on the load from the snow accumulated on the roof.
The roof is usually covered with corrugated sheets, slate or galvanized material. The metal for the frame structure has ductility and strength. It suits different design styles. Such structures can be erected with your own hands.

The wood frame system combines well with other materials. Wood suits most architectural designs. Before use, this material should be treated with protective agents. Polycarbonate canopies attached to the house are becoming increasingly popular, photos of which can be viewed on the Internet.

Polycarbonate is easy to assemble and comes in a variety of colors
Polycarbonate enjoys the following advantages:
- plastic is characterized by durability. Mechanical impact is not scary for him;
- light weight of the material;
- polycarbonate transmits light well;
- flexibility of the canvas.
Helpful information! When purchasing a design kit for self-assembly, you must check the integrity and strength of all connections.

Sheds attached to the house: photos and design features
Sheds attached to the house, as shown in the photo, can be of two types. These are cantilever models and awnings on supports. The console version can be of any length, but its width should not be more than two meters. Support structures can be used for a variety of purposes.

Awnings can have different purposes:


- awnings for car protection;

- various awnings: with posts, retractable or basket.

Related article:
Features of wooden canopies attached to the house: photos and design solutions
Homeowners often choose wood sheds. Such structures have an excellent set of characteristics:
- are distinguished by ease of construction;
- can withstand long periods of exposure to the open air, especially when properly processed;
- characterized by safety for human health;
- have an affordable price.
Helpful information! For comfortable use of the canopy, it is worth taking care of the installation of light and lighting fixtures.

Options for canopies attached to a house made of corrugated sheets: photos and design features
An awning made of corrugated sheets can be made in various configurations. Single-pitch, gable and arched structures are created from corrugated sheets. In addition, a structure made from this material has the following features:
- ease of manufacture;
- saving money;
- long service life.
Important! A canopy made of corrugated sheets is mounted only with galvanized self-tapping screws that have a rubber seal.

Creating a Project
When choosing a design project, it is worth deciding on the following parameters:
- dimensions and purpose of the structure;
- plot size;
- snow and wind loads;
- snow depth and expected annual precipitation;
- structural features of the main structure.

Before installation work, a drawing must be completed. Based on the size of the building, the required amount of material is determined.
Helpful information! When creating a carport, it is worth considering the passage of a loaded vehicle.
Preparatory work
Before the planned sheds attached to the house are created, photos of which can be viewed on the website, it is necessary to carry out preparatory work. For this purpose, a suitable area is marked out, and trees are uprooted from it. The clean area is leveled. At the same time, sand and gravel are added.

Recesses are drilled under the canopy supports. And at this stage it is worth considering laying the cable under the lighting sources. A certain step for placing supports is selected. It depends on the weight of the roof and frame part.

The stands are lowered into the prepared pits and filled with concrete mixture. The pillars are set according to level.
Important information! If groundwater is located nearby, then the ends of the pillars need to be additionally waterproofed. Metal supports are pre-treated with a primer.
How to make a polycarbonate canopy attached to a house: photos and installation steps
12-15 days after the concrete has completely hardened, you can begin assembling the structure. Brackets are mounted on the wall, and then a transverse beam is mounted on top.

Creating a sheathing
The top trim is being done. The end parts of the racks are connected using a transverse beam and to each other. In this case, parallel laid profiles are used. The metal frame system is welded together, and the wooden frame system is tightened with steel corners.

Welding areas are cleaned, primed and painted. The rafters are mounted with transverse parts in increments of 600 mm. The structure is attached to the supporting beam using steel angles. The sheathing is laid across the rafters and mounted with self-tapping screws.
Roof installation
Sheets of roofing material are cut to size. Then they are attached to the sheathing. Holes for self-tapping screws are first made in the polycarbonate.

To facilitate water drainage, the cells should be directed downwards. When working with plastic, do not forget to leave gaps between. The dimensions of the holes should be made with a margin of 2-3 mm. There are some features of installing roofs made of other materials.

Wood beams can be used as beams. Over time, cracks may appear in the material, which will reduce the rigidity of the structure. After installing the beams, transverse boards are installed, and then the metal tiles are fastened. Installation of this material is carried out from the bottom sheets. It is worth considering that there should be an overlap of the upper sheets on the lower ones.
Immediately after building a house, and sometimes even before, the problem of parking arises. It is not always possible to build a permanent garage, but installing a roof on poles - a canopy - is easier and cheaper. The carport can be a free-standing structure. Then it is placed in the yard, usually not far from the entrance gate or garage. The second option is attached to the house, when one or more sides of the roof rest on the wall of the building. From a functional point of view, both options are equivalent; everyone just chooses based on personal requirements and preferences.
Dimensions
Since the dimensions of cars can vary significantly, in each case the optimal dimensions are determined depending on the car available.
The height is usually around 2.5 meters. This is more than enough even for an SUV with a loaded trunk. And to determine the length and width of the canopy, at least a meter is added to the external dimensions of the machine. Agree, it is quite enough if there is a distance of half a meter to the pillars.

But to protect against precipitation, it is better to make the roof overhangs longer: they will also protect from slanting rain and snow.
When determining the size of a canopy for two cars, take the distance between the rear-view mirrors to be 50 cm. The same amount is calculated for the pillars. And the length of the canopy is determined by the longest car.

Frame materials
Mostly, wood is used for supports - timber or logs, metal pipes of round or rectangular cross-section. Sometimes the supporting columns are made of brick or stone. They are more massive, attract more attention, and therefore must fit into the style of the building that is located nearby.
There are also options when the bottom of the support column is made of brick, and the top is made of wood or metal. And in this case, everything is determined by the style of the house and the site. You should not make brick supports if there are restrictions on the size of the site: they are quite massive and take up a decent amount of space.
All materials (except brick) are processed before use. Wood is necessarily coated with fire retardants (reducing the flammability of the material). Then it is impregnated with compounds that will protect it from damage by wood-boring insects, as well as from all weather conditions.


Its implementation
Particular attention should be paid to the processing of wood that will be buried in the ground. It can be impregnated with special compounds for wood in contact with the ground (for example, Senezh Ultra and its analogues). The impregnation performed well during testing. The ends of the pillars that will be buried are immersed in a container with mining for a couple of days. After drying, they can be used without additional measures. 10 years is enough.
The second option is to pour a concrete pillar into the ground, and install a mounting plate, shoe or pin into it, to which a wooden beam is then attached.
Metal poles are cleaned of rust and coated with primer. After welding, the seams are additionally processed and everything is coated with paint in two layers. The second is applied after the first layer of paint has dried to a touch-touch state.
Types of roofing (with drawings and dimensions)
The most economical and simplest is a pitched roof. It is usually used if the carport is attached to the house: this is the easiest way to organize a normal connection to the wall.

They also make a pitched roof for free-standing sheds. In regions with little snow in winters, you can make a roof without a slope; in those where there is a lot of snow, a slope of at least 8-10° is required. In this case, the lower side is made from the south or east: so that there is more shadow. Also in this case, on the south side you can sew up the canopy on the side (or plant tall plants there).

If a canopy is made from polycarbonate, then the roof is vaulted. It is also optimal from the point of view of precipitation and is easily implemented due to the flexibility of this material.

A more complex gable roof. If made of metal, it has a relatively simple structure.

In the case of a wooden canopy under a gable roof, the system is multi-component.

>
Roofing material
If the carport is attached to the house, it makes sense to make its roof from the same material. For soft types of roofing (flexible tiles, ondulin, etc.) a continuous sheathing is required, for hard ones - sparse, and the pitch is chosen depending on the wind and snow loads in the region, also focusing on the recommendations of roofing material manufacturers.

If complete shading is not required, polycarbonate can be used. By the way, it is the most popular material recently. You just need to choose it correctly: take a multi-chamber one that has at least three layers of plastic and two rows of cells. It’s not hot under such a polycarbonate canopy even on a sunny day.
Also, the degree of heating depends on the color. See the technical specifications and choose the one that absorbs sunlight more. Transparent ones are needed for greenhouses to warm the plants. For canopies, on the contrary, you need polycarbonate with low light transmittance.
How to lay out the site
The easiest and most inexpensive way to make a platform under a carport is to fill it with gravel. To do this, you will need to remove the turf, dig the curb, pour crushed stone and compact it well using tamping platforms. Then the platform will be rigid and ruts will not form.

Compacted crushed stone is a good surface for car parking
Recently, areas paved with paving slabs or paving stones have become more popular. They have a more attractive appearance, but their construction is more expensive. Preparation begins the same way: first the soil is removed. But the pit is made about 20-25 cm deep. Crushed stone is poured onto the bottom, which is also compacted well. Then it is advisable to spread a layer on the crushed stone. This is a non-woven material that will prevent the sand that will be poured on top from spilling out and mixing with gravel. Geotextiles also redistribute the load more evenly, preventing the base from sagging under the wheels of a car (it is used in road construction). A layer of sand is already poured onto it, which is also compacted. Paving slabs, clinker bricks, cobblestones and other similar materials are laid in the sand.

In the middle in terms of costs is a concrete site. The base is also prepared from compacted crushed stone. Wooden planks are laid on it at a distance of 1 m, which are set level or with a slight slope to drain water. These strips serve as beacons during pouring, and then play the role of damping joints, compensating for the thermal expansion of concrete. With this structure, cracks appear less frequently.
A metal mesh made of galvanized wire is laid between the slats. You can, of course, use stainless steel, but it is expensive. Wire thickness 3-4 mm, cell 10*10 cm. Pour on top. The thickness of the concrete layer is 7-10 cm.

DIY canopy attached to the house (photo report)
It was decided to attach a canopy to the house, under which to hide favorite equipment - a car and a boat. First, using a motor drill, we dug holes 1.5 m deep - below the freezing depth.

We inserted waterproofing sleeves, a frame made of 10 mm rods with welded mortgages, and filled them with concrete.

The installation step of the pillars is 2 meters.

When the concrete set, the pillars and top trim were installed. They are sanded and treated with protective impregnation. To prevent the frame from moving, we secured it with what we had - aluminum corners. The joint between the posts and the frame was reinforced with metal plates.

The pillars are screwed to the “heels”
A support board was nailed to the wall of the house. Roof beams (50-200 cm board) were attached to it. The slope turned out to be small, about 9°, but it was enough. Small cuts were made in the beams to fit the size of the timber - for support, the edges were cut off to create an even overhang.

The beams were fastened to the frame with nails diagonally, 2 pieces on each side.

The beams on the wall are fixed to U-shaped metal plates.

The rafter system was assembled - the beams were installed with a small pitch - 40 cm, they were made from 50 * 200 mm boards.

OSB was attached to the rafters on top. Roofing material - soft tiles. It needs a continuous sheathing underneath.

A board was nailed to the side between the posts: for greater rigidity and so that the rain would wet the site less.

The sidewall was sewn up with a board - so that the rain would get in less
Soft tiles were laid. It worked - at least dance.

Now there's competition in the parking lot.

How to make a canopy for polycarbonate (photo report)
Used materials:
- professional pipe
- for racks 80*80 14.6 m;
- for arches 50*25 - 4 pcs. 6 m each + 50*25 - 10 pcs. 6 m each for spacers;
- sand concrete - 3 bags of 40 kg.
- crushed stone - 4 bags of 25 kg.
- red lead - 3 cans of 1 liter each.
The canopy was built over the already finished path. The posts were buried in the gap between the curb and the fence. It turned out that the supports of the canopy were placed near the fence posts. It was decided to use them when setting the level: they attached them with anchors so as not to suffer when pouring.


The metal pillars of the racks were buried 1.2 m into the ground, covered with crushed stone, and filled with concrete. When the concrete set, the top trim was welded.

Afterwards the production of trusses began. First, profiles with the required radius were bent on a pipe bender (rise at the highest point 1.2 m). Afterwards, the assembly of the “constructor” began.

Clamps were useful; they were used to hold parts together so that they would not move during work. They fixed it to the first truss so that everything was done accurately. There were a lot of clamps)))

Once all the trusses were complete, they were cleaned, sanded down to white metal, then primed and painted twice. Then the acrobatics began. It is necessary to install heavy trusses on poles, align them vertically, without knocking down the diagonals.

As soon as we managed to set it correctly, we quickly tacked it by welding, leaving the thorough welding of the seams “for later,” after the final inspection: everything should be on the same level.

A miracle happened, everything turned out to be almost on the same level. We do not take into account a small difference of a few millimeters.

Now we weld the sheathing from a 50*25 mm profile pipe under polycarbonate. We place them along the long side of the canopy. The installation step was chosen to be 0.8 m.

All that remains is to attach the polycarbonate. It is attached to self-tapping screws through special thermal washers (sold in the same place where polycarbonate is sold). The two sheets are connected using special profiles. They are detachable and non-detachable. One-piece ones are cheaper, but then you won’t be able to make anything else out of this polycarbonate. So we used detachable ones.

It is also necessary to cover the edges of all sheets, otherwise dust and midges will get inside, then moisture will appear due to evaporation, and then mold. And the coating will look deplorable. Therefore, we install special plugs on the edges.
Video on the topic
Having a canopy next to your home is a very practical solution. It can be used as a parking space, under its roof you can grill shish kebab in inclement weather or sit with a friendly group over a cup of tea.
Erecting a canopy with the right choice of materials does not require large financial expenditures. This review will tell you how to build a good canopy, relying solely on your own strength.

To build a reliable and inexpensive structure, it is necessary, first of all, to choose high-quality material.

Canopy base materials
Wooden structures
One of the simplest and most reliable options is to build a wooden canopy. Such a structure is easy to maintain; in addition, its construction does not require expensive construction equipment, such as a circular saw or welding equipment.

Edged timber is ideal as a material for supports, rafters can be made from edged boards, and the sheathing can be easily assembled from obapol.

Almost anyone can afford to assemble such a canopy, and with the help of special solutions you can greatly increase the durability of the wood, which will allow you to use the canopy for many years.

Metal constructions
Another popular material for making canopies is metal. The metal canopy differs from its predecessor in strength and durability.

It is easy to assemble such a canopy with minimal skills in working with a welding machine.

Only a radius profile can be classified as complex parts, but this part with the necessary bend can be manufactured at your request in any welding workshop.

Brick or stone structures
The construction of support pillars from brick or stone allows you to give a stylish look to your canopy. In this case, the rafters can be either wooden or metal.

Such a canopy is reliable and strong, but you should remember that it will not be possible to build it quickly due to the characteristics of the building materials.

Structures made of asbestos-cement pipes
This material is characterized by wear resistance and a long service life. In addition, the pipe can be easily sawed with a regular hacksaw if you immerse the desired area in water for two hours before cutting. Any rafters are suitable for such a canopy.

Choosing roofing material
The next stage is the choice of material for the roof itself. Below we will discuss in detail the most suitable materials for this.
- The most popular roofing material is polycarbonate. Its technical characteristics allow you to give the visor absolutely any shape;
- In addition to polycarbonate, roofs are often made from corrugated sheets. This material differs from others in its low cost, as well as simplicity and durability;
- A roof made of metal tiles will cost more than a similar one made of corrugated sheets, but will give your canopy a stylish look;
- In addition to all of the above, bitumen can be used as a roofing material. However, it should be remembered that bitumen requires a continuous sheathing, therefore, it can only be used if it is done in the same style as the house.

Choosing the right location as a means of saving on supports and roofing
There is a simple way to save significantly on the construction of a canopy structure, namely, build a canopy close to the house. Technically, the question of how to build a shed adjacent to the house is solved by installing two or three support pillars.

The number of pillars is calculated based on the dimensions of the cross beam and available building materials. For example, if a beam with a cross-section of 75x75 mm is used, then the gap between the posts should be about a meter. In this case, you can do without a cross beam, using the pillars themselves as support.

In the case where the beam has a cross-section of 150 cm or more, two corner posts are enough for support. A transverse load-bearing beam is attached to them, and then the rafters are attached to it. On the reverse side, the rafters are attached to a support beam, which is attached to the wall of the house ahead of time.

For greater reliability, additional supports are installed under the beam.

In addition to the simplicity of the design, a shed that is built close to the house is not as susceptible to wind as a building standing apart.

If it is decided not to attach a canopy, it is necessary to calculate the direction of the air flow in advance since the lower edge of the pitched roof should be located on the leeward side, which in turn can cause a number of inconveniences, in particular if the canopy will be used as a parking space.

Building a gable roof can solve the wind problem, but it will require a more complex rafter connection.

Building a lean-to shed
A lean-to canopy is a universal design, under which both tea parties and the owner’s iron horse can easily stand. To assemble such a canopy you need to do the following:
- install support pillars;
- install the rafter system;
- install the roof;
- lay out paving slabs.

Installing racks for the future canopy
Before installing the posts, you need to dig holes for the posts. The depth of the hole is 1.5 meters, the diameter should be 10 cm greater than the diameter of the pillar. The depth and diameter of the holes do not depend on the material of the post.

The bottom is laid out with sand or crushed stone to a height of 20 cm, then it is necessary to water the hole in order to compact it better.

If the pillars are wooden or metal, then they need to be treated with bitumen or wrapped with roofing felt to protect them from moisture penetration. After this, it is necessary to install the racks in a vertical position and fill them with concrete.

In the case when asbestos-cement pipes are used for the construction of supports, it is necessary to place reinforcement inside the pipe and pour concrete along the entire height of the pipe. When pouring the concrete mixture, it must be stirred regularly to avoid the formation of air voids. Pins are embedded in the upper part of the pillars, onto which the upper trim will be attached.

The next step is to secure the support beam to the wall of the house. It must be positioned slightly higher than the posts to provide the necessary slope so that snow does not accumulate on it, but falls freely down.

Self-tapping screws are suitable for fixing a beam on a wooden wall, but in order to fix a beam on a brick wall, you need to insert dowels into pre-drilled holes.

The nuances of installing a rafter system
The distance between the rafters is calculated taking into account the selected roof. It is best to use special programs for this purpose.

One edge of the rafter leg must be attached to a support beam on the wall. This can be done in two ways: the first is to prepare several grooves in the beam itself and insert the rafters into them, and then secure them with metal corners. The second option is to use special fasteners.

The second edge of the rafter leg is attached to the top trim of the posts. Since the roof weighs little, they can also be secured using metal corners. If the soil under the canopy is heaving, then it is better to use a movable connection of the rafters with the strapping to avoid subsidence of the racks.

We arrange the roof
The canopy does not require insulation or waterproofing. With rare exceptions, any roofing covering is attached to a sparse sheathing. Only soft tiles require continuous sheathing and waterproofing of OSB sheets.

In turn, corrugated sheeting can be laid directly on top of the rafters themselves. The sheets are laid across the rafters with an overlap and secured with self-tapping screws.

Modern construction technologies allow a person with almost any budget to build a canopy, so the answer to the question of how much it costs to build a canopy depends entirely on the desires of the buyer and his imagination.

This article discussed in detail all the stages of constructing a canopy. Now all that remains is to take the knowledge gained and begin building this practical and stylish part of the backyard landscape.
Photo ideas for beautiful awnings for a summer residence


 Chimneys for gas boilers: requirements and installation Which pipe to put in the flue from the boiler
 Installing a sandwich chimney with your own hands How to assemble a chimney from pipes
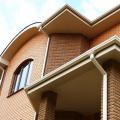 Hemming of roof overhangs - available options and methods