Making a children's highchair on a home woodworking machine. Woodchair from wood with their own hands: easy, simple and fast. To make such a kit we need
We collect a growing chair with your own hands.
I think it will be superfluous once again to talk about the relevance of the problem of preserving the right posture in children. One of the most important conditions is to ensure the correct posture of the seat, which depends on the set of parameters. Conventional chairs will not fit. Unfortunately, office chairs with a gas lift are also not able to solve this problem, since there are neither an adjustable footrest, nor adjustment of the seating, and alone the adjustments of the height of the seating and the angle of the back of the back is not enough. In such a situation, a special adjustable chair will become an excellent solution!
On the Internet you can find many different options for every taste. From the whole manifold chose the structurally favorite.
The design is not so simple as it may seem at first glance. It is very technological. It is important to take into account the ratio of the size of the elements, their mutual location, strength and sustainability of the entire structure. Of course, no drawings on the manufacturer's website or on the Internet could not find. Therefore, I had to develop the drawings. The more interesting. The design went for several days.
Unfortunately, in my disposal there is no plotter to display images of the desired size, and the program in which I worked does not know how to print large images in parts (or just could not figure out how to do it). Therefore, I had to solve the problem with the neighbral paths. Drawings of parts were saved as ordinary photos with great resolution. Next, using a free Posterazor program, converted to PDF documents containing drawings on the desired scale and divided into separate sheets of A4 format.

Do I have the right to publish them? Will there be no copyright? After all, the chair I was peered on the Internet and someone developed him! Let's deal with.
This situation can be viewed from two points of view: ethical and legal. The ethical side of the question is determined, because here there is a whole range of quite reasoned opinions and most likely come to the truth. But from a legal point of view, the search for truth is not so hopeless.
So, legally, a chair cannot be an object of copyright. In this case, according to GK, it may be either a useful model or an industrial model that is recognized and protected only under the condition of state registration, on the basis of which the federal executive authority for intellectual property issues a patent. On the manufacturer's website, no speech patents do not go, most likely, no one has a patent. Honestly, I do not see that it is possible to patent - in comparison with the analogues, neither a special novelty or originality. Although the design is quite successful. Yes, and at www.freepatent.ru I did not find it. So, therefore, I do not break any patent rights for the absence of those.
But the drawings, according to the Administrative Code, are copyright objects and are protected without any registration by default, as a type of works of fine art, (programs for computer, by the way, as literary works). The drawings developed by me are not an exact copy of the original, which is not available to me, but are the result of intellectual work and reflect my vision of the design, the general features of which saw in the photos. And on the publication of the results of their work, I have a full right as the author. Unlike those who, without permission and references to the source, places articles from my blog on their sites to attract visitors. You have to install copyrights in the photo.
Well, enough for the bore, it's time for business!
Drawings of a growing chair can be downloaded by reference: https://yadi.sk/d/-ns9on3wmbxdf
If there is no details in the archive, then its description will be further in the text.
We print them as a regular multi-page document on A4 sheets. At the same time, in the print wizard Acrobat Reader, it is important not to forget to specify the "real size" scale. As a result, after gluing individual sheets, we get the drawing of the part on the scale of 1: 1.

Cut the drawing of racks along the contour and stick it on a sheet of plywood.

As a material for racks, a plywood with a thickness of 22 mm is selected. Cut the first part by retreating 5 mm contour. In general, the quality and accuracy of the cut is not very important. If only some reserve remained.

Now the resulting coarse edges of the workpiece must be aligned exactly according to the drawing. Usually, to designate this action, I use the term "combing". To do this, press a flat rack to the workpiece along the drawing line and pass through the edge of the copier with the upper bearing. Roundings processed by directing the milling hand with a subsequent edge of the grinding machines. You can spend more time to spend on this workpiece. It will serve as a template and the quality of the remaining racks depends on the quality of its processing.

Now, having a template, mark and cut out the rest of the blanks for the racks


Next, with the help of self-samples, we fix the pattern on the workpieces. To twist the screws in the template we make holes, in those places in which there will be holes for fastening the seating and footrest. At the same time, the shirl-screw hat should not be issued from the template.

And with the help of a copy cutter, align the edges of the workpiece by template.

Using a milling mill inserted into the table, we make the groove in which the elements fixing the seat and foot stand will move. For simplicity, I decided to call them sluts. The depth of the groove is 10 mm, the width of the groove is 24 mm (it would be more convenient to make a width of the groove, equal to the width of the available plywood - 22 mm, but there was no such cutter in the workshop).

In the middle of the groove at equal distances we make holes. On the reverse side of the workpiece at the point of the drill exit, it is necessary to put the bar to put the bar so that the drill does not break the bottom layer of the veneer. Close or disguise such chip will be extremely difficult.

Similarly, we do with runners. We print the drawing in real size, cut out and glue on the plywood sheet. Next, cut out with a reserve and "combat", as they did with a rack template.

From the same sheet of plywood, 22 mm jigsaw roughly with a margin cut out future runners.

All the same self-drawing fix template on the workpiece

And on the milling table with a copy cutter, equalize the edges of the blanks on the pattern.


With the help of the edge cutting milling cutters, twigrate the edges on all the resulting details. Radius of rounding 4.8 mm.

Next, the rail is cut, with the help of which the runners come into engagement with the groove on the racks. Rake height 20 mm, width 24 mm. Because Nor 20 mm, no 24mm plywood I did not have, rake was decided to make a massive ash. This wood has excellent strength characteristics.

In the runners on the milling table, an appropriate chute was made and rails are glued into it. At the same time, when you do a chute, you must not forget that the runners are right and left.

After drying glue, the rails are cut and covered with a flush with a slut. Also in runners made holes for fixing them on racks.

Also in runners are erected in parallel floor. The depth of the gutter is 10 mm, width 16 mm. In these gutters will be recorded seating and footrests. On the next photo you can see ready-made slides.

Similarly, we do with the seating patterns and foot stands: We print the drawing, glue it to the phaneer and cut out the workpiece.

In order to make smooth roundings used a thin rail from 5 mm plywood passed between self-draws defining the desired radius. It bends well and creates smooth transitions. How it is done in the photo:

As a result, we get two templates - footrests (left) and seats (right). Next, we work with them along the already spent scheme - place the workpiece (we supply the templates with a pencil) and cut them with an electrollized with an indentation of 5 mm. For them, a 16 mm plywood is used, although it is possible to 22 mm. Fix the template on the workpiece using the screws and we work out the edges of the copier. Having ready-made templates All operation takes a few minutes. The smallest holes left on the finished parts can be either just ignored due to their minor size, or hide with putty at the grinding stage. Personally, I went on the first way. Do not forget to round the edges using the edge steam mill.

The template for the back did "in place." Therefore, there is no drawing back. The upper and lower edge did on the seating pattern. The height of the back is 100 mm, width is 464 mm (the depth of the groove for the backrest in the racks is 10 mm). After the template is ready, we make a pair of backs over it with a pair of back in a few minutes using an electrollized and copy cutter.

Total three crossbars in the chair. They are made of the same sheet of 22 mm. The dimensions of the crossbar fixing the slots 399x50x22 mm. Lower crossbar (at the bottom near the floor) - 444x30x22 mm. With a straight cutter 10 mm, we make grooves for secret furniture nuts - barrels.

Next, we make a groove for the back. Gulbery tilt the back chose in accordance with GOST 19301.2-94. "Furniture children's preschool ..." the angle of inclination of the back on it is at least 5 degrees and more. My stool has an angle of 11 degrees - it seems to me a very comfortable angle.

We get a small pile of details

Each chair is assembled on the hexagon bolts and furniture hidden braid nuts. Bolts have dimensions of 6x70 and 6x50, nuts - 10x20 and 10x12. The fastener set is presented in the photo.

Ready. As they say, "Looks like the truth." When assembling, the quality of manufacturing and fitting parts is checked, small disadvantages are eliminated, "refinement with a file" is being performed. On this, the pylon-drilling-milling stage is completed.

The grinding and painting stage begins. Now the chairs are completely disassembled and all parts are grouped before applying the coating. Used paper 180. Somehow I had to convert 80 and even 40.

Painting works are separate discipline. Poor finish coating can spoil all the work. Winter on the street and the lack of heating in the workshop introduced their own adjustments to the usual process. Painting the chair had to go straight at home. Therefore, neither kraskopultum nor multicomponent stinking varnishes cannot be used - only inappropriate water varnish and brush.
Because The chair did from the remains of plywood, some details had contaminants. Unfortunately, it was not possible to completely get rid of them with grinding, so I decided to cover one chair with dark color - "Mahagon", the second - glossy opaque enamel of dairy color. While ready only first. The second, milk, is waiting for its time.
If, after applying the first layer of varnish, the color is unevenly, the details due to varying degrees of absorption are coated with oscillates, the pile has risen and the surface has become like a sandpaper, and in general it looks terrible and want to quit everything, then you are on the right track. After drying the first layer (three-to-four hours), we take the emery paper with graininess 180 and grind all the rissed pile. Next, we put the second layer, after the drying of which the surface has become a little better - there is no pile and the color left smaller, but still far from the picture on the label with varnish. Therefore, we mature the details of the same sandpaper and put the third layer. Behind him fourth. Etc. We continue until the result becomes satisfying you. For this I had enough five layers, which were spent two days.

Growing chair is ready. The cost of two chairs is a sheet of plywood 1500x1500 mm thick 22 mm, fasteners on 50 p. And bank varnish. This is also electricity, depreciation of fixed assets, work salary.
I saw similar designs of 250 US dollars on Amazon - not the price, but some kind of tin. We, of us, of course, are much cheaper.

Despite the dubious design design is quite thoughtful.
This is not just a children's chair, it's rather office furniture for a schoolboy. Because it is schoolchildren who hold many hours first at the lessons, and then behind the computer games and for them, the correct convenient posture for posture, less fatigue and preservation of vision. At the same time, schoolchildren also grow actively.
For greater comfort, you can make removable soft linings on the seat and back. As an option. But I do not see much need - usually school furniture without pillows. The armrests are also without much need, because during the letter or when working on the keyboard, the elbows should freely lie on the table so as not to cause voltage in the shoulders. All these calculations are described in general, the set of guests and the growing chair corresponds to them. In general, I am satisfied with the result.
You can purchase some things from this blog in our Vkontakte group:
Not every family at the birth of a child can afford to buy children's furniture. It is even small, but it is an order of magnitude more expensive than the usual one. Therefore, parents in order to save, try to make furniture to the baby yourself.
So, to make a highchair with your own hands, a lot of material and time is required, the main thing is to make the right drawings and have the necessary tool.
The right choice of material
Special attention should be paid to the material from which furniture will be made. It should be only eco-friendly materials. It is best to choose high-quality hardwood wood.
The best trees breed for children's furniture:
- Beech - he has good density, hardness and it is easy to handle.
- Linden.
- Birch .
From coniferous rocks, you can use pine or fir.
So that during the process the wood did not deteriorate and resin spots began to appear, it is worth it to desighte it.
You need to check the material for the presence of bitch if they are, choose another, as the tree in the bitch area can break. The chair will break, and it can injure the child.
If it is not possible to purchase a solid tree, you can use plywood. The material is quite durable, consists of several layers of veneer of deciduous and coniferous trees. And due to the fact that the material is elastic, it can be given different forms.
Chipboard is the cheapest material for creating furniture, but it is the most short-lived. Suitable more for backs, seats and countertops.

What instruments are required
For the manufacture of children's chairs, you need your own hands so that the house has the necessary tool.
What will take:
- Material for backs and countertops (plywood, chipboard or wooden array).
- Wooden bars for legs.
- Bolts and nuts, screws.
- Power tools (padzik and grinding machine, drill).
- Sandpaper.
- Glue.
Children's table and high chairs make it possible for everyone. To do this, you need to purchase the necessary material, prepare tools and drawings. The kid will not notice the difference between purchased furniture and made independently.

How to make a children's chair do it yourself
The first thing that parents should remember when choosing furniture for a child, it should be not only suitable sizes, but also safe for the baby.
At home, parents can make a regular small stool.
What will take:
- 2 furniture shield (they are sold standard sizes - 800 x 400 x 20 mm);
- electric jigsaw;
Making a children's chair with your own hands, the drawings can be prepared independently by choosing more suitable dimensions for this.
To start work, you need to prepare workpieces. It is necessary to make them in two copies:
- sidewalls furniture measuring 450 x 400 mm;
- seat - 340 x 340 mm;
- back - the same sizes.
The back and the seat is better to leave the rectangular shape, but the side crossbars are recommended to be made figure. So the furniture will harmoniously fit into the interior of any room and will be safe for the child.

How to assemble a children's chair
Before proceeding with the collection of children's chair, all parts of the blanks are necessary, except for the butt, treat with a manual milling. This will help round the corners of the product faster than to process them with sandpaper.
The sandpaper is also needed, it is needed for grinding parts. After all the workpieces are ready and processed, you can begin to cover them with varnish. After that, it is not recommended to touch them until complete drying.
When choosing a varnish, it is worth a preference to the composition based on a turpidar. It will dry longer than a tool based on acetone, but is safer for health.
Children's chairs can be filled with a single tie. When it is elected, it is worth staying on the confirmant 5 x 70 mm. For details can be connected, you need to do small holes in them. The plugs on these holes are better not to put, since the baby can snatch them and inadvertently swallow.

Another embodiment of furniture
Children's chairs, with their own hands made, can be different, it is enough to come up with a design and calculate dimensions. You can take ready-made sizes and drawings.
What will take:
- legs - 4 parts;
- seat - 2 details;
- top, middle and lower crossbar - 1 parts;
- side and front crossbar - 1 details;
- carved crossbar - 1 part.
For the manufacture of legs it is worth choosing pine bars. Gently to harvest them, but only external face. At the top crossbar, only the front edge should be rounded, on it and can be made in the future.
The middle crossbar is mounted so that the lower edge is at one level with the seat.
The first stage of the assembly should be fastening the rear legs. They need to be well glued, after which they begin to the front legs and crossadamps. The elements of the children's highchair are connected through the CARG and the crossbar.
After the skeleton frame is assembled, you can glue the seat.
Be sure to remember that all the angles of children's furniture must be rounded, it is necessary for the safety of the child.

Drawing of a children's chair for feeding with their own hands
An interesting version of children's furniture is a stool-transformer.
To build a children's highchair with their own hands, drawings, sizes and schemes are already known, it will be necessary:
- legs - 4 pcs. ;
- the crossbar - 5 pcs. ;
- the base is 1 piece.
For the table requires:
- legs - 4 pcs. ;
- crosschain - 4 pcs. ;
- coast - 4 pcs. ;
- base - 1 pc.
In order to make a seat and a countertop, you can use a sheet of plywood, a thickness of at least 2 cm.
The legs and crossbars can be made from wooden bars with a size of 2 x 4 cm. Corners made from the board, thickness, which 2 cm.
Highchair: Step-by-step instructions
For the manufacture of a children's highchair with their own hands, the sizes need to be measured accurately, the error in the details can lead to the fact that the furniture will not work or it will be with a defect.
Child chair for feeding, with their own hands made, should be safe and strong.
First you need to take the selected material and acutely sharpened pencil to apply drawings on it. After that, it should be carefully cut them.
The mark should be made carefully and only from the wrong side, since it is actually impossible to erase the inscriptions from the raw plywood.
A large role is played by the item, which is responsible for the movement of the steps on the feeding chair. You can immediately make several steps, and the baby himself will put the legs there, where it is more convenient. And you can make one step and as the child grows it to rearrange it.
Stairs to fix it with self-drawers, which will be recessed into the material, but do not close the holes with plugs.
How to make billets
The blanks are cut separately, it turns out slower, but better. And you can divide the plywood sheet in half and cut 2 identical parts immediately, but the quality will be worse.
To make a chairs more beautiful, you can make a slot. First, the drill, and then the jigsaw. We need to grind the blanks completely, and not just the end parts.

Final assembly details
Start an assembly stands from the base of the chairs. To do this, make a good bottom base of the stool, connect it. After that, the legs should be attached to it. They need to make holes under the step. Everyone chooses steps to their taste. One like the steps of puzzle (small holes are made for them, in which the steps are inserted), the other - ordinary, firmly attached to the legs with self-draws.
The seat must be well glued to the legs and for greater strength to attach with self-draws.
The last step is that you need to attach the back and side parts and install the worktop. The purpose of the countertop is that the child does not fall from the chair.
How to save material
To spend less material and make a full-fledged highchair with your own hands, drawings, printed in advance, should be initially applied to the material. All major parts are drawn and are neatly cut. You can cut smaller parts from the residues. So, from one standard sheet of plywood you can build a small children's chair.
What to treat the surface of the chairs
Just like the choice of material for the manufacture of furniture, the composition that needs to be covered with high importance. This is done so that the baby does not hurt about untreated wood. Experts are recommended to use the Morilka, varnish, paint or glue. All these materials can be worked out with ease, and they have high hygiene qualities.

Feature of children's furniture
Children from birth need certain care. Due to different features, adult furniture is suitable. It is better to take care that they have their own table and chair.
When choosing I. Production of children's furniture It is worth paying attention to its coloring. It must be neutral tones, too bright colors and drawings more distract the attention of the child and do not give it to concentrate.

In addition to the children's highchair, with their own hands (drawings, the size you can look at more experienced masters) Parents can independently make the table, desk, bed and other furniture.
In stores you can buy chairs of different design, but they are not always suitable for the child. Parents can independently choose the size, design and draw the drawings that are ideal for your baby.
To ensure your child comfortable, durable, beautiful furniture, without spending a lot of money, you need to make it yourself. Start with a smaller - try to make a chair with your own hands. Consider the photos presented on the Internet of such pieces of furniture, ready-made schemes, drawings, determine which sizes should have a finished product, how it will fit into the interior of the children's room, etc.
What material to choose?
An important value is the choice of manufacturing material. Of course, it will depend on financial capabilities, master's skills, but it is impossible to miss the factor of its naturalness and security for the health of the child. In the production of children's furniture, it is best to use the raw materials of their deciduous trees. The advantage belongs to beech, since its wood is characterized by good density, hardness, easy to process (for example, compared to oak). You can also use a lipa, birch. From coniferous breeds - pine, spruce, but in order during operation on the surface of the product, resin spots are not formed, the wood should be desirable.
Choosing wood for the chair, be sure to note that the blanks are without bitch. Such sections of the tree are worse than the processing, they are less strong. The active use of the stool can lead to a breakdown at the site of the bitch, as a result - to injure the child.
Inexpensive wood materials include Phaneur. It consists of several layers of veneer of coniferous and hardwood trees. In addition to low prices, plywood are small, as well as ease of work. The elasticity of the material allows you to create original curved forms of various parts.
The chipboard is considered the most short-lived, but cheap material. The essential disadvantage is the use of formaldehyde, phenol formaldehyde resins in its production (6-18%). Also, the chipboard does not have a dense texture, because of this attachment do not differ reliability. In children's furniture from chipboard (as well as from plywood) often make flat details: seats, backs, table top tables.
What is needed for the manufacture of a wooden children's chairs
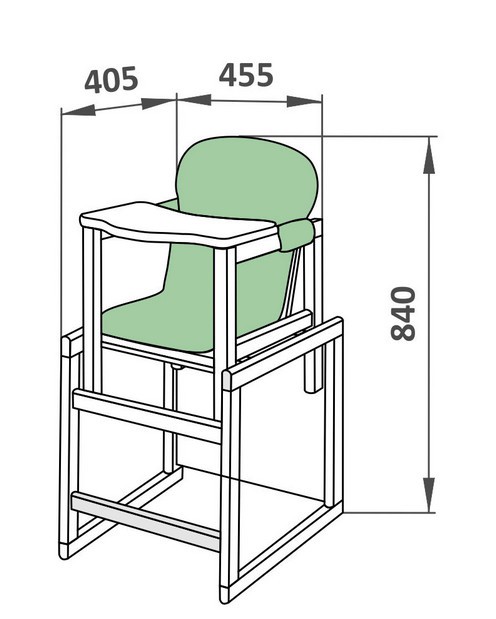
We offer drawings and the procedure for making a children's chair. Its dimensions:
- the height of the product is 630 mm;
- distance between legs: in depth (from the front to rear) - 280 mm, in width (between the front / rear) - 320 mm;
- leg length: rear - 630 mm, front - 410 mm.
For a more reliable connection, the parts will be simultaneously used with screws, as well as spikes.

To make your own hands a wooden chair to a child, you need to prepare the following materials, tools and fasteners in advance:
- Bar cross section 50x50 mm will be used in the framework of the frame.
- Bar 20x40 mm for rigidity and crossbar.
- From plywood, boards or a piece of array 30x10 mm make a chair seat.
- To enhance the reliability of perpendicular compounds, we use metal corners.
- Electric jigsaw or hacksaw.
- Plane.
- Screwdriver or electric drill.
- If the mount is carried out with the help of spikes, you need an electric power.
- Sandpaper or grinding machine for giving smoothness with wooden surfaces.
- Roulette, square, ruler.
Step-by-step instruction
- First you need to cut off the bar (20x35) 4 legs. 2 of them should be 410 mm long and 2 more - 630 mm. Then you prepare 4 connecting staps (from the same timber) with a length of 280 mm. They will be entrusted with the function of rigidity, as well as handrails.
- With the help of standard diameter spikes (from 8 to 10 mm), we perform the connection of the left legs: a short front and long rear. In the right places of the connectable parts, drill the opening electrode. In order for the connection to be strong, the hole should have a smaller diameter with a 0.5 mm than spikes. Then we abundantly lubricate each hole with glue and tightly score a spike into it.

- Next, perform at an altitude of 250 and 410 mm connecting the front and rear legs with crossbars (we get the height on which the seat will be installed).
- Similarly, in the same sequence, it is necessary to make with right legs - connect the front and rear.
- Places where the legs of the chair with crossbars are connected, additionally amplify metal corners. Fresh them on the self-tapping screw.
- Upon completion, compare the two constructions obtained. They must mirror a repeat one another, otherwise the chair will be uneven.
- We fasten both halves using bars 20x20x310 mm. Drive in crossbars with a diameter of 8 mm in the crossbars. We screw in them with self-tapping screws containing internal hexagon depresses in the head. At the end of this process, we get almost the finished chairs yet without a back and seats.
- At the next stage of work, you need to make a back. To do this, take a few (2-3) pieces of plywood or plank with parameters: width - 30 mm, thickness - 10 mm. We glue them between themselves and put under the press until the glue is dry. Fix the back to long legs with small nails. This detail will give the entire design additional rigidity. Similarly (from glued skiing of the same size or plywood) the seat should be made.

Children's furniture should be not only comfortable and easy, but also completely safe for the child. Therefore, after assembling a chairs, it must be processed, cover with varnish or paint. Playing with your furniture, the baby will move it, turn over. All surfaces, edges and connections need to be thoroughly glued with sandpaper or grinding machine, make sharp corners with round.

Several layers of olifa will create a protective coating of the tree, will prolong its operation time. After you can start painting. Choose light or bright colors for children's furniture decor, paints that differ wear resistance will not be peeling. Paint the paint reliably help the layer of colorless lacquer on a water basis.
High chair for kid
Such an original highchair can be done using simple drawings, or even without them from light weight (715 g) and in the work of the material - plywood. The chair has a small size, namely:
- product height - 360 mm,
- height to the seat - 180 mm,
- seat - 190x240 mm,
- back - 115x235 mm.
From the cardboard you can make a test model to understand whether to your child a chair for such sizes. If this product is not enough, increase it on the desired coefficient and boldly proceed to work.

Materials and tools
- Plywood with a thickness of 8 mm.
- You can collect a chair at will be on the spikes or just on the screws.
- Pern drill, electrolovka.
- Sandpaper.
- PVA glue.
- Drill with screws for connecting parts.
- Colorless varnish.
Operating procedure
- Focusing on data or sizes, draw a pencil on a piece of plywood lateral detail for the chair.
- Drill with perico decorative holes. Large - applying an electrolybiz.
- So that the second sidewall is exactly the exact same, as the first, the finished item we put on the paneur and describe the pencil. Cut it in the same way.

- We make the markup of the back, seats and parts, which gives the stiffery chaul, does not allow separating the sidewalls.
- When all the details of the chair are ready, it is necessary to make them absolutely smooth, rounded, diligently pollute the surfaces and especially the place of the cut.
- We collect a chairs on glue and secure connections with screws.
- At the final stage, we engage in the decor of the chair. Cover it with several layers of the veil, if you want to make darker, or paint in a bright color and cover the layer of varnish water based.
Showing a little fantasy and prepare your own drawings, you can change the appearance and finishing of the chairs, as well as make a table for a child like a similar design. Your child will appreciate it.
Each parent soon or later faces the problem of acquiring children's furniture, and a children's chair in this case is no exception. Moreover, the market with similar goods offers to us a fairly wide range, but when choosing often some difficulties arise. In particular, what material to prefer? A tree in this duel, naturally, wins, but the price of such a product leaves much to be desired. You can buy a plastic highchair, but it is not too pleasant to the touch and is not always comfortable. There is a way out: make children
Appointment of children's chairs
The use of this object of furniture has some features that depend on the age of the child. Teaching the baby to the stool must begin at the moment when the child can already sit on their own (usually it is about 6-8 months old). At first it is used exclusively for feeding, but only then - for seating during creativity or other cases. To date, children's chairs, with their own hands made, which can be used for a child, are of two types:
- simple chairs that can keep even inexperienced baby;
- transformer chairs that simultaneously perform several functions.
With age, the child appears the mass of hobbies that require a certain amount of time in the sitting position on the chair. The main function is still to use it for seating at the table, including dining. Children's chair, with his own hands made with all the wishes, will be loved for your baby.
Necessary materials
Make a children's chair with your own hands very easily, it is enough to strictly observe the sequence of actions and have all the necessary tools and materials at hand. For the manufacture you will need:
- several bars that have a cross section of 50x50 mm;
- bars with a cross section of 25x25 mm;
- bars with a cross section of 25x50 mm;
- board with a cross section of 25 mm;
- self-tapping screws;
- drill screwdriver;
- screwdriver (if necessary);
- sandpaper.
Since the chair is intended for use by children, it is worth remembering the high quality of the material and its safety for health. It is also necessary to think about what should be the stool. With your own hands, make this subject of furniture, using only those bars that have a smooth and dry surface. Only subject to these rules, the life of the chairs will be significant.
Preparatory work
Before making a children's chair, do it yourself, the drawings of the details should be done. Before starting work, it is necessary to carefully prepare the workpiece. The material should be dried, then go through its surface. The latter needs to be done until the workpieces are perfectly smooth. It is necessary to exclude the possibility of injury to the baby.
After preparing the material, a schematic drawing should be made, the so-called sketch. If you seize the children's chair with your own hands, try to do the drawings as simple as possible. Then, when assembling you will not have any difficulties.

Assembling legs
It is necessary to start doing children's chairs with your own hands from the bottom of the future product, namely from his legs. You will need two wooden blanks with a length of 27 cm and 52 cm. These stool details need to be carefully processed using special tools for working with wood - workbench and plans. All four sides of the bars need to be brought to size 40x40 mm. For ease of processing, you can safely use the vice, between which the bar can be shoved. To avoid the appearance of the dentin, it is necessary to make preventive measures, in particular, the use of pads made of fine aluminum or plywood, pre-giving them a M-shaped form. After processing the legs of the future chairs, the planer is required to perform marking and electrolls to remove all unnecessary parts.

Collecting and backrest assembly
At this stage, the reference of the product is designed, as well as the corresponding crossbars. The billets for the crossbar should be about 17 cm long, and for the back - 16 cm. When cutting the crossbar and the backs, it is necessary to make a tolerance of about 5 cm. Forget about it can not, since they are extremely necessary for further processing. The processing process itself occurs similar to the previous procedure. As a result of all actions, you must receive Bruks with the following parameters:
- 10x15 mm;
- 20x20 mm;
- 20x45 mm.
For seating you need to take wooden boards, there must be two. Moreover, the sizes should be the following: 150x250x25 mm. These boards need to be filled with four sides. The gaps are not allowed. After the edges are processed, sharp corners of the boards need to round. This will help you various patterns. At the end, the preparation data is required to work out elaborate paper, especially for the ends of the bars, which are as a result should be perfectly smooth.
Production of castle elements
This stage implies the following actions. First of all, using a drill, in accordance with the existing markup on the legs of the future chairs, you need to make holes that will be not through, but deaf. To facilitate the execution of this task will help to all the well-known tool - the chisel. Using this device in combination with chisels, all excess wood needs to be removed from the resulting grooves.

Choosing the method of fastening parts
Before the immediate assembly of all parts it is necessary to choose the method to which they will be attached to each other. There are several such ways:
- with spikes;
- using glue;
- with nails;
- wing method.
The last method is the most popular. This requires on spikes that are located on the crossbars, to make it possible for the entire length of a width of 5 mm. The wedges should be about 5 mm shorter than the grooves, but their width is recommended to make a greater 0.5 mm. Before inserting the crossbar in the wedge grooves you need to build into the resulting propyl, after which it is possible to collect all the details of the Cyan. This will lead to the fact that the wedge will expand the thorns and loosening the chair will not be threatened.

Final assembly of the product
After all the blanks are cut and the surface is smooth enough, you can safely begin to the final assembly of the product. You will get more reliable children's chairs, with your own hands additionally missed all their connections to start the assembly is necessary from the frame. To do this, you will need a bars with a size of 15x15 mm and self-tapping screws. After the frame is designed, you can mount the board that will perform the role of seating. Before that, in the bars it is desirable to make holes for self-tapping screws. It is necessary in order to assemble the chair, namely when screwing the fastener, the product was not damaged. Brous themselves must be attached to the inside of the crossbar, and then install the seat itself.

You can independently make children's chairs and chairs with their own hands, such as in the photo below.
You can finish the work by covering the entire chair of varnish, pre-drawing the product to the desired color.
If we are talking about furniture intended for kids, First of all, it is necessary to take care of her convenience reliability, strength and security, including environmental.
The best way - high chair. Of course, modern wooden chairs coming on sale are distinguished high cost if they are made from really valuable and high-quality breeds woods.
Why not to do Chair for a child with your own hands? With this article you can pick up best Materials for children's chairs, get detailed instructions and recommendations for its manufacture and decoration.
Types of children's chairs
What are there chairs for children? Modern manufacturers offer a large range of chairs designed for children of different ages.
They may differ in appointment Designs used material and other criteria.
Many models can be making Alone.
To the most common and practical Children's chairs include the following views:
- Simple stool - Ordinary children's chair with a back, the instruction for the manufacture of which is available in this article.
- Folding chair - Universal highchair with rich functionality. It is supposed to change the angle of inclination of the back, adjust the steps, attach the worktop and so on.
- Stool swing - The name of the chairs speaks for itself. All children without exception enjoy swinging on such a chair. In modern models, it is possible to use the seat as a rocking chair.
- Transformer - This is a set of chairs and a table that can be installed and used in different ways. In the assembled form, the transformer serves as convenient in the disassembled - performs the function of a simple chair and tables standing separately.
Some models are envisaged regulation Heights of legs and backrest positions, and highchair "Eases" Together with the baby.
If you have small experience in the area of \u200b\u200bthe joinery, then better limit to the manufacture ordinary Children's chair without additional functions. The main thing - understand the basics and the principle of work, and in the future you can make creating more complex models chairs.
What material to do
- natural wood;
- plywood;
- Chipboard.
Highly common is the creation of children's furniture (chairs, beds, tables, etc.) from plastic pipes. After assembly and decorations are enough attractive and unusual structures, but their reliability and durability Causes a big doubt.
It is recommended to choose a tree as the main material for the children's chair, faneru or chipboard, since these materials are absolutely safe For a child, characterized continuous Operational deadlines and other positive properties. With this article, you can make a chair from tree.
Important! Before starting the assembly of the chair, the ends of all parts from the chipboard should be saved with a furniture edge. It not only performs a decorative function, but also prevents the selection of formaldehyde.
Dimensions and drawings
For manufacturing Stools on this drawing must prepare the following elements Constructions:
- 1 - Upper protechard (1.9 x 4.1 x 16.5 cm);
- 2 - two rear legs (3 x 3 x 55 cm);
- 3 - Perevochard carved type (1.4 x 4.1 x 16.5 cm);
- 4, 6 – planks located in the middle and below (1.4 x 2.9 x 16.5 cm);
- 5 – seat of two boards (1.4 x 10.5 x 26.3 cm);
- 7 - two tsargi. and two planks located on the sides (1.4 x 2.9 x 17.7 cm);
- 8 - two front legs (3 x 3 x 30.5 cm);
- 9 - two kings and two planks Located in front (1.4 x 2.9 x 19.5 cm).
The legs of the chair must gradually become already: rear - up to 1.9 cm, Starting from the middle of the chair to the top, front - up to 2.4 cm, Starting from the middle of the chair to the bottom.
Tip: To mount the planks and the kings, it was simple as possible, only the external faces of the details should be reduced. Thus, the inner faces will be parallel with respect to each other.
Description of the stages of work
 For manufacturing child chairs it is important to pay attention to his security: Avoid the formation of sharp corners, cracks gaps, gaps between structural elements, and also roughness and other defects.
To give attractive The appearance of the upper crossbar, it can be rounded. Carved The crossbar is executed in any way with all sorts of patterns But without sharp corners.
Fastening Details in this case will be performed using wooden shipov and glue, however you can use other ways by using nails, furniture shkants or screws.
In the case of spikes used as durable counted The elements are rectangular shapes that are inserted into the holes previously treated with glue.
In order to additionally fasten the spikes, you can apply cross-cutting bent (6-35 mm in diameter).
Chair assembly:
Step 1. First of all, it is necessary to bore the selected way the rear legs Chairs and adjacent crossbars.
Step 2. Attach the front legs remaining crossroads and Tsargi.

Step 3. At the rear legs, attach the top, carved and middle crossbar (attached at one level with the seat).
Step 4. To all the places in which the details are connected, glued together. firmly Take advantage of a special tool - joiner clamp. It is designed for tight pressed parts to each other.
Step 5. When all the lower straps and legs are firmly connected Between yourself, attach to the base of the chair seat, consisting of two skimps. For additional reliability and strength after the glue dries, fasten the plank brazed Pre-drill holes for them. If the seatboards partially protrude beyond the base, unnecessary ends must be removed using chisels.

Important! Using clamp, carefully ensure that the parts are connected at a right angle. You can control this moment with a joinery of a carbon.
How can you decorate a chair
 New furniture, even if the highest quality, made by your hands, is unlikely to attract the attention of the child without interesting Registration. There is a lot of options decorate Highchair made of wood.
To perform some methods decorating You can even attract The future owner of the chair. For example, you can paint the chair together With a child at his discretion.
The most common ideas Staining:
- Using several bright shades;
- Imitation rainbow;
- Application patterns;
- Image of lovedoes characters from fairy tales, cartoons, etc.
Second Chair Decoration - Special case which can be purchased or also made with your own hands. In this regard, there are also no restrictions. Case may be the most ordinary - from fabric monotonous or with drawings and other decorative elements. You can dream and birds, animal Flower, cars, as well as make the original.
Another idea - blind On the sides of the seats of bright strips of fabric, decoration backs with all sorts of elements ( ribbies Artificial colors, beads, etc.). Show fantasy And most importantly - do not forget to ask the opinion child.
And for inspiration - several examples design Children's chairs:


More about how to make a children's chair from the tree with their own hands, look at video:
 How to return the love of her husband to his wife - Tips of the psychologist
 Why you can not give icons