Dooming under the soft roof. OSB Under Soft Blood - Laying, Thickness, OSB Plate Instructions for Roofing
The use of OSB sheets has become very popular for the manufacture of roofing sandwich panels, the arrangement of flat rods and in many other cases during the construction of the roof. This allows you to build quickly and easily, and developed technologies using oriented chipboard, have long become the standards of modern construction.
For what purpose are OSB on the roof
In the popularity of the use of OSB sheets (they OSB and OSP plates) in the role of the roof element there are reasons:
- Resistance to moisture and temperature drops;
- Relatively low cost of manufacture on the background of expensive plywood;
- The speed of production of work provided by the large overlapped area and proper geometry;
- The ability to quickly finish the construction and not to overpay contractors for their work;
- Technology generated by years, divides a complex process to simple operations that become expensive to perform non-cellionals;
- The stove creates a monolithic surface - an excellent basis for insulation and use of a soft roof over it;
- In contrast to the edged board, does not change its geometry during drying, which is a guarantee from the deformations of the roofing surface and the appearance of the leaks;
- Application of sip-panels for frame houses;
- Durable linkage raftered sheets of OSP increases the step between heavy beams and reduces the overall weight of the roof and the load on the support.
The oriented chipboard is well combined with materials that create solid cover on it that does not require the use of hardware. These include all kinds of soft roofs - soft tiles, waterproof and rubberoid, awning materials, as well as folding coatings.
The fantasy of house-building is not limited to the listed structures. In fact, it can be any kind of coating, the main thing to comply with the technology of waterproofing and not allow the chip mass to wet. But the experience shows that with slate, professional flooring, metal equipment, galvanized glands and Ondulin, OSB sheets act as a wind support. This means that hardware should penetrate through the OSB layer and fixed in the rafters or on top of the bread makeup and the mount is carried out to it. Otherwise, over time, self-tapping and nails are loosened, and a sharp blowing of the wind disrupts the coating elements.
Also, OSB board, laid below the insulation layer, will create an oblique ceiling surface in the attic. And trimming and waste from construction with its use, go to the manufacture of brass rafters and carrier farms.
Selection of OSB on the roof (thickness, sizes, classes)
For use on the roof only OSB-3 is suitable. In this class of material, price, strength and moisture resistance are balanced. It corresponds to the European standard EN-300 and American R1 and R2.
The main thing is to pay attention to when buying - this is the presence of labeling on all sheets in a pack, so that unscrupulous manufacturers have not slipped the second class instead of the third (in appearance they do not distinguish them). Instead of inscriptions in Russian, there may be a latin stamps, then the text should be searched: "EXTERIRIR VND", "EXERIOR TYRE OF INDE" or R1, R2 (ROOF - roof).
In addition, there are specialized OSP-3 roofing panels that are structurally intended for such purposes. They have a rough surface that does not slide and has good adhesion, as well as, tipped edges, for comfortable and high-quality installation.
All plates that go to the manufacture of roofing rods must have a standard design size (1250x2500). Such dimensions are large enough to quickly increase the plane and are still comfortable - make it possible to carry them by a piece by one person.
The remaining parameter is the thickness of the sheet, is chosen on the basis of the step between the rafters, according to the table.
However, it should be remembered that it contains the smallest permissible dimensions for the pitched roofs. In practice, 9 mm sheets of roofers are not used in general - technology allows you to start working with 12 mm materials. And indicators for flat roofs should be increased to 18 mm. In our climatic zone, such a need is dictated by additional calculations on the snow load in winter.
Only then table indicators will be true if, on rafters, fill the transverse stepper incarnation.
Arrangement of a scope surface using an OSP
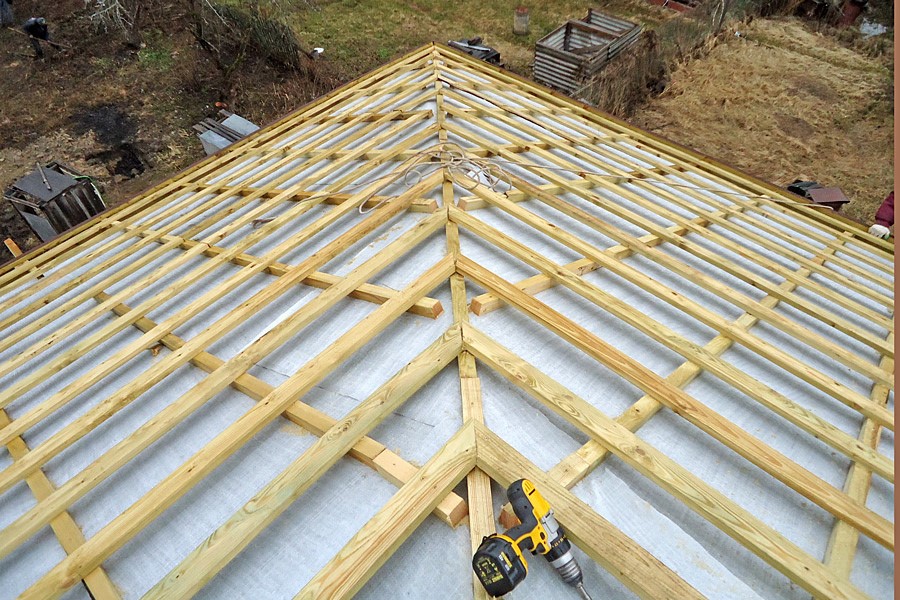
Methods of fastening oriented-chipboard are only two: directly to the rafters and to an additional incarnation. Both options are very widely applied in practice. It is impossible to say that some of them are better or worse, but each method is optimal for its specific conditions.
Fastening OSB on the roof directly on rafters.
This option is used in the presence of powerful OSB sheets, in the homes of the attic type, when the roof insulation is not produced.
Advantages:
- small number of construction operations at height;
- significant savings - no additional wood required for doom, do not waste means for insulation and waterproofing;
- fast term of completion of work.
Disadvantages:
- the upper floor (attic) in the house remains cold;
- it is required to use thicker sheets of OSP;
- if, it was decided to use the insulation, it is desirable to use non-combustible polystyrene foam and an additional covering sheets of the OSB from the bottom of the rafter.
Some builders are trying to apply the installation on the rafter using the insulation from the mineral wool and the layers of vaporizolation, without ventilation gap. Over time, a similar error leads to deterioration Materials due to destruction due to the stress of excess moisture.
 When fastening the OSB sheets to the rafters, the OSB sheets themselves perform the role of the crate.
The procedure for the production of works on the installation of OSB on rafters:
- Previously, the rafter beams and shears of the dohars are processed by an antiseptic to protect against fungus, mold and insects of the woods.

2. Installation is carried out in dry weather, with a prospect of closing wood roof to rains. If, precipitation is scheduled, and the works are still unfinished, then a protective awning will be needed.

3. Safety is thought out - temporary shelves are arranged for moving, safety cables are fixed for people and fixing belts under the tool.

4. The fastening is better to carry out nails with a grid notch, a size of 70-100 mm (depending on the thickness of the material). The use of nails accelerates the process and makes a durable connection.
5. The lower edges of the rods are trimmed by runs, which are not so scary by wetting. They provide a smooth starting ledge to prevent slab scaling.
6. The construction marking thread is planned transverse control lines on the supports in the size of the available sheets. The key must be performed strictly on the markup. About how the marking thread is marked (it is a jackhammer) can be found in the article :.
7. OSB panels are located along the supports. Styling starts from the middle of a number, with the calculation that the last panels will be pulled out half. Sliced \u200b\u200bhalves are suitable for stacking the following row to shift joints in a row to the following support. Cutting and trimming is performed on the spot with a circular saw. The remnants of the material with the oblique slice are not thrown away - they are ready-made blanks for the top row.

8. There are 3 mm compensation clearance between adjacent sheets.
9. The step of clogging of hardware: 15 cm - on the joints, 30 cm - on the support rafters, 10 cm along the edge of the roof.
10. For reliability, additional clamps are installed between the rows of sheets of sheets.

11. If the angle of inclination of the roof is large, the temporary reference bars for walking on them are mounted.
12. Lastly, the area of \u200b\u200bthe top skate residues of the material strips is laid.
The technology requires that the step between the rafters was driven by OSB sizes. And sheets when laying should be conjugate between themselves exactly in the middle of the beams with a lamb to the beam in 5 cm (or more).
Visually with the linking technology on rafters can be found in this video:
Fastening OSB on the roof to the doom.
This option is used to create ventilation gaps if you need to warm the roofs or oriented chipboard sheets (OSP) too thin and additional support is required.
Advantages:
- creation of high-quality reliable sandwich panels that will make comfortable habitat on the upper attic floor;
- savings on the purchase of OSP sheets - now you can apply 9 mm thick;
Disadvantages:
- a large amount of work and consumables;
Procedure for the production of works on the installation of OSB through the crate:
- All types of work that are performed in the previous embodiment are relevant for this method, with the difference that the installation will occur to the penetration, in addition, the internal technological layers are pre-equipped.
 Roofing Pie using OSB Sheets on the roof
2. From the bottom side, the rafter is shot by a construction stapler diffusion waterproofing. Film strips should be attached horizontally, starting with the top. The junctions of the rolled strips of the steaming membrane are punctured by acrylic scotch, with a flystone at 10-15 cm. Similarly, they pass the entire perimeter of the vapor insulation layer, attaching the film to the carrier wooden structures. It is necessary to pay attention to the fact that the linen of the right side is drawn to inside, then the film will effectively block moisture, falling out of the room in the heat insulating layer.
3. Mineral insulation cotton wool is cut into parts that are compacted between carrier beams. It should be suspended between rafters and do not fall, and a layer of vapor barrier under it, performs the role of additional fixation. In the future, the abroad will be broken, which will create an additional support for thermal insulation.

4. On top of the rafter, another layer of the diffusion three-layer membrane (for example, Eurantor N35, RNKKA, YUTAKOH), which is turned upside down with a rough side upwards. It blocks the entering of external moisture (fog, dew, leaks) and removes extra pairs from the insulation. Throwing the cocned joints should be 10-15 cm and go in the correct sequence. To do this, the rolls of rolls should be made horizontally and securing the strips correctly, starting from the bottom. The first lower band should be for the contour of the insulation by 15-20 cm down.
5. Bruks and boards, from which it will be made of a doome, are processed by an antiseptic.
6. On the surface of the vapor insulation membrane, strictly over each rafter, the sealing tape is sampled.
7. Controlling from bars with a cross section of 50x50 mm makes itself on top of the rafted, on the lanes of the sealing tape. It will create a 5 cm ventilation gap for moisture removal, which accumulates on the waterproofing layer. For better air circulation, breaks are arranged in a chess order in Bruke.
 Controlling with a doom.
8. At this stage, it is possible to start mounting sheets sheets, but, for additional strengthening of the support, it is desirable to break through the inch board as a step doom. The maximum distance between the centers of the boards is taken 45 cm, and if an OSB is used 9 mm, then the shap is fixed almost skylight.
9. At the end, the oriented chipboard is fastened, fixing it with self-draws to the boards with a doom.
The video introduces an installation of an OSP to the makeup:
FINISHING FINISHING COATING
For the formation of high-quality, reliable and durable roofing, the surface formed by the OSP is most often covered with soft tiles.
Other types of roofing materials are not so reliable or their use is not appropriate in these conditions.
Procedure for performing work:
- A drip and drapery system at the edges of the roof is thought out and placed. It is performed using cornese slats and gutters.
2. The waterproofing carpet is laid. At large angles of tilt, over 18 degrees, it is allowed to lay it only in the locations of the inflection: skates, endands, lower and frontal roof boundary. Waterproofing rolls have a self-adhesive layer covered with polyethylene film. For additional fixation uses bitumen mastic and nails for the Tol.
3. The dummy produces horizontal bands from the bottom-up, the lower boundary of the laying is the cornice bar (5 cm from the inflection), the joints of the joints between the strips of 10-15 centimeters are wetted by mastic. Special attention is paid to skates, shadows, pipe outputs and frontones.
4. Produce the roof markup with the eliminated waterproofing carpet. This is performed using a milling thread. The resulting lines will serve as a reference point for laying bitumen tiles.
5. The soft tile is laid on bitumen glue with an additional nail fastening along the upper boundary of each element. The upper element of the tile covers its petals robbed nails on the bottom.
6. Rows of tiles orient on the markup, starting with 5 mm below the edge of the waterproofing carpet, shifting each new row to half the petal.
7. The finished roof can be equipped with aerators, to improve layer ventilation.
 Aerator.
The next video shows all the technology from the first to the last step:
Black Ceiling Coverage In Mansard
For decorative finishing finish, the layers of roofing pie are covered with inside plates of OSP, a thickness of 6-9 mm. Directly on the rafter to svew sheets cannot be obtained, it is necessary to get 5 centimeter ventilation gap. For this, 50x50 mm counterbrus are stuffed on the bearing beams.

OSB panels are fixed to the shells obtained on the self-tapping screw. Fixation is performed in compliance with the editing rules of the oriented chipboard to the ceilings with a prospect of decorative finish in the future.
Many thousand housing were equipped with roofs according to the described technology. Experience in several decades has shown that this method is reliable and tested in practice. In compliance with technology at all stages of work, the resulting roofing is obtained durable and functional.
The soft roof in recent years has gained popularity with developers. But not everyone knows that the basis for which the bituminous tile is usually placed is very different from the root, which is mounted slate, ondulin or metal tile. Let's try to figure out how the lamb should be arranged under a soft roof and how it is different from the installation of ordinary dory.
A peculiar foundation for the roof is Mauerlat, which relies the entire rafting system. Flexible tile does not tolerate irregularities, unnecessary bends, drops of heights and protruding nails at the base, to which it will be laid, so it is necessary to very seriously refer to the geometric parameters of the roof design from the very beginning. All bars Maurolat must lie strictly horizontally with any configuration of the structure. And the lines connecting the ends of the Mauerlatov on the ends of the buildings should be an angle of 90 ° with them. If the ends also provides for a drunk roofing device, then the end mauelalate should lie perpendicularly longitudinal in one horizontal plane with them.
Rafyled - Future roof frame
If Mauerlat is laid and fixed correctly, the installation of rafters prepared by one template, even for curly roofs it will be simple. Actually, on this similarity with a frame for other roofing materials ends. Under the rigid sheets of the roofing, the doom can be made from the unedged board in one layer with an interval between the boards in 150-400 mm. Under flexible tile, it is necessary to prepare a solid smooth and smooth base of two layers:- Actually doomle from the calibrated (one thickness) of the edged board with a width of 100 mm wide, which can be mounted with an interval from 100 to 400 mm.

- A solid foundation that glues soft tiles, from plywood or OSB-3 plates (OSB, OSP-3)

Plywood and / or OSP-3 stove must be moisture-resistant! All Wooden Roof Designs: Maurylalat, Rocking, Rock Rock, Racks, Trucks, Boards and Bar for Gearing, Must have no more than 20%.Holding the distance between rapid legs. It is necessary to take into account the thickness of the board, sheets of plywood or OSB plates. If a step is 500 mm, then the thickness of the board can be 20 mm, and plywood or OSP plates are 10 mm. In step 1000 mm, the thickness of the board should be 25 mm already, and the plate or OSB plate must be taken with a thickness of 20 mm. The distance may be another, respectively, the thickness of the boards and sheets of plywood, or OSP-3 plates, too, should also take another. Here you have to understand that the board serves as a doom for supporting the plate or plywood. If the distance between the boards is too large, the sheet material can over time to progress, resize between the supports, which will lead to the deformation of the soft roof. Figures on the width of the board and the thickness of the materials used are minimal. Therefore, in the presence of funds, you can buy a fane or a plate of thickness more than required by calculations. In this case, the step board can be slightly increased. With a thickness of a smaller than it is required, it will be better to do a cut from the boards. What is this due? Business in the mechanical characteristics of materials:
- The board can dozens of years to maintain their rigidity under the correct operating conditions and will lie smoothly even with a step of a rafter at 1200 mm and more. Of course, the board must have a thickness corresponding step.
- Plywood and OSP-3 stove over the years under the influence of temperature differences and changeable humidity can be saved if the support lines or a distance of even 500 mm between them are relying.
- With all its rigidity, the board over time can "lead", swinging, the edges of individual boards can exit the overall surface plane. And the flexible tile does not like it. It breaks down, to be sacrificed, to be climbing, which will cause the need to repair the roof.
- Obviously, using only boards or only plywood or OSB plates will lead to the fact that the bituminous tile will begin to rush along the seams of the board or fade along with the plates or plywood. And this may mean that the installation of the roof will have to be reinstalled.
- Only aligning the rigidity of the board and a flat surface of the OSP or plywood plates will give reliability to the base for soft tiles, and in the repair of the roof there will be no need for a long time.
 To find the best option, you need to find out the cost of all materials, and calculate consumption with different steps. For example, the cost of the OSP-3 plate with a thickness of 20 mm is almost two times higher than the cost of this slab with a thickness of 10 mm. Preparation of rafting roof structures to installation should take place taking into account the fact that the tree is combustible and subject to rotting. Therefore, it is recommended to make appropriate treatment with flame retardant impregnation and antiseptics, and in places where the rafter legs come into contact with the wall, it is better to pave the waterproofing material. For example - ruberoid. Under the Mauerlat layer of waterproofing is restored.
Dormitory device
The bumbly under the soft roof must meet the following requirements:- Solid smooth, smooth surface of the base without deflection, chosel, chipping, cracks and protruding chips or nails.
- Technical gaps between OSB plates or plywood sheets needed to compensate for their expansion, should not exceed 6 mm.
- The edges of sheets and plates when installing must be cleaned so that they are not sharp, even if they lie close to each other.
 They will serve as protection against water to the wooden structures of the rafter system. If this is planned to install drainage gutters, they need to be installed before the dropper.
 Very convenient and multifunctional material for different construction works - oriented chipboard. Since plate production technology is not difficult, for internal finishing works, the wizard can choose some particular option from four types of OSB plates or consider special types of stove data.
What is the sheets of data sheets? Everything is simple - the wooden chips are activated (flat fragments are going), chips: these materials are glued together and is actually a great finishing material. Three or four layers of chips or chips - precisely such indicators can be called optimal. Installation of OSB on the walls is more preferable than the use of the same chipboard.
However, oriented chipboard - a peculiar modification of tree fiber material, a certain modern analogue. If finances allow, it is better to choose for facing work after all the same OSB (from plywood or chipboard today are increasingly refused).
OSB scope, plates classification
Before considering the classification of plates and decide, the better from the OSB to separate the walls, it is important to pay attention to the characteristics of such a material.
Types OSB plates
Here everything is as follows:
- The plates of the first class OSB - they are usually chosen for such premises, where low humidity level;
- The type of the second - the material can be safely chosen for dry rooms, it is even used as a structural element during construction work;
- 3 OSB type - Plate data is used in those rooms where a high level of humidity is observed;
- The fourth variety of such products is used for cladding structures that are able to cope even with essential mechanical stages. Moreover, we are talking about conditions where a high level of humidity.
Application area

On the area of \u200b\u200bapplication, one can say one thing - the installation of OSB task is really relevant, as such plates are used in many building aspects.
It is just that this material has such a manufacturing technology, due to which all internal defects are simply excluded (at the same time, the chipboard of the sheets they often appear - emptiness, uneven fillings). Due to all this OSB more preferred option - it is not deformed, does not shrink.

And now in detail - where exactly can be used such material?
- Often for the walls, the OSB cover is a very profitable solution. Due to this approach, the house receives reliable protection against dampness, while also acquires additional insulation. What is the most pleasant here: in additional finishing works there is no need after installing OSB;
- In the construction of frame-shield houses, OSB plates are usually used, which have a high level of moisture resistance;
- Since the material has such valuable quality, it turns out a decent reusable formwork;
- It is used in the form of a basis when they make outdoor cladding of walls, as well as in the internal work - if the decoration of wooden country houses, cottages (from a bar, rounded logs);
- OSB plates are your faithful assistant if you make a doom, rafters for a roof. This material can even work under a serious load - it will definitely power the weight not only the roof itself, but also all the concomitant loads (wind, snow) - even if natural tile was put on the roof (the material that the nimalo) was laid;
- If the house needs to align the floors or to tempt them from scratch - here again you can pay attention to the installation of OSB. Just such a stove is the perfect option to create a very durable, even base. It is better not to find under the boardwalk, carpets or other coatings;
- Pay special attention to the process when it is necessary to adjust the joints on the plane. If necessary, they must be equal to equal - without it.
An interesting point - as the underlying layers, not from each manufacturer can be used by the OSB plate - in the event of an organization of flooring. And the laying of the panels is carried out so that the smooth side is located up.
What else to know the master? Following:
- Apply an additional protective coating in the form of paint or varnish is not necessary - the material initially has excellent protection in the form of a special impregnation;
- Processing the stove is not so difficult - as well as the usual wood. Screws, nails on the surface hold perfectly. OSB plates are not afraid of rotting, fungal effects, decorative qualities of such material at height;
- OSB panels are often used in furniture production - after all, this is a great alternative to natural woodwork (but in terms of cost - more profitable);
- Weighs the material is not so much - therefore it is perfect for finishing, construction, paintwork and not only.
How to separate the house faster

It is quite logical that any owner wants to enter his house faster - especially if the construction is conducted independently. Private cottages are located separately from neighboring buildings - so in such a design you can not worry about neighbors.
There may be a well-founded question: maybe not to make a black trim - and immediately fix finishing OSB materials right on the frame racks?
Is this approach to business, or is it excluded?
If you pay attention to the instructions drawn up by professionals - immediately becomes clear: it is impossible to do so. There will also be justifying this conclusion. Simply, the house is important to warm - only in this situation in it will be comfortable (even more so, in the winter of the winter cold - almost throughout the entire territory).
WHY DO NOT WATCH WANDER COPS - Lower and Top? Everything is simple here: they form spatial rigidity - along with the trim. They can be called compulsory elements, if we consider the design of any frame structure.
A frame that does not have voids, even with the trim, will retain its mobility - as in the case when there are any. However, if there is no shelving - you can imagine what consequences may be.
Outdoor black wall

There are very many different materials for roughing today. The choice here is exactly - everything will agree with this. Pay attention to at least such options:
- Board;
- OSB plate.
Any of these surfaces needs to be finished: it can be a facing of plaster - with a mesh or a layer of foam. It is believed that even the plating board can be left as a finishing finish - but in this case it will be necessary to process the wood additionally. Under the boards is also suitable hydraulic protection of walls.

You must take into account the following: Frame to separate the board is not recommended - without black, pre-sewing OSB plates. Otherwise, there is a risk that in the fall or spring boards will be twisted. In addition, it is important for the spatial rigidity of the frame.
You will receive fewer joints thanks to OSB sheets - which cannot be said about work with other materials. The OSB finish is usually made by material, the thickness of which is 11-13 mm.
Consider more details:
- The fastening of the OSB plates is made to the racks so that in the middle there is a joint. And between the plates there should be a small gap - quite a three-five millimeters;
- The sheet is completely overlapped by the lower strapping;
- The top strapping is closely connected with the floor of the house. It will be hidden entirely - and with the edge of the strapping will be combined the edge of the OSB plate in the event that the design has only one floor;
- When the building consists of two floors, the sheet is located as follows: it must come on the racks at once both floors. But somewhere the middle sheet, the upper strapping is overlapped. This condition cannot be called mandatory, but if it is performed - the rigidity of the design increases significantly, which is in favor of the structure;
- Osb plates covering when fasteners are performed to the window opening in two-storey houses, it should be done by a solid sheet - this is how professionals are advised. Then all the joints can be taken out of the neighboring racks beyond the limits of the patch. In the stove just cut through the window opening - there is nothing difficult in such work. Here https://krepezhmaster.ru you can purchase fasteners absolutely for any purpose;
- When horizontal or vertical jumpers are performed in the frame, it turns out a very comfortable stove docking. In the event that these jumpers have the same cross section as the racks - and it happens often;
- Spiral nails are chosen for fastening. Self-tapping screws are also suitable - a length of 0.5 or 0.45 cm. Rechange from the combined fastener (both nails and self-tapping screws) is also not worth it - a similar solution is considered very high quality.
Remember that the basic rules for performing fasteners must be necessary to observe.
Namely:
- The decoration of OSB plates on intermediate areas is customary to be fixed every 300 mm;
- 150 mm fasten the places where the plates are joined;
- After 100 mm, you need to flash the outer edge.

In order for the material, the crack is because of too zealous fasteners, from the edge of the plate to the location of the fixation, the distance of 1 cm is maintained (can be slightly less).
- The gap of 4-5 millimeters leaves between the plates - so that they are not swollen. Fasteners on the same 4-5 cm rolled into the rack;
- Part of the OSB plate, which is vulnerable (can be said, is the "Achilles heel" finishing material) - ends. To ensure the protection of these sites, gaps are provided, which are called dilatation (between the wet beam and the upper edge, also between the foundation wall and the lower edge). Here the gap will be 10 mm. And between those plates, where the grooves do not have, it is quite 3 mm;
- To treat these dilatation gaps, use a sealant on an acrylic basis. It is important that it thoroughly filled all the cavities - and that this work is performed evenly;
- Windproof, waterproofing - all these tasks will perform a superdiffusive membrane, which also has a vapor permeability property (this indicator is 750 g / m² or more).
Use polyethylene, various films, pergamine - do not recommend the masters. Simple these materials, the level of vapor permeability is small, all excess moisture should weigherize.
Also, you need to know:
- The superdiffusion membrane is established depending on what is the rough sewing materials, which is a finishing finish. For example, the membrane is often fastening close to the insulation - to the frame stands;
- Make a doom (here goes to the stroke of a tree, whose cross section 2 is 5 or 3 by 5 cm. Thanks to such a design, the desired clearance will be reached. Then you can already separate the surface of the OSB with plates, CML, DSP, or to rinse board;
- From the inside of the room with the help of the film you can make vaporizolation of the walls. The material is set in such a way that it lay down to the insulation is tight enough. For fastening, a construction stapler is used. The flashes make a dock - 150-200 mm, the joints must definitely cry with scotch.

For such a job, you can choose the simplest scotch - there is no need to use building material. The vapor insulation adhesive tape is also suitable.
- To perform vaporizolation, you can use foil polyethylene, which will not thicken the wall thermal insulation (main). The foamed material is also used for such a task - this practice is distributed in our time.
Finishing design inside

What is better: OSB covering or plasterboard facing? Many are definitely inclined in favor of the number one option - when it comes to interior finishing works in the house. It is enough difficult to keep the frame racks in an absolutely smooth state - when the work is maintained, the same applies to the drywall.
Simply sheets of this material are softer, if compared with OSB plates. They will easily repeat all the irregularities - so then you have to work hard to get a completely smooth surface - more layers for alignment will need to be applied.
OSB plate in its structure is an order of magnitude hard than the sheets of plasterboard, so all flaws can be smoothed to a certain extent. After already proceeding with the performance of work related to finishing.
Watch the video about how to use OSB plates with interior decoration. This material will be useful for sure if you do not have a lot of building experience.
OSB-3 Plates and Roofing Works

Roofing work is a very popular way to apply such material as OSB plates. By the way, to cover the roof of OSB-3 plates, quite sufficiently thickness of the material 0.18 cm.
In order:
- Both the castle and smooth edge can have products. The first option is more preferable;
- Between the beams, the distance should not be more than 609 mm - this applies to both the organization of lower and in the device of flat roofs;
- Whether plates are capable of expanding - it is of great importance. For each traffic point meter, it is customary to leave the gap: it is quite enough 2 mm (believe me, it is enough);
- When plates are put with smooth edges, the gap is already done a little more - 3 mm. Leave it around the perimeter of each plate - only so you can achieve optimal results;
- For the attachment of OSB to the roof, nails are chosen. Fasten to supporting supports. Between them should be a distance: 10 cm or even more;
- The OSB plates finish attached nails - they must have a length that exceeds the plate thickness in two or two and a half times (and even more) is quite normal.

If the interior decoration is performed using the OSB of panels - here you can note the following: it will be better to look at the stove from grinding panels if the appearance is very important in your space. To finish such slabs, it is better not to use ceramic tiles or wallpaper blades - this is how the manufacturers themselves are recommended. And their opinion is best to listen!
The main scope of application of OSB plates is the arrangement of structural elements of the building: roofs, floor, walls. At the same time, the installation of OSB plates has some features whose knowledge will help to make the trim quality and durable. Before starting installation, it is necessary to determine the choice of hardware, which will play a major role when fixing the OSB.
Content:
Applied nails and screws
There are many varieties of nails that are used depending on the place of fastening the plate and its weight:
- finishing: Used where the disguise is desirable and the probability of pulling is minimized. Frequently used together with glue.
- round without a hat: needed when flooring, when installing frame structures and when fixing the plates having a tongue compound
- with a hat: apply where there is no need for disguise;
There are also special nails having cutting or screw type cutting. Such hardware is better held with a knitted stove, but it is bad to pull out.
It is best to mount the panels through screws designed to work with the tree - the reliability of the attachment increases sharply. At the same time, it is allowed to use a much smaller number of screws, if compared with the number of nails. If necessary, the screw can be easily turned off, swing the screwdriver to the reverse.
Roof finish
Prior to the start of installation, it is necessary to make sure the parallelism of the crate or the rafter feet. The surface should be aligned, and non-compliance with this requirement leads to the impossibility of a reliable compound of the groove-crest.
If the plates prepared for the installation fell under the rain, then they need to dry them before laying.
Before installation, make sure that the attic space has the appropriate ventilation (the total area of \u200b\u200bthe ventilation holes should be at least 1/150 from the entire area horizontally).

The greatest part of the operational load should go to the long axis of the plate. The articulation of short ends should be carried out on the roof backups. Long sides are joined on the auxiliary supports, the compound method is a groove-comb or n-shaped brackets.
If the plates of the edge are smooth (that is, there is no spike and grooves), then a 3-millimeter dialing gap should be left. This will give the opportunity to change the size when the temperature drops without prejudice to the quality of the coating.
The stove should lie at least on 2 supports (on them and should have a connection). The following is the dependence of the distance between the elements of the crate from the OSB thickness (for roofs having no more than 14 degrees):
- 1m: Plate thickness from 18 mm;
- 0.8 meters: Thickness from 15 mm;
- 0.6 meters: Thickness from 12 mm.
When laying the slab next to the chimney, it is necessary to observe the norms installed by SNOP. High-quality mounting of the OSB plate to the rafters is possible using ring nails from 4.5 to 7.5 cm long, or a spiral length of 5.1 cm. The distance to the edge of the plate cannot be less than 10 mm.
Installation of OSB on the walls
Installation can go in two ways: in a horizontal position or vertical.
When around the window, doorways need to leave the gap of about 3 mm.
With a distance between the walls of the wall at 40-60 cm, the casing of 1.2 cm walls was recommended. If thermal insulation is needed, then it should be organized before fastening the plates. As a heat insulating material, preference is worth paying mineral wool.

For fastening the plates, two-link spiral nails (51 mm) or annular length from 4.5 to 7.5 cm are used. To drive them every 30 cm into intermediate backups. At the places of connecting plates, nails are driven every 15 cm. With the edge of the nails should be clogged with a pitch of 10 cm (no closer to 1 cm from the edge).
Dilatation gaps should also be left:
- between the top edge of the plate and the wet beam: 1 cm;
- between the lower edge of the plate and the foundation wall: 1cm;
- between plates that do not have a groove combustion compound: 0, 3 cm.
Laying on floor
Before laying the material, it is necessary to make waterproofing (if the floor is made on the first floor).
Connect OSB plates on lags. If there are no grooves and crests, keep the same gap of 3 millimeters. If the floating gear arrangement is envisaged, then leave the gap between the wall and the edge of the plate in 1.2 cm.

Must be placed perpendicular to the lags. Long edges of the plates must be connected with each other by means of a groove and crest, and when they are lacking - n-shaped brackets. It is desirable that the connection lay on the auxiliary support. Short sides of the plate must be connected to lags. The following is the dependence of the thickness of the plate from the distance between the lags:
- from 1.5 to 1.8 cm: distance between lags no more than 40 cm;
- from 1.8 to 2.2 cm: no more than 50 cm;
- from 2.2 cm: distance - 60 cm.
For the attachment, the same types of nails are used, which requires the lifting of OSB walls and the roof improvement. On intermediate supports, nails are clogged with a pitch of 30 cm, in the joints of the plates - with a step of 15 cm.
To increase the rigidity of the entire coating, giving it a holistic type, you can glue the plates to lags. Also, it will be useful will be the sizing compound of the groove comb.
Only synthetic glue must be used (water-based compositions are ineffective due to the presence in the structure of the paraffin plate).
Finishing OSB.
After consolidation it will be needed. The most common way is putty. This method allows you to seal all the slots in places of compounds to prevent moisture penetration. Plus, a qualitative work will help to prepare plates for possible further trim (for example, varnish or coloring).
To obtain aesthetically attractive species, it is better to use plates specially polished by the manufacturer. In this case, it will have to spend less time and material to the future finish.
Before carrying out work, you should walk on the stove of the sandpaper with a shallow notch, and then cover the surface of the primer (it should not be on a water basis). Next you need to choose than to put the OSB. It is better if the composition you choose is colorless. To do this, use one of the types of putty:
- on a plaster basis;
- acrylic;
- latex.
After completing this stage, you can think than to separate the walls from the OSB. For example, it may be varnishing. The slab should be lacquered in 3-4 reception with a complete drying of each layer. The coating of the lacquer will give the shine of the surface and will ensure reliable protection against moisture penetration.
Another way to finish is painting. Use paint that does not contain in its composition of water. After, it can even be laminated or separated by a special film.
Most ways of finishing the house are available after the casing of the OSB walls with a stove with compliance with the technologies and recommendations of the manufacturer.
Quite often you need to create which is an integral part of any roof design. The roofing technology from OSB allows you to fulfill the crate durable and strong. Of course, for some types of roofs, it is permissible to use crates with a run, but there is no less with it.
Benefits of the roofing technology from OSB
OSB Plate has a number of advantages:
1. Environmental safety, because In its production, a wooden chip is used, and the glue introduced into its composition does not emit formaldehydes and other harmful substances.
2. The water resistance of the slab allows it to use it even for external use, including for the roof ends.
 3. High mechanical indicators of the plate allow you to create a solid crate without additional strengthening of the rafter. In general, OSB is a universal material that is applicable to erect any frame partitions.
4. Due to the special arrangement of chips in the plates array, it has an excellent hardness, and the plasticity is preserved (that is, the material is not fragile). Increased hardness of the material relative to the board and plywood allows you to create strong and lightweight structures.
5. The large sizes of the plate make it possible to quickly cover a significant area of \u200b\u200bthe roof, and the formed surface does not have differentials, and the seams between the plates are minimal, which increases the thermal insulation.
6. Blood technology from OSB allows you to create roofs of any configuration, because The stove is easy to cut.

Blood Mounting Technology from OSB
Before installation, you need to check that the rafter design or a doom formed smooth surfaces. Large irregularities and curvature rafters will strongly affect the final appearance of the roof, and it will also make it difficult to dock OSB sheets.
The plates are stacked on rafters with a long axis across, and a short side to the roof end. This location provides a greater number of fasteners, which means that the best bonding design. For proper fastening between the plates, n-shaped connectors (brackets) are used, and the slabs themselves are stacked with a gap of 3 mm for thermal administration, because The stove changes the size depending on temperature and humidity. But installation and jack is allowed.
The installation technology of the roof from OSB allows laying of the slab on at least three supports, and ideally, the OSB thickness and the distance between the beams are selected to ensure reliable design.

 The mounting of the plates is made by nails or screws on beams with a step of 150-300 mm, and the indentation from the edge should be at least 1-2 cm. When installing the roof is not allowed by the load of the body weight of the workers, especially with large spans. You can only use a distributed load, for this temporarily attach an additional board to the beams on top of the plate, and use it as a base for "walking".
 How to return the love of her husband to his wife - Tips of the psychologist
 Why you can not give icons