Composter from boards. Secrets of clean fertilizers. How to do and fill the compost pit. Characteristics and species
Send the material to you on E-mail
If there is a bad soil on the site, the container is built to create a humus, which is an important part of any garden plot. The use of feeding in the form of compost, allows you to grow environmentally clean vegetable and vegetable crops. Recommendations from experienced gardeners will help to understand how the compost yam is created with their own hands, manufacturer options, photos and features of which can be considered in detail below.
Capacities may contain several compartments, which increases their performance.
The compost yam is easily created with their own hands. At the same time, manufacturer options can be seen in the photo. Uncomplicated products can be performed from pallets that are taken after the implementation of building materials and are purchased for a small amount.
It is important to choose a location. It must be distant from the housing. This should be a well-blown plot. This will prevent the appearance of mall-smells. High availability is characterized by tanks from girlfriend. The finished design allows us to utilize the weed grass from the site.
Helpful information! Over time, vegetation is tamed and under the influence of bacteria and humidity transformed into excellent organic fertilizer. Perfect for processing different crops in a garden or garden.

What is the purpose of the pit?
An excellent utilization method of various garbage is a compost pit with their own hands. Production options, photos and drawings can be found in sufficient quantities on the Internet. This construction allows you to get high-quality fertilizers in the shortest possible time. At the same time, beveled grass, leaves and manure.

- side walls are assembled;
- the walls are trimmed by boards, two walls are made with gaps and two of the tight boards;

- muffd up boards for the back side;

- bottom is done;
- mounted cover;

- installed bottom doors.
Helpful information! Wood from which the pit is performed must be soaked with a special solution. This will prevent destruction from high humidity, malicious insects and rotting processes.
Compost Human Hands: manufacturer, photos and nuances
There are many ways to make compost pits at the cottage. It is worth choosing a type of structure that meets the requirements of a certain area.
The most famous methods are used:
- construction of the pit in a certain place. Kotlovan must be like a well, but be smaller. At the same time, the walls of the pits are additionally strengthened and are squeezed, but only at an altitude of 20-25 cm from the bottom so that microorganisms are easily penetrated into;

- capacity is mounted on the garden plot. This allows you to get a compost mix at any time. The pit is based on the formwork. It uses a plastic tank or a box of boards; It is important to install ventilation holes;

- the easiest way is the creation of a compost heap. This creates a substrate from sand, dried herb and gravel. Out of the waste, which must be prohibited.

Options for creating such a building a lot. They differ not only by materials, but also the properties of the reservoir and dimensions.
Helpful information! Before laying vegetable raw materials into the design, you need to thoroughly break down the bottom and install the vent hole. After the rains, the pit can be covered with polyethylene to accelerate the operation of microorganisms.
How is the compost pit on the cottage from slate?
Master Tips will help you decide how to make a compost yam at the cottage from slate to get a reliable and solid construction.

The slate web will become a magnificent base for the walls of the drawer. The design is performed in several stages:
- suitable dimensions are determined;

- after selecting the site for the location of the structure, you need to make a small recess;
- in all angles, supports made of pipes or boards are mounted;

- the pit is mounted using slate sheets;
- a partition is installed in the box, which shares the space into two parts.
How to make a compost pit - with this question sooner or later each owner of the country site is facing. From this article you will learn how to competently arrange a place to obtain natural fertilizers.
Compost - effective means to increase soil fertility. This is known even to novice gardeners. But about how to equip a compost pit, unfortunately, not everyone knows. In this case there are many nuances. And only a competent approach will allow "kill two hares" - dispose of household waste and lay the foundations of a rich harvest.
Choose a suitable place
If you break your head over the question, how to make a compost yam correctly, then the first thing you should take care - the choice of a suitable place.
As a rule, a compost bunch is placed for economic buildings, on the backyards of the site. Do not stir the pit too close to the source of drinking water. The optimal distance to it is 25 meters. The place must be shaded, because Direct sunlight inhibits processing processes. It is important to take into account the direction of the wind, hardly the neighbors will be delighted with the smell by the future fertilizer.
 Think about the convenience of access. Many are forgotten about it, and then suffer with the bookmark of garbage and the sample of humus. Well, if the surface of the earth is smooth - stagnation of water reduces the inflow of oxygen, which will significantly stretch the time "preparation" of the most valuable additive.
Chose a place for a composter? Excellent! Clean the land from the turf and explode to a depth of 30 cm. So you will create favorable conditions for the vital activity of worms and other useful microorganisms that make an active participation in recycling.
About sizes and design features
So, with a place for the composter figured out. And here it is brewing a new question, what size should a compost pit be? The size is determined by the principle of "two cycles". That is, the first half of the pits should occupy the waste, which accumulated in 2 years, the second half is "young" compost (not older than 2 years).
It is important to understand that the larger the compost pit, the faster it is heated to the desired temperature (up to 60 degrees). If the pit is small, then it, of course, is also heated, but hardly to the temperature indicators, in which all pathogenic flora and weeds die. Specialists are recommended to lay a compost bunch with the following dimensions: height - at least 1.2 m, width - 1.5 m, length - 2 m.

Be sure to comply with the removable lid for the composter. Do not cover the bottom with film, rubber, metal sheets or slate. They will prevent moisture passing up, which means that the compost will be dry. The best floor for compost pit is an earthy.
Production options
Computer heaps can be several species. Consider the options for arrangement, and you will choose the most convenient for you.
Ordinary Yama
 "Composter for lazy" is a conventional shallow pit. First put on the bottom of the bark of trees, hay or branches. Next - vegetable and food residues. Blank with black polyethylene film. After each discharge of new waste, cover them with grass. To be honest, this option cannot be called successful - the contents of the pit will not warm up sufficiently, and the stirring will have to spend a lot of forces. It is better to try and build something more efficient.
Wooden two-section composter
Wooden drawer, immersed in the ground, is the most common option. Having a depth of a depth of about 50-80 cm, a width is 1.5-2 meters and a length of 2-3 meters. In the corners of the corners of the support bars, retreating from the edges of the pit of 20 cm. With this task, the cuts of the pipe will cope with this task. Treat previously bioprotective composition.
Collect three walls of the drawer from the boards, providing ventilation holes. Install and remove if necessary. Divide the composter into two parts using a wooden shield. The first compartment is for the "old" compost, the second - for the "young". Screw the front wall.
Each bottom straw or wood bark. It will protect against the accumulation of excess fluid and will provide a normal air exchange. The lid can be made of plywood sheet, fixed on the back wall by means of loops. First, process the wooden parts impregnation protecting against moisture and insects, and then cover acrylic paint in two layers.

You can divide the compost yam not two, but by three sections. The first compartment is for the finished compost, the second is for the concerning, the third is to bookmark new waste.
The whole composter is made of wood, but if you wish, you can use slate, metal sheets or bricks.
Composter with one section
 If a two-or three-section composter seems uncomfortable to you, then you can make a pit with one compartment. Install the wooden box so that 30 cm remains between the Earth and the edges. From this hole and the matched compost will be selected. The new raw material is laid on top, that is, loose fertilizer is not necessary. In principle, very convenient.
Concreted pit
Those who want to make a compost pit once and no longer worry about it worth advantage of the concreted "tank". Follow the territory (approximately 2x3 meters) and dig a shallow trench (70-80 cm). Build a formwork with a thickness of 10-12 cm around the perimeter of the future composter. Prepare concrete and pour it into a formwork. After the final frost, the formwork disassembled. Lay into the pit of waste and cover with a film, metal mesh or wooden shields. That's all.
Plastic containers
 Modern interpretation of the traditional pit, requiring some refinement. Plastic does not let air, so you have to do ventilation holes yourself. Make it happens problematic. It is better to buy a ready-made plastic composter, equipped with a lid, ventilation strokes and lower doors for calculating fertilizers. The volume may be different. On average - from 400 to 1000 liters. The cost varies from 2 to 10 thousand rubles.
When the work on the arrangement of the compost pocket is complete, you should think about how to use it correctly. After all, it directly depends on how quickly you get humus and how much it is nutritious.
- from time to time, "Combat" the contents of the pits of the pits. So you will provide oxygen access and speed up the rotation process;
- do not forget to water a compost bunch - dry waste does not decompose;
- accelerate the process of "preparation" will help the film that the pit is covered;
- sometimes, sit in the worms in the box and add drugs activating decomposition (composting, compostar, Baikal EM-1, etc.);
- place the raw layers. Wedding residues alternate with food waste, wet - with dry;
- will accelerate the decomposition process of cow manure, as well as some plants (dandelion, chamomile, Valerian, Yarrow);
- do not tamper the layers tightly, watch the contents not too wet, too loose or, on the contrary, dry;
- the dry material in the compost puch should be 5 times more than the wet.
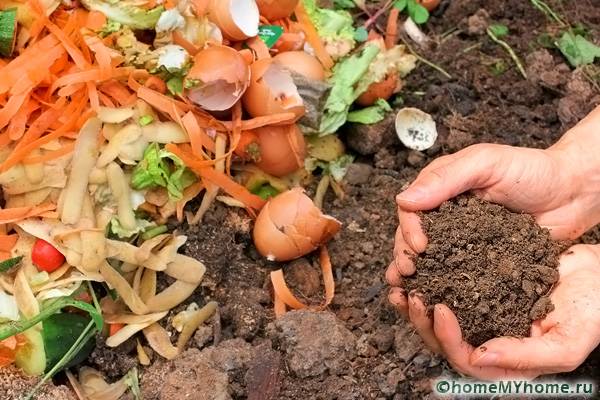
And finally, that you can lay in the composter, and what is impossible. This, by the way, determining the moment to get a good fertilizer. Wedding residues are thrown into the compost yam - mowed grass, straw, bark of trees, leaves, branches, wood ash. Food waste - welding, fruit and vegetable peel, egg shell, porridge residues and soups. Black and white newspapers, napkins, cardboard, old things from wool or cotton.

To enrich the contents of the pit nitrogen, from time to time you need to add to it manure, bird litter, bone flour, legumes and pea stems. Do not forget about superphosphates, dolomite flour and complex mineral fertilizers.
It is impossible to make excrement of animals, fats, bones, spoiled products, tomato and potato tops, weed seeds treated with plant herbicides, inorganic debris (rubber plastic, glass, synthetics).
Video: Device of modern compost pits on the household plot
What is more convenient - bought garden composter or homemade compost box collected by the desired size? Now there are ready-made garden composters on sale. There are a large number of different models for the production of compost - both with the participation of oxygen and without it. They can be equipped with additional air supplies, or be sealed. Many have a device for draining the excess fluid generated during the composting process. Capacities for compost in the country can be used any: buckets, barrels, cans, baths, etc.
Such a structure looks quite aesthetically and testifies to the "promotion" of the gardener. Mobility, the ability to establish a container in any suitable place for this place is a certain plus. The plastic container, made by the type of thermos, retains heat well, which helps the heating of the compost and maintaining inside the desired temperature. Another plus - there you can safely put waste from the table, in the closed container they will not be available for rodents. The compost cooked in the composter is considered to be more efficient and concentrated, since the "leak" and weathering of the useful substances does not occur during the preparation in the container.
Among the minuses are the presence of unpleasant odors, this compost is much more difficult to "regulate".
The compost component laying should be made at a time, that is, before that, all the components accumulate, waiting for its turn. In addition, the acquisition of the composter is the wrong thing, it is necessary to post a decent amount. And it is possible that later you will be disappointed because this purchase will not justify hopes. And finally, the main minus of finished composters is a slight amount of the finished compost that can be prepared in it. What is well somewhere in Europe, when the garden owners dispose of the barbecue residues cooked during the arrival of the weekend, and the rolled grass with a small lawn, then we, with our garden waste, does not pass. There will be a little place! Therefore, a closed-type garden composter is good for those who are on their site episodically and composperates a small amount of kitchen waste in the form of potato cleaning, egg shells, etc., passable with grass from the lawn mower.
Homemade wooden box for compost, unlike purchased compostera, will cost you almost free. In addition, the box is open to air and atmospheric precipitation. The composting process is carried out on a continuous cycle, there is constantly throwing something back, the gardener regulates the processes of composting, adding weeds, then the ground, then the kitchen waste. Before making a compost box, you can learn about all its practical advantages and take the right decision.
Thus, over the summer in a compost box, you can get much more compost than in the standard finished plastic composter.
If you have a new site, and you are starting to master it, then before making a compost box with your own hands, you can do the temporarily simpler solutions, for example, at first, the compost pile will be more likely. Down Putted Dern "Down your head", then lay down the beveling grass, legumes and any crushed residues of plant origin, manure (if any), and then all this abundantly spinning with a dust or diluted urine. Sprinkle wood ashes on top, add a little bit of dolomite flour and urea, which also accelerate decomposition processes. Pile for better air access in several places stick. The higher the temperature inside the compost heap, the faster the compost will be ready, so it is covered with leaves or hay to maintain the desired temperature, or simply a layer of land. Then all this will be degraded and after a couple of years will turn into a beautifully structured rich substrate, in which you will not find and signs of what was at the beginning.

Before making a compost box with your own hands, you need to understand all the processes of Humus preparation in such facilities. Is it possible to do only a conventional compost bunch? You can, but you do not need! Not only that this pile will have an unsightly look. The process of laying organic residues itself, not to mention the kitchen waste, it is the layers that seems to be problematic. Yes, and stacked unsystematic, constantly roll down, will be delivered to a lot of trouble. Beautiful, proven alternative - a compost box.
And if to prepare a compost to use a pit? This method of cooking compost has the right to exist. But only provided that you will lay everything at the same time, and "forget" for 2-3 years. Compost is preparing in this case in anaerobic conditions with all the ensuing consequences. This refers to a specific smell of a fermented silos-like mass. Few people want to inhale such flavors in a small garden. It is permissible somewhere in the village, in rural expanses, somewhere on the far backyards of the garden. And on a small summer cottage or garden plot - a box, box and a box again!
How to make wooden compost boxes and from slate with your own hands (options)
How to make a compost drawer with your own hands from the available primed materials? If you are a gardener with experience, but you still have for some reason there is no composter box, then set out all the cases aside and take for the construction of such a box! You are free to do it at your discretion, but you need to know and follow some of the mandatory rules.
It is best to build durable wooden compost boxes, the benefit of the remaining wood in the form of crackers there is practically everyone. Moreover, you should not make it from any unnecessary cutting boards. It should be durable and reliable, even, not afraid of this word, a beautiful construction that serves you not one year. To do this, do not lay down to put on this matter new, fresh enough boards, which must be predetermined by some composition against rotting. After all, the contents of the composter drawer is a rather aggressive organic substance, saturated with bacteria, which is still to eat - bevelled grass or boards. There are other options for compost boxes with greater stability of materials to rot and aggressive environments.
Side and rear walls need to be made with slits about two fingers wide, it is important for aeration. The front wall is about a third of the height is done stationary, and above it is laid to the top of the transverse butt boards so that they can be removed alternately to that height, which is necessary. For this, vertical bars are stuffed, and thus produce grooves in which the boards are invested. It is extremely convenient when the compost is ready and it's time to choose it from the box.
The cheaper option is to make the rear and side walls of the box of sheet slate. A compost box from slate does not rot, so it will be longer to serve. But in this case, the box should be spacious enough for better aeration.
Where to place a compost box? Naturally, not in the parade and visible place, but somewhere in a secluded corner of the garden, it is desirable not in the sun, but not in full shadow. This is required to maintain optimal humidity in it, because the compost must not disperse. It should be convenient approaches, because you will be forced to walk in a day several times in a day.
What are the optimal dimensions of the compost box? They depend on three factors:
- area of \u200b\u200byour processed plot,
- the number of members of your family,
- the time you will spend in your garden.
The dimensions of the site, multiplied by your diligence in the fight against weeds, suggest which volume of plant residues will be formed for the season. If you have a big lawn, and you often cut it, it's one thing. And if you have only a small grodge - completely different. So the different number of family members produces a different volume of household and kitchen waste. It is important whether you live constantly or visit the garden. All these moments should be considered when planning the size of the composter box. For a family of five, the sizes are more suitable, for grandmother with grandson - more modest.
What should be the right box for compost and how much do compartments? Anyone is a large or small - a box for composting should consist of at least two, and better than three compartments. The presence of a third compartment makes it possible to store there ready compost, or peat or manure in bags. Dimensions in length and width - performed, but the height (this is important!) Should not exceed one meter. In a higher compost pile, all processes will go slower, and it is harder to manage the gardener. Box with a size of 1.5 m x 1.5 m allows each season to receive an approximately cubic meter of the most valuable nourishing earth substrate.
Check out the compost box in the photo, where various options for such structures are shown:


Do I need to cement bottom? The box is done without the bottom, it is simply installed on the ground. No need to overtaken with Mother-Earth, let yourself the rainworms and other beings freely penetrate your compost bunch.
Each gardener knows how important it is in time and efficiently fertilize the soil on the garden and in the garden to get a good harvest as a result. You can purchase a ready compost, spending quite large amounts on it, almost equal value of the harvest itself, and you can, without applying special efforts, make it yourself.
The compost yam is your own options for which will be considered in this publication, will help not only make quality fertilizers, saving on their purchase, but also functionally use waste from vegetable products. There are several approaches to its creation, but for a start - a few words about the purpose and importance of this agrotechnical structure.
Purpose and general principles for creating a compost pit
Why do compost pits do?
At every land plot, at least some cultural plants are settled, and without feeding, they will eventually lose their vitality, wake and die, since the soil around them is depleted.

Therefore, be it tree, shrub or annual vegetable crops, the soil for them is necessary to periodically fertilize. Today in specialized stores there is a large number of fertilizers made on a different basis, but not everyone is equally useful for plants and unsafe for a person. Some manufacturers are manufactured by the production of compost, however, they are not always conscientious. To speed up the maturation of humus, some of these "agrochemicals" are not biological, and chemical means, quickly decomposing different organic substances, but to check how the processing of an injective person who does not have special knowledge - simply impossible. Therefore, having rummbled to such a product, you can not only not achieve an increase in the harvest of the garden or garden, but, on the contrary, spoil the soil to such an extent that many years will go to its recovery.
That is why the most optimal option is seen by the manufacture of organic fertilizers, especially since almost all the necessary components can always be found literally under their feet or in the kitchen after cooking.
Any territory is periodically powered by order, and in the process of cleaning the heaps of grass and fallen leaves are collected, a mixture with fallen fruits, as well as branches after the haircut of trees and bushes - all this is perfect for the manufacture of compost.
If the loaded compost yam does not touch, then the maturation of the compost will leak quite a long time. A, subject to the addition of special biological solutions containing live bacteria, fertilizer can be obtained for 3 ÷ 4 months. However, that the process of "maturation" inside compost pits and containers passed uniformly, the mass must be intermitted periodically and add preparations accelerating the processes of the natural decomposition of the organics.
Requirements for the arrangement of the compost pit
In order for the compost pit to function properly, its design should provide all the necessary conditions for the development and active life of bacteria that will process vegetable waste.

The conditions necessary for the normal life of bacteria include such factors:
- The presence of free access of oxygen into the container (pit) so that vegetable waste embedded in it is not discharged, making unpleasant odors, and split under the influence of earthen worms and useful bacteria.
- SPECIAL Temperature Mode
- Permanent high humidity.
High-quality fertilizer can only be obtained if you comply with all these conditions, and this requires correctly build or assemble a compost container from finished materials.
Requirements that must be met when building this useful facilities can be transferred to the following items:
- The container must have holes in its walls for free air access, which means that it will be the best option - to set it above the soil level.
- For the convenience of extracting the finished compost from the container, the front or side wall is best done in the form of a door, or collect from removable boards.
- If the compost pit is arranged in the dug in the ground, it is not worth it to plunge more than 500 mm. Mass laid in such a pit must be mixed quite often by adding a solution with alive bacteria.
- A highly attractive option is a mobile compost container - if it has at least some aesthetic appearance, it can be installed anywhere in the site. The only thing that should be provided is that it should not be constantly in the sun. Therefore, it is best to find a place for the container in a half-trees under the trees. In addition, if you wish, it can be reappeted by removable

- The dimensions of the compute container or pit depend on how much fertilizer is expected to be manufactured for the needs of the site. But it is best that its dimensions do not exceed 1000 × 2000 mm sizes. If the site is large, and humus will need a lot, it is recommended to make several small containers with an exemplary size of 800 × 1000 mm.
- You should not make the container box too high - it should have a height that will allow you to easily produce the process of loosening the mass, and this must be done quite often. Therefore, the height is reasonable to envisage depending on the growth of the gardener.
- Of which material, the compost container is made, its bottom should not be closed - it always remains earthen. Thus, the box will support the humidity that will come from the soil. In addition, there will be free movement for earthworms, which also take an active part in the production of humus.
What waste can be laid in a compute container?
Compost will be high-quality and beneficial for plants only if it is made of environmentally friendly plant products. Therefore, you need to know what can be laid in the container, and what is categorically impossible.

- The branches of trees (but they are stacked only at the bottom of the composter - it will be a kind of drainage layer).
- Fallen leaves, needles, roots, bark and crushed branches of trees.
- Beveled or by doing her grass.
- Cleaning from vegetables, fruits and berries, as well as spoiled fruits.
- Chicken litter, aged biennial overwhelmed manure.
- The ash and charcoal remaining after burning wood.
- Sawdust, straw, hay, chips and other small wood waste.
- Welding residues and coffee.
- Paper bags, corrugated cardboard, used napkins and paper (naturally, in the absence of typographic paint or office glue on paper).
- Sometimes the lower branch drainage layer wakes up lime for the speedy splitting of wood.
All vegetable waste, for example, layers of freshly acted grass, it is necessary to wake up a layer of garden soil, since without it the decomposition will pass more slowly.
It is also very important to know what should never be put in compost, otherwise you can not help, but to harm plants.
Garden Prices Containers
garden container
So, in the container can not be filled with inorganic substances that are not decomposed or decomposed, toxic substances are isolated, dangerous not only for plants, but also for humans. In addition, there are other substances and products that are contraindicated in compost pits. These include:
- Polyethylene packages, plastic products, rubber, metal and synthetics.
- Plants treated with chemicals.
- Potato and tomatoes - it can be infected with phytoofluorosis.
- Bones from fruit trees and animal bones.
- Pets feces - they can be helminths and their eggs.
- Wool pets, as it will decay for a long time.
- It is important to trace so that the glass does not fall into the compost, since when processing the beds, they can be seriously painful.
- It is not recommended to lay thick threads in the upper layers - they will be too long to decompose.
What are the compost pits and how to do them yourself?
Composts or containers are made from different materials - it can be wood, metal, smooth or wave slate, metal mesh and plastic film or geotextile, plastic black bags and more. The design of containers can also be different, but it should function according to one principle. Next, the designs of various compost pits will be considered, from complex to the simplest options, so the reader will have the opportunity to choose the most appropriate for a particular case.
First option - ready-made plastic container
To begin with, it is worth considering the prepared version of the compostera that can be purchased in specialized stores. These are plastic containers manufactured with all the necessary conditions for the production of humus.

Containers of various volumes and shapes have quite affordable prices that start from 1300 rubles, and if there is no possibility or desire to make a compost yam on their own, then the best way out will purchase this agriculture already in the finished form.
Containers are pretty compact products having a neat and stylish look, which will not spoil the landscape design of the site. Moreover, most often plastic plastic is painted in green, which helps the tank visually "getting lost" against the background of the vegetation of the site.
Capacities are sold in a disassembled form, so they can be easily delivered to the place of installation, even in public transport. Completely attached instructions for assembly, and independently mounting such a container will not be difficult, as no tools will be required for this.

For the convenience of seizure from a composter of the finished humus, the design provides a side door that simplifies its operation.
Composters are made of frost-resistant UV stabilized plastic, which perfectly withstands the impact of ultraviolet, precipitation, wind and temperature drops. The advantage of this design compared to the "classic" compost hole arranged in the ground is that it will not become a source of unpleasant odor, since the aeration system provided in the container does not allow the waste.
Second option - homemade wooden compost container
This version of the compost pocket will not be so easy to make them the hands of the owners of land plots that do not have joinery instruments or do not know how to work with them. However, knowing the size of the billets, they can be ordered in a joiner's workshop, and collect the box independently - no longer should be particular problems, since there will be no special tools for this process. If the "carpentry instrumental arsenal" is available, and there is at least a little experience with it, the manufacturing process will pass simply and quickly.
So, for a wooden compost container, 24 boards with a length of 1500 mm, 25 mm thick and 150 mm width.
From the tools it will take a circular saw or an electrolovka, a regular or electrical planer, clamps, a tape measure and a simple pencil.
| Illustration | |
|---|---|
 | The first step is made parts for the container. It is desirable for this purpose to use high-quality solid wood, which will be resistant to external natural impacts, such as moisture, wind, temperature differences and ultraviolet rays. This is due to the fact that the container will be constantly on the street. And besides, wood will be exposed not only outside, but also biological - from the inside, because there will actively flow the processes of decomposition of vegetable waste. |
 | Boards are collapsed and stress from all sides, so that they look quite carefully. This is especially important if the container is located on the site, which is clearly visible - probably, no one would like to sprout a landscape design. |
 | After the boards are prepared, they are folded together and tightly tighten with clamps on both sides. Further, each of the edges is measured by 100 mm, then postponed and marked with a pencil for another 25 mm - it will be the width of the groove that is to be cut. The depth of the groove should also be 25 mm. |
 | Then, on the placed boards are made. To do this, the depth of the cut is exhibited on a manual circular saw, and in the area marked on the boards there is a lot of marbles at a distance of 1 ÷ 2 mm one from the other. When the wood is broken into small parts, it is easily removed from the boards of the same saw. |
 | When the grooves are ready on one side, the boards turn the opposite side. It also places marking - 100 mm is first deployed from the edge, and then 25 mm. After that the cutting process is repeated. The grooves on the same side on the width of the boards should be exactly the opposite each other - as shown in this illustration. |
 | The next step is taken two boards with grooves, fold and fasten with the clamps. The line shakes the separating boards exactly in half - in this case it is 75 mm from the edge, and the boards are collected on this markup. These parts will be used to install the lower and top, that is, the last row of the structure. |
 | Further, all surfaces of the finished boards, including carved grooves, should be treated with one of the antiseptic solutions. This tool will prevent mortgage processes and will prolong the life of wood. The antiseptic is applied with a wide brush. It is important to trace so that there are no unprocessed areas, otherwise the decomposition of wood under the influence of processes occurring inside the container and external natural factors can begin. |
 | After the wood is completely dry, you can go to the assembly of the design. The container should be installed on bricks, since there must be a space for air intake. Bricks are exhibited on the site where the compost box will be installed on an ongoing basis. The installation site should be relatively smooth so that there are no blocks of the container walls when assembling it. |
 | The assembly begins with the fact that on reliaved bricks on the edge are installed two boards, having a groove on one side. They are located so that the grooves is directed up. |
 | Further, perpendicular to them, boards are installed with two oppositely placed grooves, that is, with each side. The lower groove of the upper board should be in the groove of the bottom facing the bricks. This is well shown on the illustration. |
 | The next step is mounted boards located in parallel to the lower elements of the design. On the same system the whole box is collected, until the top. The work passes fairly quickly - if necessary, the board is installed on top, or neatly hammer. |
 | The latter are installed two boards that have grooves only on the one hand - they naturally mounted cutouts down. As a result, the "Well" is obtained with the necessary distances between the boards, through which oxygen will flow into the compost. |
 | It's a little and install such a box - it is very important to fill it correctly. The lower layer of the filler - the branches (in this design it will be between the bricks installed under the container). And the thickness of such a layer must reach up to half the width of the lower wide board having the groove on both sides. The branches must be put quite tight, as they will perform the role of drainage. On top of the branches, lime 70 ÷ 80 mm fall asleep, and then waste, then the soil layer (its thickness should be about 100 mm.). Next again go waste, ash and soil. Then, waste, manure, soil and again waste. At the same time, the ash, manure and lime can be periodically changed in places. It should be noted that this is only one of the options of filling, as each gardener invents its own "recipes" and uses various components for the manufacture of compost. |
Such a design is good, except that it will not be too convenient to get the prepared compost. Most often, the variant of the compost box with the door installed or with removable boards is selected.

In this design, I would like to consider the front side of the container, which is equipped with removable boards installed at an angle to additional angular vertical stands.

For their fixation at an angle, on the one side of the boards forming the side walls of the container, complex grooves are cut at an angle. So that they turn out the same, the boards fold together in pairs, fasten with clamps, and then the placed part of the groove is selected by the jigsaw.

The result of the work done will be the container presented on the illustrated illustration. It is clearly visible at the angle of the board and two added vertical racks, holding the side walls with the "front side" side.

We must consider another circumstance. This is what the antiseptic not treated and unpainted wood under the influence of moisture can wake up, and under the influence of the sun, start to disappear, giving cracks. In this case, get the boards from the grooves will be very difficult. Therefore, I do the grooves in such a way that the boards originally went out very freely, and before assembling the design it is recommended to process and paint its elements. In addition, the wooden structure is best installed under the roof or under the crown of trees.
The container may be single or two-section, open or closed. It is better, of course, to build a two-section option, or put two composters nearby, as they can be used in turn - use the finished humus from one container while it matures in the other. Having devastated the first composter, switch to the use of compost from the other, and the first is again filled with waste.
If the territory of the site allows you to locate a container away from residential buildings, it can be done open. If the composter is set not far from the house or recreation areas, it is recommended to equip it with a lid.
Third Option - Production of a Computer Basket
This method of manufacturing a container for compost production is so simple that it may well be independently any gardener, since the process does not need to make special efforts and be able to work with complex tools.

For the manufacture of this version of the container, the following materials will be required:
- Metal welded grid with cells 40 × 40 or 50 × 50 mm - a length of 3000 mm, width of 700 to 1000 mm - it will be the height of the basket. The width of the material is selected at the request of the wizard. You can choose a conventional steel grid, but better if it has a polymer anti-corrosion coating.
- A dense polyethylene film or a black geotextile, a length of 3500 mm and 750 ÷ 1050 mm wide (depending on the planned height of the future basket).
- Stationery clamps - 8 ÷ 10 pieces.
- Flexible and durable knitting wire for fastening the grid.
From the tools it will be necessary to prepare conventional scissors and scissors for metal, pliers and roulette.
| Illustration | Brief description of operations performed |
|---|---|
 | The metal grid is unfolded and smoothed. It is measured from it cut off a strip of 3000 mm long. |
 | Then the cut-off strip is folded into the cylinder, so that the edges are combined with the mustache, about 200 mm. This location of the connection across the entire height of the cylinder is neatly tied with wire or plastic clamps - tightening. |
 | Next, the polyethylene film or geotextile is spread, the canvas of the desired size is measured and cut off. (Work will go faster if there is such an assistant))). |
 | The next step is a cut film or geotextile turns into a roll and installed inside the basket. Then, the material is distributed over the walls. |
 | The top edge of the film wraps through the edge of the grid outside and engages to the walls of the basket using the stationery clamps. They securely fix the cloth and will not allow him to be pulled out even with compost stirring. |
 | All - a compost basket is ready. It turns out not at all difficult, so it can be easily transferred to any area of \u200b\u200bthe site. |
 | Next, the resulting container is filled with various garbage of plant origin, which is placed by layers. The first, the lowest layer, go branches that are smashed, then any grass, fallen leaves, waste after cleaning vegetables from the kitchen, etc. Then again goes the soil layer, and then vegetable waste. After filling the basket, its contents must be shedding with water, so that it passes to the bottom of the container. After that, a special ecologically clean agent containing bacteria, which contribute to the rapid decomposition of plant products, which will significantly accelerate the maturation of the compost will be divorced. It is easy to get from the compost basket simply - it will be necessary to simply raise one edge of the tank, it is necessary to glove the finished compost with a shovel, fold it into the garden trolley and take it to a fearful area of \u200b\u200bthe site. |
Here you need to specify the moment that if a polyethylene film is used for the internal coating of the basket, then it needs to cut holes for the intake of oxygen into the processed mass. If it is decided to use geotextiles for the compost basket, it does not have to cut it, since it is a "breathable" material, that is, well-driving air, as well as - preserving moisture, preventing the rapid evaporation.
Fourth option - concrete compost
The construction of concrete structures is quite a time-consuming job. In addition, if the pit is suitable below the top level of the soil, it turns out not quite comfortable for the withdrawal of the finished product. In addition, the construction will cost much more expensive than the arrangement of the wooden version or the manufacture of the basket. However, if there is a desire to work with concrete and build a capital construction, then you need to know how work is carried out on its construction and maintenance.
Prices for geotextiles
geotextiles

You can build a pit with one or two compartments. If the second option is selected, then one compartment is intended for the matured humus, and the second is for constant replenishment.
Since oxygen can enter such a hole only through the top, the cover for it should be made of the grid.
The bottom part of the pit is not concreted and not hydroizing, as it must remain an earthen so that the rainworms have access to vegetation waste, and also to moisturize the mass due to soil moisture.
In such a non-aeration, the waste placed in it can begin to be installed, so it will have to properly carry out loosening, providing air access.
Work on the arrangement of concrete facilities consists of the following steps:
- The first step on the markup in the selected place is boiled. In length and width, it can have any size, ranging from 1000 mm and more. Here you need to take into account that the inner space of the pit will decrease due to the construction of the side walls. The depth of the pit may vary from 500 to 800 mm, but the deeper the pit will be, the more difficult it will be to get ready-made humus from there and it is harder to carry out regular loosening of the mass.
- The next step along the walls, for the entire height of the pit, is installed formwork from the board or a thick plywood. It is mounted at a distance of 100 ÷ 150 mm from the ground surfaces - this space and will be the thick of the walls.

Before the framework of the framework of formwork by boards or plywood, the reinforcing grid is mounted between it and the ground walls. After that, the framework is fixed on the frame.
- Next, is mixed from sand, gravel and cement in the proportion of 2: 4: 1. This process is best carried out in a concrete mixer or in a large container, for example, a bath or a spacious garden car is suitable, since the fill of the solution to the formwork is desirable to carry out at a time.
- The next stage the solution is poured into the formwork, and "plump", that is, it is repeatedly punctured by a pipe or a piece of fittings that gets up to the bottom - this process is carried out so that air shells are not formed in concrete. After the formwork is filled, the bolted concrete is left for drying and a durability. It is advisable to carry out the platform not earlier than in 10-12 days.
- After pouring the solution, the walls of the pits need to be raised over the ground using a brickwork, or again enhancing the formwork on top of the finished walls, strengthening the pit, rein it and fill with concrete. The height of the fobties framing the edge of the pit must be equal to 150 ÷ \u200b\u200b200 mm.
- The walls of the pit can also be strengthened with brick masonry, but for it on the perimeter of the bottom of the bottom, it will be necessary to pour with concrete a ribbon base.
If the walls are decided to arrange brick masonry, then it should not be done solid. It is best if there are holes in it that will enable in the pit of the soil moisture and earthworms.

In such a hole (without air access to its lower part), the processing of waste to full ripening of humus will last about two years. And in order to accelerate it, a special solution containing live bacteria designed for such conditions will be added to the vegetable mass.
Fifth Option - Spiter Composter
The construction of the pit for compost from slate is a fairly simple and affordable way, especially when the older has been preserved, it would seem unnecessary roofing material.

It doesn't matter if the sheets have small damage, since the air flow in the plant mass is only a good, especially since the containers from the slate are most often revealed. Slate will only perform the function of the walls, not allowing to crumble content beyond the site organized for the site composter. To create such a box, you need to do the following work:
- As in the previous cases, you first need to decide on the size and design of the container, that is, with how many sections it will have. The optimal size of the sides of each of the section sections is 800 × 1000 or 1000 × 1000 mm. The height of all walls, in addition to the front, should be 700 ÷ 1000 mm, depending on the intended number of waste. The front wall can have a height of 300 ÷ 500 mm, which will be convenient for the loading of waste and sampling of the finished humus.
- By choosing a platform for installing a box and making it markup, it takes off the top layer of the soil at 200 ÷ 250 mm for free penetration into the mass of soil moisture and earthworms.
- To secure slate sheets in a vertical position along the perimeter of the site, wooden or metal columns are installed. They may be required from four to six, depending on the design of the composter.
- Then, slate is fixed to vertical racks. It is desirable that the gap of 20 ÷ 25 mm remains between the lower edge of the sheets and the surface of the soil, which will allow oxygen to flow freely into the lower layers of the plant mass.
Located waste for faster recycling is recommended to moisturize, adding composting agents with alive bacteria into water.
Sixth option - a compost pit in the ground
This, probably, the most common way to arrange a compost pits, which often choose not particularly experienced gardeners. As can be seen from the above-mentioned information - this is not the most successful version of the compostera, since plant waste will start in it, rather, to rotate, and not degrade.
Metallic grid prices
metal grid

Such a pit is best used simply to relieve organic waste that is not intended for the manufacture of humus. If the pit is based on this purpose, it is best to place it away from residential buildings, since the rotting garbage attracts a large number of flies that will strive to visit not only the trash can, but also the premises of the house.
If this option still turns out to be attractive as a compost pit, then loose-based plant waste will have to be very often to ensure the necessary aeration necessary for properly processing.
It is easy to equip such a hole - for this, the depth of 400 ÷ 600 mm is far away from the house. Its parties can be different, but the optimal option is 600 × 600 or 700 × 700 mm. Large sizes of unreasted pit can lead to erosion soil processes around it, that is, it will begin to crumble and expand. If the pit needs more significant sizes, then its walls need to be strengthened at least slate, settling it to the entire depth.
Discalled in the pit Kitchen waste, such as cleaning vegetables and fruits, it is recommended to suspend herbs and a small amount of soil - it will partially help hide the unpleasant smell, which attracts flies.
Special substances will be alissed into such a composter, however, it is necessary to choose environmentally friendly drugs, since chemistry can spread to the garden beds or to get under the roots of trees.
Seventh option - Waste composting right on the ground
Another way to prepare fertilizers, which is often used in rural areas is the storage of plant residues in the form of a stack. This is affordable for any owner and the simplest method of compost production. However, it has some inconvenience, since it is frightened to loosen a mass, and to get ready-made compost from under the upper fresh layers is quite uncomfortable.

If it is still decided to stop your choice on this option, then before laying waste, it is recommended to fit the ground layer that will allow oxygen to penetrate into the lower layers of the stack. In this embodiment, compost will reach full ripening after one and a half - two years.
If there is no possibility to build a composter and even fulfill the time-consuming work on the construction and loosening of a stack with vegetable waste, then there is another simplest way to make compost. It can be called "female", as it is done without the application of special physical efforts.

In this case, waste also consists right on top of the soil. The best place for this will be a half, which can always be found under the garden trees. You can organize such a composter and directly at the temporarily unused garden, covering the labored waste with any dark material. This compost bunch is optional to do high, so it can be easily loosen by the pitch. If there are a lot of waste, then a few pile are organized, in different parts of the garden. With this approach, the finished humus does not have to carry out of one corner of the garden to another, as it will be manufactured on the site that needs to be contrary.
Learn how to do with step-by-step instructions, in a new article on our portal.

However, in this case, without bioactivators can not do. Composite manufacturing work in the following order:
- A bunch of vegetable waste is laid on the soil with a height of no more than 500 mm. Each layer is smashed by garden soil.
- Then, all waste is watered with water, as all layers should be wet.
- Further, according to the attached instructions, the bioactivator is divorced, and it is all a bunch of this solution.
- The wet biomass is covered with a dark material, but with such a calculation so that the lower part of the heap is a partition for free access of oxygen. If there is no dark film or, then the old oilcloth is suitable, which does not miss the sunlight. The corners of the coating material are pressed to the soil with heavy objects, such as stones or bricks.
- The finished design is left to overheat. Well, it is necessary to loosen it about once every two weeks.
- According to experienced dacities, using this method of manufacturing humus, it comes full ripening after 5 ÷ 6 months.
Biological products for the manufacture of compost
Now a few words should be said about preparations that are used to prepare compost.
Today in specialized stores you can find a large number of different means to reduce the period of decomposition of biological waste.

When using bioactivators for the manufacture of compost, it matures much faster than the decomposition of plant waste in natural conditions. And this is especially important when the site must be fertilized annually, as it is constantly used to grow crop.
Bioactive means containing contribute not only to the rapid production of humus, but also the destruction of harmful microorganisms, the elimination of unpleasant odors, as well as the enrichment of the soil with mineral substances. The manufacture of solutions from concentrates is carried out according to the instructions located by the manufacturer on the package. However, experienced gardeners advise after breeding bioactivators to add some sugar or old jam in them. This will help to give a peculiar "acceleration" of the initial activation of living bacteria that are prior to breeding in a "sleep" condition. After dilution, the solution must lack a little. It is interesting - if it is kneaded to produce in a bucket, then you can even clearly observe how the activation process goes.
The table below represents several drugs that can be found in stores selling goods for processing and fertilizing garden sites.
| Names of bioactivators | Mass or packaging (gram or milliliters) | The average price in rubles (summer 2017) |
|---|---|---|
| "Compostar" | 50 | 200 |
| "Compost" (compost for 15 days) | 100 | 360 |
| "Baikal Em-1" | 40 | 380 |
| "Compostello" | 70 | 200 |
| "Happy dacket" | 45 | 120 |
| BIOFORCE COMPOST | 250 | 580 |
| SanEX ECOCOMPOST | 100 | 300 |
| "Dr. Robik 209" | 60 | 180 |
| "ETISO KOMPOST VITAL" | 1000 | 670 |
| SanEX ECOCOMPOST | 1000 | 280 |
| "Compost 25" | 1000 | 300 |
If there were no above-mentioned funds in the nearest store, the Seller will definitely offer other variants of bioactivators. Before purchasing the selected drug, it is necessary to carefully examine its characteristics, manufacturer's recommendations for use and instructions for the preparation of the working solution.
In conclusion, I would like to say that according to the above information on the existing options for arranging the composter for the processing of plant waste, it is quite possible to determine the choice of a suitable option. It depends on the financial capabilities and practical experience with various materials and tools. And the presence of a compost pit on the garden plot, in any embodiment - is always a big plus.
And for the completeness of the information - look at a very informative video, which contains recommendations for independent production of compost from vegetable waste.
Video: Tips Ribbed for the manufacture of high-quality compost
If there is a cottage, it means there is a vegetable garden, and for the vegetable garden, the most important fertilizer. Not everyone loves to use mineral complexes as feeding. Many prefer the organicity like humus and compost that can be prepared by themselves. In this case, magnificent assistants for the gardener will be composters for cottages - special containers of different volumes in which it is convenient to prepare and store natural fertilizer.
It is mistaken to believe that these two terms have one value. The total for them is only the essence of fertilizer, namely, the process of overloading. The difference lies in the components used, which will put the basis of the feeding and its vitamin and mineral composition.
Humus
This decomposed manure is a cow, horse, rabbit and any other depending on the farm living in the site. The whole process of debating or decomposition takes from 2 to 5 years. The finished humus should have a pleasant fresh aroma, like land in the forest. To improve the quality of the fertilizer, the manure is stirred from the ground, sawdust, straw, adding water as needed to prevent drying.
The presence of a heavy ammonia smell says that the process of maturation is not completed.
Estimation of centuries by manure in Russia feather almost all cultures. It is great for sakes, keeping moisture in them. Clay soils it makes more loose and aerial. Ready humus - this very humus, which is a fertile component of any soil.
Compost
Not all dachans have the opportunity to fertilize the area by humus. In this case, compost comes to the revenue, which can be done by itself using a pit or a special capacity - the composter.

For its preparation take vegetation and everything that can overheet. Great fits grass, sawdust, chips, small twigs, remnants of tops, cleaning, tea bags, ash, and all that is at hand. Some gardeners can add some manure or chicken litter if possible - this significantly improves the quality of the finished fertilizer.
It is not recommended to put vegetation, feces of dogs, cats and a person, fish, bones, meat and dairy products in a compost bunch of fungi and disease. Violation of the compost rules can lead to a deterioration in its quality and the development of harmful microorganisms.
Comfort fully matures in about two years. But the market today offers various composting accelerators, as a result of the use of which the whole process can take no more than one season. The finished fertilizer on a par with a humus improves the structure and properties of the soil, thereby increasing yield.
What conditions are required for composting
The simplicity of compost preparation only seems at first glance. In fact, compliance with the composting conditions is necessary that the fermentation process goes correctly. The main factors that naturally affect the course of this process are:

What is a composter and what is it needed for?
For the preparation of the compost, the pit is traditionally digging. However, its use is not very convenient, especially when there are only 4-6 acres in possession. The small area of \u200b\u200bthe plot, the smell emanating from the pit, the inconvenience during the mixing of the compost heap is forced to look for an alternative.
The composter is a container of a given volume, a special device of which provides for the creation of favorable conditions for the preparation of compost.

Each design must be:
- cover, where material is layered for composting;
- holes for air intake;
- holes at the bottom to eliminate the accumulated liquid.
Additional functions depend on the specific model.
The composter can be independent of the primary materials - it is a good cash savings. The advantage of purchased models is durability and a beautiful appearance that allows you to put boxes anywhere.
Composters made from different materials, such as wood. In such products, good saturation of the contents of oxygen occurs, as a result, the fertilizer is obtained by crumbly, but sometimes a little dry. In metal containers, moisture is superbly maintained, so the prepared compost is wet and more dense. There are also composters from plastic resistant to low temperatures and ultraviolet.

What are the advantages of using a composter
The household composter is the same as the food processor for the household. This is a comfortable thing that will help save time, strength and money. Composters, especially closed, have many advantages, most essential of which are:

Modern composters have excellent operational and aesthetic characteristics, so they can be installed without harm for the design of the site. In addition, manufacturers began to produce landscape devices in the form of a small hilly, decorative stone or other natural elements. Such models will not only fulfill their functions, but also decorate the place.
Types of composters
By type of operation, the device for composting is divided into:
- Open composterswhich are exploited during the warm season. This is the most economical option. It is easy to collect and conveniently operate on large areas, where many organic material.
The disadvantage of this type of construction is the spread of the unpleasant smell and the possibility of grazing with vegetation. In addition, the term of fermentation increases.
- Closed composters More convenient in use. They are small, their volume is from 200 to 1000 liters. Such composters can be left on the street all year round, and if necessary, it is easy to hide in the garden. Moreover, chemical reactions are in faster, which means that fertilizer will be ready earlier.
The only minus closed composters is the price. It is significantly higher than the open-type composters.
Models
Among the variety of industrial composters, the following three models are distinguished, which differ in their constructive features:


How to choose a composter?
The choice of the composter begins with its volume. For small areas (up to 6 acres) or for the disposal of food waste, a volume of 200-300 liters is suitable. For larger area, great capacity will be required - up to 1000  l. Sometimes dachensors acquire two or three composters at once and in turn lay the organic in them, thereby ensuring themselves with the continuous flow of organic fertilizer.
When choosing a composting device orient on its design details. For example, it is important to pay attention to the presence of a bottom mesh that protects the contents of the container from rodents. If it is not included, it is worth worrying about the timely additional acquisition. And it will not prevent immediately decide whether it will be a summer composter or the all-season laying of the organics will be supposed.
Before purchasing boxing, you need to pay attention to the input and output hatch. They should be wide enough to make it easy to put the hack of grass and straw up the fertilizer of the Sovic shovel. Having a large loading hatch, it will be easier to steer a bunch to increase the access of oxygen. As an alternative to the unloading hatch, a retractable pallet with a finished fertilizer from the lower layers can be.
Fastening hatches - a spoon of tar for many models. During operation, it is found that the doors hang out and from the wind remains to fly. Therefore, before buying, you need to check how they rotate and how tightly adjacent when closing.
The mobility of the composterator is important, especially if it is removed by the winter to store or regularly move. If composting is planned throughout the winter, the thermostat with thermostat, thermostat, and peat bundle will be indispensable. For lovers of Californian worms, vermicoposter will suit.
Best manufacturers
Kekilla Global (Finland)
Perhaps the first place can be assigned to the Finnish manufacturer Kekilla. Their composters are distinguished by excellent stability to strong frosts, and therefore are considered universal. There are no heavy or small details in the most popular Globe model. Rounded design, easy to use, safe for children.
Due to the high composting rate, the device is 310 liters. By the number of finished fertilizers per season comparable with 600 liter. In addition, the volume can be artificially increased by adding a pair of 160 liter rings, which are purchased separately.

Compost is reliably isolated from the environment, and after ripening is easily removed using a shovel. To do this, simply remove the lid and the case, opening access to the content. Finnish key-flag on the composter - a sign of the highest quality of products made of its own raw materials.
An analogue of the Finnish composter is the Russian meridian, which exists on the market for 5 years. He has the same characteristics as the Finnish "fellow", but the outside has a pattern in the form of parallels and meridian. It has a favorable price.
Graf. THERMO. King. (Germany)
Another thermocoupler model that has proven perfectly in practice. Its hull is made of plastic resistant, which foamed the structure of which perfectly supports the optimal temperature inside the box. There is support for the choice of the summer and winter mode of operation.

The lid consists of two sash and securely fixed. Does not open even with strong wind. Loading material, respectively, is carried out on both sides, as well as the extraction of the finished compost. The design of the device is beautiful, ergonomic, easily fits into the landscape.
Wavea (Russia)
 This cone-shaped container, the body of which has a wavy shape (hence the name). Made of frost and heat-resistant propylene increased rigidity, which due to its form perfectly distributes the compost mass. It does not oxidize and does not enter into a chemical reaction with other substances.
The volume of wave is 1000 liters, ideal for six acres. He has no bottom, so the extra moisture will go to the ground. However, additional acquisition of the bottom mesh is required to protect against rodents.
In the case there are ventilation holes and four holes for the extraction of compost. Easily disassembled and transported in the trunk of the car. Of the disadvantages - the opening of the lid with strong wind.
Operating Rules
- Do not overload the container - the finished fertilizer should be loose and slightly wet. Immerse the material in it is not higher than the maximum mark.
- Installing the composter is recommended on Earth or grass, but not on a wooden or concrete base. It is necessary to provide worry access inside the design and to remove excess moisture.
- The best place to install the compostera is shaded and protected from the wind plot away from open fire.
- The bottom of the composter should be protected by a metal mesh from penetration of mice.
- When coldly occurs, the device needs to be translated into winter mode or wrapping the film to maintain the internal temperature.
- Regularly 1-2 times a month need to mix a compost bunch to improve chemical reactions. At the same time, the lower, the proper layer is better not to touch.
Composter do it yourself
The composter can be made of girlfriend - boards, old furniture, construction residues. Most often make wooden containers, as working with wood easily allows you to observe all the necessary conditions. Furniture in this regard is good good, it usually grabs only one season.
For convenience, you can prepare a drawing of boxing. It will be easier to navigate it in the process, as well as calculate the amount of the required material. The optimal size of the composter is 1 m 3, that is, 1m × 1m × 1m.
To work, it will take a 5-centimeter bar and 2.5 cm thick boards. All material will need to be treated in advance to the means against rotting, which will prevent the participation of the hull in fermentation.
At first, the bars make the columns that stick into the ground and, if desired, are fixed with cement mortar.
Next, the side walls are harvested, follow the back and front. Between the boards leave 1-2 cm. Gaps for access of oxygen. A small gap is necessary and from the surface of the Earth. The front wall can be short for convenience, then the folding door will lie under a small angle. The lateral door will noticeably simplify the extraction of the finished compost.

By the same principle, two- and three sectional composters are made. While in the same section, the process of debate is underway, the vegetable material is laid. You can make the side walls of the device not from the boards, but from a fine stainless grid, concluded in a wooden frame. Frames are attached to the bars columns, creating a well-aerated container.

Composters manufacturers are a lot. Here you can truly show fantasy and your skills. It is only important to observe the basic principles of the device, which are responsible for the quality of the finished fertilizer.
Video instructions for building a composter
 How to return the love of her husband to his wife - Tips of the psychologist
 Why you can not give icons