How to roll back Android update? Rollback to the previous version of Android after updating
To the initial state, you can use the firmware zero code. When using it, all data that are not part of the firmware will be erased. You can find out the code by contacting your manufacturer's company. Find it on the official website. Provide your IMEI, then enter the received code.
Download the firmware and install the software for flashing. You can find these components on the fan sites of the manufacturer of your phone. Install only TU firmwarewhich is indicated as a factory. Make sure the phone battery is fully charged. In no case, do not disconnect the phone before the message about the completion of the software update. Before completing the operation, do not use the phone and do not turn off the computer. Try to use only the software to which thereof, otherwise, it is advisable to contact a specialized service for repairing cellular.
Sources:
- How to return the "old" firmware android?
Returning the standard phone firmware allows you to get rid of problems with the functioning of software, various hangs and device failures. At the same time, after resetting the settings (Hard Reset), the device firmware will come to its original state, in which it was installed by the manufacturer.
Android
Reset to the factory firmware of the Android phone is performed using the appropriate setting in the machine menu or by combining the keys (if there is no possibility to enable the phone). To reset the flash firmware, go to the "" machine menu. Then click "About Device" and select "Reset Settings". The menu items name for calling the reset operation may vary depending on the version of the operating system of the device and the manufacturer, which made changes to the standard firmware. If necessary, enter the security code for the software reset, after which you confirm the operation.
If you want to return the phone to the factory state if it is impossible to complete its full start, hold the phone key combination, which can be described in the instructions for applying the device, on specialized forums or on the official website of the device manufacturer in the Technical Documentation section. Most devices reset the version of their operating system and return the settings to the factory when using the unlock key combination (on), the menu, and the volume reduction buttons. It is worth noting that some phones to reset the settings use the volume key. At the same time, the power button can be released after the start of the smartphone starts, and the volume keys and the menu should be retained by a few more seconds before the formatting process starts.
To reset the iPhone settings, you can also use the corresponding menu item. To do this, go to "Settings" - "Main" - "Reset" - "Delete All Content and Settings". Double-confirm the operation and wait for the phone to return to the factory state.
You can also reset the device settings using the iTunes program. Connect the phone to the computer and open iTunes. After that, select the name of the device in the upper right corner of the program. In the "Overview" section, click on the "Restore" key. Remember that the firmware reset will lead to the loss of all saved settings and data, and therefore it is recommended to make a backup before carrying out the operation.
Windows Phone
The Windows Phone phone firmware reset is also performed using the appropriate function that is available in the apparatus settings. Click "Settings" and go to the "Device Information" section, then select "Reset Settings". Double-confirm the operation and wait for the formatting notification to appear.
Some models of Windows Phone phones can be returned to factory settings without the need to turn on the device. To do this, clamp the volume button simultaneously with the power button. Release the power button. After you see the phone logo, release the volume key to reduce. Then, press the volume button to increase the volume, reduce the volume, power, and then again decrease the volume. After that, wait for the settings and the appearance of the appropriate notification on the screen.
The need to reset the settings on Android may occur in completely different situations: the device began to hang, or you just can't unlock it. And if no action helped solve the problem, Hard Reset is a real opportunity to restore the device's performance. From the article you will learn what to do.
(!) If you forgot the graphics key, PIN or password, first read these instructions: and.
Well, if after these manuals, you still need help with removing blocking or you have other problems with the device, carefully read this article. It is worth noting that after Hard Reset from the phone or tablet, data is deleted only from internal memory. SD files, photos, music, video, etc. Will be untouched.
Method 1. How to reset the Android settings via Recovery
The first way is relevant for those who do not turn on at all, it works faulty or you need to return access to the smartphone system:
1. Turn off the device.
2. Now it is necessary to get into Recovery mode. To do this, clamp and hold a specific keyboard shortcut until the screen is lit. Depending on the manufacturer of the device, the combination may differ:
- Reduce volume + power button
- Volume Increase + Enable Button
- Increase / lower volume + power button + Home button
- Volume Increase + Rewinding Volume + Enable Button
How to go to Recovery Mode on the phones of various brands is written in.

Using the zoom buttons, the volume decreases can be moved up and down, respectively, and confirm your choice - the on / lock button. In newer devices, the recovery menu can be sensory.
3. Select "WIPE DATA / FACTORY RESET".

So you consent to clean the internal memory of the smartphone / tablet.

5. And at the end of the "Reboot System Now".

The whole process will take no more than a minute. After all Android actions, the phone or tablet will reboot - the factory parameters will be restored. You will get the device as it was when you first start.
MEIZU recovery mode
Meizu made their recovery mode instead of classic recovery. To get to it, use the "On" + Volume "UP" combination. Note only the Clear Data item and click Start.

We perform Wipe from the recovery on Xiaomi
The Xiaomi engineering menu is loaded when the power key and VOLUME "+" is pushed. It is available in several languages \u200b\u200b- to switch from Chinese to English, press:

1. Select "Recovery"

2. Click OK if you are going to go to recovery mode.

3. Press "WIPE DATA". Here the sensor does not work, use the power and volume keys to select and move.


5. Confirm by clicking "Confirm".

6. The device will inform the successful implementation of Wipe. Open the main menu.

7. To restart the smartphone, select "Reboot".

8. Then "Reboot to System".

Method 2. How to make Hard Reset through settings
1. Go to Android settings.
2. Open the "Restore and Reset" item. Do not forget to execute.

3. Select "Reset Settings".

4. Then click "Reset phone settings (Tablet PC)".

5. If a graphic key is installed or a password, you need to enter it.

6. At the end, click "Erase All".

After that, all data will be reset from the internal memory of the device.
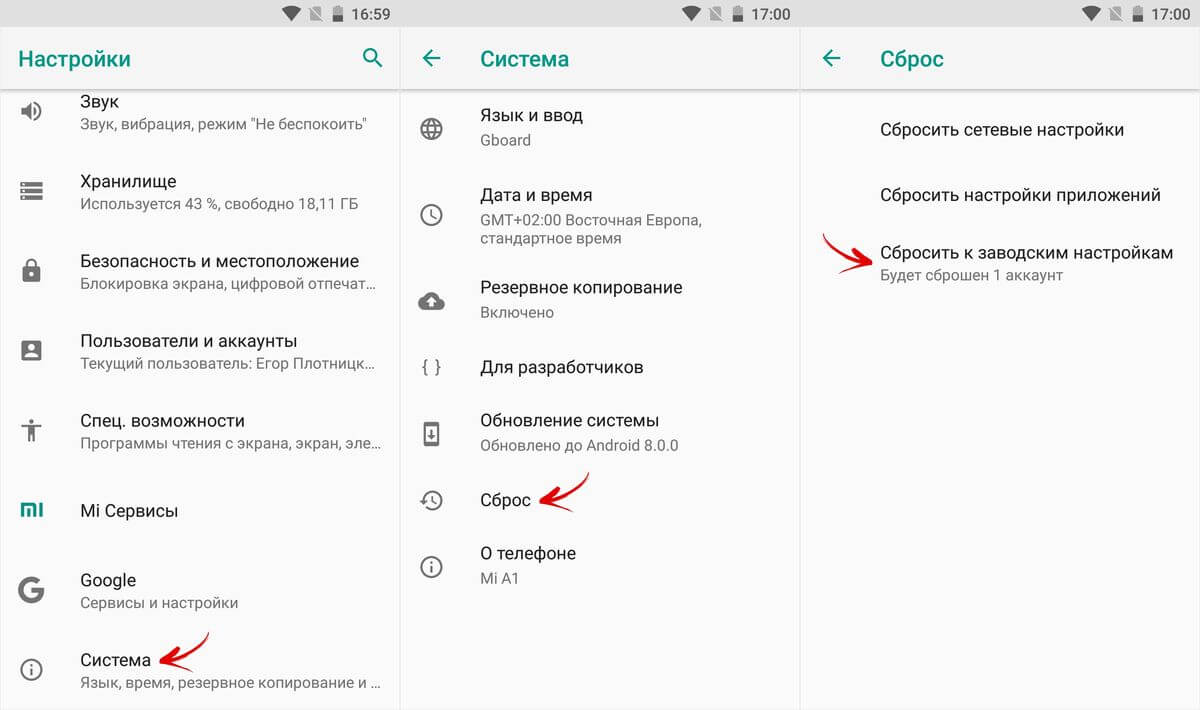
On Android 8.0 Oreo and above
The "Settings" menu in Android 8.0 has undergone strong changes. Now the "Reset to the factory settings" function is in the "System" section → "Reset".
On Meizu.
In Flyme OS, the path to the function is different from the stock of Android: go "Settings" → "On the phone" → "Memory" → "Reset settings".
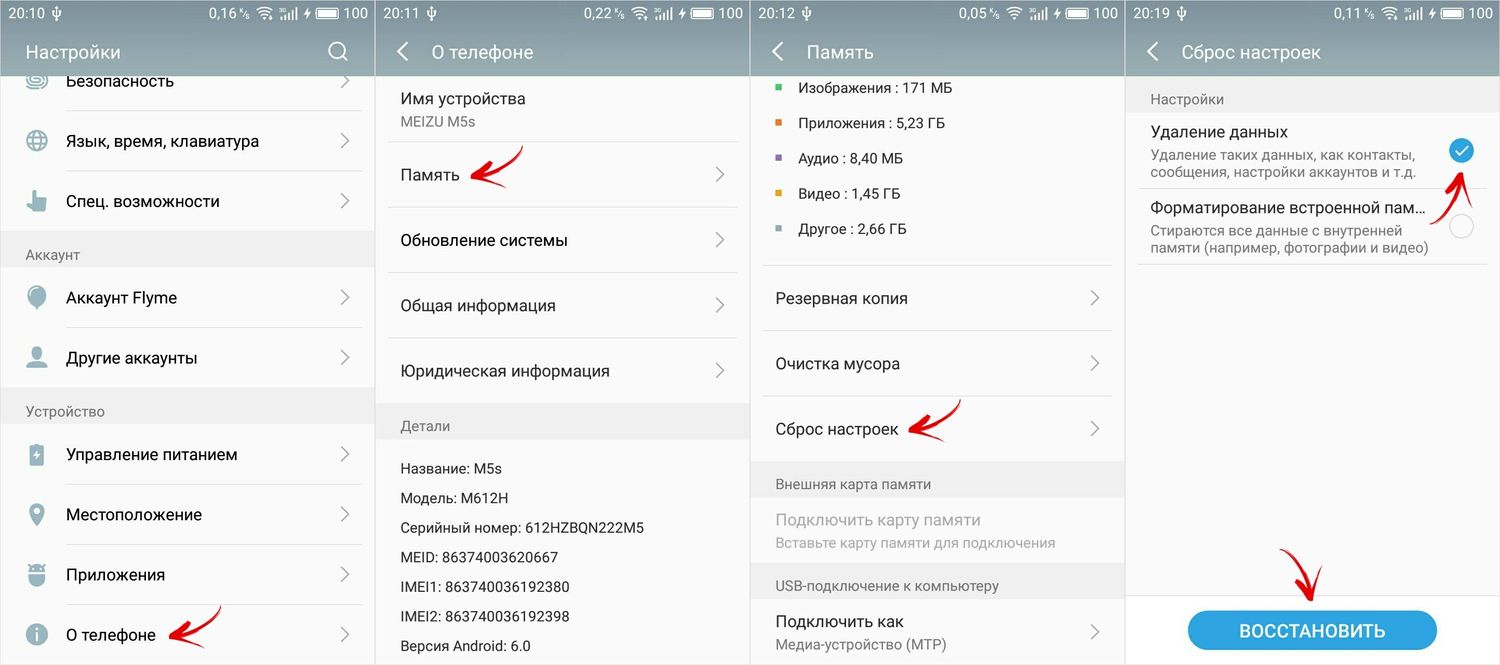
Mark the "Delete Data" item and click Restore.
On Xiaomi.
In MIUI, the Factory Reset feature, the developers hid in "Additional Settings" - see the video instruction:
A USB drive is also cleared on Xiaomi smartphones, so take care of creating a backup if you want to save photos, audio and other files.
Method 3. Resetting the settings for Android
This method is even easier than previous. In the dialer, type one of the following. Perhaps none of them will work, everything depends on the manufacturer here:
- *2767*3855#
- *#*#7780#*#*
- *#*#7378423#*#*
Also try entering these codes in the "Emergency Call".
4. We carry out Hard Reset from FastBoot Mode
You can clear the internal memory of the Android device using the FastBoot utility for the PC when the machine is loaded in the same mode (if any on the smartphone). On the installation and startup of the program, as well as ADB and USB drivers, told in. On such devices as Nexus, Pixel, Huawei, HTC, Sony, Motorola, the last LG must first unlock the bootloader:
- On Nexus - team FastBoot OEM Unlock
- On Nexus 5X, 6P and PIXEL - Activate the OEM Unlock option in the "For Developer" settings, apply the FastBoot Flashing Unlock command
- For the rest, you will additionally get an individual code on the manufacturer's website.
(!) Unlocking bootloader is carried out via FastBoot and immediately makes Wipe. In the future, to reset the phone, it is enough to perform actions from the instruction.
Translate the device to FastBoot mode. There are 2 ways:
First.Turn off your smartphone. Then clamp and hold the "ON" + buttons to the volume before the FastBoot Mode appears. This shortcut of the keys may differ depending on the manufacturer.

Second. Carefully read how to work with ADB and FastBoot, the link to the article is above. Connect the phone to the computer by activating the USB debugging (see). Then enter the ADB command via the command line (or PowerShell in Windows 10) running on the administrator name and press "ENTER":
For Windows PowerShell to execute this command, add at the beginning:
It turns out like this:

The device is loaded in firmware mode. To erase the data, it is enough to execute one of the commands (do not forget to add. \\ When using PowerShell):

To restart the device, use:

5. How to delete data from the phone through the service "Find Device"
Google has developed a special service "Find the device" With which you can not only track the phone, but also reset its settings. To do this, the device must be connected to the Internet.

2. Google will find devices attached to this account. Click "Erase Data".


4. Confirm the selection by clicking "Clear".

As a result, internal memory will be cleaned on the smartphone or tablet.
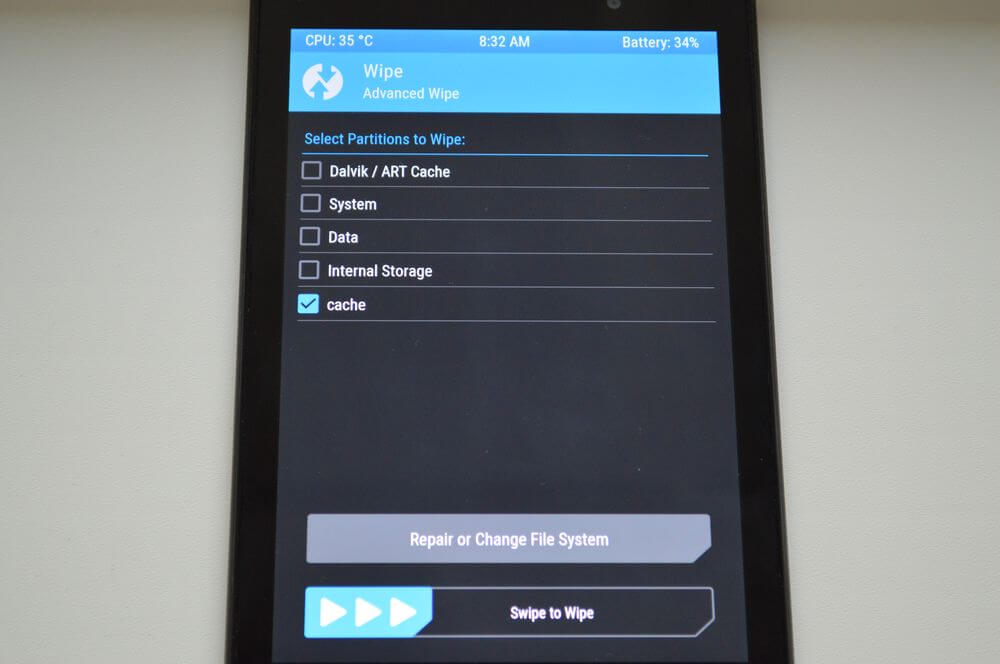
6. If installed TWRP Recovery
Unlike the standard recovery mode, custom allows you to reset specific sections, and not all settings immediately.
To do this, in the main menu, open "WIPE".

If you just want to make Factory Reset, pull the slider to the right.

If you want to format specific partitions, select ADVANCED WIPE.

Mark the sections you want to clean and make swipe to the right.
To restart Android, click "Reboot System".

That's all. In fact, no difficulties with resetting the settings on Android should not arise, the whole process will take no more than 5 minutes.
(4,80 out of 5, rated: 25 )
Probably there is a few people who would have become deliberate in this question after they tried to returned the operating system to the version installed earlier. But, facing some difficulties, would decide to read on the network to figure out what these difficulties can be connected. And here it turns out that there are many nuances that need to be provided in advance.
In addition to the huge number of foreign names and abbreviations, instead of understanding the process, the information in the head turns into porridge. And each read offer adds more lack of understanding to the overall picture.
Well, let's understand together!
Short Likbez
- There is no universal algorithm for action! This is the first thing you need to know about the return of Android OS on an earlier version. For each brand (and even models!) Devices can exist their features
- Returns version of the OS is a process affecting the system core. Consequently, manufacturers care that only "advanced" users can get there on this issue. For this, root rights were invented. They are intended to give you the authority of the administrator. There are both pros and cons. Before starting something to do, find out how to get them and what can fill the use of root rights on your device!
- If you did not scare everything read about root-rights and you are also full of confidence to return the version of Android 4.4, then another concept in which you need to figure out before starting the process is backup. In Russian -.
After returning the system, you can easily restore all contacts, applications, settings, etc. The main thing is to correctly choose a program that will make a backup on your device as correct as possible.
How to return Nexus
The developer of the Android operating system and the manufacturer of Nexus devices is one company - Google. Therefore, for Nexus devices, the return process remains as simple as possible and consists of 4 simple actions:
- Download and install on the device the image of the Android firmware that you need;
- Run this firmware directly from the device and wait for the installation of the installation;
- Download data from backup.
How to return everything else
Devices of other manufacturers have their own features when the system is returned. But despite this, general manipulations are still there.

Need a PC or laptop
As a rule, to return Android from version 5.0 to version 4.4 or similar, you will need:
- The desired firmware;
- Program to create a backup;
- Program to establish root rights;
- Personal computer or laptop;
- Device (tablet, telephone) on which you need to make a refund;
- USB cable.
Firmware
The first thing you need to take care is, of course, the firmware itself. It is necessary to clearly understand and represent that you want to see as a result of manipulations with Android. Decide which firmware you want custom or official? Official firmware, as a rule, can be downloaded from the official website of the manufacturer of your device. Castomnaya - search for forums, compare and choose. It is necessary that the firmware fit for your device and was a deliberately working, that is, verified. To find out, you will have to shut up more than one forum, read a lot of feedback and ask a bunch of questions. But it is necessary to do this, since otherwise you risk saying goodbye to your favorite device!

To the selection of custom firmware should be approached
Backup.
The main rule of any geimer or programmer - "Saving !!!" And in our case, this rule is of the same importance.
It has a backup feature backup while saving in your Google account. But in this case, you can save only contacts. Therefore, you need to get the desired program. And then you can reserve almost everything: both contacts, messages, and system settings, and information about applications, thanks to which the system automatically downloads them from Google Play and will install.
But, no matter how cool, you will have to make a choice again. We will only list the most popular programs to date:
- Titanium Backup.
- Go Backup.
- HTC Backup.
- ClickFree Mobile Backup.

You can use various data storage programs.
The backup process looks approximately the same for all devices:
- Install the memory card in your mobile device;
- Search, read reviews and download the program you like for Backup to your tablet or smartphone;
- Install it and run;
- In the program settings, mark what you want to reserve. Do not forget to check in the settings, there is enough space to save the backup. It is necessary that this free space is on the memory card;
- Run the reservation process, wait for the end, take the map.
Now all important information is on the flash drive and after returning your Android c version 5.0 to the previous one will be restored using the same program.
Root.
An additional program is needed on your device. Also choose, read reviews, ask questions, compare. Then download and install on your computer.

Directly process
So, everything is ready for you to start the process. Recall that for each device this process is individual, so we will focus on manipulations that are the same in most cases. We present you the procedure:
- We make backup (see above);
- We translate the device to programming mode (may be called differently; see the instruction);
- Connect the device to the computer;
- Run the root program;
- We launch the downloaded program and choose its version;
- Run the installation process, waiting;
- At the end, it is desirable to make a reset of settings to factory;
- Re-install the program with which you made backup, insert the memory card with a backup, run the data recovery process.
Conclusion
In conclusion, I would like to disassemble another concept that will necessarily come across in the process of studying forums. This is the concept of "brick". "Brick" is called a device that, after returning to Lollipop on Kitkat, ceased to work at all. So that this does not happen to your Android device, you need to go to business as carefully and scrupulously examine all aspects. Only after the entire picture of the planned actions is clear and clear can be confident in a successful result.
Google and program developers for smartphones or android tablets are constantly developing updates, trying to make them better and correct errors.
In this case, if you do not prohibit them, they will be installed automatically, although the system usually asks if you want to update.
Only sometimes the process can go not on script and problems will appear. What to do then? Those who have already dealt with a computer will certainly try to make a rollback.
That's just android is not Windows and such a function as in the computer is not provided in it.
For example, on your phone asus or Samsung when buying was android 4.4 and over time the system was updated to Android 5.1, and this firmware did not suit you.
Before that, you had android 5.0, 4.4.2. Is it possible to make automatic rollback to 5.0 or 4.4.2 No, it is not possible, only up to 4.4, just as it is impossible to roll back the Android system for a week or a month, both in a computer or laptop.
This is just an example to show you what to do rollback is possible only to the version that was installed at the factory.
Yet some nuances are. Let's consider them - who is not in a hurry, read about them below.
How to make a system rollback on android - to the previous version
So, after updating the firmware, the work of a smartphone or tablet does not please you, then we will roll back to the previous version, more precisely on the factory firmware.
Note: If you need the previous firmware, it can only be installed, so to speak on my own, after downloading.
Important: If you roll back the system update to the factory firmware, you will lose all data, including contacts, photo programs, and so on, with the exception of those stored on the memory card.
Therefore, think carefully, it is possible to correct something to correct something in the currently installed version of Android and continue to use it.
If you still decided to roll back, turn off the smartphone or tablet and use the following key combination:
- most often you need to hold and hold two buttons: turn on and decrease the volume.
- on Samsung, clamp and keep the inclusion and increase volume;
- on Sony inclusion, reduction of volume and camera;
- on LG clamp and hold the power button, reducing the volume and the main screen. the appearance of the logo release the power button, the rest at the same time hold until the recovery appears;
- on Huawei clamp and hold the power button, decrease the volume and increase the volume;
- on HTC - Press and hold the volume button, after which briefly press the power button. When the recovery menu appears release the volume reduction button. Find "Clear Storage", select it clicking on the power button and confirm the action button to reduce the volume.
When performing actions described above, you will be taken to Android System Recovery. There you will see several options.
- highlight - will move you on the menu;
- sELECT - selection of a specific menu item;
- Wipe Data / Factory Reset - the phone rollback to the factory (after clicking is required to confirm).
After selecting "WIPE DATA / FACTORY RESET" in the new menu we descend on sub-clause acknowledgment and choose it.
Now wait for the reboot, then get the firmware android, which was installed at the factory. Which of the above written little is understandable.
How to roll back the settings for android
To make a rollback of Android settings in all versions of smartphones or tablets first need to open settings.
Further action is slightly dependent on the version of Android. I will show pictures from the Samsung Galaxy smartphone with Android 6.0.1.
Despite the fact that the developers seek to ideal, the new update of the familiar application does not always bring pleasure to the user. Though it is more and refers to the issue of habit. Nevertheless, many want to leave the application as it was before making changes and are looking for information about.
It is worth noting that VKontakte in the fall of 2017 completely updated its mobile application. This is one of the most tangible changes that the program interface has undergone lately, before this, such an upgrade was represented by developers in April last year. Almost all starting from the new features of the user, to the general organization of the working space. And even "huskies" now have become red.
Despite the fact that optimization is pretty good and the application itself has become more convenient, many (as, however, and last time) want to continue to use the old, more familiar version.
All Android users have a well-known service for downloading and installing new PlayMarket applications. Depending on the settings displayed in this application, the program installed on the program will be updated in two available modes:
- Manual - When PlayMarket simply offers and recommends available updates, and the gadget owner independently decides which of them to install, and which ignore.
- Automatic - as soon as in the device market, a new update appears. The installed program independently accepts it and updated. In this case, the user enters the application and sees a new design and interface (as it happens with VKontakte).
In this connection, the first action that must make an adherent of an old software for VKontakte - disable auto-update applications and translate it into manual mode.
To do this, go to the PlayMarket application menu, for this, click on the "sandwich" in the upper left corner, in the menu that appears go down and find the "Settings" section. In the general settings group, we find the item "Auto-updating applications" and three proposed settings options are chosen "Never". 
At this stage, the settings are completed. It was the first step in solving the issue,how to return the old VK version on Android. Now the PlayMarket will not automatically update the installed programs, and the user will be able to safely use the program of the old sample, without fear of the author. If you need to get a new version of the program, it is sufficient to log in to the section of the installed applications and check the availability of updates, as well as if necessary, run the upgrade.
After the external settings that affect the update of the version are installed, you can start working with the program on the device itself.if the market no longer updates the applications automatically? In this case, everything is quite simple, the process is divided into two steps, which provide for uninstalling the updated program and the installation of the desired version.
Delete an updated application
This step is extremely simple and understandable, you just need to completely remove the existing one. If you are an inexperienced user and worry that it is possible to lose information or access to your account, then this is groundless concerns. The old version will contain all the same as there is on your page now, it does not depend on this.
You can delete the installed application in several ways:

After the updated version, you can additionally clean the cache and delete unnecessary files on the phone. The procedure is not mandatory, but it will not be superfluous.
Install the desired version
After the memory of the smartphone was cleared of remnants of the previous version of the program, it is time to make a final step in solving the issue,how to return the old version of the VK on android.
The main question of this stage is to get the distribution of the previous version of VK. Today on the Internet you can find a lot of proposals to download and install any program, not just Vkontakte. Before contacting any source, it is necessary to pre-check its deceitability. Installing software for mobile access to the Personal Page VK from a third-party resource can be fraught with unpleasant consequences, and VKontakte itself Previous versions of the application does not distribute.
Before downloading the file package and install them on the phone worth searching for reviews about the source. Today, old VK versions can be found on Trashbox or Uptodown.
Before downloading the distribution, you must set the settings on the gadget. To ensure greater security, the default devices have specified parameters forbidding downloading and installing third-party applications. To install the old version you need these settings to change. Usually, when trying to install the necessary program pops up the pop-up window. Warning of unauthorized actions and a proposal to prohibit or resolve the process. 
Android operating system is constantly improving: the manufacturers of devices and Google itself correct the errors that have arisen, struggle with shortcomings, optimize energy consumption, and add new features. It would seem that the update to a newer version of the OS is always good. However, all this is far from the wrong: often it is possible to upgrade to the flawed version and the smartphone or the tablet will work much worse than on a stable assembly. That is why we decided today to talk about how to return the old version of Android after the update.
Unfortunately, Nor Google, as the Creator OS, nor device manufacturers have provided such a function. To use the full reset to the factory settings from the corresponding menu is meaningless, all of your data will simply be deleted, and the operating system version will remain the same. We think that you obviously want it. So how to be?
Return the old Android version with Recovery
First, save all your data. You can take advantage of any program, but we recommend "Titanium Backup". It requires root-right to use it, as well as to restore the old version of the OS, so if you do not have them - get it. For each device there is its own unique instructions for receiving them. That's what exactly you should do:Agree, the process is clearly not empty and use it only in one single case, if the device really works well with the new version of the OS: constantly freezes, indispensable applications and so on. In other cases, we recommend just to get used to a new interface, new features are not always bad. Moreover, people are quickly adapted to everything. So what should you cope with a smartphone or tablet?! In any case, now you know what to do if they decided to return the old Android version after the update. If you have difficulty, we recommend visiting the 4pda forum, where you can find out detailed information on your device.
 How to return the love of her husband to his wife - Tips of the psychologist
 Why you can not give icons