A stool of a drink of wood with her own hands. What can be made of stumps, hemp, logs, handicrafts with their own hands. Ideas made of wooden stumps for home decor and garden
Hello everyone. This time I suggest you work with a tree. And we will do an unusual massive stool. Its unusual is that the stool is made of hemp, it is completely monolithic. To give the product a more interesting look, the author made it as if she was spinning. Such furniture looks beautiful and it is almost eternal. As a wood, the author used ash, this wood is very strong and has a beautiful drawing. For the manufacture, you will need a rather small set of tools, and we have a single stuff material, not counting the materials for finishing (oil, epoxy, and so on). So consider in more detail how to make such a stool!
Materials and tools that used
List of materials:
- Poek ash;
- wood for wood;
- epoxy glue and dye;
- ready-made rubber legs or materials for their manufacture.
List of tools:
- chainsaw or electric;
- Bulgarian (petal nozzles, wood disk with three teeth and "Velcro" for grinding by sandpaper);
- planer machine;
- a hammer;
- Measuring tools and more.
Stool manufacturing process:
Step one. We select the source material
As the source material, the author used ash. This wood is dense, strong and has a beautiful drawing. It is important to understand that the tree should be dry, otherwise it will still be cracked after applying oil, and the oil is not absorbed. The author of the woods sued 18 months outdoors.


Step second. Start cutting
Next, we need to make a square from hemp. The author decided to use chainsaw, it can be done manually, but it will take a lot of time and strength. When everything is done, we go through the plane of a plane machine to remove rough irregularities.


Step Three. Cut the "screw" part
Next we will need a pencil and ruler. We place on the material where you need to cut off excess so that the effect of the twisted tree is turned out. Well, then you can proceed to cutting. The author's main work again performed with chainsaws. Here the main thing is not to rush and not cut off extra, and then you can spoil everything.


Step fourth. Cut the Bulgarian
Next, you can proceed to a thinner processing, we will need Bulgarian. With her, we will form the main stool profile. For work, the author used a metal disc with three teeth for cutting wood. It is safe, if compared with discs for circular, which many are installed on the grinder. Gently for the placed area we remove excess material. How exactly to do, decides eachself, this is a creative process. We form a profile to your taste. As a result, a practically finished product is obtained, you can begin to grinding.


Pitch fifth. Rough grinding
You can proceed to rough grinding to remove all defects that remain from cutting. Here we will need a petal nozzle for the Bulgarian. The graininess will need large, as you need to remove the bumps, smooth down the recesses and so on.


Step six. We work with epoxy
Next, armed with epoxy and proceed to eliminate defects. With the help of it, you can pour the gaps, holes, strengthen the puff plots and so on. You can show fantasy and add any dye to the epoxy at your discretion. Consider that resin can be rather fluid, and this will be absorbed into the tree. But if you use quick-drying epoxy, you can not have time to expel air bubbles from it. In order for the air to come out, the epoxy after the fill can warm the hair dryer.
After that, we all leave the epoxy to dry, we need it to pass it away.


Step Seventh Finish Grinding
When epoxy is completely dry, attacks the grinding of the entire product. Here we will need a Bulgarian with disk nozzles from sandpaper. The author used the sandpaper by the graininess of 120 units. In general, the smaller the abrasive will be at the final stage of processing, the more beautiful it is a product and the smaller the oil is needed for the coating.


Step eighth. Coating with oil or varnish
In general, ideally, the tree is covered with oil, it is the best coating. The oil well emphasizes the natural type of wood, and also protects it well from moisture. But the author decided to use varnish on a water basis, since he did not have enough patience to wait until the oil heel. For a better effect, you need to impose several layers and before each new layer to perform a light grinding.
An interesting and fairly unusual trend is the use of wood pitsom in the interior design, appeared literally a couple of years ago. She rapidly gained momentum, and today the stumps are no longer an urgent trend, but a sign of style and taste.
To date, the stumps are incredibly popular, and at the same time inexpensive and environmentally friendly material.
The stumps are often used as furniture for the house, it helps not only to update the space, but also awakens the thoughts about our place in nature. As a rule, the result exceeds all expectations and turns out to be inexpensive, beautiful and unique.


Coffee table from Koryagi


Table from stump do it yourself
Especially often - in the interiors, the stumps are used as a table, bedside tables and coffee tables, as well as furniture for the bathroom.
Natural stump. The easiest way to use the stump in its original form as a table, only a little sabbering it, so as not to receive the offrance.


Stump painted

Stump painted gold paint (from cylinder)
The stump looks great in its natural form, but you can give it even greater originality as painting in any color, to apply patterns with a tassel or using a stencil.
For bathroom

If you treat the stump of water-repellent impregnation - then it is suitable for the bathroom
The stump for the bathroom will be a very original decor. It can be used as a table, putting bath accessories on it, or candles when you want to arrange a relax evening.
Table with glass
The simplest application of PNI is to make a coffee table from it. From above, you can accommodate a glass countertop for a more elegant look. The stump can also be put on legs or wheels, as a result, it will turn out a very comfortable mobile table.
The usual pencil will be perfectly looking at the role of a bedside table. It can be decorated at its discretion.

Table with glass

Table on wheels
Stuli as chairs
From the stumps are excellent stools. From above, you can put small pads to be softer. Also, hemp can be used as decorative chairs, which will be an excellent interior addition. The presence of a back will make a stool of stump even more convenient.
If you contact the workshop, you can make the original author's chair or bench.


How to treat stump for interior
To create a table or stands, you need to find a suitable stump and processed it correctly. Corre can be removed with the help of a chisel, or leave it.

Cut the desired size

Remove the bark from the stump
Slices Stumps need to be stuck with a skirt and then clean the stump from dust. Treat the layer of primer and open the stump by several layers of varnish for wood.

Stagnate stump with skirt

Applying water-repellent impregnation
If the future table is intended for the bathroom, you need to apply a water-repellent impregnation.
Other methods of applying stumps in the interior
Small hemp can be used as a colors stand, so home greenhouse will look very aesthetic.

Puffy Flower Pencing

Flower vase

Birch Pen
Vases from stumps will become an excellent addition to any interior. Moreover, the bark of the tree can be left for a more natural, natural appearance.
Hemp can be used even as extraordinary lighting devices. Inside the stump you need to place LED lamps emitting warm light.
You can decorate the wall with cutting slices on a lot of rings. You can get the whole wall with solis, or its fragment, as a result, it turns out a unique panel. For this, the sleeps are simply attached to a clean smooth surface, on the adhesive for wood.

Great Solution for Living Room

Wall decor Cuts from wood
You can glue the mirror treated with cutter on smooth layers of wood, and thus get the original mirror. 


Is there an old stump? It is not necessary to get rid of it at all. If desired, the availability of free time, some practical skills and of course suitable tools, the old "poor" stump, you can turn into a real work of art. From wooden pitsry You can make a bunch of useful things.
Ideas made of wooden stumps for home decor and garden
As it looks like, we look at specific examples.
Wooden Stump Stouchers
Garden stakes from stumps.
Wonderful garden stoves from stumps with bright soft linings will be accurately visible to hospitable summer houses and will provide guests with comfortable places in the open-air holiday.
Candlesticks from pney
Bright candlesticks from sleep.
Of the sleeves of a small diameter, painted with special glossy paint, will get amazing candlesticks, which will become the original decoration of the coffee table, window sill or fireplace.
Flowerbed from old stump
Flowerbed in a log.
Amazing flower bed, which each of any dry log can make, will become a real highlight of the country site.
Stone stand
Still with place for books.
A small original snay cabinet with a hole for books in the center, perfectly fit into the interior of anyone and will become his stylish detail.
Mobile stands
Charming mobile stands from stumps.
Wonderful carved chambers on wheels made from carefully stripped and slightly painted hemp will become original and practical details of any modern home.
Armchair
Chair-chaise lounge from birch logs.
A very unusual armchair made of birch logs of a small diameter will become a unique detail of a city apartment or a comfortable chaise lounge for relaxing in an open-air.
Bench
Bench from log cabins.
The wonderful small bench, made of several wooden log cabins and decorated with decorative pillows, will become an unusual detail of the interior of the modern urban hallway.
garden path
Sadwear from sleep.
Woodwoods can be used to make original garden tracks, the process of creating special physical efforts and costs, and the final result will delight for a long time.
Lamp
A unique lamp of sleep.
A magnificent lamp that can be made it alone from wooden spins and a vertical lamp, will become a real highlight of any space.
Fence
Fence from log cabins.
A large number of wooden log cabins can be used to create a beautiful and reliable fence that will protect the plot from an extraneous eye and will become its decent decoration.
Garden headset
Large table and stake stools.
A huge dining table made of wood massif, and a lot of stools from the stumps, will be a wonderful solution for the arrangement of the dining area in the backyard, where large companies are often going.
Wine stand
Desktop stand for bottles.
Wonderful desktop stand for wine, which can be easily made with your own hands from a small, pre-stripped and varnished, wooden log cabin.
Coffee table
Coffee table from stump and glass.
An amazing coffee table, which can be made of massive stump and round glass countertops, perfectly fit into the interior of the modern living room.
Mini bar
Mini bar and stands from Stumps.
A stunning minibar and a washstand under the kitchen made from the stumps will become unique details of any kitchen.
Potion potty
Miniature pot for succulents.
Small wooden spiles and succulents can be used to create unique decorative compositions that will become charming details of any space.
Pnice feeder
A small feeder for birds in a wooden srub.
Small wooden logs can be used to create creative feeders who will decorate trees and attract birds to the site.
Interior design in Eco-style, perhaps, never loses relevance. Residents of large megalopolises with their mad rhythm of life often seek to create an island of calm and relaxation at home, choosing natural materials, natural color palette and decorative elements created by nature. A special place is occupied by accessories and furniture from the stumps and trunks of trees. Let's see examples of using whole pieces of wood in the interiors of apartments of different styles.
Furniture from Stumps and Sveta solid wood
The stumps are a magnificent material in order to make a stylish, inexpensive and completely unique furniture, because there are no two completely identical trees in nature. Similar furniture from stumps will fit in almost any interior, be something easy classic or country, Scandinavian style or minimalism, loft or industrial. If stump is painted in glossy or metal shades, then even hai-tech can organically accommodate such an item. The treated spice of a tree trunk or a fuken can be a comfortable coffee table in the living room, a bedside table in the bedroom, stuffing in the kitchen or a table in the bathroom. Most often in the interior, the stump is used in the role of the stands or table.
How to make a table of stumps with your own hands

First, find the appropriate stump for the creation of a table or the couch. It is not so difficult even if you are a purely urban resident without giving. First, there is a mass of companies that are engaged in wood - logging, sawmills and so on, you can buy with them with a tree of the desired size. Secondly, we advise you to interview all familiar and friends who have summer cottages or relatives in the villages, they probably have billets on firewood or emerged stumps. And, thirdly, you can take a drink, go to the nearest forest, find a fallen tree and cut it into parts.

The stump should be dry, but not drowned. If the bark is easy enough to move away from the trunk, then such a stump can be used. In case you found fresh wood, you need to give it to dry. Leave such a stump for a month or two in a warm and dry room.
Corre must be removed from the barrel. To do this, take a chisel or a chisel and carefully, helping the hammer, disconnect the bark.


If you plan to use stump not just as a decorative decoration, but as a functional piece of furniture, it is necessary to align it. With the help of a building level, check how smooth your workpiece. If the surface of the stump has a slope, align it with the plane.
Collect the slice of stumps and sidewalls with a grinding machine or manually with a skin.

Well, if the stump has an interesting natural texture with bitch, cracks and chips. After you have been processed and polished the entire surface of the stump, clean the cracks from small shavings and dust. To do this, you can use both plumbing tools, a rag and a conventional vacuum cleaner.

Any stump or slice log is beautiful in its natural form. But you can paint the stump in any color (after the bed of the primer), apply a pussy pattern or with a stencil or, at least, open lacquer or apply a water-repellent impregnation for wood. The latter is especially true if your future table will be actively used in an open-air or indoor with high humidity, such as in the bathroom. Remember that even from one layer of varnish the tree will take a little. It is recommended to apply two or three layers of varnish on a water basis, and after drying the latter layer, polish with soft abrasive fiber.


You can just put such a table from the stump. You can also use shortened legs from old tables or tools, wheels or special stands. By the way, the use of the legs, firstly, will save your floor from scratches, and secondly, it is raining a stump and ensure air circulation, which is important for a long service life of such furniture.

Stumps and tables from stumps in the interior
Watch different options for tables and bedside tables in the interior.
Stage tables in natural form with minimal processing (click to enlarge):


Tables made of stumps painted:


Stools and chairs and stumps in the interior
There is practically no difference between table and stump stout. But it is obvious that it is not very convenient to sit on hemp. In order to make a stump with a comfortable stool or footrest, you can simply put a pillow on it. You can also make a soft uphill with filler and attach to the log surface. The presence of a back will make a stool of stump even more convenient. Such a chair designers and carpentry masters are cut out of a solid piece of wood with chainsaws with subsequent treatment. Some examples use of stumps as seats can be viewed just below.


Vases from the stumps and trunks of trees
Vases from stumps will become an excellent addition to any interior. Very nice and harmoniously looks a bouquet of living flowers or a houseplant in a porridge or a vase of natural origin. For VAZ, parts of the trunk of small trees often use, and the bark of the tree in such products is sometimes left for a more natural, natural appearance.

To make such a vase or porridge from a tree, find the right piece of dry wood. Remove the bark chisel or leave it.

The main task of the whole project is to make a hole in the tank barrel. Decide that you put in the middle - a flower pot or a glass jar. Mark on the cut log circle with a diameter by 3-5 mm larger than the diameter of the widest part of the tank. Next, you have several options how to make a hole in the log.

You can use the nozzle on a drill for round holes or a ring saw for wood - quickly and conveniently, but the method is suitable for shallow holes, under small jars or candles.
The second way is more laborious. Drill a lot of holes around the circle drill, and then with the help of a chisel and hammer to get the core. The hole will not be perfectly round and smooth, but any size and depth you wish.
 Wood can be painted, covered with aqua varnish or water-repellent impregnation. In case you use a foam as a candlestick - be extremely careful with fire.
Several options for candlesticks and vases from the tree trunk - below.


Lamps from pney
Stumps in the interior can serve as unusual lamps. Duncan Mirding (Duncan Meerding), a weakweight designer and an artist from Australia, creates unique lighting systems from tree cuts. Inside the wooden chumbana with through cracks are placed by LED lamps emitting warm light. Such stump lamps can simultaneously serve as tables and stands, and stools. Especially relevant to the use of such a multifunctional interior object in the bedroom, where muted lighting will perform the role of the night light.


Everyone knows the expression: "Simple, like a stool." It has a fair share of truth. This piece of furniture in its classic performance is concise and strict.
Without tool, it is difficult to do in the kitchen and in the workshop, in the garage and bath. It is necessary everywhere, where the cramped conditions do not allow to place more overall furniture. For homemade craftsmanufacturing such a thing is the best way to get practical skills in a joinery.
In this article we will introduce you to the varieties of wooden stools and tell about the features of their independent manufacture. We hope that after that you can confidently begin work and please our home this useful object of the situation.
Before you make a stool with your own hands, you should learn more about what was invented the Wizard of the Joinery in this area. To begin with, we will study the sketch of the simple product and remember the names of the main parts. This will help us speak the same language using generally accepted terms.

So, the classic stool consists of a seat and four legs. The bars of the top belt serve as a support for the seat and wear the name of the Tsarg. The lower belt of rigidity, binding legs also consists of four barrels called prodes. Experimed by the wizard installed optimal dimensions: height 50 cm, 45 cm seat width.
Stools from logs, sleep and branches
Refusing the legs, the seat can be made from the usual log. Slowing it into a few scrabble and supplied with each soft lining, we will get the original kit for the country rest.

The lack of this decision is obvious - a large weight that creates inconvenience when carrying.
But what can be done, combining wooden legs with a massive seed from the rounded trimming of the log. This unusual stool claims the title of designer find.

There are no CARG and PREDOK here. The stiffness of the structure provides a massive seat into which four legs are embedded on 1/3 of its height.
The one who owns a chainsaw can create an original piece of furniture from the log. To do this, in a thick chumbach, you need to make three neat lateral cuts forming legs. By making accurate marking on trimming of one barrel, you can cut off the set of two stools invested in one into one.

Continuing the "forest topic", let's see what can be built from the material under the legs. The beautiful product can be made of thick branches, freed from the bark and the grinding grinding. This design has one original part - boxes for household things, placed under the seat. The lid is assembled from planed boards planted on wooden spikes and glue.

This piece of furniture will perfectly fit into the interior style of Rustic, which is inherent in massive wooden beams, stairs and tables. But in the usual kitchen, he is hardly killed.
Ipell a log is a ready-made clove seat. Cutting three legs of thick branches into it, we get a solid and pretty design.

As grounds for the manufacture of original products, it is possible to use hemps and a fork of stems. Grinding and thick-spined logs, they fit perfectly into the interior of the log hut.

Traditional simple stools
Not an aging classic lives not only in buildings facades. Time-proven decisions are preserved in stool designs. Adding smooth lines to their appearance eliminates boring angularity.
In the photo below, we see the classic option. Thanks to the rounded kings and prodes, it looks quite decent. Milling cuts of grooves on the legs also improve its appearance.

There is in simplicity and their own charm. Designers successfully play this quality, creating deliberately rough brutal products. Artificially the furniture is not easy. Over the product, the photo of which we see below, the author had a lot to work.

To the category of classics of "Taberet Design" can be attributed to the designs with boxes under the seat. To do this, use wide sidewalls-kings and folding covers.

Sophistication and originality
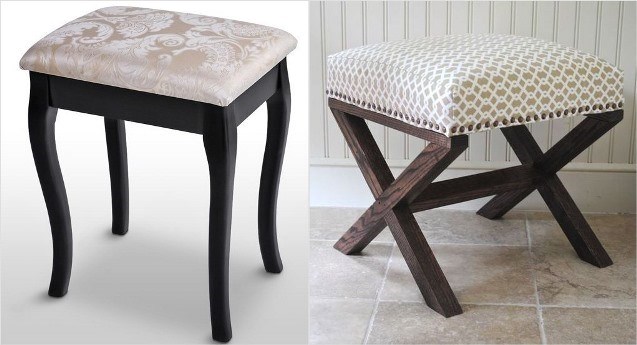
Not everyone likes a solid sidushka and an angular shape of a stool. Fans of aesthetics and comfort of the masters offer elegant products with bent legs and a soft upholstery.
The newcomer is difficult to make curly curly legs. Without prejudice, they can be replaced by two pairs of crossed bars connected by crossing. But it should not refuse a soft foam upholstery.
We ask yourself the question: what is needed to build a homemade stool of wood? Four thick boards for seats, legs and crossbar. To reagreeing them with carvings, we get a refined and good quality. They can be happy to use at home, and if the exhibit of the exhibition of folk crafts is made.

When going to make your first "masterpiece", do not forget about the use for decorating the roasting, moroli and varnish. Even the simplest piece of furniture acquires a noble gloss after the finishing finish by the method of contrasting tinting.

In addition to natural wood, stools can be made from chipboard and thick plywood. Such a solution reduces their weight without loss of strength. In the photo below, we see an interesting design of plywood. Sitting holes in the seat and legs give her beauty and openwork.

Square, round and oval seats - yesterday joiner's art. Today in fashion original solutions. Of these, you can collect a bench of any length and configuration. Call your acquaintances and show them a miracle. Among them, you will probably have wishes to play an unusual furniture "constructor".

Bar stools
The one who believes is mistaken that the stool must be low and inconspicuous. Designers successfully prove the opposite. A little fantasy and the usual object of the situation becomes a "fashionable thing" in the style of the avant-garde.

A high stool imprinted in the picture is a bar. They can decorate the interior of the cafe and the atmosphere of their own apartment. Its lower fellow, made in the same style, will take a worthy place behind the dining table from euro pallets.
Nowadays, the bar seats are popular not only in catering enterprises, but also at home. The tradition of placing the bar racks from the ocean in the apartments caused a real boom to these products.

The high stool is convenient not only for drinking cocktails behind the bar. It can be successfully used as a stand when collecting fruits.

Folding stools
There is a huge set of their varieties from the simplest solutions and up to very complex transformers.
Your attention is offered an original folding structure. It consists of two rectangular frames, connected in the center of the metal axis. The support frames are attached to the seat with carpentry loops. When folding, the axis moves along two grooves cut into one of the legs. The seat is rotated on the hinges and gets up vertically.

But another version of the folding tobuck. The seat is made of two halves. When folding, the legs rotate around the axis and placed in the same plane. Halves of seats are pressed against them on both sides.

Fans of complex folding systems are offered an option consisting of eight pairs of lattice legs connected at the base of the general bar.

The top ends of the legs on one side are hingedly connected to the seat, which is also typed from bars. To fold the design, it is taken over the bottom planks and shifted them in the counter direction. At the same time, the lattice legs and bruks of the seats are included in the gaps provided for them, and the stool becomes flat.
Another option is a folding stool with a "caterpillar" seat. Despite the simplicity of the design, it looks very original. Two crossed legs are hinged in the center, and on top are connected by a wooden segment. Having been following the edges, you will easily fold and decompose such a stool.

An example of self-making
Having finished a brief overview, it's time to proceed to the practical part. We offer you step-by-step guide. Let's just say that it is better to refuse from connections like "Ship-Groze" type. They require good carpentry skills and the presence of a special tool - a milling machine or at the worst end of the hand mill.

To work, you will need several tools:
- Roulette or ruler;
- Hand hacksaw with fine tooth;
- Electrolovka for cutting legs and seats;
- Screwdriver for drilling holes and twisting screws;
- Ribbon grinding machine for smoothing sharp faces on the details;
- PVA glue or joinery glue.

Step one - With the help of a pine planing board with a thickness of 30 mm thick, cut the blanks for the legs and the seat. If it was not found a fairly wide board for the manufacture of a solid seat, it can be collected from several narrow trimming. To do this, in their side faces need to be placed and drilled holes for the seasons. By lubricating the shots with glue, they are inserted into the boards, they collect them into a single shield and fix it with carpentry clamps. After a day, you can start making the seat.
Step two - Cut from a dense cardboard a profile of one legs and transfer it to all blanks. The same is done with the seatpot.
Step Third - I cut out the legs and sid with the electroller, after which they process their sharp edges with grinding.
Step fourth - We collect legs in pairs, twisting the screws in their ends. To connect pairs of legs with each other, we also use self-tapping screws. We have them so that they do not meet with the previously twisted.

Pitch fifth - Marking of holes under the seats on the legs and the seat. Having made this job, lubricate the spikes with carpentry glue and plant the seat on the base.
Anyone who wants to easily simplify work can refuse to fasten the seats to the seats. Instead, you can on top right through the cover, four screws into the legs. In order for them not to stand out on a flat surface, drill in advance for shallow hiding sockets. After twisting, cover them with a carpentry putty and cover the product with varnish and mourn.
 How to return the love of her husband to his wife - Tips of the psychologist
 Why you can not give icons