Scrapbooking with your own hands for beginners step by step: detailed master classes from scratch, instructions for making albums, postcards, colors, panels, photo frames, wedding invitations and notebooks with photo ideas for creativity. Create photo book online with your r
Photographing is a unique activity that is not only popular today, but also helps a person will open up, show himself. Modern technologies allow not only to make high-quality photos, inventing and improving modern technologies, but also to share them instantly.
Daily, every second is divided by its personal, or other people's photos on social networks, by mail. However, it will be much more pleasant to fit comfortably and extract the album. Especially if it is decorated with clippings, quotes and interesting thoughts. Undoubtedly, the second is not found.
About how to make a photo album with your own hands, not few articles written, removed a lot of videos with master classes. It is quite difficult to determine the choice. However, there are basic knowledge and insane tips that should be explored, starting to work.
Choosing the topic of the future album
Of course, the idea of \u200b\u200bcreating a unique photo album does not arise with their own hands. Perhaps a person moves the thought of earnings on such things. However, most often the solution comes suddenly, after a significant event in the desire to keep every bright moment.
Create an ordinary classic album will not be much difficulty. Enough have several hours of free time and rich fantasy. You can decorate an ordinary photo album, and you can create your own album from scratch.
The most commonly popular are photo albums:
- Wedding theme. Wedding is a great moment of starting a new family life. Mass of events on this day exacerbates newlyweds, depriving them to enjoy this day and just contemplate each other. Professional photographer at the wedding has long been no innovation. Beautiful photos that transmit every emotion of this day are simply obliged to be decorated accordingly.
- Photo album on the birth of a kid. The emergence of a child in the family is an important stage. And every parent seeks everything to remember and display in the photo. However, even the most attentive mom is unable to remember every important point, because there are so many of them. A photo album with quotes will help to remember the most important thing even after many years.
- Album with a school, training story.First Garden Day, First Class, Graduation Evening, Institute Stages of Adults, which are accompanied by excellent memories.
- Imprinting a bright lifestyle. This is not only a vacation, or a trip. You can create an album as a gift, for example on the anniversary, or at a memorable date. Popularly enjoy the thematic album beloved, beloved.
The reason for creating a photo album can be anything. The main thing is the creative deposit and the presence of the tool.
Tools and materials required to create a photo album
The original handmade album is a fairly expensive thing. Its cost will enter not only the price of the materials used, but also the dignity of handmade. But it does not make such a photo album inaccessible. On the contrary, everyone can make it with their own hands using his talent and fantasy.
In order to make a photo album independently at home you need to have:
Required tool:
- miniature scissors;
- punch simple;
- knife cutter;
- the pencils;
- paints;
- markers;
- glue stick;
- curly scissors;
- punch figured;
- double-sided tape.
Necessary materials:
- paper. It must be tight enough. You will also need paper for substrates under the photo, its density must be lower than the density of the main sheet;
- dense cardboard (2 sheets). It is needed to create a cover. You can use old unnecessary cardboard boxes;
- the material that the cover will be wrapped. To do this, you can use absolutely different material. Old segments of fabric, jeans, decorative colored paper, to create a soft cover will need a thin paralymp;
- decorative material (depends on the overall idea: fur, leather, wood, iron, beads, butt, ribbons and other decor). Small details of the decor can be made independently: tie, sew, blind, put it.

Interesting details for their creation can be found both at home and in the store scrap buking.
Making an album cover
When all materials and tools are prepared, you can proceed to work. Making a photo album with her own hands, often starting with the cover.
There are two options for creating:
- Use already ready to: buy a new one, or remove from the old album. This method is the easiest. All that is required from the master is beautifully arranged using decorative material. You can enjoy such a cover any cloth (depending on the idea), use colored paper, a different decor. Often this option does not require the inner part.
- Create a new one. This option is already more complicated. Since it requires certain knowledge. In order to make the cover, it is necessary to determine which form will be the future album, how many photos are accommodated to 1 page. Deciding, you need to cut from the cardboard the page you need in size. Also worth doing and with the second sheet of cardboard. Next you need to draw on each sheet 2 lines (2.5 and 3.5 cm from the left edge of the sheet). After, it is cutting up with scissors in 2 lines.
To decorate the top of the cover with colored paper, you need:
- take a sheet of colored paper, 4 cm more cardboard sheet from all sides;
- place the album sheet in the middle and put in a pencil;
- it is good to cover with sheet paper sheet with glue, or both parts of the cover sheet;
- the cutting sheet of the cover is put into the drawn square on the colored sheet of paper so that its edges clearly coincide with the drawn lines;
- wrap the remaining edges of colored paper on the cover, gluing them tight. It is important to try to do it carefully so that the water gets out the most smooth and beautiful;
- you also need to be done with the finish of the inside of the cover. Colored paper you can cover unsuccessfully glued corners.
Making the first albums worth paying attention to ready-made covers. Creating new from scratch can cause some difficulties.
To work less on the design of the cover, you can use not an ordinary cardboard, but designer.
Useful tips of page design: how to fill in the page correctly
Fill the album pages will be easier in disassembled state. After following each sheet, you can proceed to the collection of album.
An album design is a whole science. Therefore, filling the page, you should follow certain rules:
- Initially, you should define the semantic center of the page.
- Pick up the appropriate colors that complement the photo without knocking out of the total colors.
- Select the decor for pages that will correspond to color and meaning.
- Pick up the inscriptions for photos that will necessarily comply with the general meaning. It may be quotes of famous people, aphorisms, or their own thoughts. Sign up in the album words must be based on the harmony of color.
- Collect major and small parts on the page follows from balanced proportions.
- Each album page should have a bright accent. However, it is worth watching the page is not rebooted. Watch this album is hard.
- Each page should visually resemble the triangle "Photo - name - signature."
Well, if there is an odd number of details on the page.
In order for the page to be balanced, you should try to follow the rule: a large item is a few small. For example, a large volumetric part can be placed in the upper corner, and in the opposite corner the bottom is slightly small.

Ideas of family album
Creating a family album is a rather fascinating business that can be an excellent project for the whole family.
Family album is not only a set of family pictures in one book. This album is important to transfer the history of the family, her spirit, collecting all the memorable moments in one photo album.
Family album can consist of named pages:
- Little dad with grandfather or little mom with grandmother and the opposite. This is an interesting idea that will help determine the similarity between all generations.
- Birth of a new family or wedding. There can also be placed not only the wedding of mom and dad, but also grandparents. The scanned documents, scanning them, made in vintage style are originally described.
- Birth kid in the family. How to issue this page to solve each mom individually. After all, everyone has its own concepts about the importance of this or otherwise of a child. However, experience shows that the pairs of pages for this event are small. Sometimes one album is small. It is originally the creation of mini photo albums made in the style of diaries. It can be a whole series from birth to the desired moment. Such an album is filled not only by snapshots, but also important entries.
- The first year of life.
- The first time in the first class and below.
Pages that are intended for the baby can be added envelopes that will help save the first curl, a tag from the maternity hospital, the first tooth of the child.

Mom's children's album can be supplemented with his thoughts and memories. Appeals to your child, which he gladly read when to grow. You can also write down all memorable dates: first sound, laughter, first word, first step, first tooth. Such records will become an excellent addition to the corresponding pictures.
Another excellent idea of \u200b\u200bthe family album is the compilation of a family tree.


Choosing the style of the family album (any other too), it is important to withstand this style in the smallest detail. So old photos, children's pictures will be perfectly combined with a retro and vintage style. The decor for such an album can be found in grandma.
Original photo album design ideas do it yourself
Before proceeding with work, you need to perform its sketch. On the usual sheet paper outline everything, to the smallest details. So you can not only visually estimate the end result, but also not to forget. Do it stands with each sheet. Their number, by the way, must be counted in advance at the rate of 1-2 photos on the sheet.
The photo album page is obliged to have 5 elements:
- snapshot name;
- signature to each snapshot: When, from what circumstances a photo was made. Perhaps there is something important in the picture, which you would not like to forget with time;
- pages background;
- jewelry;
- supplements.
Blank album pages need to be placed with a simple pencil, so, after the completion of the design, the extra lines will not be difficult to erase.
Fill page need from top to bottom. The likelihood that paints, color works will smear will decrease to 0. To begin with, it is necessary to perform work with a felt-tip pen and paints so that they can dry up until the photograph is glued.
The inscriptions and quotes are prescribed in the album in mascara, felt-tip pen or helium handle. Ink color, font size and tilt letters should also be thought out in advance. You can use paper cuts that beautifully lay out the necessary words. Only after that the album decorate with flat decorations. They are glued, sewn. Volumetric parts of the decor are recommended to be secured at the very end. Do it with the help of glue, threads and needles, carnations.
Adhesive details of the album are better with a special adhesive pistol.
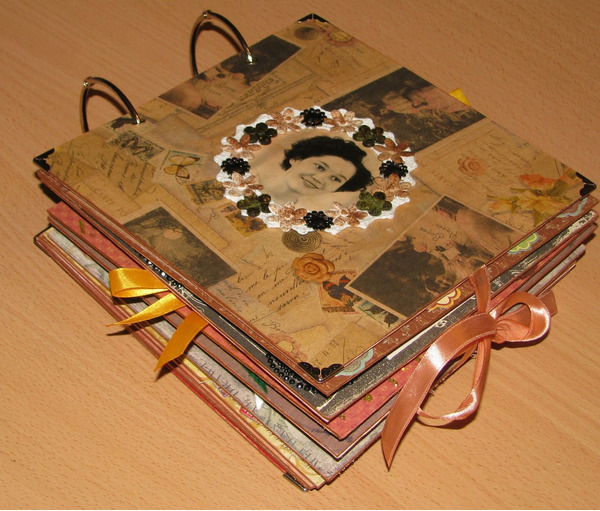
Regarding the decoration of the album cover, it looks beautifully designing the cover with the help of small photos collected in mini collages. The form of these collages can be given absolutely different from banal geometric shapes, to more artistic.
Creare the album pages can be different ways:
- using massive rings. Then each leaf of the album should be handled with a hole, making a hole in the right place;
- the same hole punch holes on each page and make them together with beautiful ribbons. You can use different plexus techniques: from the simplest, all to more complex;
- the album pages can be flashing;
- you can skill album.
Today, in the world of digital technologies, keep your life in the pictures of Garadbo is easier. It is unnecessary for hours to sit in anticipation of the result. Just second and perfect snapshot is ready. Most stores their photos on gadgets, on the Internet. Garadlo nicer to watch photos, touch them with your fingers. Even more pleasant if this is an album with a unique decor, where there is something to remember what they will touch. Such an album captures, and each detail causes its emotions.
If there is a great desire, but there is no fantasy, you can use ready-made ideas that are quite a lot on the Internet. No few articles are written about how to make a photo album with their own hands, a lot of master classes are removed with detailed instructions.
In the XXI century, people do digital photos every day. They are saved in mobile phones, show friends on social network. But the homemade photo album with memorable pictures, inscriptions and decorations produces an unusual impression. Photo album do it yourself, the ideas of design and its final edition is a matter of the whole family, a creative way to express attitude to life. The whole family will show talents, creating a photo album with their own hands, the ideas of design will definitely come to your mind.
Friends of the house with pleasure will ship a similar piece of art. Handmade album will be an invaluable gift.
Theme of albums
Make your own hands the classic photo album is easy if you need the necessary materials, tools and original ideas. The design depends on the selected plot.
Themes that traditionally devote photo albums made by their own hands:
- birth of a baby;
- wedding;
- journey;
- school graduation evening;
- bright event.

You can make an album on an anniversary for a colleague or a gift to your beloved man. Popular children's albums and photo books for parents. After the topic is scheduled, you should stock tools. The table can be seen that it will be necessary to create a photo album with your own hands.

Materials and tools for work
Instruments:
- miniature scissors;
- punch simple;
- knife cutter;
- the pencils;
- paints;
- markers;
- glue stick;
- curly scissors;
- punch figured;
- double-sided tape.

Materials:
- paper;
- cardboard;
- material for the cover;
- fur, leather, lace, beads, chains, etc.

An important role for the original design is played by decorative details. These are any interesting things found at home or in the scrapbooking store.

How to make a basis for a photo album
The base of the future masterpiece - the pages in the cover.
Step-by-step instructions for creating a photo album with their own hands:
- calculate photos. 1-2 pictures are placed on 1 page;
- cut out paper substrate for each page;
- paste substrates on cardboard squares with a side of 30 cm;
- punch holes for fastening;
- cover from the purchase album to cover with the material;
- punch holes in binding;
- attach pages to cover with cord or rings.
Homemade artists crawling round albums, in the form of a heart or a house. The newcomer is better to start with square sheets. It is more convenient to make the basic part of each page separately, and then copold the pages with the album cover. D. ekorative add-ons are glued late.

Experienced masters make an album cover for photos with their own hands. The beginning of the workout is better to take advantage of the finished binding. It can be saved by foam rubber, tinted with a beautiful cloth. The soft layer inside creates the effect of "plumpness" and is particularly well looking in the photo albums of newborns.
The top covering cover is made of fabric suitable in style, fur or skin.

Composition: Learn to issue photo albums
Choose beautiful photos and stock decorations - not everything you need to create a photo album with your own hands. All elements should be visual unity.

Each sheet is fill in scrapbooking rules:
- choose a semantic center page;
- pick up harmony of shades for photography, inscriptions and decorative details;
- pick up the decoration for the meaning of the photo;
- balance the proportions of large and small parts;
- make bright accents;
- do not overload the page with decorations;
- note the triangle "Photo - Title - Signature";
- place an odd number of details on each page.
Create a contrast from one large element and several small in the opposite corner. For example, on the right below - a big snowflake, on the left above - three small stars.

Family album design options
The family album should reflect not only the story, but also the spirit of the dynasty. It is important to take the most important memorable photos.
For example:
- "Little dad with a young grandfather";
- "For the wedding table";
- "We will have a child";
- "The first time in first class".

The beginners should try themselves in the design of the album of a small volume - 15-20 pages. To decorate the family album inside with scanned documents, nominated newborns.
Ideas for creating a page about the sail grandfather stages:
- substrate from the paper "Pearl turquoise" to trim along the edges with a wave-like closure;
- make up the name "By seas, by waves";
- the name is highlighted by strips of decorative scotch with the image of the fish;
- in the center place a vintage photo;
- on the left below to attach a small anchor;
- on the contrary, stick the sticker with the inscription "Black Sea Trading Fall, July 1979."
A young mother can make a newborn photo album with her own hands. Children make albums as a gift to parents. Another popular view is a wedding photo album. The design of the family album is becoming a fascinating joint project.

Photo album as a gift to the teacher
Traditionally, gifts for the class teacher and the first teacher are preparing for prom. The best way to capture the memory of childhood will be the photo albums created by their own hands. They include the brightest pictures from school life: lessons and excursions, concerts and work on the school area. Photo album design styles: children's theme (for the first teacher), computer (for computer science teacher).

Popular in albums for teachers Stylization "under school" - notebook with a braid line, cool board, autumn leaves. The pictures are accompanied by funny illustrations: scanned "comments" from schoolchildren diaries, fragments of school essays. Often graduates make photo albums as a gift with wishes.
Ideas for Page:
- light paper background;
- in the center - photo;
- to the left of the photo - the strip of decorative tape with the maple leaves;
- over the photo - calendar for a month (printed or manually made);
- to the right of the frame - a sticker in a cell with the inscription: "History's lesson, 4.02.2016"
- below - the inscription in the blue marker "one day from our life".

In the photo album for the teacher, all students can sign on the graduation. Created albums created by their own hands perfectly complement pockets with compact discs of memorable video.

Original ideas of photo albums: capture life
Digital technologies provide us with a variety of photos from all spheres of life. It's nice to show your friends created by your own hands, whose ideas suggested by life.
Here are some interesting plots:
- "The best moments of the year";
- "I love this town";
- "My hobbies";
- "I and my cat";
- "Men in my life";
- "A house and a garden";
- "Cool Selfie".
Well suited for photo album quotes. You can print them on the printer or write gel handle on color stickers.
Review your digital photos, select topics with a similar plot. Think than and how to decorate the photo album. Any thing is suitable from home: trimming lace, butt, colored paper clips, dried flowers.
It is interesting to make some photo albums with your own hands in the style of the diaries. Decorate such a photo album diary with simple stickers, often with the status from the Internet.

Covers created by their own hands albums for photos decorated "all sorts of all sorts": openwork knitting, straw, collages from small photos. Vintage albums decorated with belts from the Babushkoy Chest.

Small album: Beautiful memories
Sometimes a number of photographs associated with one plot accumulate. For example, a romantic walk with a loved one, a wedding girlfriend, kid smiles. These images are easy to combine in a mini album.

There are several options, how to unusually place an album with photos:
- use half paper size;
- take as a basis for the purchase album of small format;
- make a book folding on the principle of harmonic.

When decorating a mini photo album on the page, only 1 photo is placed on the page. Inscriptions, decorations, quotes are located on a parallel page.
Registration of the photo album page Stepha:
- background - Scrap-paper "Dandy";
- on the page on the right - a photo clipped on the edges scissors "scallop";
- on the upper corner of photography - heart chip;
- on the page on the left - the blue inscription "We are two under the umbrella";
- under the inscription - fabric autumn leaflet;
- on the edge of the left page - the vertical strip of decorative tape;
- in the scotch inscription "Autumn is ...".

To create your own hands, a mini photo album will need two-sided paper. Photograph slope will give dynamism. Under the pictures you can glue the patchwork bright fabric, lace.
In the style of "mini" you can perform a large family cycle: "I was born!", "First steps", "Walking with grandmother", etc.

Page decoration in homemade photo album
Sketch of the photo album pages must be drawn in advance. On the usual page there are 5 main components: name, photographs (1- 2), inscriptions for them, background, decoration and additions. Page are placed by a simple pencil.
First, perform all the works with paints, felt-powder, not to smear later. Fill the page starting from the top. When the art elements are frozen, glue a photo in the planned zone.

The inscriptions to the photos of the album are performed by a gel handle, a felt-tip pen. Then attach flat decorations. Volume elements are more convenient to attach when the album is fully assembled. They are glued, sew or nailed with cloves. It is convenient to use the adhesive gun when designing photo albums.

For photo albums, a variety of materials are used: paper, fabric, wood, metal, plastic, felt. The subject of the pictures will tell you how to better decorate the photo albums. Wedding photo album decorated lace and pearls, traveler album - pebbles, shells. Decorations can be made with your own hands: Tie, cut out of paper.
Appliques do not have to buy in scrapbooking stores. Dried flowers and leaves look even better than plastic.

On the Internet and special reference books contain thousands of extraordinary tips, how to make photo albums of any subject with their own hands. Specialists carry out master classes on scrapbooking. But it is much more exciting to invent and create yourself!
Master Class: Scrapbooking (3 VIDEO)
A variety of album design options (45 photos)


In the article you will find ideas for creating your own hands of a wedding photo album.
The creation and design of a wedding photo album is not only a symbolic, but also a very pleasant occupation for lovers of people. Of course, you can independently sew the ribbons or a deckling thread of a page from dense cardboard, but the most common classic "adhesive" photo album will fit as the basis (clean pages without liners, which should be pasted with glue).
Before you begin to decorate pages and covers, you should decide with the style and pick up all sorts of decorations. You can buy them at any store accessories or needlework. You will come in handy:
- Satin ribbons
- Lace
- Sequins
- Putts
- Organza
- Mesh
- Crystals and rhinestones
- Pearl
- Beads and semobusins
- Bows
- Rosets
- Frames
- Patterned paper cuts
- Decorative sticking figures
- Satin fabric
- Guipure
Decorate you can not only cover. It looks much more effectively the album in which a certain topic is traced to the last page. Such an album can be safely put in a trilty so that it is proud and the highlight of your family, and every guest could admire them.
What and how to decorate a photo album:
Speecually and very feastfully look at the album with photos, decorated with volumetric and textured patterns, for example, flowers from phoamyran or satin ribbons. They can be put in the shape of a heart and add a variety of beads, sparkles, rhinestones. Remember that such a decor is the main and brightest accent and therefore it must prevail on a simple background (lace, atlas or guipure).

Volumetric decorations in the form of flowers, leaves, petals or bouquets will help you create an elegant style for your photo album. It is not difficult to purchase in any needlework store. Just spread them over the cover as you think most beautifully, and then start gluing.


You yourself determine in what style should be your photo album. Focus on the photos themselves, for example, if the wedding was in a classic style, do not do without lace, satin ribbons and pearls. Greek or beach wedding will be perfectly combined with turquoise paints, shells, stars. Wedding in retro style "loves" bright paints and images, clippings, bows.


In addition to the photo album, you can also make a box or cover for its storage in the same style, color or with similar patterns.

It is completely uncomplicated to sew the pages yourself to get a unique photo album of incredible beauty. You can purchase the most simple shopping option and decorate under your taste, covering the cloth by reprint by beads, sticking lace or other decorations.

Of course, in the decoration of the wedding album can not do without the symbols of love and marriage. Hearts are suitable, gingerbreading, wedding rings kissing steam, hearts. They should be sewed or glued, originating with different decorations.


If you want, every time you look at the wedding photo album you have created a certain mood, try to add the album decor by phrases and words, known quotes and statements about love, marriage and family. They can be written manually, cut with postcards or print on paper. This is the perfect decor not only the covers, but also every page.

In modern shops for needlework, you can easily purchase words drawings and patterns cut from a plywood wooden thin sheet. Such a decoration will perfectly complement the cover of the photo album in the spirit of minimalism, but it always looks spectacularly.
How beautiful to make a cover of a wedding photo album: ideas, photos
Ideas:
- Scrapbooking -this is a bulk decor technique using different types of jewelry: dry flowers and fruits, burlap, cards, cuttings, ribbons and beads, wooden patterns, buttons and much more. Such a decor always looks very effectively and perfectly suitable for the decoration of the wedding album.
- a good way to decorate the album. It can be glued in the center, and around to beat with any decor in the form of lace or sequin, bulk roses and petals.
- Embroidery -if you know how to embroider, you can embroider the words with beautiful gold threads on a white cloth, and then cover the cover.
- Wedding Color -modern weddings necessarily have color and style. These parameters can also be followed when creating an album.
- Creative -creative albums will talk about a pair as a creative and unusual family. You can find ideas for decor in any shop of creativity and needlework.
- Book -modern printing houses will easily print a photo album with colorful photos in the form of a book, but you can decorate the cover for your taste.


How beautiful to make a wedding photo album sheets: ideas, photos
Ideas:
- Designer paper -depending on the style you are haunting, you can choose several types of beautiful paper with patterns or words and make a background on each page of the album.
- Words and Inscriptions -print on the usual or design paper with a printer (beautiful font) phrases, beautiful words about love or poems. They carry them next to each photo.
- Paper Lace -special sheets of lace paper can be bought or cut independently, and then decorate the pages.
- Decoupage -any drawing can be cut and apply to each page of the album.
- Stickers -find in the store you can thematic stickers with hearts, recognition in love, images of the bride and groom, wedding cake and so on.
- Envelopes -on each page, together with photos, you can also place small paper envelopes in which all sorts of notes or things associated with the day of marriage should be placed.


How beautiful to arrange wedding photos: ideas, photos
What can decorate photos in albums:
- Satin ribbons bows
- Dried colors and petals
- Cut-off patterns from lace
- Sparkles and golden sand
- Decoupage
- Rhinestones
- Polobusin
- Cutting
- Verse
- In words
- Wishes
 Words for photo album pages decor
 What are the inscriptions for wedding photos: tips, ideas
You will complement your photos and pages of the album Beautiful words and wishes. Check out the proposed options to pick up the most suitable.
Options:


Registration of wedding photo albums and photos: Best examples
To draw ideas for decorating your album You can view ready-made work. Album number 5.
How to buy ready-made wedding photo album in online store Wildberries and AlExpress: Links to the catalog
If you prefer the store version of the photo album what you can do with your own hands, pay attention to those options that can be purchased on the pages of the modern store Vaildberry . Here is the goods only the highest quality, stylish design, with liners or with glue pages.
In addition, if you are looking for a special album that will be unusual and stylish, view the range of store Aliexpress where there are many available and extraordinary album options for newlyweds, as well as many options for their decor, and a variety of decorations.
Video: "Wedding album in the style of scrapbooking"


Instruction
Create a photo album program to create photo albums - AntWorks Fotoalbum. Download it from the official site. Load the program to your computer and open it. Click "File - Create Album". Enter the name of the photo album in the window that opens and download photos from the computer by clicking on "Add". If you need to select the entire folder with photos, select "Add Folder". Click "Create".
Make the album cover and viewing photos of the program startup to the left will be presented with a list of photo albums. By choosing one of them, all his photos will appear on the right. Creating photo albums involves accompanying images near effects. You can make an album cover by pressing the F9 key and selecting the "Cover Setup" string. To configure the slideshow - F7, run the slideshow - F6, view photos in full-screen mode - F5 (all this is in the View tab).
Add a music file to the photo album to add music files from the computer. Press F8. The playlist window opens, select "Add" in it. Save the necessary composition for the album by clicking OK.
Make a video from the photos. Select the album, go to "Service - Create a video" or press the Ctrl + F key combination. In the "Creating a video" window, in the "Images" tab, select the image with the left button with the left mouse button while holding the Ctrl key. In the next tab, set the video settings you need the options (size and time frame, music in WAVE format, etc.). After that, click "Create".
Make a collage from the photograph of this, select the photo in the album with the left mouse button + Ctrl. Go to "Service - Create a Collage", determine the style (stack, grid, horizontal or vertical) and click "Create". If you are not satisfied with the position of photos in the selected style, then click on "Create" until the program chooses the right position for you. Then save the collage.
Make an HTML-galleryelectron photo album can be unloaded on the Internet. Select "Tools - Create an HTML Gallery - By Template / Simple". Denote directory, i.e. The folder on your computer, where the HTML album will be saved. Enter the name of the HTML page in Latin letters, select / download the template (if you create a template gallery), name the gallery, press "forward", set the necessary parameters, then "forward" and "finish". Now the photo gallery with HTML code can be placed on the site.
Video on the topic
Sources:
- How to make photo album | Creating a photo album in AntWorks Fotoalbum
- photo album on computer
- Where to create a photo album online?
Modern technologies allow any user of the computer to mount their own video or film. This can be done using both more professional programs - Pinnacle Studio and Adobe After Effects and the standard, which are accompanying Windows, such as Windows Movie Maker. It is on the example of Windows Movie Maker that we will analyze the creation of a simple video.
Instruction
Open the Windows Movie Maker program. It is on your version of Windows. To do this, use the Start button, the link "All Programs".
Click on the Multimedia Import button and specify the program to the files that you plan as material to, it can be both audio files, as well as static images. You specified files will be copied to the program's working folder - "Imported Media Files".
At the bottom of the program, you will see the installation area, it can be displayed in several modes (-Parter - in the lower left corner of the window): In the "Strip" mode and the "time scale" mode. The latter gives you much more about the installation materials: the duration of video and audio fragments, the text superimposed on the names of the names. The "Stripping" mode is convenient to apply to transfer files from the "Imported Media File" folder to the installation area, as well as for the use of effects and transitions.
Transfer the necessary files in the desired order to the mounting area. In the "time scale" mode, highlighting the file, configure the duration of its display in the future video.
In the drop-down list at the top of the window, select "Transitions". Options for transitions that can be used between two any fragments in the installation area will be displayed. Set the transitions in your video, dragging them to the installation area.
In the same way, configure "Effects" for each file separately.
Save the video by selecting one of the items in the "Publishing in the selected place" menu. You can save a video on your computer, on a DVD, or send an email.
Video on the topic
Sources:
- how to make your video in 2018
To date, websites bring good income to their owners. But in the context of competition, it is necessary to constantly maintain your resource in the top, otherwise users and search engines simply will not find it. One way is to fill the video content.

Instruction
Worldwide Web has a large number of services that allow gallery On the resource to users who have insufficient disk space in memory of computers in order to place large video files. On these services, video is stored, it is reproduced through them. Another advantage of this method is the relative simplicity of implementation. From such services, YouTube is most popular.
If you want to make a video gallery on your site, place the video on YouTube.com. If you are not registered on it, be sure to go through this procedure. First of all, as in most cases, create an account. Click on the appropriate button to go to the page where you will need to enter such data: date and year of birth, country of accommodation, specify the floor and click on the window called "I accept".
Pre-examine the conditions that YouTube puts out. Then specify the address of your mailbox, double-click the new password. After that, carefully type characters (captcha), which are presented in the window). Registration completed.
Click on the button with the "Add Video" inscription. On the displayed page, click on the same button. After that, select the video to download, which is on your computer. Click on "Open".
Come up with your name, register the tags for search robots, in the drop-down window, select the heading in which the video file will be presented. Complete the placement procedure on the site by clicking on the button called "Save Changes". Know that the maximum amount of file being placed is not more than 2 GB, and the playback duration is 15 minutes.
In order for the video to play on your resource in the HTML page of the page, write down the link and HTML code.
Photo albums are able to keep the memory of important moments of life over long years. In order for your album to be decorated as close as possible and pleased not only you, but also guests, you can independently arrange his cover.

You will need
- - Color and brilliant paper;
- - decoration (beads, rhinestones or sequins);
- - glue;
- - velvet or staple;
- - gilded braid;
- - photos.
Instruction
One of the most appropriate ways to design any photo album is an applique. Select the plot for it in accordance with the theme of the album. For example, color and brilliant paper are suitable for decorating a collection of children's photos, as well as brilliant decorations - beads, rhinestones or sequins. Create a composition suitable for the age of the child. For the smallest you can make appliqué with animal and cartoon characters. Older children will especially like models, boats or aircraft. The album looks good with paper jewelry in the form of beautifully dressed dolls or colors.
Cover of a photo album designed for photos of both adults can be covered with velvet or staple. Choose a color depending on the child's preferences or other family members. In the center of the cover, place the best, in your opinion, a photo of a child, newlyweds or other people important for you. The edges of the album can be carefully attached to gilded braid or other original ornaments. Relevant will be decorated from threads or yarn.
Wedding photo album provides many suitable design options. The main place in the composition here can occupy an applique from your favorite colors of newlyweds. Lovers of all bright can make a cover of contrasting shades - red and green, black and white, etc. Those who prefer the classics should choose more relaxed tones. The central cover area decorate with two wedding rings made of gilded paper, or better joint wedding photos. Creative people can also use various wedding accessories for appliqués: flower petals from the bouquet of the bride, bows and ribbons from the jewelry of the cortex, etc.
Video on the topic
From family photos you can make an interesting slideshow. To create the simplest slideshow, the Microsoft PowerPoint program will suit. This program is designed to create spectacular presentations. Microsoft PowerPoint is widely functional and included in the Microsoft Office software package.

You will need
- - Personal Computer;
- - Mounted Microsoft PowerPoint program;
- - photos.
Instruction
Create a separate folder and save photos from which you will do a slideshow. Remember the location of the folder.
Open the Microsoft PowerPoint program. On the Control Panel, click the Insert tab and select the "Photo Album" section. In this section, you need to select the "Create Photo Album" option. A dialog box appears in which you want to select the "File or Disc" command.
After pressing the "File or Disc" button, specify the path to the folder with the desired photos. In the "Add New Figures" window, select multiple photos to create a slide show using the SHIFT key. Click "Paste". Photos will open in the Photo Album dialog box. Click "Create".
Click "Paste". Photos will open in the Photo Album dialog box. Click "Create". All selected photos are displayed on the right on the monitor.
On the control panel, select the View tab. In this tab, click the Slide Sorter button. In this mode, you can change the sequence of slides. To do this, select the desired slide button with the left mouse button and drag the other slide to the place. Photos will be changed in places.
Click on the "Normal" button in the View tab. On the first slide, change the name of the slideshow.
On the control panel, click the Animation tab. In this tab, you need to choose the type of transition between the slides of those that the program offers. In the Slide Change field, set the checkbox to the value "automatically after" and select the time.
To create an interesting presentation, you need to impose music on a slideshow. To do this, go to the "Insert" tab. Click the "Sound" button. The program will offer several positions to choose from. Select the "sound from the file" position. In the "Insert Sound" window that appears, select a music file to accompany the presentation. Click OK. A dialog box appears with a query "Play sound when showing slides?". Press the "Automatically" button.
To task an automatic slide change, go to the "Slideshow" tab. Open the "Presentation Setup" window. In this window, set the following options: Display slides - automatic, slides - all, change slides - in time.
Save the document. To save, select the PowerPoint Demonstration File type with the file extension - * PPSX. Name and specify the path to the folder to save the slideshow.
Tip 6: how to make a wedding photo album yourself
Photobook, in contrast to the memory, will never let down, she is a visual testimony of the best moments of life, what the wedding belongs to what the wedding belongs to.
Modern technologies allow not only to capture happy moments from the life of lovers, but also to preserve colorful, bright pictures for many years ahead. Without a limitation period, when no yellowness on paper and small cracks in the upper corners.
Become the author of your own love story. Choose the best wedding photos and make photobooks from them. Unlike ordinary photo albums, you can transfer it to the next generations!

You will need
Instruction
Select the desired photo book template. Currently, 6 templates corresponding to the most popular album sizes are available on the site.

Download and dispel photos in a special framework, add text.

When you click on the image, a window will pop up in which you can edit colors, size or tilt of the image. You can also add frames, clipart and choose background.

The next step is to watch your photo book. Press the "View" button in the lower right corner of the screen. If you like everything, you can go to the order. If you need to change something else, then click on the "Edit" button.

Complete the placement of the order by selecting a convenient way of delivery and payment. In case of difficulties, use the video in the "Help" section or an online consultant.

Video on the topic
note
An online photo editor "takes" snapshots not more than 10 mV. Simply put, when overweight photos, use the "Offline" version, for this download it to your computer. And then each detail marked with the camera will fully appear in the picture.
Helpful advice
The quality of printed photo book does not depend on the physical size of photos. You should not use the pictures from which you can print a poster.
The size of the photos should approximately correspond to their size in the already printed photobook to get truly clear, bright pictures.
One of the most important characteristics defining the print quality is the number of DPI (the number of dots per inch). Optimally use snapshots with a resolution of 300 dpi.
The correct selection of paper means a lot for the future preservation of your photo gallery. You can choose Standard Colotech paper or for especially solemn cases Exclusive Everflat.
Sources:
- Wedding photoalbum
Beautiful photos deserve to insert them in an unusual photo album. It can be ordered from the scrapbooking masters or create independently of the primary materials.

You will need
- - file folder;
- - cardboard;
- - fabric, ribbons, lace, shoelaces;
- - beads, fiberglass, buttons;
- - glue, thread, needles, jewelry and so on.
Instruction
Buy a file folder of any size, for example, A4, A5 or A6 format. Purchase a strong durable cardboard of the appropriate size, it will serve as the pages of the future album.
Cover the front and rear crusts of the folder with a tight bright cloth, do not tighten the root, otherwise, when you open the album, the fabric will be collected in the folds. It is better to paint with opaque paint. Make a bending of the fabric in the place where the root starts, gently glue, adjust the material along the edges of the crust, proof from the inside. In order not to be seen the edge of the fabric, stick to the inside of the front and rear peel cardboard or tight colored paper.
Decoor the album cover. Sew the material large buttons, make a loop from a gum or ribbon, enter the folder back to the back so that a stylized clasp is formed. You can also use old buckles from straps. Folder crust surface decorate with skin pieces, ribbons, applique. If you are preparing an album from the journey, place the folder in the appropriate style - stick the waves from the ribbons, the steamers collected from newsprints, pieces of peony.
Cut from the cardboard sheets suitable to the size folder, rounding their edges. Create an unique appearance for each album page, decorate them only on the one hand, to the opposite side, stick the photos not necessarily.
Here are some ideas for decorating pages. Stick to the cardboard a light fabric of PVA glue, a gel handle Write a lyrics that means a lot to you. Place the photo on top of the text. Or roll the transparent tape into a loose tube, on the one hand, fasten the thread, flush the resulting, make stems from ribbons or cords. Wide leaves can be made of skin pieces. Place all the details at the bottom of the page, glue, close the photo. Cut out the leather or substitute flowers with four-five petals. Choose thick bright threads, make in every flower two stitch cross-cross in the center, like a button. Secure the thread from the wrong side. Fill in colors free space on the page.
Photo album - the most convenient way to store and show photos. In our time, digital technologies photo albums have become more souvenir than the photo storage facility, so the exclusive photo album will be valued more expensive than purchased in the store. Namely, such, unlike other photo album can be made independently.

You will need
- Files
- Dense paper
- Photos
- Foil
Instruction
Photo album can be made in different ways. The easiest thing is to remember how our grandmothers did it. They took an album or notebook with dense sheets, cut the holes in the sheets of holes for the corners, or placed corners. Less often pasted a photo on a sheet. Painted with paints, or page markers, signed the date of the picture and who is depicted on it. The cover of such an album was glued with colored paper or foil.
In our twenty-first century in a stationery store you can always purchase a folder with files of any format. Printed will remain only to invest. The cover of the folder is easy to decorate, it is enough to plunge it with velvet or soft skin and decorate rhinestones.
Now the fashion appeared on the photo albums - they are often on the weddings and. To such an album, much work is not required. The box from you need to puncture wrapping paper or cloth, decorate with bows, beads or rhinestones, put in the same way decorated
Scrapbooking is the art of creating and draw up original photo albums. The main goal of this direction of the needlework is to turn a boring photo album into a unique story from our life. In this article, you will learn the story of the development of scrapbooking, as well as how to make an album cover, binding and secrets.

In the 16th century, notepads for notes were popular, where important dates, quotes, recipes and more were recorded. At the end of the 17th century, a book appeared, in which there were additional empty pages so that the owner could independently incur do the illustrations like him. After the appearance of color printing, collectors actively started collecting carved images into their albums. This was the beginning of the development of scrapbooking.

In the 19th century, when a photo in Skarppuking was actively started to develop a real revolution, a real revolution was happening: special pockets for photos began to paint and independently paint the pages. Greedy albums with drawings, photographs, stickers and secrets began to be popular with popularity. Today there have been many styles of scrapbooking and he again gained popularity worldwide.
Scrapbooking album, do it yourself
Cover for photo album in scrapbooking technique
Materials:
- Kalzovina;
- cardboard or paper with millimeter markup;
- Sinypron;
- PVA;
- cardboard;
- scissors;
- lover;
- rings.
- Decide with the dimensions of the album. In our master class, the album turned out 30 × 30.
- With the help of millimeter cardboard or leaf, reflect on the usual cardboard 30cm in length and 30 cm in width.

- Cut the same size segment of the synthetic winterizer.
- Shill PVA glue sintepon to cardboard.
- Cut the square of the Holzovin, while make a stock on each side of 1 cm to be convenient to glue. Enclose Calzovin on Sinytender.
- To close the segments of the material, a cardboard sheet is glued on the inside. The rear cover for the album is ready.


- Stick on the front of the cover of the Cynthetone, and on top of the cholevine, but without the window.
- Now neatly cut down the window and the edges are sticking to the cardboard.

- Make holes for champs at a distance of 2 cm from the edge.

If you want the album to be not on the rings, and as a book with a binding, then do not make holes for chalks. The cover can decorate to your taste, it is also not necessarily as in the first master class.

To fill the album, they will need sheets. It is best to use cardboard. Also apply additional strips, 2-2.5 cm wide for gluing the main sheets among themselves. Ready color pages, such as paper or thin cardboard with color prints.

On each strip in the center, measure the strip of 2-4 mm wide, for this you can use a handle that does not write or a sharp object. This is done so that in the album you can store volume decorations, such as convex paper flowers. The edges of the strips need to be cut off at an angle of 45 degrees from two sides. Bend the strips so that the marked strip remains in the center, and start gluing to the pages. All pages need to be glued smoothly so that the album also came out even, and not overwhelmed.

The number of pages can determine themselves. After the middle of the album is ready, projected. To do this, take a gauze or bandage, cut off the strip in the album album, and at the same time the width is 1.5-2 cm. Now you need to take a piece of braid or tape and stick it to the upper and lower edge of the binding. Thanks to the edge, they will look aesthetically attractive, and the binding will turn out more durable.

Make the root from thick paper, which will completely close the binding and will perform 1-1.5 cm. Attach it to the album, and on top to the bend root glue the cover.

Do not glue the root itself to the binding, otherwise the album pages will not open freely. Open the cover and glue the protruding layer of the bandage or gauze and the ends of the braid. It is most convenient to do it not by PVA glue, but a transparent "moment."


Everyone who wants to make a photo album is plans to be interesting, beautiful and original. Sometimes the album volumes do not allow you to place a large number of photos in it, so we offer a unique idea for its design.

Secretary is a way of arrangement of inscriptions, drawings or photos, which is known for each schoolgirl, who had a "girl's album". There are several options for their design for the photo album.
- Secretary on the principle of postcards. Make a postcard in the background of the album page. At the front side, glue the main photo, and inside the secret. The folding page can be fixed with ribbon, lock or cord.
- Secrets in pockets. Think in advance where such a pocket will be located and perform it in the color of the page. Top covers the main photos and re-adjust the page. In the pockets do not forget to put a photo-secret shot. In the photo it is better to make a loop or make a hole for challenges so that it was convenient to pull out. Karmoshai can soory so that additional pictures are pasted on it and visually hid.

Thanks to the secrets on one photo album page it is easy to stick a vertical and horizontal photo. Also, the photo itself can become a pocket for another one. You can stick a photo on a postcard and stick together to glue a few more photos. The "sandwiches" of photos and paper look original, thanks to which several surprisions can be hidden on the page.

Want to stick a big photo in the album, but sorry for the place? Shape a photo into a paper cut in the background color in such a way that the fold is convenient to glue the album. Now a large photo can open, and under it take other photos. Secure a large photo by threads or lock. In the same way, you can easily stick more photos, if instead of a big photo to use a few small, and save technology for secrettes.

So that the album looked creative, cut off the vertical or horizontal parts of individual pages and decorate them as if they continue the next page. Do not forget about what is permissible not only to glue a photo, but also to sew. This will bring the highlight to the finished product. Some photos of the harmonica and secure on the cord.

If it seems that some photos do not fit into the plot, hide them behind the decorative door. For children's albums, use drawings of colors or animals, which will also be hidden secrets.

Also watch videos: scrapbooking: "Wedding photo album do it yourself"
It all depends on the preferences of the owners of the future family relic and the style of execution. See more crafts in this.
 How to return the love of her husband to his wife - Tips of the psychologist
 Why you can not give icons