How to make a new floor in a private house. Wooden floor on lags on the first floor of a private house. Modern floors on lags in a private house do so
Falling the foundation, the walls are raised, the roof is mounted and windows with doors are installed. You can proceed to laying floors in a wooden house with your own hands. The stage of work is not complicated, but requires a careful approach to detail.
Proper laying of the floor cake is the key to its longer service life. A rather small error with waterproofing and will have to be transferred all the coating in a few years. The lack of info ventilation will result in the same result. And without insulation, it will be necessary not only to walk around the house in warm slippers, but also to fork on additional heating costs.

Chernovaya floor - what is it?

Wooden house It is important to protect against moisture - rotting the buildings very quickly. Therefore, you should not cut the lags in the first crown of the cut, even if they are made of larch and processed by an antiseptic - in any case they will once be changed. Optimally ladding to the foundation and fix after raising the walls.

It is also important to ensure good ventilation of the underground, organizing a sufficient size in the basement or foundation. According to regulations, in the subfield without forced ventilation, the area of \u200b\u200bproduction must comply with 1: 400 sub-field squares. Otherwise, regardless of waterproofing events, the picture under the house will be impartial.


When the floor is ready, you can proceed to insulation. But before laying the insulation, it is worth solving a question with his protection against moisture - after all, the wet of Minvat not only does not preserve heat, but also contributes to the formation of fungus and mold on the adjacent wood.
Waterproofing and vaporizolation - what is the difference?
Waterproofing protects materials from direct water from entering, and vaporizolation prevents the penetration of wet evaporation. Thus, all waterproofing films are stacked outside, and vaporizolation - from the inside. With the walls everything is clear. But how and what to put on the floor?
Under the hygroscopic insulation, on the black flooring of the first floor, it is better to lay any riceproof films, you can even simple polyethylene. They will protect the crumbs or basalt plates from evaporation raising directly from the wet land. At the same time, the expensive membranes, withdrawing moisture, will not be useful here - all evaporations are still rising up. But, given the ventilated underground, increasingly return to the proven time of Pergamin, as the "breathing" material.

But on top of the insulation, it is necessary to put the vapor-permeable films that displays a possible moisture. To do this, leave a special ventilation (minimum 5 cm). If the boards of the lag are not high enough, along them, on top of the membrane, nourish the interface on which the finishing floor is laid.

Floor insulation - why is it necessary?
Even schoolchildren know the principle of convection - warm air rises up. According to this logic, the radiated floor can not produce heat from home. In fact, the heat loss with a cold field reach 20%!

All due to the same convection - the air from the sample rises into the house, turning it out, and the energy is also spent on heating the air in the unheated basement or sudfol.
Each type of insulation has its advantages and disadvantages:
- perlite, vermiculitis, Shungizite - analogs of clamzit, do not absorb moisture, but cost more;
- the foam and its derivatives are not subject to moisture, so it does not need waterproofing, easy and inexpensive, but creates a "greenhouse effect" in the house and is not recommended for wooden houses.


The bulk insulation stacked on solid flooring, the plates and mats can be placed on the rarefied rough floor, it is only possible to put waterproofing and protect the insulation from rodents.
Clean floor and its types
Depending on the desired interior design, almost any gender can be seized in a wooden house:

Wooden floors are perfectly suitable for residential rooms. The main thing is to put good waterproofing to protect the insulation. But the tile is better to put in the kitchen and in the bathroom - places with high humidity.
In addition, there are variations with a warm wooden flooring device and even a concrete screed of lags. So the choice depends only on construction skills and design preferences.

Technology laying floors in a wooden house with their own hands
Warm floors are comfortable, economically and extremely functionally. Especially when you have to dry the winter overalls, jackets and mittens of three children after winter games on the street. And so the entire floor area turns into a spacious battery - sin does not take advantage!
Concrete screed in a wooden house - reliability and functionality
In a wooden house, a warm floor in a concrete tie to do though difficult, but it is quite possible:
- The most important thing when pouring a concrete screed is to correctly calculate the load on the lags in advance. After all, the weight of the finished slab, taking into account the first floor there will be about 150 kg / sq. M and this is excluding furniture and tenants. The pitch of the beams during the pouring concrete is shrinking twice, the lags themselves are lowered to the height of the screed (if the fill is made only in the kitchen and the bathroom, and not in the whole house).
- An excellent way to reduce the weight of the overlap is not to fit the draft floor. It is enough to fix on the bottom of the vapor barrier film by the rails so that the insulation plates do not resist.
- On top of the lag with a mandatory ventilation gap of 5 cm, dense waterproofing is laid. It is very important for all the places of its attachment to the beams to glue with butyl rubber scotch - so that no holes remain through which the insulation wooch.
- Waterproofing is mounted slate or cement-chipboard - they have the best adhesion with concrete. Over the level, the formwork is set to the same height as the future screed. The reinforcement grid is stacked on the substrate from the same slate. The substrate height is about 1 cm.
- The "Snail" of the pipes of the warm floor is laid out. To the grid it can be attached to ordinary cable clamps. It is important not to forget to make a damper tape between the formwork and reinforcement - to compensate for the expansion of the future sex.
- To protect yourself, we produce a trial start of warm flooring systems with high pressure. If the leakage is not detected - you can begin to fill.
- After filling, the screed is better to vibrate and only after that align the long rule. Water with concrete you need 1-2 weeks so that it gained strength. A month later, you can start laying any floor covering.


Wooden floors - simple and beautiful
If the lags are not enough durable to withstand the weight of the concrete slab, do not be upset! After all, you can make a dry warm floor with water heating. For this, there will be boards with grooves under the pipes, and foil is used as a heatwise layer. Laminate is raised over on top. Detail of the whole process is presented to the video:
To date, environmentally friendly construction in the spotlight, and wood, as a building material, takes first place in it. This is facilitated by the fact that the tree is environmentally friendly and affordable material, which is processed by a person for many thousands of years. Increasingly, you can see country houses and cottages from wood, in which nature and technology are combined. As in any other construction of the house, one of the important stages is the creation of sex. The device itself in the wooden house is a very important and responsible moment, requiring increased attention to the work performed. Therefore, that the floors in the wooden house are durable and durable, it is necessary to comply with the technology of their laying and adhere to certain recommendations and rules.
Floor construction and wood selection
The floor in a wooden house on the first floor is fitted on the ground and consists of the following elements: lags, rough floors, hydro and thermal insulation, clean floor and floor covering. The entire design on the beams or support bars made of brick or concrete is established. Between the floor and the soil is underground, which is thoroughly ventilated to maintain wood in the optimal condition and the creation of the first floor microclimate.
Wood floor chart
Important! The arrangement of wooden floors on the soil is a fairly cheap option, but for their arrangement it is necessary to take into account the level of groundwater. If it is high enough, and the soils are wet, then you should bother about waterproofing the entire structure of the floor and high-quality ventilation ventilation.
Since the floor is subjected to frequent mechanical loads, wood for its creation must be carefully chosen and adhere to the following rules:
- the moisture content of the tree should be 12%, from this will directly depend on how long the tree will keep its shape;
- the tree should be without chipping and cracks so that later it did not have to replace or repair a part of the floor design;
- the boards must be processed by antipirens and antiseptics, it will help to increase the fireproof and avoid damage to the pathogenic flora;
- to create a durable and durable design, it is necessary to choose wood solid coniferous rocks - spruce, pine, larch, cedar, fir. Although the most durable will be deciduous oak or ash.
Underground space

Arrangement of info ventilation
From how dry and well ventilated underground will depend on the microclimate in the house, and how long the wooden floor will last. Therefore, to ensure ventilation around the perimeter of the base, the holes are equipped, which in independence from the time of year and the direction of winds will provide natural ventilation. In case the winter winter, from the holes, the underground remove ventilation pipes with a visor, and several window fans can be installed to increase air circulation. It is also necessary to take care of protection against various rodents. To do this, all holes should be installed with cells with cells up to 8 mm.
The base of the wooden floor
In order for the floor to be durable and durable, it is necessary to prepare a qualitative basis. Wooden floors in a private house are laid on the supporting beams embedded in the foundation. If, in the project of a wooden house, the support beams are not provided, then you will have to equip the support columns of brick or concrete. The difference is only in supports that lags are stacked, further work on the wooden floor laying is identical.
If the beams are laid together with the foundation, the support pillars have to do separately.
We define places to arrange support columns. To do this, we make markers on mortgage beams and stretch the cord along the entire length of the underground. The same is done in the perpendicular direction. In places of crossing cords there will be corners of columns. It is also necessary to calculate the number of columns so that the step between them is 70-100 cm. The length of the step between the support pillars directly depends on the thickness of the beams or the lag, which will be laid on the poles. The thicker beam or lag, the smaller step can be taken between the columns. For the beams, the 150x150 mm section of the support pillars should be no more than 80 cm. Dimensions of recesses for pillars must match the parties of the pillar. When laying the support columns, it is necessary to take into account the fact that the higher the soil poles, the more stable they should be. Accordingly, the greater should be their cross section.

Arrangement of support bars from concrete under lags
In places of installation of columns, we choose the soil to a depth of 40-60 cm and lay the pillars themselves. They can be made of brick or concrete. Brick columns with a height of up to 250 mm are laid in "one and a half" or "two" bricks, higher columns are laid in "two" bricks.
Important! For greater reliability of the design of columns from bricks, it is desirable to pour the foundation for them, which will perform above the level of soil at least 5 cm. Bricks secure cement mortar and waterproof.
Concrete columns are more durable due to the reinforcing grid inside. The sizes of the sides of such columns range from 400 mm to 500 mm based on the height of the column itself.
Important! In order for the floor to be even, it is necessary to observe the horizon at the stage of laying the support columns and beams. To do this, you should constantly check their level so that they are all in the same plane.
Then, along the entire area of \u200b\u200bthe future, the underground is chosen the fertile layer of the soil, roll over and fall asleep the gravel layer, and then sand. Each layer is watering water and thoroughly tamper. To do this, you can use a special vibrating plate or a common log with a baked board.
Installation of wooden floor
As soon as the base in the form of support columns or beams is ready, you can start the installation of the wooden floor itself. On top of the columns lay several layers of waterproofing, the ruberoid is perfect for this. On top of the waterproofing layer, we install lags or beams that firmly fix in place. Lagged directly on the support columns can be laid directly, but to increase the strength of the floor, the beams first should be put on top of them. If the length of the beam or lags is less than the length of the room, then the places of their joints are laid on the support columns, we connect to the lock between themselves and fix with the help of self-samples. For fixing the beams and lag on the support pillars, we use metal corners that firmly screw to the columns of the dowels, and to the tree with the help of self-tapping screws.
Important! Lags and beams process antiseptics and antipyrenes. If you missed somewhere, or could not withstand the horizon for the columns, then nothing terrible. This can be corrected by laying under the beam or lag of wedges or wooden strips at the place of her drawdown. The wedges themselves and gaskets are firmly fixed.
Single wooden floor
The wooden floor device in a private house can be single or double, but the design of the floor itself will be unchanged. Single wooden floors are usually done for summer wooden houses. Houses with such floors are not suitable for year-round accommodation. In order for the floors to be warm throughout the year, double floors with insulation are created.
To equip a single wooden floor, it is necessary to put on the support columns of the lags and consolidate them. For lag, it is enough to use wooden bars 50x50 mm or 60x60 mm. On top of the lag, the pinned board is stacked with a thickness of 40-50 mm and is fixed to lags using self-tapping and nails. Linoleum can be used as an outdoor coating or just paint the boards. Sometimes, to give the whole design, the floor strength on the support poles first put the beams and are already lagows on them. For reference beams in this case, a wooden beam is used with a thickness of 100x100 mm or 120x120 mm.
Double floor black floor
Laying the floor in a wooden house, which will be residential throughout the year, implies the creation of a double floor with insulation. Such a floor requires great effort and quantity of materials, but also the level of reliability and strength it will be an order of magnitude higher in comparison with one-layer. To make such a floor, you will need to perform the following stages of work:

Important! The boards must be laid at a distance of 15-20 mm from the wall to ensure ventilation and avoid swelling of the floor during the seasonal swelling of the tree.

Waterproofing wooden floor can be polyethylene film 200 microns
- for the waterproofing of the finishing floor and the floor covering on top of the draft floor, we laid a polyethylene film with a thickness of 200 microns and additional thermal insulation of foamed polyethylene. The film is placed in the mustache, and its edges are sicking with a scotch with each other. We are looking at 20 cm on the walls and glue with a scotch;
- now that everything is ready, you can start laying the finishing floor and flooring.
To create a clean floor, you can use plywood sheets or a massive board. Plywood sheets are stacked over the thermal insulation layer and are fixed using self-samples around the perimeter and diagonally. After that, you can lay a wooden floor covering.
Ground massive board

The tipped board from the wood array is not only beautiful, but also convenient in laying and operation
In the case of a massive board, everything is more complicated, although a significant plus is that such a floor can be opened with varnish or paint without additional flooring. The massive board is two species: tipped and ordinary. The difference lies in the installation method. More simple and practical in laying is a t-shirt board. To lay it, you need to do the following:
- before laying the board, it should be closed in the room for three days and "get used to" to the room microclimate;
- measure from the walls of 10-15 mm to create a ventilation gap and in case of seasonal booting boards;
- floor boards are stacked across draft floor boards. We put the first row of boards strictly along the line of spike to the wall and fix them with the help of self-samples. Self-tapping screws in such a way as to near the wall they overlap the plinth. On the other hand, screw the screws in the groove at an angle of 45 °;
- in the gap between the wall and the board, we lake the wooden gasket;
Important! If the length of the flooring is less than the size than the room, put them in the "rotary". This will provide additional sexual strength. The length of the self-samples should be several times the thickness of the board. Under the self-sufficiency is necessary to drill a hole in advance, it is necessary for the board not split and did not give a crack.
- the second and further ranks of the boards are placed in spike in the groove of the previous series. Compact with the help of a rubber hammer and fix the self-drawing on the other hand in the groove;
Important! In order for the wooden floor to serve for a long time, the boards must be placed one-time rings opposite to each other.
Parquet massive board

Parquet boards laying up "Mukejuguka"
Another option of the first floor is the flooring from a massive parquet board. In essence, this is the same t-shirt massive board, only shorter. Its styling has its own characteristics:
- the massive parquet board can be fixed with self-draws only from the spike side;
- ONLY "MUST" is performed;
- if the base from plywood is used, then it makes sense to glue the parquet board first, and then additionally secure self-drawers;
- the massive parquet board can be laid diagonally, thereby visually increasing the room.

Open lacquer or paint wooden floor can be at the end of all mounting works
Regardless of which element of the wooden floor design, it is necessary to process it with antiseptics and antipirens, it will extend the service life of the entire design as a whole. Laying the wooden floor will be fully completed with the applying of the final flooring. It may be varnish or paint, the main thing is that the floor in the wooden house look natural and fit into the overall concept. Laying the wooden floor is the case rather responsible and complex, requiring increased attention and care when performing work. You can perform all the work on your own, but still, it is worth finding a partner.
Normal living conditions in a private house are unthinkable without flooring of warm floors. From how correctly the carrier floor design was chosen, elements of isolation and protection were made, it depends on how healthy the atmosphere in the room. Would we like the floors in a private house with their own hands, any person who has a clear idea of \u200b\u200ba home-floor device will be able to collect and put the coating, even without having a joiner or carpenter.
Wood floor device options
Concrete or stone varieties of sex in a private house today - a rarity. Even with a powerful thermal insulation, turn them into truly warm floors in a private house is almost impossible, so most owners prefer to build a wooden floor in a private house with their own hands. With proper care, the floors from wooden boards can stand out several decades, but they still need to be repaired periodically, update and restore.
Traditionally, a warm floor option in private home ownership can be made in three ways:
- Make the laying of classic flooring from boards, with insulation of minvata or frosting from the clay;
- Flooring from boards on lag beams laid on concrete pie, with thermal insulation of polystyrene foam;
- Make laying lag beams on columnar supports.
In the first two cases, the fertile soil is replaced by the rammed layer of gravel and sand, a switched rubberoid cloth. If the insulation of the floor in the private room to make a filling of clay, then, in addition to the main floor, it is necessary to put the draft base from the board. On top of the backfill, you need to make a film vapor barrier, after which make the laying of the new floor from the polished board.

In the second case, make laying of warm sex on lags, based on a double concrete tie, insulated EPPS and reinforced by reinforcement grid. Lagged beams can rely on the base of the walls or threaded studs.
Both options are quite effective, but today they are considered too expensive, since the studio with a concrete cushion and massive suspended lags will explicitly cost a decent amount. To date, in this way the flooring is made in a relatively small private room, with an area of \u200b\u200b10-15m 2. How to make a warm floor in a private house in an affordable way?
The most modern and easy assembly is considered to install the floor of the boards on the columnar supports. When choosing a way, how to properly make the floor in a private house, you have to take into account the complexity, the cost of installation and the opportunity in the future to repair the wooden floor in a private house. Installing beams on the columnar supports allows you to cheap and safely make the floor assembly in a private house of almost any size. You can make the repair of floors on the pillars within one day, and to repair the studs or a long massive beam of the suspended lag is not so simple.
The concrete pillow under lags allows you to dramatically reduce the humidity and the loss of heat in a private house. Initially, it will be necessary to make a crushes with sand with sand, lay the waterproofing film, a layer of insulation, and close the concrete layer, 40-50mm thick. Experts are recommended to make a screed, if the soil is soft, and there is a danger of penetration into rodents underground.
Build wooden floor by optimal scheme
The most difficult version of the floor arrangement is associated with the replacement and alteration of the entire carrier structure in old private houses, which is several decades, and most of the lag beams and boards are rotten and turned into a duch. The situation is complicated if the primer in the subfield of the private house is too wet. In this case, you have to look for a way to make wooden floors in a private house so that they are preserved and stood at least a couple of dozen years.
The sequence of new flooring in private house-building can be divided into several stages:
- Make cleaning and preparation of soil in the subfield;
- Collect columnar supports and waterproofing;
- Establish lag beams;
- Make the preparation of a t-shirt to laying;
- Perform installation of insulation and vaporizolation;
- Make the boarding board and decorative coating finish.
Tip! If you plan to make a rework and replace the wooden floor in a private house, purchased a pre-t-shirt board to fold in the room where the repair is assumed. In this case, in a couple of weeks, the dry board will take the background moisture content of the room, which will save from the squeak and skew of the flooring in the future.
Preparing supports and ground base
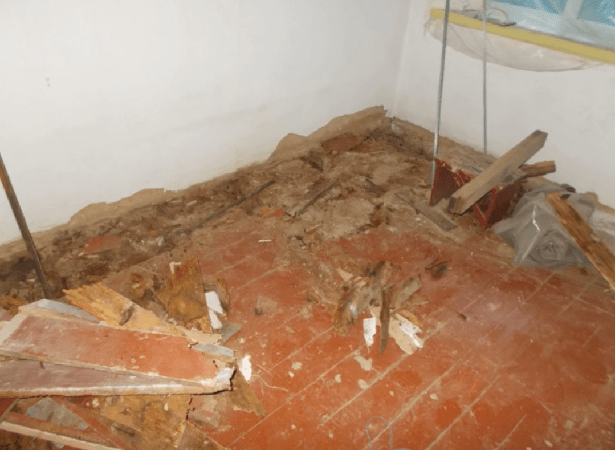
How to make the floor in a private house? Initially, it is necessary to free the room in a private house from all elements of the design of the old floor. To make sanitary processing, any boards are mercilessly cut and removed, even those that in appearance do not look amazed or rot. Often in the boards of the old fired floor there is a large number of dispute of pathogenic microorganisms, so it is necessary to make floor repair in a private house. It is necessary to make a mask and protective clothing.
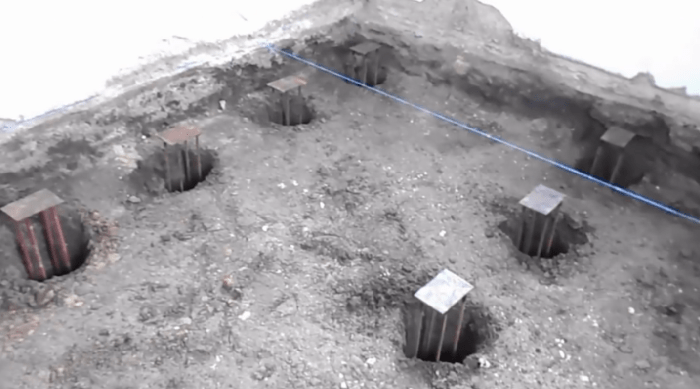
The ground pillow will be removed by 25-30 cm, and make a thorough traam. By the area of \u200b\u200bthe room, several rows with increments of 100-120 cm drills a hole of the hole with a diameter of 30 cm. An intercussion interval is 0.6 m.
Make reference poles can be used in two methods - folded out of the brick or make the concrete mass casting into a polystyrene form. The second method is more accurate and fast. Each support is reinforced by four vertical twists, a thickness of 12 mm, welded to steel horizontal plates, in size 15x10 cm. The support frameworks are laid into the bored holes, the upper plates of all supports align in the same plane by hydraulic level. The room with dimensions of 3x4 m took 18 supports.

Four-grade polystyrene molds are installed on the aligned frames, pour them with concrete M300, with an additive of 10% haired lime. After 4-5 hours, the shapes are removed that the welding goes fine, the metal frames of frames must be made clean to the brilliance.

Waterproofing the floor in a private home room is made of thick, at 0.8 mm, a plastic film that is stacked on the ground. In places of lifting of the column supports, the film is primed to each tape support, the film section on the ledge of the support is cut to release the metal plate on the post.
A five-point meter of fine rubble and a ten-grant layer of a mixture of dry sand mixture with an overexheasted lime, in proportion of 1: 5, is poured on the laid fiber of waterproofing. Such a mixture will make it impossible to penetrate the remnants of rotten microorganisms from the soil to the floorboards in the private house.
How to make a support lag, laying vaporizolation and insulation
For fastening the lag beams on the bar supports, it will take to each horizontal plate to weld the vertical shelf. The support beams are attached to the welded plates with the help of a threaded stud, pairs of nuts and carbed washers.


Due to an increased 1 mm diameter of the hole in the beam, during installation, the carrier surface of the lag can be cut and aligned in the horizontal plane, as in video:

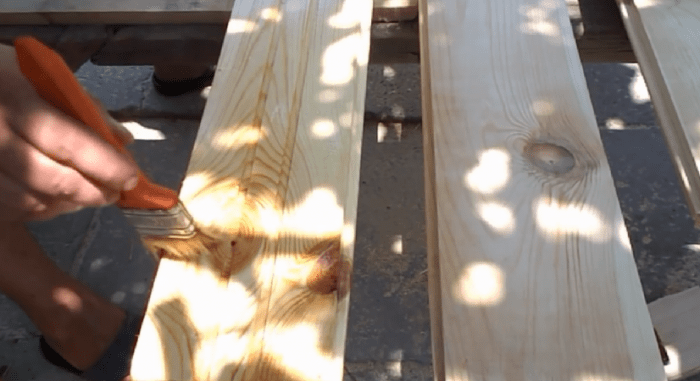
Beams, cross-section of 100x60 mm, before installation are processed with oil varnish and oil.
At the next stage, it will be necessary to make the laying of the 15-centimeter layer of mineral wool and vaporizolation. Mineral wool is placed in space between lags, after which the lag beams in the transverse direction stretch the vapor insulation material. Film Brepim to lags with a stapler. Separate canvases can be glued together with the help of bilateral construction tape over the red separator line.
Tip! Do not use for the insulation of gender, ceilings and the inner surface of the walls in the private structure of the foam, especially Chinese or domestic production.
Stacking board and finishing wood floor in a private house
For flooring in a private house, a pinned pine board is used, a thickness of 40 mm. The presence of a groove and protrusion allows you to get a very strong connection of all boards in one plane. Before making laying the floor in a private house, the boards must be treated with an antiseptic, thoroughly dry, and then cover with varnish.
Before laying boards to lags, it is necessary to make a gap with an indentation from the wall of the private house in 10-15 mm. The air clearance allows you to align the moisture in the subfield of the private house, and at the same time plays the role of the compensator when expanding the boards. Stacking the first board must be made spike to the wall. Each board is fed to the lag with black carpentine screws, 50 mm long, threaded along the entire length. Halves - self-tapping screws with rolling threads ½ fastener length, for installation of floor in private house-building is not suitable.

Self-tapping screws in the groove boards at an angle of 45 o with the help of a screwdriver. Before fastening the board is brought with a hammer through a wooden bar.

After screwing the self-pressing in the grooves of the board, microscols are formed from the deformation and raising individual fibers of wood, they must be neatly cut off with a knife, otherwise the spike of the next floor will not go completely into the groove, which will result in the formation of the slot.
After laying the boards, it will be necessary to make additional surface treatment. One layer of lacquer coating is not enough for reliable protection against moisture penetration into the thickness of the wood. Therefore, before re-lacquer, the floor surface is treated with a sandpaper to knock the gloss and make the floor covering smoother. After the end of the work, the surface is cleaned with dry, pure rags or vacuum cleaners.

A 10% solvent is added to the pentafthalic varnish, achieving the lacquer mixture easily fluid. It is better to make the floor varnishing with a wide soft brush, intensely rubbing the lacquer into the wood surface. Gradually, air bubbles will leave, and the second layer acquires a smooth surface. After twelve hours, the lacquered floor surface is moisturized, and after a day, make a dry polishing.
Conclusion
Purchased boarding boards purchased to repair the floor, before proceeding to flooring, it is necessary to go through and measure the size of the groove and spike sizes, the presence of defects in the form of bitch and sleep. If in the array of the board there are ring defects, when laying and climbing, they can fall out like plugs. On average, a hundred calibrated boards accounts for a couple of defective, even when buying a building material for repair in a private house in a corporate store.
Each of us wants to build a spacious house, in solitude with nature. And of course this house should be made of natural and natural materials. The house of the tree is perfect for a quiet and relaxing stay. When building a wooden house, the main special attention to pay floor design.
In order not to disturb the harmony, the beauty and naturalness of the floor should also be made of wood. Many know that houses collected from wood have a wellness and beneficial effect.
The floor design should be reliable and have an effective protection against heat loss from the house. Today we will look at the design of the floor in a wooden house.
Floor characteristics
Regardless of which the house was built, the floor should have the following characteristics:

It should also be noted that the load on the floor, the first or basement floor must be calculated from the average value of 2100 Newtons per square meter.
Types of floors
For wooden houses, use the two most common types of floors, it is made of concrete and from wood. Now we will analyze the pros and cons of everyone.
- Concrete floor. The advantages include the speed of the process, and especially in the presence of concrete mixers. Minor price that is the cost of sand and cement.
The ability to work with your own hands, without professional skills. With all these advantages, we get a finished smooth surface in a month, after the final drying of the concrete screed.
The disadvantages include a large mass of sex, which presses on the foundation. Not for each type of foundation is suitable, requires a thorough calculation of the load on the foundation and soil. 
And the second, since we have a house from a tree, then there are vibrations of the walls (narrowing - expansion), it poorly affects the surface of concrete, stress zones, chips, cracks appear.
- Wooden floor. By advantages, we will take the fact that the tree is an environmentally friendly material. The floors made of wood in a wooden house are harmony, naturalness and sophistication.
When performing work, special devices are required. The shortcomings are slightly more than that of concrete floors. The most important minus is the cost (high). 
The second drawback is the complexity of the installation technology, assistants will be required. Perhaps you will have to attract specialists, and these are additional costs. During the laying of the first floor, it is hard to achieve a perfectly smooth surface. Strict adherence to the technology of the floor mounting process.
Wood floor device in a wooden house
We describe the pros and cons of two types of floors. With concrete floor everything is clear. Especially since the wooden house should have a wooden floor.
Not a cutting board or sheets of multilayer plywood, chipboard, usually use for the arrangement of the draft floor. And if it is used to arrange a finishing floor, then decorative flooring is placed on top of it.
The glued bar or a folding board is used as a fingerboard. After mounting paint or varnish.
Floor designs
Sex flooring is divided into two types.

The structure of such a floor looks like this:
- Rough floor.
- Waterproofing.
- Insulation.
- Air bag.
- Picture floor.
- Decorative flooring.
Preparation of foundation
The choice of foundation is always a complex and controversial choice. Price policy is different. Since the wooden house refers to easy buildings up to 14-17 tons, then the foundation should be selected.
Some put at home immediately to the soil or make a rubble layer of a layer of 10-20 cm. This is done in places where there are no groundwater, and the earth does not crawl.
2 layers of waterproofing (rubberoid, polyethylene film) are laid on the solar, then lags are placed. This type of foundation is suitable for small seasonal houses with a single floor.
The most common foundation is of the foundation from concrete. It may be a ribbon type, a cheaper way or one-piece (stove), a more expensive way. 
Concrete foundation is usually amplified by the reinforcement belt. This is a long-term and reliable foundation, both for a wooden house and for a brick.
The following option is the support columns. The playground on which the house is going to stand is freed from the soil to a depth of about 50 cm. The formation of the pillow is due to the layer of sand and gravel.
Each layer must be about 20-30 cm. Everything is carefully trambed. Then lay the columns from brick or asbestos pipes flooded with concrete.
Poles are located around the perimeter and inside the house with an interval of 90-100 cm. Observing one level. The pillars are placed in waterproofing, then 3 cm. The board throughout the perimeter is a lining. Bruce is put on her. 
And recently, pile foundations have become popular. Everyone is simply bought ready-made piles of a given diameter, they screw in the soil for one level.
After that, the framework for walls and floor is built. This type of foundation is ideal for places where the groundwaters are close or movable soil, since piles can be shuffled to different depths and make the base strong and reliable.
Single-layer floor device
The choice of foundation remains yours. Supports, piles, soil or concrete surface on which laying thick bars are necessarily coated with a layer of waterproofing material.
Brussia is desirable to buy from coniferous trees. As mentioned above, all the wooden elements proceed with special compositions.
Lags are usually placed on top of the bars in the location of the supports, the main thing is to observe one level. 
The distance between the lags should be selected 60-80 cm, if you have a 4 cm thick floor board and more. And if the thickness of the board is 3 cm, then the distance is best to choose 50-60 cm.
Lugged on the one by one level of lags. The first board is put on the wall at a distance of 10-15 mm. This gap should definitely leave for natural ventilation.
Subsequently, this hole will be closed by a plinth. To create decorative beauty, the floor boards are better to lay parallel rays of light from the window. Use nails for attaching boards.
Guests acquire with the fact that their length should be twice as long than the thickness of the boards. Scroll nails under the tilt of 30-45 degrees. Do not forget the hats to catch.
Then, when all the boards are fixed, all holes from the hats, close in a putty on a tree. After the putty will dry, you can start paintworks. Installation of plinths are made throughout the perimeter.
On the two walls of the opposite, a constant plinth is nourished, and two other opposite people left the cracks nourish temporary with a gap of 10 mm, from the wall. For 2-3 weeks, due to natural convection, the floor will fool completely, and temporary plinths can be replaced, constant. 
As mentioned above, this type of gender is used in non-heated, small houses. And in winter, the land under the house freezes and the deformation of the poles is deformed, which directly affects the functionality of the floor.
In order to maximally remove this effect, the soda space is covered with a slag, leaving 4-6 cm. To the floor, for an airbag.
Double floor device
Such gender has the structure of a multilayer cake. The design of BRUSEV and LAG remains as described above. Only in the lower part of the lag are stuffing bars along the entire length and on both sides.
These bars are called skull. On top of these bars is mounted black floor. The floor is usually carried out from non-edged boards with a thickness of 2-4 cm. All wooden elements are processed by special means. The boards should be mounted with minimal gaps. 
After the draft floor is fully assembled, vapor insulation and waterproofing materials are placed on it. Often it is a polyethylene film with a thickness of 200 microns.
But you can use other materials such as parchment paper, rubberoid and modern membrane films. The material is placed in the pectorist 10-15 cm. And the seams are sinking with a construction scotch.
Then the insulation is put on top of the waterproofing layer. In the past, mixtures were actively used: clay + sawdust or clay + straw. Grozunzit has proven well well, it does not eat rodents, it does not lose shape and volume.
 But in the century of high technologies, the market offers a large selection of materials for insulation. Equata, foam, isolon, minvat, polystyrene foam or polyurethane foam. This is not the entire list, but only those that are popular.
Each of them has its own advantages and disadvantages. The main difference in price and characteristics. The selection of insulation depends on you. After you bought the insulation, put it between lags.
On top of the insulation, we put a layer of waterproofing, we leave 3-5 cm. To the lower edge of the first floor, as natural ventilation of the underground.
If you envisage the presence of a "warm floor" system, the pipes or wires should be put on top of the insulation. They should not be covered with a layer of waterproofing material.
On top of this "cake" put the finishing floor. The punching board is ideal for fixing the first floor. The principle of assembling boards like a laminate, each subsequent board is inserted into the grooves of the previous one, and the fastening occurs with nails at an angle.
If in the first method we talked about the ventilation gap, which is located along the walls, then here we will talk about the ventilation gap, which is located in two opposite corners of the room.
These gaps may have a square shape, a circle size of about 5 cm. After the floor is covered with all the boards, the ventilation gaps are decorated with lattices.
The grilles must be made by 5 mm. Above the floor level so that the fluid does not fall into the insulation. The punching board, grind and covered with varnish. On top of this floor, the finish coating can not be used. But if you wish, you can sash carpet, linoleum, laminate and others.
Remember that in the basement should be left ventilation holes. They close, only in winter.
Conclusion
We looked at all nuances of the floor design device in a wooden house. I hope our article will help you find the right decision and an approach to the floor arrangement.
Do not forget that the tree is a natural material that requires care and processing with special means.
The flooring process requires care, accuracy and compliance with the instructions. Installation work can be made with your own hands.
The construction of a private house is a long process required by high spending time, labor and finance. Many, seeking to save, are decided to carry out some of the works on their own. How to make floors in private houses without resorting to the services of builders? Make the floor it is quite realistic if you have the necessary materials, tools and knowledge.
What kind of floor design to choose?
Before proceeding with the construction of floors in a private house, it is necessary to decide on the type of design of the future coating. Experts allocate three types of structures:
- Single;
- Double;
- Concrete floor.
The choice of one or another type of construction depends on the characteristics of the building in which the floor is laid. The determining factor can recognize the conditions of operation of a private house. The single floor is the most simple design, there is no time and materials on the construction of such a floor, since the board boards are attached to nails directly to lags. The main disadvantage of single adhesive sex is the limited application: such a coating will be appropriate only in small summer houses and dachas. For home, where it is planned for year-round accommodation, single design is not suitable.
 The scheme of the possible implementation of the "double" floor and concrete.
 If you want to make a private home suitable for accommodation at any time of the year, you will have to deal with double floor arrange. This type of construction is warmer, reduces heat loss and provide comfortable accommodation in the house in the cold season. The double floor consists of several layers, the main of which are rough and fine coatings. Between these two layers, hydro and heat-insulating materials protecting both the floor and the whole house are additionally stacked.
Most often, the draft coating in a private house is collected from the unedged board, and the pistol floor - from the tipped flooring. All work, including styling of heat insulation from sawdust or clay, can be easily carried out with their own hands.
 Blackboard boards.
 The third possible type of floor design in a private house is a fill of a concrete screed. Compliance with all rules for conducting preparatory work, styling waterproofing, fill the cement mortar and its drying time will allow to obtain a solid quality floor, ready for finishing with any decorative coating.
Installation of wooden floors
When erecting a private house, many prefer to make the floor of the wood. Such a desire to have a high-quality wooden flooring under the legs is due to the desire to use environmentally friendly materials to which wood belongs. In addition to high ecology, such gear has a number of advantages.

Wooden floors are easily mounted and easily repaired during operation. Due to the low thermal conductivity of the material, such a floor will maintain heat inside the house without releasing it outward. The boardwall from high-quality wood is a long service life and an attractive "natural" appearance.
To make the floor in a private house, you need to choose the wood. The choice of starting materials should be based on the characteristics of the structure of the structure itself. The flooring device in the country house must necessarily provide for the presence of an underground that performs the role of the air layer. If such a layer is absent, then the wooden floor will quickly come into disrepair due to the impact of moisture. In addition, for good gender, it is important for the presence of all layers of construction, including lags, roughing, hydro and thermal insulation, a finite coating.

The floor in a private house is subject to essential mechanical loads, so it takes it to choose wood with good technological characteristics. The boards must be well sucked, the recommended moisture content is not more than 12%. Any chips and cracks on the surface of the material are not allowed. Experts recommend to give preference to wood conifers, pine, larch, fir, cedar. To increase the life of the future floor, all the boards must be treated with antiseptic and antipiren.
The installation of wooden floor begins with defining places under the support poles and their installation. The fertile layer of soil over the entire perimeter of the house is removed and removed, gravel falls asleep in its place, and on top of it - sand. Layers of gravel and sand takes good tamper. On the ends of the support pillars, the waterproofing material is stacked, most often for these purposes use the usual rubberoid.
 Floating gravel.
 Next, make the beams that need to be fixed on the pillars with metal corners. Floors in a private house better do with double insulation. Specialists are offered first to lay plywood sheets from the beams, and then place mineral wool or other insulating material.

When the layer of the insulation is ready, you can begin the flooring of the draft coating. The boards of this layer must be well to fit together, as the attachment to the beams you can use conventional screws. Between the flooring and the walls of the house it is better to leave some distance: a slit of 1.5 cm can be considered for this part of the floor. These gaps provide ventilation of the entire floor design and protect the walls from the expansion of the flooring boards upon subsequent drying.

On top of the draft floor, a layer of vapor barrier from a polyethylene film with a thickness of 200 microns is fired. The joints of separate pieces of film must be glued with scotch, and the edges wrap onto the walls at a height of about 20 cm - to the height of the final coating. When the film is laid and fixed, you can go to the assembly of the first floor.

The finishing floor is assembled from array boards or from plywood sheets. The plywood sheets are fastened easier, but they look really not very attractive. Therefore, if you want to leave wooden floors in your home, then the first coating is best to collect from the headboard, and if you plan to close it with decorative material - it is enough to fix plywood sheets. The boarded floors after assembling the first floor are required to be covered with varnish, which not only protect the material from external influences of a mechanical and chemical nature, but also emphasize the decorative qualities of natural wood.

Pouring concrete floor
Concrete floor arrangement in a private house begins with preparatory work. First, on the place of the future floor there is a markup and gravel dumping. The soil is pre-cleaned from the plants and the top layer, and then tamper. Next, the gravel layer is poured, which also needs to be good. In the construction of concrete floor in a private house, Gravel will perform the role of thermal insulation. On top of the gravel, sand is embanked. After its tampering, a thick polyethylene film is spread on the surface, which performs the role of waterproofing material.
How to make a concrete floor in a private house? After mounting the waterproofing layer, you can proceed to the pouring of the screed. The cement screed in a country house is poured similarly to the screed in the apartment: the levels are installed and the solution is poured, which from the wall to the door is resurrected by the rule.
When pouring a concrete screed, you should consider several features. The fill solution must be fresh, it is recommended to use the grade cement not lower than M-300, sand dropouts and water. To increase the strength of the concrete layer into solution, special compositions can be added - plasticizers who will give the future coating additional strength.

When pouring a screed with a height from 5 cm, you can use reinforcing elements or a reinforcing mesh, which is placed on the waterproofing layer before the fill. In the case of the arrangement of warm water floors in a private house, the use of a reinforcing mesh and adding plasticizers to cement mortar is mandatory procedures.

When concrete after the fill will slightly freeze, you can delete lighthouses. The emptiness remaining after their removal is filled with the same solution. After filling and aligning all the slots, the floor is closed with polyethylene and left to dry. The drying of the concrete floor is a long and responsible event. Concrete must dry himself during the month, in the presence of a warm floor system, heating to completely dry the screed is prohibited. Turning on the heating elements, you will help concrete to crack even before the operation of the room. When drying, the concrete screed is recommended to be periodically made with water and turn it out with polyethylene again: while complying with this requirement, the coating pulls the maximum strength and does not crack.
To properly make cement fill, remove lighthouses and dry concrete It is recommended to consider photos with the works of builders specializing in the arrangement of floors in private homes.
Finishing
Make only a finishing floor in a private house from scratch simple enough, but sometimes it is additionally required to lay decorative coating. You can also cope with this problem alone. What can cover the floor in a private house?

The most optimal option for a private house can be considered a double floor of the boards. Covering such a design can not be covered additionally. This option is practical and beautiful, and also has a long service life with proper care. Before using the board, the protective compositions should be treated and covered with varnish, which will protect them from the effects of sand, dirt, water and chemicals. For the coating, you can choose both transparent varnish, leaving the natural color of wood, and color, giving the floor with another shade.

Concrete floor in a private house involves the presence of an upper layer of decorative coating. As a floor finish, a parquet or parquet board will look. Such a coating is quite expensive, but is distinguished by high ecology, good antistatic and thermal insulation characteristics. Making a parquet does not make sense, but in the house where you plan to live constantly, such a coating will look appropriate.
As analogues, the parquet can be viewed more affordable laminate, linoleum, carpet and ceramic tiles. The laminate is suitable for living room and bedrooms, ceramic tiles will be appropriate to look at the kitchen, in the bathroom and hallway. Linoleum is also better to post only in the kitchen or in the hallway. The use of carpet is more limited: the material is suitable for finishing the floor in the bedrooms.

The range of modern colors and textures of the listed materials allows you to choose a coating for every taste. In a private house, floors with natural drawings, repeating wood texture or natural stone, will be appropriate.
 How to return the love of her husband to his wife - Tips of the psychologist
 Why you can not give icons