Floor preparation for stacking tile is the possibility of laying on the surface of different types. Preparation of floor under the laying of tiles Preparation of concrete floor under the tile
For high-quality laying of polyvinyl chloride tiles, the surface is of great importance to which it will fit. Equally, the importance is like the choice of a suitable base and its preparation for laying tiles.
Choosing a suitable surface
When laying PVC tiles, first of all, it is worth thinking about the kind of surface to which it will be laid. Many materials are suitable as a base for laying polyvinyl chloride tiles. It can be laid both on the screed and on already existing coatings.
One of the main criteria for the surface on which the polyvinyl chloride tile will be laid is its strength. A suitable surface with the surface can be considered the one that does not destroy when the tile is dug from it, and also does not creak when walking through it. As an example of an appropriate PVC base-tile laying, an OSP plate can be caused. When separating the tile from a similar surface on it, particles of chips will remain, from which this surface consists. As a result, a set of irregularities will appear on the OSP plate that at best the installation of polyvinyl chloride tiles will hardly make it difficult. Another example of an unsuitable for laying PVC-tile base is poorly spilled concrete screed. In places of the most frequent operation, such a surface eventually destroys the upper layer, which will result in the dugout of PVC tiles from the base.
As another criterion, the surface stability should be called. The surface on which a polyvinyl chloride tile will be laid must be firmly fixed. In the case of using a wooden base, the distance between the lags and the thickness of the boards should be selected, taking into account the floor to be fed when walking. With all other things, it should be noted that the polyvinyl chloride tile is a fairly durable material, and will perform its functions even on unstable surfaces. However, in this case, gaps can be formed between the tiles.
In general, it can be concluded that the following types of surfaces are suitable for laying PVC tiles:
Preparation of the selected surface
If the type of surface of the surface is suitable for laying polyvinyl chloride tiles, then first of all should be worried about the evenness of this surface itself. If the base of the floor is wooden, then it is possible to align it, checking the plywood thick layer. The floor having a concrete surface should be aligned using a self-leveling screed.
Also, the surface on which the PVC tile will be laid must necessarily be dry. Especially if we talk about screed and leveling mixtures. For cement-sand screed, the drying process depends on many factors such as coating thickness, air humidity, and can last up to several months. Check the readiness of the cement base to laying PVC tiles is quite simple. It is enough to glue to the checked surface with a scotch piece of polyethylene. The surface will be ready for laying a polyvinyl chloride tile in the event that condensate is not formed on polyethylene during the day. From this it will be possible to conclude that the screed is dry. In the case of condensate formation, the surface is nototted to lay the tile, because water still continues to leave it. If the leveling mixtures were used to align the floor, the same test method can be used. The difference is that the drying process in this case is easier and much faster. To distinguish dry areas of the surface treated with an aligning mixture, from raw in many cases can be color.
An extremely important criterion for laying a polyvinyl chloride tile is also the purity of the surface on which the tile will be laid. In the event that the surface is contaminated with any foreign substances, whether dust, the remains of building materials, or anything else, may have serious difficulties when laying tiles. Therefore, before installing the tile, the base of the floor is required to be thoroughly projected. The main purpose of this procedure is to increase the adhesion between glue, with which the tile and the concrete surface of the floor will be fixed. For this, any acrylic primer will suit. When using tiles with lock connections, the need for a surface tool disappears.
It should be noted that the PVC tile also needs to be prepared for laying. To do this, it is necessary to decompose and for about a day to withstand in a horizontal position at an air temperature of at least 24 degrees.
Ceramic tile - popular facing material that has been widely used. The durability of the facing, provided that the proper installation is the indisputable advantage of ceramics along with high aesthetics.
What is the preparation of the floor under the tile? Consider further steps.
Why should the preparatory work be carefully carried out?
Many neglect with preparatory work, they make them reluctantly and poor quality. But it is impossible to do so:
- Saving time in preparation, you will spend much more with the laying of the tile "on the layer". In this case, each tile will need to individually lay, and use different layer thickness.
- Installation of tiles on the layer leads to increased flow of tile glue, which affects the total cost of construction.
- The durability of the facing at an incorrectly prepared surface decreases. A faithful sign of trouble - the tile is closed, a hear sound is heard. This means that under the tile of emptiness, which can lead to cracks and other defects.
How to prepare grounds for laying and why it needs to be done carefully - video
What is included in the surface preparation?
What the preparation of the surface for laying the tile will be required, depends on the type of base. But there are universal requirements. The surface must be:
- smooth, not to have chosel, drops and cracks.
- purified from dust, dirt, oil spots, fat.
- opened primer, which will improve adhesion and reduce moisture absorption.

Consider how sex preparation is carried out under the laying of the tile:
- concrete floor;
- wooden base;
- old tile.
Preparation of concrete base
The nature of the preparatory work depends on the state of the foundation. If you discovered the differences from 2 cm and more, then a new filling of the floor will be required. If the old floor crumble, the whole fragments are numbered, then dismantling a concrete base.
The new concrete screed will create a solid and even base, as well as to make the level of the floor that you need.
How to align concrete floors and close cracks - video
Technology work as follows:
- Dismantling of the old cladding and fragments of a concrete screedthat need to be replaced. It may be that in the replacement only damaged part of the floor needs. Then the partial fill will be required. If it is better to completely remove the continuing and loose old concrete floor, then spend a complete disassembly. Use the perforator to speed up the process.
- Montage of Mayakov. Lighthouses will help create a flat plane and lift the floor to the level that you need. Lighthouses are mounted on the starting putty, the plane is checked by the level and rule.
- After the beacons were recorded, make a cigarette with cement-sandy solution. Level remove the excess layer of the solution, smoothen the solution throughout the floor plane. If you need a large fill thickness, use clayzite as a subfolder or filler for concrete.
The disadvantage of this option is to wait until the month until the floor dry.
It is not necessary to confuse the term complete drying of the screed and the moment when you can step onto the new floor. It will be possible to walk along the concrete screed the next day, but to carry out facing work only in a month.

The floor should dry evenly and gradually, so it is necessary to cover it with a polyethylene film. Periodically screed water water. This is done so that the moisture is scared gradually. Otherwise, moisture will quickly evaporate, and the concrete screed can crack.
But it happens that the concrete base is durable, it needs only in a small repair.
What can be done?
Small drops of up to 1 cm can either ignore or use self-leveling mixtures. They are not suiced, but easy to use. Self-leveling mixtures are on cement and plaster basis. Used to align the floor to 1 cm.
note
The advantage of such mixtures is the ease of use. Observing instructions for use, prepare the solution. After that, just pour it on the floor surface, which was previously cleaned and trunk.
The self-leveling mixture is cut throughout the area. It is possible to help it with a gear roller, which also drives out the air from the mixture, which achieves high strength and monolith of fill.
If some parts of the floor began to crumble, but it did not become a serious problem, use the primer of deep penetration. It will harden the surface, grab the loose fragments and make them monolithic.
Small pits and potholes can be chopped with tiled glue. Experienced tile tires can sometimes leve out a black tie with liquid tile glue, which are covered with all irregularities.
Preparation of wooden base
Previously, the question can be laid tile on a wooden base, you would hear categorical and strict prohibitions. Now there is no such categorical.

The fact is that the tree reacts poorly to moisture, it can make it easier, wake up and change its shape. In addition, the wooden base can progress, but the tile does not possess such abilities. So if the OSB panel will then seek, then the entire tile will crack or burst.
Preparation of the base of the floor from the tree should be correctly carried out, after which the tile can be laid. What is included in such training?
Rating base. Under a wooden base, it can be understood as the old Soviet floor of boards and an OSB-panel or fiberboard. Look, do not play DVP sheets, they are securely attached.

- If the floor rotted, and the flooring "walk", you need to dismantle the old wooden floor.
- All floorboards are removed, drunk and fragile lags are removed. Durable and untouched lagows need to be treated with antiseptics.
- In the space between the lags, the insulation is stacked, such as a sheet foam. You can make a subtype. As a subfolder, clamzite is often used, which, due to its small weight, will not create a large load on the overlap between the floors.
- After that, OSB panels or sheets of GWL are attached to lags in a checkerboard. Plates should not "walk". Mounted them not close to the walls, but with a gap of 1-2 cm for possible expansion.
- A new wooden surface is ground, after which you can start tile mount.
If the wooden base is reliable:
For mounting tiles on a tree, use special adhesives that are designed for this. Famous manufacturers produce products with high plasticity, strength, adhesion, so that such adhesives will cope with non-traditional and problematic grounds.
What to do with old tiles?
Is it possible to lay a new tile on the old tile? This question sometimes arises from those who want to make a small repair.
What will be the answer depends on the situation. What includes the preparation of the floor before laying?
- If the tile holds reliably on the surface, in particular, lies on the floor, then it is not necessary to knock it down.
- If the tile has talked his own, began to crumble, then it should be knocked down.
- Another reason for dismantling can be unacceptably the high level of the new floor, which may turn out. If on the old cladding, lay a new tile and an additional layer of glue, it can affect the floor level.
We have already written about the dismantling of the old coating above. If you decide to leave the old tile, then do the following:
- Remove any contamination, fat stains and everything that can interfere with the fixation of the new cladding.
- Entry paper dut the old tile to remove the gloss and create a rough surface.
- You can use the primers "concrete contact", which contains quartz sand. The primer is designed to improve the adhesion between the materials, which are traditionally not combined.
Such procedures can be carried out in relation to the floor tile, but it is better to knock down the tile from the wall. The weight of the old tile and the new one can become too big, so all the cladding will roll together together.
How to prepare the floor to laying a tile - video
Outcome
Preparation of floor to laying tiles - work that cannot be neglected. Tips from the article will help you do it right.
Ceramic tile is an excellent floor covering with excellent characteristics. It is ideal for bathrooms and kitchens, since it is capable of withstanding significant physical exertion, moisture resistant and easy to care. All would be good, but one moment overshadows all the advantages of this coating. Stopping the tile is quite difficult and it is this item most of all confuses those who are first taken for independent repairs. In addition, the preparation of the floor under the tile - the process is also not easy, because you will have to almost completely update the surface surface.
Proper flooring under the tile - the pledge of fast and high-quality mounting
How to prepare wooden floors to laying tiles
In old apartment buildings and cottages floor, as a rule, wooden. However, this does not mean that it will have to walk all his life along the creamy boards - they can be used as a basis for ceramic tiles.
To begin with, it is necessary to carefully examine the boards on the subject of rot, fungus and other unpleasant moments. In addition, the floor surface must be smooth and "silent". If, when walking under your feet, knocks and screens are heard, then such a floor, most likely, already loses its former thing and requires a thorough repair.
It is worth paying attention to the sticking hats of nails, screws and screws - they need to score with the hammer and screw the screwdriver.
Hammer and nails - the main tool when preparing wooden floor to laying tiles
Next, you need to explore the floor for the presence of cracks. Small slits in 2-3 mm can be bypass - they are not dangerous. But in large grooves you will need to drive away thin sins of soft wood. It will give a double effect: the floor will not creak and at the same time will be much smaller. Only one "drivening" will not be enough - it is desirable to reliably fasten the chips in the slots using glue or nails clogged at an angle.
The next stage is the alignment of the sandboats of the grinding and putting the left after grinding of chosel and recesses. At the end of all the preparatory work it is necessary to remove the remains of rapid activity and cover the floor of the oil.
Concrete Priming - Mandatory Stage Before Pouring Screed
At first, a damper tape is glued along the perimeter of the room, which will not give the mixture to the slot between the wall and the floor, and also prevents the seasonal expansion of the screed. Next, the surface of the concrete is soothed in two layers and only after the final drying of the primer is poured a mixture. It spreads well, forming a perfectly smooth and smooth surface. The standard layer thickness is approximately 2-4 mm, but in rare cases, this figure can reach 10 mm.
When distributing a self-deemed mixture over the surface of the concrete, you need to ensure that bubbles are not formed inside it. To do this, you can use a needle roller, which "protrudes" all "balloons" and will not give them to spoil the screed.
Pouring self-confined mixture - a quick way to align the base of the floor
Such a screed dries off for a short time - 12 hours and it can be walking on it, and in two days it will be possible to play tile laying.
In general, the preparation of the floor under the tile takes from several hours to 2-3 days, but it is better to spend so much time than to miss this stage at all, because in this case no one will guarantee that the floor covering will serve at least a month.
Floor arrangement is an integral part of the repair of the room in general. Of course, in different parts of the house or apartment are more functional and beautiful floors of different types and class, but in the kitchens and bathrooms recently, it is quite often possible to meet floors covered with tiles. Also, they often lay the tiles of the floors in the hallway - either throughout the area, or at least adjacent to the entrance door part of the floor.
Laying tiles do it yourself
Positive sides of the tile
Tiled floors (or floors covered with ceramic tiles) are very practical and durable. They are not afraid of moisture, do not combustible, it is easy to remove all pollution from them. Worry about the replacement of such floors to the owners will not have a fairly long time. And you can choose an ornament for the floor for every taste and wallet. After all, the modern building materials market offers a huge range of tiles not only domestic production, but also the tile options, which is called, from all over the world.
Disadvantages of facing tiles
In order for the beautiful and practical tiled floor to please you as long as possible, it is necessary to take care of being laid it was on a flat, without flaws the foundation.

Ideally laid tile on the floor
Otherwise, a buccourt missed during the preparation of the surface or not sealed gap in concrete can present you an unpleasant surprise in the form of a cracked or retired tile. Therefore, if in the near future you do not plan to spend strength, time and additional materials for repair or alteration of the floor, the surface preparation of the surface under the laying of the tile must be paid special attention.
Flooring of the floor tile can be carried out using a cement solution with an admixture of special substances, as well as on specially designed mastic or glue for tiles. The preparation of the floor to laying the tile in each case will be different, but the general requirements for losing the floor to a state suitable for cladding are practically identical.
First, it is necessary to carefully explore the overall condition and reliability of the floor on which the tile is planted.
How to prepare under the laying tile boarding floor
It seems that laying the tiles on the pavement is impossible, nevertheless it is not. Of course, cook the boarded floor under the laying of the tile is necessary very thoroughly.

Floor facing tiles do it yourself
So, the first thing that needs to be done is to score the tree sticking caps of nails in the thickness of the tree, as well as to remove and drown into the thicker of the wood screw. The slots between the boards are allowed width no more than 2-3 mm. In wider cracks robs from soft wood, which, in turn, it is very desirable to fasten with glue or cloves with counted hats, drive them into the floor of the plant. After all the cracks are thus embedded, the surface of the floor can be crushing and shaking all potholes.
After drying the spatlets, the entire surface is desirable to stamp on a wooden block. Then the wooden base should be thoroughly clean from chips and sawdust, after which it is impregnated with an antiseptic and dry well, then led by oliff.
Another requirement: boards should not be fed when walking. If the boards begged, about laying the tile on top of such a coating should be forgotten. Strengthening such a floor to the required level will not work. The same applies to parquet coating. If the planks of the parquet are loosened - they must be reliably secured by nails or mastic.

Align the floor using the chipboard
You can also put waterproofing from several layers of rubberoid on a dumping basis. Then above the floor level at an altitude of about 1 cm secure the reinforced grid with a cell of 10 cm, and the solution of the screed is poured, on top of which, after complete drying, you can lay the tile.
Concrete base under the tile
To begin with, it is necessary to completely eliminate the surface of the residue and paint. It is most convenient to do for warm water, pre-soluble in it caustic soda in the proportion of 150 grams to 10 liters of water. You can also use a 2-3% solution of hydrochloric acid. With the help of a scarpel from the surface, all the projections are spilled, and all the slots and potholes are wetted and carefully closed with a solution of cement. Places where defects were detected, can be additionally treated with PVA glue. This will increase adhesion. Places where defects were sealed with the help of a solution, it is necessary to diligently to upload a trowel, comparable to them with the surface. After that, the semi is given to grab during at least 12 hours, periodically wasting the surface with water. When the solution is enough, it is necessary to pass the whole base with a coarse-grained bar and then carefully clean from dust.
Alternative - self-leveling screed. To perform a screed, it is absolutely not necessary to be a construction specialist, so if you decide to prepare the floor under lining with your own hands, you will certainly be paid attention to this technology. With the help of a screed, even hopeless floods are perfectly aligned under the view. The floor prepared in this way perfectly fit and linoleum, parquet or parquet board, and tile.

Prepare the floor under the lining tile do it yourself
Initially, a separation tape of polystyrene foam is fitted at the junction of the floor and walls. All cracks and potholes are climbing with adhesive composition, after drying the base is processed by a grinding solution. If the base of the floor is too porous and fragile, then it follows it even two or three times.
When the primer is completely dry, the base of the floor is neatly poured with freshly prepared screed solution. If the solution is prepared in accordance with the recipe, it is easily spreading on the basis, forming a smooth surface. In some cases, for the distribution of the mixture, you can use a metal grater or a toothaper.
The result is a layer of screed with a thickness of 2 mm to 1 cm. If the base is strongly tilted, the screed layer can be thicker. In order to avoid the formation of air bubbles in the thickness of the solution, the entire surface along and across several times carefully pass on a special needle roller. The same needle roller is used to improve docking between different portions of the solution. At the same time, this procedure allows you to avoid the formation of voids between the layer of screed and the base. Move along the flooded semi-sized semi is comfortable on the kraskaskostups - special shoes on the pins.

Distribution of the mixture for laying tiles on the floor
After 12 hours of exposure at a temperature not lower than 20 ° C, it will be possible to walk along the screed, and after two days the solution will dry completely, and you can start laying the tile.
If a layer of screed was already applied to the surface earlier, it should be carefully checked for strength. This is done by simple climbing with a small hammer. The sound when climbing should not be deaf, which indicates the absence of emptiness under the layer of screed. Also, the awake will help to understand how high-quality a solution was. If the screed crumbs and strates, it will be better to pour a new layer of solution.
In addition, it is necessary to check how far the surface to which the tile will be attached. This is done with the help of a two-meter aluminum rule. During the inspection between the surface of the floor and the rule, the lumen is formed. The permissible value of this gap can be different depending on the upcoming method of fastening the tile. When using tile glue, the clearance should not exceed 2 mm. If the tile is attached to the mastic - 4 mm. If it is planned to use cement mortar, it can be allowed even to 8 mm.
Check how horizontal the base for laying the tile will allow the construction level. For the best result, the slope of the floor should not exceed 2% or, simply speaking, not more than 4 mm by 2 meters of length.

Alignment of the surface under the laying of tiles
In the premises of the bathrooms, the preparation of the floor under the laying of the tile has its own characteristics. In addition to leveling the base, before the facing, it is necessary to carefully close the joints between the floor and the walls with a special waterproofing composition.
Laying tiles on "Warm floor"
Systems "Warm Paul", equipped under a tie, can be the most different. And made of propylene pipes - including.
If the screed is tested, and there is no complaints about it, then before performing work, the "Warm Paul" system will need to be disabled for several days. Next, the tile is laid on the basis of compliance with all recommendations for the preparation of the surface under the laying of the tile. Include a warm floor system is recommended no earlier than 2-3 days after the seams are made between the tiles.
If the "warm floor" system is equipped with thermal mats, they are also required to turn off at work. You can lay the tile directly on glue, without prior execution of the screed. Adhesive for tile, however, you will need a special, suitable for a warm floor.

Laying tiles on "Warm floor"
Preparation of sex under plastic tile
Also, as in the case of ceramic and tiles, it is necessary to ensure that the base (draft floor) is even, without any flaws. If necessary, it is also recommended to perform a cement-sand tie of the floor to achieve the best result. As a basis for PVC, the tile can be used chipboard, OSB and even plywood coating.
Before starting work on laying the tile, the foundation is recommended to be projected to increase the degree of adhesion between the materials.
The room temperature where work will be carried out on laying PVC tiles should not be descended below 15 ° C.
PVC tile is stacked by a joint in the joint. One of its differences from tile or ceramics is that air bubbles can be formed under it when laying. So that this does not happen, the surface of the tile is carefully closed with a rubber hammer.
Ceramic tiles are popular in the interiors when finishing floors and walls. Their beauty, durability, ease of care attracts consumers. From the thoroughness of preliminary preparation of the base, the life of the decorative coating depends.
What is this article
Requirements for surfaces
The preparation of the floor under the installation of the tile includes a number of mandatory work, which allow you to make the future basis of high-quality, smooth, capable of withstanding intensive loads. What to pay attention to:
- the presence of irregularities;
- check strength;
- protection against moisture, mold, fungus;
- surface purity;
- clutch of materials.
Removal of floor covering
To estimate the amount of intended work, it is necessary to remove the old coating. If a tile is laid on the base, it is dismantled together with cement mortar, with a perforator with a nozzle or a chisel. If the linoleum, laminate, parquet, is laid, then it is removed using a fir-handed tool. It is important to clean the surface from the leaks of glue, spots or paints with a 3% hydrochloric acid solution.
Paul is the following types:
- concrete (draft, with a screed);
- wood;
- with an old screed;
- with a ready-made basis.
Depending on the type of floor covering, the floor preparation for laying the tile will take different amounts of time, means, materials and tools. When working with any of the surfaces, follow a certain order:
- assessment of floor quality. The presence of irregularities, the gaps, the strength of the base, the degree of slope;
- correction of the identified deficiencies;
- cleaning;
- treatment with antifungal protective impregnations;
- laying waterproofing;
- applying a screed;
- drying;
- primer.
Preparation of concrete floor
General rules that are used to prepare the floor to lad out the tile.

- With the help of a rule of 2 m, the protrusions are noted more than 3 cm, remove them. The gaps and joints are expanding, processed with soil, cementing;
- Remove with a vacuum cleaner from the surface of dust, sandbreaks, rub oil stains. Treated with impregnation from mold;
- Make waterproofing. For this, it will be suitable: thick plastic film, geotextile, mastic, bituminous rolled materials, waterproof varnishes and paints. In rooms with high humidity, the film continues on the walls (up to 30 cm). In the residential premises, it is convenient to handle the mixes of the joints between the floor and the wall, plates;
- The type of screed is selected depending on the edge of the floor or the most protruding part. So:
- the height difference is up to 3 cm, corrected using a solution (tile glue), to which the tile will be laid or, the entire surface is poured by a self-leveling screed. It should be noted that the rapid drying of the mixture is achieved due to substances that form a film interfering with a good setting of the coating with a base on the floor surface;
- up to 10 cm use cement-sand tie. The thicker its layer, the longer it dries, possibly the appearance of cracks;
- over 10 cm lay out the clamzite, and after the solution is poured for alignment.
- Drying. Complete frozen of the cement mortar occurs in 28 days. When using quick-drying mixtures - depending on the manufacturer;
- Primer. Allows you to improve the properties of the clutch of the surface with the facing, get rid of dust residues, has antiseptic properties, protects the moisture from excessive absorption. Rolled over the surface with a roller in several layers. The choice of a priming solution is due to the type of screed;
- After complete drying of the primer (up to 12 hours), the preparation of the surface for laying the tile is completed.
Floor preparation with an old screed
If there is a screed on the concrete base, it is necessary to estimate its condition. If there are small cracks, the depressions, they need to be expanded, to handle the soil and close with a solution that will be used when laying the decorative coating. If the screed when climbing with a metal hammer makes a deaf sound, it is necessary to completely remove it. Further, the whole process occurs in the method described above.

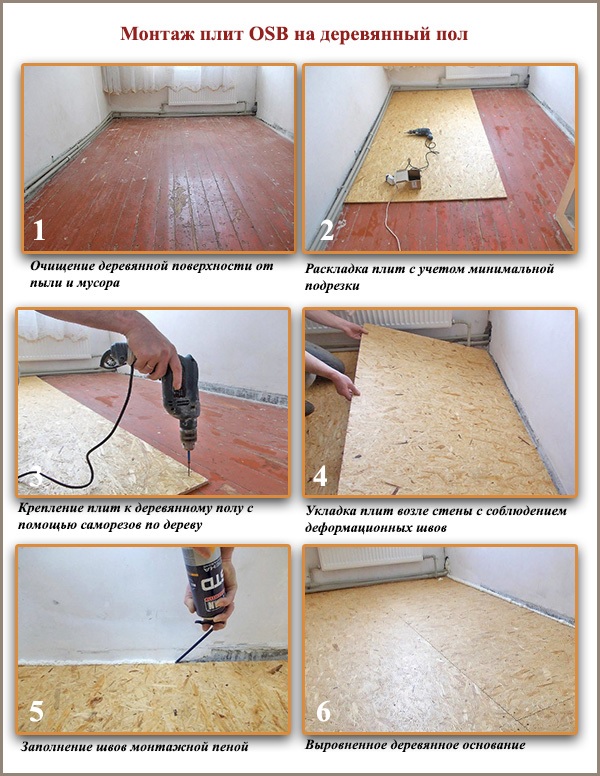
Preparation of wooden floor
The floor prepared for laying the tile should be smooth, clean, durable. It should be remembered that wood is subject to expansion and compression, these properties may affect the strength of the surface, as the final result.
If the floorboards do not creak, do not be suggested, then all the cracks are migrated to the mounting foam or sweeping, the surface is ground, waterproofing for wooden surfaces is placed. Then, the reinforcing mesh is stacked with a cell of 10 cm, poured with self-leveling solution for wood.
If the floor goes a chance, then you remove all the floorboards. The lags are treated with an antiseptic, falling asleep between them. Between the wall and stove leave the space up to 2 cm (the gap for expansion depending on the humidity), which is then gate. Further, the plates are soaked, carry out work according to plan.
Laying on the finished decorative coating
There are cases when linoleum is well glued to the surface and, it is difficult to remove it. To improve the grasp of glue with the base, it is permissible to process the floor with emery paper to better prepare it for laying the tile. When laying out a new tile on the old one, it is necessary to sweat its surface, check the tile is highly attached. The falling slices of the tile are removed, and the space under it is filled with tiled glue. You should make sure that the new layer of tiles will not prevent the door opening.
After all the preparatory works, the training of the floor under the tile is completed. It remains only to lay a tile on the finished surface.
How to prepare walls for laying out decorative elements?
The surface of the wall, as well as the floor, should be clean, smooth and durable. The tile laid on such a basis will last for many years. The order of work on the preparation of the wall under the tile is as follows:
- cleansing the surface from old coatings;
- alignment;
- soil treatment.
If there is an old tile, paint or wallpaper on the walls, it is necessary to carefully remove this material, as it will worsen the adhesion between the solution and the wall. In the absence of coating, the preparation of walls to laying the tile will take the minimum amount of time. It will be necessary to evaluate the type of wall flaw: concave, curved, with slopes, with irregularities at the joints. Depending on the height difference, use:
- plastering cement-sandy mixture (for bath) with differentials up to 6 cm or plaster mixes for kitchens and corridors;
- the use of plasterboard sheets - over 6 cm;
- the use of metal profiles and GKC with significant surface curvatures.
Plastering

The wall with the help of a chisel is applied notches, the grater gives it a roughness. Purify the surface from dust, ground with a suitable solution (depends on the wall porosity). If curvature is within 1 cm, then plastering is not required. If more, then you need:
- install the beaches on the edges of the walls, stretch the thread and secure the rack solution;
- apply stucco on the wall with a spatula and evenly distribute the rule;
- wait for drying;
- remove beacons;
- fill the holes with residues of the solution;
- after complete drying, the plaster rubs;
- the surface is so primed.
Use of plasterboard sheets

With curvature more than 6 cm, pre-processing of walls is required before laying tiles with plasterboard. First, you need to remove dust from the surface and apply a primer. Next, prepare sheets, and starting from the floor to glue them to the wall using the level and rubber hammer. The mounting glue is applied to the surface of the GLC with a step of 40 cm. The seams wipe the finish putty. After drying, the surface is ground.
Metal profiles and plasterboard
In strong deformations, the preparation of walls under the tile is performed using metal profiles. With the help of self-samples, the design is collected, the distance between the attachments of 50-60 cm. Sheets of plasterboard material must go to the profile half the width. Between the wall and sheets lay waterproofing.
Tile is a beautiful, durable material. And to the question of how to qualitatively prepare the walls for laying the tile is to approach the scrupulously and responsible.
 Why you can not postpone the pregnancy
 Effect from regular use of home recipes
 Features of the structure of the neck