Lessons photos for beginners: free video for home learning. From these recommendations, photography of photos from full zero begins
We will tell and show novice photographers how to properly keep a mirror camera, competently configure the camera in various conditions of photos, how beautiful to place objects in the frame and much more that you need to know to learn to be beautifully taking pictures.
However, you should remember that free photo lessons for beginners are not a magic wand. Neither the lessons of the photo nor the teachers of the paid photoshole nor the certificate of photocurses nor a photographer's diploma will not make a masters of the photo if you give the theories more time than practice!
It seems to success in training a photo very simple - take pictures of a lot, everywhere, in different conditions, and only sometimes, but regularly study the theory of photos!
Personal lesson 1.
How to keep the camera
You would be surprised by learning how many amateur photographers do not know the basics of working with a camera and at the same time cannot understand why their photographs look like something not very! Many of them are already adults who have long completed school and even received higher education. Is it worth spending going to study all understandable things?
Textural lesson 2.
How to properly press the shutter button
Using the photography "With a frame recondition", the most important object in the photo will always be sharp, this is how professional photographers take off. But, sometimes it is difficult to catch the climax of photographed events, especially if you photograph the camera with a large shutter trigger delay. You can reduce the lag of the shutter ...
Personal lesson 3.
The priority of the diaphragm or the priority of excerpts?
What is better to use a diaphragm priority or exposure priority? The answer is simple - depending on what you take pictures! In the TV or S exposure priority mode, get a non-blurred actuator will increase. On the other hand, if you want the background to be blurred in the photo, choose the AV mode (A) - the priority of the diaphragm. However, in this case, you may need a photo tripod.
Photo lesson 4.
Part one
What is the depth of field and how to control the flu
If you carefully look at the photo, where there are objects located at different distances from the camera lens, you will notice that, with the exception of the main object of shooting, some objects, both before the main and behind it, are also sharp ... or vice versa blurred.
Part two
Focal length lens and blurred background. The first rule of the hype
What is the focal length of the lens. What is an angle of view of the lens. What is the relationship between an angle of the crision lens, focal length and depth of field (blurring the background in the photo). Press the button selection buttons of the focal length of the lens and the observes changes the depth of field depending on the focal length of the lens
Part of the third
Blurred background and lens diaphragm. The second rule of the hype
In this lesson about the depth of field, you will learn about a more powerful tool for changing the depth of field. To see how the photo will look like with a closed diaphragm, use the rehearser of the diaphragm - the button by clicking on which you can forcibly close the diaphragm to the set value and estimate the depth of field before you take a picture. Lens diaphragm switch buttons under the picture
Personal lesson 5.
Fundamentals of the composition in the photo
Please remember what you felt when they looked at the masterfully shot frame? What picture attracted your attention? It is difficult to answer this question, isn't it? But the thing is that competently shot photography attracts your attention on the subconscious level ...
Personal lesson 6.
Photographing a portrait
Portrait, perhaps, the most responsible type of photography. Not because if the photo is an unsuccessful model can be offended, or even ... :-) Because the portrait reflects not only the external feature of the object being removed - a good portrait photograph always transmits a mood or sense of model.
Text time 7.
Landscape and macro
Landscape and photography with a very close delay - what can be common between them? Photographing landscapes, this is the opposite of the portrait, in the sense that all objects in the frame should be sharp. For photos of landscapes and macro better to use compact cameras with a small matrix ...
Personal lesson 8.
Photography Panorama
Panoramic photo is a relatively new and very spectacular mode available only in compact digital cameras. However, even if there is no panoramic shooting mode in your camera, you can still do a great panoramic picture.
Personal lesson 9.
Proper exposure
Proper exposure is very important for good photos - this is the most important component of the technical quality of the photo. Since the artistic photo of photos partly is a subjective evaluation of the snapshot (taste and color, as they say, no comrades), then the photographer class determines its ability to remove the frame with the correct exposure in any lighting conditions ...
Personal lesson 10.
Equivalent exposition couples
Imagine that you take off the portrait and you need the minimum depth of field - you fully open the diaphragm. To obtain the correct exposure of the photo to the selected diaphragm, you need to choose an excerpt. And now, imagine that we went to the shadow. Light has become less - the conditions of photography changed ... We will guess the correct setting of the camera or make test pictures?
Photo lesson 11.
What is ISO in a photo and camera?
And you know that, depending on the characteristics of a particular camera and a lens, the available excerpt and aperture values \u200b\u200bare changed, and it may happen that you cannot pick up a suitable exposure pair. If you do not have the opportunity to set the correct exposure pair, you will not be able to get a properly exposed frame: O (what to do? Does the frame be spoiled by the wrong exposure?
Temperature lesson 12.
How to photograph with photo flash
Why in the "automatic" built-in photo list often turn on when light and so much? Do you know why the built-in photo message is used in a dark room - not the best idea? How to eliminate the basic disadvantages of the built-in flash and how to use a space-free (external) flash ...
Personal lesson 13.
Photography in unusual conditions
As competently photograph the sunset. How to photograph salute or carousel. You were told that you can't take pictures against the sun? You can get excellent photos and when photographing against the sun, if you learn how to use ...
Personal lesson 14.
Camera Setting: Manual Mode M or SCN?
Many amateur digital cameras do not have a manual shooting mode M and therefore do not allow you to configure the camera manually. But, there are a camera settings that allow you to get around this flaw ... But even if there is a mode in your photo, the letter M and you want to quickly master it, then this class lesson will be especially useful for you - I will explain the logic of the exposure settings for you often Meeting plots.
Personal lesson 15.
What is white balance?
Have you seen color photos on which all colors turned out with some kind of yellowish or bluish tint? You might think that this is this camera is not good enough ... or something broke something ...: O) In fact, any good camera (even the most expensive, shooting in AWB mode can make similar photos. It's all about mysterious For a beginner, the configuration that professional photographers often reduce up to two letters - BB ...
Still: how to take pictures of your first photo-masterpiece. The use of these simple rules and practical tips on the photography very soon will allow you to photograph your first photo masterpiece.
Gathering on vacation or long-distance journey, you always take a camera with you to capture the bright moments of life, but how to photograph a mirror photo and what parameters to pay attention to the photo please you?
In this article, we will look at all the parameters that you need for the correct photographing on the journey, we will try to set out everything so that it is clear even a novice photographer. After reading our article, you will no longer wonder how to photograph the landscape, portrait, architecture and other shooting directions. But for starters, read our articles about the fact.
More and more driving in different countries of the world, we see the transition of all travelers to mirror cameras, but most of them borrowing an art survey machine take pictures on automatic modes. Why pay such money if the traveler does not even want to see what kind of potential keeps the mirror photo apparatus? Or maybe he simply does not know how to photograph, perhaps, we will begin with this.
Such photos are obtained if you follow the elementary rules
Let's start by S. matrians Camera. The most important parameter of the correct photographing carries the matrix, the more physical size of the matrix, the greater there will be a light bandwidth, and therefore the photo will be much rich and brighter in colors. On budget mirror chambers, the matrix size is 23 × 15 (crop matrix). In professional technology, the physical size of the matrix is \u200b\u200b36 × 24 (full frame or FullFrame), with a full-frame matrix you will have amazing photos, but for the correct photographing of the object, you will need some other parameters to pay attention to you.

The size of the circumcision (crop) matrix relative to the full-frame matrix
Correctly photograph also a camera with bo to the number of megapixels. For a modern mirror chamber, a number of 18 megapixels and more, but many plants under the guidance of marketers manage to shove a huge number of megapixels in a small matrix of some soapy, which is impossible in its small physical size. From such cameras of ideal photos should not be expected! We give advice, pay attention to the Nikon series mirror cameras starting with the D7000 and next, Sony Alfa series, Canon EOS with two or better one digit before D "" (for example, Canon EOS 60D).
All the above, the above-mentioned series of cameras have a matrix not for the wide consumer market, which means the quality of the matrix remains at a high level, unlike the lower series of these cameras, which are well promoted by marketers and to which so good "pecks" people due to low price. To the question of how to photograph and choose a good matrix, you already know half of the answers, but what mode to choose better?

Hand modes are highlighted in red
Another parameter for proper photographs is depth of field. Now you need to forget all standard modes (auto, portrait, landscape ...) and start using modes " AV, TV, M, P"Nikon has modes" A, p, s, m" other. For the depth mode, we need mode " AV."Canon or" A."Nikon. In this mode, you can change the number of diaphragms that may vary from 1,2 before 22 .

Pay attention to the blurred rear background.
You probably have seen more than once how good photographers make a photo with a blurred back background, it is the depth of field and it depends on the diaphragm. The smaller the number of the diaphragm, the more you can blur the background, but you must first focus on the object you want to highlight. For example, for the correct portrait photograph, you need to set a diaphragm from about 1.4 to 5.6. To correctly take a picture of the landscape, you need to set a number from 11 to 22, from such numbers the depth of field will be at the limit and the image is sharp and realistic.

The second moment you need to consider that the focal length of the lens also affects the depth of field. The greater the focal length, the more errors the back background behind the object of the shooting. The wider there will be an angle of lens - it will be less blur.
Another factor affecting the question as correctly photograph is the distance from the lens to the shooting object and from the object to the rear background. Let us explain, portraits need to be removed on a larger approximation, after setting the depth of field to the minimum value (for example, put 1.4).

Here you see blurred background in Dali and the shooting object two meters from the lens
For proper photographs of portraits, Fixes exist - lenses or portrait lenses with a focal length from 35-85mm (in such lenses, the minimum diaphragm value is from 1.2). With such lenses, the blurred background is provided to you if the subject of shooting is far from the rear background and you set the minimum number of depth of field.
We go further to deal with "how to photograph how to photograph", for this you need to study the exposure parameters. Nikon shutter speed is denoted by "S", Canon is denoted by "TV". This mode is used extremely rare, and is mainly needed for artistic photography. For example, to correctly take a picture of the river, which will freeze in your picture, we need to make an excerpt for about 5 seconds, after such an excerpt, it turns out that ...

The camera is in the shade and exposure set for 5 seconds
If you decide to experiment with an exposure, then be sure to be a tripod otherwise all the image is woven. Exposure It is necessary to use only in the evening or night time, in the daytime it is a photo of it is simply white because of a large number of lights in the time of high exposure. It is also worth considering, in this mode, the matrix is \u200b\u200bparticularly susceptible to breakdowns and can simply burn from the sun, for this use neutral filters or the installation of the camera in the shade, the filters are dressed on the lenses and protect the matrix from overheating.
Let's open a small secret if there is no such filter at hand, then use conventional sunglasses from which the artistic effect will change your photo in the best straight. But sometimes even with the highest excerpt that you can put on the camera (up to 30 minutes), the image is still dark, ISO will come to the aid of us as another answer to the question how to photograph correctly.

Photo taken on Lake Baikal with sunglasses instead of filter
Televance (ISO) is exhibited when you decide to photograph in the dark day. At night, when your photo gets dark, and with a flash photo it turns out to be light and flat, an ISO parameter comes to the rescue. Its value can be set from 100 to 12000 or more depending on the mirror photo.

The photo was made in the Tunky Valley with the wrong ISO value exhibited
To photograph to photograph with this parameter correctly, we recommend not to increase the ISO value to more than 6400, then the "noise" and your photo is beginning to be formed in the odds. In order to correctly take a picture of the object at night, of course, many will begin to use the standard flash, we will talk about this parameter separately!
If you decide to find answers to the question how to photograph, you forget about the standard flash. A photograph with such an outbreak is overly light and flat in volume, if you have extra money, then be sure to buy an external flash, you make a huge step towards the right photo.

The photo was made at 3 o'clock in the morning with a water Russian city with an external flash
At worst, you can use the usual built-in flash, but with a little secret. So, we take the usual white sheet of A4 format and close the flash, in this case the sheet will serve the light diffuser and give the image light bright, volumetric tones, and also remove the "red-eye effect". In this way, it is good to use in a dark place or in the gloomy time of day.
On the way to success in the question how to photograph to photograph further and consider the sharpness of the lens. No landscape do without sharpness to get the most sharp image, take a look at the lens parameters. The sharp lenses are Fix lenses, zoom lenses in this regard lose, they have blurred on wide and long corners.
In order to qualitatively, sharply and correctly photograph the object, allocate it from the main plan. You definitely need a fix lens! But there is one big secret - all lenses have its own maximum number of sharpness, this number can be calculated by making multiple test images at each depth of field and see the results obtained on the Big Screen. Usually, the slightness of the lens begins with a number 2.8 to 11.

A stack of hay is located at two points of intersection of lines - the perfect composition!
Another most famous and main answer to the question of how to photograph is correct - this is a golden cross section rule. Watch your image into two horizontal lines and two vertical lines, so the main object of shooting should be at two points of intersection of lines. Do not forget to photograph and landscape. If you, for example, take off the sea and the sky, then either the sea or the sky should take more than half of the frame (2/3 of the frame). This rule is called the correct composition of the frame and is one of the important parameters of a successful photo.

According to the rule 2/3, the sky is only 1/3, because the entire plot of photographs is located in the haystack located on Earth
how to take a picture of the portrait and do not cut anything superfluous? To do this, you need a cheat sheet below ...

Proper portrait cropping
We looked at all technical parameters to the question of how to photograph, now consider the usual life parameters, which you should not forget about everyday shooting and which will enable perfectly and correctly photograph shooting objects.
First of all, you need to check the battery charge and take a spare battery with you, it will be needed to you at the most suitable moment of life. Do not forget to check the amount of your memory card leaving the house, sometimes it is filled out and photos on it in a single instance. Do not forget than the battery is more discharged, the more auto-focus will flush on the shooting object.
For the correct photographing, it is also worth paying the attention of dust on the camera mirrors and lens glasses, check it easily, photographed a light one-knife background. To remove dust, use only a special pencil or other cleaning products for optics and apparatus.

Cleaning pencil for lens and camera mirrors
We go further to receive answers to the question how to photograph and do not forget the attributes for the camera, if you are shooting at night - do not forget to take an external outbreak and tripod, shoot an art photo on long exposures - do not forget photo filters, tripod and other accessories.
For the right approach to the photo, do not forget and put on the weather right. Before shooting, check all the camera settings so as not to skip an important point, select the optimal mode and values \u200b\u200bfor shooting. If suddenly, during the shooting, the battery is sitting, and you have not photographed the object you need, turn off the screen, go to manual lens focus mode and lens stabilizer.
If water or sand got into the camera, then the first thing to pull the battery and do not insert the camera until the camera does not dry, if there is a hairdryer, then it's just great. With sand, another story, sand can cause mechanical damage to the internal mechanisms of the camera and then expensive repair you are provided.
Observing all these rules and recommendations of the site site described above, you can definitely succinitive in the photo. But in order to raise your authority in my eyes, we recommend communicating with photographers on profile sites and forums, put your photos at different thematic exhibitions on the Internet, sometimes even earning on it.

Mount Elbrus was photographed at 5 am to capture all the paints of the artistic photo
Well, here are all the answers to the question how to photograph to be photographed and shown. In order to learn how to photograph correctly, you should always experiment and forget about standard photographing modes. At first, the pictures in manual modes will be obtained dark, blurred and not high quality, but after you make several hundred frames with different settings, you will see all the possibilities of a mirror camera on the examples of your work!
Publication date:31.10.2014
This article we open a new project. "I'm a photographer", Within which we share with you using photographing. Weekly will leave new lessons about all aspects of photography. Lessons will be focused on a different level of reader preparation: from a beginner to an advanced photographer. I will conduct this project I am, Konstantin Voronov, professional photographer and teacher of photography.
Of course, each of us has ever been shooting or on a simple "soap". However, many want not to just make frames for memory, but also getting beautiful, high-quality photographs, getting pleasure from the photograph process, and when you lay out photos on the Internet, there are many "likes" under them.
How to become a photographer? Where to begin? Every day, this question is asked many people. To begin with, I will give a few general tips to help at the start not to make common mistakes, and will dispel a few rallies about photography.
Nikon D810 / 70.0-200.0 MM F / 4.0 Settings: ISO 100, F4, 1/80 C, 95.0 mm eq.
And let's start with delusions.
Misception number 1.
"A good camera makes good photos"
This is not true. Good photos do not make a camera, but a photographer. Many people before starting to take pictures on their own, think that professional photographers are good, high-quality shots due to the use of expensive equipment. However, the camera is only a tool. How to use it, solves his owner.
If unique to draw a person to give the best, most expensive brushes and paints, it will be absolutely the same result as when using the easiest and cheap. Good brushes and paints will show all their capabilities only in skillful hands. With a photo is the same.
During working with students, I often came across newcomers, who had the most expensive, the most professional from the existing cameras. Have such students do such students better than others? Not. Even on the contrary: their pictures were worse, because they could not figure out the complex photo equipment designed for experienced professionals.
The camera is best to choose not by his belonging to the professional class or the highest price category, but by how much it is suitable for your level of training and your tasks. For example, many expensive professional cameras, such as Nikon D810, do not have automatic mode and plot programs at all ("Portrait", "Landscape", "Macro", etc.), which makes work with them incredibly difficult for beginner photographers : You have to dig in unknown settings for a long time. At the same time, many entry-level cameras, such as Nikon D5300 or Nikon D3300, are able to make beautiful pictures on the full automaton: the photographer can only choose the most interesting stories, without thinking about the technical side of the issue.
How to choose a camera? Choose not "the best professional camera", namely, the model that is suitable for your skills and your tasks. To make the right choice, it is enough to understand how seriously you want to engage in photography, are you going to learn to take pictures or want to just take pictures for memory.
Discussion №2.
"Take pictures easy!"
Like many creative classes, the photo seems to be a very simple matter at exactly until they do it yourself. For example, as a game on musical instruments, dances, singing ... You look at the professional dancer and you think: "How he does everything and naturally it turns out! It seems that there is nothing complicated! I can also! " But when you try to independently do at least a couple of dance movements, it turns out that it is not so simple: at least, you need special training.
The same with the photo: when apparent simplicity, it's good to take pictures - quite difficult. After all, it requires a large number of knowledge and skills. Moreover, both technical (how to configure a camera, for example) and creative (how to connotate the frame, how to choose suitable lighting). Sometimes it comes to questions that seem to be indirectly related to the photo. For example, how to plan a tourist trip to get a lot of good frames; How to make a child sit still, while it takes pictures ... By the way, we will cover all these topics within this project. Stay tuned!


On the other hand, when there is a necessary experience, it is really easy and pleasant to take pictures. The camera does not interfere with getting good frames, and the composition is arranged intuitive. But for this you need to train, learn, gain experience.
Misception number 3.
"To learn to take pictures, it is enough to study the equipment and correctly press buttons on the camera"
Technique and shooting parameters are only part of the necessary skills. And, by the way, part is the simplest. How to configure exposure? How to manage focusing? What is white balance? - All these technical issues are solved easily and simply, and with regular training, they are fixed and remain with the photographer forever. This is the arithmetic photos, two plus two. But the photo is primarily creativity. But the creative component is much more complicated and not so unequivocal. How to compose the frame? What to show in the photo? What plot is worth photographing? The photographers are constantly tormented by these and many other creative issues and solve them with varying success. Starting the studies of the photo of course stands with Azov, with technology. But to finish it early.
 Nikon D5200 / 18.0-105.0 MM F / 3.5-5.6 Settings: ISO 1100, F4.5, 1/60 C, 38.0 mm eq.
The main problem of most novice photographers is not the lack of good photographic equipment and not even a lack of some special skills. The main problem is the lack of artistic taste. Form yourself a good artistic taste! See photos of famous photographers, attend exhibitions. By the way, when was the last time you were in the Hermitage and the Tretyakov Gallery? Analyzing the works of the real masters: Why did the artist or the photographer decide to show this exactly that way? How is the composition built? How did the author work with light?
Visiting exhibitions, viewing galleries of famous photographers and artists on the Internet - this is what will give you a good luggage for your personal creativity. Conversely: bad, mediocre things are better not to watch.
Why is it important? Imagine what happens, if a person who has never seen a single picture, give a brush and paint in the hands? Most likely, he will not understand what to do with them; At best, he will depict something in the spirit of rock painting. For example, some isolated African tribes do not know how not only to perceive the image on the plane, but even distinguish between the colors that are not responsible for their survival, are not found in their environment. Because no one taught them, they do not have the necessary experience for this. It is peculiar to the person in his life and creativity to use seen, accumulated experience. This experience must have. As the photographers say, "you need to be watched."
As we know, lying on the couch at home, good photos will not do! Watch your camera! Travel, walk, attend interesting places: exhibitions, festivals, sporting events. Thus, you will witness interesting plots for shooting, get the experience required for shooting in various conditions. If we talk about landscape shooting, then it is generally unthinkable without traveling. By the way, like portrait: it is often to shoot a good portrait to choose a beautiful place, a good background, and only then beautifully take a picture of the model.
There is a purely psychological aspect: in the journey, regardless of its range, a person is gaining impressions, inspiration, charges creative energy.
 Nikon D810 / 70.0-200.0 MM F / 4.0 Settings: ISO 400, F4.5, 1/200 C, 200.0 mm eq.
So that there were progress in your occupations of photography, and the number of beautiful pictures increased, it is necessary to refer to your creativity critically. Do not rest on the laurels, know the shortcomings in your works, even if all of them praise.
For example, the most rigid critic of my works - I myself. I know better than any criticism, in which and where the errors in my pictures are taken. Analyzing your photos, I understand that I could remove even better. And with the next shooting, I try to do it. Believe me, you will get a great pleasure from correcting your own shortcomings, and your pictures will become more beautiful!
Any creativity begins with the technical foundations. Photo - no exception. To write books, you need to explore the alphabet, grammar, spelling of the language. Of course, modern cameras have excellent automation, which will allow you to get good frames by pressing a single button, without thinking about any settings.
However, those who remove in authores know: automation is often mistaken: the brightness of the picture is not the same, then the colors are not the sharpness there. But so I want to say the camera, as it was necessary to do! To fully control the shooting process and do not depend on the quiet automation, it is worth studying the fairly simple technical foundations of photography. How is the image in the camera formed? What is the exposure? What is white balance? How does focus work? Understanding how everything works, and the ability to configure your device will allow you to take high quality pictures and fully control the shooting process "from and to". By the way, we will talk about these technical foundations in the following lessons.
This article will be interesting first of all to those who acquired a mirror chamber, removes in automatic mode, but wants to move on.
Consider the mode of the exposurer. There are a lot of questions about the depth of field and what affects it. When you go on sharpness, at a certain distance from the camera objects become sharp. That is, there is some plane in which all objects are visible sharply. But this is ideal, in fact, this plane has some assumptions that depend on. The smaller the aperture hole, the greater these assumptions (wider zone where the objects are sharp) and vice versa, the greater the hole, the less these assumptions.

For greater clarity, I will give examples of photos with different values \u200b\u200band which clearly see how the depth of field changes from its value.


Note How highly depends the depth of the sharpness from the number F, indicating how open the aperture hole is open. Immediately I want to specify two things: the first picture is not photoshop. So it really is obtained with a fully open diaphragm. And the fact that the second photo is "elongated" in Photoshop. Let it not bother you, the fact that with the same parameters and shutter speed changes, and the picture is not much darker.
A few words about choosing shooting parameters. To begin with, you must decide for yourself that you are more important to "freeze / smear" movement or depth of field. In the first case, for you a priority is in the second. For example, from personal experience I can say that excerpts at 1/60 seconds when shooting slowly moving or still objects (portrait, landscape, walking person, still life, etc.) is enough to get rid of movement and lubricancy movements. If you are shooting, something faster, for example, cars, race athletes or flying bird, then the excerpt must be reduced to 1/100 second, and if you have a goal to take a picture of a drop in flight or a falling subject, the exposure time must be set less than 1 / 500 seconds to freeze the movement.
Also, based on our own experience, I can say that the diaphragm is less than F5.6 often leads to the fact that only the subject is obtained by sharp, and everything else is blurred, and this effect is not needed in all cases.
Several examples for what frames is that priority.


The same story
f 11.0, ISO 100, EXP 1/250

It was required how to narrow the depth of sharpness, that is, as much as possible, open a diaphragm.
f 1.8, ISO 100, EXP 1/80

The same requirements as for the previous photo.
f 1.8, ISO 400, EXP 1/80
Pay attention to the ISO parameter in the last two photos. It varies greatly, and everything else completely coincides, nevertheless, both photos turned out "normal" this is explained by the fact that in the first picture there was much more light illuminating paper than on the second.
This site about photography does not pretend to complete the base of the photo. Rather, it is a small tutorial photo for beginners who want an accessible language to get answers to questions about how to remove it correctly.
Which camera is better suitable for me for me and what to choose is the key question of many newcomers, which I don't really like to answer, because I wrote "how to choose a camera", and then also "photo tutorial", read now. Today, a compact - thanks to a small size and accessibility - enjoy a huge number of people: from movers, to top managers of large companies, and a mirror - thanks to a great price, size and great opportunities - also use a lot :) Humor is that the majority and those And other photographers in general unfamiliar even with Aza photoela. Six people out of ten did not read the instructions of their camera, seven out of ten remove the moon with an outbreak, eight remove the marriage without trying to understand why it did not work, but nine believe that the mirror camera always automatically makes beautiful pictures. And the mirror differs from the compact only the capabilities, because the problem is not always seen in the chamber (and not even in price), but in reluctance to study neither the camera or the basis of photography.
Therefore, I created this tutorial for passionate people who wish to make good pictures, master photoelle and camera, but do not know where to start. Basics of photographs for beginners are knowledge of the camera and the ability to make a technically correct picture; A photographer, besides this, should own some set of creative techniques, and a professional is to be able to remove to order. We will not consider the latter, to become a professional easily: if a friend asked you to take a picture of him and ready to pay for work, then you immediately consider myself a pros :) The artist who knows how to make not just a beautiful photo, but to fill it deeply internal content, or reveal the spiritual world of the character. If anyone promises to teach you to this - do not believe it will begin with the Azov :)
Learn to photograph easily. It is difficult to learn how to make good photos :)
How to shoot correctly
For a person, who first took the camera, first of all, you need to learn how to keep it in my hands. And in both. These are the foundations of photos! A typical start-up error - the camera in one hand, stretched forward. 
For example, like this. The result is clear. The hand is trembling, and the shiver, of course, is transmitted by an unstable-located camera, and as a result, a snapshot is smeared. Such an unpleasant effect of photographers is also called a coach, this incident is not every time, but usually with poor lighting. The most difficult to remove the owners of soaps, in which you can only visit the display. But in this case, you do not need to pull your hands as much as possible if the angle of the screen of the screen allows you to keep them closer. The owners of the mirror cameras also do not need to decease - there the movement can cause cotton mirrors, although the mirror is more stable in his hands due to its weight. Apparently, in a special position there are owners of large "compact" cameras with a viewfinder :) Shevelenka - the main enemy of the photographer, we will also prepare for the sobs of this beast more carefully.

On the right one more very unsuccessful photo sample. To understand a similar error, you do not need to comprehend the foundations of the photo by posting textbooks. And failure will be at once for two reasons. Not only that the shooting is done on the elongated hand, it's not yet in the additives and the lens cover :) by clicking on the frame, you will see it clearly ...
And the result of such a shooting (if the focus is allowed) will certainly be a masterpiece - absolutely black square Malevich :) or rather, a rectangle ...
Do not smile, gentlemen, the bird will not crash!
How else to keep the camera? How to shoot? On the left snapshot below you can see the most stable position of the camera when shooting. Elbows tightly pressed to the body, eyepiece - to the eye, 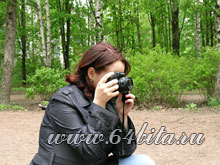 The right hand holds the camera (the finger is ready on the shutter descent), the left holds the lens. The camera in the hands must be kept tight, but without excessive voltage. It also happens that the stronger the camera is squeezing, the greater the trembling, which is caused by the tension of the muscles. The camera should be felt, it must be a continuation of the hands (and even better - the eye!) Of the photographer. For greater stability, you can put your legs wider than shoulders so that you do not swing the wind :). It is even better to rely on something shoulder - a wall, a pillar, the fence - everything will fit! You can drink the camera itself, for example, about the Parapet of the Embankment, or the table. And ideally on tripod. Many beginners neglect by a tripod, without which it is unthinkable to a self-portrait in full growth (you can with friends!), Or clear photos of the night city.
In short, you understood the idea. The camera should not tremble in order to avoid lubrication, lubricated photo of ugly. Always keep the camera with two hands, even if you take off your mobile phone. Press the trigger button smoothly, and do not release a sharp finger, it can cause unwanted oscillation. In the frame, compress everything is superfluous, not necessary - only the essence! These are the very first foundations for beginners.
And further. Usually beginners do not pay attention to light. Remember, the light source should illuminate the object of shooting, and not the background behind it, not foreign objects, and not the lens of your camera! Do not remove against the light, only experienced photographers make it - with the help of counter-slices. Little advice. Try to shoot with good lighting - as a rule it is a bright daylight. In any room, the conditions of shooting become quite complicated for any camera. If you still do not know the terrible words exposure, excerpt and aperture, then remove on the machine. With a good daily lighting, even a simple soapbox machine gives quite decent results. Photography for beginners here is usually reduced to cropping - the choice of the frames of the frame of the future photography using the viewfinder, or the liquid crystal display. At the same time, sometimes use zoom, approaching what you want to remove, or even easier - "crumble with your feet", coming closer (or further) to the shooting object. In addition to the borders of the frame, you need to choose an angle, i.e. Determine from which point (and at what angle) to shoot to prevent the object of your photo modelings in the winning light itself.
There is a well-known anecdote on this topic. Two photographers go, one stumbled and fell into a puddle. The second immediately falls nearby, with a cry catching the chamber:
- What angle ?? What do you remove ???
Jokes jokes, but, in fact, in this and there are - the choice of frame borders, angle and work with light. In fact, these concepts cover so much that there is enough for many volumes ... Our task is still modest - to learn the elementary concepts, such as exposure and aperture, what is lubricant, noises and how these (and other) is avoiding. The camera is your tool, and it first first to master it to learn how to use and how to shoot them correctly - in the elementary sense. Such foundations immediately generate the following question:
And what tutorial on the photo you need to master the beginning to learn how to shoot? The first textbook should be instructions for your camera! It is very useful to study (and not only newcomer!), Especially if there is more than one button. In the camera, of course :)
Those of you who still want to improve, you need to know how to work with the exposition. The exposition is, roughly speaking, the time for which the desired amount of light will fall on the photo material, and is realized by the ratio of exposure and the diaphragm, with a given photosensitivity. Of course, for this, your camera must have such settings as shutter speed and diaphragm. With basics and start.
What excerpt is
Exposure is the time that the camera shoes opens. The longer time - the more the light will affect the photo material (film, or the matrix.) In fact, it is not as difficult as it seems at first glance. If dark (for example, evening, night, dim lighting), then the excerpt, of course, should be longer. For example, 2 seconds, 1 second, 1/2 second, or, let's say, 1/15 seconds. Why? Because if at night you will set a short exposure (for example, 1/100, or 1/250 second), then the picture will be almost nothing visible - a solid darkness ... film, or the matrix will simply do not have time to "frish" for such a short time. Was when the old good camera "Change 8m"... Here's how an excerpt was implemented in it:
On the first picture you can see small images of clouds. Right left: bright sun, day, cloudy, overcast, evening. And so that the photographer does not forget at all at all, it corresponds to the desired value, on the other side of the lens there were the same gradations, but in numbers: 1/250, 1/125, 1/60, 1/30, 1/15. ("In" not to be confused with 1/8, there was no 1/8 fotic ... "in" - this is a manual exposure - how much do you hold the button, so much shutter is open). Red risk is located on the second cloud (overcast), which corresponded to 1/30 seconds. Place the risk opposite the desired value was reached by the rotation of the lens exposure ring. Not difficult? A good technique was, simple and understandable as 3 rubles ... Now how to get to read the description of the digital with the listing of settings, it becomes so bad. "Setting the digital zoom"! Yes, it is generally not needed for shooting ...
In my opinion, everything is fine here. It is a pity that the excerpt range was not very large 1/15 - 1/250. But what to want from the old, inexpensive, nationwide camera ... And he removed, not so bad ... Modern digurities (with manual settings) have a much larger range: from about 30 to 8 seconds, to 1/4000 ( And even up to 1/8000!) Sec., and of course "in". Cool? Well, the progress does not stand still (and the price, by the way, too!). However, I think it is not necessary to explain that the presence of a large range does not guarantee high-quality and (especially) interesting pictures!
It should not be used in relation to the expression of the expression "more", or "less" - it can be confused, because the more the number in the denominator is the less time the exposure time! Therefore, more precisely and easier to say "shutter speed", or "longer."
When shooting moving objects, it is necessary to use short exposure - the faster the movement, the shorter excerpt.
The author, of course, brought an interesting picture with clouds on the old Soviet lens, but where to observe the exposure readings in modern chambers? In soap jerse, alas, nowhere. In the mirror camera - always in the indication of the viewfinder, and only in modern models of the mirrors also on the screen. The compact is always on the screen, and only in some models - by the viewfinder. The same with the diaphragm, and with the choice of focus point, and the focus confirmation, and some other entertaining parameters, the state of which can be monitored by turning on the shooting mode.
And how to use this wealth, which buttons click, which wheels are twist - see the instructions for the camera, since the models are different, and everything is implemented in different ways. The instruction is the best tutorial of photography, but not my site, as some photographers have already thought rash :)
But the instruction is not a panacea. In the text of the textbook, there will be more different incomprehensible photo-words that will be explained right "along the match". But if you missed - there is a pretty complete on the site Photoslovar. Do not forget to return from there backwards :) The foundations of photography (as well as any other case) imply not only the desire to rush with the buttons, but also the ability to consistently receive knowledge - from simple to complex. Stand up with exposure, Lord-comrades, :)
here are examples of excerpts:
| Running, excerpt 1/250 sec.
|
1/4 sec. and longer - necessarily need a tripod Why is the first number 3.5, and not 4? After all, the standard values \u200b\u200bof the diaphragm are based on an increase or decrease in the illumination of the object twice (and in mathematics in √ 2, i.e. at 1.4142 times :) f1; F1.4; F2; F2.8; F4; F5.6; F8; F11; F16; F22; F32. However, the first diaphragm numbers on lenses may not coincide with standard and be, for example, F3.5; or F1.8 is associated with the lens design. The translation of the diaphragm on one division changes the shutter speed also to one division (usually twice the values \u200b\u200bof exposure, but this can be adjusted by setting intermediate values \u200b\u200bfor greater accuracy). Thus, the same illumination is achieved. Photography for beginners implies possession of exposure and diaphragm. Excerpt does not own only very sharp and hot-tempered people, but the photographer is obliged - in any case! Setting the exposure and diaphragm is called exposure. Usually for certain lighting, the correspondence of these two values \u200b\u200bis necessary, which, sometimes, are also called the expiratory. The rules are as follows: The more you pinch the diaphragm, the longer the excerpt should be (for as many values), and vice versa. Basics of photos! This rule works in order to obtain the same exposure (not to change it for the image with the same lighting). It turns out that in the chamber in fact there are 2 "identical" settings, and both make the same thing - dosage light. However, the effects of these settings are different and photographers are very actively used by this. Sometimes the diaphragm is used not only to increase / decrease the amount of light, but also to control the depth of field. For example, like this: As you can see, the figure in the foreground is focused (in this case, for those who are unfamiliar with a noble game is a black king), and the rear plan's blur can be adjusted with a diaphragm. And what is focus, focusing? In any encyclopedia, the following will be said (or approximately the following): Focus (English: Focus) - a point in which the parallel beam of light rays occurred through a single lens (or optical system) after their refraction. And what did the newcomer understand from this definition? What does it explain to him and how does the photographer help the photographer? Nothing in any way. Let's formulate more clearly. Focus is a point in which the lens creates a clear image of the subject. The mentioned "Setup", or the laying of the lens is made either automatically - when applying the "Start" button, or manually. The mirrling press is manually achieved by rotating the focusing ring on the lens until the subject of the shooting is in the eyepiece of the viewfinder is especially clear. Then we have the term "object in focus", "attacked sharpness", "focused", etc. What happens in the background? The back plan - and so you saw for the king on the left picture - it can be "blurred", "unresight", "not focused", "out of the focus zone", "did not get into the depth of field," not clear, "muddy", " Cash "- to your taste :) In a compact, everything comes down, as a rule, only to the selection in the on-screen menu of some focusing points (left, right, in the center, etc.), and there are no autofocus in the soapboxes. But we will not run forward - we will return to focus, and to the conversation about the depth of field. Let's see another interesting effect that can be obtained by changing the diaphragm. When it is closed, the luminous objects turn into ... stars - the more it is closed, the longer the rays are obtained. Interestingly, the amount of rays often depends on the number of petals of the diaphragm, the more petals - the more rays. If the number of petals is used, for example 8, then the rays will be exactly the same. Now you probably realized that the diaphragm and exposure are a rather powerful creative tool in the hands of the photographer. And, of course, tripod! Opening a diaphragm to f / 2 (the picture on the right) we obtain a very long shutter speed of 1/6 seconds., And if the diaphragm is covered to F / 13, and even at night, we get an exposure much longer (in this example 30 sec.!). Have you already guessed that it will be here in the absence of a tripod? That's right, everything will be smeared - in the dark with hands do not click! Always distinguish the phrases "zoom in a diaphragm" and "zoom in a diaphragm". The meaning is the opposite of them. With a diaphragm value of 2, its hole is much larger than, for example, with a value of 8. In other words, you opened (they also say "opened") aperture. But the "cover" is just the opposite! In this case, imagine a hole, and then the numbers. What is the exposure and explorationWe already know exposition - This is the excerpt and the diaphragm necessary to obtain the desired amount of light at a given matrix light sensitivity (is regulated by the ISO settings.) Competent exposure is a guarantee of the correct image display. And the excerpt itself and the diaphragm in this bundle are called the exploratory. Many beginners are asked, "how to find out which diaphragm does the desired excerpt match." Reply to them "Depending on the lighting and your goals" means nothing to answer (although, the answer is the most faithful!). Who wants to learn more (and to assimilate the foundations of the photo), see here: and even better - experiment more and you will understand everything myself. Well, who is completely lazy, he takes the camera, aims to the object of shooting (automatically), and looks at the display - which diaphragm matches the desired shutter speed :) Believe me, learns better than any textbook! At the same time, it is not necessary to photograph, it is not possible to take pictures to the exhibition, but the chamber itself !! :) The most useful experimentSo, the excerpt is responsible for dispensing light in time and fighting the movement, the diaphragm for the amount of light and the depth of field. Let's start with simple, i.e. from light. Shortening an exposure (or reducing the hole of the diaphragm), we make a snapshot more dark, and increasing the values \u200b\u200bare lighter. I do not advise you to read it 17 times in a row, it is better to take a camera in my hands and try to figure it out more quickly! Put experience. Camera - in manual mode (m)! Without changing the diaphragms, take pictures with a decrease in exposure, for example, 1/2, 1/15, 1/60 s. etc. Looking through every time the result obtained. The snapshot must become more dark. For example, like this: If you do this experience without a tripod, removing from the hands, then you can see a decrease in lubrication (chapelins) on short excerpts, and an increase in long. Then, without changing the shutters, experiment in a similar way with a diaphragm. The usefulness of this Council will replace you with the reading of hundreds of sites like this subject (including mine), many of which will heat the terminology more than trying to explain. Therefore, the best photo textbook is your own camera and your desire to learn how to photograph correctly. But another example of using excerpt to achieve "creative results". I take in quotes, because "creative results" is a notionable concept and everyone has its own. Picture number 1 was filmed from a tripod, and a long excerpt (1/4 seconds) was used just to achieve ... Pechaninki, or Luba. As you can see, a fluent lubricant (relative to the camera) object, but as a result we feel the speed of the outgoing train. It is beautiful or not, everyone decides for himself. In the picture number 2, a short excerpt (1/227 seconds) allowed "to stop" (stop, freeze) in the frame of a fast-lived bird. It is more technical technique than creative. Washed over the clouds of the bird is unlikely to decorate the picture. Although, perhaps, someone will seem fun :) How to avoid the chapels we will still study. I have a rather strange photo tutorial, because I once again suggest to achieve the effect of Luba (and for the good of the picture), and even then - options to combat it. I do in order to show how the excerpt and aperture work together. This sweet couple well demonstrates the foundations for beginners. But for this purpose, a picture number 1 is not suitable, made in the subway? Let's in order. On the left we see a photo with a rather beautiful effect of the waterfall falling along the rocks. Such an effect of blurring jets is achieved with long exposure and tripod. A 7/6 second excerpt was used here. To get such a value with weak lighting (as in the picture in the subway) there are no problems, but what if the lighting is more than enough? The problem is that the camera machine will try to give an excerpt of the shorter - to avoid luba, and we need just the opposite! Here you should switch the camera into manual mode and clamp the diaphragm (less light will be obtained!) - And due to this, we calmly extend the exposure to the same steps (at the same time and the light equalize). And even easier to immediately put the desired excerpt and the diaphragm :) You can do this both in manual mode and in the priority mode of excerpts, or the priority of the diaphragm - as you consider comfortable. For a waterfall, I had to clamp aperture to f / 16! To get a long exposure of 1/6 seconds. But if we deliberately use lubrications in the name of artistic purposes, then why do you need a tripod? It is needed so that only water flows are blurred, and the remaining parts of the landscape remained kidka. Now you understand why the camera automatics (even the most expensive itself!) Will not always cope with the frame? Yes, she just does not know what you want to get in the picture! Smart technique tries to prevent lubricants and puts a short exposure, which for this style shootout does not fit at all! And the conclusion? And the conclusion is simple: remove the photographer, not a camera. These are also the foundations of photos! The following 2 headers about the focal length and noise you can easily skip. Of course, if you own this material well, otherwise some places of my textbook will not be completely clear. In general, the focal length of the lens refers to basic concepts; What the EFR is also necessary to represent. Therefore, do not be lazy to go through the links and return back. Do not be afraid, the link is not the removal of a convicted one for a compulsory settlement in a certain area (for example, in Siberia), but just the transition to the relevant page of this site. Return back will be just as easy as thoughtlessly climb the shutter of the camera! What is a focal lengthSince I have a whole page written about the focal length, I will not repeat, and who will not know the vote here: So, changing the focal length of the lens can be brought around or removing the object of the photo. But not everyone knows how to make it possible to achieve quite interesting effects and without any photoshop. For this you need a zoom lens, i.e. The lens with a variable focal length and the possibility of its change manually (as a rule, this is a zoom for the mirrors).
To obtain similar photos, we simply change the focal length using the rotation of the corrugated ring on the lens, and it is followed at that moment, the camera's shutter is open - i.e. Right during the photo. In order to have time to twist a long exposure, it is desirable to shoot from a tripod. I used long exposure (1 sec.) When shooting with a flash. How to quickly twist the ring and what kind of excerpt you will not say you, because there are different situations and the result may turn out too different - as successful and not very :-) What is noiseHow to avoid LubaWhat is lubricant? Smeat, he is a chapel, it is a flicker, a unwitting picture. Lubricated, shorter :) On the left, the whole picture (shooting from the hands, excerpt 1/90 seconds), on the right only the moving object is a girl, everything else is sharp (shooting from a tripod, excerpt 1/4 s). 1.
So, let's start with the eternal Russian questions "who is to blame", and "what to do"! It should not be thought that this question is purely Russian, it concerns all, even blacks :) Lovers raise the noise about tolerances I advise you to search for the proven word "tolerance" in the explanatory dictionary of the Russian language of Ozhegov and Swedio. There is no such thing as not and the words "political correctness" :) As well as the words of Afrofrunce, Afro-Own, or African American - but there are ebony. The vocabulars did not come to the head that reasonable people would come in the 21st century before they would call things not by their own names :) Not only, even the famous word African does not reflect the essence, it can be a white man born in Africa ... And Papuas and in Denmark Papuens :) So what is "tolerance"? Any parrot with the newspapers will repeat that it is tolerance to other culture (religion, national tradition, etc.), but will not explain what exactly needs to be tolerated in someone else's culture and, most importantly, why. In addition, it is not clear how culture can be different, the other - she or is, or her, sorry, no :) In this regard, it will be better for an explanation of the term not even to philologists, but to doctors, I assure you will be in Shock: Tolerance is a complete or partial absence of immune reactivity !! In other words, the loss of immunity to foreign impact ... many will not cure, but make sure they will force ... Therefore, we will not treat the sore society and come back to the lubricated pictures. Choose from the same dictionary trail. Value: Lubricate - deprive the clarity, certainty, sharpness. It is more suitable for photographers rather than "lubricate on the physiognomy" :) So who is to blame? Laz, due to 4 main reasons: With the first point everything is clear. Above you have already seen a flying bird. But be tolerant to a lubricated bird in the photo and it does not want to treat this to this tolerantly :) Such "traditions" clearly lead to a flawed perception of the picture, even at a primitive level, and impose such "photoculture", of course, it is impossible (as well as one cannot tolerate some The customs of the Aboriginal-Godded of the Nice Mumbo-Yumbo tribe).
Note that the background (trees) even on such a short excerpt turned out to be slightly smeared. The effect is well emphasized by the movement of the bird, and it turned out just at the expense of filming with wiring. With the second case (hand shakes) is not simple. Hand shake is transmitted to the camera, but why the hands are trembling? The question is, of course, rhetorical! From the tension of the muscles, from an uncomfortable grip, from fatigue, from old age and even from a bad mood. Okay, so be - I did not forget, I remember that you wanted to hear ... and from drinking too. Alas, the hands are always trembling :) Item Three: Bad illumination. Why does bad light occur? Who does not know, I will reveal a terrible secret right now. Because the Earth revolves around his axis, and the day is replaced at night :) And how many fanatics did not burn the people on the bonorants of the Inquisition, it turns back! Believers, read 7 times 10 of the commandments of Christ before using the terrible law on your rights adopted by unbelievers. Pope, skip in the heresy of unreasonable, nursing in the basements of the Middle Ages thousands of people, and so that the crunch of bones and cries did not dare at night the sleeping mind, buy glasses and read school textbooks in the morning. She really spins (and the sun glows)! So, we found out the reason for bad illumination. Why does the lubrication arise? Selects the camera. Of course, you need to understand what trembles, actually, is not a camera, but again your hands. But this is no longer your fault! With very poor illumination (evening, night, overcast), you need a long exposure time, for example, second, two, sometimes more - and it makes it very noticeable even minimal hand shake. It does not save a healthy lifestyle, nor the image stabilizer, nor the correct chamber grip. The worse the appendation of the shooting, the one spoils your masterpiece more damned. Point fourth. On different focal lengths, the lubrications are also different: the longer the focus, the greater the lubrication. Who is guilty? Actually, this is also trembling hands. It is clear that you need to shorten the exposure if there is no tripod, but it is necessary to quickly determine what to set the minimum excerpt value for a specific focal length. For example, at a focal length of 30 mm in the EFR, it is better not to remove with an exposure, longer than 1/30 seconds, and shoot from 1/60, or even shorter. For lens 100 mm, use shutter speed 1/100, for example, 1/128. Of course, if the object of shooting is moving, then it should be shortened even more. Of course, the definition of the rolling of the hands is not amenable to accurate measurement, and some individuals can go beyond the rules in one direction or another, but in most cases the rule still works well. It should be remembered that the full-frame camera (camera 35 mm of format) has a focal length and EFR equal to each other, so it is even easier to determine the shutter speed to combat the movement here even easier. It is notable to add that many nasty is the easiest way to be treated by a tripod (the best image stabilizer!), But it is not always on hand. What to do? First, less drink before shooting, secondly, hold the camera correctly, in third, turn on the same image stabilizer if it is (it does not help in the case of a bird!). And then shorten the shutter speed, if not enough - use the flash if the flash does not get, or its use is undesirable, then ISO. Nothing helps? Buy a tripod! But the attack - when you are in manual mode (other photography modes will look at below) put an exposure in short, then the light will fall less! And the snapshot in this case will become darker (underexposed, as photographers say). So that this does not happen to increase the same hole of the diaphragm on the same order. For example, there are excerpts 1/15, 1/30, 1/60, 1/128 sec. etc. And there is a diaphragm F / 2.8, F / 4, F / 5.6, F / 8, etc. For example, we have rooted the excerpt, shifting it to 2 positions - from 1/15 to 1/60. The hole of the diaphragm in this case should also be increased by 2 positions, for example, from F / 8 to f / 4. As a result, the photo will get exactly the same amount of light, but the possible lubrication on the short excerpt will be less noticeable to the eye than on a long one. And we get high-quality (or, at least, not smeared) snapshot. Well, if, of course, the lens torque will allow (if you have a F / 2.8 marking on the lens, then the value of the aperture F / 2, or, say, F / 1.4 will, of course, is not available, which means there is no longer a shortest excerpt). Here in such cases and the ISO should be increased. Better let there be noises than a blurred picture! Shooting modesThe essence of the main modes is reduced to about the next. I recommend reading only those who have the instruction is lost, or it is not, and there is a camera :) Green mode (Fully automatic) everything is clear here. "You press the button - we do the rest." - This famous advertising slogan D. Istim (who did, in essence, the first automatic camera "Kodak" in 1888), as it is impossible to describe the green regime. Exposure, diaphragm, focus, flash, and everything else (even ISO) is automatically set when you press one button. The green mode is indispensable for beginners, as well as when you need to quickly take a picture without rearing with the settings. This mode is almost in all digital chambers, and in cheap soapboxes, he, in fact, is the only one for the shooting :) P - semiautomatic The same is that the green is all on the machine, but you can change some settings (focus points, white balance, ISO, flash). Sometimes "p" is called "software", but, in my opinion, the "semi-automatic" is more accurate. S - exposure priority Semi-automatic mode with exposure priority. Some cameras denotes (TV). You put an excerpt, the camera puts for you a diaphragm! A - diaphragm priority Semi-automatic mode with a diaphragm priority. In some cameras denotes (AV). You put a diaphragm, the camera puts an excerpt for you! M - fully manual The photographer is entirely controlling the entire shooting process. You independently include the camera and ... you do everything else for it :)Koloysiko selection of modes.
Clockwise: Green Mode, PSAM [Considered in the text above], SCENE (scene, or user mode [Consider below]), video, SETUP (settings), Quality / Photo size, ISO (photosensitivity), WB (white balance) , View pictures. Of course, in different cameras, the wheels can vary (there is simply no inexpensive cameras), but everyone has a green mode and view of the pictures, even if the wheel is not :). It is often necessary to hear the following: if there is a green mode, which "does everything himself", then why do you need the rest? Yes, the machine will select the correct (but averaged!) Exposure and aperture values. And here is a photo of a cyclist, being well-proxposed, it turns out to be blurred due to long exposure. The machine does not know what you want to shoot! Well, I do not know the autofocus, the cyclist goes, or an erroneous exposure occurs, but an erroneous shutter speed occurs, but the function of determining smiles in the frame will teach you to smile to laugh at failures! :) In order to "tell" the camera of what you need, just there are other modes that, unlike the green, are usually called creative, or manual. Of these, such as such as "Exposure priority" and "The priority of the diaphragm"which are now available in many digital chambers. Now avoid mistakes easily: suppose you need to quickly change the shutter speed, then in the "exposure priority" mode, you make it shorter (for example, so that there is no lubrication) - and then the corresponding number of the diaphragm exhibits the chamber machine. Similarly, you can quickly change the diaphragm. But this producers seemed a little. In some cameras, there is a "sensitivity priority" mode - you install the ISO - the camera selects shutter speed and aperture ... and even the "exposure and aperture priority" - in response, the automatic is selecting sensitivity. Hmm ... It remains only to someone about the absence of a red button: "Make a masterpiece" ... In my opinion, only 2 modes are enough: I will not speak in detail about the so-called user modes, such as "Landscape", "Portrait", "Night Landscape", "Museum", "Sport" and the masses of these, which are almost in every chamber. In any case, the essence of such modes is reduced to the elementary combination of excerpts and the diaphragms, because these modes are generally absent in professional chambers - for full inappropriate :) I think, not even being professionals, you yourself are able to put a short excerpt instead of the Sport mode, the maximum Open a diaphragm instead of the "Portrait" mode, or "night landscape" (without a tripod), and, of course, turn off the flash when shooting in the museum ... Depth of fieldThere are other effects of using aperture, such as a decrease, or an increase in the depth of field, and this is actively used by photographers to increase the sharpness, such as the landscape, or, on the contrary, the background of the background in portraits ... Here is an example of a blurred, or defocused background that did not fall In a small depth of field, or, as they say, a small flu (acute infectious disease of the respiratory tract caused by the virus? No, the depth of the sharply depicted space): In the picture number 1, the diaphragm 2.9, which gives the depth of the sharpness of just a few centimeters, which is enough for the figure, but not for the background, which is centimeters 20 further. As a result, the background did not hit the small limit of the depth of field, and therefore blurred. In the picture number 2, the aperture is slightly covered (F4.4) Because the ramp is greater, but because The distance to Zelenya is even more, it is still blurred. By the way, these pictures are a good example, refuting the problem, which with diligence promoted in many forums - the compact is impossible to blur the background. Beware of experts who write a lot, but do not give examples to work, i.e. With its pictures. Both photos are made precisely compact (Nikon Coolpix 5400), Old (2003) and not even the most expensive in his class. And snapshot number 2 was not at all at the maximum open diaphragm, i.e. Blur is theoretically possible even more. The next photo for the site I kindly provided my buddy Sergey Andreev. I do not want to shock anyone - this picture is made not even compact, but ... mobile phone! 3. As you can see, a mobile phone can also get a small jumper. But to control the depth of field and make it predictable seems very difficult: such a camera does not have a diaphragm setting. Despite this, the fact remains a fact - even a mobile phone camera can be blurred background! These classic examples of using depth of field should not, however, perceive so that the compact is not inferior to the mirror. The light-melted fix-lens mounted on the mirror will make bokeh (blur background) much more deep (if necessary!) And with a more beautiful pattern. It should be remembered that the best "washing" background long-focus optics. But even with a whale lens, the mirror camera has more opportunities both in this regard and in terms of light control of the flu. Here are typical pictures with a defocused background: Little reception for those who have a compact. It is suitable, of course, for a mirror camera. If you want to remove a portrait with a defocused background, then remove the background to be as far as possible from the face of the portrait :), and the person itself occupied as much part of the frame as possible - then the background will be blurred more. At the same time, the diaphragm should be maximally open, and the lens is better to put into the television (for on a wide angle, the sharpness is greater). If your compact is too big for an apartment (the object does not fit in the frame!), Then you have to, of course, buy a more spacious apartment, but I personally prefer to shoot on the street, or I use a mirror :)
What gives a small junk and bokeh? The ability to highlight the main object of shooting and take a snapshot more voluminous. In this case, a hand is highlighted that fills these lines on the keyboard :) From which the depth of the sharply depicted space depends. With the same size of the matrices (and other equal conditions), the depth of field depends on the following principles: ◆ If a diaphragm number (F8 is greater than F2, i.e. the aperture hole is less), then the flu is larger; in other words: The flu depends on the diaphragm and the distance to the shooting object. The larger the diaphragm hole and the closer the lens to the object, the smaller the flu. And it does not matter - you came closer to your feet, or closer to the zoom. If the distance to the object (and the focal length) is unchanged, then change the depth of the sharpness is possible only by the diaphragm. It should be understood that the fun is very dependent on the size of the matrix, but since it is assumed that the photographer at one point in time removes only one chamber (and not the palette as if the cowboy immediately with 2 different-caliber trunks!) Lower :) Let's just say one thing: it is easier to get a smaller flu on a large matrix. If you want to slow down the background by the portrait, then go closer (or drive the zoom) so that the person takes most of the frame (it is even better to use a long-phocus lens), while opening the diaphragm. If you do not want, cover the diaphragm so that the background is not too muddy :) In the network you can find a lot of disputes on the topic "Does the flu depends on the focal length". Some consider that it depends, others, of course, do not consider it :) In general, democracy and freedom of speech the thing is very strange: even a regular paper sheet, some will definitely be called black if the majority believes that he is white. And why? And because freedom can be all that I want! :) By the way, the degree of idiocy of society is assessed by the inability to determine the boundary of the jernery permitted, but then the confusion is arising from the misunderstanding that infinite freedoms are also bad as if they were completely closed (like a diaphragm)! By the way, the foundations of photography (and not democracy) are sought in the nature of light, the design of the lens and the common sense of the photographer :) Since I often asked questions, "Why on another site it is said about the funny wrong, but on the contrary," then the author of these lines is tired of answering - "You are free to choose any resource" - and wrote a small article: Who is not interested, you can safely skip it. Photography for beginners does not provide for the involvement of the latter in theoretical disputes. As well as everyone else. The author only expressed his opinion about the "problem" - inferior to the wishes of the photos community. I hope the foundations of photos will not suffer from it :) Must warning newcomers: it's not worth making someone from a small jumper. First, blur background is not always appropriate. And secondly, the high depth of sharpness is required at least, and in the macro simply needed. Most often, the sharpness "throughout the field" is required when shooting landscapes, so it should be part more details on this topic. Those. We do not stop, and read on :) How to remove the landscapeFor the landscape, the diaphragm, as a rule, is covered - so that everything is sharp, "from Pup to infinity", as often happens with a compact cameras - on the landscapes there can not cover the diaphragm at all :). The mirror is more difficult to use (so that they spoke in advertising!) - The light lens can give blur at the beginning of the panorama when focusing on distant objects. Blur of the neighbor (or long) part of the picture in the landscape is not necessary. More precisely, it is not always necessary. That is why I advise you to cover the diaphragm even on a compact - to develop a habit called "Right photo". This is how typical landscapes look like :) As, for example, in the following pictures. The focal length for landscapes is usually chosen less than standard, this provides a wide angle - in the frame "will fit more space." A typical example of such a plan is the photo number 1, where the angle is used as wide as possible (for this lens). Of course, the landscape can be removed on a longer focus: it all depends on what you want to take off, from an angle, from the possibility to come closer. For example, I did not have such an opportunity - to "learn legs", photographing №2 - I would simply be drowned together with the camera, and the parachutist wanted to get a larger, for he is an important "detail" landscape ... :) The textbook photo does not claim a more detailed presentation of the foundations of the photography of landscapes, so a separate photo store was allocated for the latter. In general, I consider the landscape to where it is easiest to start a newcomer. This page discusses not only the analysis of typical errors, but also the photography of the landscape standard lens. All this is in the main menu of the site, but it is easier to click here: Since the matrix is \u200b\u200ba heart, and the processor is the brain, then the lens is the soul of the camera. And the photographer only clicks the button :) If you are seriously thinking so, then with the purchase of a mirror camera, it is better to postpone, and at the same time, this is the textbook to remove from the bookmarks :) Landscape (like everything else!) You can simply watch your eyes "along the match" and not Blind by cameras, lenses, photosayts and other photodeogrand :) And when you learn to look at the world around the world from different angles, looking for the most winning in the mind, you will easily understand - you need a camera, or not so! Actually, this approach concerns not only landscape and not only photos ... For shooting portraits, lenses with a focal length from 50 mm (standard in EFR) and higher, i.e. telephoto lens. To separate a person from the background and make the background blurry, you need to use the "television". If you want a person to be blossoming on a beautiful background and this background was visible, then the Internet does not need to take :) In this case, you can shoot a standard lens, or simply reduce the focal length (if you have zoom), and you can also clamp, if possible, diaphragm. The foundations of photography suggest that the photographer is removed, and not his camera! - It is not tired of repeating it :) The previously considered lens Pentax 16-45 / F4 is more suitable for shooting landscapes (not because PENTAX, but because it is more widely right than normal!), But portraits they can also be removed. I intently bring examples taken out by this lens because it resembles a standard lens that is in delivery with the camera (it is usually called "whale") - this is exactly that newcomers are used. Do not think that you are offered - "First learn to play a guitar without strings, and only then buy yourself a real fander ..." - I just asked questions. "Is it possible to remove good portraits", "what a whale can be in macro" And the like, so I considered it necessary to use the lens, more approximate to the whale. Why not, actually, whale? Yes, because I just don't have it :) Since the lens gauge 16-45 / 4 is relatively low (F4), then to shoot a portrait, you need to open the diaphragm. And, of course, to set the lens into the maximum television - on the focal length of 45 mm, which for the portrait it will be quite good - less will be geometric distortion. Noticeable distortion can be acceptable to the landscape, but for the portrait it will be an explicit defect. When photographing, focusing should be made in the eyes (or the eye close to you), since the eyes are the most expressive part of the portrait, no wonder they are called the soul mirror. If the ramp is very small, then even if the ears are "washed" together with the nose, but the eyes are necessarily in the sharpness zone. This is a technical part. But the creative part is somewhat more complicated. Therefore, I allocated several well-known rules for building a composition, which even the masters allow themselves to break infrequently. A beginner should more comply with these rules than denying, the opposite does not prove skill. Building the composition we will take not only a portrait, but also to any main object of shooting. Alien hand in the frame next to the face of the main character MiG turns a good photo in sucks. The beginning "Tertéy rule" is useful, often used in the photo (frame division into three equal parts); Green marked semantic points, "attracting eyes". We will believe the geometry of harmony! But ... without unnecessary fanaticism.)
In addition, the portrait should, if possible, express the essence of man and its most expressive features, revealing. If this fails, it can be said that the portrait failed, but it is possible and otherwise - it came out a normal photo for memory! Let's see the typical portrait of the usual Russian macho :) Russian Macho. 0. To get such a shortened background, it is necessary not just to open the diaphragm as much as possible, but also remove from a very close distance, so that the face takes the greatest part of the frame. And the background here, of course, was not made not sharp in order to show not the sharpness of the background (it's stupid!), And just the opposite to emphasize the main object of shooting :) And this object is noted, very stern on the view ... Which type! Pretty Russian Macho, hero and lovers of women, horror of enemies :) However, the term macho has nothing to do with that "sexually heroic" manner created by stupid Latin American TV series, no less stupid American militants, and diligently mutized by our (no less silent ) Domestic television. Women, do not share! In fact, Macho is a rude and cruel male that takes women by force (read rapes), and any questions decides fists and boots, in general, a trunk rustic male from which heavy labor (or idleness), alas, did not make a person ... I apologize, this Russian guy is not applicable to this Russian guy, and it looks not at all like that, just a photo, as such, you can express a lot - if you want :) i.e. expressively emphasize and allocate some elusive features of the face. You can guess now, what does it mean to shoot a portrait? Now a little about the photography of children. They say children are flowers of life. Some argue that the flowers of life are hippie :) It's all in the root incorrectly, for the flowers need to still grow up, and Pankov manage to raise ... And even if the children are not growing on our garden, they should be able to photograph them. They guessed, what phrase will follow now? Yes, yes, - how to shoot children correctly :) On both pictures, the diaphragm is open to F4, EFR 67 mm. 1.
Children take pictures very easily - they are immediately natural, their smiles are not intertwined. It is very difficult for children - they are all the time spinning like a wolf, they suddenly turn to the lens with a population and, moreover, they constantly slip out of the frame ... Imagine - they don't even want to pose! And if this happens in a poor room (and it almost always happens!), After a few lubricated pictures, perhaps a learned smile will already have! Do anything, remove the toy to the children, shoot the face, tell the joke, catch their mood, but just do not force the child for several minutes to look straight into the lens, promising that "the bird will fly now." To be honest, it will not crash, I tried 17 times in a row - it is useless :) It is better to take a picture when the child is passionate about his deeds, is filled with emotions, and not pays attention to anything or on the photo ... Who said that portraits can not with a wide roller? On a long focus, they can be removed by any lens, and not just a leading portrait. It does not matter what you take pictures, but you should always be able to use the lighting, even if you have only a built-in flash. It is believed that it is necessary to avoid shooting with a flash in the forehead, that for portrait it is necessary to use soft, scattered light, use daylight lighting, or external flash directed to the ceiling, or light reflectors ... All this is true, and even better have your own photo studio with Fashion models. Let me remind you, the site for beginners. Even with a bright sun, turn on the flash to highlight deep shadows on the face, especially concerns the content light. And, most importantly, look for interesting rekursing. But if the lighting allows you to turn off the flash, since it really kills the natural light and gives a flat image. The outbreak embedded in the camera, of course, is weak, but it needs to be used. When you see in the stands of a huge stadium a lot of flashing outbreaks, it should not be assumed that there was a mass spiritual development of the population in the country, and many photographers appeared instead of sellers and spackers of the advertising garbage :) It should be aware that the outbreak embedded in the camera is usually not further 3-5 meters. Therefore, it is surprising genuine: what is the distance from the distance of the Tribune people going to highlight? In order not to be disappointed in humanity, and gain peace of mind, always tend to think about the simple forgetfulness of "photographers" to disable the automatic flash response. Do not give in sclerosis - this leads to a premature discharge of batteries :) How to apply an outbreak? It is possible on the machine, but in advanced chambers it is possible to adjust the power of the pulse (- +). In order not to reboot the face to reduce the power in close distances and, on the contrary, increase if the object is located a few meters away. To use this opportunity is especially useful when shooting against the oncoming light. Alas, the flash is not adjustable in the soapovers, it can only be used in automatic mode, or disable. Snapshot No. 3 was made in a slightly familiar room and then the flash is simply necessary - the children are constantly in motion, hence too high the likelihood of luba. The diaphragm, of course, opened to the F4 to get a minimum flu, everything else entrusted automation, and removed it to ISO - 100. Actually, I always remove on the minimum ISO, and only sometimes at a higher :) On both pictures of EFR \u003d 67 mm. But different ISO, diaphragms and Especially remarkable in terms of using the flash shot number 4. I had to photograph late in the evening, without a tripod, and even on a diaphragm, clamped up already up to 8 - and everything because of my mobbies in the frame not only a girl, but also a background of the night landscape, and I wanted to get this background not quite blurry that It would be inevitable with an open diaphragm and such removal of the back plan. Straight to use the flash for this purpose is meaningless - the face, of course, will highlight, but the landscape will not be visible - the flash will not reach it. Therefore, the shooting was carried out in slow synchronization over the rear curtain. This is such a flash mode: the camera has long exposeds a background on long exposure, and only at the very end quickly highlights the face of the near plan (in this case, the person). But in the end, the excerpt was 8 seconds! ISO had to shut up to 400 and get an exposure significantly shorter - "total" 2 sec. Lazy was still inevitable. What to do? The easiest way was not to be able to open a completely diaphragm, put an outbreak on the machine, and make a normal snapshot on ISO 100 and 7/60 s shutter speed. Think, the background is not visible, we are not a background, and take a night portrait. By the way, pay attention to the focusing there was not on the eye, but on the mustes :), - in the center of the frame - a typical error of beginners who took the first-hand sir of the sir. To the right focus we will later come back ... But I was stubborn ... and certainly wanted a night portrait only with night lights, but 2 sec. Exposures were an obstacle, and ISO even no longer wanted to raise. I advised the models to rely on the stone, thereby hardly fixing the chin, and do not move, and the camera was not less rigidly fixed in the hands of the elbows to another stone - it turned out something like a tripod ... In general, the girl managed to do everything right: To keep 2 seconds is not blinking, smile, and look natural enough. The exposure time left to exposure the background (and, partly, the foreground), and the outbreak at the end of the excerpt clearly recorded our model before the closure of the shutter. - ha! So take pictures of any fool will be able! Give me an expensive professional camera with a set of top lenses, I also don't have such a nachine! - Exclaims another novice and ... will be right. But it will not be right because it picks up, but because it may not have seen bad photos made by no means soapmaker with a plastic lens. And here is an example, admire: So, photo №5. What can I say? You can rapid about choosing a lens to the camera. It is good to say that this snapshot is well-sponsored, focused, the chapels is absent, the white balance is not littered, there is no noise too. Everything is good yes? Foot feet cut off, a drainage tube sticks out of the head, and the background ... words do not have enough in Russian to express the ridiculousness of the background and the pureness of the plot. Yes, it is generally outside of good and evil :) No most expensive camera will save from such mistakes - it is impossible to see the world - a girl in a stone trough with a drainage pipe in the head - so can not be removed! I am unbearable painfully and painfully ashamed for this snapshot (and, of course, for all the years lived) :) Although ... After the evening viewing of our television, such a photo may seem a masterpiece .... Photo on the left looks more pleasant than just a picture of memory. If you have not yet felt soul in our absolutely insane world, and if I haven't been closed by reason in a society, which is called secular, then Orthodox, then criminal, then the society of consumption - and even democratic - then there is a chance that this imperious grandmother's photo is The granddaughter will not leave you indifferent. Their faces are shining, it can be warm and peace from the snapshot. To do this, it is not necessary to use the camera with the feature of face recognition and smiles :) If the photographer is not able to recognize the faces, then he needs to throw, and if it does not help - throw a photo! In general, it is not difficult to remove it. Especially when portrayed absolutely do not pay attention to the photographer and do not suspect that they are removed. If they are sat down in front of the camera and make it look into the lens, then all the directness would disappear in the moments of the eye, well, if there are still stretched smiles. And you know, for this photo I do not want to indicate what an excerpt and aperture was installed, and noise is noticeable. And even more so there is no desire to discuss the type of manufacturer's matrix, or brand promotion :)
And the photo on the right is made by the compact camera. It is not even a portrait, and not setting, but a purely reporting picture made by a small compact with a turning screen. Watch down on the turned horizontal screen, and you shoot forward and slightly up from - under the table! That's just a treacherous flash gives out, but I could not, in fact, turn off the puff in a poorlywedted room! The most important thing is that the snapshot is already done! Do you think Russian Macho is again? No, but the type turned out to be very colorful :) How to shoot portraits with wide-angle zoom we have already looked. And it would not be wicially not to give an example made by the classic lens from the Pentax line: it is a light 50 / 1.4. Of course, such models will be found in other manufacturers (as expensive F1.4 and more affordable F1.7); In general, fixes continue to successfully exist because of the best price / quality ratio and better price / light ratio. It is expressed in the following: With the same diaphragm, the optical distortions of the Fix-lens - less, and with the same quality and light, the zoom will be an order of magnitude more expensive. And even in a dream, the zoom will not be able to compete with fixes on luminosity, greater than F2 / 8. The exception is only the lenses of some top compacts, and the exception, as is well known, only confirms the rule - such cameras are very expensive. And even the fix-lenses are almost not found in them: compact cameras are positioned for beginners, and the manufacturer does not want to explain the newcomer why I need a fix when there is a light zoom. I will try: the zoom lens is more distortion, but it is easier and cheaper to do for a small matrix than for big :) The appearance of light zooms (and 2.8 is a very expensive zoom, often more expensive than the camera itself!) Did not put the cross in the mirrors on the Filling and other lenses with a constant focal length. By the way, a similar "Filnik" on the camera with a crop factor 1.5 is confidently turning into a mini-peer with EFR \u003d 75 mm. In general, this is a sufficient good portrait. On open diaphragms that this lens can allow, photos with a soft focus look very good. But here is a paradox. If portraits advise to shoot on an open diaphragm, then for a high-speed portrait, you can advise on the contrary: to hold the diaphragm for a couple of divisions!
First, when it is closed, some optical distortions are minimized, characteristic of open holes. Secondly, with a fully open hole F1.4, the depth of field becomes so small, which most of the face of the face will not be in focus, especially if you take a portrait of a close-up portrait. For example, the face on the left just photographed with a diaphragm 1.4 with focusing on the right eye (Hmm, the cat believes that it is left left!). And now the second eye was not in focus. In principle, this is normal (even with close-up), but if it allows an excerpt - the diaphragm here can be slightly covered. By the way, for our part, I am deeply alien to the opinion of some animal about the arrangement of the eyes ... The cat has something else that the world's own lusion will appear :) Each photographer has a good hundred photographs of domestic lovers (and perhaps not alone), so I do not count anyone to surprise: Think, the cat. But look at all, what zero attention to the crown of nature is a man :) Yes, yes. On who takes pictures of it. The photo model did not even turn his head!
This festy is deeply born on someone's understanding of the world - she has his own and, and well, quite self-sufficient ... yes no, it does not touch me! Think, fashion model with tail ... Returning to the lens, I will say that it is convenient to removed with high-sound optics even in a slightly familiar room. Here, the illumination allowed the diaphragm to F2. - How so!? - I get a photographer, "choose the lens because of his lights, and then reduce this very light, sticking the diaphragm! Nonsense… And this is not a question, it is very simply explained. In fact, you buy a lens at all because of the powerful luminosity, as many think, and in order for your photos to look like they were thinking about! And the possibilities for this are the greater the more the lens light ... On the photo on the left of the diaphragm was slightly clamped to F1.7 with ISO 400. This old "film" lens on open diaphragms (even closed to F1.7 the diaphragm is also very separated) makes the picture soft, which is winning for portraits. It should be noted here that the desire to make any photograph of cutting "as soon as possible", "to the pimples on the skin," and even "to pain in the eyes" is characteristic of many lovers. A photograph with a "soft portrait" it seems to be soapy, and muddy, and worthy of any other photographic (and not very) words. By the way, in vain. What is good for the landscape (and not always!), Then for a portrait just death. Compare this photo with those harshs that are lifted by the above Pentax 16-45 / F4. If you like such sharp portraits more, then maybe the mirror was wounded early, and should be shoved by sozerle for some time? All good fix lens, but should not be considered that he has no flaws. There are all flaws :) The main lack of a lens with a constant focus distance is a complete absence of zoom! Yes, yes, you understood everything correctly - the legs will have to run forward-back, legs to take into the frame of the frame what you want to get in the picture :) Horrible! And it is instead of standing in place with comfort to twist a corrugated zoom ring on the lens of the model, or press the zoom button on the Compact :) In fact, the main lack of fixes is not in this, and not even in the absence of opportunity to come close to the shooting object, Or, on the contrary, move away. This problem is "easily" solved by a set of heavy lenses with different focal lengths and light bag to them :) or even a fashionable photo product :) But what should I do when you immediately learn a fast moment? Here is the zoom outside of all competition. Most likely, I still continue the topic "How to shoot landscapes and portraits", it may be distinguished by a portrait in a separate page as, for example, "landscape" and "macro". I understand perfectly well that the themes are completely (and even by a third!) Are not disclosed, but at least you saw that and how to remove inexpensive lenses without the use of special studio lighting. In all examples, used (or not used!) Only an outbreak built into the chamber. What is expozamerNot every digital camera has manual settings of excerpts and aperture, but automatic, believe me, there are all :) To determine the illumination of the object in the frame, there is a system of measuring the exposure in the chamber, which first estimates the degree of this light, and then the desired shutter speed itself and diaphragm. The correct exposer is needed to obtain an image that displays the shooting object as we see it in fact. This automatically makes the design system of measurement - an exposure member, which usually copes with this task. One photographer told me that it became uninteresting now to shoot, the camera in most cases is perfectly coping with all the settings even on a complete machine, and man only stupidly press the trigger. Say, outgoing the spirit of creativity who was on film, etc. etc. But what prevents the photographer to switch to manual mode and remove the way he wants himself? Since my site is conceived for beginners, and not for the guru, then I want to give advice right away - try to shoot with manual settings! And if it does not work, then removing on the machine, do not be lazy to compare your mental exposures and aperture with those that shows the camera's exposure chamber. This is useful! This and the spirit of a creative experiment develops, and teaches great. By the way, and the machine is far from useless, because it is sometimes necessary to take a picture very quickly - it happens that there is no time to mess with the settings - the bird can fly away! My familiar photographer who tells about the film I advised to throw out a digital and buy a mechanical film camera to forget the "creative crisis of numbers" forever. For some reason he looked at me very incredulously ... It is understandable: the crisis is not in the figure and not in the film, but only in its own brains! And it belongs not only to the photograph, but since philosophy, or politics (as, for example, in Mr. Medveputkin, in which there is no place for the domestic photographic engineering, as well as other Russian goods) - not the topic of this article, then we will return to the exposal And briefly tell about his views. Expubs are needed to correctly define the exposure - excerpts and aperture, as well as to control them on the viewfinder or screen. To control the excerpt is necessary to avoid lubrication, and the diaphragm - to understand the assessment of the depth of field. These are the foundations of photos! In advanced cameras, there are 3 main types of automatic exposure measurement setting: matrix, centrally weighted and spot. Let's start with the smallest :) 1. Point measurement. Allows you to measure the exposure only along a small area in the frame, roughly speaking at a large point, or in a small circle :) This is about 3% of the matrix area. This is usually a frame center, but some cameras allow you to set this point in other places. The spot measurement is used for large dynamic range of brightness; Typically, it is necessary to choose a smaller out of the evils: insignificant details will go into the patch / inadvertent, but the correct measurement will be made on the plot of the object being removed. In simple situations - where there is no large range of brightness - all three types can produce about the same result, but in complex assessments can be great. Therefore, besides the matrix measurement, there is a point and central. In addition, the expozier can be carried out using specialized external gadgets ... Ugh, devices, such as an exposureter or flash meter :) What you need to know about focusIf you take off soap, then you don't need to know anything about focus! Who disagrees, read further :) Indeed, the machine itself perfectly focuses on the soap box on infinity - everything will be sharply: as they say, from Pup - until the horizon itself. It is good and bad at the same time. Well - because everything will be in focus, it's bad because you will not be able to highlight the main object of shooting, blurring with insignificant details of the back plan. As we know, the latter is especially easy to give a mirror camera. But it is not worth blindly to believe those who claim that the mirror is simply photographed even to housewives. Here is a pair of pictures with a mirror camera, which I gave to shoot in an inexperienced person. Understanding that he holds the camera for the first time, I installed an automatic mode. By clicking a couple of times, the man looked at the pictures and said: "Why do you need such a big camera, a small soapbox even takes off." 1. We will not find fault in the unsuccessful layout of the frame of these pictures and, moreover, to their artistic value. We will assume that this is the usual photo of the memory, and this is not a speech here about creative achievements, but absolutely about the other - about technical quality. The essence is short: the incorrect depth of field. In the photo number 1, the grass in the short terms is absolutely not the topic and only prevents the perception of the snapshot. When people photograph enough closely, it is still assumed that people are the main object of shooting, which means they should be well focused. But this is just not, focusing in the background! That is why even the undemanding newcomer noticed that the "soap was clearly removed." Did the mirror really worse? Let's figure out. By default, the autofocus works in the center of the frame, therefore, in the picture number 1, there is a focus fraction. But in fact, it is not the fault of the camera, but the slip of the photographer sniper, which brought the camera in the center - past both people. So even drunken militiamen, rejected into the police form, do not shoot :) By the way, for veterans of the Great Patriotic Word, a policeman and a policeman is tantamount to the word traitor ... What do you have in the photo? Background - water and the opposite shore are depicted sharply, and the players are on average plan - not in focus, even more not in the focus of grass, which is in the near plan. In the photo number 2, the camera focused on the contrary, on the grass, and everything else is not in focus. The similarities of the pictures are one - the main actors in the focus did not fall! These real (and not staged) photos of how it is impossible to show that the camera does not understand where he should be aimed! Especially if the photographer does not think about focusing, but simply picks up the button :) In this case, the mirror camera is really inferior to the soapy, which gives a sharp shot from the near plan to the horizon (and even further!). If you do not want to explore the photo, mess with the settings, think, read the instructions and tedious sites - buy the cheapest compact with one button and without manual control. By the way, people do not want to study anything and are in demand by the state in incredibly large quantities. I bought a mirror, and she did not fit - nonsense, buy a compact. The black soap wash does not fit your image - we buy pink, and then green. Tired of furniture and old camera - Emissions, everything and buy anew! It is right. Saved your funds, you are a bad citizen, because you do not contribute to the construction of a society with a developed ruffle of Morla capitalism. I bought a car - I did not like the traffic jams, expensive gasoline and the absence of parking lots - bought a motorcycle, hijacked - I bought another, and when it turned out that it was hard to carry it on the 2nd floor, bought a bike :) Nothing terrible, we are building a consumption society and consumers is not it? :) You know how nice to consume without thinking about the reasons for what is happening! :) No, well, at least a little ... Well, aware of it ... well, okay, we read further. :) But still - what to do if the main objects are located at the edges? If you have a more or less serious device, and there are manual settings, you can set the location of the focus - the machine does not know what exactly you want to shoot and what exactly should be in focus: the object on the right, in the middle, or left ... typical Error in this case - camera filming center. For example, as in the picture number 1. 1. Similar we have already seen. In the picture number 1, the camera focused in the center (i.e. in the background), and a cup and a jar of coffee are located on the left and to the right of the center, because they were out of the sharpness zone, i.e. out of focus. But in the picture number 2, the focus was made on the cup and we got what they wanted. The objects of shooting are highlighted, and the back plan is insignificant in this case - blurry ... How to do it? If there is no possibility to set the location of the focus, you can use the Lok - Focus feature, which is available in many cameras. In the first case, we brought the camera in the center and pressing the descent button immediately taken a snapshot, which was an error. In the second case, we brought the camera to the cup and the descent button was pressed, but not to the end, but only half. The camera has focused on this (as it is easy to guess exactly on the cup). Then, not the release of the buttons (it is important and not to press it to the end!), We brought the camera in the center - so that not only a cup, but the jar of coffee is fit in the frame and only now they have come to stop. The camera has remembered the focus remote to the cup all this time. Picture ready. Snapshots with the "right" focus will look more voluminous and expressively in the art plan. By the way, the main object of shooting is in this case a cup has been crashing for a long time, but it continues to fulfiguously serve it to serve the foundations of photography. Coffee kilograms I now absorb, alas, another cup that has not yet deserved the role of the photo model :) But how to correctly remove the mirror camera of the near and distant plan at the same time in focus? Right, clamp aperture! The closer to us the foreground, the less we are wearing, but if we still want to sharply, then you find it more :) In advanced chambers there are other settings, for example, the selection of the focusing zone with a special frame, or focusing on the object by rotating the ring on the lens (manual focus). However, such settings are not available at all, but mainly in mirror chambers, and in some particularly advanced digital dig pericitis.
By the way, in compact cameras such a problem almost "no", for the depth of field is too large. And at a distance of 1 - 2 meters, he will have a sharp all around, and the mist (if there was also) will not be noticeable. It is clear that this is not so much dignity, how deficiency: in this plot, the twists play a leading role, it is important to allocate them - otherwise they are completely merged with a pinsome background. And in general, the foundations of the photography say that it is not only quite natural to allocate the main object of shooting, but it is even necessary. Let us dwell on such a problem as autofocus speed. Autofocus In some types of reportage shooting, it will definitely show that the compact can, and what is not very. On the pages of this site already mentioned the speed of autofocus, but without example, and this is not good, so here is a couple. So, that "not very" can compact: Exposure 1/1500. 1. And what is this impossible here? With a short excerpt, this is not a problem at all. However, the case is in the moment the moment of the moment (Snapshot No. 1). Already in the next moment, the boat takes off the water in the water and in the frame it can already be overgrown (picture number 2), or can "fly out" from the frame at all. Because the digital code for such time will simply do not have time to focus. Those, with a short excerpt, the frame will be released, maybe even high quality, but ... it will be a completely different frame! The mirror is easy to remove, especially if you have some skills. This is done when shooting "with wiring" (the chamber is moved synchronously with the movement, constantly holding the object in the viewfinder), and the button is pressed at the right moment (in our case - during a scooter). And here the mirror will show the speed of shooting, and there is no compact. The compact has a slow autofocus, a descent delay, and others, unpleasantly slow things. The brakes of compacts makes them unsuitable for such a report. In addition, the soap is very hard to remove with the wiring on the screen, and not through the viewfinder, whom she simply does not have ... What to do, such is a feature of a constructive. You can, of course, set a serial shooting if the camera allows (and if not?), And here it is possible to be lucky (or not lucky ...). You can manually arrange all the settings in advance (if they are, of course) and focus in advance in the estimated point of shooting (if you know exactly where this point is). This we achieve the fact that the compact is less thinking, but alas, the cooking themselves take time - the frame can be missed! And therefore all these tricks do not give any guarantee of the desired result. I, however, I previously mentioned that the soap was catching out of the pocket of the shirt, it can sometimes be ahead of a large mirror in a reportage shooting. There is no contradictions here, just this phrase concerns newbies, and not reporters who always keep the camera at the ready - especially if you feel that the moment has come ... And what then the report of a snapshot can be made compact? And at least such:
White balanceWhite balance (BB) - so sometimes referred to as the color ambient lighting temperature. For example, they say: "The picture is yellow", "the colors in blue", "too cold color,", etc., what can be read about me in the photo-dictionary. But it is easier and easier to show photos to understand the difference. In the second snapshot, the white balance is improved - in my opinion, of course. In this case, the look relying on the natural color transfer, i.e. The one that was at the moment of photography. Cool and warm white balance. White balance can be set both in the camera to shoot and edit after in a graphic editor. You can, but not necessarily! Not good everyday truth says that they learn on errors. A more wise philosophy approves more common idea: you should learn from other people's mistakes, then not to correct your own. Absolutely true in all senses, not only in the photo! But I tell you: I need to foresee errors to prevent them at all :) Indeed, it is better to set the white balance before shooting than then rule it in the editors, as a rule, with some loss of quality. The shooting in the RAW file (raw format), of course, facilitates the editors of the BB, but it is not always a panacea. Alas, any method has its advantages and disadvantages, raw no exception. And if the pre-configuration of the BB reduces the efficiency of the photo shoot, then the "raw format" reduces the efficiency of the prescription preparation and the capacity capacity of the memory card in addition :) Therefore, you yourself must anticipate your own preferences about color in the photo! In addition, RAW is very limited (and even useless) in case of receipt of parts from cleanless lights, and the easiest drawing of the shadows leads to increasing noise. This, of course, does not mean that the raw format should not be used. But it will help excellently only at the maximum possible high-quality shooting, I advise you to strive. It is better to immediately install the correct exposure and white balance - even when shooting in RAW. Typical BB settings in the camera There are still settings for the BB on the temperature scale. Here it is not bad to study the instructions for the camera, in parallel experimenting in its settings. By default, the camera removes "on the machine", but the automation, as we know, does not always cope with the idea of \u200b\u200bthe photographer. Experiment! Do you know what is the difference between faith in God from the truth? The truth can be checked by a scientific experiment, and the existence of God is never. Experiment and you will be rewarded :) Analysis of the photoBut once I retreated from this rule, here is an exemplary dialogue: - You do not want to criticize, but at least say something ... - Saying pictures, you ourselves had to say at least something about them. What are you waiting for the assessment, are you satisfied with the landscape yourself, or is something embarrassing in this photo? What did you shoot, what did you want to express and convey to the viewer? What finally were the conditions of shooting, what an excerpt, aperture, iso, focal length. Well, okay, I decided to tell myself what torture the girl. Picture as a photo, nothing special there will see. There is nothing to comment. Ordinary river, ordinary coast, ordinary landscape. But still, what did you want to portray the author, what pictorial agents did he use? For a start, I looked at the metadata snapshot, and you (and more precisely - tools) can see to the right of the photo. Analysis of the photo
Picture Parameters: Exposure: Matrix Now I have increased and carefully considered a snapshot. You also advise you to increase it in any case. Further. This landscape has 3 plans: near (grass), medium (water with reflections of trees), and far (park). And in focus for some reason only the grass ahead. In general, so take pictures of the landscape when there is some kind of main object of shooting in the foreground. Here it could be a fisherman, or a mooring boat with a nose chopped. Then focusing in the Middle Plan justified himself. But since the main object is still absent (which is already a drawback), in this photo not only the grass should attract the attention of the viewer. But the sharpness is barely reaching the middle of the river, without reaching the park on the opposite shore. A picture (in the left part of the park) is visible to some kind of building. Whether the bus stop, or a painted house, or a barn - not to disassemble. Is this the idea of \u200b\u200bthe author, or accidentally hit the object in the frame? What and why the viewer is shown, what thoughts, or emotions should arise from him when viewing? It is not clear ... With further correspondence, it turned out that it was ... swimming for walrus :) However, such an unexpected turn could serve as an excellent plot for another time of the year, and, without fail, with the actors in the frame! And what are the creative achievements of the photo? This photo can be a documentary depreciation of the area and have an undoubted personal value for the author. All of the above comes from personal experience, understanding and taste. If the criticism falls out of the framework of the generally accepted opinion, please forgive ... It's easy to sit on the sofa and increasing a snapshot on the monitor to look for shortages, and there, by the river, anyone could be confused. The author of the photo is Tatiana Parfinova from Moscow - I express my gratitude for the snapshot provided for educational purposes. Dozens of highly artistic photos from your albums should not be sent me. Better take one of them and carefully look like from the side. This is your photo, your idea and photography. What was the lighting and conditions of shooting? What did you want to portray? What happened? And was there a way to improve? The above analysis of the pictures you can perfectly learn to do on your own. Analysis and creative vision of the world are the foundations of photography. If this happens until the shutter button is pressed (and not after) is the basis of an interesting photo! What is an interesting picture? Nobody will say exact wording. An interesting frame is an interesting frame. There is an interesting book, an interesting film, an interesting game, an interesting acquaintance. Moreover, from 100 people, some of the time will certainly say that this film (photo, book) is interesting, others will argue the opposite, and the remaining - that you can look 1 time, but not more. There are still pictures of interesting and understandable only to a narrow circle of persons. For example, a snapshot of friends who can only be interesting to them and anyone more. There are photos that simply copy the surrounding reality. This trouble can be leveled by the beauty of the depicted place. In addition, there are photos, interesting and understandable only to a narrow circle of experts. There are no clear and clear criteria of "Interesting". You can remember some pictures all my life, and forget the lot of others immediately after 2 sec. View. And yet there are things for those who are thinking about, or causing emotions. Here, most uniquely distinguish distant - it is interesting to him or not. Yes, yes, you understood me correctly, I'm not talking about nude :) But it is easier for me to show a couple of pictures than to describe the essence of phenomena. Let's see 2 examples. The following photos depicts actually the same: a copper rider - a monument to Peter I in St. Petersburg. Recalls for those who believe that this is Jigit in the attack. With sincere respect for national culture :) Photo of a copper rider. 1. The technical quality of these pictures is approximately the same. They are normally proxposed, sharp enough, etc. But one of these photos looks more interesting, is it? At one of them, a monument is shown at one of them, and the connection is shown on the other. You noticed that I did not even indicate which one :) Below we see two more photos, which shows almost the same thing, even the angle is the same. But on one of them we see some kind of dim glass figure on a colorful, but completely incomprehensible to perception, and we guess: what is shown? Two photos. 3. Yellow Issonokrys? Subject photography? Sample of glass plant "Gus-Crystal"? Unsuccessful self portrait of the author? What is depicted and that they wanted to convey to the viewer in the meaning or genre plan - completely incomprehensible. But in another photo, the viewer, not deprived of, of course, the famous share of imagination, without difficulty, seems to go to the artist's scene in the rays of the world - before measuring in the severity of the hall with the audience, waiting for his performance! And here is unnecessarily talking about what photo is speech, as it is obvious. Here are also pictures from the Find 2 distinctions series. To the topic "How to photograph from the first time" they do not have a relationship, because we are talking about retouching, with the help of which the possible defects of the picture (random points, spots, acne on the skin, freckles, etc.), and in this case You see what & nbsp :-) Lions and pigeons. 5. Read more about retouching in my photo graduation. In advanced graphic editors (Photoshop, GIMP, etc.) such retouching (correction of the area in a digital image using it to fill in textures from other areas) It is convenient to do the "stamp" tool, after activating the cloning area with the "ALT" key in Photoshop (or " Ctrl "in gympta) - if other keys are not specified). Who does not want to master the editor, can rub the spots with a wet cloth with soap, and then convene the pigeons and take pictures of & nbsp :-) However, I'm not sure that the set of brooms, buckets, rags and soap will be the best accessory to your camera. Imagine such a set in the photomagazine! What photo of pigeons is more interesting - the original or retouching - I will not tell you. In the end, the tastes do not argue & nbsp :-) Well, as you can, I'm not mad, in society a long time to pose an alternative look at art & nbsp :-) The diaphragm here was installed F9.5 so that the lions do not break away at all with the background. Forget about it and retouching too. See lions and pigeons, look for harmony in the surrounding world. And the last couple. Here we see photos that photographers are usually done for calendars with views of cities, memorable places, or architectural ensembles. And where usually newcomers love to pose, so that it is proud to write "here there was Fedya," what to do is extremely not recommended, so that you are finally and irrevocably not to spoil the snapshot :) Gatchina Palace. 7. The ability of the photographer (or camera?!) To put the desired excerpt and the diaphragm is absolutely not enough for a beautiful landscape to see more winning. Another point of shooting and an unexpected angle can turn the palace at the lake in the real artistic postcard! You noticed that it is not indicated here, what photo looks more interesting? :) The direct continuation of this tutorial is the page For those who studied the foundations of photography and mastered this small tutorial, I advise you to visit the rest of the site page (menu below), and if you have moved ahead healthy, and my materials seem primitive (or they have just been missing) - Here are useful links to others - If there is a desire - Improve. Yes, and successful you have pictures! |
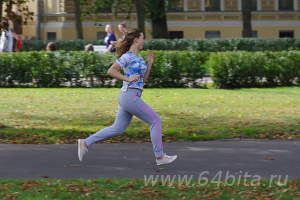


 2.
2.


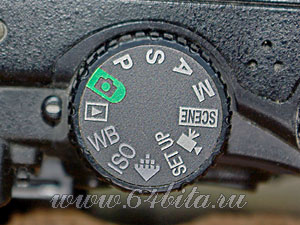


 2.
2. 


 2.
2.

 2.
2.

 In the photo there is such a purely technical moment as autofocus accuracy. Or, if you like, the promotion of autofocus :) He wakes up, heartfelt, even in expensive cameras, because it is not known to him the goals and desires of human - namely - what to focus. Especially on such plots, such as on the left (the picture is better to increase). Thin rods are sometimes a serious obstacle for a stupid machine, even if the photographer tries to accurately take them in the crossbone. But the focus is going on in the background, then on the twigs, the camera is buzzing, the lens goes back - forward, trying to visit an unknown target for him. In more civilized versions, it will not be buzzing, the focus will simply miss the background, but someone is easier. But it is easier to turn off the automatic focus immediately, since it is much faster and more accurate to visit the ring on the lens and controlling the depth of the eye into the viewfinder.
 2.
2. 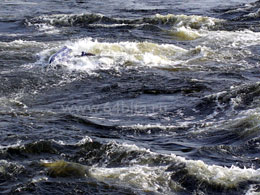

 2.
2. 
 4.
4. 
 6.
6. 
 8.
8. 
 Why you can not postpone the pregnancy
 Effect from regular use of home recipes
 Features of the structure of the neck