Floor repair in the apartment: a phased creation with their own hands. How to repair old floor floor: options, price how to disassemble old wooden floor
The update or replacement of the old, worn floor in the apartment is one of the most time-consuming operations in the overall repair process. Only submitting all the scale and cost of the upcoming, many housing owners very often refuse to repair floors, limited to changing decorative coverage on them. But the time takes its own, and sooner or later the moment comes when it becomes simply impossible to delay such work.
In this case, it is not necessary to immediately look for the brigade of the masters - especially since in a similar area of \u200b\u200bservices, you can very often meet the frank "Khalshchikov". As a result, everything can pour out in a completely unnecessary spending of time, nerves and money at a low-quality result. Why not try to do it yourself? If the owner has certain skills in general construction works, and if we hold in the apartment with your own hands in stages, with compliance with the recommended technological rules, then everything should work out!
Stages of repair certainly depend on the type of flooring, their original state, the purpose of the premises in which work is underway, such as the finish coating. This publication will consider several most common options.
Starting Stage - Decide on the front of the work
Once the owner of the apartment wondered about the repair of the floor, then, most likely, on that there are motivated reasons, unless, of course, this is not a cosmetic replacement of the coverage in the next whisper of the spouse. Therefore, first need to identify and clearly formulate problems - all the scale of further preparatory and repair work will depend on it.
This publication is about the urban apartment, and in the overwhelming majority of multi-storey houses, any gender has the basis in the form of a reinforced concrete slab overlap. But the further design can already be significantly different. The floor can be arranged on the lags fixed to the base, or be imposed directly on the concrete tie.
- The wooden floor on the lags, its defects usually begins to show the screech, the instereability of the coating - the flooring "play" under the legs, the appearance of an unpleasant smell of rot, education and gradual expansion of the gaps. Even worse, if suddenly one of the boards cracks or her fragment falls down.
 Old wooden floor reminds itself with a creak and "playing" boards
 - The old screed on which the coverage is used, from "old age" can also begin to preserve surprises, especially if it was once filled with low quality. Thus, the emergence of obvious creaks and rustling from sand or small pebbles, "Creation" of the screed, the occurrence of the washing sections of the surface, the inclusive instability of the whole major fragment is also not excluded.

In any case, with explicit defects, remove the old coating.
Removal of old coating
- From the room you will need to make all the furniture, completely freeing it for further work. If the repair is not carried out in the entire apartment immediately, but from the room to the room, it will be necessary to provide protection against dust propagation, for example, waking up the inlet of a tight polyethylene film or often moistened tissue, and a gap under the door with a roller with a wet rag under the door. True, the full effectiveness of this method is very doubtful, and the best option is still - to provide for the removal of family members at the time of repair behavior. Nevertheless, the barrier for dust is necessary in any case.
- Next, old plinths are removed. Do it carefully so as not to damage the bottom of the walls to which they are attached. If the plinth is supposed to be used, then they are numbered at the location and temporarily remove.

If anyone before with this business did not come across, then you can recall - the plinths are attached to the wall, and not to the surface of the floor, that is, you need to correctly direct the arm of the lever. It will be easier if the plinth is fixed on the self-tapping screw or on special brackets.
The next step is actually removing the old coating. Several options are possible here:
BUT. If the floor is staminated by some rolled material, then it is attached to one of the sides and try to accurately roll into the roll - it will be easier to carry it out. In the event that the coating (for example, linoleum or carpet) once laid without glue, directly on the concrete screed, make it easy. It is possible to first, to facilitate action, to make parallel cuts with a sharp construction knife, thereby separating the entire cloth into several narrower tapes.
But often there are situations in which the old material is moving together with the layers of the detached screed. Then you will have to remove it fragmentary and immediately endure out of the room together with pieces of concrete so that this construction garbage does not interfere with further work.

It happens that once a qualitatively glued linoleum when removing himself begins to settle down, leaving the suction films on the screed. In this case, you will have to work as a scraper (spatula), warming these sections with a construction dryer or moisturizing the old glue layer with a solution of detergent for floors.
B. More trouble can deliver the old "playing" parquet. If it does not represent value, then its dies are consistently removed, immediately loaded into bags that endure as well. If once the parquet was glued to bitumen mastic or glue on an organic basis, then the removal of individual dies or even integer fragments can be difficult. "Recipe" is the same - a scraper, chisel and heating with a hair dryer.

IN. To remove the old tile, it is the most convenient to use the perforator switched to the loafing mode with a chisel-blade installed. If there is no such tool at the disposal, then everything is performed manually using the hammer and chisel.

G.When removing the boarding of the floor, the most complicated, probably pick up and separate the first floor. Further when you can get a free lever, work will go faster. You will need a nail-pressure with a long handle-lever, hammer, ticks. Nails must be treated to remove carefully, without destroying the boards, as it is possible, this material will still serve for a new flooring after repairing or for the manufacture of lag.

If the old coating is mounted with screws (self-tapping), then you can try to dismantle it and with a screwdriver.
Well, if the boarding coating is already no value, it will be most convenient to make cuts (carefully and prudently and prudently, so as not to hook a concrete base, do not damage the lags and not "dig" on a nail). After such separation of long floorings, their removal will become an easy task.
Is it worth removing all the boarding floor covering, if the explicit defects were observed only in some sections, and the plans should not be replaced on another type of surface finish? Of course, it can be limited to only partial repairs - the replacement of wear or spoiled parts. But specialists in one voice advise - remove everything completely. There is no guarantee that if the process of the scene manifested itself in one field of the floor, he will not show himself in another after a year, or even earlier. It will not be cheaper to render the basis and rearrange the floor, even if it is used to return to this repair again after some short period.
Conducting the reserves
After the floor covering is removed, it is necessary to carefully examine the base.
- If lags remained on the floor, and it is planned to fire a milking coating again, then you should carefully check the condition of these carrier elements and the backups to which they are installed. Brussia Lag should not have places of decomposition, drumsiness, mushroom damage - such details are subject to mandatory replacement. Every loggment is checked under load - it should not hang out, fuse, creak, etc. If necessary, the linings are updated that hold the guide at the desired height.
If the state of the lag does not cause concerns, then after conducting thorough cleaning in spaces between them you can install a new coating. It is possible for this, most of the old floorings are quite suitable. After such a bulkhead, the floor will cease to creak and acquire the necessary stability. If required, there is a thermal insulating material between the lags, which will also take on the role of a noise insulator.

However, on the old wooden floor, very often the lags themselves are quite worn, and their repair is impossible or does not guarantee durability. In this case, they will have to be dismantled to subsequently install new ones. When removing the lag, it should be remembered that they can be firmly attached to the base base. It is necessary to show accuracy and diligence to prevent strong destruction of the concrete basis and do not add excess worries to restore it.
After removal of the lag, the most thorough cleaning of the base of the floor is carried out so that you can move to further stages.
In the case when, after removing the old finishing coating, a concrete screed opens under it, it is examined in the most thorough way. It is necessary to rely that concrete is strong in itself, and repairing such a surface is optional.
The screed must be tagged - it will help to identify areas of its detachment, which are to be removed to the "healthy" base. The surface is checked for the presence of loose places, where, due to the violation of the filling technology, the solution did not scroll the strength or has been erosion due to the impact of moisture. Such sections also require cleaned.

Do not leave on the surface of large slots - from here, the process of destructuring the base may continue. The slots and cracks lie down with the cutting of the stitch and deep into at least 10-15 mm, for subsequent repair.
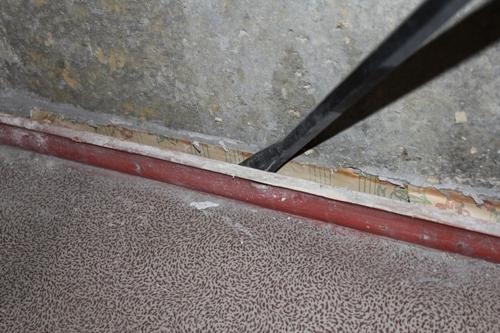
Sometimes after removal of unstable sections of concrete, an unsightly painting opens, such, for example, as shown in the photo. However, it is quite amenable to repair.

After removing defective sections and cutting cracks, careful cleaning is carried out. It is best to use a powerful building vacuum cleaner in this business - other means to clean the surface and the formed cavity from small garbage and dust is extremely difficult.
Sometimes you have to resort to a complete dismantling of the entire screed to the slab overlap. This can be caused by extremely low quality, coatings that are inappropriate to repair, and it is better to restart completely. Often in the screed in raw rooms finds the "refuge" mold or fungus. Another option is when the floors require additional insulation and noise insulation, and the height of the ceilings and the dimensions of the doorways in the apartment will not allow to raise the level of the coating (taking into account the thermal insulating layer and finishing). To the same extent resorted when it is planned to make the wooden floor on the lags instead of thin coatings.
 Complex, but, often, simply necessary operation - Full removal of old screed
 Of course, the process of completely dismantling the screed with the help of a jackhamper is very tedious, noisy and dusty, but no other way is not invented. This requires certain caution in order not to damage the concrete slab overlap. The screed is cleaned with separate slices that immediately dig up toward the shovel and pack over the bags for the export. Use even small fragments as a material to fill a new solution - not recommended, as they do not enhance, but on the contrary, the quality will worsen.
After removing the old screed, a thorough cleaning of the surface is carried out - as it was described above.
Basic surface repair
What was the floor was not planned further to the flooring, the concrete base for it is necessary to put in order. Thus, poorly sealed seams can be expounded between the slabs of the overlap, the slots around the perimeter of the walls, potholes or cavities, etc.
Such a repair is necessary even if the fill of the new solution may not penetrate these flaws, there will remain air cavities that reduce the monolith of the coating and the starting point of the screed destruction process. Especially this is important and necessarily if the screed will be poured onto the separating layer or on the waterproofing film (floating screed).

All surface defects need to be carefully cleaned, if necessary (for example, interchange seams), to be separated, and then remove even the smallest crumb and dust with a vacuum cleaner.

The next step is thoroughly, at least twice, which is designed specifically for concrete.
Such treatment will significantly strengthen the surface, which is especially important in its loosenness, increase hydrophobic qualities, reduce the absorption of concrete, will improve adhesion with repairs. Further work is transferred after the last applied layer of the soil is completely absorbed and dried.
As a repair composition, a conventional cement-sandy solution can be used. However, it will dry and gaining the necessary strength, it is long enough, and it is better not to regret money on special repair formulations, also on cement or epoxy basis.

The printed flaws of the surfaces are maximally fill in the repair makeup, comparing with the overall level of the floor. To do this, you can use the usual spatula. Some remodes are implemented in plastic tubes, and it will be more convenient to apply them using a construction syringe or a special "gun".

If the defect is large in volume, then in some cases it can be resorted to its filling foam. After its drying, the surplus is cut off, and then the remission is adjusted to the total surface level.
Repair "twists" give time for full frost, in accordance with their instructions, after which you can fill the surface using sandpaper, wrapped on the bar. Then it is recommended to go through the entire surface of the primer again. If in places of repair marks an increased absorption of the composition, then these sites are so ground twice.
After drying the soil, the surface can be considered ready for further work.
Aligning screed
If the old screed or wooden floor was shot, and the slab opened, then, most likely, its level is very far from the horizontal. The house eventually gave a shrinkage, and when it was erected, many years ago, builders could not particularly take care of the strictly verified level of overlaps. So, what floor was not planned to do next, it is recommended to be the basis and strengthen, and at the same time align the screed. The thickness of this flooded layer should be at the highest point of at least 30 mm
First of all, it is necessary to determine the value of the difference, that is, to identify the peak, the highest and lowest surface point and "breaking" the zero line line. At this mark will be an exhibited a system of beacons.
To fill the screed, you can apply a conventional cement-sandy solution that is preparing directly at the place of work. Usually proceed from the proportion of three parts of the sand to one cement M-400 - this ratio gives the optimal surface and wear resistance to the surface on which then can be mounted any of their existing floor coatings.
Those novice builders who do not want to communicate with independent preparation of proportions can be recommended to take advantage of ready-made construction dry mixtures. Their composition is already optimized under the screed, and it remains only to set it out correctly, in accordance with the attached instructions.

What is the result of materials in a matter of or that? It all depends on the level of the height drop at extreme points, the planned minimum thickness of the screed, the area of \u200b\u200bthe room, the characteristics of the solution.
Usually, the packaging of dry construction mixtures indicates the normalized consumption in kilograms per square meter of the pliable area with a layer thickness of 10 mm. Based on this, it is possible by easy calculations to determine the required amount of material.
To facilitate the readers of the task - a calculator that allows you to quickly and accurately produce such calculations.
Wooden floor as any natural coating over time comes in disrepair. There is a need to remove it and replace the new one. How to spend correctly disassembly of the old flooring? how opening wooden floors without help masters? These and other questions are worried about those who want to make repairs in the house with their own hands.
Why open the floors
Wooden floor base parts, a drawring coating of a rough and facial layers in the process of long-term operation rot, dissipate, turn into a duch. The main enemies of natural products are high humidity, insects and small rodents.
From the large presence of moisture, the tree moldsheets is covered with a fungus. In the process of destruction in the room, an unfavorable microclimate is created. People may have an allergic reaction. Breathe mold harmful. It is especially important to protect children from such a danger.
Moldy boards look not aesthetic. Blue divorces break the beauty of natural wood pattern. Hide them hard. No construction cosmetics helps.
Pests exude wood, turning it into the duch. Mice are discharged in it holes. From this walk on the floor becomes unsafe. Cold air enters damaged boards. Feet on such a floor shied. In winter, maintain a comfortable temperature in the room is problematic.
In addition to the main reasons, the replacement of the wooden floor exist others:
- strong wear of the coating as a result of intensive operation;
- errors at the construction stage of the building, the improper device of the base, rough and clean flooring, violations in the ventilation system;
- to install the floor, the low-grade material was originally used, which in the installation process was deformed.
These reasons are the basis for replacing old wooden parts new.
Methods for dismantling old wooden coating
Before, how to open wooden floors, It is necessary to explore the coating and explore the ways to dismantle it. The choice of technique depends on the state of the main floor elements, the conditions for the disposal of waste, the planned material costs for repair.
- If many well-preserved elements are detected as a result of the survey, they can be used when construing a new coating. The main condition is in the process of dismantling to preserve their integrity. For this, it is important to spend the work neatly, trying not to damage the boards.
- Absolutely unsuitable for reuse, the material is removed completely and disposed. Necession is needed here, so as not to be covered with a sliver, do not drink hands.
Attention! When dismantling old wooden elements work in thick mittens with a convenient tool.
Dismantling of boards with their subsequent use allows you to save money when purchasing construction and finishing products. Calculation of the purchase of new floor elements lead after its opening.
How to carry out a wooden floor
Dismantling of the wooden coating is carried out in several stages.
Preparatory work
If the removal of old boards is carried out in the apartment of a multi-storey house, it is accompanied by certain inconveniences for neighbors. High noise, a lot of dust, small and large garbage.
To avoid trouble for yourself and others, work is carried out in the time defined by law, when it is possible to exceed the noise level. This is the gap from Monday to Friday from 7.00 to 22.00. At the weekend it is better to abandon noisy activities or start it no earlier than 8.00. To avoid conflict, you should prevent neighbors about your decision to conduct construction work.
A respirator is used to protect the respiratory tract from dust. To protect your eyes, put on special plastic glasses. Perform dirty work follows in working mittens and overalls.
The room where the dismantling of the floor will be released from furniture, decorative elements. The doorway is covered with a damp cloth or polyethylene film. This will prevent the spread of dust in the apartment.
At the preparatory stage it is important to prepare bags for garbage, consider where to carry large fragments. To dismantle old boards, you will need an easy set of tools:
- nail or screwdriver if the boards are screwed by self-drawing;
- compact metal scrap;
- a hammer;
- topor;
- ticks;
- hacksaw (electrolybiz).
If a concrete slab serves as a base for the floor, a cement-sandy mixture should be prepared to close the chips and cracks.
Well-preserved elements that can be repeated in the case, you need to clean the paint, varnish with a metal brush or grinding machine. Before dismantling, they are recommended to numbered to preserve the former order.
Main works
- Plinth removal. The edging of the floor is beginning to remove from the doorway. Wooden plinth usually attach nails. On the bar find the location of the fastener cap. Here neatly fit the lombing and slightly lifting the product. So come along the entire length of the plinth. The hammer is slightly inserted down to expose the nail heap. Then the nail is removed fastened. The strap removed is disposed of or used during other repairs. Long products can be cut to make it easier to bear and storage.
- In the presence of ventilation holes of the closed with a special metal grille, the lining is removed. It can be reused.
- Halling of the floor starts with the first board of the board, adjusted to the opposite door of the wall. Boards screwed by self-drawers are released using a screwdriver. This happens quickly, without much difficulty. However, most of the old flooring was attached to nails to wooden beams (lags). It is harder to remove them longer, as they do it manually. Time to remove nails increases, if it is assumed to further use the shotboard. They must be saved without damage.
To carefully reveal the wooden floor, the first board is lifted by 1-1.5 cm with a nail or scrap, looking at the slot between the wall and the floor. Start from the middle, gradually moving to the edges. The raised item is in the lags again to expose nails hats. It is removed the nail to remove the fastener, pull out the board from the spike-groove compound, trying not to damage the position of the horizontal connection. Also come with other details.
If the boards are not subject to reuse, they can be split, cut, remove more aggressive methods. Slugs and large fragments are put in bags and endure out of the room.
After removing all parts, they are inspected. Good products are left damaged and disposed. The boards for recycled are clean and treated with special protective equipment to extend their service life. Be sure to explore the state of the lag. If they are unsuitable for further operation, they are replaced with new products such dimensions.
Help the wooden floors is easy. Dismantling of old boards can be performed alone without attracting additional labor. This will significantly save the budget of all repair.
Viewed: 1 308
 Replacing the old wooden floor
  Wooden floor vaporizoation with their own hands Wooden floor arrangement with their own hands
  Grinding wooden floor - how to make it yourself Wood floor mounting with his own hands, video
Dismantling work occupy a lion's share of strength and time when conducting a major repairs of housing. Old floors are no exception. They can lose appearance, start creaking or just serve their time and do it. Therefore, dismantling the wooden floor, which is often found in the homes of the Old Foundation - an integral part of the work during repair. How to remove such a floor with minimal time loss?

When dismantling the wooden floor is often removed not only the flooring themselves, but also the lags on which they are fixed. This is pretty hard work, although apparent fast and easy from the side. At the same time, everything should be done carefully, so as not to harm yourself.
On a note! Sometimes it is necessary to disassemble new militant floors, although it is more often dismantled by old coatings. In the first case, it is necessary to remove the boards as much as possible so that later they can be applied again.

In general, the reasons for the dismantling of the floor boards may be the most different:
- loss of appearance;
- high level of coating worn;
- improving the level of humidity in the room;
- rotting processes, damaging boards;
- cracks and other mechanical damage to the floor surface;

- creaking and dips when driving on the surface;
- formation of colonies of various microorganisms, including mold, fungus, etc., damage to floor covering and human health;
- errors allowed when laying material;
- the use of low-quality materials in the arrangement of floors;
- destruction of boards insects;
- laying new coverage.

In general, when conducting overhaul in the apartment it is better to immediately update the floors. Especially if the wooden coating has been used for several decades - during this time it deteriorated significantly from the point of view of operation. Despite the fact that the work is not so simple, as it seems, it will still be justified and far from unnecessary.

Repair of "Playing" Halp - Alternative Solution
Tip! Find out, scheduling boards or not, very simple. To do this, the surface of the floor is closed with a conventional hammer. Those elements that when you hit, make a deaf sound, you need to delete and replace new ones. It is necessary to fully disassemble the floor if such a sound is distributed when the hammer is hit anywhere in the coating.

By the way, few people think that wooden is not only the floor made of solid wood. To the same category include covers such as tree laminate, parquet board. The dismantling of each species passes in its own way, but there is a certain similarity between the works.

Main ways of dismantling of wood
Wooden floor can be dismantled differently. And to decide how this process goes, it is important to determine what the final result should be. It is from this that will depend on how all work will be.

Woods dismantling methods.

By the way, it is always better to work on dismantling the wooden floor as accurately as possible. In this case, the entire trash formed even when applying the first method to utilize will be much easier.
Attention! The offering obtained as a result of cleaning can deliver a lot of trouble. Reduce the risk of damage can be used to work neatly and in gloves.

Features of professional dismantling of floors
There are certain requirements for the dismantling of old floors and the rules for conducting work. Some of them may not be respected depending on which method will be removed from the old coating.


By the way, not only the wooden coating itself is exposed to dismantling, but also the screed, which is under it. After all, if she came into disrepair, it will affect the state of the new coating on the future.
How to start dismantling gender?
Before proceeding directly to the dismantling of the wooden floor, it is important to carry out a number of preparatory work. They are not as complicated, but, nevertheless, it is necessary to ensure that all work has passed in the most comfortable conditions and quickly.

Preparation for dismantling of wooden coating
The first thing from the room is to remove all the furniture. Otherwise, dismantling will be simply impossible, since any detail of the situation will interfere with removing the boards. Chairs and chairs will have to be rearranged from place to place, and these are extra labor costs and time loss. That is why it is important to remove everything from the room that only you can - the room should become absolutely empty. It is also worth removing from the room all the garbage - it will interfere with the state of the floors.

After this preparation phase is completed, the state of the floor is estimated. To do this, it is important to inspect and catching up with a hammer. Right flooring will make a deaf sound. The level of boards is also evaluated, that is, the fatty floors.
On a note! If the floorboards are not deformed, and also if it is not planned to arrange a bulk sex, then the boarding coating can not be removed - it is enough to carry out cosmetic repairs.
It is important to choose the right time to dismantle the floors, if the work will be made in an apartment building, as the process will be accompanied by quite strong noise. Early in the morning should not be taken for work, the optimal time interval is working hours, when most residents in apartments are not located. It is also better to work on weekdays, not on weekends.

You should choose work clothes. Provided personal protective equipment for eyes and respiratory organs. Clothing should be the one that can then be thrown away, because during the dismantling of the floor there is a mass of shallow and corned dust. It is also recommended to use gloves to reduce the risk of occurrence. Foreign people, and especially children, should not be present at a dismantling process.
It is better to call for help to help a friend or relative - so the process will go faster. In a small room, you can work in turn, but the powers of the partner will significantly speed up the work.

When dismantling, various tools can be applied - it can be:
- axes;
- a hammer;
- fomka (scrap) or nail-holder;
- hacksaw, jigsaw;
- ticks;
- sledgehammer;
- screwdrivers, chisel.
Removal of plinths
Before the boards of the old floor will be removed, it is important to remove the plinths located along the walls. They will brake workflow and interfere with it, if this step of preparation is missing.

In order not to damage the wooden plinth, it is necessary to disconnect it from the base, starting from the end. The location of the extreme nail is calculated and here the plinth with the help of a fombus gently raises a couple of centimeters. Similarly, the plinth rises at each point of the combination of the product with the base. If necessary, returned to the first nail and raise the plinth again, sequentially lifting it up and at other points. The closer the scrap is located to the fixation point, the more chances to remove the product gently without damaging it.
You can also try to remove the nails themselves, up following their hats with a nail. Protecting the plinth from dents will help a piece of boards, chips, plywood, which is led by the working tool. If the plinth is not scheduled to be planned, it can be broken.

Plastic product remove significantly easier. To do this, a protective bar is removed from it, the fastening elements are spinning and the plinth is easily separated from the wall.

Wooden floors dismantling technology
Consider how the dismantling of the wooden coating is being passed in the event that old boards are removed and they will not be used again.
Table. Floor dismantling instructions.
| Steps, photos | Description of action |
|---|---|
| Along one of the floor boards according to its center, it is performed with a circular saw, jigsaw, the saws ordinary. This is usually done on the board, which is close to one of the walls of the room. |
| Fomka is inserted into the incision made, one of the halves of the board is lifted and then removed. To do this, on the handle of the fombus is carried out by pressure - the instrument handle is used as a lever. |
| The second half of the sawn board is removed. The construction garbage is immediately removed from the room, so as not to interfere with further work. |
| Other floorboards are powered by a jigsaw. Propyl is performed perpendicularly removed by half. In this way, work is done if there is no need to save the boards as a whole. The propyls are made so that the boards are divided into sections of 30-60 cm long section. |
| Each board must be completely removed - only then the transition to another halfway and work with it is performed. |
| If the fombus does not come between the board (the board is not fuel) and the base (or lags), it is inserted under it with a hammer. Then, when you press a tool, the board is lifted and removed completely. |
|
| Each board, if it is well fixed, rises evenly from one edge to another. This is especially important if the boards must be saved intact. |
| Similarly, all the boards are completely removed. |
| Completes dismantling work cleaning garbage from the base. |


If you plan to replace the lag, then old are removed. To begin with, after opening the floor, insulating material is cleaned, if such was laid between lags. If under the floor is glass gamble, then it is necessary to work with it only in gloves. The lags themselves are cleaned with a scrap or ax and thrown out.

If necessary, removes the old screed. The work is carried out with the help of a jackhammer or puncher. The base is finely crushed, and then removed in pieces.
Prices for model range of McITE perforators
macita perforators
Video - dismantling of wooden floor
Video - Dismantling Parquet Board
Remove the wooden floor can be independently. The main thing is to comply with all the rules for holding work. And, as they say, breaking - not to build, because problems with this stage of work on the restoration of the room is usually not observed.
In your apartment, the old wooden floor, which by order fed the screech of the flooring and some of their malfunction? We offer you several types of solutions that will help to cope with such a coating and make the old floor beautiful new. Here you will see your friends will also acquire. How to redo or repair the old wooden coating on the floor in the apartment, we understand below.
IMPORTANT: Make the repair of a wooden coating in the apartment must be styled and depending on the complexity of its damage.
Below is the video to update the wooden floor in the apartment.
Repair of wooden floor

Such work will be relevant if, in principle, the floor itself likes, but some of its boards or simply the appearance of the entire coverage cause doubt. So, first we liberate the room from all the furniture and carefully browse all the coverage.
If only large cracks in the floor are observed, then it is enough to close them all either with a special putty (under the condition of cracks up to 5 mm), or close the slots with special wooden chops cut out of wood. They are clogged into the cracks, after which the entire floor is processed by the cyclical machine and is covered with two-three layers of varnish. You can make this type of work independently.
If doubt calls the quality of the boards on the floor in the apartment, you can first thoroughly try to try all the floorboards. Rotten and docking are completely removed. And those that simply creak or snack when walking, have to raise to check the status of the lag. If the lags are in perfect order, it is enough to fasten the creaking boards with self-draws to lags, and rotten - to completely change to new ones. The renovated wooden floor is also grinding the cyclical machine, trying not to do deep cuts on the board. At the very end, you need to make floor vacutration in the apartment acrylic varnish for wood.

Important: In any case, during the repair of wooden floor, you must remove the plinth. By the way, it is desirable to replace new ones. So the floor will look newer after repair work.
If all the floor boards look, in principle, it's good, but at the same time creak and squeeze, then here you will have to repair Lag, most likely. For this, the underground, providing ventilation boards, and the apartment is warm, will have to fully disassemble. So, all the boards are removed alternately, going up by a montirop or chisel.
IMPORTANT: HALLTS When dismantling, you need to numbered to appear later in the same order. Make it necessary.
All rotten and drunk lags with the sleepers and without sleep removed by replacing them with new ones. If you are doing a major overhaul of the floor, you can first completely remove all the lags, clean the concrete overlap and to be sealing it with a layer of waterproofing material. After that, old and new lags are stacked on the floor with a step of 40-50 cm. It is necessary to observe the gaps between the lags and the wall of about 2-3 cm. This will ensure reliable ventilation to the tree and freedom of expansion as a result of changes in temperature and humidity level in the apartment.
Between the lags, it is possible to pave (closed) flooring from thermal insulation materials. If you make such a layer, then the apartment will be warmer at times. Last but I mount all the boards in the reverse order, securely fixing them with self-draws. At the same time, the hats preferably drive deeper into the tree. Paul cincionally and coated with varnish in 2-3 layers. On the new flooring installing the plinth.
We take a wooden floor

If you wish to fully update the floor, but at the same time tend to the tree, you can simply replace the flooring with new ones (provided that the lags under them providing ventilation are in the normal state).
For the rest of the wooden floor in the apartment, you can use a high-quality tipped board, which is mounted online. Ideally, it turns out a smooth and beautiful floor covering without cracks and gaps.
So, the lags are tested for strength and quality. If necessary, change the rotten. If you wish, you can completely change the lags to the new ones, while setting the floor with a waterproofing material, and there is lags from the heat-insulating polystyrene or mineral wool between the lags.
Now let's start the installation of a t-shirt.
Important: The length of the boards should be such that there is a small gap between the flooring and walls. This will allow the board the ventilation and freedom of expansion under the influence of temperatures.
The first floorboard without spins with a smooth surface mounted to the lag with self-draws. Then the floor boards put in the apartment of the jack, driving the groove in the recess of the previous floorboard. Each board can be customized tightly along the entire length of rubber Cyans.
The laid floor seished with a wooden plinth and coating acrylic varnish for a tree in 2-3 layers.
It is important: to operate such a repaired floor without different sleeps can be immediately after drying the varnish (that is, in a day), but only in the socks. And installing furniture on the wooden flooring in the apartment covered with varnish, better in a few days. Moreover, it is necessary, using special felt overlays on the feet of furniture.
Wooden floor covering by another material

In the event that your old wooden floor has not rotted in the apartment, did not crumble and, in principle, has the right to life, but at the same time you want something new, then you can apply a new flooring on top of a wooden flooring. For example, laminate, linoleum or carpet. To do this, first will have to prepare a good reason.
Important: Such a repair technology will provide ventilation to your new floor and keep warm in the apartment.
So, it will be necessary to fulfill work:
- Plywood sheets 6 mm thick;
- Substrate under laminate, linoleum, carpet;
- The selected floor coating itself in the desired quantity;
- Screwdriver and screws;
- The new plinth selected to the selected flooring.
If you decide that your underground should be new, you will need new lags to repair the cheek. Here work is carried out by analogy with the example above.
So, proceed to the flooring of a new floor covering. Do this will be so:
- First, check all the boards for the presence of a screen and seed. If defects are detected, they need to be repaired (eliminated) by the method of fixing the flooring to lags by self-drawing.
- Now we proceed to laying plywood. It must be attached to the floor boards also self-drawing. In this case, the presence of sleeps on the floor does not matter.
Important: Between the walls and edge of plywood, you need to leave the gaps of 1-2 cm on each side. The gaps of 5 mm should be left and between every joint of the sheets of plywood on the floor.
After all the plywood is fixed, a substrate can be displayed on the floor and consolidate it with a special construction tape. Lastly on the floor with a laminate, observing the laying technology. And if you are against laminate, you can cover the floor with a linoleum or carpet. Your new floor in the old apartment is ready. Ventilation of flooring and heat from the side of the floor will be provided for you for many years.
Quite often, when repairing the repair arises the need to dismantle the old floor. The reasons may be the complete replacement of the coating, the reconstruction of individual components of the laminate or parquet.
The article describes how to remove the wooden floor, without resorting to the services of third-party specialists, which tools are used with an independent dismantling. In addition, there are some methods for the repair of flooring without removing wooden flooring.
Need to dismantle a wooden floor
Wood floor is considered the safest, environmentally friendly sex. In compliance with the technology of installation and proper operation, such a floor will serve over 50 years. However, over time, the boards may come into disrepair and need partial or complete replacement.

The main reasons for dismantling old floors:
- caution wear;
- increased moisture in the room - the wooden floor is better replaced by waterproof coating (tile, linoleum);
- band damage fungi and insects;
- cracks with wooden boards, appearance of a screap, etc.
Council. Planning overhaul, from the old wooden floor it is better to get rid of. Of course, such work is very laborious and dusty, but fully justified. The new coating will "go to bed" smoothly and stop creaking.
Before proceeding with dismantling work, you need to carefully examine the floor. Excess furniture to endure out of the room, remove the accumulated dirt. Particular attention is paid to the uniformity of sex rack and the degree of its wear. If the coating is not deformed, then it is enough to carry out cosmetic repairs. Sometimes, the wooden floor is played, turning the available plaques on the wrong way.

There is often a situation where repair is required for a separate area (corridor, passage of the room). In this case, damaged boards are deleted and replaced with new ones.
Council. Identify the rotten floorings, it turns out, knocking on the floor with a hammer. Boards emitting a deaf sound are subject to replacement. If most of the floorboards require updates, then the old floor is fully disassembled.
What to take into account when removing a wooden coating
Dismantling of old wooden floors has some features:

How to make a dismantling of a wooden floor: work order
Preparation of instruments
For dismantling parquet or other wooden coating, the following tools may be needed:
- nail holder;
- sledgehammer or mounting hammer;
- pliers, screwdriver and ticks;
- saw or electrolovka for cutting long boards.
Note that to dismantle a concrete screed under wooden floors, the perforator and chisel will be needed.
Removal of plinth
Dismantling of the floor in an apartment or private house is customary to start with the removal of wooden or plastic plinth. Sequencing:
- From the room to carry out the furniture, remove the structures arranged on the floor, the working surface wipe with a damp cloth - this will reduce the amount of dust raised during dismantling work.
- Removing starting from the corner of the room, otherwise the plinth will start strain and break. Between the floor and the plinth insert the sharp end of the nail. Applying efforts to pull the first nail half of the plinth.
- The same to do with subsequent nails.
- Return to the first nail and pull it completely.
It is much easier to remove the plinth, fixed by screws - they need to just unscrew. Painted plinths, on the contrary, harder in dismantling. For their removal to the point of the support of the nail-breed, you need to drive the wood. If the nails are very long and the nail stroke is not enough, then it is necessary to put a bar.
Usually, the plinths are naught with nails and painted in 2-3 layers of paint. In these cases, most likely, the fasteners are located at a distance of 50-70 cm. Having removed the nails, the nail should be slightly strung to knock down a mild - so the plinth is easier to remove without damage.
The procedure for removing the plinth fixed on the wall is the same as the outdoor.
Dismantling of the floor
After removing the plinth on the perimeter of the room, you can proceed directly to the dismantling of wooden boards. Given that the laying of the floor begins with a flooring facing a spike wall, then the removal is carried out in the opposite direction - this will preserve the integrity of the wooden material and use it in other repairs.
If the floor is mounted on screws, then all the locks are unscrewed, and the boards are removed sequentially. In cases where the floorboards hold on nails, it is necessary to act in such a sequence:
1. Determine the side of the floor where the last board is laid.
2. Under the board to score a nail with a hammer or hand.
3. Raise the flooring by 1-3 cm from the lag. 
4. Press the board so that the floorboard lay back. As a result of the work done, the nails hats will remain hanging over the floor surface. If it did not work from the first time, then the board must be re-lined and lower.
5. Lay under the nail plate and remove nails with a nail. The attached plate will protect the floor from the press.
Important! In order not to damage the sex board to raise a floor from lags, it is not higher than 3 cm.
To remove an extreme board, you need to remove all nails in the method described. Then gradually with the help of the chisel to increase the gap between the floorboards.
When dismantling there is a chance of damage to the groove and spike of the board. This can occur with a strong press on the nail-cutter or due to the poor state of the wood itself (the presence of cracks, the appearance of rot, etc.). The broken upper part of the groove will be restored with the help of glue or nail a small nail. The appearance of the board is somewhat worse, but the functionality will not suffer.

During dismantling and construction work, certain difficulties may occur, for example, a dense fit of wooden boards to the wall. If the nail holder is difficult to shove in the gap, then it will have to score with the hammer. With such a removal there is a risk of damaging the plaster. Sometimes you have to resort to using a drill to remove part of the floorboard. In the resulting space, it turns out to drive a nail.
Lag removal
Dismantling Lag and concrete screed is better to entrust specialists. The removal of the floor of the floor is a rather complicated event that requires special technical means.
With independent dismantling, the following order operates:
- Usually lags are installed on substrates, between which the insulation is located. Heat insulation material pull out. When removing the glass gamble, it is necessary to use personal protective equipment.
- Lagges to join crow or break - depends on the worn out of the wooden elements.
- After removal of lag, it may be necessary to dismantle a concrete screed and fill a new base.

It is necessary to assess the status of the lag. If lags are rotted - they will have to be thrown away. It is necessary to mount new ones, high-quality dried wooden. It is important to choose exactly the dried lags, which in the course of operation will not give shrinkage, and the floor is not overcome.
If old lags look more less worn, then the wooden floor can be simply strengthened by setting additional new logs between old elements.
Council. To extend the service life of the lag, they must be impregnated with oil and paint. It will protect the wooden elements from moisture, fungi, mold and the effects of other microorganisms.
Dismantling of an old screed
To remove floor screed, you will need a jackhammer, a perforator or the use of diamond cutting circles. At home, where you have to work on a small scale, you can arm a hammer, chisel and a sledgehammer.
The dismantling process is significantly complicated on large areas, where the screed is equipped with reinforcement. Remove the metal grid from cement chisel and hammer is difficult. A diamond circle will cope with this slave.

You must first throw the screed, after which it will easily be removed from the surface. The remnants of concrete are put in bags and are taken out of the room. If the garbage is planned to be taken out immediately, then the bags should be placed under the cover - in the case of wetting in the rain, the concrete will be lost and the loading process will become significantly complicated.
Disassembly of the concrete screed is very dusty and noisy process. It is necessary to conduct such work during the daytime, having coordinated the action with the neighbors. In addition, it is necessary to follow the safety regulations and put on the respirator, so that the smallest particles of the construction garbage did not fall into the respiratory system.
Wood floor repair: Scroll removal
Very often it is the appearance of a syringe is the reason for dismantling the wooden floor and filling the base concrete. However, it is not worth a hurry - to solve this problem will be able to be one of the ways.
The first method. In a creaking half, over the beam, drill a hole with a diameter of 12-16 mm and pour it with cement, diluted with water in a 1: 1 ratio. After 2 days in the hole to drive a wooden pin, impregnated with glue, to the overlap panel. After complete drying, this section is attached to rip out, open lacquer or paint.

The second method. Between the scripting boards, drill a hole at an angle of 45 ° 6-8 mm thick. In the hole to score a wooden pin, lubricated with joinery glue. The protruding part of the stroke cut off the agent, the repaired area is spacing.
Third method. In apartment buildings with central heating, often the creak is due to excessive dryness. You can eliminate this deficiency with lubrication. The usual talc starts in a slot through a rubber pharmacy pear. It is necessary to act carefully, so as not to wake up the talc on the surface of the flooring, otherwise it will remain white divorces after a damp cleaning. After processing the gap slippath.
 Why you can not postpone the pregnancy
 Effect from regular use of home recipes
 Features of the structure of the neck