Main points in working with plasterboard. How to work with plasterboard - theory and practice How to work with plasterboard
Before installing plasterboard, you should prepare a framework on which it will be attached. For these purposes, a special profile differs in size, cross-section and configuration is used. About the features of the assembly of the profile for drywall and his appointment will be talked further.
Plasterboard profile: Characteristics and general information
Plasterboard is a material, easy enough to use. However, in order to secure it on the surface, a special design should be built from the profile. In the process of performing these works, it is most often difficult to arise.

The construction of a metal profile construction for fastening of plasterboard allows this material to fully perform its functions. Since refumbaging fastening of drywall is sheets of plaster, which are separated by the room. At a time when frame structures differ in forms, sizes, have arched openings, etc.
The absence of the crate will not allow the wall alignment, the ceiling finish or the installation of partitions.
There are two options for profiles used in the installation process of plasterboard structures:
- wooden;
- metal.
The first option is distinguished by a weighing of deficiencies, among which, above all, the low duration of operation, compared with the metal. In addition, the wooden profile is more exposed to moisture than metallic.
Steel profiles are several times more expensive than wooden, in this and consists of their main drawback. Despite this, they have a mass gain, among which we will highlight:
- high resistance to all external influences;
- availability of acquisition;
- simplicity and reliability in use;
- the duration of operation, the galvanized steel is used for their manufacture, 6 mm thick;
- this profile is easy to restore;
- a variety of profiles that are suitable for use in certain situations.
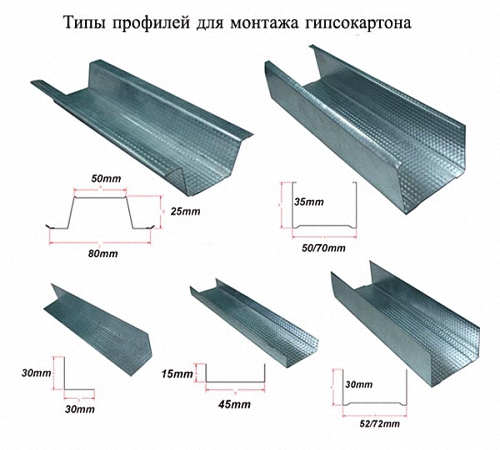
Main types of metal profile under plasterboard
In accordance with the appointment, all the profiles under the installation of plasterboard are divided into:
- main;
- guides.
The dimensions of the profile for plaster axes vary in the ratio with the design features, which is erected from it.
The first option is labeled PS and PP. It is intended for places with high load. It is on this type of profile and mounted plasterboard sheets. Two variants of the guide profile differ in the edges in the form of the letter P or C.
For guide profile, there is a marking of PN. It is a horizontal plank, which is the basis for attaching vertical racks. It is this profile that forms the basis of the steel frame.
We offer to familiarize yourself with the main options for the profile for plasterboard made of metal:
- Mon - are guide profiles of ceiling purposes, since it is precisely on them that the plasterboard is mounted, used in the process of finishing the ceilings;
- PP is a type of ceiling primary profile, is used in the process of fixing drywall on the ceiling, it is fixed around the perimeter of the room, when installing suspended ceilings;
- Mon - Wall-proof profiles, perform a vertical rack function in wall structures.
Tip: PS profiles are partially used, that is, they are installed by segments, in order to save material. It does not affect the final quality of the design.

There are two more profiles that are used infrequently:
- angle - help to form the angles of the plasterboard partition, they are installed directly to the already mounted drywall and protect it from the effects of different types of mechanical stimuli, when the ceiling is fixed, the angular profiles are fixed around the perimeter, when the walls are arranged on the floor and the ceiling;
- arched - apply during the construction of the arches, in addition, with its help, radius and all sorts of asymmetric forms of walls or partitions are formed, for fixing such a profile enough simple self-tapping screws.
Note that the maximum radius of the arched profile flexion is 50 cm, with a larger load, there is a risk of destruction of the structure.
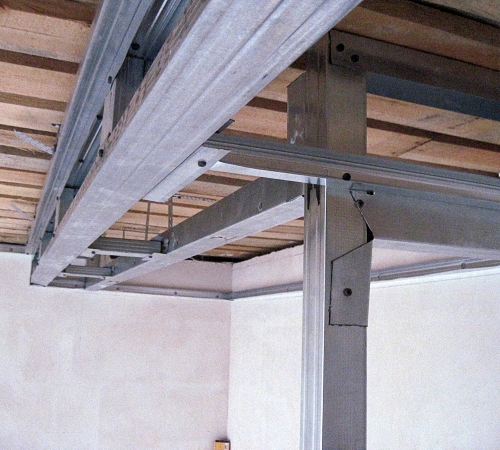
Features of the fastening of a metal profile
Special suspensions are used to fix the material, with the help of which the interval between the wall and the profile is adjusted. Thus, before the construction of the structure, it will not be necessary to pre-align the walls.
If the ceiling height is more than two meters, then it will take 5 suspensions attached to the ceiling or on the wall. With their help, the evenness of the whole design is adjusted.
Note that the base of the metal frame design is the profile of the guide type. It is fixed with the help of dowels and self-tapping screws. The average distance between the holes is 200 mm. Thus, the design will be securely attached to the wall.
Some types of profiles already have in advance drilled holes, it is better to choose such materials for beginners.
In order to facilitate the procedure for mounting a profile under drywall, we suggest familiarizing yourself with the helpful advice on this process:
1. On a wide wall of the profile, there are two plasterboard sheets with ease, but consider that each of them should be located evenly.

Tip: Clean the installation of vertical racks so that the interval between them is less than six centimeters, the values \u200b\u200bof half of the drywall in width.
2. Screws are installed in close proximity to the wall, to ensure more reliable mounting.
3. Sweep the screws exclusively at right angles, otherwise, unscrew the screws and reinstall it.
4. All screws of the self-tapping screws are accumulated by 0.5 mm in the profile.
5. Vertical racks have a special place to install engineering communications. Although in most cases, wires and pipes pass directly under the plasterboard.
6. When finishing a private house, you should take care of the presence of additional heat and sound insulation.
7. When buying profiles and guides under hypokarton, it is necessary to increase the required amounts of materials by 10%, to compensate for various kinds of sections and technical moments.

Features of the installation of profiles under plasterboard around the perimeter of the room
To begin with, make the markup of the plane to which the framework of the frame will be made. Next prepare tools in the form:
- two plumbers;
- fishing line;
- line;
- hammer with nails;
- chalk.
To fix a plumb on the wall, nails are used, it must be fixed on the ceiling, but hang up to the floor. The second plumb is attached in the same way. Please note that the plumbings should not touch anything, as the smoothness of the vertical will be impaired.
The wall stretches the fishing line in three places: from above, bottom and centered. The highest point on the wall will serve as a place of installation of a metal frame. Returning place from it, check the accuracy of the breakdown. In parallel in advance of a strained fishing line, pull another part of it at the side wall. Connect the areas of the fasteners located on the two walls using the line, so make labels by plane location.
Repeat this procedure with all the other walls and with the ceiling. With the help of the rule and chalk, mark the perimeter of the design.

Installation of a profile for guidewall guide type
In order for further design from profiles to be smooth and correct, it is necessary to correctly fix the guide profile correctly, which is the basis of the frame that takes on most of the entire load.
To secure the guide profile, you will need to:
- perforator;
- electric drill;
- hammer;
- fasteners;
- metal scissors;
- passatiy.
Install the guide profile on the wall, according to the markup predetermined. To make it easier to work, it is better to start the whole process from the bottom. Return from the top of the profile 0.3 m, and drill a hole that should be a few millimeters more than the length of a dowel-nail. Make two more holes in the central and bottom and install a dowel-nail.
Check the flatness of the entire design according to the specified markup, if necessary, adjust the profile and score nails. Next, measure the distance that remains until the end of the wall and add twenty millimeters to it, since the installation of the guides is made by the brass.
Using scissors for cutting metal products Cut the side portions of the profile and bring it outward, cut the central part and align with the help of the passage. Set the next part of the profile, while on the butt plot, score an additional dowel-nail.
Stop the markup profile and secure it with a dowel-nail. Also, all subsequent guide profiles on the perimeter of the walls and the ceiling are also installed. For additional strengthening of the entire design, dowels are used, installed in a step in thirty centimeters. Before that, it is recommended to check the design on the flattering and matching the design.
Installation of the drywall profile do it yourself: vertical sites
Vertical profiles must be attached in accordance with the size and type of installation of plasterboard sheets. From the beginning of the wall, the distance is measured equal to the width of the sheet of plasterboard, the label is made. It is here that the vertical profile will be located, which will be the joint of two sheets. The label indicates a transverse middle of a metal profile.
In the same way, mark all the vertical sections of the profile installation. The plasterboard sheet is divided into two parts in accordance with its width, each of them should not be more than fifty centimeters. Make marks on the floor surface, they denote the middle part of the vertical profiles.
Throw a plumb from the ceiling to the floor, and mark the places where the vertical profile is attached to the ceiling. Using the first mark, transfer the dimensions to the surface of the ceiling. To check the correctness of the work, throw a plumb from the ceiling to the floor if the labels match, then the markup does not require adjustment.

To fix vertical profiles on the ceiling, you will need:
- electrical sufficient;
- self-tapping screws;
- fishing line;
- passatizhey;
- regulations;
- pencil;
- suspension in the number of three pieces;
- hammer;
- fasteners;
- electric drill.
On the central part of the wall, measure the interval between the ceiling and floor. Transfer all measurements to the profile surface, while deducting one centimeter. To avoid the emergence of errors with the help of a pencil, mark the size throughout the workpiece. Cut the side portions of the profile, bend it the edges outward, ride the central part. Use pliers to align cut. Thus, the guide connects with a vertical profile.
After installing the workpiece on the wall, you should mark it around the perimeter. Further, the wall is divided into three sites, which make tags and remove the workpiece.
Install the suspension according to the labels made, drill with the help of the holes in the suspension and secure it on the labels of the dowel-nail. With the help of plumbing, plasterboard is very conveniently attached, in addition, with their help, it is set in the desired direction.
Machine the second suspension and return the workpiece. Attach the vertical profile to the surface of the guide with screws for metal. First fix its upper part, and then the bottom. Note that the profile height is less than a total height of one centimeter, so you should take care of the presence of an allowance of 0.5 cm on top and bottom.

On the surface of vertical guides, screw the screws on which the fishing line is fixed. Side sections need to be cut, and a vertical profile is exhibited on the fishing line. For this process, more than one person will be required.
Note that the profile, in no case, should not push the fishing line or move away from it. A variant of checking the mechanism of design is possible using the rule.
Tip: If minor errors are detected, you should resort to their adjustment at this stage of work. After installing the vertical profiles, the error fails to correct.
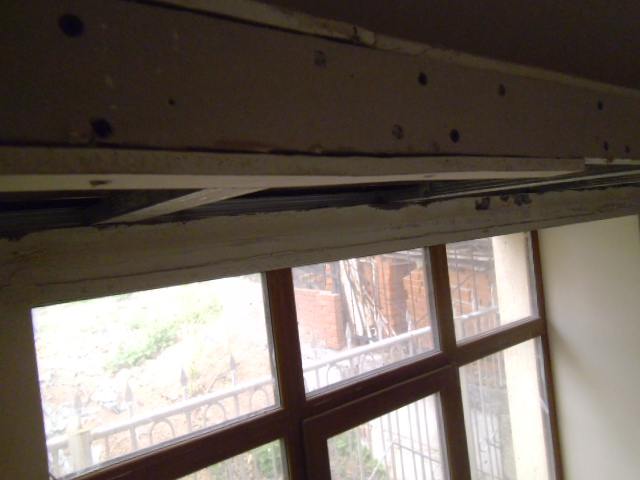
Installation of horizontal fragments made of metal profile
Horizontal parts are jumpers that increase the strength characteristics of the structure. These components are fixed directly on the design, and not on the wall. In order to save material, in the process of fastening horizontal parts of the profile, the principle of fastening of plasterboard should be used, that is, to install jumpers in areas under plasterboard.
Please note that in the process of mounting drywall, the principle of chess order should be used, that is, the whole sheet is first stacked, and then half. This will help prevent the advent of long seams and strengthen the strength of the structure.
To perform this process, you will need:
- screwdriver;
- self-tapping screws with metal scissors;
- passatizhey;
- crabs;
- marker.

In a place where the transverse profile intersects with a vertical design, a special item is established, which is called crab. If a smooth cross is not formed, such actions should be performed:
- measure the distance between the average sections of two verticals;
- cut the workpiece and install in place;
- using the marker, mark the profile installation sites;
- with the help of scissors for metal, cut the desired section of the profile;
- passatia will help to align cuts and unhappy lateral areas at right angles;
- install the profile and attach it with the help of screws;
- check out the flatness of the resulting design.
Video installation of the profile of the plasterboard:
2015-05-28, 00:28
Working with Gypsum Carton Profile Design Glk How to cut drywall How to mount plasterboard to profile
Hello Dear Ammodylkins.
Consider the nuances waiting for you when working with plasterboard, knowing which significantly reduce repair budget.
Work with a receiver's profile
To work with the profile will require the following tool:
1. Metal scissors.
2. Passatia.
3. Metal square.
5. Roulette.

The first tricks appear when cutting a profile.
Although guide notches are applied on its plane, in the form of points, it is better to make accurate marking of the cut.
To perform markup, it is better to use a metal square and a scratch. The pencil is not noticeable on the metal profile, and the scratch is also visible better, and it will not happen by chance.

After cutting on the profile, these bends remain:

 .
.
It seems to be a trifle, 2-3 mm. But in the future, when building a design, this little thing will lead the plane, because the ceiling profile is inserted into the bypass, and such bends will expand the latter.


I often heard that they might wait on the plasteron. No, not wait. Or wait, not everything. So it is better to take the passatology and align these bends.


The same applies to both partition profiles. If you want, there is less putty on the subsequent finish, do not be lazy, and hang out unnecessary protrusions formed when cutting the profile.
A couple of times I ran into facilitated profiles. The price is lower, but also the metal thinner.
In no case are not fought for the price of such a profile. The thin metal does not hold the desired manner, which is not possible to pull the plasterboard normally normally.
As a result, saving not the price of the profile, you lose on the expense of the shtlock.
Glk design.
If you have never independently assembled the design of the drywall, then it is best to contact for familiarization, directly to the creator of this technology, the company Knauff. According to the link you will find technical tips on the installation of the structure.
I will indicate some of the little things that are not shown there, which are capable of relieving your wallet, and knowing that, you can avoid this relief.
Let's start with the attachment of profiles among themselves with seeds with seeds. Seed - a small screws, intended only for connecting profiles.
Apply seeds on the plane to which the plasterboard sheet will then be mounted, it is better not worth it. Or do it with one condition about which is slightly lower.
Here for example the plane that is trimmed by plasterboard:

But the seed that is fastened by the ceiling and bypass profiles:

Now freamed to this plane sheet (I really did not spoil the sheet and attached the strip, just to show you):
Substitute for clarity a ruler:

Here is such a "smooth" plane turned out. And it's so completely and negle!
In such masters, such masters, the life-affirming thought is firmly sitting: "Nothing, the shp can be counted."
Of course ever. The attacker (ka) will be matnughing, and lines, and your loot, with the joyful exclamation of "Hurray, Freedom," will swell out of the stuffy and darkness of your wallet. It does not matter that not long to be freedom. This is probably very comfortable.
For reference.
If the pack is 25 kg. It is an average of 350 rubles, and its consumption, with a layer thickness of one millimeter, is approximately 1.5 kg. per square meter, then each extra millimeter of the layer, squises about 20-rubles from each square meter.
The thickness of the seed cap - 2.5 mm.
It turns out that these millimeters are somewhat, and square meters are several dozen. Here is the price of non-aligned tips, when cutting a profile, and not competent bonding profiles.
It happens when there is no other output, except to put a seed on the front part. In this case, we apply a sheet going to this place and press it slightly, so not to break, but so that the self-pressing hat left a dirting on the plasterboard, and in this place we make a deepening.
Now I was kepping this sheet, not afraid to sparkle the plane.
The next moment is the use of direct suspensions, extension cords, clips, and crabs.
In the use of direct suspension, there are no nuances.
Extension cords and clips are worth fixing on the profile by seeds, as the self-sketch of a little bit "leads" the profile, and will only get worse.
But the crabs are controversial. They are conceived correctly - the crab creates a hard crossroads, which in the idea should set a flat plane for the design.
In practice, it turns out otherwise. First, 8 seeds provided for the installation of the crab are clear bust.
As I said above, every seed, a little leaving the profile. So that this does not happen, you need to get the tip of seeds accurately into the center of the mounting hole, keeping the screwdriver perpendicular to the plane of the profile, which is almost impossible, and even when installing the ceiling.
Therefore, it is better to make the crossress in another way. Without crabs. In addition, this way is easier, as it requires 4 seeds, instead of 8, and cheaper, as the crab is relatively expensive.
Cut the end of the profile as follows, flexing the side planes, and secure to the transverse one.


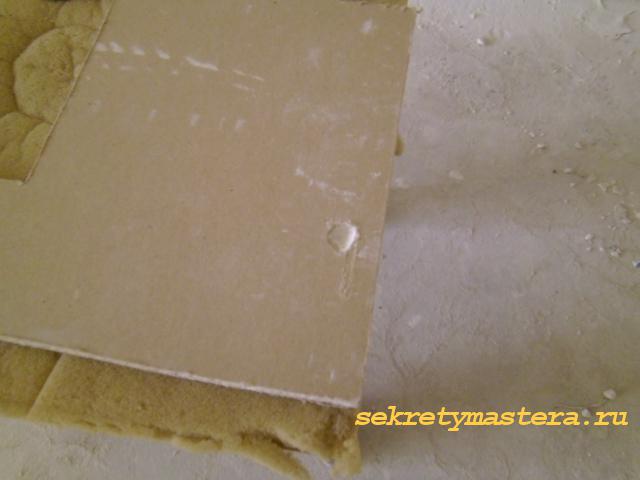
For cutting of drywall, a knife and a ruler will be required.
The knife can be purchased special, for drywall, but approach the simple wallpaper, and the profile is usually used as a ruler.


The process is as follows: the layer of cardboard cuts through the line, then the sheet is reheated, and the second layer of cardboard is cut.


The nuances in this matter are as follows:
1. Cut the plasterboard is needed on a flat and relatively clean surface. Orthodox and garbage, which appended under the sheet, can break drywall.
2. Slip cardboard needed with pressure. The deepest, it turns out, the smaller will succeed.
3. Since the knife is conducted with pressure, then at the end of the cut he jumps from the sheet, and so that at that moment the blade tip is damaged at the end of the sheet, at the end of the sheet it is necessary to put something (pruning GLC, plywood, etc.).
4. Immediately after cutting, we definitely remove the chamfer from the end of the sheet that goes on with another sheet.

5. For the cutting of the segment, the canvas is suitable from the cutting metal.

6. If you need to cut off the thin strip, or cut a sheet on a centimeter - one and a half, it is better to cut the cardboard on both sides, and then make a strip.
How to fix plasterboard to profile
1. Self-tapping screw, fastening sheet of GLC to the frame, is applied perpendicular to the plane. Skovo going, he can break through the top layer of cardboard with one edge, and the opposite will remain stitching over the plane.
2. Self-pressing hat should not break through the top layer of cardboard and drowned into the plaster, as it means that the fastening in this place it turned out weak. The top layer of the cardboard is broken, the gypsum is destroyed under it, one lower layer of cardboard remains.
3. The screw of the self-sufficiency should not be over the plane of the sheet, as it will turn into hell to work the platelahr, because the spatula will constantly stumble on this self-tapping screw.


4. Cropped sheet ends, it is necessary to rush at an angle to the inner plane. Otherwise, the probability of the appearance of the crack at the place of the joint will come close to 100%.

5. Do not screw the screws in the departure places of one profile to another. These are corners, crossings and entrance sites in the rubbish profile.
In the figure, red shows the places where it is impossible to turn the screws.

6. Seeds are screwed in the second velocity of the screwdriver, self-tapping sheets - on the first
How to use trimming of drywall and profile, can be read in the article
I wish work success in working with plasterboard
7 comments
- Electric tool.
- Hand tool.
- Auxiliary tools for productive work.

Electric tool
Electric tools include:


Hand tools
Working with a metal and drywall profile, not only electricity tools are needed, but also manual. Tools are as follows:

All of the above tools will become indispensable assistants in the process of preparing materials and plasterboard sheets.
Materials
Of course, in addition to tools, materials are required. These are:
- GLC The material dispelled, each master of parameters and requirements selects the desired size, shape, thickness.
- Metal profiles or rails mounting.
- Bolts, screws, nuts, screws, dowels "Butterfly".
- Materials for finishing finished design. Such are putty, primer.

The main thing is to select high-quality materials so that the design serves for many years.
Main works with plasterboard
Before proceeding with work, the priority of actions and nuances of each of the processes are studied. Session of actions Next:
- Purchase of materials.
- Preparation of surfaces.
- Creating a frame.
- Mounting frame to the surface on which the design of plasterboard will be equipped.
- Fastening drywall on the surface.
How to mount drywall on the frame: Basic rules

Forted for the first time with the works on the mounting of plasterboard sheets on the frame, have some fears and fears regarding this process. Knowing some rules and features, problems in the process of fixing should not occur.
The rules that will lead to a successful fastening of GLCs on metal profiles are:
- The first rule. No need to be afraid to move and rearrange a sheet of plasterboard from place to place.
- It is necessary to act when working with the material, it is necessary to carefully so that all sheets are tightly adjacent to each other. Dowels should pay special attention, they should not deepen into a sheet of more than two millimeters;
- The easiest way to secure plasterboard sheets vertically, so it turns flat, ideal sections;
- On the plasterboard sheet it is necessary to make a markup, which will help proportionally and at the desired distance to distribute the screws.
 Schematic drawing of fastening of plasterboard to the profile
 These tips will help maximize the installation of plasterboard sheets on the frame.
How to glue plasterboard
It also happens that for certain reasons, drywall sheets must not be attached, but glued. Make it easy, the main thing is to fulfill the following conditions:
- The surface must be cleaned from various contaminants.
- Depending on the framework of the foundation, the frame is or a smooth wall, it is necessary to select a special glitter for plasterboard sheets.
- By performing the gluing process neatly, tightly fixing each leaf to each other, everything will turn out quickly, and the surface will last for many years.

How to bend plasterboard
Often in the designs of the premises you can find bending, the curved architectural forms of plasterboard structures. Having invented such a design, it will take bending sheets. There are two ways:
- dry;
- wet.
Dry fashion
This method can be flexing sheets if the bends are insignificant. To do this, it is necessary to gently bend sheets. After that, wait a few hours so that GKKC was fixed in the right form.
 Dry bend of drywall
 Wet fashion
When it is required to make a complex architectural figure design, as a rule, a wet bend method is used. For this, the sheet passes a needle roller. Then, in the resulting holes pour water. Several hours of HCL should lie down. In a wet state, the sheet will be fine, taking the required form.
 Wet bend of plasterboard
 With cuts
There is another method of bending. For this you need to make cuts and gently bent in these places.
 Scheme flexion cuts
 How to cut plasterboard
Knowing some secrets, you can easily cut GCC. Required:

Finishing drywall
Some prefer not to spend time laughing and blew the wallpaper, paint the surface right over the plasterboard. This is a bad idea, because the material will absorb everything and can be risen or completely stuff. Therefore, it is necessary to pre-prepare the surface. To do this, you need to put a putty design. You can use a special grid that will help to make the surface perfectly smooth. It follows a few that the result is perfect.
How to paint plasterboard
When the putty dried, you can start painting. Everything is done on the same technique as painting any other surface. The main thing is to carefully paint every piece of construction.
How to glue wallpaper on plasterboard
Glitting of plasterboard design with wallpaper is a fairly popular idea. The process is available and understood. The main thing is to wait until the putty is completely dry, then glue the web with a standard method, causing glue to the surface of the drywall and on the wallpaper.

It is easy to work with drywall. It is important to study the process from the beginning to the end, and then engage in the transformation of space.
- It should be understood that the lamp occupies a significant place. That is, it turns out that part of the room will not be used. It is clearly noticeable when work is carried out in small rooms. And without the narrow space - it becomes like a matchbox.
- A simple desire to do work faster. Yes, no need to make a frame, the sheets are literally superimposed on the wall.
- Saving. The profile is not so cheap, and when you have to work in a private house, where many rooms, then its price becomes very significant.
- Remove all unnecessary from the wall.
- Two wooden bars are placed on the floor. They have them in parallel.
- They are plasterboard - a facade to the floor.
- The wall and rear strait plate are ground.
- Having waited when everything will dry well - prepare the adhesive mixture. It is clearly applied on the Plate Glk.
- The sheet is lifted and pressed against the wall, the level of installation is tested.
- They put additional backups before the adhesive dry.
- Fix guides. They are installed on the floor and the ceiling. What are they needed for? Everything is very simple, so that with your own hands it was easier to install the entire design. Guides set the main distance of the retreat from the wall. And the vertical racks are already simply inserted into them.
- To calculate their location, choose the most dilated plot and the desired distance is discouched. First fasten the first guide profile, usually the top. Next, with the help of a plug, the lower element is aligned.
On a note! Check the correct location of the guides is very simple. Cut a vertical profile. Insert it into fixed areas, apply the level. Such a prominant is made in five places.
- The cost profile is immediately cut in the desired quantity, given the mandatory installation of two extreme vertical elements. The rest will need to be located between them, observing a step in sixty centimeters.
- How to strengthen jumpers? They have two attachment points to the walls. Do it with installed vertical racks - very difficult. Therefore, they are applied as follows - drill holes at an equal distance, the markup is transferred on the wall surface. Do it yourself make it using a marker.
- After that, drill the entire area of \u200b\u200bthe wall. Scroll dowels and screw brackets.
- If the mustache do not get to the profile, then make mortgages.
- Now wooden materials are quite expensive. This is caused by naturalness and high-cost production.
- A certain skill is required, because all the elements are very demanding to pretreatment.
- It is impossible to quickly create a crate if there are significant differences. The fact is that there are no special fasteners that can be used to create such a frame. Use to align mortgage from the rails is not entirely good.
- work is dry and less dusty;
- GLK - coating breathing and maintaining heat;
- installation of a wall or ceiling of drywall allows you to create structures of various shapes - a decorative basis for finishing finish and separate rooms with an unusual layout (attic).
- For marking: Level, plumb, pencil, greasy cord, roulette. Easily perform markup using a laser plane builder.
- For installation: Knife, scissors for metal, screwdriver, perforator, hammer, spatulas, stepladers, fixtures for cutting extension from edges, cutting holes.
- Materials and components: GLK, which has the necessary parameters (for example, moisture resistant); Steel profiles: guides and rack, metal suspensions and connectors for fastening, wooden slats, dowels, selflessness, screws, washers, glue, foam.
- For fastening the GLC dowel-nails, it is convenient to use a mounting gun (Spit Pulsa 700p gas gun).
- the price in Moscow - on average from 300 rubles / sq.m;
- in Kiev - from 65 UAH / sq. M.
Thank you very much for a really useful article. Interesting finishes at home not far away, we will do it yourself. Do you plan to have material on the outer decoration, in particular siding?
I make material in the process of a particular work, as the article needs a photo and video material. If you need currently not on the site at the moment, then ask a question in the comments. Almost all finishing works are familiar to me, and I will quickly give you a response.
Good evening Aric. Plans are not a doctor, but an engineer-designer. But overshadowed ......!
For a log cabin, it is generally not necessary for a particularly powerful foundation. In the Mari villages of the log house still stand in six stones. Well, this is of course anokhronism, but it's worth it.
About the scoring piles. Did you have something special there? And now there are screw piles, their installation and easier and they themselves are cheaper, and no need for such a depth. Well, if of course the soil is swampy, then another thing.
About the excavator. Drop the meter trench 60 meters threesome is half a day. With an excavator more troubles. Well, if of course the soil is rocky, then another thing. You see how difficult it is to answer questions on the foundation without knowing all the circumstances at the place.
The excavator is so digging that then the solution is much more leaving, spreads in irregularities. Manually Rovenko.
You often mention Booth, apparently there is a lot of it, and we have more and more on the decoration applied. The fences there are zklusive, etc.
Come on here is better in a cut. The finished log cabin can only take with a good special, correctly refused. And when they will chop, do not be lazy, come and check that the semicircular groove and the width endured it. Do not listen if they say that everyone does and no complaints. This is a lucaviness. Require your own, and not in advance. Categorically. Cut part - check and if you pay. Although in the crown, but not in advance. And then then you will warm myself to prove, even though in you and 1.92 m. The most common debris is "the forest to buy it is necessary." Give money for the forest, and then there is nowhere to go. And the nerves starts.
Size 9x12 is a huge house. And the question is purely individual. And so, the winter window is 12-meter quite a business, you just need to watch such logs from Komle were, and the logging of 1 cm did not exceed the meter. Birovna will be hefty, more than 40 cm. With no technique, you will not turn ourselves.
In height - if the log house is 3.8, then with the ceiling floors after shrinkage, the height of the ceilings in the room will be 2.6-2.7. So for you you can probably 14 (4+ m.) The crowns should be done, so that the chandelier is painted.
I also have a request: if everything happens with a turpidar, give contact?
Thanks for the phone, what the damn does not joke. But what if. Yes, and you look at the consultation when I turn, I have five grandchildren. I will not publish it in the comment.
If that, ask, only in separate positions and with details. I will definitely answer.
Sergey Yuryevich, thanks for the answer!
The site is not every spring, but imputs up to 1/2 area, I plan to put the house on a given zone, but the water is very close. Soil: 20-30 cm Fertile black soil, deeply glill clay, after 50 cm sufficiently dense, raw.
About Skipidar: I was looking for a few links of 0.5 liters from the company "Beauty from Mezroll" Moscow, but it was unclear whether it was unclear whether it was naturally possible?
And Olihu found too Moscow: Biask in the canister of GOST 7931-76 linen, more: Belarusian there are imports: linavarnits from Vekker (Finnish?)
Again in construction:
Why piles zhby? Cheaper and easier (100 tp / 1 day + 1 day for preparation, a huge margin of strength (MB even excessive), no problems with the grounds of the soil). Woodworks - the Lower Crown of Srub.
The boob stone in the Urals is really fully, if you take a shaft of 11 tons - no more than 10 thousand rubles (and then and 7 T. rub) with delivery. True, it's more with him, but the concrete can be done without reinforcing (the entire mining part of the region on such foundations, the truth is there the bite laying, although not always neat.
I want screw piles, because Not cheaper, but not so reliably, + corrosion of metal at the place of welding blade with a pipe, maybe an angle to suit due to a sharp change in the pile support area to the ground. There are cast tips, but even more expensive (like clogged progress).
Another question: is it too late to harvest the moss? I often go in the mountains, we are about the snow, while the "third Indian summer" is :).
Regarding consultations: the mail from which the corporate letter wrote, that is, at work, it is possible on it.
I found in Argayasha (the Sosnovsky district of the Chelyabinsk region of the rubbing, already now began to chop the log house 12x12 m of 4 walls, it seems to be neatly. They took this log house for the sample (in size), I think it can order, but requires 50% prepayment now, although I said that we will do from the winter forest and on Moss. With moss, he promised to help, there are people who harvest him (I hope after the Trinity :)). By the way, what is your price per moss (askby?).
Your opinion? Foundation now to do (can I have time to snow) or in June? The log house will be defended on the platform of the rubbing, although it is unknown to what time.
Thank you, up to communication!
Sergey Yuryevich, hello again!
Tell me (the main milestones) How to plan a log house 12х12 m to close to overload (lags, rafters, subcording beams?)
Internal size 10.7x10.7 m 4-Rehot, Internal partitions from a bar 200х200 mm. + Prostasy 12x6 m.
The roof is a simple double or attic type (but a cold attic).
Entrance from the north through the destroy.
Bathroom, toilet, boiler room and storage room in the attack.
In Siruba: Two children's rooms, one adult bedroom and room / kitchen
How to do without a long corridor?
Thanks in advance.
Good evening Artem. Well piles so pile, since everything is calculated and no objection.
You know, I'm not an engineer-designer, and how exactly it will be better, I can not say, since all my knowledge is based only on personal experience. What did, talk about that.
Cutting on the scoring piles once put on the kama shore, but there the groundwater was close, 1.5-2.0 meters and loam, and you have a clay and that's good. Usually clay on top of raw, but if you dig up a plot of centimeters by 50, then there is already dry and hard a la brick. In any case, never had problems with foundations on clay.
And soils are similar to the description of your in Tatarstan a lot. Especially on the right bank finish the black mill from 0.3 m. Up to 1.0 m., And then clay.
Buricular with painter on such soils showed itself very well. But since you are made there, then you need to do this. I always try on Old-timers and consult before the foundation I decide, and never confused me tactics.
About moss. It is possible to harvest it to specific radoos. But you probably probably for anything. If the log house would wait for the installation - then another thing, and you will cut it in the winter, it will be depleted until July, and there will be a fresh moss.
Therefore, the rubber, I don't know how, but you need to make him cut down since it is necessary. Since you need, not "I do that".
If you just knew how many frank hacktracks. The demand is huge, there are no knowledge from buyers, that's it led to what the logs are doing, with which there are some problems.
Well, in my articles it seems to be described everything, I will not repeat, but I mean, all that is said there must be observed, and only then the log house beaten to fit your dreams.
Here is another article that I removed in connection with the termination of the work of the brigade. By age. . It also has something very useful.
And even if it is useful for you. High-quality log house, from a good tree hand-cutting can not be cheaper than 12,000 per cubic meters. How much I saw joys in connection with the purchase of an inexpensive church and how much tears during its operation.
The foundation is best done now and leave for the winter. Definitely.
What about the layout of the church. Here is the free app https://www.sketchup.com/en. I'm still drawing in it. Like that:


There is a version for mobile. The simplest toolbar, 3D, rotation in any perspective, can be logged in, sizes. Osill a couple of days and creature all that your soul and as you like.
Yes, even already. There are two companies, the company in Marie-em Tree12 and somewhere in Altai Kedroff. I dealt with their girlfriends. Marytsev had even been at the site, and the Altai log house was separated. Frams are the highest class, manual cutting, do not require cavropka, but expensive. But delivered in Russia. On the Internet there are their sites. Marytsev is even better than a log house, or rather attitudes towards their production and installation more responsible. Look if that.
If it is decided to complete the placement of the space of the house or apartment with the help of GLK, then you should first study how to work properly with plasterboard. The material is popular among modern builders and repairmen, because with its help, different ideas are embodied in reality.
 An example of room design with drywall
 Before working with drywall, the required procedure is prepared. Work begins with a profile with the help of remedies.
Instruments
Works will be high quality and faster if you purchase special aids for GLC. Set of tools:
Do with your own hands it does not provide for professional construction experience. If desired, such an event can spend anyone.
There are various methods that allow you to quickly get a smooth surface. It will only remain to close the joints and, if necessary, prepare the basis, after which it will be possible to deal with the final finish.
Mounting drywall technology is not so complicated, but many make mistakes that will not allow the opportunity to get the desired result.

So:

Thus, it is worth avoiding such errors, especially when all works are performed with their own hands.
Preparation of material
When it became clear to what nuances to pay attention to, the next stage begins - preparation. Sometimes it seems that this is the most tedious event. After all, it is necessary to drive around not one store to find suitable materials. But it is better to pay sufficient attention to this stage. This will give the opportunity: first - to save, secondly, choose all the highest quality.

To work, you will need:

Tip! It is often necessary to store plasterboard sheets for a long time. You need to know the important rule, the storage of the plates is possible only horizontally. Pre-on the floor lay the rails to get a flat plane.
Is it possible to mount plasterboard without a crate?
All that was described above (regards the metal profile) is necessary to create a frame. Of course, this is the most popular option. Although, you can offer quite another. Namely - attaching plasterboard directly to the wall.
Each, probably heard of such an opportunity, but it was not decided to use it. And indeed, it will be necessary to comply with numerous nuances, otherwise it will be "floating" design. All materials will be spoiled.
 Installation of drywall on walls without crate
 For which they resort to this method:
In any case, resort to the frameless method you need when the walls are quite smooth or there are certain skills (familiar who can help).
With your own hands you can make the easiest option. Instructions for it is such:

In general, there is another way. It uses mounting foam. But this method is very complicated, although it seems that it is even easier to do it. The fact is that to calculate the right amount of foam is pretty difficult. It is worth a bit to overdo it and the sheet literally can break. It is better not to do it with your own hands, if there is no experience.
Mount Metal frame
By and large, there is nothing complicated in this technology. It is worth understanding the basic principles and work will go pretty quickly. You can select the following stages of work:
The process of the metal frame device (photo):

Several small secrets:
Everything, it remains to install jumpers and mount drywall with your own hands.
Why not a wooden frame?
In addition to the metal crate, there is another variety of it - wooden. Why doesn't she have such a spread? There are several answers:
Yes, if the work is carried out in a wooden house, then the choice of such a material will be preferable. But they are more suitable for creating partitions with their own hands.
What difficulties may arise?
The doom is ready, it's time to start directly installing drywall. Everything is done pretty quickly. Although there are certain nuances that can significantly slow down the data of work. Namely:
But the installation of the material itself allows you to bind the walls literally in one working day. Although, one should not put temporary records, it is better not to do so quickly, but qualitatively.
Important! Be sure to leave gaps between the ceiling and floor. This is done in order to take into account the possible shrinkage. Even old residential premises are not insured.
Sheets are attached with a pitch of fifteen centimeters. Self-tapping screws with a surface.
It remains to sharpen all the joints. This is done using a putty, seam strengthens the reinforcing grid. If it is further painting or creating a textured surface, then the finishing layer of putty is applied.

Tip! It happens that due to non-accurate circulation - deep scratches appear on the facade part of the plates of GLC. What to do? The technology is the same as when the joints are seeding. Expand the scratch, we wipe off the cardboard, put off the putty and press the sickle grid. Apply another layer and after drying - they grind.
All works that are performed with plasterboard are made by their own hands. The main thing is not to rush and everything will work out.
The interior decoration of the room begins with plastering walls and ceiling or installation of drywall. Installation of drywall, as an alternative to plastering walls, guarantees the formation of a perfectly smooth surface, which is especially important if irregularities are too large for the alignment of plaster.
At the same time, plasterboard - although there is a special moisture resistant - it is afraid of dampness, flows, and is not intended for heavy loads (many bookshelves are better not to hang). The editors of the publication are dealt with all the intricacies of the process of installing drywall.
Installation of plasterboard on the walls: technology
Benefits:
There are various ways to install GLK, the order of installation of each is slightly different. One of the principles of the classification of methods is a doom. Its presence or absence, from which and how to do the crate - all this affects the material and labor costs of alignment of the walls.
IMPORTANT! Mounting of drywall using metal structures is the most common way. Steel profile guarantees the strength of the frame. Errors In the installation of the crates are one of the reasons for cracks on the finishing finish and may entail dismantling of drywall. Therefore, it is very important to correctly install profiles.
To begin with, we will define that it is necessary to build a wall from materials and what tools to work.
IMPORTANT! The profile of two basic sizes is most often used: D - to form a plane on which the GLC will be fixed; W - To build a common wall frame.
Installation of plasterboard on the walls using metal profiles
Marking under the framework
Using a painting cord on the floor, a line is marked, which will be the frame of the frame. With the help of a plumb, level and pencil of the cord, the line is transferred to the ceiling. On the walls there are strictly vertical lines for which the racks will be mounted. The step between them needs to be observed so that the joints of the sheets of HCL during installation accounted for the middle of the rack profiles. Usually a step between the profile axes is 600 mm.
Installation of guides
Step 1 - Mounting frame for fastening GCLHorizontal guide profile from the side, which will lay down to the base, are covered with a special seal - a ribbon that will provide sound insulation. Then the perforator at the bases are drilled by holes in which the dowels are inserted, and the profile with insulation is attached to them with self-draws.
So that the guides tightly kept the GLCs, there is a step of 500-1000 mm between the screws, but one profile segment should be attached to the base at least in three places.
Fastening suspensions
The vertical lines marked on the walls, like guides, fasten the suspensions that will additionally provide stiffness of the structure.
Installation of racks
Accordingly, the vertical racks are inserted into horizontal guides. It must be remembered that the open side of the rack should be located sideways or look at the wall. At first, the rack is inserted into the guide on the floor, then on the ceiling. The stand screws is attached to the guides and to the suspension.
Installation of plasterboard
The correct installation of sheets of GLCs must be carried out by several people. Two holds a sheet, and the third - fastening it to the profile by self-draws. The fastening begins on top, the distance between the screws is not more than 25 cm. The seams between the sheets should not press each other, so they are mounted with a displacement. Installation of columns and other complex elements is made according to the same principles: the desired form is achieved due to the surplus of the profile and the leaf of HCL.
Step 5 - Fastening GLC on the frame using self-tapping screws and surnippersCutting holes for sockets and switches
 Scheme 1 - Installation of HCL using metal profiles: one of the possible options
The use of a wooden crate applies less frequently - the tree is afraid of moisture. The instruction on the installation of wooden rails is practically no different from the installation of a metal profile. The framework of the frame is performed, then wooden racks and struts are attached to the walls of the dowels. Then check how the frame is Rovnov. Glkl sheets are attached as on the profile: joints should fall into the center of the Rake.
How to stick plasterboard?
Step 6 - On a flat surface can be attached to HCL using a special glueInstallation of GLC on glue is the fastest way, but applicable only on a relatively smooth surface - with differentials not more than 20 mm. This method is the most gentle to the room space - takes the least place, the sheets of GLCs are tightly adjacent to the wall. The placed sheets on the purified projected surface of the walls are fastened or on the 10-centimeter bands of the GLC (on glue perlfix). For this, the plasterboard sheets themselves also need to be projected.
Step 7 - can be mounted drywall after the wires and noise insulation are laidThe glue is applied depending on the surface relief around the perimeter and along the middle of the sheet is uniformly with the help of a toothed spatula or small pellets with any suitable spatula.
IMPORTANT! For greater reliability, after hardening glue, GLC sheets can be fixed by a dowel-nail.
IMPORTANT! The glittering of drywall is performed after thorough markup, detecting irregularities and convexities, definitions of a single level, on which all sheets will be peeling.
There are different options for how to stick plasterboard, except the above described above. And distinguishes them not only technology, but also adhesive material. For example, some applies a sticker of plasterboard on the mounting foam. Foam installation guide is somewhat different than working with glue. Here, the sheets of GLCs are screwed to the wall on long screws, after which it pumps mounting foam through the holes in the sheet under it.
Montage of plasterboard with your own hands: video of step by step instructions
Tools, Materials and Accessories for Mounting
Scheme 2 - Glk Installation ToolsDepending on the installation method, you may need:
Installation secrets: How to cut drywall?
Cutting GLC is needed by a special knife. How to cut a sheet exactly: take advantage of a long rail, cut the paper on it, press on one side of the sheet (the plaster core breaks) and cut the bottom layer of paper with a knife.
Cutting plasterboard in large volumes can be performed by a special cutter. The edge of the cut-off sheets must be made at an angle to increase the area of \u200b\u200bseams, which will be put on the future. For this, the line is noted at a distance of 5 mm from the edge and the excess material is cut off.
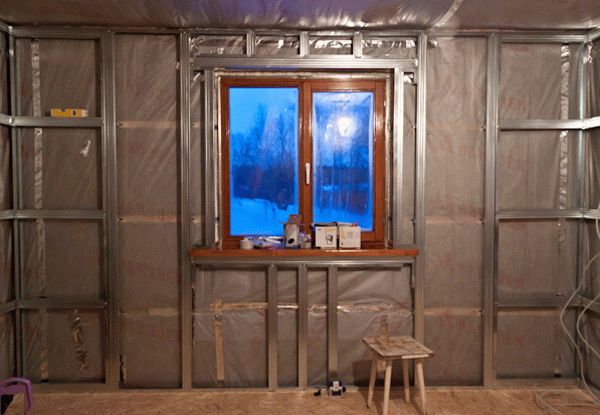
Heater under plasterboard
Often the premises require insulation, it usually relates to a balcony or loggia. As a heater under GCL, a glass gamble or mineral wool is usually used. Working with insulation is carried out at the stage when the lamp is installed, but the sheets are not yet attached.
Wiring under plasterboard
Wiring under plasterboard should be completed before the start of its installation and before insulation. Wiring is mounted when the lamp is installed. Mowing the wires for plasterboard are needed in a metalworking or corrugation from non-combustible plastic. A complete wiring of wiring on the walls and ceiling is performed.
When installing sheets of GLCs, holes for submersion and wiring leading to lamps are cut. The corresponding wires are pulled through the holes.
IMPORTANT! Outputs can be mounted immediately after installing GCL, and setting out rosettes, switches, point lights and chandeliers should wait until all finishing works are completed.

Junctions of drywall
Sealing the joints is an important step of forming a smooth surface. It is necessary to properly close the corners and joints of GLCs so that we do not have cracks over time. For this, the junction is putty, then the reinforcing tape for the joints is paved on top and another layer of putty is applied. On the outdoor corners of the doorway and window sloping, it is necessary to install corner profiles on putty. They put the places where screws are screwed.
Step 10 - View after putting all seams and places of fastening GLKAfter drying the putty, all the places treated with it need to go well to pass. If the surface is not flat, then it is necessary to completely paste the walls and after drying to pass the grater.
Finishing work with plasterboard
After the aforementioned manipulations, the appropriate question arises: what to primitive GKK and whether it is necessary to primitive? Unambiguously needed. If the next stage is the painting works of water-level paint, then the primer can be performed by paint, diluted with water in proportion 3: 1.
Step 12 - Ready work after painting frameTechnology of working with other coatings, such as wallpaper or decorative plaster, requires the use of special primers recommended by manufacturers for finishing coating. The processing of the plasterboard surface is facilitated with their own hands due to the fact that the coating is very smooth.
IMPORTANT! How to work with plasterboard - paint, plastering or bold wallpaper - you can learn from the instructions to the selected finishing materials.
Cafe on plasterboard: laying technology + video of step by step instructions
A special type of finishing - laying of a tile on plasterboard. GLC is an undesirable base for the tile. But if it is used for a tile, then it must be a special moisture-resistant plasterboard laid in two layers and processed several times. In addition, mounting drywall under the tile, the step between rack profiles needs to be done less.
The cost of mounting plasterboard
Mounting price GLK:
 Why you can not postpone the pregnancy
 Effect from regular use of home recipes
 Features of the structure of the neck