Everything for the garage with your own hands ideas. Garage devices do it yourself - homemade machines, tools. Self-made carrying for garage
Usually the garage is the second house of a real man. This is a place for storing transport, and storage room, and a workshop and a recreation corner. The garage is equipped with different workbenches, shelves, tables and cabinets to ensure a comfortable stay of both a person and a vehicle. In order not to buy expensive elements, you can make the necessary homemade garage devices, which will simplify the use of the room.
We will consider recommendations and tips, exactly how to make devices for the garage with your own hands. What is this adaptation? What do you need to do in the garage? How to equip it correctly, so that everything is under rug? Tips from this article will help this. In addition, we will look at visual video to simplify the task.
There is a big list of what a man would like to see in his garage. After all, it should be pretty roomy to equip a workshop there, clean, so that nothing bothers work, as well as comfortable and correctly equipped. No one wants to search for a screwdriver among the piles of metal and other tools.
To ensure comfortable conditions in the garage, you need to take into account the basic requirements regarding the arrangement of space inside:
- Inside the garage there must be shelves for the storage of seasonal tires, as well as shelves for tools and other things. This will save space and organize it correctly.
- It is required to provide high-quality lighting, since there is usually no windows in the garage, or it is one. The lack of lighting makes the garage gloomy and unattractive. In addition, working in the twilight is not entirely useful for health, and you can make a mistake, damaging something.
- To expand the range of works inside the garage, you need to install a building workbench, machine, observation pit and other devices.
Comment! Experts were calculated that the list of these elements should not occupy within more than 20% merchant.
The following is a scheme of an example, as you can perform and devices for it.

It decrypts as:
- Place for open brackets and hooks, where the most useful and frequently used tools are placed.
- Place for rack, for small tools and fixtures.
- Shelves for automotive spare parts and tires.
- Place for rack with large tools and devices.
- Cabinets for other things such as garden tools, broom, mop, etc.
- Wheelpit with shelves.

Now that we found out the example of how you can organize space, consider how to make homemade machines and garage fixtures.
Shelves for the garage do it yourself
Virtually 80% of the shelves in the garage are needed in order to store different devices and accessories, such as:
- tools and additional devices for the garage;
- components for vehicle;
- accessories.
Very often, the shelves that make their own hands are combined with a rack. He is also done with his own hands. It is the rack that is considered as the main place to store things. And when the rack is set, it remains to fill it with spacious and comfortable shelves for garage fixtures.
It is required to highlight the place in the garage under the storage of work clothing. It is better to place it near the door so that you can immediately undress on the arrival in the garage, and then change yourself again, leaving it. No need to create a whole cabinet or big hanger. Sometimes one shelf with crochet is enough. However, it all depends on the needs.
It should be borne in mind that the garage is a room with dangerous flammable materials: gasoline, oil, paint, solvent, polyrolol, etc. Therefore, you need to make a separate cabinet, where all these materials will be stored. Near it to install a fire extinguisher and sand barrels, which is enough to eliminate ignition.
Tip! To protect the wheels from dust and dirt (as they are located on brackets), you can use large packages or buy special covers for tires.
From this video you can clearly see exactly how to make shelves for storing tools and other garage fixtures.
Brackets and shelves for tires
A set of spare rubber is bulky and takes a lot of space. It is usually stored in the garage. And so that it does not occupy a lot of useful space, they can be suspended. The plot is not needed at the height, so the brackets for storing tires are recorded at the height.
Design device for garage as follows:
- two frames made in the form of a triangle from the corners. Between them are jumpers. For this purpose, a durable metal is suitable;
- the triangular frames are made at an angle of 90 ° and mounted on the selected area. Wheels are installed perpendicular to the carrying structural element. The tires themselves should be drown a little between jumpers. So they will be reliable to hang, fixing under their own weight. The photo shows how to implement it.
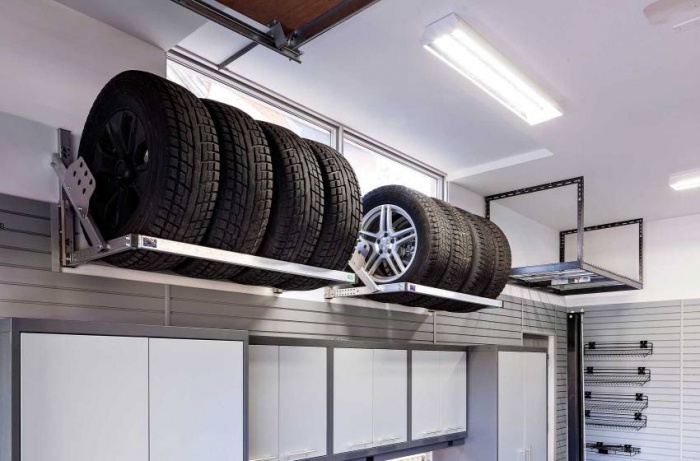
Tip! Place the shelf for wheels higher to the ceiling. This will allow you to conveniently store them, they will not take useful space.
To compactly store wheels in the garage, some use a rack with four wide shelves. It is used for wheels along with disks. They are comfortable to have each other horizontally. The rack can be made angular and install higher to the ceiling.
To create a device will be required:
- bruks of wood;
- wooden boards;
- several sheets of chipboard.
On how to make such homemade devices for the garage, you will learn from the video.
Ideas for storing tools
To store tools, spare parts and other garage fixtures, you can organize a zone for location. It is enough to make a spacious rack and shelves with your own hands. The store has a variety of diverse options, but they will cost more. Yes, and the thing made with your own hands is valued much more. In addition, the dimensions of the garage fixtures will be created under its parameters.
Important! The minimally withstand loads for the shelves and racks are 150 kg and more. But one section should have a maximum limitation by weight of 500 kg.

There are several rules if the garage device is made of wood:
- Suitable solid wood, such as beech, oak or ramp. Usually used pine, as it is cheaper and easier to process. However, solid rocks are more reliable.
- Before making the assembly of devices, it is required to handle the tree with special protective impregnation and antiseptics. It will extend their life
- Details from which the framework consists is required to be treated with sandpaper or grinding. This will make operation more secure.
- Shelves are better to create chipboard, plywood or OSB sheets. As an option to use the two-plates, the thickness of which is not less than 4 mm.
You need to choose the thickness of the tree from the loads discharged to it. There are some recommendations for the manufacture of garage shelves. First you need to create a plan for placement of the shelves, decide on the size and make marking. Then the material (boards, fasteners) and tool are prepared. The holes in the wall drill holes, the dowels with hooks are inserted into them. This will increase fixation fixtures. Suspensions are fixed on the boards, after which the finished fixtures are fixed. It is important to use the construction level to do everything smoothly.
Important! When making shelves, it is better to create several short designs than to do one big. The fact is that a large can not withstand the weight of the tool and breaks down the center under weight.
It remains only to paint the product or go with a special adopting decorative film.

And now consider the creation technology. We will need a board, 10 and 20 cm wide. But, the design dimensions each chooses himself. Instruction:
- The board is 10 cm wide, you need to cut into several parts, the length of which is 18, 27.5 and 30 cm. These parts serve as struts.
- The board 20 cm is cut apart 36 cm. Of these, the shelves will be formed.
- The board that serves as the basis for the design needs a marking. It should be noted space with spacers. On each side, an indent is 2.5 cm.
- The upper strut is glued, the top shelf with strut is fixed to it. The following details are formed by the same principle. The bottom strut is mounted at the very end.
- The device turns over, and the struts are tightened by screws along with the basis of the structure.
- It remains to seam the product with sandpaper and cover it with 2 layers of varnish or other material.
- The device is fixed on the wall anchor screws both under the top and under the bottom shelf.
If you need to strengthen the rack, wooden bars are installed between sections. Thanks to them, the load is uniformly distributed by construction.

Note! The garage comfort is also provided by high-quality lighting, ventilation and heating.
Light bulbs or lamps are used for lighting, and it is enough to make it possible to make it possible to produce in brickwork. They are closed with lattices. Heating can be made chimney, gas, air or water.
Creating a garage workbench
The design of the workbench includes a tabletop and a substole, and several elements of the clamping type. It is required to correctly select the height of the workbench. It depends on the growth of the one who will work in the garage. For a reference point, you can use the height of your own kitchen table. To create a workbench, it is better to use drawings as on this photo.
Such drawings are just an example, they can be adjusted under their own sizes. Now you can proceed to work:
- College is going. This requires 20 boards, the size of 5x10x200 cm, having a groove of 2.5x2.5 cm in the fifth and sixteenth element. Mounting with adhesive composition and metal ties. You need to wait when the tree is dry.
- Further legs are made. This will require a 10x10x80 cm timber, having grooves under the brackets on the front supports. They are recorded through brackets.
- An assembly of the base of the substolenik is performed. Two frames from the 5x10 boards are made. Fastening type: spike in a groove, a depth of 2.5 cm, as well as bolts.
- The side and rear support walls from the chipboard plate, 10 mm thick, are fixed. Shurups are used here.
- It remains to fix the top countertop to the rapid frame with bolts.
In order for the device to light up for a long time and was not subjected to rotting, wooden elements need to be treated with oil and opened with varnish.
Now that the table is ready, you can make a press for the garage. It can be bought, but if there is a desire, he is done with his own hands. To do this, it will take 4 cuts from metal pipes from which the framework is made. Its dimensions are 178x80 cm. Details are combined with welding. The further is set:
- Fixer.
- Removable emphasis.
- Hydraulic or bottle jack.
The above is a scheme on which the upper power platform is indicated (1), nuts (2), the lower platform (3), studs, the diameter of which 30 mm (4), the lower thread of the stud (5), hydraulic jack (6), base, The thickness of which is 20 mm (7).
Below is a video, how to make a metal workbench for the garage.
Conclusion
Make homemade garage devices with your own hands is easy if you have instructions and suitable tools. But they can significantly simplify work in the garage. There are also other devices that will be useful, everyone itself decides that it is still necessary in the garage.
In today's story, we will introduce you to several advice and rational recommendations for the arrangement of the space of the garage parking space, which will help the owners of the cottage to save square meters and things.


Let's look at 10 lungs DIY ideas for.
You can easily and quickly set some wires on the wall to store various things in them. The rational arrangement of balls and hoses is another simple way to organize all items and products that easily create chaos and dust if they are not decomposed on compartments and containers.

2. Plates and inscriptions
These can be stickers or full painting of doors and cabinets. unusual furniture coating for special marking. They will help to navigate in the garage space of family members, and also store items and products in a certain place. The main advantage of this method of decor is the speed of implementation, which will take only a few hours!

3. Magic magnets
For small tools and drill bit, you can use magnetic stripes on a free wall area. You can hang small parts and devices that will always be at hand. This is an easy way to practical organization of premises and storage systems, as well as extremely light performed.

4. Original hooks
Take the long-unused keys and turn them into hooks for decor of walls and as an original authentic accessory. You can hang work clothes, ropes and everything that should be in an easy access.

5. Banks and other capacity
Organize and split nuts and bolts You can add some plastic package for the toolbar. So you will be much easier to find the desired detail or item. All products will be sorted and placed in certain containers, and for additional convenience, they can be attached to a wooden shelf.

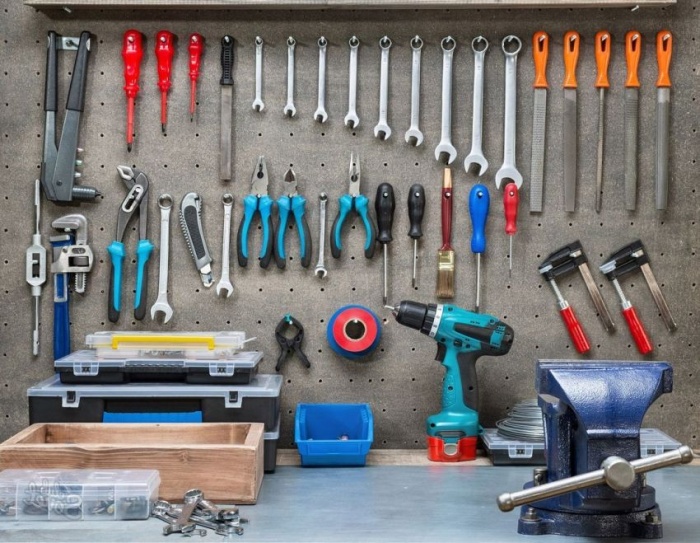
6. Switching panel or board
Of course, you can always put a dialing field with perforation, where you can easily add some new hooks and organize the space in the decoration of the house. In addition, such an organizational idea can act as a "transformation" walls for the garage boxing! Tips and recommendations on the use of this multifunctional device you can find on the Internet portal Small interiors.

7. Practical buckets
Some shelves and a large set of segments (stickers) can really come in handy. This is another quick way to form a functional and rational area to accommodate things that add a characteristic style in interior Design And help keep order among working tools.

8. Bunja balls
The use of spring cords for storing equipment for a variety of sports is a wonderful conceptual idea of \u200b\u200bthe transformation of space. In such stylized grids, you can put both football, so basketball balls! They are available on sale and extremely simple when installing.

With this creative idea of \u200b\u200bcreating rational planning, you will not have absolutely no excuses why children do not wear helmets during classes and after school on cycling and attractions. After all, now you need to manage to not find them on a specially equipped place! Complete registration of walls Small hooks on which these safety devices will be located.

Instead of throwing bottles with water and cardboard boxes in the corner of the garage, build a quick and easy in the manufacture of a trash can for the whole family. It can be built using plastic boxes and boxes with inscriptions that allows you to sort garbage on plastic and iron.

We submitted to your attention an interesting and extraordinary selection of conceptual ideas and creative solutions to the organization of the garage premises in an unusual home.
Did you like these rational and practical ideas? Share with us your opinion on this issue in the comments below ...
Categories:Places:
The garage takes a lot of space in the life of a strong half of humanity, even if there is no car in the family. In addition to using a room for storing and maintaining a car, a garage has a fairly wide range of functions, despite its rather limited area.

How can I equip a garage?
To begin with, consider several options for ergonomic use and design of the design of the inner space of the garage:
- Garage box on its internal configuration in 99% of cases has a rectangular shape. Accordingly, the distance from the car to the side walls is not very large and is not comfortable for carrying out some works. The most common option for the arrangement is the removal of the working area (workbench, racks or cabinets with tools and spare parts) into the back of the garage, to the wall opposite to the goal. In this zone, there may be enough space even to install any necessary equipment, in addition to the workbench.
- If there is an extra room in the garage, there is an extra room (ottoman, electrical), then on the surface of its door you can organize a repository of tools using a mounted cloth or fill holders on it in the form of loops of different sizes from plastic and conventional ropes.


- The simplest option: if the garage fails to install the rack, you can place a metal grid at some distance from the wall. You can spend almost any items, clothes and things like that. Even the shelves will not have to mount.
- Another way out is to attach hooks to any surface. There are simply not enough of them in the garage. You can make them alone, but you can also purchase in the supermarket. Significant savings of free space are guaranteed.


Small tricks for garage
So, the garage is purchased. At the initial stage of arrangement, we will talk about buying furniture items, most likely. Find what makes the owner and at the same time will take a minimum of space, not so simple. The way out of this situation is to make the necessary furniture items with their own hands.

Table with a folding tabletop - Perfect option for a small garage. Such a stand does not occupy a lot of space, but may be a table of a very decent useful area. With its manufacture often use materials from which the old cabinet was made.


Materials:
- furniture loops;
- fastener on a tree;
- accessories;
- wooden bars;
- anchor.

First, the markup is made, in which the construction or household level is applied.
The following steps:
- the bar is drilled through and attached to the wall by anchors;
- the holes in the future plane of the table and the mounting area of \u200b\u200bthe corners are placed and drilled;

- bar and tabletop are connected by loops;
- the table in the folded position is held by the standard scorelet, lock or crochet, which is strengthened on the wall;
- tool supports simply lean against the wall next to the table.

How to make a rack for a drill?
The manufacture of a mini-drill machine does not require high qualifications, but very expanding the scope of the use of an ordinary electric train. In addition, the machine will succeed much cheaper than the purchase, and the components can be borrowed from previously used devices.

Making a rack made of wood will take quite a bit of time and will not require any special materials and tools:
- wooden bars or boards are not thinner than 20 mm;
- furniture guides;

- metal rod with carving for the caliper;
- fasteners for wooden parts (screws, glue);
- emery.


Instruments:
- hacksaw;
- vice;
- screwdriver Set;
- electric drill.
The dimensions of the mini-machine are chosen according to the size of the workspace in the garage.


Metal stand manufacturing requires a bit of time and materials, so it is necessary to illuminate it a little more.
The proposed metal rack is more versatile than made of wood, and includes:
- carrying bed;
- drill guide racks to which it is fixed and moved vertically;
- knob vertical tool feed;
- additional nodes for ease of use.


How to make an overpack for car repair?
It is no secret that the car needs regular maintenance and small repair, as any technically complex mechanism. For the convenience of accessing nodes and units located on the bottom of the car, they often apply a lightweight flight made by their own hands, which will significantly save funds that spend on Masters a hundred.

Outacades are full and small-sized. Strictly speaking, the overpass function as well as observation pit.
The need for the construction of such a useful invention most often dictates a high border of aquifer in a place where the garage is built, which makes the arrangement of the observation pit is impossible.


The overpass can be installed with their own hands. For this case, drawings are needed, action plan and car part of the dimensions:
- the total length of the overpass is usually taken from the calculation - the length of the car + 1 m;
- route width - more than 40 cm;
- the height of the supports is 70-80 cm.
Swims are made from the corner, the cabinets are welded from angle with a width of the shelf 50 mm. The surface of the ladder is made from corrugated steel with a cross section of more than 14 mm.

How to collect a garage compressor?
When servicing the car, and for other works in the home and garage farm, it often arises the need for an air compressor. It will also help in painting, and when pumping tires, when filming dust, and in many other cases.

The simplest compressor for car dyeing can be collected from the old car chamber itself.
Here is a description of the necessary materials and tools to implement this idea to life:
- the receiver will serve directly the camera itself;
- the supercharger is a pump, it is desirable that he can have a pressure gauge;
- remkomplekt for tires;
- awl.

Procedure:
- check the pump to the camera in the absence of damage and eliminate them if they are found;
- in the receiver do a hole for the release of a jet of compressed air;
- glue an additional fitting and combine it with the paintopult;
- in it, unscrew the nipple to give air free passage;


- leave the "native" nipple of the camera - it will be used as a valve, holding excessive pressure;
- by samples, determine the desired air pressure pressure, spraying paint and seeking it to be smoothly;
- the main rule - in the chamber there should be no extraneous: moisture, dirt and dust particles.

If there is a minimum number of build skills of more complex designs, you can suggest to try to collect a compressor of a greater degree of complexity and multifunctionality, which can be used to measure the amount of atmospheres in the car tires, painting, blowing and blowing dust.
The method is inexpensive, even if there is no large number of primary materials in the garage.

Installation is carried out from:
- old refrigeration unit;
- air receiver to 10 l;
- pressure gauge for air receiver;
- air pressure regulator;


- high pressure hose (20 bar);
- the most affordable filter regulator;
- several clamps;
- adapters.


The compressor does not take up much space, so it can be installed in a niche on the wall either on the wall shelf made with your own hands, where the need dictates.
The compressor receiver of this type has three outputs:
- the top sucks compressed air;
- the average is used by pressure gauge in the receiver;
- condensate and oil are drained through the bottom.

Principle of operation: The compressor sucks the air through the bottom, where the filter controller and the inclusion package are installed. Regulator pressure limits - from two atmospheres up to eight.
To progress from trouble, the discharge valve can be installed for security.

How to make a crane-lift?
No one will deny that periodically any car must be serviced, and from time to time and repair. Serious repair - the pleasure is not from cheap, so many car owners are taken to perform it in the garage or in the country of their own hands. For example, when repairing the engine, considerable physical efforts will be required when it is removed and installed after repairing in place.
Large help with such operations can have a crane-lift with a winch. It can be equipped in the garage both by purchasing in the supermarket and do it yourself, according to a simple scheme.

The most practical way to accommodate such a crane-beam is above the front of the car supplied to the garage. If the arrival takeaway is 1 meter, then the work area will be around 5 m².
The base in the present version will serve as a sheet steel 400x400x25 mm. It is welded with a rod with a diameter of 80 mm, attached to the ceiling by M16 bolts.

It is necessary to monitor compliance with the levels of horizontalSince often the floor or the ceiling outlet of the garage can have a slope in one way or another.
The arrow is made of a meter pan, a corner 50x50 and a glass with two clicked bronze bearing sleeves. The entire design is recorded by a gliding shaped nut M42x2.

Pit and cellar
The useful space is not limited to the garage box itself: they rarely meet the garage without a cellar, where the racks for the soles and marinades are so superbly placed, and departments for fruits and vegetables collected on the native "six weaves".

The situation is as follows: The garage is built / purchased / rented, the car requires repair or simply maintenance, and there is no observation pit in the garage. There is a way out - build it with your own hands.

In general, the observation pit must be such a size so that the owner can accommodate and work in it with comfort.
For this purpose, the sizes of the pit are measured:
- length The pits are chosen in accordance with the length of the base of the car + 1 meter;
- width It is determined by measuring the distance between the front wheels minus 20 cm for confidence that the machine does not fail at the entrance;
- depthchoose in accordance with the growth of the car owner + 20 cm.

Lifehak: All the amounts obtained must be added 30 cm. This is done for the proposed installation of hydro and thermal insulation.
Consider the construction process itself:
- Mixed dimensions are located.

Lifehak. If the band screed is already available, then you will have to organize the order of work as follows: to put markup and then cut through it with a grinder or any other tool.
- We comply with the parallelism of the floor using the level, thoroughly tamper it. Typically, the first layer on the floor of the pit is placed a pillow of rubble, then in order: 5 cm of sand, 30 cm clay, reinforced grid, which is poured with concrete layer 7 cm. Then it is necessarily spilled by a bitumen mastic, on top of the rubberoid, then the seams are stacked. Locked the layer of foam and the next concrete layer at 15 cm.

- The walls of the pit are missing clay, laid polyethylene, and the rubberoid is put on it and all the joints, as on the floor, are missing by mastic.

- Creating a formwork is the most time-consuming operation: it is made up of plywood sheets or boards, leaving the gap 7 cm from the wall.

- The wall reinforced and poured concrete.

Lifehak: In height, the fill is made at a speed of 20 cm per day, no faster.
- In the walls, a niche can be done, a ceramic tile must be used as a cladding.

When the cellar arranged in the garage, the most reliable solution is to use the caisson. If you ask the question of what the Kesson is, it is best to contact several lifehams that explain its purpose.
Simply put, caisson is a bank. Ordinary large waterproof canister, tank or all that is like them. It is used as an impermeable soil moisture basement.

It consists of:
- of the overast structure (this is the entrance to the hatch of the cellar);
- the cylindrical chamber with dimensions 2 M height and diameter of 1 m, this is the best option, in terms of the proportion of "Volume / spent materials";
- the caisson will additionally be waterproof from moisture with various bitumen mastic, asphalt layer or by various solutions again based on bitumen.

Consider several useful tips and recommendations on this:
- The walls of the caisson must withstand considerable external pressure, should not be saved on their thickness.
- Welded seams must be failed twice, anti-corrosion products are also highly recommended.

- When using caisson, it is necessary to arrange the reliable ventilation system.
- The list of basic storage units is almost the same: canned food and marinades, other homemade reserves, rolled into cans and other capacity, raw vegetables and fruits. Therefore, it is necessary to take into account their storage conditions.

- Ventilation requires special attention: the variant of the ventilation of the natural type is not always suitable due to the absence of the possibility of its artificial regulation. The ventilation of the forced type is better.
- If the caisson is absent, for waterproofing to the floor, the so-called sand pillow is placed on 25-30 cm thick, it is covered with a rubberoid or other material from above, the seams are squeezed by bitumen or mastic.

- Raw vegetables are stored on the floor in boxes. Carrots and beets additionally spend sand.
- Wood racks over time tend to be covered with fungus. To avoid this, they are covered with protective mixtures.

- Steel racks of this lack are deprived, but they have a property to be corrosion, so they are treated with water-repellent materials.
- Plastic racks are resistant to moisture and corrosion, but rather fragile and cannot bear a large weight load.

- The depth of the cellar is directly proportional to the depth of the aquifer on this particular area, if the caisson is not used.
- When using caisson, it is necessary to take action so that it does not occur to the extrusion of groundwater to the surface.
- The floor of the cellar should be located at least at a distance of 1 meter from the upper border of the aquifer.

How to make a workbench?
Who saw a garage in which there is no workbench with a vice fortified on it? Or a garage without shelves, antlesole, mounted cabinets on the walls? Without a stand for checking or maintaining a car?

By the form of the interior of the garage, you can immediately say who his owner and how functional one or another use of the inner space is as far as it optimizes for operation.
A large and convenient workbench in the garage is its indisputable advantage. If you organize boxes for tools and parts in it, then it will turn into a universal place of work. Typically, such a workbench makes the entire width of the garage with different boxes.
To install it with dimensions of 660x100x60 cm, you need:
- saw;
- plywood of various thickness;
- polyurethane;
- paints;
- schlifmashinka;
- fasteners

Operating procedure:
- for the tabler with a size of 660x100x60 cm, it will take to cut 4 sheets with a thickness of 20 mm;
- for the work surface, it is better to use polished faeer;

- boxes are made of 0.6x4.8 m bands, 13 mm thick;
- the shelving section is mounted from 20 fragments of 61x61 cm in size;

- each vertical series of boxes is calculated as: 3 small and 1 deep;
- the depth of the grooves of the guides is 1.27 cm;

- additionally cut the groove 254 mm at the bottom of the cabinet and three grooves 127 mm from each other and 146 mm from the top of the cabinet;
- the desired stiffness of the structure is created by the rear wall with plywood strips;

- we collect all the designs for five boxes and fasten them between themselves, then fix the fastener screws to the wall so that the free space for oversized items under them;
- collect plywood boxes 13 mm thick;

- the handles are cut in the front wall of the box or acquire ready and fixed with self-drawers;
- the dimensions of the lower boxes are 120x25x5 cm and 60x25x5 cm;

- the frame 60x120 cm frame is mounted on the working surface of the workbench;
- the workbench finishes is grinding and painting in several layers.
- it is allowed to the finish coating of varnish.

How to make racks?
The rack is one of the most common rational solutions to the organization of free space when placing things in a limited volume of the house or garage boxing. The surface of the box of boxing so urge to lean the rack to them or strengthen a dozen-different shelves and folded the most diverse items on them: from fishing facilities and clothing to a boat engine and a spare unit of the engine cylinders.

The rack for the garage can be purchased in retail chains - this is an option that almost does not require energy consumption. Installation / dismantling of such designs is elementary and does not require highly qualified assembly-collecting.
It is perfect for all categories of garage owners, but quite expensive and will require an investment of certain capital.

You can try to make a rack on your own from undergraduate or purchased materials: from trimming pipes, profile or corner, from pieces of plywood, chipboard, plastic.
Instead of drawers, it is quite possible to apply ordinary plastic canisters. Canister is located horizontally, and for the handle, which turned out to be ahead, it is pulled out and return to the place.
The only thing that should not be forgotten is forbidden to use canisters and another container from under chemically aggressive, radioactive or combustible substances that can harm health. Best option - Canister from under drinking water.

To make an aluminum or other metal rack yourself, it is necessary to prepare, remove the size, calculate the load and select the material for the product. It should also be taken into account which communications are in the place where the rack is scheduled.
- First determine the external dimensions of the product.
- Then calculate the number of shelves, their height. It makes sense to make their unequal height, since the size of storage items vary.

- Sections are too large to do irrational - the carrying capacity of the shelves will decrease sharply, the possibility of collapse will increase.
- The drawing should begin with an outline of the rack, its schematic image with preliminary dimensions that gives the general concept of what should happen in the end.

- The next step will cut vertical parts.
- All parts are cut into one length of a solid profile or angle. Make them from individual parts is not recommended.

- Sometimes the risers use metal pipes or metalplastic.
- The material for the shelves is chosen according to its strength. For example, shelves from chipboard and DVP will not stand considerable weight due to its relative fragility.

- Design width shelves no more than 60 cm.
- The presence of edging (stern) in the shelf will serve immediately in two directions - will create an additional ribbon edge and prevents the drop in small parts.

- First install vertical racks. The method of fastening (to the floor, ceiling, walls) should be thought out at the stage of drawing up the drawing.
- When installing, it is necessary to use the level to avoid distortion.
- Shelves are fixed with the help of corners.

Consider some useful lifehaks:
- Sometimes, the shelves are fixed directly to the ceiling without using vertical supports on the floor. Hinged shelves can free the place in the lower yarus of the garage box, but they cannot differ in special loading capacity. You can put oversized, but light long rails, plastic corners, cardboard pipes, etc. Also, you can also make them mesh - then you can additionally hang something to the hooks.
- Another of the popular ways to use the wall - to arrange a metal or plastic panel with fasteners (hooks, brackets, etc.) instead of the rack (hooks, brackets, etc.), it will very much free space.
- To create a small gap between the wall and the panel, the use of wine plugs sawed in half are recommended.

Hinged structures
The problem of storing small parts, self-tapping, washers, bolts and other fasteners in the garage is quite acute. On the one hand, they should always be at hand, on the other - they are easy enough to lose, drop on the floor. Solving problems somewhat. Here is one of the interesting, simple and not requiring variants - only ingenuity and a new look at the use of ordinary things.

To begin with, decide on the required number of cells of the desired size.
To work will be required:
- 4 Rake metal 2.2 m long each;
- electric drill;
- fasteners


In our case (see photo) 24 identical cells are in the row. Total four rows, the size of each cell is 14x10x7.5 cm. In a metal rail (in our case, its length is 2 m) for the entire length of the row, it is necessary to drill the hole drill for fastener on the wall. Save is not recommended, as the rail will keep cells filled with metal parts. Next, the rails are attached to the wall. On the rails fastened cells. Ready!

Original options
Much in the garage has to do with their own hands, because among the entire diversity of goods that the modern industry offers us is not always the fact that fully satisfies the demand of the picky and master master.
In this case, we are talking not only about furniture (cabinets, racks, shelves, tables, workbenches), but also about all sorts of homemade devices that make life so easily with sudden needs to perform a non-standard operation.

The garage performs a wide variety of functions: from the pantry and workshop to Remmm and rest. In any case, there are a lot of original ideas embodied in the useful, right and functional devices and homemakes for the garage, which are quite accessible to make it with their own hands.
- To protect against drafts, such a felt "sausage" is often recommended to be laid under the gate of the garage. Very helps when working inside the garage in the winter season.
- Spare tire kit are stored in a suspended state or on the side. If there are no discs, tires store vertically with a mandatory change in their position once a month.


- To position them in a standing position, it is recommended to descript your own storage location on the wall. In fact, this is a wall-mounted triangular frame, which inserted tires in a standing position. The further the frame will be installed from heating devices, the better the tires will be saved.
- Well, if the tire spent their time remaining in the garage, not yet duck. If you put a piece of plywood or chipboard on such a tire and decorate the decor, it will turn into such an elegant thing as the author's stool.

- With a lack of driving experience, you can fix the used tire on the wall opposite to the goal as a bipper. Such an aircraft will significantly reduce the risk of scratching the bumper during car parking.
- From the old tire it turns out homemade things for storing small things. Attach the tire to the wall is simple enough, and it will look like this option. For flowerflowers, the shelf will easily turn into a flowerbed if the bus is located outside the garage.

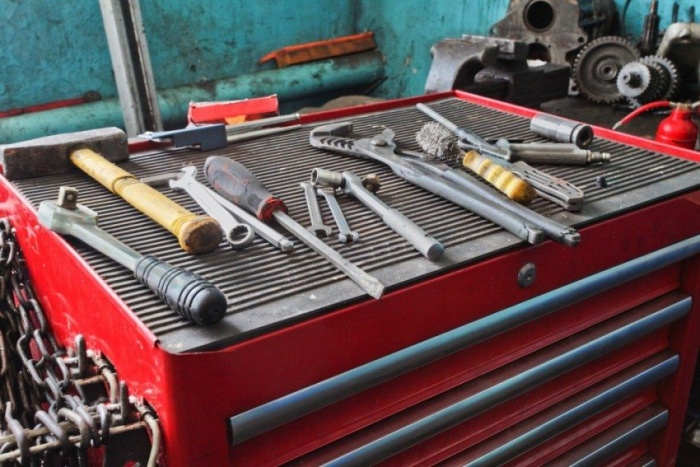
- Storage of various keys (precipitated, combined, adjustable) on hooks is beneficial and preferably immediately from several points of view. Multiple keys on one hook, they are clearly visible, take up little space, everything is available at once.
- The rag is very convenient to store with a wall holder, which uses conventional clothespins. The rag will always be at hand, it is not necessary to waste time on its search.

- To make the records "for memory", you need a board and chalk. But this is absolutely optional: cover the door of the cabinet, part of the gate, some shield or simply a free smooth section of graphite paint walls and make a schedule on it, leave notes or write down the dimensions of the future rack.
- From the old 200-liter barrel with the help of the Bulgarian will be a wonderful chair, if you climb it with foam or rubber. The base of the table for something necessary can become the same.

- Boxes with various things on the floor of the garage will be much more mobile, if they make rollers from old office chairs to them.
- If on the wall above the workbacker, except for hooks, attach a figure-cut bar with holes and brackets, then it will very help when storing and using pencils, rolled, bobbin with threads or beams.

- The same applies to various types of loops and straps fixed on the wall of the garage.
- If you attach the covers to the lower surface of the mounted cabinet, they are very convenient to make banks in which various little things store.
- Another possibility of using them: an electrical cable is stretched through the hole in the lid, and the jar is put on the bank with a lamp - absentee is ready!

Garage doors - a very significant and important part of boxing. They carry a rather significant load, serve as the main obstacle for robbers, need thermal insulation. To all of the above, you can add that the gate must be as comfortable as possible to use for the garage owner.
The variant of the gate, equipped with springs of stretching or torsion springs, is not very popular in Russia compared to the "classic" option, but they also deserve attention due to the convenience of use.

Stretching springs are usually used with a gate less than 8 m² of area. They do not need a high height pendant due to the fact that stretching springs installed on the sides are used. It is easier to install them, and the price of them below the gate that use torsion springs. Unfortunately, the built-in gate in such gates cannot be installed.
Torsion springs are used when setting the gate more than 8 m². It is allowed 3 types of installation: standard, low, high. A large plus during operation of the gate of this type is to protect against the fall of the door of the gate when the springs are out of order and low-noise functioning, as well as the embodiment with the embedded gate.
Make accomplishments for the garage with your own hands. With the help of such products, the owner of the room will free a lot of space, and the tools and equipment will always be at hand.
Workbench - the required product in every garage
Homemade workbench should be in every garage. It does not occupy a lot of space and allows you to comfortably produce repair and make useful crafts. Typically, the workbench is made from durable wooden planks that are attached to a thick wooden bruster or profiled pipe. Often the workplace is made of steel blanks. They are pretty easy to chop and brake into one durable design using metal corners and universal self-tapping screws.
To make a workbench, as well as other and garage machines, it is necessary to draw an accurate design plan. At the same time, take into account the space that will be assigned to the product. It is best to put the design with glasses with shelves or racks. In the drawing, mark the presence of drawers and shelves. In them you will keep small fasteners and tools. A compact vice can also be attached to the tabletop. Having drawn the plan, proceed to the manufacture of the workbench. First we collect a countertop.
If you have a small room, it makes no sense to make overall homemade for him. You can connect the boards with each other with good glue and metal screeds. As a rule, the tabletop of the standard workbench consists of 5-10 identical boards. Next, we make special grooves on the tabletop with dimensions of 2.5x2.5 cm. They are needed for stops. As soon as the glue on the product dries, the surface must be overtaken. As a result, it should be perfectly smooth coating. The legs for the design can be made from several bars with dimensions of 80x10x10 cm.

In the front legs, we make grooves in which brackets will be inserted. In the future, the latter will connect with the longitudinal beam of the table top. Then we collect the base of the podstoly. It consists of two frames that are made from 5x10 cm boards. The base is attached to the support, after which the frames are cut into the legs of the workbench by 2.5 cm. At the end, fix the components of the bolts. Then you need to attach the rear and side support walls to the workbench. For their manufacture, chipboard sheets or centimeter plywood are taken.
The last stage will be the compound of table top and upper frame. To do this, it is worth using powerful bolts. After covering the workbench we apply olif. As soon as it dry, the surface is cultivated by varnish. As a result of the work, you received a stable design on which you can not only repair spare parts or make various crafts, but also to store the tool.
Make a rack - about complex design with simple words
Each driver probably has many large garage devices that have nowhere to store. Where to find them such a place so that you could quickly find the right tool? The correct answer is on the rack. This design will allow you to organize free space and save a lot of time. Such adjusions for the garage can be made of wood or metal. The second option is more reliable, but it is quite difficult to implement independently.

The first is much easier to fulfill, however, that the design serves for a long time, it is worth picking a strong tree species for work. For this, the beech or oak will fit perfectly. Boxes and shelves of them can withstand significant loads. In principle, the rate for the rack is considered to withstand a mass of 150-180 kg. In practice, only units are adhere to these recommendations. However, it is necessary to remember that the maximum weight of all tools on the rack should not exceed 300 kg. Otherwise, this design will be dangerous for the owner of the garage.
Make a challenging rack design very difficult. It requires considerable effort, a lot of time and equipment. It is not enough to give him a simplified product, the manufacturer's algorithm we will look more detailed. So, the order of work looks like this:
- 1. First you need to take a board with a width of 9 cm. And cut it into different sizes. In the future, these details will play the role of the backups for the design.
- 2. The shelves will need to take a thicker board. It must be cut into several identical parts.
- 3. Next, take the board for the base of the rack and mark the points in which we will make the struts. They should be located at a distance of 3 cm. From the edges of the base.
- 4. Breep the upper strut, using superclauses for this. It is nails nail to the top shelf. The same manipulations need to be repeated with other spacers and shelves. The latter must be attached the lower sawing part.
- 5. Then it is necessary to flip the assembled product, pull the base of the rack with struts using for this screw.

After the work done, your rack is almost ready. At the end, you will learn to clean the surface of the shelving of sandpaper and treat it with oil varnish. Apply the latter is best in 2 layers. Crepe design to the wall with powerful anchor bolts, screwing down the fasteners under the top and bottom shelf of the design.
Cyclone Vacuum Cleaner and Press - Useful Homemade Amateur Mastern
The list of homemade machines and devices must necessarily include the press. This clamping device will become an indispensable helper to each lover of homemade creativity. For the manufacture of the press, a hydraulic jack will be required, a metal bed-platform and 4 profile pipes. Two of them must have a 4x4 cm cross section., And the rest is 6x6 cm. To make the press, take two pipes with a smaller cross section and secure them to the base of the product. At the very top between these pipes, weld another pipe with a large cross section.

The remaining pipe set so that it easily moves the previously mounted guides. The fixture made in this way works on a very simple principle. To connect two products, they must be put on the base of the press and cover with a dense plywood sheet. The pipe with the installed jack must be omitted, after which turn two short pipes. Having done this is a simple movement, you securely connect the two previously supplied products.
The second device is a cyclone vacuum cleaner, it will help you always keep your garage in perfect cleanliness. For its manufacture, prepare a plastic or metal container. An important nuance is a vessel cover must be sealed. Next in the lid we do 2 small holes. The first should be located in the center, and the second - not far from the edge. The diameters of the hole and the cross sections of the hoses you use must be the same. Connect pipes to holes. The first will serve to collect garbage, and with the second you will connect the usual vacuum cleaner
In the inlet nozzle, install plastic knee. With it, the air will be absorbed by the device, like the cyclone. Thanks to the presence of this knee, the vacuum cleaner will be able to draw not only dust, but also small stones, sawdust, lumps of dirt and other small garbage. All this will remain in the container to which you connected hoses. If you wish, you can not equip the vacuum cleaner with the knee. But in this case, you will not be able to remove the garbage, but only dust. In such a device, it is more expedient to use a plastic container and non-screensy hoses. If you need a more powerful device, then you should make a vacuum cleaner from large hoses, knee and steel tank.
Device for the manufacture of ropes - Ropes of plastic bottles
In the process of heating the bottle of plastic is quickly compressed. Thanks to this, we get the opportunity to make enough rope of them. With their help, the garage owner will be able to connect several different products that are used in the economy. To create a device, you need to find two bolts with nuts and washers, a piece of thin board, an electric drill and a stationery knife. After that, take two washers and put them in the middle of the board. Shab centers should be noted on the chalkboard with a marker. In the obtained points we drill holes.

Next, replete holes on the back of the board. It is necessary to do this to exclude turning during the operation of the device. At the next stage, screw the bolts. Test the device. We put on a few washers on the protruding ends of the bolts. From the number of bolts will depend on the final thickness of the rope. Next, on top of the washers put the stationery knife or his small piece. Fix the device through additional washers screwed to the stop. Next, the device must be fixed on the desktop using clamps.
Then we take a two-liter bottle of plastic, cutting off its bottom and cut out in the remaining part of the strip. We put the last on the device so that it is located under the knife. Next, we take striped with one hand and stretch it, and the second hand you need to hold the plastic container. As a result, from one unnecessary 2-liter bottle you will receive approximately 20 rope meters.
How to make a viewing pit - detailed instructions for beginners
No matter how cool, and sooner or later the car has to repair. And so that the owner of the car did not have to climb under the car and "clogging", bending twice, it is necessary to dump the garage on the garage for inspection and repair. First of all, who wants to do this, it is necessary to mark the marking of the area of \u200b\u200bthe room where the car parks. For this, the section of the garage is marked with chalk. When drawing up marking, you need to take into account several important factors. The length of the pit must correspond to the length of the car, and to this magnitude it is necessary to add another 1 meter. The width should be such that you can work comfortably. However, be careful - this value should not be more distances between the wheels of the car.

The depth of the pit is calculated taking into account the growth of the owner of the garage. This indicator adds another 20 cm.
"Removing the measurement", proceed to dumping the pit. Having done this, think about the arrangement inside. First of all, it concerns the walls of the pit. To this end, on the sides you can lay out brick, building blocks or concrete. The thickness of the walls directly depends on the material. So, if you apply a ceramic brick, then this indicator should be equal to 20 cm. If you purchased cement, the wall thickness should be 12 cm. If you want to make the walls from the blocks, then their thickness should not exceed 22 cm.
Do not forget that the walls of the pit will need a hydrophobic impregnation. It will protect the materials from the influence of moisture. Apply impregnation is necessary from the inside of bricks or blocks. For a more comfortable entry and exit in the front of the pit, we make steps. It is best to use cement for this. You need to start from the bottom stage, gradually rising above. Each of the elements of the stairs should be the same. To achieve this, pre-measure the lifting height and calculate the number of steps.
Rooms indoors - for storing scattering fasteners and not only
Sometimes the garage area does not allow and install a large spacious rack in it. In this case, you can make shelves of different sizes. They will be attached directly to the walls on any height convenient for you. This will give the opportunity to save place on the floor of the room. First of all, it will be necessary to determine the place of fixation of the shelves. On the selected section, we make approximate marking, separating the area to the same squares. In the corners of these squares, dowels will be screwed to hold the shelves.
To screw the fasteners, drill holes for them using a perforator. If there is an opportunity, it is necessary to purchase special dowels with hooks at the ends - they will ensure the best fixation of products. Next, we take a not-butter board and freamers to her suspensions with eyeles. When calculating the distance, focus on the marking on the wall surface. To secure metal suspensions, use reliable screws. After that, it remains to make the shelves. We take a few boards and cut them on the same parts - they will serve the bottoms for products. Then, from thicker boards, cut the walls of the shelves. You nail or glue them to bottoms. If you wish, it is possible to paint or apply a varnish on them.
The final stage will be the installation of finished shelves in the designed places. Setting each of them, carefully follow the products to stand smoothly and fluently moved along the guides. If you want, retractable wooden handles can be glued to the front walls of drawers. With them, the shelves will be more convenient. A very interesting idea will be the manufacture of plastic canister shelves.
If you have a sufficient number of these tanks, and in the future you do not plan to use them for the purpose, then you can this principle. Initially cut the holes in the extreme walls of the canister. At the same time, watches only the right or only left wall of each of the containers. Otherwise, the shelves will look inorganized. Cutting the extreme walls, clean the plastic from burrs. To do this, use the file. After that, it will remain to install the shelves in the place in the wall or use them as retractable boxes in the rack.
Who said that crafts are not interesting to men, just if women with great pleasure read about how we are, then for motorists there are no topic is more expensive than homemade with their own hands for the garage. Actually, with the help of which you can improve your garage life, very much, so that the whole long winter will be doing something.
Useful homemakes for the garage do it yourself
There are original, interesting products that you can do yourself, but useful homemakes for the garage do it yourself. First of all, the furniture includes such things :, lockers, tables, hangers. All this allows you to most optimize the surrounding space, especially if the metra is not too big.
Most often, at initial arrangement, ordered all the necessary furniture. But if you rent a room or do not want to remove money from the family budget, it is quite possible to equip and on your own, especially if you know how to keep basic tools in your hands. To help yourself and for inspiration, you can use the video from homemade garage with their own hands (YouTube Can please you with a variety of ideas), and you can take into account the arrangement tips that will be the basis for successful planning.

If you look at the photo, which demonstrates the optimal set of useful furniture elements, then note useful nuances for yourself. First, the location of any storage system should be located at a certain distance from the walls. It is believed that between the indoor-standing room with the machine and the rack must be at least half the meter for normal, comfortable work inside. If your car storage form is more like a rectangle, not a square (it happens quite often), then it is worth moving all the storage for tools and useful things into one zone along the far wall opposite to the door. It is here that you can make not only a table or rack, but even a joiner or lathe. It will be necessary to mention that all the repository of your tools inside the garage should only be closed if it is reliably closed or is protected by firmly closed. Otherwise, it is better to place the most necessary, preferably not representing special value for robbers.

If you provide in a separate room, which is located on the territory of your country site, it is better to make them, the so-called, attic type, that is, located in the roof, and choose the place just above the work area. In the summer and spring period, such a window layout will help you to save on lighting, sunlight will be quite enough for all types of work, besides, you can also ventilate the room, because the ventilation does not always be able to cope normally, especially if you are going to do as in the workshop.

With a total shortage of money or from love for art, you can make the original storage system, using old empty canisters. Any car accumulates them for a year for the year, and if they ask for their neighbors, it will be enough for each compartment of such an interesting locker. Of course, nothing complicated here and to perform similar homemade for garage do-it-yourself video- Turks are not needed at all. You need to take a plastic canister, wash it well so that there are no traces of its contents. Armed with metal scissors, a knife or other tool, cut off the front cover with the canister, but so that the sides remain, and the contents did not turn over the edge. In order for the design to be more stable, you can fix it on the back wall with the help of self-tapping screws, but will drive them, of course, not in the wall, and in a wooden slak, which we attach to a dowel.
Homemade garage do-it-yourself photo
Continuing the inspection of options homemade garage do it yourself, photo Which you have already seen and still see below, we must look at other ways of rational storage. If horizontal retractable shelves simply do not fit inside, then you can make very original and functional vertical shelves. You will be surprised how many things they will be able to accommodate themselves, while the tools will be easily accessible and, as they say, "at hand".

The same option, as presented in the photo, can be used in, there, too, it is also often necessary to equip the workshop, and the places for it are allocated even less than it remains in the garage. For such a design, you will need to build a frame of wooden boards, and on the upper and lower edge of the edge, where cells will be inserted. Most likely, the inspiration for such a design was the classic hives, which are used in breeding bees, the system here is exactly the same. Sheets that are inserted inside have a perforated surface and the presence of these small holes will allow you to screw inside the carnations, hang hooks to raise the tools and useful devices as convenient as possible so that they do not fly when nomigating and hiding.

Exactly the same perforation can be inscribed in the furniture kit. Having such a complete set of everything you need for a home master, you can build a lot useful homemade garage with their own hands, video With which there is online. In popularity, such resources may soon convert and popular hand-maid projects, because men, not less than women, want to make the space around themselves, their kingdom, beautiful, functional, convenient.
Interesting homemakes do it yourself for the garage
From useful little distracted and talk about things not obligatory, but no less useful than traditional furniture, machines, lighting or heating. Recall that for many men garage is a real male club, where you can all equip to your liking. We offer you a couple of options. interesting homemakes do it yourself for the garageSupporting car themes and can be used for long gatherings.

We are accustomed to the finally wear tires or simply throw away, or to make. I freeze the last winter set on the swan or Vazon, this year you can highlight it with your loved one, making a whole furniture headset. Frankly, you will use not only car tires for this purpose, but also bicycle tires, because they can be constructed backs, turning the stool in the chair.
Practice in the manufacture of such furniture and soon be able to replace your coffee table on this look not only beautiful, but also can become part of the original design concept.

The table and chairs are great, it will be where to sit, but with the question, on what to cook a delicious kebab, our next idea will help. The fact is that the usual folding brazier may not support the long-needed coal temperature, and if you like a long time to sit near the fire, you should make something more large-scale. We are a little modernizing and present to your attention a brazier made on the basis of the wheel rim. In order for the rim well to support the specified temperature and did not give coal to cool, it must be chopped by bricks, but for maximum decorativeness of such a self-made, it is better to cut them a little with the help of a grinder to fold in a circle. The bottom must be filled with any available material that does not support combustion, for example, a chubble fine fraction.
Homemade garage do-it-yourself drawings
Returning from entertainment to business again, it is necessary to understand that for many the garage can be an alternative workshop in which you can serve not only your needs, creating crafts for your apartment, cottages, or even to repair the car, but also performing small orders. In order to make high-quality useful homemade garage do-it-yourself drawings, Schemes and technical recommendations will be accurately useful to you.

If you plan to spend a lot of time in your improvised workshop, then among those who are interested in homemade with your own hands for the garage - Heated, lighting, ventilation, that is, the arrangement of a full-fledged comfort stay within a long time. Some prefer to establish infrared heaters, but in terms of the cost of electricity it will not be a very rational option. A good option can be water heating, but it is best to design in garages that are located next to the residential house.

Solid fuel boilers of any design you can place inside a garage of any type, even make a metal stove on your own, using a welding machine. But do not forget that with such a type of heating, the finish inside should be from non-combustible materials, and ventilation is done qualitatively, even at the stage, when we are in order to delete all combustion products in a timely manner.
Homemade machines do it yourself for the garage
Even if you are a non-professional joiner or turner, you still need the most convenient and compact as possible on the territory of the garage workshop. machines. Homemade with their own hands for the garage They can just become workbenches - table tops, for which various electrical instruments are attached, for example, a jigsaw, a milling machine, a lathe. The working surface of the metal will serve you much longer than a wooden one, so you can combat the tree and metal.
 Why you can not postpone the pregnancy
 Effect from regular use of home recipes
 Features of the structure of the neck