Do-it-yourself roofing with a profiled sheet. Installation of corrugated board on the roof. Strong and reliable roofs made of a new roofing covering Construction of a roof made of metal profiles
To find out how to fix a metal profile on the roof, you need to understand the features of this material. The profile is made from galvanized steel sheets using cold rolling. During production, this material is covered with different protective layers, which makes it very reliable and resistant, so many people want to cover the roof with a metal profile. The corrugated board is treated with specialized anti-corrosion phosphate, and then primed. The lower part is coated with a special varnish, applying a polymer coating to the surface.
Features of metal corrugated board
Steel sheets are galvanized to provide adequate cathodic protection of the entire surface and give it anti-corrosion properties. Now the corrugated board is a multi-layer structure, which is created to maximize resistance to a variety of natural surprises.
Resin-based synthetic plastics are organic polymers that are used during the production of polymer coatings. To give the profiled sheets a more decorative look, they are supplemented with a variety of additives and pigments that perform important protective functions.

To get a wavy or trapezoidal configuration of the finished sheet, you need to use a specialized device called a listogib. It provides the ability to select the desired width or height of waves, the main purpose of which is to add resistance to the entire roof.
It is known that a roof made of such a profile has many advantages, because this material is:
- durable;
- reliable;
- sustainable.
When planning to do most of the roofing work with your own hands, it is worth paying attention to this particular material, because, having understood the basic nuances, it will be very easy to install it.
Back to the table of contentsHow to choose the right material?
All corrugated board is conventionally divided into several classes, which are designated as follows:
- H - used only for non-removable coverings, floors and formwork, it is considered the most suitable option;
- C - designed for walls, it is often used during the installation of fences;
- NS - combined, it can be used for fences or flooring.

It is very important to choose the most suitable brand. It is clear that H is considered the most reliable and durable among all, its thickness is not too large, there are several additional stiffeners, and the corrugation itself is quite high. NS is also sometimes used for roofing, but this type is more suitable for roofs that are not exposed to heavy loads. The cost of grade H is slightly higher than that of C or HC, but all costs are quickly justified by the durability of use.
Profiled sheeting H can withstand just huge loads, so it is possible to increase the step between the battens. It turns out that you can use fewer fasteners and it will be much cheaper.
There are a few things to consider when talking about the thickness of the flooring. If the roof has a rather high slope angle, then it can be covered with HC sheets, because they are a little thinner and much cheaper. However, if the roof is flat enough, then it is better not to save money and not take risks. With a flat surface, the load on it increases significantly, therefore, the larger the waves and the thicker the profile, the safer the whole structure will be.
Back to the table of contentsWhat should be done before installation?
Before starting the installation of a metal profile roof, you need to do some more work, namely:

- Calculate material. To determine the number of sheets, it is necessary to measure the roof slope, its lathing, diagonals. Performing all calculations according to the drawings, it is necessary to duplicate all measurements in order to take into account the error if the roof has a non-rectangular shape. It works best if the length of the profiled sheet corresponds to the slope, then there is no need to provide additional sealing, and the fastening of the metal profile itself will be less laborious. During measurements, it must be borne in mind that all profiled sheets located in the first row must protrude 4 centimeters beyond the cornice.
- Provide waterproofing and ventilation. Before fixing the corrugated board, it is necessary to ensure the correct waterproofing by installing it along the entire crate. Laying a waterproofing layer is necessary to avoid the formation of condensation or leaks. Ventilation is installed so that moisture does not accumulate. There can be no exceptions, ventilation with waterproofing must be arranged regardless of the steepness or flatness of the slopes. Leave 2 centimeters between the waterproofing layer and the corrugated board. To do this, several slats are laid on top of the waterproofing. It is important to place them so that this layer of air can be ventilated unhindered from the eaves itself.
- Choose a crate. Before starting work, a very important point must be taken into account. If various additional elements are located in the roof itself: chimneys, ventilation shafts or fire hatches, it is necessary to strengthen the crate around with additional bars. There are no standards regarding the thickness of the lathing, so it is possible to use many different combinations, which are influenced by the length of the screws or corrugated board. The main thing is that the cross-section of the bars is at least 32x100 millimeters. The board that goes along the eaves itself must be much thicker than the upper bars.
One of the most inexpensive, durable, practical options for roofing material - or, as they say, a profiled sheet, a metal profile. This is a sheet of metal that is covered with several protective layers, and then passed through a molding machine, which pushes projections and grooves into it - to make it more rigid. The material turns out to be quite light, the roof of the corrugated board can be mounted independently and even "in one hand". The technology is not the most complicated, it is quite possible to do it yourself.
Types of corrugated board
There are different types of corrugated board. There is an ordinary profiled sheet - galvanized, there is a colored one - with a layer of polymer applied over the zinc coating. The polymer coating has a double role - it protects from external influences and gives the material a more decorative appearance. Simple galvanized corrugated board is used as a roofing material mainly in temporary buildings, the colored one has quite a solid appearance, it can be seen on the roofs of residential buildings and courtyard buildings.
By appointment
Decking is made from sheet metal of different thickness. The thinnest ones are designed for wall decoration, but can fit on the roof with frequent lathing and light snow loads. Sheets of this group are marked with the letter "C".
The thickest metal is used to make a material with increased bearing capacity. It is marked with the letter "H" and is used as a roofing material in areas with increased wind or snow load. There is also a universal professional sheet - it is designated "NS". It can be used both for walls and for roofing (the amount of snow should be medium).
After the letter coding of the profiled sheet, there are numbers: C8, H35, HC20. They indicate the height of the wave in millimeters that is formed in a given material. In the example, these are 8 mm, 35 mm, 20 mm, respectively. A corrugated board with a wave height of at least 20 mm is laid on the roof.

The waveform of the bearing metal profile is often more complex - additional grooves are added to it to increase rigidity.
By type of coverage
With all the external similarity, the price of corrugated board of the same type may differ significantly. The point is, most often, not in the impudence of the manufacturer or seller, but in the different technologies and materials that are used in production. For example, the protective coating can be zinc and aluzinc. The second type of protection has appeared recently, the equipment is expensive, but the durability of the metal coated with aluzinc is much higher.
Also, the method of wave formation affects the durability of the coating. There are two technologies - cold rolling and emulsion. In cold rolling, the sheet is simply pushed by rollers without any preparation. Expensive equipment is required to prevent damage to the previously applied coating. Accordingly, the profiled sheet of cold rolling is more expensive.

When a wave is formed with an emulsion, the metal surface is moistened with a liquid (oil, water, special liquid) and then sent under the rolls. If, after rolling, such a sheet is not dried, but sent to the firing oven - to fix the paint, then the places that were wet will quickly begin to rust. It is impossible to see this defect in advance; one has to hope that the technology is not violated. But the profiled sheet made using this technology is cheaper.
There are also different polymer coatings. They create films of different thicknesses and densities, with different properties.
- Polyester (glossy and matte). The profiled sheet with a polyester coating has a relatively low price (the cheapest of the colored ones) and good characteristics - the coating is plastic, it does not change its color for a long time. Matte polyester has no reflections on the surface, it looks like velvety. This is achieved with a different application technique and a thicker layer. This coating is the most resistant to mechanical damage.
- Plastisol. Has increased resistance to aggressive environments, but does not tolerate ultraviolet light. Plastisol-coated corrugated roofing will quickly fade (two to three years).
- Pural - polyamide and acrylic are added to polyurethane. The coating is more uniform, the service life without color change is from ten years. The disadvantage is the high price.
- PVDF is a composition of polyvinyl fluoride and acrylic. The coating is expensive, but it lasts a long time even in an aggressive environment. This roofing material can be used on the seaside. Another remarkable property of it is that it can self-clean. The slightest rain, and the roof made of corrugated board with PVDF coating shines like new.

Under normal conditions, the roof is made of corrugated board with a polyester coating. In terms of price and quality ratio, it is optimal.
How to install corrugated board on the roof
A roof made of corrugated board is laid on a finished sheathing of boards, in which the fragments are located parallel to the eaves of the roof. The installation step of the lathing is up to 60 cm. Usually an inch edged board, 25 mm thick, is used. Sheets are stacked one after another with vertical overlap on one wave. When laying the corrugated sheet on the roof, please note that the outer shelves have different lengths. The one that is slightly shorter should be at the bottom, which is slightly longer - it covers the short one. In this case, they adjoin one another tightly, without a gap. If you mix it up and do it the other way around, then a gap of several millimeters will form between the two shelves, into which water will flow. Therefore, be careful when installing.
About the amount of horizontal overlap. If there are more than one rows of corrugated board on the roof, the sheets are laid with overlap. The amount by which the top sheet overlaps the bottom one depends on the angle of the roof slope: the flatter the roof, the more entry is needed.
Most decking factories can offer you to make sheets that will cover your entire roof - from ridge to overhang - in one long sheet (maximum length 12 meters). During installation, this creates certain difficulties - such sheets are difficult to lift and stack. Especially it will take a long time to expose the first sheet - it must be placed strictly vertically, which is difficult at a height. But the main advantage of such a solution is a continuous covering from top to bottom, which significantly increases the degree of protection of the attic space from moisture penetration, negates all the inconveniences. After all, there are no horizontal joints, which means there are no problems with flowing too.
How to properly attach corrugated board to the roof
To fasten the profiled sheet, use special self-tapping screws with rubber gaskets under the caps. They ensure the tightness of the connection. Such self-tapping screws are usually painted in the same tone as the roofing material. The number of fasteners per square meter is 5-7 pieces (do not forget to add about 20% - for fastening the ridge element, fastening joints and other similar work).
Self-tapping screws are installed in the lower shelf, where the sheet is in contact with the crate. Their length is 20-25 mm, depending on the thickness of the sheathing board, since it is important that the sharp end of the screw does not protrude from the back of the board. There will be a waterproofing film that can be damaged.

When connecting two adjacent sheets, they are also fastened with self-tapping screws. But in this case, you have to screw the fasteners into the wave, and also break through the double layer of metal. For these purposes, the fasteners are longer - 40 mm and more (depending on the wave height) - the screw must go into the batten board.
What to cut
Very rarely, the installation of corrugated board on the roof does without trimming - these are just unique cases. How to cut the profiled sheet? Scissors for metal or a jigsaw. Yes, it is slow and not very convenient, but this is exactly what the manufacturers advise. It is impossible to use an angle grinder (grinder) - when cut with it, the sheet heats up to very high temperatures at the cut site, which leads to the evaporation of zinc. As a result, in this place, the material quickly begins to rust.
Installation procedure
After collecting the rafter system, the front board is nailed, hooks are attached to it for installation, and on top of a special bar is a drip, onto which the edge of the waterproofing film is then brought. Both the dropper and the film are attached to it with self-tapping screws with a sealing rubber washer.

The composition of the pie of materials for corrugated board depends on whether you are going to make the attic room cold or warm. If the attic is cold, the sequence of actions is as follows:

If you insulate the roof, the order of work and the amount of materials required will change. There will be more layers:

Corrugated roofing: knots
Even with the construction of a conventional gable roof, there are several difficult sections that are usually formed at the junction of different planes and / or parts of the system. These sites are usually called "nodes". We considered one such unit in the previous paragraph - the design of the front board and the fastening of the gutters. But this is far from the only site where a detailed explanation is required.
Installation and sealing of the ridge
The roof space under the corrugated board must be well ventilated. This material heats up quickly and also cools down quickly, which contributes to the formation of condensation. Therefore, when installing a metal profile on the roof, in the upper part, the sheets on both sides do not join closely, but leave a gap of several centimeters - so that the air can freely escape, taking water vapor with it.

If there are special skates with ventilation (in the photo), but even if you just install a regular ridge element, between the profiled sheet and its edge, you get a large number of holes - in each groove of the corrugation. The amount of this gap depends on the height of the wave - the higher the wave, the larger the gaps are. On the overhang, where the front board is nailed, there are also similar holes. The air movement usually goes from bottom to top - from the overhang, through the under-roof space (for this, ventilation gaps, which are formed by the crate, are required when installing the roofing material), to the slots in the ridge. This is how the ventilation and regulation of the moisture content of the insulation takes place, the condensate evaporates and is carried away.
Large gaps are good for ventilation, but in them rain / snow with the wind clogs precipitation, and dust and leaves get into the attic through them. It is much worse if the holes are clogged with leaves - ventilation will immediately deteriorate. In order not to get into a similar situation, previously about 2/3 of the height of the gap was filled with sealant, applying it in layers on the roofing material. Crawling back and forth with a sealant on the top of the roof, waiting for the previous layer to polymerize a little, is not very convenient. Also, this decision is incorrect from the point of view of ventilation - the gap decreases, the air movement worsens. But there was no other solution. Now it is - a compactor for corrugated board. It is made from foamed polyurethane, polyethylene or wood composite. The structure of these materials is porous, air permeable, but not dust, water or leaves. In shape, it either repeats the shape of the corrugation - there is for different types of profiled sheet, and there is also a universal tape that is simply pressed in the right places.

The sealant "sits down" on the sealant, double-sided tape, glue, there are options with self-adhesive tape. With this compaction, the air passes freely, and the sediments remain in the outer layers, from where they then evaporate.
Overhang filing with profiled sheet
In order to sheathe the overhang with a profiled sheet, a special profile is attached to the front board. A profiled sheet is inserted into its groove, cut into strips of the desired width. The second edge of the filing is attached to the board nailed to the ends of the rafters. The joint between the filing and the board is closed with two droppers - one is nailed from the bottom, covering the lower half of the board, and the other - from the top. The edge of the waterproofing film is then laid on it.
If the gutter system will be attached, then the hooks for the gutters are nailed after the lower drip is installed. The top drip is nailed after all hooks have been installed.

Adjoining corrugated board to the wall
In some cases, a metal profile roof is adjacent to the wall of a structure. How to make an abutment so that there are no leaks? There are two options (see picture). Both use a corner strip, only it has a different size and profile.

You can take a corner strip with shelves of 150 * 200 mm. A shorter side is put on the wall, a longer side is attached to the roof. Attached to the wall using fasteners depending on the material from which it is made (nails or screws, if it is wood, dowels, if brick and building blocks). The joint of the plank with the wall is passed with a silicone sealant. From the side of the roof, a bar is attached to the crest of the wave, installing special self-tapping screws with rubber washers. Their length is determined in the same way as when joining adjacent sheets of corrugated board (wave height + 20 mm for entering the sheathing board).
The second option is more laborious: a groove (groove) is made in the wall, into which an angular bar with shelves bent at 45 ° is inserted. The fastening in this case is similar, the difference in the dimensions of the strip - it can be 100 * 100 mm or so.
Pipe passage
Many questions arise when sealing the passage of a chimney pipe or ventilation through a roof made of corrugated board. Pipes are round and rectangular in cross-section, each type has its own solution.
For the passage of round pipes through the roofing material, there are special steel or polymer aprons. Their upper part is made in the form of a cone, the lower part is a skirt made of elastic material that can take a given shape. The apron is tightly put on the pipe, lowered so that the "skirt" lies on the roofing material. Next, you need to give the elastic skirt the shape of a corrugation. Use a hammer for this (normal or rubber - depending on the type of apron). So that water does not flow under the skirt, the joint is coated with sealant, well pressed.
After fixing the skirt, the neck is fixed. If the apron is metal, the top is covered with a clamp, tightened, the joint is coated with sealant. When using a polymer apron (master-flush), it is put on the pipe with a decent effort (sometimes it is even necessary to lubricate the pipe with soapy water), but the joint, nevertheless, for reliability, passes through with a sealant.
With a rectangular (brick) pipe, everything is somewhat more complicated. Elements are cut from metal sheets that close the joint with the roofing pie.

In the construction of cottages and summer cottages, such a practical and inexpensive material as roofing sheeting is often used to cover roofs. This material is available in different colors, so with its help you can give your home an attractive and unique look. The technology of installing a roof from a metal profile is quite simple, therefore, home craftsmen often undertake the work on laying the coating on the roof on their own. Consider how a do-it-yourself metal profile roof is mounted.
When choosing a material for installation on the roof, the owners always strive to choose the most reliable and, at the same time, affordable material. For example, if a metal profile is chosen as a coating, the roof will turn out to be strong and airtight, while the purchase of the material will be inexpensive.
And if the roofing work is also done by hand, then the arrangement of the roof will not greatly affect the family budget. Let's consider how you can lay profiled metal sheets on the roof with your own hands.
The main characteristics of the material
First of all, you need to decide on the choice of material, for this you need to find out what types of metal profiles for the roof exist, and what parameters you should pay attention to when choosing.
Steel profile sheets are manufactured in accordance with the requirements of GOST 380-71. For roofing, it is recommended to choose sheets with a corrugation height of at least 21 mm.
Moreover, the best option is considered a material with a profile height of 44 mm or more. The thickness of the steel base of the material for laying on the roof should be in the range of 0.4 -0.7 mm. It is better to choose a material that has a polymer coating.
Advice! A polymer-coated material should be preferred not only because it looks more attractive than conventional galvanizing, but also because the polymer layer protects the steel base well from external influences and, accordingly, increases the service life of the coating.
When choosing a material, you need to pay special attention to the dimensions of the metal profile for the roof. The width of the sheet can be from 75 cm to 1.15 meters, but the length should be chosen depending on the length of the slope.
If possible, it is recommended to lay the metal profile in one row horizontally, ordering sheets in length corresponding to the length of the slope, taking into account the width of the eaves. In the event that the slopes are long, then you will have to plan a two-row installation.
Preparation for installation work
When planning to use a metal profile for the roof, you will need to prepare well for installation: carry out waterproofing work, build a crate.
Roof waterproofing
When using metal roofing materials, roof waterproofing is included in the mandatory list of works. The fact is that condensation accumulates on the inner surface of metal coatings, therefore, in the absence of waterproofing, water will penetrate into the insulation and destroy the internal structures of the roof.
Advice! The use of roofing felt or roofing material as a waterproofing material is not rational, since these coatings will fail much earlier than the metal profile itself, and the roof will require repair much earlier.
The waterproofing film should be laid horizontally, spreading the panels parallel to the cornice. The material should not be pulled between the rafter legs, on the contrary, it is laid loosely, with a slight slack.
It is convenient to fasten the material to wooden structures using a construction stapler. The panels are laid so that they form an overlap at the joints with a width of at least 10 cm. They are connected together using double-sided adhesive tape.
Counter and lathing
In order for a gap to remain between the roofing and the waterproofing coating for free air passage, it is necessary to build a counter-lattice. It is made of bars with a cross section of 50 mm, which are nailed to the rafter legs with galvanized nails.
Next, you should proceed with the installation of the lathing. This point is very important, since the lathing is a structure that ensures the strength and reliability of the metal profile coating. Correctly assembled lathing prevents the covering from deflecting under the influence of wind or falling snow.
Advice! As a rule, large manufacturers of roofing materials offer customers installation instructions that detail the requirements for lathing. Therefore, if the roof is going to be a metal profile with your own hands, you must carefully study the manufacturer's recommendations.
In most cases, the lathing for a metal profile is assembled from a bar or boards with a thickness of 50 mm. The spacing of the elements depends on the slope of the slopes. On flat roofs, a solid flooring is assembled, if the slope of the slopes is more than 15 degrees, then a permitted lathing is made with a distance between the elements of 20-30 cm.
In the places where the inner corners are located, as well as at the chimneys and other vertical superstructures, a solid floor is assembled for the installation of shaped elements. A cornice board is nailed along the eaves, onto which special hooks are attached for laying the drainage gutter.
Laying and fixing sheets
After the base is prepared, the roof of the roof begins with a metal profile, that is, the direct laying of the sheets. Here are the rules for doing the job:
- Self-tapping screws 4.8 x 28 mm are used to fasten the sheets to the crate. Screws are screwed into the places of lowering the profile, that is, in those places of the coating where it fits snugly to the crate.
- When fixing the sheet in its lower and upper parts, screws are screwed into each lowering of the profile. On the sides, in places where adjacent sheets overlap, self-tapping screws are placed with a pitch of 50 cm. In the middle part of the sheet, the screws are screwed in, passing one wave, and placing the hardware in a checkerboard pattern.
Advice! In order for the sheet to be securely fixed on the base, it is necessary to use 7-9 screws for each square meter of the roof covering.
- Before laying the sheets on the covering, the internal roof extensions are installed. It is necessary to install cornice strips on the ends of the cornices, internal elements of valleys and abutment strips for pipes.
- The layout of the sheets on the slopes depends on the shape of the roof and the height of the ridge. On rectangular slopes, installation begins from the cornice, on triangular slopes - from the ridge.
- The size of the overlaps between the sheets depends on the slope of the ramps. On flat roofs, the overlap should be 25 cm, on those with an angle of inclination of more than 15 degrees, the sheets are laid with an overlap of 15-20 cm.On steeper slopes with a slope of more than 30 degrees, the width of the overlap should be at least 10 cm.
- Having finished laying the sheets, they begin to install the ridge elements. Then you will need to nail in the pediment strips and install the external elements of the abutments and valleys.
So, a metal profile roof is a practical and reliable solution for the roof of a house or an outbuilding. It is possible to mount a roof covering made of this material with your own hands.
The owners of private houses, when it becomes necessary to close the roof, the question of the choice of material arises. Many people stop at corrugated board, as it is of high quality at a relatively low price. In addition, the installation of a metal profile does not cause any particular difficulties. All work can be performed even by a non-professional. The main thing is to comply step by step with all the requirements put forward by the technology of using this roofing material.
Purpose and properties of the metal profile
Corrugated metal profiles are used for the construction of fences, facade cladding and roofing. It is made from sheet steel. At the final stage of production, the corrugated board is covered with a layer of zinc, as well as with a decorative protective compound, which significantly increases the material's resistance to mechanical damage and corrosion. The cold-rolled sheets are then fed into a special unit that squeezes out the waves. The service life of this building material is 25-50 years, which is much longer than that of ordinary slate or ondulin.
The standard thickness of the corrugated board is from 0.45 to 1 mm. Basically, this indicator depends directly on the thickness of the prepared sheet and the layer of paintwork. The standard width can vary from 0.646 to 1.2 m. The smaller width increases the maximum load as the profile height increases.
Marking
The marking of the corrugated board is determined by GOST 24045–95. It consists of letters and numbers. The letters indicate the purpose of the sheet, and the two numbers after the wave height. At the end, there may be several more numbers that determine the length of the sheet.
Table: marking and parameters of popular models of profile sheets
Material characteristics
To correctly calculate the required number of corrugated sheets, you need to know their dimensions and weight. The length of the sheets can be any, since this building material is produced by rolling.
When working with a profiled sheet, two different widths are used - general and working. The total width is the actual size of the material, and the working width is calculated as the total minus the size of the overlap on the adjacent sheet. For the installation of the roof, products with the following working width are most often used:
The strength of the universal corrugated board is practically the same as that of the carrier, but the cost is somewhat lower. This ensures the widespread popularity of this material. It is used not only for the roof, but also for sheds, fences and other purposes.
Wave height is an important parameter. Strength and material and its ability to withstand loads depend on it:
- for carrier sheets, it can reach 4.4 cm;
- at the wall - up to 2 cm.
The thickness and weight of the sheets also depends on the marking:
- "H" - thickness from 0.55 to 0.9 mm. The weight of one square meter can range from 7.4-11.1 kg;
- "NS" - thickness 0.55–0.8 mm and weight from 6.3 to 9.4 kg;
- "C" - thickness in the range of 0.55-0.7 mm, and weight - from 5.4 to 7.4 kg.
The service life of the corrugated board largely depends on the type of protective coating applied to its surface. Apply:
- Acrylic. It can withstand temperatures up to +120 ° C, but is not resistant to mechanical stress. Peeling off the paint can begin after three years.
Acrylic coated metal profile has a short service life
- Polyester. It perfectly tolerates mechanical stress and is suitable for all climatic conditions. Quartz sand is added to the coating.
Polyester coating increases the price of a metal profile due to the addition of quartz sand to it
- Plastisol. This coating rarely receives mechanical damage, but does not tolerate temperature extremes and ultraviolet exposure.
- Pural. Inert, it is not affected by chemical compounds. It perfectly tolerates large temperature changes.
Manufacturers assure that pural is able to maintain elastic properties even at very low temperatures.
- PVF2 (Polydifluorionate). Excellent UV tolerance. Does not lose color over time.
Polydifluorionad is the most expensive coating for corrugated board
Advantages and disadvantages
The metal profile differs from other materials in its practicality and versatility, therefore it is considered one of the best roofing materials for backyards and residential buildings. Main advantages:

One of the disadvantages is that during work a large amount of waste is created if a roof of a complex shape is erected. This is due to the need to adjust the sheets when laying. The main disadvantages of the metal profile are high thermal conductivity and loud noise during rain.... Additional heat and sound insulation is indispensable here. Otherwise, there will be constant temperature changes in the house, and the sound of raindrops will be clearly audible in any room.
How to choose a metal profile for a roof
When choosing a metal profile for a roof, some evaluation criteria must be followed. Particular attention should be paid to the following points:

When choosing a material, it should be remembered that roofing is a rather expensive process. It must be done once every several decades. Therefore, the purchase of a metal profile should be treated responsibly.
Calculation of a roof from a metal profile
For complex structures, it is best to use specialized programs. They are able to accurately calculate the amount of required roof material. For simple roofs, you can do the calculations yourself. You just need to use standard geometric formulas.
In calculations, you need to use not the total, but the working width of the corrugated board, which is calculated without taking into account the overlap on the adjacent sheet... To determine the total number of sheets, it is necessary to divide the slope length by the working width of one sheet. You need to round the result up, otherwise there may not be enough material.
When calculating, it is important to use only the working width of the corrugated board
It is necessary to observe the correct lateral and horizontal overlaps, which depend on the slope of the ramp:

Roof slope
According to sanitary norms and rules, as well as building codes, a profile sheet can be used to cover absolutely any roof, the slope angle of which is more than 7º. This will keep rain out of the self-tapping holes and joints.
For each roofing material, there is a minimum permissible slope of the slope, for a profiled sheet it is 7 degrees
Several years ago, the roof of the garage was covered with corrugated board. The slope was not monitored, it turned out to be almost flat. At the first rain, it began to leak, so I had to coat all the joints with resin. This suggests that such recommendations should be followed.
A value of 7º is the minimum for outbuildings. For residential buildings, this indicator should start from 10 o. If the roof is laid in two or more layers, then this threshold rises to 12 o. The maximum angle is practically unlimited. According to SNiP, an angle of 20 º is considered optimal..
Metal profile roof structure
Before purchasing corrugated board, you need to understand the structure and all the intricacies of the future roof. A cold roof is the most effective for utility rooms. But in residential buildings it is necessary to use insulation. Arrangement of a cold roof involves the use of:

For a warm roof, thermal insulation is used, which is placed between the rafters. Mineral wool is usually used. To protect the rafter system, a membrane is used that retains the flow of steam. The use of material like roofing material is unacceptable.
The roofing pie of the roof made of corrugated board consists of standard layers, arranged in a strictly defined order
The sheathing is an integral part of the roof. These are wooden boards, which are laid perpendicular to the rafters, and corrugated board is already laid on them. The lathing is attached to the bars of the counter-lattice, which creates an air gap necessary for ventilation of the roof. The use of a counter-lattice to create a ventilation gap is mandatory for any type of roof - both warm and cold.
To lay the crate, you need to know:
- The thickness of the metal profile.
- Slope angle:
- if the angle is less than 15 º, then it is necessary to use a solid crate;
- at an angle of 15 to 20 º, the lathing should have a step of 300–650 mm;
- a slope of more than 20º allows you to fix the boards every 1 m.
Video: installation of the crate
Calculation of the rafter system
When developing a project, you should complete the following steps:
- calculate the load on the roof;
- decide on the angle of inclination of the slopes;
- calculate the step between the rafters and the crate elements;
- make detailed drawings of the frame indicating the method of connecting all nodes.
The total load on the roof is calculated as the sum of the snow and wind loads in the region of construction and the weight of people who may be on the roof during its installation or repair. This calculation is described in detail in SNiP 2.01.07–85 * “Loads and Actions”.
The step of the rafters is usually chosen from 60 to 120 cm, depending on the width of the insulation.
The rafter system is the basis for the entire roof, therefore high-quality execution and strict design calculation are required
The calculation of the number of rafter legs is performed according to the following algorithm:
- The length of the slope is measured - l and the preliminary step - l1 is selected.
- The length of the ramp is divided by the selected step: l / l1 = q.
- The number q is rounded up and one is added to it. It turns out the number of rafters for one slope.
To get the exact step of installing the rafters, you need to divide the length of the ramp by the resulting number. This calculation is carried out for each slope separately.
Calculation of the metal profile for the roof
As an example, let's give a calculation for the most common gable roof:
- We measure the width of the material. Let's say the total width is 1190 mm, and the useful width is 1100 mm.
- We measure the width of the slope. Suppose the gap between the first and last rafter legs is 11.67 m.
- We calculate the number of sheets: 11.67 / 1.1 = 10.61≈11. You will need 11 sheets to cover the roof.
Most often, a metal profile is used as a roofing material, the length of which is up to 6 m. This is due to the ease of delivery and installation. If the length of the slope is longer, the sheets will have to be stacked in several rows, which must be taken into account when calculating.
How to make a roof from a metal profile with your own hands
Installation of a metal profile is a fairly simple process. To do everything correctly, you just need to know certain features of the material used and the main recommendations for handling it.
Required tools and materials
Before starting work, you should prepare all the necessary tools, as well as materials. To create a roof you will need:
- saw;
- drill;
- measuring tool;
- pencil;
- fine mesh lattice;
- self-tapping screws 4.8x38;
- screwdriver;
- hammer;
- hacksaw for metal;
- balloons for tinting sections, abrasions;
- long hooks;
- jigsaw;
- drill with ratchet clutch;
- nails (25 mm);
- wooden blocks;
- boards;
- waterproofing material.
Sequence of work
Before laying the corrugated board, it is necessary to fix the eaves and install the brackets for attaching the gutters. Directly the roof must be installed from the bottom left. Each subsequent sheet fits under the last wave of the past.
Subject to the scheme of laying sheets, the roof will turn out to be reliable and airtight.
Fixation should be carried out using self-tapping screws:
- the first and second row - in every second lower wave horizontally;
- the third row - after two waves, then the order is repeated;
- vertically, self-tapping screws must be screwed in every 35–40 cm;
- if you have to lay several horizontal rows, then in the overlap places it is necessary to fasten each lower wave.
Roofing screws with a size of 4.8 x 28 mm are taken as standard. They should be twisted at right angles to the plane of the crate. The tightness of screwing should be such that the polymer spacer is slightly compressed.
The bottom row of sheets should protrude slightly beyond the cornice, by about 4–5 cm. Screws should only be screwed into the lower parts of the waves.
The order of stacking sheets:
- The first sheet of corrugated board is lifted to the roof with the help of a rope and other people, and the master on the roof accepts it.
Sheets should be lifted with a rope to keep people from underneath safe
- On the skate, a rail is laid across it, which is called a control one. When laying sheets of material from their edge to it, there should be 6 cm of free space.
The control strip makes it easier to lay the sheets straight
- The first sheet of corrugated board is aligned in accordance with the end and eaves of the roof.
It is necessary to accurately align the first sheet, since the slightest skew will lead to large discrepancies in the future.
- If the length of the sheet is enough to close the roof slope completely, it is fixed with self-tapping screws immediately.
On a tightened self-tapping screw, the gasket will collapse over time
- The second sheet of corrugated board rises to the roof and fits in the same way as the first, but with an overlap on the previous one in one wave. Fixation is done in the same way.
- The rest of the sheets are installed in the same way until the slope is completely sewn up.
If the length of the sheet is enough for the entire slope, then it is simply fixed with self-tapping screws equipped with seals. If the length is not enough, then the laying will take place one by one. First, the first three sheets are screwed on, but the fixation must be weak until accurate alignment. Only after the final alignment is the corrugated board securely screwed on. The first three sheets are placed in the first row, the second two - in the second, one more - in the third. Then, on all rows, one sheet is added until the ramp is completely closed.
Features of complex roof covering
Difficult areas usually have interior corners. Such elements are called valleys. The vents, chimney junction and slope joints are also difficult places. Internal joints must be carefully sealed to eliminate the possibility of moisture penetration. In such areas, the crate should be solid..
All difficult areas must be carefully sealed to prevent water from entering under the roof
Installation of the valley:
- First, at the installation site of the valley, additional bars are installed in order to make the crate solid. Before laying the valley, additional waterproofing must be done in this place.
- A waterproofing tape is laid on top of the roofing membrane in the valley, which should be 5-10 cm wider than the lower plank of the valley. Sometimes special self-adhesive waterproofing tapes are used, but most often they are simply fastened with nails to a continuous roof sheathing.
The lower valley is fixed according to the following scheme: 1 - waterproofing membrane, 2 - adhesive sealant, 3 - self-adhesive tape-fixing, 4 - valley strip, 5 - corrugated sheet
- After laying additional waterproofing at the junction of the roof slopes, the lower valley strip is mounted. When the roof slope is small, it is better to use an oversized plank. If the usual valley strip has a width of 300 mm on each side, then it is doubled more.
Endova protects the place of the future joint of roofing sheets
- Before installing the valley, measure the length of the inner joint of the slopes. The lower planks of the valley must be cut in such a way that they overlap each other by at least 150-200 mm. If the slope of the roof is small, the amount of overlap can be made even larger.
- Installation is started from the bottom section, and each subsequent plank overlaps the previous one. It should be borne in mind that when laying the corrugated board, the sheets will need to be launched onto the valley bar, not reaching its axis of approximately 50 mm.
The corrugated board is laid over the lower plank of the valley
- After the installation of the covering sheets, the installation of the upper valley is carried out. It performs mainly a decorative function, covering the edges of the corrugated sheets in the place of their trimming along the axis of the valley. Particular attention should be paid to how to fix the valley over the profiled sheet. Considering that the upper plank of the valley is much narrower than the lower one, its through fastening to the lathing can break the tightness of the lower plank. To avoid this, the top plank of the valley can be fastened to the cover sheets with rivets.
Video: instructions for installing corrugated roofing
Self-tapping screws for roofing
For fastening the metal profile on the roof, self-tapping screws are usually used, which have rubber seals. With their help, it is possible to completely seal the holes formed during fastening. Rainwater will not be able to penetrate under the roof.
It is necessary to use only special self-tapping screws intended for roofing work.
Self-tapping screws for profiled metal have a special head at the end of the rod. The EPDM gasket not only protects against water penetration, but also prevents corrosion from spreading.
At the beginning of the thread, a drill bit is installed on the self-tapping screws. This allows quick installation without any additional tools. All fasteners are produced with a paint coating, which makes them invisible and resistant to corrosion.
Metal profile roofing elements
After installing the profile sheets, you should start installing the ridge. First you need to attach a special protective pad with nails. The skate itself should be fixed through one wave of the sheet.
The ridge should be mounted on a special substrate
The ends are fitted with plugs to prevent moisture ingress. The minimum overlap of the ridge strip is 15 cm.
Compliance with the step of fasteners and overlap will not allow water to penetrate into the roof
At the exit point of the chimney, abutment strips are usually attached. They are made independently or purchased ready-made.
Chimney junction strips are a mandatory element of the roofing
Installation for a square chimney takes place in the following sequence:

Adjoining round chimneys is easier. For this, special penetrations are used:

Snow guards can be installed in different ways. Lamellar ones are attached to the wave, corner ones are attached in the same way, but only along the upper edge, and the rest are attached through the wave.
For snow guards, it is imperative to use special fasteners
For fastening, use a through hole through the roof and lathing.
Facing the gables
The gable is the end part of the roof, which is made in the form of a triangle or trapezoid. Before starting the finishing, it is advisable to make a sketch where the exact dimensions will be painted.
The number of sheets should be calculated as for the roof, that is, taking into account overlaps. For calculations, only the working dimensions of the material are taken.
When facing the gables, it is imperative to leave a gap for the linear expansion of the material.
Around the entire perimeter of the pediment, a gap of 1 cm should be left if the finishing takes place in the summer, and 0.5 cm if in the winter. This is required to compensate for linear expansion from temperature differences.
Roof ventilation from corrugated board
Ventilation is necessary in order to reduce the amount of condensation on the inside of the roof covering. Metal is especially prone to condensation, so great attention should be paid to ventilation in corrugated roofs.
To create air exchange, the waterproofing must be laid so that it does not reach the middle of the ridge by 5 cm. Instead, a seal is placed under the ridge. Holes with a diameter of up to 10 cm are made in the cornice every 1.5–2 m. Natural ventilation occurs due to the temperature difference: cold outside air enters from below and squeezes out the warmer air from the under-roof space due to its higher density. This is how cravings are formed.
Air enters the under-roof space through the vents in the cornice, passes through the ventilation gap created by the counter grill, and exits through the holes in the ridge element
The formation of condensation cannot be prevented in any way, but its amount can be significantly reduced. Ventilation performs several important tasks:

If the ridge and eaves are not enough, condensation will continue to form in large quantities. We'll have to install additional elements - aerators. They need to be placed evenly over the entire roof surface, increasing the number in the upper areas and near the valleys.
The fixing of the vent must be carried out with roofing screws.
On pitched roofs, the area of the vents should be three hundredth of the entire slope. If there are more slopes, then the ventilation holes are made in the same number on each.
If the under-roof ventilation system cannot cope with the formation of condensation, additional aerators must be installed
Errors in the arrangement of the roof
When installing a roof from a metal profile, non-professionals may encounter errors that ruin the whole work. You should know them in order to prevent them. Major violations:
- Incorrect material calculation.
- The choice of a low-quality metal profile.
- Installation errors:
- improper styling. If at the very beginning small gaps are allowed, then at the final stage there will be huge inconsistencies. If the metal profile sheet has unequal lateral edges, the smaller one must be placed at the bottom;
- skewing can happen during the installation of the next sheet if you step on the previous one;
- work must be carried out under suitable weather conditions. This is especially true for wind and precipitation.
Features of operation
Processing the rafter system will not allow bugs and mold to start in it
When re-painting the corrugated board with high-quality paint, you can extend the service life for many years
Metal profile roof repair
If moisture begins to seep into the room, then you need to very carefully check the entire roofing surface. Find out how securely the fasteners are tightened and tighten them if necessary. If this does not give any results, you need to perform other operations:
- sealing or covering small scratches and cracks with mastic;
- cleaning, priming and coating with bituminous varnish of places where rust has appeared;
- elimination of small holes in the roof with tow and bitumen mastic;
- elimination of medium holes using burlap or roofing felt patches and bitumen mastic.
If this is not enough, then a complete overhaul will have to be performed. It includes dismantling, as well as replacing metal-profile sheets. This is a very time-consuming process, since there is a possibility that other structural elements, for example, rafters, will need to be changed. Overhaul should be carried out in compliance with the following rules:
- all wooden parts must be impregnated with an antiseptic;
- you can not install corrugated board in strong winds;
- when constructing a roof made of corrugated board, it is necessary to provide a layer of sound insulation;
- the roof must have a lightning rod.
Video: quick roof repair
When choosing a roof covering, it is necessary to focus not so much on the cost of the material, but on its operational, technological and technical indicators. Only a combination of all these characteristics will make it possible to create a reliable and high-quality roof. One of the materials, whose popularity is growing at an incredible pace, is the metal profile for the roof. It is distinguished by its durability, reliability and external beauty.
- by material of manufacture;
- along the width of the profile;
- by the size and shape of the corrugation;
- by appointment.
Currently, metals such as aluminum, copper, galvanized steel, and zinc-titanium alloy are used for roofing. The most common of these is galvanized steel roofing sheet. This material is strong, flexible, easy to work with, and relatively inexpensive. It can be used to mount roofs with different geometries. Sheets are made of cold-rolled steel and processed by hot-dip galvanizing. The zinc layer serves as a reliable protection against corrosion.
To increase the rigidity of metal sheets, they are profiled, that is, they are given a wavy shape. The size and shape of the “waves” may vary.

The metal profile for the roof is lightweight, durable and resistant to adverse weather conditions
There are the following types of profiled roofing sheets:
- the profile of grade C has a sinusoidal and trapezoidal waveform with a height of 8-44 mm, it is most often used for arranging light roofs;
- the NS profile has a wave height of 35-44 mm;
- profile of grade H has a wave height of 57-114 mm, is equipped with additional stiffeners, can be used for a permanent roof.

It is better to use sheets with a wave height of more than 18 mm as a material for the roof.
Laying of profiled sheets depending on the angle of inclination of the roof
To carry out the correct installation of the roofing profile, it is necessary to take into account the angle of inclination of the roof, since this indicator will affect the amount of overlap of adjacent sheets:
- when the slope is within 12-15 degrees, the overlap of the sheets should be at least 20 cm;
- with a slope of 15-30 degrees, an overlap of 15-20 cm is provided;
- if the slope of the slope is more than 30 degrees, then it is allowed to reduce the overlap to 10-15 cm;
- with a slope of less than 12 degrees, horizontal and vertical overlaps must be sealed with a special silicone sealant.
Preparatory work before installation of a metal profile roof
The installation of profiled roofing sheets should be started with a waterproofing layer, which will prevent the penetration of moisture onto the battens and insulation. The waterproofing membrane is laid horizontally starting from the eaves. It is fastened with an overlap of about 15 cm.
The metal profile must be installed on the crate, which is designed to provide the necessary structural strength, preventing fractures and deflections from the wind or under the weight of snow. The lathing for sheets with a trapezoidal profile can be made from a bar of 50 by 50 mm, 30 by 70 mm or 30 by 100 mm with a rafter pitch of 900-1200 mm. The manufacturer's instructions for roofing materials may contain more accurate dimensions for the thickness of the battens.

First, they make a crate on which the sheets of the metal profile will be attached
Next, a cornice strip and end boards are installed, which are fastened with self-tapping screws. The eaves should be below the vapor barrier. The end plate is attached to the wave height of the metal profile, that is, above the crate. Under the valley, it is necessary to arrange a dense boardwalk, diverging on both sides of the gutter by 60 cm. The bottom strip of the gutter is nailed with temporary nails, and finally fixed together with the installation of the metal profile.
Important!
When laying flat roofs at the joints of the gutter, the use of sealing mastic is additionally provided.
Before installing a metal profile roof, it is also necessary to calculate how many profiled sheets will be needed to cover the roof. To do this, you need to measure its perimeter and the length of the slopes. The ideal option is when the sheets correspond in length to the slope. This will improve the waterproofing properties of the roof, as well as significantly reduce the complexity of installation.

Laying of short profiled sheets is performed in order in a horizontal direction, starting from the bottom
Basic installation rules
- Installation should start from the bottom corner of the roof. Profile sheets are overlapped and attached to the wooden crate with self-tapping screws.
- On gable roofs, the installation of the profile should be started from the right end. On hip roofs - from the middle of the hip.
- The profiled sheets are equipped with a drainage groove, which must always remain at the bottom during installation.
- When laying, the sheets are aligned not along the joint, but along the overhang.
- When installing corrugated board with a thickness of less than 0.7 mm, it is advisable to use structures such as skis or wooden platforms. This will prevent the formation of dents and other signs of deformation.
How to fix metal profile sheets
- The sheets are attached to the crate in the places of their tightest fit, that is, between the waves.
- On the extreme sections of the roof (near the ridge and near the cornice), fastening must be done in each "depression". This is done to ensure a more reliable fixation, since it is at these places of the roof that the strongest wind loads fall. In the middle of the slope, you can fix the profile, skipping one gap.
- At the edges of the roof, the profile is fastened to each lathing bar.
- In order for the adjacent sheets to adhere more tightly to each other, it is necessary to shift the attachment points in the abutting waves by 5 mm. On the upper sheet along the slope, this should be done in the direction of the overlap, on the lower sheet - in the opposite direction.
- In problem areas, for example, where the sheet is adjacent to various roofing elements (walls, chimneys, ventilation shafts), you need to use abutment strips.
- To connect the extreme flanges of the profile, it is better to use combined rivets with a diameter of 3.2-6.5 mm.

The thread length of the self-tapping screw must exceed the height of the parts to be joined by 0.5 cm or more
Important!
In no case should you use nails instead of self-tapping screws. Firstly, there will be a significant increase in the chance of the roof covering tearing off in case of wind gusts. Secondly, one can only dream of tightness - water will seep in the places where nails are hammered.
Failure to comply with all of the above rules for the installation of a metal profile roof can lead to a violation of the integrity of the coating and a reduction in its service life. In order to prevent this and not to engage in frequent repairs, you can entrust the installation of the metal profile to professionals who know all the subtleties and nuances of this work.
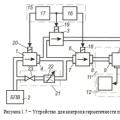 Automation of control of the tightness of the purge valve of the gas manifold of boiler plants
 Useful information about installing air conditioners with your own hands
 Site drainage project: selection of location, slope, depth, drainage system elements