Laminate in the kitchen: pros and cons: should it be laid on the kitchen floor? Laminate for the kitchen - is it worth it? How to put laminate flooring under kitchen cabinets
The kitchen is one of the most important parts of any home. For every housewife, it is important that the kitchen is comfortable and functional. In addition, an important point is the floor surface of the kitchen area, which constantly requires care and cleaning. It is important that the floor surface withstands moisture well and is easy to wash off any dirt. One of the most popular and fashionable coatings of this century is a laminated board, or laminate.

Peculiarities
Laminate is used in construction and renovation not so long ago, but is one of the most popular flooring. This is not surprising, because the floor covered with laminate looks quite aesthetically pleasing, and the variety of shapes and colors of laminated boards allows you to choose the right option for any interior.

Laminate is considered a natural product, as 60% consists of wood, namely pressed sawdust. This material is a good alternative to expensive parquet, it allows you to significantly save the family budget without compromising the beauty of the interior. Laminate flooring is chosen by those who appreciate environmental friendliness and naturalness for a reasonable price.

Advantages of moisture resistant laminate
If you decide to choose laminate flooring for your kitchen, then you should pay attention to those models that are resistant to water. Laminate for the kitchen has many options for shapes, colors and sizes, but each of them has increased strength, is not afraid of bumps and scratches, it is easy to clean, it does not leave streaks and stains.

A kitchen with laminate flooring looks cozier, wood is much warmer than ceramic tiles, and much more pleasant to walk on. This is an important factor for families with small children. Laminate can imitate absolutely any type of wood, you can also opt for a board that repeats the pattern of natural stones. In this case, the laminate is very similar to the tile. Special fans of laminated boards can even afford to put a laminate backsplash that will look like ordinary tiles.

Flaws
Despite the large number of advantages, laminate for the kitchen has some disadvantages. Like any tree, laminated board does not like moisture. Modern laminate models are well protected from moisture with a special coating, but water that has got into the joints between the boards is still a danger to the floor. The most annoying thing is that you may not notice the spilled water and will not be able to control its entry under the laminated sheet.

Many argue about the safety of laminate flooring in the kitchen, as it contains formaldehyde. These substances can accumulate in the body, resulting in serious consequences. But this applies only to cheap boards, where the manufacturer does not pay due attention to the environmental friendliness of its products.


The reason to refuse laminate flooring in the kitchen may be its sonority. If you drop something on the floor, the noise from the falling object will be very loud. That is why it is recommended to lay the laminate on a sound-absorbing substrate. More expensive materials are immediately equipped with a sound-absorbing effect.

All the pros and cons of laminate flooring will help you decide what to put on your kitchen floor.

Varieties
classic tree
The name of the laminate speaks for itself. This type of laminate resembles the structure of wood, has a smooth surface. For greater naturalness, manufacturers apply small cracks and depressions to the canvas, which are more reminiscent of a natural wooden surface.

As a rule, a classic wood-colored laminate has a matte surface that does not slip, looks quite simple, but tasteful. If you prefer rigor and conciseness in the interior, then this laminate model is ideal for your kitchen.

aged tree
Natural wood tends to age and lose its attractive appearance and whiteness. If you are a fan of retro style, and your interior matches it, then feel free to choose a laminate in the form of aged wood. This flooring has smoothed scuffs, uneven color, characterized by the effect of faded paints.

The laminated canvas is made for an amateur, as few people want to lay the “old” laminate in their new fresh kitchen. But, nevertheless, there are many gourmets who are delighted with boards of this type.

Glossy surface
Laminate with a glossy surface looks incredibly attractive. The kitchen floor, covered with a glossy laminated board, immediately falls in love with it. Glitter is present not only on the floor, but throughout the room. Glossy laminate resembles a wooden floor, which is richly and carefully varnished. On the surface, it may seem that this type of floor is slippery, but it only seems so. You may not be afraid that you or someone from your family will slip on the floor.

Glossy laminate requires special care, it must always be perfectly rubbed, otherwise every stain will be very noticeable on the surface and spoil the whole good impression.

texture surface
Laminate for the kitchen with a textured surface is a board with clearly visible lines and depressions that are inherent in natural wood. Stepping on the surface of the floor, you will feel a certain relief that will remind you of natural wood. Such a laminate is considered quite useful and has a positive effect on the human nervous system. Surprisingly, such a part of the room as the floor is able to restore emotional balance when you walk on it barefoot.

Relief
A laminate with a relief surface is somewhat reminiscent of textured models, but in this case, manufacturers do not set themselves the goal of reproducing the wood pattern. The laminate only has a slight roughness along the entire length of the chamfered board. This texture is quite pleasant to the touch, you want to step on the floor and walk on it barefoot.

Shea tree
Butterwood effect kitchen laminate has an even and smooth texture. When stepping on such a floor, you will not feel any protrusions and roughness. Outwardly, such a floor is a matte surface, which was carefully treated with drying oil. It may also seem to someone that instead of a laminate, linoleum is laid on the floor, so not a single hole and time are visible on it.

waxed surface
This type of laminate resembles waxed boards. Such a floor radiates incredible inner warmth, and the kitchen becomes unusually cozy and comfortable. Waxed laminate most often looks like solid solid boards spread from the beginning to the end of the room.


Country
Laminated boards of this type are great for kitchens in country houses, where everything natural and close to nature is valued. And gender should be no exception. Country-style laminate resembles wooden boards that have been lightly planed. The floor has a slightly embossed surface. The pattern of such a laminate is a tree, on which traces of knots and cracks are visible.

How to style
Laying laminate flooring can be done by hand without the help of specialists. Your main task is to follow all the recommendations specified in the instructions. To lay the laminate on the floor, it is necessary to level the surface well so that no depressions subsequently form. To do this, you can use a concrete screed, the thickness of which depends on the angle of the drops on the floor.

After the concrete surface is completely dry, it is worth laying it with a special substrate that will absorb noise and serve as additional insulation for the floor. After that, the process of direct laying of the laminate begins. It is best to start laying from the far corner of the kitchen, moving towards the exit.

The emergence of new modern moisture-resistant types of laminate has made it possible to widely use this material and give a positive answer to the question of whether they put a laminate in the kitchen. A feature of different types of moisture-resistant laminates is that they differ in their characteristics and parameters - this provides for various laying methods.
In many cases, to obtain a quality result, it may be necessary to level the floor in the kitchen. When deciding whether it is possible to lay the laminate on the floor on your own, it should be noted that laying the laminate in the kitchen with your own hands is not an extremely difficult task if you use the advice of specialists and do the work without disturbing the process.
Laminate for the kitchen
When deciding whether it is possible to lay a laminate in the kitchen, two types of it are considered: moisture resistant and water resistant.
Moisture-resistant laminate differs from the usual one in that its edges with locks are covered with a special water-repellent wax composition, and an additional protective layer is applied to its surface.
A high-quality moisture-resistant laminate of well-known foreign brands can withstand being in water for about 6 hours without losing its performance.
Moisture-resistant laminate is suitable not only for the bathroom and hallway, but also for the kitchen
When deciding whether or not to put laminate in the kitchen, many opt for a water-resistant look that has a wider range of performance. In addition to the standard type on locks, a wide range of modifications is produced in the form of thin flexible plates with a thickness of about 4 - 5 mm. Waterproof laminate plates can be mounted on the floor in several ways:
- standard lock connection;
- gluing to the floor surface;
- laying panels on a finished substrate, partially protruding beyond their dimensions;
- installation of the floor on the adhesive coating of the panels themselves.
How to install laminate flooring in the kitchen
Do-it-yourself laminate flooring in the kitchen is considered one of the easiest construction jobs. This requires the simplest tool in the form of a square, pencil, hacksaw or jigsaw for cutting sheets, pegs may be needed to step back from the walls.
When buying for living rooms, material of class 31 and 32 is selected, class 33 is used in the corridor and in the kitchen.
You should not pre-purchase a laminate, it is better to do this a few days before laying. The fact is that in the room where the repair is being done, there may be increased humidity from plastering or painting work, the laminate can absorb this moisture and lose its properties.
The laminate should be laid in compliance with the expansion joint: a distance of 10 mm must be retreated from the wall.
It is possible to lay the laminate in a run-up with the plates offset by half the length (two-row laying), one-third (three-row), and a quarter of the plate length (four-row), three-row breakdown is mainly used.
Laying the laminate in the kitchen with your own hands should be done along the direction of the light, this makes the seams invisible.
Often laminated panels have a repeating pattern, so when laying it is desirable to distribute them so that there are no repetitions nearby.
Metal hammers should not be used to compact the panels, a rubber mallet is usually used. Also, do not hit with a hammer along the edge of the lock; for this, a special flat closer is used, through which tamping is performed, or a laminate board is trimmed.
Particular attention should be paid to the substrate, the cheapest option deforms over time and in the kitchen the laminate moves away from the floor, the more expensive cork substrate is better.

The underlayment is an important element for laying the floor, which is not worth saving on.
Before laying the laminate in the room, it is necessary to measure its width. If the last row is less than 5 cm, then the first row from the wall is cut off. It is clear that this rule does not have to be observed if the last stacked row in the kitchen or room is completely covered with furniture.
To firmly fasten the panels near the wall, a special z-shaped clamp is used (you can do it yourself by bending the edges of the metal plate in opposite directions). When sealing the joints of the plates, one of its ends rests against the edge of the plate, the second is knocked out with a hammer.
It is not necessary to lay the plates in the traditional way - in parallel rows, you can lay the laminate beautifully and aesthetically in a herringbone pattern.
Laying laminate with glue
To work, you will need a toothed comb with a pitch of 3 - 5 mm, a paint knife, a durable rubber roller that you can press hard on.
Waterproof vinyl laminate in the kitchen is most often made in the form of thin sheets with a thickness of 3 - 5 mm. To glue it, the adhesive composition is applied to the floor surface with a notched trowel.
Laminate can only be laid on a primed surface. This is useful in terms of better adhesion and reduced adhesive consumption - otherwise it will be absorbed into the porous, unprimed screed.
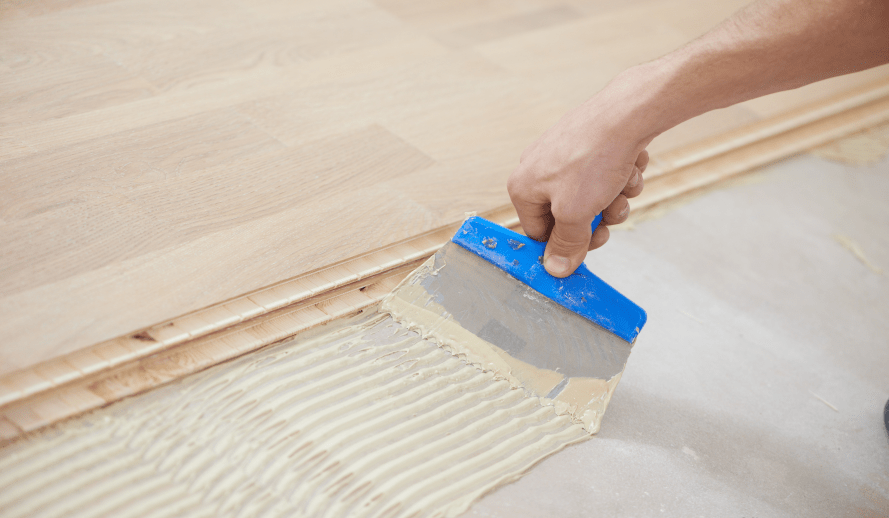
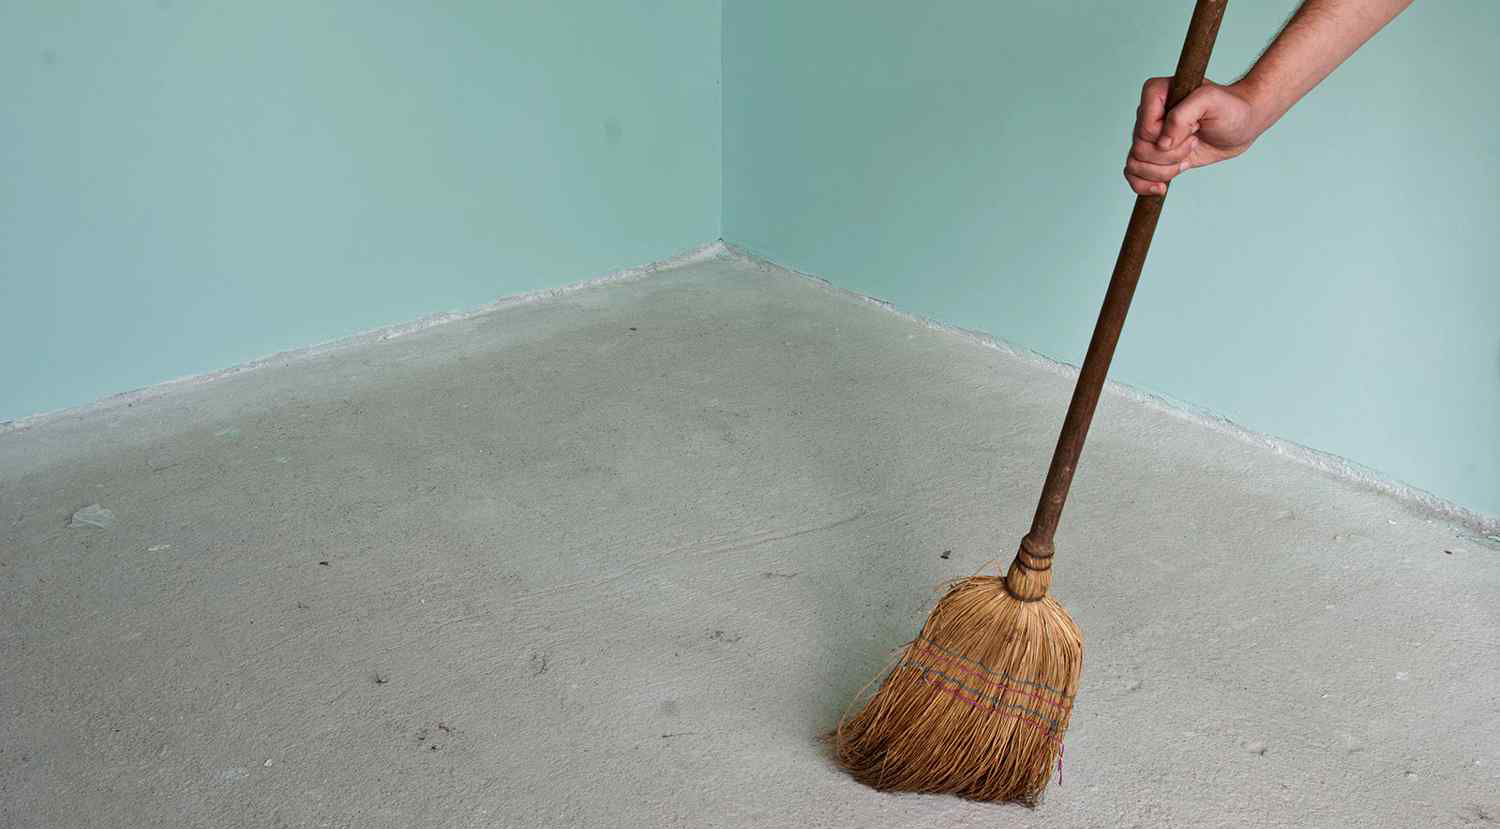
Before laying the laminate on the adhesive - it is necessary to carefully prepare the surface
As with laying linoleum, when the smallest pebbles get under the surface of the sheet, a bump may appear over time - this will lead to accelerated wiping of the laminate in this place. Therefore, before applying the adhesive, the surface should be cleaned with a vacuum cleaner.
Vinyl laminate is cut with a simple paint knife and breaks at the cut point, no additional tools are required for this.
Manufacturers recommend pressing the surface with special rollers of 50 - 70 kg when laying. This is unrealistic to achieve at home with self-laying, so a durable rubber roller is used, with which the sheets are rolled with effort.
Before putting the laminate closer to the wall or near the pipes, it is necessary to lay out the sheets on a dry one and cut them, otherwise, when approaching the wall or pipes, extra time will be spent on cutting and the glue will dry during this time.
Before laying laminate flooring, also make sure your floor is even.
How to level the floor in the kitchen
The most important condition for high-quality laying of a laminate is the presence of a flat surface. If the kitchen has a poor-quality screed with height differences of more than 5 mm, then when laying a standard laminate with locks, it will move under load, the seams may deform and disperse over time. This is especially unpleasant when laying a moisture-resistant floor, the most demanding on the state of the seams.

Moisture resistant laminate will require special attention when laying it.
The most commonly used methods for leveling the screed are applying a new screed or filling the floor surface with a self-levelling leveler.
In both cases, the height of the kitchen floor will increase, and with the subsequent laying of a standard interlocking laminate, the floors in the hallway and in the kitchen will not match in level, which is unacceptable.
The best option for solving this problem may be to abandon the standard type of floor with a thickness of 9 - 12 mm. With a backing and replacing it with a thinner waterproof quartz-vinyl laminate. Its thickness is 4 - 5 mm., This will allow you to fill in a self-leveling screed with a thickness of 5 - 7 mm. and level the floors of the kitchen and corridor with laminate and underlayment with a total thickness of 9 - 12 mm.
The price of a waterproof laminate is much higher, but considering that the area of a standard kitchen is usually small, and in return you will get an eternal floor (34 or 43 strength class) that does not burn (traces of cigarette butts and matches do not remain on it). Given that such a floor is not subject to impact loads (hammer blows do not leave marks) and most chemicals, the economic costs in this case can be justified.

Waterproof laminate flooring is not only practical in high humidity areas, but also durable.
Not everyone will be able to fill the self-leveling well for the first time, in extreme cases, you can find a specialist: the work of filling the kitchen will take no more than half an hour and will not require large material costs for payment.
Moreover, for high-quality pouring, a construction mixer and a needle roller on a long handle, a notched trowel, and a trough for mixing the mixture are required.
Another important factor is the exact calculation of the amount of mixture needed to fill the layer of the required thickness.
To do this, there is a very useful program on the Internet called "calculator for calculating the self-leveling floor." The thickness of the floor and the area of the room are entered into it, the name and brand of self-leveling from a different manufacturer are also selected, as a result we get the amount of the required dry mix in kilograms.
Filling the floor in the kitchen with your own hands

Filling the floor can be a time consuming process if you do it yourself.
Before applying the self-leveler, it is imperative to prime the floor surface (it is advisable to do this twice, adding more water during the first primer), and allow it to dry in accordance with the instructions for the primer.
A waterproofing edge tape should be glued around the perimeter of the room (you can use a rubber damper tape for a drywall profile), it will perform two functions: it will create the necessary expansion joint and prevent the self-leveler from flowing into the cracks at the corners of the floor.
After kneading the mixture with a mixer in a trough strictly according to the instructions on the package (in many cases it is too thick and you can add a little water), it is poured onto the floor and leveled with a notched trowel. Then the surface is rolled with a spiked roller, it must be done with smooth movements (otherwise the drops will fall on the wall) for no more than 10 minutes.
To prevent the self-leveler from getting on the surface of the walls, you can paste over them with newspapers or paper using masking tape, you should also roll the needle roller from the wall.
When working, it is desirable to roll out the entire surface of the floor at the same time, in a large room for this you will have to walk on the floor in order to reach the far walls or corners. For these purposes, special construction shoes with spikes are sold, but you can make a home-made version or work in rubber boots.
This is what it looks like kitchen 6 square meters before laying the laminate. Linoleum on the floor in two layers (as it seemed at first glance). There is a wooden Soviet plinth along the perimeter. The service life of the floor covering is about 20 years. Here is the quality! Now what are they producing?
Removed three layers of linoleum. The first two layers are soft, the last layer was hard and easily broken by hand. Under three layers of linoleum, I discovered Soviet bituminous mastic - tar. A unique, versatile adhesive from the rise of the Soviet empire. The ecology of the room is fragrant when it enters the nose.

I put things in order with the environment - I quickly close the bitumen with a natural coniferous substrate.
I put the coniferous substrate without a gap. I stick it with tape of my choice.

Of furniture in the kitchen refrigerator and sink. When laying the substrate, I move the refrigerator forward and backward.
The "built-in" sink in the kitchen will "please" any master of laminate flooring. Built-in wardrobe, bulky kitchen - this is not a problem. I don't think about how to lay the laminate - I put it on any obstacle. The presence of built-in and non-movable furniture elements does not scare me.
I begin to lay the laminate in the kitchen from the wall, where the sink and gas pipe are located. In this case, this method of laying laminate is optimal, as it allows you to bypass the cabinet with a sink without difficulty.
The wall tiles are thicker and protrude forward. When laying laminate, this creates a problem. It is inconvenient to fasten the last board. You have to twist your arms and strain your brain.

To correctly cut the laminate in the sink area, you must first measure seven times. Etudes for measuring lines for cutting.
View of the laminate from above. Difficult areas in the kitchen completed. Ahead is a flat regular laying.

Door pillars (frame) are not bypassed with laminate. Why? When bypassing the laminate, you must leave a gap. The gaps between the box and the laminate create the appearance of a damaged floor. The holes don't look nice and are terrible. Therefore, over the years, laminate has been taught to move under the box. Previously, the door frame is reduced by a height equal to the thickness of the "pie" of the floor. As a result, I create the effect of installing a door on a laminate. Looks beautiful. The hand of the master of laminate flooring is visually felt at work.

The photo of the second section is the left side of the door.

Three more photos of how to slip the laminate under the box.

I lay the electric wire (parallel connection of sockets) behind the baseboard. The location of the two sockets in the photo can be clearly seen.

With the owner, we bring a gas stove. I screw the hose connection to the gas stove. We put the refrigerator in its usual place.

On this page, I tried to tell as much as possible about my experience, how I laid the laminate in the kitchen of 6 square meters. I do not recommend laying down the laminate on your own! It's easier to hire a master laminator!

Thanks to the efforts of developers and manufacturers of flooring, modern laying of laminate in the kitchen does not present any particular difficulties even for beginners. You just need to follow the recommendations for preparing the base and strictly follow the sequence of assembling the lamellas. And you will also need a good tool, time and great patience, since assembling a laminate in a kitchen is still different from working in a residential area.
How to install laminate flooring in the kitchen
There is one feature of laying laminate in the kitchen with your own hands. The kitchen room differs from living rooms in its humidity and regular sanitary cleaning of the floor covering. The most important thing that scares and stops apartment owners from laying laminate flooring in the kitchen is the possibility of a flood due to a spill of water from a washing machine or a breakthrough in a water main. Water flows into the joints, and the expensive flooring in the kitchen turns into unusable trash.
Therefore, laying the laminate in the room is performed in two ways:
- Adhesive laying. In this case, a moisture-resistant type of laminate coating is used. When laying the slats on the kitchen floor, the ends are smeared in the lock joints with a sealant or a special elastic adhesive mass. As a result, a coating is obtained in the kitchen that can withstand a small and short-term spill of water;
- Use of waterproof laminate. All preparatory procedures and laying the flooring itself are no different from installing laminate in living rooms. The tightness of the coating is ensured by the characteristics of waterproof lamellas and a special lock device.
For your information! Waterproof brands of laminate are much more expensive than moisture-resistant ones; when choosing a coating, pay attention to the class of the material. Waterproof coatings start at grade 32.

Such a laminate coating in the kitchen, according to experts, can withstand for 20-30 minutes. a layer of water up to 5 cm, provided there is no mechanical load. If at this moment you do not walk on a waterproof laminate, then there will be no leaks, and half an hour will be enough to collect water from the laminate in the kitchen.
How to choose the right material for laying in the kitchen
The difference in cost between two different types of laminate is quite significant, and if you use branded brands for installation, it is quite possible that for the price paid for a waterproof laminate for the kitchen, you can install two or three rooms.
It is quite possible to choose moisture-resistant laminate brands for laying in the kitchen, subject to the following conditions:
- There is no washing machine in the kitchen;
- There are new water and sewer pipes, high-quality taps and mixers;
- Along the future facade of the kitchen set, it is planned to lay a strip of tiled floor tiles.
A small amount of water spilled on a glued laminate will not affect its quality and will not lead to repairs and laying of new material. But if at least one point is not met, it's not worth the risk. In addition, waterproof laminate has a significantly higher resistance to abrasion, so its repair or new laying, even under stressful conditions in the kitchen, is half as often as for moisture-resistant laminate flooring.

The sequence of the process of laying laminate in the kitchen
First of all, you need to inspect the door frame. You need to do this for two reasons:
- Firstly, before laying the laminate in the kitchen, you will need to decide on the method of joining the level of the kitchen laminate flooring with the threshold of the door frame or with parquet, if the door frame is made according to a non-threshold scheme;
- Secondly, it will be necessary to align the piece before entering the kitchen in the same plane with the rest of the subfloor. Most often, a rise and fall of a concrete base is formed along the threshold.
For your information! It is known from practice that most of the defects in the concrete floor screed are concentrated at the entrance to the room.
Hence the creak of the new laminate immediately after laying, and the subsidence of the coating, and even the exit of the edge of the lamella from under the threshold. Such defects are most often found in private homes, but can sometimes be found in old apartment kitchens.

Preliminary calculation and selection of tools
The process of laying laminate in the kitchen has one remarkable feature, if the calculation of the number of lamellas is incorrect, then the coating can be laid with one missing board, which will have to be hidden under the kitchen set. It is clear that such a scheme significantly reduces the value and strength of the laminate floor. Most often, it is resorted to if expensive imported styling material was brought to order, and one strip was not enough. Considering the huge weight of furniture cabinets in the kitchen, nothing will happen to the floor.

To calculate the number of slats, you will need to know the dimensions of the kitchen and the dimensions of one strip. The calculation sequence is as follows:
- We divide the longitudinal size of the kitchen by the length of one strip of laminate, we get the number of pieces, for example, 6.2;
- We divide the width of the room by the transverse dimension of the lamella, we get the number of rows, for example, 17.7;
- We round and multiply 7x18 = 126, with 8 pieces in a package, 17 packs are obtained.
Material for the kitchen is best bought ahead of time and stored in a dry and cool place. Laying the laminate can only be started after the completion of all repairs in the kitchen.
To work, you will need a jigsaw, a tape measure, a construction square, a construction knife, a hammer, a set of dowels with plugs, adhesive tape and lining material.
Preparing the floor for laying laminate
In theory, laying laminate flooring can be done not only on a concrete base, but also on a wooden floor, an old floor sewn with plywood, and even tiles. The main thing is that the base should be as level as possible along the horizon and not have defects on the surface exceeding 1-3 mm, depending on the substrate used.
The only exception is waterproof laminate 34 or even 43 class. The material is very expensive, and in terms of wear resistance it can be said that it is eternal, therefore, under a good coating, it is best to remove the old floor and level the concrete base.

The simplest leveling option is to use a self-leveling compound. If there is no experience of such work, then you can invite a specialist, it will take no more than an hour to fill, and the procedure is inexpensive.
The pre-cleaned floor is primed with a filling mixture with a double amount of water, then a damper strip is glued along the perimeter of the kitchen and a self-leveling mass is poured. The fill is rolled with a needle roller, after a day you can start laying the laminate.
Lining material laying
To equip the floor in the kitchen, two types of linings are used - coniferous mats and cork linen. The material is laid on concrete in rows with mandatory dressing of the seams. The joints must be glued with adhesive tape so that under load the lining material does not disperse to the walls of the room.
The standard thickness of the lining is only 8 mm, therefore, if the work is carried out with the dismantling of the subfloor, sometimes it is necessary to lay out two layers in order to guess the height of the laminate in relation to the threshold level.
Laying laminate in the classic way with locks
In the traditional version, laying the laminate starts from the far wall of the kitchen, moving towards the front door. Preliminarily, soft spacers are laid along the perimeter, pressing and limiting the laid laminate flooring. Between the walls of the kitchen and the ends there should be a gap of 5-10 mm, which will later be closed by installing skirting boards.

The first lamella is sometimes laid with a clamp on the glue, the next board is installed from the narrow part, joined into a lock and leveled on the substrate. The next row starts with half the board, this ensures that the joints are offset by half the length. The slats can be laid with an offset of a third and a quarter of the size, but it should be borne in mind that the beginning or end piece should not be less than 20 cm.
If laying is carried out with gluing, then the end and longitudinal spikes are initially glued, then the lamella is engaged with the end of the previous board, placed on the substrate and clicked into the lock of the previous row by pressing. Everything is done by hand, no hammer blows.

The last lamellas have to be cut so that part of the canvas goes at least 15-20 mm under the base of the future threshold of the kitchen.
Laying laminate with glue
The technology of mounting lamellas on an adhesive base is used mainly for waterproof coatings of class 33-34. The PVC laminate board is only 5mm thick, so the base must be perfectly aligned.
Laminate can be glued directly to concrete, but it is best to prime the base first. In this way, a good penetration of the adhesive mass into the very dense structure of the self-leveling base is ensured. As a result, Grade 34 laminate won't flake even when subjected to impact loads or uneven distribution of furniture, which is essential in any kitchen.

A good primer makes it possible to save on glue consumption, although it is better not to think about saving when laying laminate on a concrete kitchen floor. The glue is applied with a comb trowel along the entire length of the canvas, after laying the board, you need to check its position using the building level.
Installation of skirting boards
The laying of the floors in the kitchen is completed by sealing the walls with skirting boards. Wooden skirting boards are fastened with dowels and plugs punched into the floor. Plastic plinth rails, depending on the version, are either glued to the walls or fixed with self-tapping screws. Good quality skirting boards ensure that the laminate flooring stays firmly in place throughout the life of the material.
Conclusion
Laying the laminate in the kitchen using the locking method is carried out in 4-5 hours, planting the canvas on the glue will take 10-12 hours. In general, floor repairs take two business days.
Why do people choose laminate flooring for their kitchen? There is nothing to hide here: laminate kitchen floors are very resistant to impacts, cracks and scratches, temperature changes, fading and abrasion. Such material is many times warmer than ceramic tiles, besides it is pleasant to walk on it even barefoot. It allows, in which families with young children are always interested.
- Coating versatility: today there is a variety of textures and colors. Therefore, you can always choose what suits you the most;
- it does not fade or fade;
- stains do not form on it;
- it withstands any blows and is quite difficult to scratch;
- laminate flooring is easy to care for and looks clean even after regular cleaning;
- it quite easily tolerates temperature changes characteristic of any kitchen;
- this type of coating is considered quite inexpensive when compared with ceramic tiles or natural wood;
- you can lay the material on any surface: tiles, wood, concrete, etc.;
- the laying process itself requires a minimum set of tools and little experience. Therefore, you can always do the installation yourself;
- this type of coating allows you to make warm floors.
We all know that laminate or linoleum is usually chosen for the kitchen. If you are still thinking about what to give preference to, remember that if any part of the board becomes unusable, it can be easily replaced. While everything is not so simple with linoleum (you will have to change the entire coating).

To date, there are several types of this material. According to all the rules, the higher the class of the material, the higher the likelihood that it will cope with different loads and such an important factor as water. The class of laminate for the kitchen should be chosen starting from indicator 32. Such material can even be used in enterprises.
Before you buy a laminate for the kitchen, do not forget to pay attention to special types of products - waterproof and moisture resistant. There is a difference between them: waterproof ones can withstand a flood, and moisture-resistant ones are protected only from moisture. Do not forget that such material costs much more than usual.
Styling features

If you have chosen, it is best to buy with a margin of 5-10%. It is very important to take into account the fact that the more non-standard the shape of the room, the greater the margin. Read the instructions carefully, as each buyer gives recommendations for installation and care.
The most common are glueless (lock) and glue. Each of them has its own disadvantages and advantages, but the lock, nevertheless, is more popular.
It is very important that the base under the material is even. Laminate can also be laid in any direction:
- along the window opening;
- diagonally;
- across the room.
The second method is considered the most difficult. And, if you do not have enough experience, it is best to entrust the work to a professional or choose any other way.
When you lay in the direction of the light, the joints between the panels are almost invisible. If you want to visually change the geometry of the room, you can combine several laying methods or combine laminate with ceramic tiles in the work area. In many cases, such a combined floor is far from an ideal solution, because the combination of two types of flooring visually reduces the space of the kitchen.
Installation technology from A to Z

Even if you are a novice master, be sure that you will not have to suffer during installation. So how do you get started with installing laminate flooring in your kitchen?
The board is mounted on top of the substrate, perpendicular to the window, to make the joints less visible. The plates are joined at the ends, and then adjusted with the help of blows with a special hammer. Hit the wooden plank so as not to damage the board itself.
Install expansion wedges on the side of three walls. So the elements of this coverage will be able to expand freely. If the material is laid without spacers, it will bulge during use. Lay a strip of boards along the wall, and then cut off the excess piece. Press the finished strip against the wall.
Laying the next row is done in the same way, but you need to start with half the board. Mount the third row from the whole board, etc. As a result, the floor will be the so-called brickwork. To connect the strips to each other, it is enough to insert the ridges of one into the grooves of the other.
Make sure that such connections are tight enough: the ridges should go into the grooves, and not into other ridges. As a rule, after connecting the strips, small gaps form. To eliminate them, tap with a hammer over the grooves. Use a jigsaw to process thresholds and batteries. With this tool, you can easily give the board the desired shape.
So, when you finally need to lay the last row, use a clamp. Hook the end of the board with one end, and hit the other end with a hammer. Remove wedges and
 How to build a profitable business selling shawarma
 The right advertisement for a hundred
 Own business: cosmetics and perfumery