DIY flowerpot ideas. DIY outdoor flowerpots. The procedure for making flower pots made of concrete
A personal plot is a visiting card of everyone who lives in their home. In addition, this is an area where you can relax, unwind, get aesthetic pleasure from a neat and well-groomed green area. Flowers and shrubs add special beauty to any yard. They can be planted in the traditional way directly into the soil, or you can get confused and make flowerpots. In all the best modern courtyards, these decor items have a significant place, because they make the exterior richer, more interesting and more comfortable. In our article we will tell you how to make a flowerpot with your own hands for your summer cottage or garden plot.
A street pot, it turns out, can be made from everything that only comes to hand. Especially in this case, old items that you have not used in everyday life for a long time are suitable, because they have lost their attractive appearance or become inoperative.
We offer you as an option such ideas for creating a flowerpot in the yard:
- If you have old kitchen utensils in your attic or in your closet, which you still can't dispose of, then just restore it a little, and you will have an original flowerpot. For example, you can use an old metal kettle with a burnt bottom or dents. And if you find several such teapots, you can ennoble an entire zone of flowers with such flowerpots:

- Vases from old rubber boots look very original. They can be painted, painted, attached to a fence, just lined up. Here, give free rein to your imagination and imagination, and it will definitely tell you how to arrange the boots so that they look elegant:

- If you find beautiful stumps of a tree trunk in the forest, you can take them to make a flowerpot out of them. It will look very harmonious with the vegetation on your site:

- If you have a metal mesh and a bunch of old stones, then combine these materials to make a decorative flowerpot. It looks, of course, quite eccentric, but if you like everything large-scale, attracting attention, then you will like this option:

- If you still have old plastic barrels or cans, then their top can be cut off, the outer side can be painted and placed in a row several, so that, for example, to highlight the path at the entrance to the gate:

Give your old things a new life! At the same time, you do not have to spend money on purchasing a special flowerpot in the store, in addition, you will create absolutely unique decor items that no one else will have.
How to make do-it-yourself outdoor flowerpots out of concrete

A pot made of concrete is a beautiful product with an unusual design, which serves as a special container for the cultivation of ultra-sensitive outdoor plants, giving your landscape in the courtyard uniqueness and beauty. You have probably seen concrete flowerpots in the courtyards of expensive houses. Of course, if they have a pretentious shape that only professional sculptors can make, then such a flowerpot will cost a lot of money. But you don't have to reinvent the wheel and make a simple version of a concrete flowerpot that will look stylish and modern.
To make a concrete flowerpot for your personal plot, you need to follow these instructions:
- First, the concrete is mixed. It consists of several components - you can see their name and approximate ratio in the picture below:

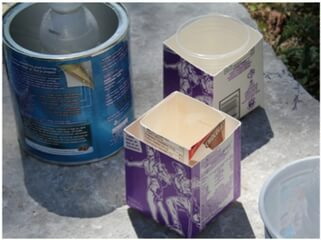
- After that, you need to prepare a container that you will pour with concrete, and the oppression that you will put inside the container to make a roomy flowerpot. As a container, you can take an old basin, bucket, plastic container, and as oppression - stones or sand in large quantities.

- If you want to decorate your concrete flowerpot somehow, you can use additional broken glass, shells, pebbles, coins and other decorative elements. Just do not forget that the decor is not always appropriate. The flowerpot should correspond to the stylistic idea of your garden, besides, you can spend a lot of time on the made flowerpots, and then its decor will not be visible at all behind the flowers or greenery. For clarity, we will give you an example of a concrete flowerpot:

- When you find a container that will be the basis for your future flowerpot, it will need to be wrapped inside with cling film. This is necessary so that later the container can easily lag behind the concrete. The same will need to be done with the second container, into which you will pour the oppression.
Keep in mind that the film rarely lies flat on the walls of the container into which the concrete is poured. There will definitely be errors, but they can be corrected with decor.
- The concrete is poured very carefully and gradually. First, you need to fill the bottom of the container so that the height of the bottom is 4 cm. It is advisable to level the bottom right away with a spatula, because then you will not be able to do this.
- After that, drainage is done. For drainage, you can use a metal tube cut into small strips. All these elements must also be treated with some kind of lubricant.
- When the drain is ready, you can install a container with oppression on top. Sand always helps as oppression.

- After that, the rest of the concrete is poured between the containers. Be aware that bubbles may form. To prevent this from happening, be sure to insert metal rods into the concrete that you will pour.
- Smooth out all the edges with a spatula, and then wrap the future flowerpot with plastic. Leave the flowerpot in this form for a day so that the concrete hardens well.
- After a day, all elements of the containers must be removed from the structure, and the flowerpot itself must be painted and decorated.

Important! If you still want to decorate your flowerpot, then do it before it is completely dry, so that the decorative elements stick to the concrete surface of your flowerpot.
How to make flowerpots out of cement and fabric

Flowerpots made of concrete and fabric look very nice. It turns out to be a real work of art.
Of course, to make such a flowerpot, as shown in the picture, you will have to work hard:
- First you need to mix the concrete solution so that it is not too thick. In this case, it should be more liquid, because in this liquid you will soak the fabric of your choice. We recommend using an old towel because it will give the flowerpot an unusual texture when it dries.
- After you dip the towel in the mortar, make sure it is completely soaked in the concrete.
- Remove the cloth from the solution and place it in an upside-down bucket. Straighten the edges of the towel immediately and leave the future flowerpot to dry for as long as necessary (a lot also depends on the weather conditions).
- Turn the finished flowerpot over, set it in the desired place and paint if you want. In natural color, such concrete structures look quite nice.
How to make a flowerpot made of wood

To make such a beautiful and very organic flowerpot for any exterior, you need to do the following:
- First, find some kind of stump that has already dried well so that it is convenient for you to work with it. Decide on the size of the future flowerpot and cut exactly the length of the hemp that you need.

- Along the entire perimeter of the hemp, you need to drill holes that should be very close to each other. This is necessary so that you can then knock out the desired depth of the flowerpot with a chisel.


- Once you achieve the desired depth, place some kind of plastic container inside the wood. This is necessary in order to protect the tree from moisture. If you do not have a container of a suitable size, then just treat the tree with wood stain.


- After that, pour soil into the tree and plant the plant in a flowerpot.


How to make a flowerpot from a tire

- On the side of the tire, make the pattern you want to cut. You can cut it with an ordinary knife, but first you will need to dip it in a soapy solution, so that the knife will cut better. If you want the edges of the pattern to be embossed too, then it's better to cut them out with a jigsaw.

- Next, the most difficult thing will be to turn the tire out so that it resembles an opened flower. It is physically difficult because the rubber is very dense. After you manage to cope with this step, sand the surface of the tire so that the future flowerpot looks beautiful.

- We make the basis for the flowerpot from the tire disk - we connect the elements and it turns out that the frame of the flowerpot is completely ready. You just need to color it and plant flowers:


How to make a shape for a flowerpot

It is enough just to make a shape for a flowerpot from plaster. It will turn out to be light, in addition, you can give any structure to a gypsum pot. Of course, it will be very fragile, so you will have to handle it very carefully so that nothing heavy falls on it. It is ideal to install such flowerpots in flower beds or gardens, where there is the lowest likelihood that something can damage them.
Here's how to make such a shape:
- Take any rectangular cardboard box. It will need to be sanded on all sides. Plaster will adhere better to the treated surface.
- Make a plaster mortar in such a consistency that it looks like sour cream. You need to lower gauze pieces or a regular bandage into it. Wrap the box with this bandage.
- After that, leave the flowerpot for a while to harden the plaster. All irregularities that will form can be removed using the same sandpaper.
- We paint the finished flowerpot with acrylic, and when it dries, we cover everything with enamel on top.
- The top coat is a varnish that will add shine and beauty to the flowerpot. By the way, a plaster pot can also be decorated with pebbles, shells and other tinsel. Although they look quite interesting without it.
How to make a large tiered flowerpot, ideas with photos
Multi-tiered flowerpots look very nice. They can also be made from scrap materials or building materials. We suggest you consider several original options for your summer cottage or personal plot:
- If you have building blocks, then you can place them beautifully so that they resemble a wall with flower pots. Such a flowerpot will look like this:

- If you have old metal buckets that you cannot find a use for, you can also make a multi-tiered flowerpot out of them by connecting the buckets together in a large flower bed:

- The easiest way, which is very common everywhere, is to make a multi-tiered flowerpot out of car tires. They just need to be stacked in layers in a checkerboard pattern, and then painted. In our opinion, for giving such a flowerpot is the best solution:

Beautiful flowerpots with your own hands, step by step with a photo
At the end of our article, we will present you with a few more instructions on how to make a beautiful flowerpot with your own hands:
Option number 1

- Take an old barrel, treat it with an antiseptic on all sides so that it does not rot.
- Strengthen the future flowerpot throughout the entire barrel with additional metal hoops.
- Attach a wooden foundation to the bottom, which should correspond in size to the circumference of the barrel itself.
- Make some holes in the bottom to allow good drainage.
- Decorate the barrel - you can make such a couple in love, as shown in the photo.
- Place the soil inside and plant the plant.
Option number 2

This version of the flowerpot is suitable only for those who have basic carpentry skills:
- Prepare a flat wooden surface to function as the bottom. Immediately make drainage holes in it.
- Then cut as many pieces of wood as possible and lay them out so that you get the structure as shown in the photo. Although you can not complicate this, but simply make a rectangular wooden flowerpot.
- Fasten the bars together with self-tapping screws.
- Sand the surface of the flowerpot with sandpaper, and then saturate the wood with a special antiseptic that will protect it from decay.
- It remains only to cover the flowerpot with earth and plant the plant.
As you can see, you can add beauty to your garden or yard without making any large financial costs. It is enough to show your ingenuity and a drop of creativity, and you will have an incredible piece of jewelry that you can admire every day.
Video: "How to make outdoor flowerpots"
Every owner wants, leaving the house, to admire his plot, be it a private house or a summer cottage. One of the techniques for decorating and diversifying the site is to arrange interesting outdoor flowerpots in some places. They may contain dwarf trees and so on.
Below we will talk about what kind of flowerpots are, where it is better to arrange them, how and from what you can make containers yourself.
What are the vases
 Previously, such containers, tubs and flowerpots were used only for growing capricious plants. They contained specialized soil, different in composition from the usual soil in a flower bed.
Now different and beautiful containers are used for ordinary flowers to diversify ordinary gardens and verandas.
Views
 Conditionally, you can divide street flowerpots into several categories:
- by form;
- by material of manufacture.
As for the shape, containers can be anything. There are both standard (round, square, rectangular) and unusual (irregular). Everything here is limited only by the imagination of the owner of the house or dacha. Various materials can also be chosen - natural (for example, stumps or logs), concrete, fabrics, metal, wood.
You need to select material for a flowerpot focusing on the general style of the area of its location.
Each raw material has its own pros and cons, care features.
Materials (edit)
Let's take a closer look at common materials for making outdoor flowerpots and caring for them:

How to choose a place for flowerpots
 The location of the flowerpots largely depends on the wishes of the owner of the garden. But still, do not forget that you need to put them in an appropriate and convenient way.
Vases installed on the sides of the porch will enliven the entrance to the house. It is also good to place them near or a summer kitchen.
If you have a wide enough blind area, outdoor flowerpots will be appropriate along the wall of the house - flowers will bring a lively touch against the background of stone walls. 
Bulky flowerpots are not appropriate in small gardens. Just like the miniature ones will get lost in the vastness of the large garden.
 A permanent place for flowerpots must be chosen carefully. These are quite heavy products, and it is not recommended to disturb the plant once again.
 It is good to highlight the entrance to the zones of the garden, buildings with flowerpots with flowers. Do not forget about style - if you have a gazebo made of wood, then concrete flowerpots will not work.
We decorate the site with our own hands
The easiest and fastest way is to purchase ready-made flowerpots in the desired style or order production according to your own sketch. But this will be an order of magnitude more expensive than making flowerpots for a summer residence with your own hands. This, of course, will take time, effort and imagination, but it's worth it. Here are some examples.
Concrete
 Even the fair sex can cope with such a seemingly difficult task. The simplest do-it-yourself concrete flowerpot is made from any fabric, concrete mix and a bucket. You can use the remains of the mortar after construction work.
Place the fabric in the liquid mixture and soak it thoroughly. When the whole rag is saturated with the solution, we take it out and hang it to dry on any bucket. 
Position the rag as the upside-down flowerpot should look like in the end.
 After the cement hardens, the resulting flowerpot must be removed from the bucket. Now you can start decorating - paint it in any or any color. Here the flight of imagination is not limited.
To make it easier to remove the flowerpot from the bucket, it is better to lubricate the latter first. Working off or any oil will do.
There is a more expensive option - manufacturing using a special form for flowerpots. You have to buy it. For that, the result will please you - you get a beautiful neat flowerpot. Yes, and there is nothing difficult in manufacturing - knead the solution, pour it into the mold and wait for solidification. 
 By the way, you can even make the forms yourself. For this, cardboard and tape are suitable. Cut out the outer parts of the future shape, fasten them with high-quality durable tape. Then you install the inner part (where the soil for the plant will be filled up) and fill everything with a solution.
 The most time-consuming method of making outdoor concrete flowerpots is molding. Here you will already need a frame and some (at least minimal) sculpting skills. For that, the shape of the flowerpot does not depend on anything. You will need to work in stages and use additional additives and primers.
As you can see, making cement flowerpots with your own hands is not difficult.
Tires
 Not the most difficult, but not so easy option either. To work, you need an old tire with a disc, chalk and a hacksaw.
 So, first you need to draw the outline of the edge of the flowerpot (it is the cutting line) with chalk. This is done not in the middle of the tire, but closer to the disc on one side.
Non-studded tires are suitable for making flowerpots - they are easier to cut.
After basting, you need to make a cut. Be prepared for tricky cutting.
 When the tire is cut, it must be turned out. So the vase will be made of rubber, and the disk will play the role of its legs.
DIY ones can be painted or painted with suitable paint.
Stone
 An interesting solution is offered by designers - the manufacture of flowerpots and garden furniture from mesh and boulders. They look very interesting and unusual, the work does not require special skills, and most importantly, such outdoor flowerpots can be made with your own hands.
For work, you will need a special metal mesh, geotextiles and boulders.
We collect a hollow frame from the mesh. We fall asleep stones into the emptiness of the walls. In conclusion, we fix geotextiles to the walls from the inside - it will not allow the soil to seep between the stones and will allow water to pass through.
 It is better to pour drainage on the bottom - a layer of sand or expanded clay. A beautiful do-it-yourself flowerpot is ready!
It will not be possible to move such a structure, so immediately choose a permanent place for it.
Wood
 Do-it-yourself flowerpots for the garden can be made of wood. Even pallets left over from construction will do.
For work you will need:
- boards;
- sandpaper or grinder;
- saw or jigsaw;
- nails or screws;
- roulette;
- pencil;
- impregnation.
 To make such flowerpots, you will need a little carpentry skills. First you need to think over the dimensions of the future product. The best way to do this is on paper.
At the corners, you can attach narrow bars or cut locks.
After all the boards are prepared, you need to sand them and apply a special impregnation. The latter will prevent wood from rotting in all weather conditions.

When the coating is dry, you can fasten the parts. In the end, it remains only to decorate the resulting flowerpots.
Various
 We have described the most affordable and popular manufacturing options. Barrels, an old wheelbarrow, a bicycle with a basket, a few old pots, a prepared stump, and so on are also suitable as outdoor flowerpots. In fact, fantasy is where to roam.
You can diversify and decorate the garden without large investments. It is enough just to find the time and give free rein to your imagination. Finally, look at the photos of street forged flowerpots - they are very inspiring: 


Original outdoor flowerpots with their own hands - video
Do you still associate the dacha with potatoes or tomatoes? But more and more of our compatriots are abandoning the vegetable garden and hard physical labor in favor of comfortable rest and the beauty of their summer cottage. As a rule, the process of landscaping a home garden requires significant capital investments, but they have a real alternative. A flowerpot garden is affordable for every summer resident; it is able to revive even the most dull landscape. The secrets of landscape gardening will help you to choose the right flowers for flowerpots.
The advantages of growing flowers in flowerpots
Potted floriculture has ancient origins. Today, just like several millennia ago, people grow plants in pots or special containers.
A container garden can easily be placed even on a small personal plot, for this you do not need large areas. Green pets in flowerpots look perfect on paving slabs, cement paving, in courtyards and on the porch of the house.
Flower pots can be placed at different levels using shelves, stands and steps. They can be easily moved from one place to another if desired.
Caring for plants does not require much physical effort. They are not afraid of the common bear, beetle larvae and other pests living in the ground. In the photo, flowers in flowerpots look not just a decorative background. They give charm and charm to everything that surrounds them.

Flowers will decorate every corner of your home
Due to the use of special substrates, you can plant any flowers in containers, even those that are not suitable for the soil of your summer cottage.
Flowerpots can be used to mask imperfections or unsightly objects. To do this, it is enough to put a luxurious flower in the right place.
Unlike stationary beds, there is always the possibility of replacing plants that have faded with others.
Such a garden has unique mobility. It is easy to transport it to another cottage, place it on the balconies or loggias of your own city apartment.
What flowers to plant
Ampel petunia, pelargonium and fuchsia are considered ideal flowers for outdoor flowerpots. The variety of shapes and colors of these plants allows you to create chic floral arrangements.

For ampelous petunias to please the eye for a long time, do not forget to remove dried flowers
It should be noted that petunias are quite capricious flowers that only experienced growers can grow. Possession of agrotechnical techniques and strict adherence to the rules of care will preserve the delightful appearance of this ornamental plant.
The main advantage of pelargonium, popular in European countries, is its enviable endurance.
Shady alleys are considered the best places for fuchsia. This plant is not placed in open sunny areas.

Fuchsia is a great option for a hanging flowerpot on a shady terrace
The following plants are also suitable for growing in pots:
- undersized marigolds;
- daisies;
- pansies;
- coleus;
- dwarf dahlias;
- begonias;
- lobelia;
- snapdragons of dwarf varieties;
- equifolia bell;
- periwinkle;
- chlorophytum.
In the spring, you can decorate your garden with blooming crocuses, daffodils or potted tulips.

Bulbous plants after flowering must be removed to a cool room.
The containers are ideal for herbs such as basil, lemon balm, rosemary and marjoram. The "highlight" of the garden can be figured trimmed flowerpot shrubs and trees.
The technology of planting flowers in flowerpots
In order for flowers in containers (street pots) to delight you with their beauty for a long time, you need to take into account a few simple rules.


If desired, you can create a mini rock garden in a flowerpot
Features of care and protection against pests
Once the flowers are planted, they need regular maintenance and watering.
It is important!
It is best to water container plants with moderate amounts of water. Remember to loosen the soil frequently to allow air to reach their roots.
Flowers in pots need additional feeding. For this, mineral fertilizers are used in the form of:
- granules (characterized by slow action, it is enough to add 1 time per season);
- solutions (feeding is done during watering, the recommended frequency is 1 time in 10 days).
It is necessary to remove dried inflorescences in time. This improves the appearance of plants and prolongs their flowering period.
Heat-loving species (fuchsia, pelargonium, coleus, etc.) for the winter must be transferred to a room with a temperature of at least + 5 ° C.
Perennials can be left to winter in the garden. Straw and jute fabric will help protect the flowerpots and their contents from frost.

Pelargonium in pots will decorate your garden with its flowering for at least 3 years
The main enemies of potted plants are the whitefly and spider mite. These pests can be controlled with chemicals. In addition to Lepidocide, Gaupsin and Bitoxibacillin, nettle or garlic extract is often used for spraying.
With proper care, flowers in flowerpots grow beautiful and healthy. Let your work and imagination pay off with the beauty of a blooming garden!
Flowerpots are an interesting option for decorating your site, giving a wide scope for creative ideas. To bring these ideas to life, flowerpots can be bought, or you can ... make them yourself.
First, here are some tips for using flowerpots.
Combine the shape and size of the flower girl with the size and appearance of the plant: do not plant miniature flowers in bulky tubs, and vice versa. Use massive flowerpots to decorate only large areas. By the way, large modules can be used to differentiate functional. Excessive pretentiousness when decorating the walls of a flowerpot can create disharmony with the composition of plants or with. Do not use a flowerpot finish brighter than the plant itself.
Making flowerpots for the garden with your own hands is not difficult. Let's consider the most popular materials and methods.
Concrete
A concrete pot is durable and frost-resistant. Its walls retain heat and water in the ground for a long time. Plus, it doesn't take a lot of effort or money to make. The large weight of concrete vases deprives them of their mobility, so it is necessary to carefully approach the planning of their placement. Only a truck crane will be able to move the module filled with earth and plants.
In factory production, special forms are used. A pre-prepared cement solution is poured into them. To increase the strength, a reinforcing mesh is installed inside the container. The material for the form is polyvinyl chloride, silicone, plastic, gypsum, wax, etc. After the concrete acquires its hardness, it is broken.
A mold for making a concrete flowerpot with your own hands can be made from a variety of materials. The main thing is that it does not get wet and does not change when filling it with a solution. For small and medium-sized flower girls, thick packaging cardboard, plastic bowls and bottles, glasses, trays are suitable. A bowling ball is an excellent solution for creating a round flowerpot: it is smooth and heavy, and it will be easy to remove it from the cured cement.
You can also assemble the mold yourself from wooden boards or plywood.
How to make concrete flowerpots with your own hands?
You will need:
The optimum temperature for working with cement mortar is from + 20 ° C. High humidity is desirable.
Manufacturing process:

Result:

In order to prevent the roots of plants from rotting, a drainage layer of coarse sand 5-7 cm thick is laid on the bottom of the flowerpot.
Original flowerpots can be obtained by using decorative concrete... It can be found in the store under different names: architectural, artistic, acrylic-concrete, art-concrete, polymer-concrete. It will vary in appearance and composition. For example, small fragments of natural minerals and dyes are added to architectural concrete, which makes its surface more textured.
Alternatively, you can do with only one container and mold the flowerpot by hand, see the video.
The design of the concrete flowerpot will depend on the decoration methods used. You can apply one of the following options.
- Trim the walls mosaics- ceramic tiles or pebbles are suitable for this. Place it carefully on a 5-6 mm layer of specialized glue. Once dry, grind the joints with narrow tile lacing.
- The flowerpot can also be decorated painted: Draw an ornament on the freshly primed surface.
- Another artistic technique - thread using a special tool. Apply a pattern to them one day after removing the mold.
- To create an unusual relief before the solution hardens, use wicker basket... Her prints will look original on the surface of the walls.
- Also you can pin to the inside of the form plant leaf with a pronounced texture. Hold it with your hands while pouring and remove after hardening. Decorate the recess with acrylic paints.
Silicate blocks
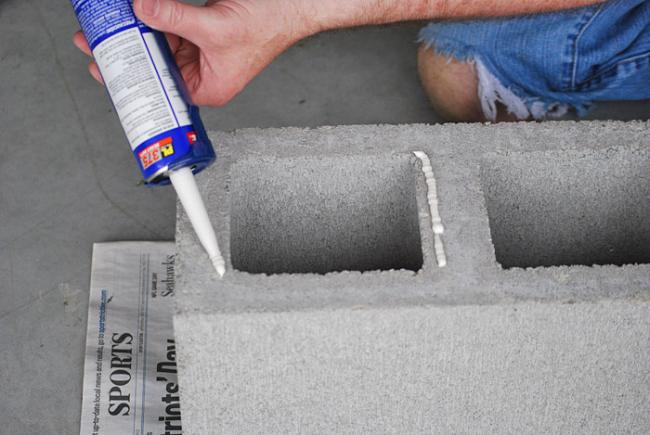
DIY flowerpots can be made from hollow building blocks. They look unusual and go well with a garden in style. When creating them, carefully consider the shape of the structure. It must be stable and blend well with the outside environment. A draft prepared in advance will greatly facilitate the production.

You will need:
- blocks;
- glue;
- plastic or wooden base.
Manufacturing process:
Gypsum
It is easy to make cute flowerpots from plaster with your own hands. This material will allow the roots of plants to feed on oxygen, but it does not retain moisture well. Therefore, it is better to choose a shady place for the gypsum module. It will not be difficult for you to vary the accents in the garden by rearranging the flower girls, because they are very lightweight and mobile.
You will need:
- cardboard box in the form of a cube or parallelepiped;
- sandpaper;
- plaster or medical bandage;
- gypsum powder;
- brush;
- white acrylic paint for the base;
- white enamel.
Manufacturing process:
- Measure the height of the flowerpot from the bottom of the box, adding 1.5 cm. Cut off the excess part.
- If the surface of the mold is too smooth, it is recommended to sand it for better adhesion to the plaster.
- Cut the plaster bandage into strips. Or make a solution of plaster with water in a separate container. Its consistency should be like thick sour cream. And put a medical bandage in the solution.
- Remove excess by passing the bandage between the index and middle finger. Wrap the walls of the mold, starting from the top.
- Dry the workpiece. Remove irregularities with sandpaper. Pull out the form.
- Paint the surface with white acrylic paint. After it dries, apply white enamel.
- Apply a final coat of paint or varnish on top of the enamel.
- To decorate a plaster pot, use pebbles, shells, buttons, beads, rope, pasta, etc.

Such a product can be used as a planter for a plastic pot with plants. In order for the flowers to be planted directly into the flowerpot, a drainage hole must be arranged in its bottom.
Wood
The natural origin of the material allows outdoor flowerpots to blend harmoniously with the garden setting. Wooden flower girls are easy to do with your own hands, so this budget option is widely in demand. It is important to remember that due to the high hygroscopicity of the material, finished products must always be treated with varnish and an antifungal solution.
There are several options for making this design yourself:
1. From the stump
A stump, log and other pieces of wood can serve as the basis for a flower girl. You need to select a sample in accordance with the designed plants: the larger the root system, the larger the flowerpot itself should be. As a rule, the height is made about 40 cm.

You will need:
- stump or log;
- saw;
- drill;
- chisel;
- polyethylene.
Manufacturing process:
- Cut the log to the desired part.
- Using a drill with a 25 cm drill and a diameter of 20 mm, drill several holes in the upper plane at the same distance from the walls. Make a row of holes in the center to break the core.
- Remove wood with a chisel, forming a container for soil and plants. If the log or stump is large in diameter, use an ax or pickaxe. Form even, strong walls.
- Treat the insides of the stump with a moisture-proof solution, cover it with polyethylene. Then fill up the drainage and soil mixture. You can place a plastic or ceramic pot in an untreated container to act as a moisture barrier.


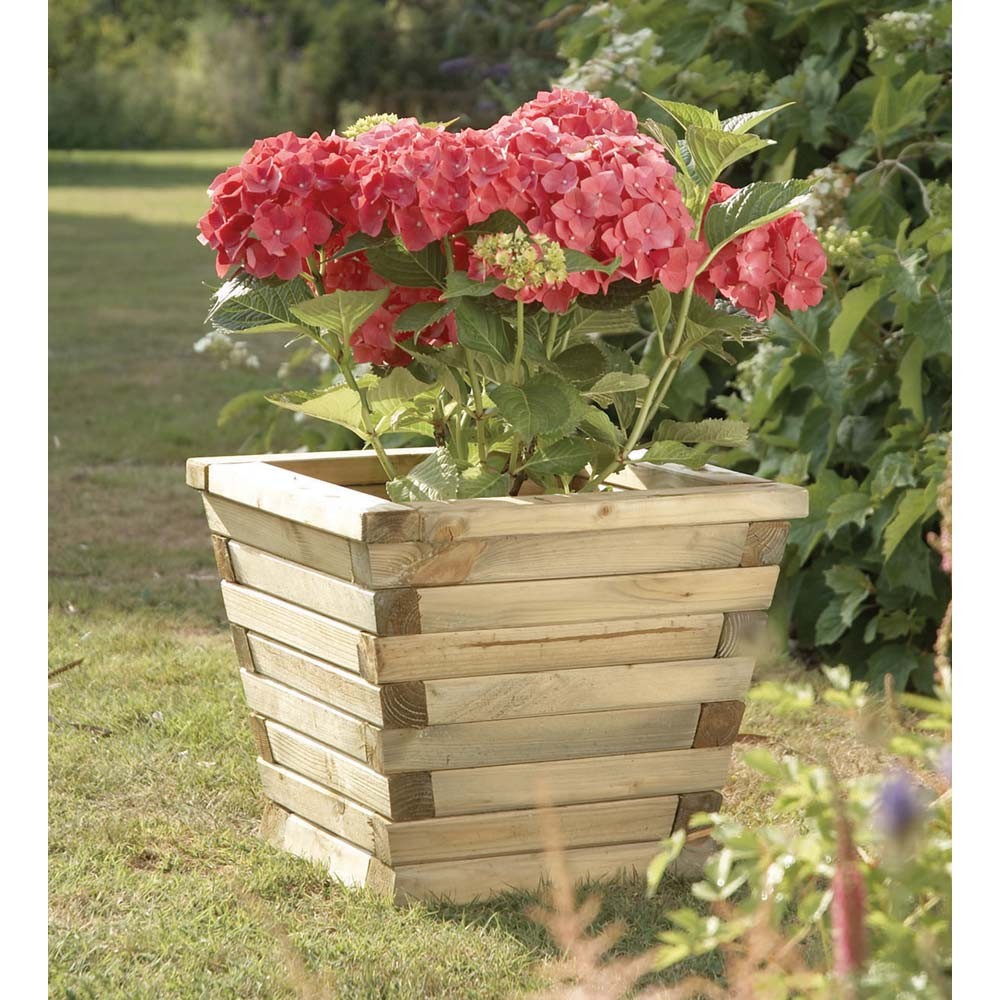
2. From timber and boards
To keep the tree for a long time its original appearance and not turn gray, use a special oil. It will also protect your product from fungal and insect infestation. They are distinguished by shape: rectangular, cubic (most often used), hexagonal, trapezoidal.
You will need:
- timber from 20x20 mm;
- plywood or boards with a thickness of 10 mm;
- fasteners - nails, screws;
- joiner's glue;
- wood preservatives;
- varnish or paint.
Manufacturing process:

When assembling the structure, it is necessary to take into account that when watering the tree will swell, so the boards are not nailed very tightly to each other.
A tub for flowers, completely assembled from a bar, also looks good.
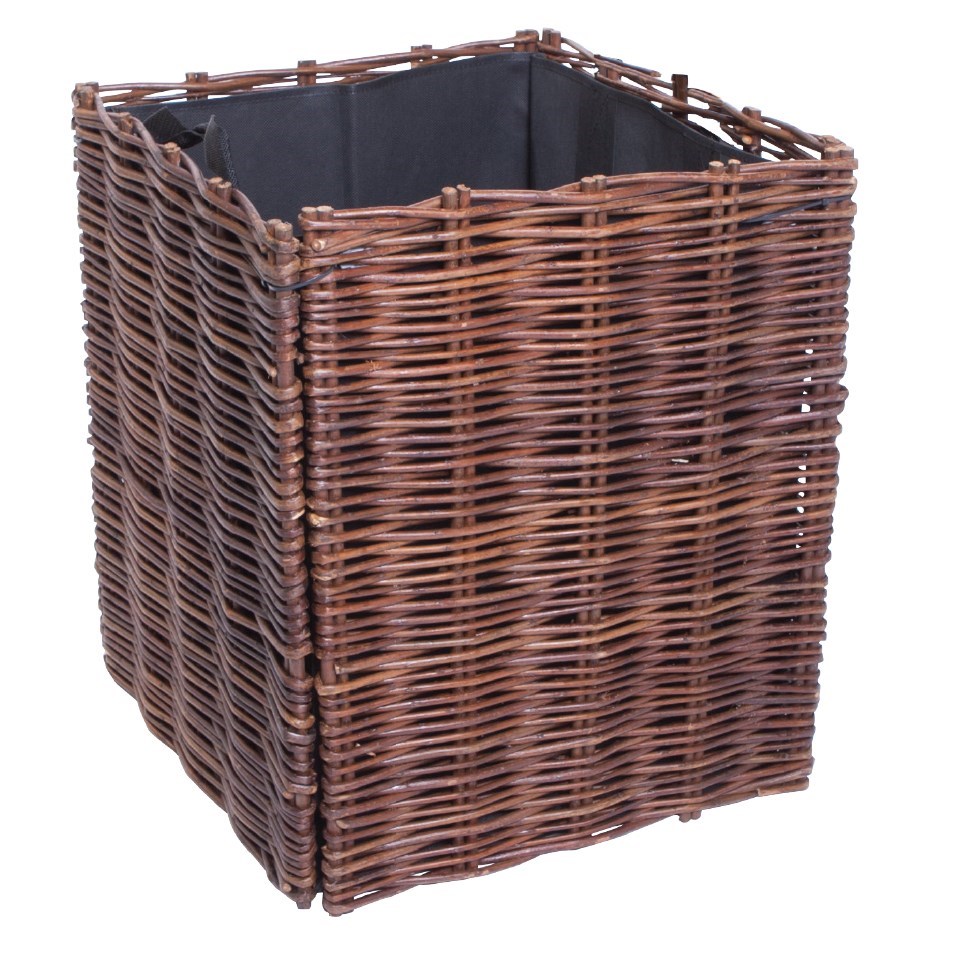
3. From the vine
You will need:
- special willow vine for weaving;
- a small piece of plywood;
- awl;
- sharp knife;
- drill;
- round nose pliers.
Manufacturing process:
- Soak the vine in water until it becomes flexible.
- Cut a blank for the bottom out of plywood. Using a drill, drill small holes along the edges of the workpiece at an equal distance.
- Form the frame by inserting thick twigs into the holes.
- Place the vine between the twigs, pressing with an awl. There are many styling methods that can be combined to create different textures for the surface of the planter.
- Upon reaching the required height, cut the frame rods.
- Dry, treat with moisture-proof impregnation and varnish.
- In such a flowerpot, you can fill up the soil, having previously lined it with polyethylene, and planting plants, or simply put a plastic pot with a flower and use it as a planter.
4. From a barrel or tub
You will need:
- barrel or tub;
- sandpaper;
- drill or grinder;
- varnish, paint or oil for wood;
- moisture-proof solution;
- saw.
Manufacturing process:
- Saw the barrel either lengthwise or across. (If you cut it lengthwise, the planks knock together for strength).
- Sand the surface with sandpaper. This can be done manually or with a drill or grinder.
- Paint or varnish. Treat with a moisture-proof solution.
- Place a pot of suitable size in the barrel with.


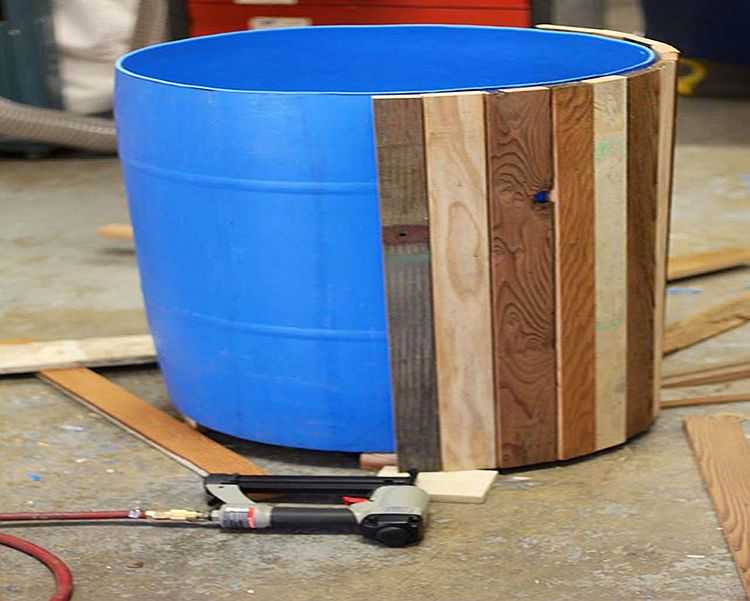
5. Made of plastic with wood sheathing
You can also make plastic flowerpots with wood sheathing.
You will need:
- plastic container - bucket, tank;
- narrow wooden boards, match the size of the glued container;
- antiseptic;
- paint or varnish;
- drill;
- bolts;
- nails;
- nail gun;
- hammer;
- universal glue for gluing plastic and wood or nails, gun and hammer.
Manufacturing process:

5. From plywood
You will need:
- moisture resistant plywood;
- self-tapping screws;
- a drill with a drill diameter 1-2 mm less than the diameter of the screws.
Manufacturing process:
- Cut off four identical pieces with a cross section of 20-25 mm. Use them as construction edges.
- Cut side boards.
- Attaching the sidewall to the rib, drill a hole, stepping back 1 cm from the edge.
- Fasten with self-tapping screws.
- Place a suitable pot with the plant in the barrel.
Car tires
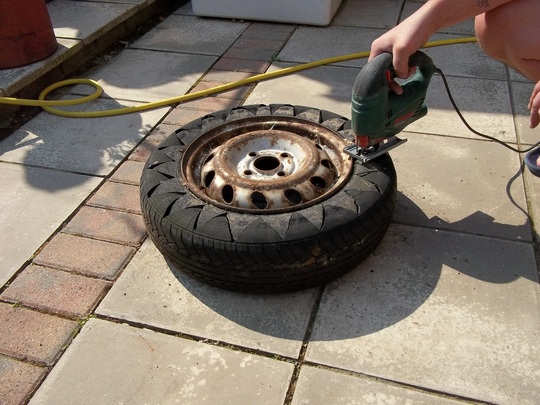
In small gardens, near the entrances of residential buildings, flowerpots made of tires are often found. Elastic rubber allows you to give them a fancy shape. The creation process does not require special efforts, skills and costs. This is the reason for their popularity.
So how do you make these interesting flower girls that will decorate your garden? Studless summer tires are best. The rim inside will serve as a stand.
You will need:
- car tire with a rim inside;
- Sander;
- boot knife or electric jigsaw;
- piece of chalk;
- oil paint, enamel or nitro paint, paint in spray cans for a car is also suitable;
- soap solution;
- paint brush;
- degreasing solution;
- primer.
Manufacturing process:
Stone
Vases made of stone have high strength and durability. They are very decorative and are able to retain moisture well in the soil. The large mass allows them to remain stable, but impedes mobility. Select the location of the stone flower girl in advance.
Making a flowerpot out of stone by hand requires skill, patience, and the appropriate tools. Below is a master class that should help a beginner to cope with such a task.
When choosing a stone, it is better to give preference to sandstone or limestone.
You will need:
- bushhammer;
- bit;
- a piece of sandstone or limestone;
- support for installing a stone;
- pencil;
- brush;
- Bulgarian;
- Grinder.
Manufacturing process:
- Apply the contour of the groove into which the plants are supposed to be planted. So that the edge of the flowerpot does not collapse, 50 mm is left between the line and the border.
- Use a hammer and chisel to gouge a recess.
- Use a brush to sweep out stone chips and dust.
- Using a grinder, make a cut, gradually deepening the tool along the edges.
- Arrange a drainage hole in the resulting bottom.
- Sand rough furrows.
Stone processing is made easier by using special power tools, see video.
It is much easier to make flower modules decorated with smooth river stones.
You will need:
- river stones;
- plastic pot;
- glue gun.
Manufacturing process:
- Turn the pot upside down.
- Using a glue gun, gradually attach the stones to the walls. Try to pick them up so that there are no empty gaps.

There are many different ways to make DIY flowerpots. Some are easy to craft from scrap materials, others will require more training and experience. When you create a flower girl yourself, you can show your imagination and develop a unique design that will suit your personal tastes.
Various options for flowerpots made from ordinary car tires, plastic bottles, decorate kindergartens, courtyards.
Such flowerpots with their own hands can be made by ordinary citizens living in apartment buildings. With minimal material costs, you can decorate the adjoining territories.
Using available tools and materials, you can make not only garden pots, but also original figures. They can be created for some specific purpose, for example, planting flowers, that is, they can be given a functional load, or simply decorated in the form of unusual decorative elements.
Attention ! Do-it-yourself flowerpots from tires do not require special skills and abilities, you just need to stock up on free time.
Rubber is a plastic material that can take any shape. This characteristic of rubber allows you to create the most unusual flowerpots out of it with your own hands. The dacha, decorated with flower pots, amazing flowers, will become a real “corner of paradise”. Unusual flowerpots for the garden, created from worn tires, can be decorated in such a way that few people will guess that the starting material was a tire. Housewives of summer cottages use all their creative imagination to make a real work of country art out of unnecessary rubbish. Planting in such a flowerpot is performed in early spring, and throughout the summer cottage, people around will be able to enjoy bright annual flowers.

Advice ! It is best to make outdoor flowerpots from imported rubber, as it is softer and more elastic. Domestic tires are rougher, it is much more difficult for them to make a fancy flowerpot shape.
It is flower beds and flowerpots that are most often made from old wheels. The simplest option for flower beds is considered to be filling the wheel with soil, planting inside flower seedlings.

It is rubber that has become the most popular material for creating summer cottages. Don't know how to make do-it-yourself flowerpots for the garden? We offer step-by-step instructions for making a garden vase from an old car tire.
- We choose a variant of the shape of the pot.
- Draw the selected shape on the tire with chalk.
Advice! It is better to use the wheel together with the disc, in which case you can get a product with an original foot.
- A sharpened knife is required to cut the tire. You can use an electric jigsaw if you need a complex pot shape.
- The cut tire is turned inside out.
Advice ! In order to make it easier to turn the tire over, you need to start from one edge, then smoothly move clockwise (in a circle).
- Additionally, you can partially cut the tire on the tread side from several sides.
- We grind the edge of the pot with a sander, improving the aesthetic appearance of the product.
- Let's start decorating the legs of the vase. You can paint the leg, or leave it in its original form.
- Before applying paint to the finished product, it is important to prime the product with high quality. It is advisable to choose light colors, they will not fade in the sun.
First, you need to cover the entire product with one tone. After the first layer has dried, you can proceed to decorating the pots with patterns, ornaments, unusual shapes. Decorating the edges of the "flower bed" with small pebbles, shells, you get original outdoor flowerpots. It will take 2-3 hours to create such a craft.
Vases for decorating a summer residence
To make the suburban area beautiful and well-groomed, you can plant a variety of flowers. If you supplement the garden decor with unusual outdoor flower pots, then the overall impression of coziness and comfort will only increase. Such flowerpots for summer cottages will not require a lot of free space, and if necessary, they can be placed anywhere in the garden. Even the most capricious annual plants grow well in such "flower beds". Plastic flowerpots are lightweight, if necessary, you can bring them into the house, protecting the plants from cold and rain. Such unusual decorative elements are placed along the garden paths, near the gazebo, on the steps of the stairs.

What materials are suitable for creating garden flowerpots
Do-it-yourself flowerpots for the garden can be created from various improvised materials: car tires, plastic, concrete, wood, metal, clay. Each flowerpot material has distinctive features.

Characteristics of clay
Clay is highly plastic. From this natural material, you can create any shape, texture, then planting gladioli in flowerpots will be a real pleasure. When firing clay products, terracotta material with high porosity can be obtained. Plants in such a flowerbed will not rot the roots, they will calmly "breathe".

Stone
Garden flower pots made of stone have high strength, they are durable, perfectly keep moisture in the ground. In addition, such products have an attractive appearance. Having certain skills, they decorate concrete vases with their own hands, cover them with paint or varnish.
Advice ! For additional protection from decay, stone or concrete vases are treated with an antiseptic.

Wood
Wood is a material suitable for any garden. The disadvantage of wood is its instability to high humidity. If you treat the tree with a special impregnation, and then varnish the pot, it will become a real decoration of the garden. You can plant moisture-loving flowers in such products.

Metal
Metal surfaces quickly heat up, so it is undesirable to place metal products in sunny areas of the garden without constant watering, otherwise the plants will die.

Concrete
Outdoor concrete flowerpots are similar to stone vases, they perfectly retain moisture. Concrete has low thermal conductivity, plant roots will not overheat. Such flower beds have a significant weight and are suitable for large areas.

Plastic
Plastic flowerpots can be seen at any summer cottage. They are ideal for planting perennial plants, you can pick up the pots of the desired color, size, shape.

Old vinyl records, bent in the form of bizarre shapes, are sure to attract the attention of neighbors. Samovars, aluminum teapots, exhibited along the garden path look original. Plastic bottles are also suitable for decorating a summer cottage.

Instructions for creating concrete vases
Concrete vases are considered the most durable, they can be made in a special form. Before pouring the cement solution into the mold, its surface is treated with spray or engine oil. Such a "trick" will simplify the extraction of the finished pot, help to avoid breaking the product.
The following materials are suitable for molds: silicone; plastic; wax; gypsum.
- We prepare the cement mortar.
- Lubricate the mold with machine oil.
- Fill in the solution.
- After complete drying, we remove the product.
The algorithm of actions, as well as useful tips on how to make a pot of concrete with your own hands in a video clip
Flowers for garden pots
If you choose flowers for flowerpots that bloom all summer long, you can get a harmonious composition. In large concrete flowerpots, you can plant 2-3 types of different colors. For example, gazan, dwarf ursinia, perfectly "get along" with each other.
If you place flowers with high stems in the center of the flowerpot, and plant low-growing varieties in a circle, you get an interesting flower arrangement. Pots with tall flowers are placed closer to the wall, and short annuals are distributed in front of the site.

Geranium (pelargonium) can be made focal (central) flowers. This plant is unpretentious to care for, it has a rich color palette. Semi-double and double asters have good density, besides, this plant has a significant flowering period.
Attention ! For planting in a flowerpot, dwarf or medium-sized variants of flowers that do not exceed 15-50 cm are suitable.
If plants that love light are chosen, in this case, the flowerpots should be located in the southern part of the summer cottage. Dahlias can be placed in the neighborhood with any flowers. When combining dahlias of different shades, you can transform the porch, make changes to the appearance of the garden. Small violets are suitable for framing garden paths. Having planted the ageratum of lilac, white, burgundy, purple, you can arrange the basis for tall dahlias and asters. For blue and red tall flowers, limnantes is suitable as decoration.

If there is a green lawn on the site, uncultivated land, you can make a bright flower area. Such an accent of flowers, additionally highlighted with tiles, stones, wood cuts, is best placed near a reservoir. If you need to decorate the steps on the stairs, the entrance to the bathhouse, the veranda, a variety of flowerpots will be the ideal way out. The photo shows do-it-yourself outdoor flowerpots. They will help avid summer residents turn their plot into a mini garden.
Rules for the selection of plants for planting
When choosing plants for flowerpots, you need to consider the following features:
- the plant must have a small root system;
- maximum endurance;
- unpretentiousness to excessive moisture and dryness;
- long flowering period;
- ease of care
For planting in pots, it is better to take hanging and bushy plant varieties.

Florists select varieties of flowers for "flowerpots", different in splendor of flowering, height, color, type of stem. It is best to place tall flowers in the middle of the flowerpot, and plant hanging varieties of flowers around.
In a large concrete flowerpot in the center, we will plant abundantly flowering pelargonium (geranium). It reproduces by cuttings and seeds. Over the summer, the plant needs to be fed with humate 2-3 times. This geranium will bloom from early spring to late autumn. We place dwarf asters around (up to 20 cm). Seeds are sown directly into a flowerpot; they will delight the owner of the summer cottage with their color from June to September.
The "background" flowers for small flowerpots are violets (viola). These border flowers are ideal for decorating playgrounds, balconies, stairways in the country.
Iberis begins to bloom at the end of May, so it is advisable to plant it together with rockeries, rock gardens, so that the flowerbed remains bright and beautiful throughout the summer. The most popular and widespread flower of modern summer residents has become petunia, despite its "capriciousness", the difficulty of growing seedlings, it is petunias that most often decorate verandas, balconies, facades of shops and shopping centers.

Conclusion
The design of suburban areas is becoming popular among modern owners of "suburban hacienda". Armed with a variety of materials, imagination, you can transform your garden with minimal cost.
 Forbidden Ancient Magic and Ancestral Spells
 The meaning of the name Adam Adam's family relationship
 How to dry a man's love on an apple