How to sew a cloud baby pillow. DIY cloud pillow. photo of original pillows in the form of a cloud
To sew, it is best to use fabrics made from natural materials and high-quality fillers. It can be cotton, linen, fleece, non-woven, plush. You can also make a pillow from unnecessary knitted blouses and sweaters. The main thing is that the material is clean.
Holofiber, synthetic winterizer or special balls are most often chosen as a filler. It is worth noting that a pillow with the last padding will be quite stiff.
How to sew decorative pillows?
The sewing process, as in any other case, begins with building a pattern.It can be drawn in two ways:
- You take as a basis a pillow of the usual shape (square or rectangular) and add decorative elements (for example, eyes, wings, ponytail, legs, and so on).
- You draw a pillow, shaped like an animal, an object, and the like. Such patterns can be either one-piece or one where each element will be sewn separately.
When everything is ready, the patterns of pillow toys, created with your own hands, are cut out and applied to the fabric. Then parts are made from patches. Then everything is sewn together and filled with filler.
As you can see, everything is pretty simple.
We sew a pillow in the shape of a lamb
It turns out very cute for sewing is done on three sheets.

Master class on how to make a lamb-shaped pillow:
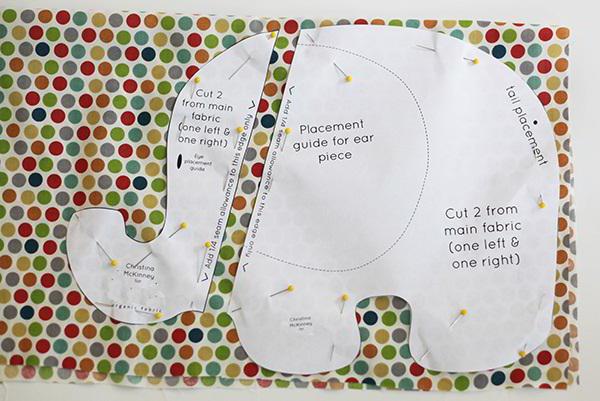
- Attach the pattern to the fabric and cut out the following number of elements: four legs, two muzzles and ears, two torsos (picture 1). Remember to connect the front and back of the body.
- Sew each piece with your pair, except for the torso, leaving small holes to one side (picture 2).
- Then connect all the parts to each other using pins and sew the body along the contour (picture 3).
- Fill the pillow with filler and sew the hole (picture 4).
A wonderful pillow toy is ready!
It is not necessary to make the pillow this way. You can sew a lamb with a cloud body from a homemade pillow toy pattern. With your own hands, draw a drawing of a cloud, legs and faces. The latter should be sewn onto the body.
Owl shaped baby pillow
Instructions on how to sew a pillow toy:

- Cut out all the patterns of the pillow toys with your own hands.
- Pin each piece to the appropriate fabric and cut out (Figure 1).
- As a result, you will have two parts of the body, eyes, wings, four legs and one beak and one belly.
- Sew eyes, belly, beak and wings onto the face of the owl's body (Figure 2).
- Sew the legs in pairs, leaving a hole at the top. Fill the parts with filler (Figure 3).
- Sew the feet to the front of the pillow (Figure 4).
- Cut out a strip of fabric. The volume of the pillow toy depends on its width.
- Sew the strip to the face of the owl along the outline (Figure 5).
- Sew the back of the pillow to the strip, but not all the way.
- Push the filler into the hole left (Figure 6).
- Sew up the hole
The pillow toy is ready in the shape of an owl ready!
Tip: if you sew on the belly only on three sides, and leave a hole on top, you get an owl-pillow with a pocket. Optionally, you can make Velcro, and then it will close. It is undesirable to sew a snake, because the craft is more a pillow than a toy.
We sew in the form of a giraffe
Neck pillows can be both comfortable and fun. You can often find such accessories in the form of a cat, dog, ducks, bears, and so on. The shape of the pillow resembles a roller, but details such as legs, ears, tail, give it a touch of affection.

Workshop on sewing an original giraffe neck pillow:
- Transfer the pattern to the fabric.
- You should have the following number of necessary parts: two bodies, four rectangles-legs, eight hooves, one tail, four ears, two horns.
- Fold the tail piece in half lengthwise and sew it, leaving a hole at the top.
- Sew two hooves onto each leg on one side.
- Then fold the piece in half and sew them, leaving a hole at the top.
- Sew the ear pieces completely in pairs.
- Sew the ears and fill them with filler.
- Push the filler into the legs and tail using a wooden stick.
- Sew the eyes, ears, horns, tail and all legs to the front of the pillow.
- Sew together the finished front of the giraffe and the back.
- Fill the pillowcase tightly with filler and sew up the toy.
The giraffe neck pillow is ready!
By the way, special stones are often used as a filler for such accessories - this way the shape of the product is better preserved.
Decorative pillows are one of the easiest ways to noticeably change your interior. We are used to the standard square or rectangular sofa cushions. But what if you fantasize a little and make a pillow, for example, in the shape of a cloud? This option would delight children, and with skillful use could make a unique and cozy and "adult" bedroom.

Decoration of decorative pillows
These decorative pillows are sewn in the shape of clouds, and they can be decorated in completely different ways. You can use stars, sun, snowflakes, raindrops and even flower-hearts for decoration.


 You can also decorate such a pillow with an embroidered lettering.


The color scheme of such hand-made pillows can be completely different - it is not necessary to use the traditional white-gray-blue colors for clouds and clouds. For example, the pink color of the pillows, as in the photo below, looks great in the bedroom or on the bed in the nursery.
More restrained colors are suitable for the living room or for children's games.

Look at the photo below - original pillows with inscriptions that display data about a particular baby: name, date of birth, weight and growth, not only an original interior decoration, but also, for example, an excellent background for home photo shoots and a good "memory".

Take a Whatman paper or a piece of cardboard measuring 50x30 cm. Draw a cloud on it with a pencil. Decorate the wavy edge with a cup, glass. Turn these kitchen items upside down. The bowl will help to make bulging waves, the glass - concave. In this process, complete improvisation is allowed. You can render the cloud the way you want. Lovers of regular shapes can fold the cardboard in half lengthwise, draw a wavy line on top and on the sides, cut along the outlined contour. Now the leaf unbends and a symmetrical cloud appears before the eyes.
Cutting, sewing
Fold the fabric in half, right sides facing each other. Attach the finished piece to the wrong side. Pin it off the canvas. Not pressing hard on a simple soft pencil, sketch out the outlines. Remove the pins and pattern, cut along the pencil lines, leaving 1 cm on all sides for seam allowances.
Zigzag or overlock the edges. If the machine has such an operation when you can simultaneously create a seam and then overcast it immediately, use it. If you have nothing to process the edges with, you don't want to do this on your hands, it's okay, you can leave them natural, but you need to sew 2 halves of the cloud pillow together. Do not forget to leave an open space of 10-15 cm on one of the small sides.
Through it, turn the pillow blank onto the front side. This hole will assist in filling the product. Put on a lightweight synthetic winterizer. First, you need to cut it into small pieces. Spread the filler evenly. Take a needle and thread to match, sew a hole on your hands. The cloud pillow is ready.
Decorating
If you are sewing for a child and want an applique on one side of the product, create it in advance. After you have made the cut, swept the edges of the parts, start decorating. The idea for the application will be suggested by a children's picture book. Transfer this design to the fabric.
Attach the appliqué details to the fabric of a suitable color, cut without seam allowances. Now place them on the front side of one of the cloud cushion pieces and sew on the overlock stitch. You can attach a piece of red tape, making a frame of a smiling mouth out of it, and stitch it with a regular seam. The blue tape will become the eyes. The cheerful face of the cloud is ready.
If these decoration methods do not work for you, attach the glue applique with an iron. Then sew the pillow parts, leaving a gap, and put a lightweight filler through it.
The child will be delighted. On a pillow with his favorite characters, he will fall asleep faster. And an adult will like a comfortable thing.
The cloud pads look very cute and fit especially well in toddlers' rooms. Parents often decorate cribs with these pillows. Usually, a soft pastel-colored fabric is used as a material to emphasize that this is a children's room.
Observing the clouds, we often have feelings of tenderness, lightness and softness.

Cloud-shaped pillows will be an excellent decorative element of a child's room.

It is better to fill such pillows with synthetic fluff or holofiber, these materials are hypoallergenic, keep their shape, perfectly withstand washing and dry quickly.
Finding a similar product in a store is problematic. But it is very easy to create such a craft at home. It is quite simple to sew, because the pattern is no different from the pattern of an ordinary pillow, it just has curly edges, reminiscent of a cloud.

The main thing here is to think over the design well so that it is interesting, to choose high-quality materials.

To make the interior fun, combine different pillows with each other.
Materials are selected based on the needs, but usually soft tissue is taken. The filler is also bought according to the needs. The most popular are synthetic winterizer or batting. In this article, we will take a closer look at the nuances of tailoring the product.

In the process of selecting fabrics, it is better to focus on the pattern and color of the wallpaper, other textile things in the children's room.

When thinking about the decor and style of the future product, be sure to take into account the style of the interior.
To sew such a craft, you do not need expensive or rare materials, the details can be found in any department or store for needlework.

It is better to sew baby pillows from dense natural materials.
- The fabric in the desired color.
- Threads to match.
- The filler is synthetic winterizer or batting, they create a flat surface of the pillow.
- Needle, sharp scissors.
- Pencil, marker, pen and crayon - for transferring the pattern to the fabric.
- Thick paper of the size that you want the pattern to fit on. You can use whatman paper, cardboard.
- On request, ruffles, embroidery threads, beads, appliques, buttons and other accessories.
The product is quite possible to sew by hand, but you will have to spend much more time than sewing on a sewing machine.

Before starting work, fabrics are necessarily washed and ironed with a hot iron in order to sew, taking into account possible shrinkage.

If you intend to make a pillow not only for decorating a room, but also for sleeping, then it is advisable to sew a pillowcase for it.
Pattern and fabric for sewing pillows
The pattern is very simple to create - download a picture with a cloud outline that you like. Print, if there is no printer, hold a white sheet of paper to the screen and draw an outline with a pencil. Cut out the cloud along the outline.

At this stage, you can improvise as much as possible, the cloud can be made whatever you want.
Now it remains to transfer the drawing from paper to the selected material for the pattern, for example, to cardboard or whatman paper. Attach the cut out cloud to the cardboard and begin to draw, but not along the contour, but retreating from it to the selected length. After all, the printed cloud is small in size, so you will have to retreat from it by 20-30 centimeters or even more, depending on the chosen size of the finished product.

First of all, you need to decide on the size of the pillow.
After transferring the drawing to the mold, cut it out with scissors. Ready! Later, the pattern is applied to the fabric, and outlined with chalk, taking into account the indents - about two centimeters. There are no special criteria for choosing a fabric, but it is undesirable to take a stretchy one. Fleece is ideal because it is pleasant to the touch.

Fold the fabric in half so that we have 2 identical parts.
If you want to create a cloud with legs, then follow the steps described above to transfer a picture from a picture from the Internet to paper. Just choose a cloud with legs.

Their popularity is well deserved - such products are easily sewn, they look incredibly cute.

They are ideal for decorating children's rooms.
Sewing pillows
There is nothing complicated when sewing a pillow, the main thing is to do everything carefully. If you plan to decorate the product with a ribbon or lace along the edge, then immediately after cutting out two parts of the pillow from the canvas, a ribbon is sewn to one of them from the wrong side. It is better to sew the tape, bending it a little, to get a beautiful curly line.

We cut out with allowances of about 1-1.5 cm.
Cut out two parts of the future pillow from the fabric, taking into account the indents of two centimeters. If you plan to embroider a design or attach an applique to one side of the craft, do it before you start sewing the pillow.

We sew along the contour on a typewriter with a regular seam, leave a hole of about 30 cm from below, as small as possible.
Fold the two pieces right side in. Sew two parts by hand or on a typewriter along the edge (taking into account indents), leaving about ten centimeters to turn the product out. Now fill the craft with a sealant. Sew the hole very carefully by hand.

We will fill our pillow for volume through the hole.

For the base of the filler, you can take a regular synthetic winterizer.


We outline the stuffed pillow along the unsewn edge.

We connect the two edges with the hem of the edges of the fabric inward and sew on a typewriter along the edge.
The cloud pillow is ready. If you want to make a whole composition of pillows, then save this template. You can make several different products and decorate a room with them.

It turns out this is such a cute pillow that will perfectly fit into the interior of any children's room.

For the base, it is better to choose plain fabrics or denser upper fabrics so that the pattern is not visible.
VIDEO: Master class on sewing a cloud pillow.
50 photos of original cloud pillows:


Cute decorative pillow "Cloud" is another highlight of your interior. Also, the pillow can serve as a spectacular accessory for a photo shoot, an element of decor for a romantic evening, bachelorette party, children's party. Such a pillow can be used as a gift for a loved one or a child - the fact that it is made by hand will add value to it and make it even more beautiful.

You need very little to sew a pillow:
- - Pattern in the form of a cloud of the required size;
- - A piece of fabric of any kind and color;
- - Filler (cotton wool, synthetic winterizer, holofiber, spunbond);
- - Threads of a suitable color;
- - Needle;
- - A set of safety pins for fixing the material;
- - Fabric chalk or marker;
- - Scissors.

The small size of the pad makes it possible to sew it quickly and easily without using a sewing machine.
As a filler, you can use any of the materials listed above that are most available to you. Even many small patches will do. I have a large piece of spunbond, I used it by cutting into strips. As for the patterns, it is better to print the cloud picture on two sheets, cutting it in half in a text editor (each half of the picture is on a separate sheet).
So, let's start sewing the "Cloud" pillow.
1. Cut all parts of the pattern, lay out on the seamy side of the fabric and circle. Attention! The fabric should be folded in such a way that the lower edge of the cloud coincides with the fold line of the fabric: this way you will need to stitch much less.

2. Fix the upper and lower layers of fabric with safety pins so that they do not come off, and you can cut two layers at the same time. Cut out the cloud shape.

3. Sew both layers from the seamy side, stepping back a little from the outline, leaving a little unstitched space at the edge for filling.

4. Remove the pins, turn the figurine out.

5. Fill the pillow tightly with filler. Sew up the filling hole with a blind stitch.
 Forbidden Ancient Magic and Ancestral Spells
 The meaning of the name Adam Adam's family relationship
 How to dry a man's love on an apple