Building a garage with your own hands. Building a garage with your own hands: a step-by-step guide from scratch, how I build a garage. Do-it-yourself strip foundation for a garage
The construction of the garage can be ordered by third-party specialists. You can also study the available instructions and build a great garage with your own hands. In this case, you do not have to spend money on anything other than building and finishing materials. You will personally control each stage of work and be sure of the quality and reliability of the finished structure.
Choose the right material for building a garage. The design can be made of "stone" building materials and metal. Brick, foam blocks, cinder blocks, etc. are usually used as stone materials.

The stone structure is characterized by higher reliability when compared with metal structures. The metal garage wins in terms of complexity and speed of construction. Otherwise, you will have to decide on a suitable building material yourself.

First, the procedure for building a garage from stone materials will be considered, and at the end you will receive recommendations for the construction of a metal garage.
Project preparation

A good project is the key to success. Project documentation can be the most modest. The main thing is that the following information should be reflected in the project:
- tasks assigned to the future structure. A garage designed solely for storing a car will be different from a building in which it is planned to carry out any other repairs. Be sure to consider this point and reflect your wishes in the project;
- construction dimensions. They depend on the requirements for the future garage and the area of \u200b\u200bthe available construction site. To store a passenger car, a room of 3x6 m is enough. For the rest, be guided by your needs and capabilities.
Consider the above points and draw a sketch of the future garage on paper or in a computer program.

Marking and earthworks
Transfer the finished sketch to the real area. A number of reinforcing pegs will help you with this. Usually bars with a diameter of 12 mm are used. You will mark the corners and sides of the garage with pegs driven into the ground and a rope stretched between them.

After marking is completed, proceed to the main earthworks. The earth can be dug with the help of special equipment or manually. If you are planning to equip a viewing hole in the garage or even a full-fledged cellar, it is recommended to use the help of companies specializing in earthworks. Digging such a large hole by hand is very difficult.
In the process of digging, consider the features of the future foundation. For a strip base, a trench with a depth of 60-100 cm is sufficient. The specific depth depends on the climatic conditions and the type of soil at the construction site. A meter depth is sufficient in most cases.
Level the bottom and sides of the pit. An ordinary shovel will help you with this.

Foundation device
Today, there are many types of foundations. Private garages are usually built on rubble concrete foundations. This is a relatively budgetary and extremely easy-to-arrange system that you can do yourself.

First step. Lay rubble stone in the trench. This stone should be placed in layers, spilling each layer with a concrete solution. Prepare the solution on the basis of cement M400 and above. Lay the stone up to the top of the hole.
Second step. Install a wooden formwork for the base around the entire perimeter of the pit. Assemble the formwork structure from boards. Boards with a width of about 10 cm are suitable. In general, the design is set strictly according to the level.

Third step. Lay moisture barrier material over the plinth. Two layers of roofing material will be more than enough. The material is laid dry.
Fourth step. Fill the basement of the future garage with concrete mortar to the level set by the formwork.

Installing gates, arranging walls and erecting a roof
First step. Install the gate. This element is installed strictly before the construction of the walls. Weld reinforcement bars with a diameter of about 12 mm to the gate frame. Thanks to the bars, a stronger connection between the garage door and its walls will be provided. During the construction of the walls, the reinforcement will be embedded in the seams. Install the gate strictly vertically. After leveling the gate, fix it with wooden braces.
Second step. Start laying out the walls from the selected material. The next row of masonry, regardless of the material used, must overlap the seams of the laid row. Directly masonry should start from the corners. Be sure to check the verticality of the walls, the correctness of the angles and the horizontality of the rows of masonry at each stage.

Third step. Mount the roof of the garage at a slope necessary for the removal of atmospheric water. To obtain a slope, make end walls of different heights. Traditionally, a slope of 5 cm per 1 m2 is performed. For example, if the garage has a length of about 6 m, the total height difference will be about 30 cm.

The overlap of a private garage will look like metal beams with additional filing of wooden boards. Prepare the I-beams. Their height should be about 12 cm. Use the beams so that their length is approximately 250 mm longer than the width of the future garage. Insert these beams into the structure by at least 100 mm. At the support points of the beams, cinder block, brick or other building material used should be replaced with monolithic concrete blocks.
Lay the beams across the building at a distance of about 800 mm from each other. Beams are laid with embedding in a long wall of the building and the same slope as that of this wall.
Step four. Fasten wooden boards 4-5 cm thick along the bottom of the beams. Lay the boards as close to each other as possible. Cover the boards with roofing material. The edges of this waterproofing material should extend approximately 100 mm onto the wall.
Fill the roofing material with slag or cover the waterproofing with another insulation, for example, mineral wool insulation boards. On the rear and front edges of the roof, you need to install visors protruding by about 40 mm. Use boards to make canopies. Pour a cement screed about 3-3.5 cm thick over the insulation. Try to level the screed as carefully as possible. Be sure to treat the frozen screed with a bituminous primer.
Step five. Finally, the roof must be waterproofed. To protect against moisture, you can use roofing material already familiar to you. This waterproofing material is laid using the fusing method. Also, roofing material can be fixed using bituminous mastic. Lay sheets of roofing material with an overlap of about 100-150 mm. At the edges of the roof, overlap the visor.

Flooring and paving guide
Make the floor at the level of the upper border of the base or slightly higher. The floor structure must be strong enough to support the weight of the vehicle and other loads. For pouring, use concrete prepared on the basis of cement grade 500. Or buy ready-made concrete grade M200. The thickness of the fill layer should be about 10 cm.
First step. Carefully level the base for pouring the floor.
Second step. Set the beacons to the required level and pull the cord between them. Lighthouses can be made, for example, from a profile pipe or other suitable material.
Third step. Lay a crushed stone pillow about 5 cm thick on the base.
Fourth step. Pour concrete in strips between the beacons. After all concrete has been laid, the surface must be carefully leveled.

Fifth step. While the floor is gaining strength, take care of outdoor work, in particular, a blind area device. In the case of a garage, a blind area 50-60 cm wide is sufficient.

The blind area is created in the same order as the floor, i.e. first you install the beacons, then prepare the gravel base and pour the concrete solution. Only first you need to install boards that will mark the boundaries of the blind area, i.e. make formwork. The blind area itself is recommended to be done with some slope from the walls of the garage. The recommended thickness of the structure is 40-60 mm.
As a rule, they do not pay special attention to finishing the garage. In most cases, the owners simply rub the walls with a cement mortar and cover them with a layer of plaster.
A more significant point is the thermal insulation of the structure. Mineral wool and polystyrene slabs are suitable for insulation.

The ceiling, walls and garage doors are insulated in a similar manner. A crate is attached to the surface to be trimmed with a step equal to the width of the insulation plate, then a plastic film is laid on the crate, a heater is laid over the waterproofing, the laid plates are covered with moisture insulation and at the end the finishing sheathing is performed, for example, clapboard, siding or other material of your choice.

The procedure for the construction of a metal garage
The arrangement of a metal garage requires less money and time.
First step. Make a foundation. Prepare a trench with a depth of about 400 mm along the perimeter of the future metal structure. Fix the formwork boards along the outer boundaries of the pit. Make the formwork of such a height that after pouring the solution layer protrudes at least 10 cm above the ground. Pour the solution immediately over the entire area.
Second step. Make a frame from a profile pipe. You will need a welding machine. Attach the frame elements to the dried concrete base. For fixing, use an anchor with a length of about 20 cm and a diameter of about 14 mm. Anchors can be made from rebar. For greater convenience, pre-prepare holes in the concrete with a diameter equal to the diameter of the anchors.

Third step. Weld the lower belt of the garage frame to the hammered rods. For reliable fixation of a 4x6 m structure, 15 anchors will be enough. Continue to weld the transverse chords of the structure until you get the frame of the required height.
Fourth step. Sheathe the frame with sheet metal. Sheets with a thickness of 3-4 mm will suffice.
Fifth step. Insulate the walls of the garage from the inside. To do this, first attach a frame of wooden bars to the walls. Place the bars in increments equal to the width of the insulation plate. For thermal insulation, it is most convenient to use mineral wool or foam. Previously, the wooden frame should be covered with plastic wrap, and already a heater should be laid on it. Lay a vapor barrier film over the thermal insulation. At the end, sheathe the walls with clapboard, OSB, siding, chipboard or some other material of your choice.
Thus, if you need a simple and inexpensive garage, give your choice in favor of a metal structure. If properly erected and carefully handled, a metal garage will last a very long time.
If you want to have a capital and most durable structure, make a garage out of concrete blocks, bricks and other similar materials. Both tasks are solved without any problems on their own, you just need to carefully follow the instructions and unconditionally follow the main recommendations.
Successful work!
Video - Building a garage with your own hands
A frame garage will be an excellent solution for storing a car. It can be made warm, dry, comfortable. Then in such a room you can repair the car, store tools, as well as auto parts, preservation and much more.
Now frame construction is gradually gaining more and more trust and popularity. Of course, you can build or expanded clay blocks, other traditional materials. However, it is for a garage that this option will not be entirely rational, since it will require significant financial investments. A frame garage will become a reliable building for storing a car, while it can be built in a short time, at minimal cost.
A good solution is to build a frame garage with your own hands. Then the motorist will be able to perfectly save on work, since he will not need to invite qualified builders. Given the relatively low weight, the relative simplicity of the design, frame garages can be built on their own without problems. The main thing is to know exactly about the features of materials, tools, familiarize yourself with the algorithm of work, remember the step-by-step instructions.
Advantages of frame garages
Let's denote the key advantages that distinguish the construction of a frame garage with your own hands.
- Democratic price. Ultimately, significant savings can be made by purchasing building materials and tools wisely.
- The design is lightweight, so there will be no problems with installation. People do things on their own. Lifting equipment is not involved, which significantly saves money.
- Making a frame garage is relatively simple. If you know the algorithms of work, read the step-by-step instructions, there will be no difficulties in the process: you can really build a frame garage with your own hands.
- There are practically no seasonal restrictions. The construction of a frame garage is also allowed in the winter, although laying the foundation will be somewhat more difficult.
- The building will have decent technical characteristics. Frame garages attract strength, durability, wear resistance. They are not afraid of negative atmospheric and mechanical influences.
- Work can be completed in a short time.
Everyone will be able to quickly see the benefits of frame garages if they watch a video, a photo with finished buildings. Such buildings serve for many years, retaining their original technical characteristics.
There are some nuances. It is very important to carefully observe the technology, remember all the features of construction. It is advisable to think carefully about the insulation, wall decoration. A good solution is to prepare in advance a sketch of a frame garage, make a drawing and make the appropriate calculations. You definitely need at least a minimal set of professional tools.
Of the minuses, only one thing can be noted: if you do not follow the algorithms, violate the construction technology, the characteristics will not correspond to the specified ones. But this applies to the construction of any garage, regardless of materials.
Ultimately, subject to all construction technologies, it is possible to build a frame garage, which, in terms of its characteristics, durability and aesthetic qualities, will not be inferior to garages made of other materials.
We build a frame-type garage from a metal profile
Metal frames have a number of advantages. These are fast assembly, strength and fire safety, durability and increased wear resistance. Of the minuses, it is worth noting the higher price of materials, as well as some difficulties in terms of work technology. You must have a good command of the grinder and have the skills and experience of welding. Of course, you will also need a welding machine, which will slightly increase costs. However, this is not so significant if the motorist is able to adequately cope with them on his own.
For work, you need metal rolling or a curved profile. We will try to highlight the main stages of work. This is a short algorithm for building a frame garage with your own hands.
- First of all, a starting profile is laid on the foundation. Fixing is done with anchors.
- Profiles with each other must be carefully welded. In principle, fixation using self-tapping screws is allowed, however, experts say that such a connection is not strong enough.
- The perimeter is completely boiled - the lower part of the frame.
- Then 4 vertical racks must be installed in the corners. Each profile is placed with an angle outward and then welded to the anchors and the lower perimeter.
- Then comes the turn of the assembly of the upper perimeter. It consists of a metal profile, and is welded directly to the vertical support posts. It will become in the future the base for roof trusses.
- The frame is ready, to which horizontal stiffeners, vertical intermediate racks are welded.
- The roof is made of the most suitable type. There are flat, gable and shed roofs.
- The gate is made from a corner. The main frame of the swing structure should be rectangular. Be sure to weld horizontal stiffeners.
- The gates are protected from corrosion with a special paint, and are also insulated with polystyrene foam, mineral wool or other material.
- An additional profile is welded above the gate opening to strengthen the structure of the frame garage.
- It remains only to weld the hinges, install the shut-off valves on the gate according to the instructions.
Experts note that it is more profitable to order a ready-made metal frame of the garage.
We cock a frame garage from bars
This is a good option for maximum savings in the construction of a frame garage, however, a timber frame must be treated with a special compound to provide fire protection. The construction of a garage from beams resembles the work in the construction of a metal garage. When the lower harness is assembled, vertical and intermediate racks are installed, it remains to assemble the upper harness and install the truss system.
There are some nuances that you should be aware of when working with timber.
- The beam must be of high quality. Masters note that the optimal size is 15 by 15 or 10 by 10 cm.
- The jibs should be done using a board 10 by 5 cm.
- Self-tapping screws, anchors should be used as fasteners. Anchors fasten the lower trim to the foundation, and for mounting other elements, you can take self-tapping screws. A good option is to have special perforated plates for fasteners.
- It is recommended to keep a distance of 30-120 cm when installing vertical posts.
Materials, tools needed for construction
The set of materials depends entirely on the type of frame garage. From the tools you need to stock up on shovels, a hammer and a level, as well as have gloves and formwork with you.
In our case, the material will be wood. You can choose linden, aspen, larch. It is worth noting the unique characteristics of larch. This tree is durable. It is absolutely not afraid of moisture, under its influence it becomes even stronger.
There are only two types of garage frames. It is from them that you will need to choose one option.
wooden garage
The wooden frame attracts with impeccable environmental cleanliness, ease of processing. In addition, this material is energy-saving. However, if we talk about the cost of the material, we can note its relative high cost. When compared with metal, the wood option will be more expensive.
Garage from profile pipes
This frame is much more economical. At the same time, it has worthy technical characteristics: it is distinguished by ease of installation, strength, durability, good resistance to atmospheric and mechanical negative influences.
Building a frame garage with your own hands: step by step instructions
When there is already a certain place for the construction of a garage, you can begin to work out all the stages of construction, and then directly to the activity. The first step is drawing up a drawing.
Drawing
Some masters believe that you can do without a drawing. However, experts with extensive experience are sure: it is necessary to make a drawing, think again about the size and location of the garage, imagine it constructively. It is important to make a competent calculation of materials, to determine the approximate budget for the construction of a frame garage with your own hands.
Foundation
The stage of laying the foundation is the most responsible. First you need to think over the features of the location of the garage, determine how convenient it will be to drive up to it. It is advisable to build a garage near the house. It is important to take into account the height of the groundwater, the composition of the soil.
Foundations can be of different types. Consider the main features of the three types of foundation.
- Tape is more economical from a financial point of view. It is universal, suitable for almost any soil.
- Monolithic is installed with slab pouring, reinforcement. Then you need more and. The foundation is characterized by increased strength, but requires a long drying of the concrete base, which takes an average of a month.
- The most budget option is a pile foundation. But it is not very suitable for a garage, it requires increased floor strength. It is difficult to install it without special equipment.
Do not forget about the cellar and the viewing hole when you build the foundation. Now we will present a step-by-step instruction for the construction of a monolithic tape type foundation. It is he who is most suitable for a frame garage.
Building the foundation of a frame garage: an algorithm
Remember all the nuances. It will be easier for you to install the foundation if you follow all the recommendations.
- Foundation preparation. The area is being cleared. Eliminated not only debris, plants, but also the top layer of the earth. Markup is being done. To do this, you will need pegs with cords, a square and a laser rangefinder, a plumb line with a level. The markup is from the corner. You need to drive a peg using a plumb line. Then you need to set aside a distance equal to the length of the future garage. Then the next peg is driven in, and a cable is pulled between them. From the first peg, you need to set aside the width of the foundation, drive in the third peg and make sure that a right angle is created. Then, when all four pegs are driven in, it is important to double-check the accuracy of the angles, the lengths of the sides. To mark the inner part of the foundation, it is necessary to retreat to a distance equal to the width of the strip foundation. You should try not to make mistakes.
- Digging a trench. Trenches are dug according to the markings. The depth will depend on the level of groundwater, soil characteristics. The walls must be made vertical. The bottom must be carefully compacted, and then covered with geotextiles and covered with a layer of sand. Then everything is compacted again, already using irrigation.
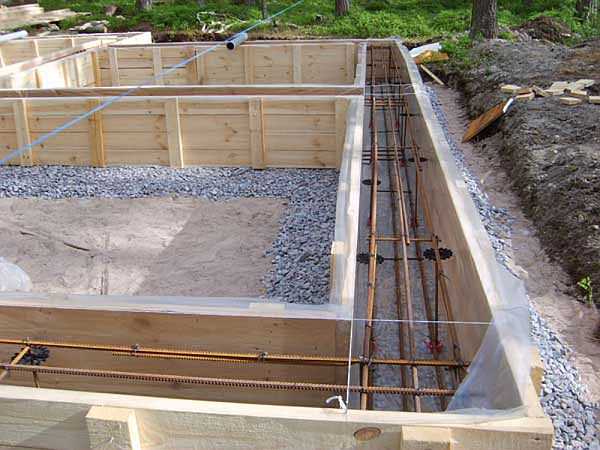
- Formwork assembly. For this, plywood and fiberboard, scrap metal, plastic and boards are useful. Nail heads must be inside the formwork, and protruding ends must be bent. A good solution is to wrap the formwork with polyethylene. Then the desired moisture regime will be created, while the concrete increases its strength during solidification. Shields must be reinforced with ties.
- Reinforcement. Steel bars are needed here, as well as knitting wire for fastening them. The frame is placed on supports. Remember: there should be a distance of 5 cm from the formwork to the reinforcement.
- Foundation pouring. Concrete must be poured at the same time. This is important to ensure the integrity of the structure. When the concrete is poured, it is pierced with thin metal bars, compacted using a vibrator. Then the concrete should be covered with polyethylene. Water the concrete for the first 7-10 days. Then the surface is carefully polished.
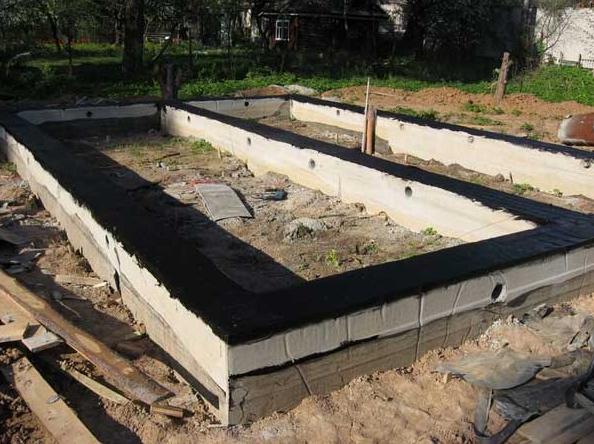
When the base is already ready, be sure to provide its waterproofing using roofing material or bituminous mastic.
Roof
This well describes how to build a garage roof
At the final stage of building a garage, it is important to equip the roof. It must be borne in mind that there will be a noticeable load of snow and wind. It is necessary to take care of the competent installation of the truss system. It is advisable to first assemble the structure on the ground, and only then fix it on the garage, fixing it to the walls. The optimal solution is a gable isosceles roof. For fixing, a skate is required, as well as a crate of bars. As a base material, you can take a bituminous sheet, tile or corrugated board. Remember that the size of the overhang should be at least 40 cm. Also, do not forget about the drains.
Finishing, insulation
Finishes and insulation
Garages are lined with siding and eurolining, profiled sheet and facing bricks. It all depends on your taste, planned budget. You also need to insulate the garage from the inside. Mineral wool is optimal. A good option is to use ordinary plastic wrap for sheathing the walls of the garage from the inside.
At the final stage, it remains to take care of the garage doors. You can choose among sliding and swing, retractable and sectional models. In most cases, motorists prefer traditional ones. If necessary, it will not be difficult to make them personally, using corners, a metal sheet. To fix the elements, installation, you need to use a welding machine.
Building a garage on your own is quite simple. It is important to choose a certain technology. The frame garage is a fairly simple design. For its construction, there is no need to attract special equipment, hire workers to clear a large area. It will take only a few free days and standard tools.
There are several methods for building a frame garage. They depend on the chosen material - wood or metal profile. Each of the options has its own advantages. In the process of building a frame garage, you will have to get acquainted with the features of building a foundation, installing a frame, wall cladding and installing a roof. In order not to make mistakes in the calculations, you can invite a specialist.
Advantages
The cost-effectiveness and practicality of frame structures have been confirmed by years of construction practice. In most cases, the structure is built of wood, which significantly reduces the weight of the building and facilitates the work on the foundation.
The advantages of a frame garage include:
- low cost of construction;
- high strength of the building;
- low thermal conductivity;
- high speed of work.
Another significant advantage of a frame garage is that each car owner is able to build it on his own. Bolts and self-tapping screws are used to fasten many elements. For this reason, work can be done at any time of the year.
To carry out the construction, it is enough to invite two installers. Also, the construction site will not be littered with debris after work, special equipment will not be needed.

Low thermal conductivity has a positive effect on saving fuel or electricity spent on heating the garage. For this reason, starting the car can be carried out instantly even during severe weather. Also, the frame garage is highly durable. He is not afraid of strong winds, long rains and spring floods.
Construction types
What type of frame garage to choose for construction? Wooden structures are considered the most environmentally friendly. The materials are also easy to process, cheap and readily available.
However, the cost of the garage is reduced due to the use of a metal profile. If you make a garage from this material, the structure will be quite durable. Also, when choosing a profile pipe, the task of installing the frame is facilitated.
Preparatory stage
Before starting construction, it is worth choosing a place for the future garage. Planning should take into account all the nuances of the exit and entry of the car. Equally important is the distance between the garage and the residential building. For example, for heating technical rooms, many owners connect them to central heating.
It is better that the building is located near the building. When choosing the optimal dimensions of the future garage, one should take into account the standard size - 10x10 m.
When choosing the type of foundation, it is worth clarifying at what level the groundwater occurs. You should also familiarize yourself with the quality of the soil. The main types of foundations:
- The cheapest bases for a garage are columnar and pile. They are strong and reliable. However, such foundations are more appropriate when creating a full-fledged frame house with a garage. A similar type of foundation is also used if it is necessary to build a garage with a very strong floor. A significant drawback of the construction of a pile foundation is the need to involve special equipment.
- Monolithic - is a slab, which is poured with mandatory reinforcement and fine finishing. Such foundations have maximum strength and long service life. The disadvantage of the foundation is the need to dry the poured concrete for a month.
- Tape - can be prefabricated or monolithic. Such foundations are more profitable to build from a financial point of view. A strip base is also used for building a garage on different soils.
Even during the construction of the foundation, it is necessary to equip a viewing hole and a cellar. The most popular in the construction of a frame garage is a monolithic strip foundation. Instructions for its construction are presented below.
Solution preparation
On the site that is planned to be occupied by a garage, it is necessary to carry out thorough preparations - remove all debris, level holes and mounds, remove plants and fertile soil. Then the markup is done. For this you will need to have:
- level;
- wooden pegs;
- twine;
- laser rangefinder;
- plumb.
Marking should be carried out from one of the corners of the future garage. Using a plumb line, it is necessary to drive in the first peg. From it you need to measure the length of the garage. Then a second peg is driven in. A string is stretched between them.
After that, the width of the garage is measured from the first peg, and then the last, fourth peg is driven in. Now it is important to check the coincidence of the garage diagonals and the accuracy of the corners.
Next, you need to mark the inside of the garage. To do this, step back from the string inside the site to the width of the foundation. After that, the ropes are pulled along the inner surface of the future base, thereby preparing the markings for digging a trench.
Important! To properly build a frame garage with your own hands, you should carefully take measurements and monitor the accuracy of actions.
Trenching and formwork
When the marking is completed, it is necessary to start excavation. The depth of the foundation will depend on the characteristics of the soil and the height of the groundwater. The walls of the trench must be strictly vertical. After digging is completed, the bottom is covered with geotextiles, and then covered with sand. Be sure to tamp the pillow.
The formwork is erected from fiberboard, plywood or plastic. Metallic materials may also be used. Formwork construction features:
- nail heads should be placed inside the formwork;
- the ends of the nails that stick out from the opposite side of the boards must be bent.
- formwork must be wrapped with plastic wrap.
Thanks to waterproofing, an optimal moisture regime is ensured when the concrete gains strength.
Shields are mounted close to the walls of the dug trench. They also need to be strengthened with transverse screeds and braces. From the walls of the formwork to the stakes should be 100-120 cm. The transverse jumpers are at a distance of 50-100 cm from each other.
In the process of reinforcement, steel bars are used, fastened with knitting wire. The frame must be installed on plastic props. From the reinforcement to the surface of the foundation should be 5 cm.
Foundation pouring
It is better to pour concrete around the entire perimeter at the same time. This will ensure the solidity of the base. After pouring, the solution must be compacted with a deep vibrator. Then the base of the frame garage is covered with plastic wrap. In the first few days, concrete is poured with water so that it does not crack. The surface should be sanded. The finished foundation of the frame garage must be covered with roofing material or bituminous mastic (as in the photo).
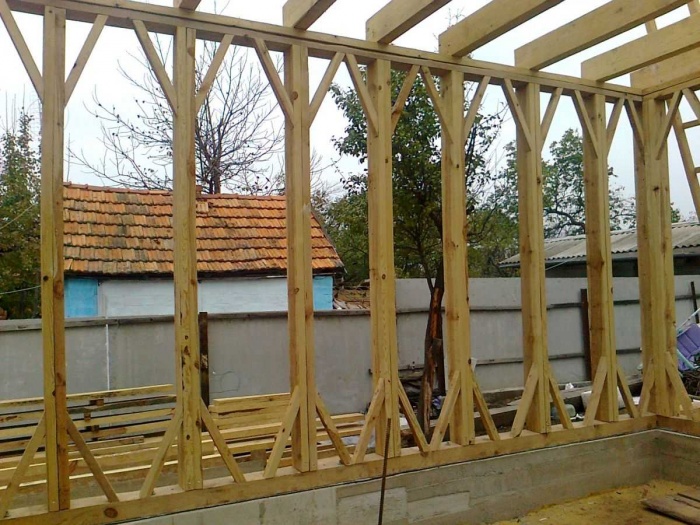
Frame erection
Step-by-step instructions for building a building depend on the material chosen. The garage frame made of stainless metal profile is mounted using a welding machine. In more detail, it is worth considering the construction of a wooden frame garage. Before construction, all boards and beams must be treated with an antiseptic and fire retardant. This will increase the strength and durability of the structure.
A frame garage made of wood begins to be erected from the base. For this purpose, choose larger boards. They are installed on the foundation with metal brackets. After mounting the corner brackets, which are fixed with additional supports.
Then perform the upper strapping of the frame. The garage structure is strengthened with additional supports, doors and windows are tied. This makes the frame strong and lightweight.
roof construction
The roof for a frame garage can have a different design. It is flat, with one or two slopes. In the latter case, it is necessary to know all the subtleties of the construction of the truss system.
First, farms are erected - they are knocked down on the ground, and then they rise up. The first farm should become a template for all subsequent ones. Only with identical dimensions of all trusses can the correct installation of the roof be achieved.
After that, the crate is performed and the roofing is laid on the roof. You can choose corrugated board or metal tiles - such materials are quite light and reliable. In order for precipitation to be removed from the roof more efficiently, a drain should be installed.
wall cladding
Outside, the wooden frame can be sheathed with various materials - it depends on the financial ability of the car owner. Moisture-resistant plywood, sandwich panels, edged boards can be used as a material.
From the inside, the walls are sheathed with clapboard, plywood or drywall. Mineral wool or foam boards are used as insulation. At the final stage, metal gates are installed. They may differ in the way they open. The most common option is swing gates. After installation, the metal surface should be treated with sandpaper and coated with a primer, and then with paint. This will help prevent corrosion of the metal.

Results
Any car owner can figure out how to build a frame garage with their own hands. In the constructed structure, it is necessary to carry out finishing, as well as take care of sewerage and electrical wiring. You should also think about how to make heating.
A frame garage can be built in a short time and at minimal cost. In this case, all work can be performed by a non-professional. This is a significant advantage over brick or block garages. Another important advantage of the design is its mobility. The frame garage can be quickly assembled and disassembled to be moved to another location.
A properly equipped frame garage will provide reliable storage of the car at any time of the year. People are increasingly giving preference to frame buildings. Wood is extremely easy to process and install, and financially, this option is one of the most profitable.

There is nothing super complicated in the construction of a frame garage. You can handle the basic construction activities with your own hands. You just need to understand the main features of such work and follow the instructions in everything.


One of the main advantages of a frame garage for most private developers is the possibility of building it with your own hands. It is enough to familiarize yourself with the main provisions of the manual and do everything according to the instructions. Start by preparing the necessary project documentation with all required drawings.
Required project documentation

The listed drawings will make the work on arranging the garage as simple and convenient as possible. With their help, it will take a minimum amount of time to complete the necessary construction activities.
However, it is extremely difficult to draw up such a detailed project without the required skills. In such situations, it remains either to turn to professionals, or to select suitable drawings from open sources.
Place for a garage
Before you start building, choose a suitable place for arranging a garage. Think over everything so that in the future there will be no difficulties with the exit and entry of the car.

It is better that the garage is located near the house. The optimal size of the site for arranging a garage is 10x10 m. You can choose the dimensions of the garage itself at your discretion. It is strongly not recommended to tie the building area to the dimensions of a particular car, because after a while you can change your car to a larger model.
Clear the selected site of any kind of debris and other third-party items. Remove vegetation from the site. Level and tamp the ground.
Mark out the site according to the plan of your garage. Simple pegs and any rope will help you mark the territory.
Garage Building Guide
Start building a frame garage. You need to start, as with the construction of any other structure, with the arrangement of the foundation.
The first stage is the foundation

The finished frame building will have a relatively small weight, due to which the requirements for the strength of the base are significantly reduced. The most important thing is that the site is level and stable.


If desired, a small frame garage can be built even on compacted gravel or a flat asphalt path, but it is better, after all, to give preference to a concrete surface.
Dig a trench around the perimeter of the future foundation. A pit with a depth of about 400-500 mm will be enough. Install formwork.
Fill the bottom of the trench with a small layer of sand and gravel. If the foundation is being built on difficult soil, lay a reinforcing mesh over the compacted backfill.
Pour concrete solution. Filling can be done independently or entrusted to a specialized team.
In the case of self-filling, you will have to spend extra time and effort preparing the solution.


After pouring, the concrete must be treated with a special vibrator. He carefully compacts the mixture and removes excess air from it. In the absence of a vibrator, it is necessary to at least pierce the concrete in several places with a reinforcing bar. All recesses are subsequently sealed with concrete.
Leave the foundation to harden for 3-5 weeks. After that, you can proceed to other construction activities.


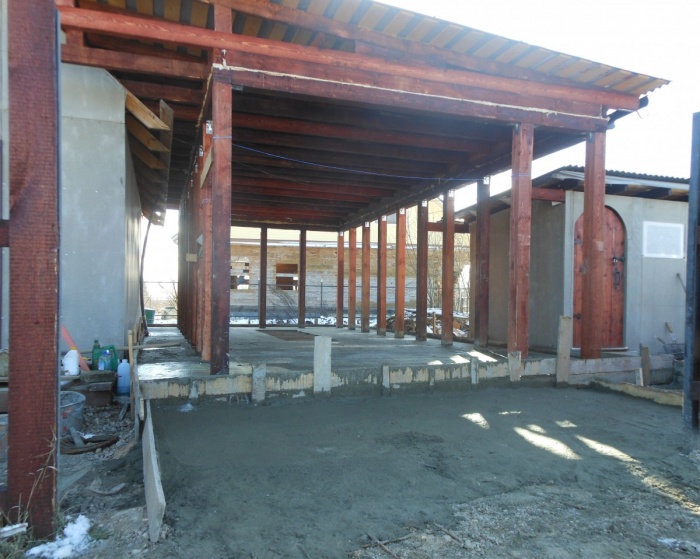
Stage two - gender


Start arranging the floor.
Backfill the area with gravel. Lay a reinforcing mesh over a thin layer of gravel and pour concrete. Lay a roofing material on the hardened concrete.
Lay wooden beams on top of the roofing material. Nail the deck boards to the timber.
If the level of groundwater passage and soil features allow, you can equip a viewing hole in the garage. If you wish, you can also make a full-fledged cellar. Such additions will definitely not be superfluous.
The third stage - the frame
After completing the work on arranging the base and floor, proceed with the installation of the frame.
To equip the lower part, use 10x5 cm boards pre-impregnated with an antiseptic. Mount the corner posts of the frame, as well as the gate posts, from a 10x10 cm beam. For the manufacture of all other posts, beams, as well as

For truss elements, use boards 10x5 cm.
Mount the racks of the lower garter in increments of up to 120 cm. These racks can be fastened to the bottom harness using corners and self-tapping screws, nails, or a tenon-groove connection.


Build the frame in accordance with the project.
If the width of the garage exceeds 4 m, it is preferable to use high-quality 10x5 boards rather than 10x10 beams for the manufacture of ceiling beams. They will make the finished building much stronger and more reliable.
For the manufacture of longitudinal elements and the necessary jibs, use a 5x5 cm timber.
It usually takes several days to assemble a garage frame. To make the work go faster and easier, you can enlist the support of 1-2 assistants.

Fourth stage - the roof

Fill boards 10x2.5 cm over the rafters - they will serve as a crate. Finishing roofing material choose at your discretion. You can give preference to both budget bitumen and more expensive materials such as euroslate, metal tiles, etc. At this point, be guided by your personal preferences and affordable budget.
Fifth stage - wall decoration

For the interior decoration of the frame garage, use the lining. Wall cladding is carried out with parallel arrangement of steam, heat and moisture insulating layers.
To install insulation layers, you need to fill the crate. Usually the crate is assembled from a wooden beam. The beam fastening step is selected individually in accordance with the thickness of the heat-insulating plates.

The outer skin can also be made using lining. Siding is often used. Choose the material of the outer skin of your choice.
Finishing is completed with the installation of double-glazed windows and doors. At this stage, you also have to make your own decision regarding the best option for the structures mentioned.
Stage six - gate

Choose your gate. A huge range of garage doors is presented on the modern market - from ordinary and most popular swing metal structures to modern automatic lifting gate systems consisting of several sections.


The cost of finished gates will vary in accordance with the features of their design, ease of use, quality of insulation and finish, appearance and other parameters. If desired, garage doors can be made with your own hands, having previously studied the provisions of the assembly manual for the selected type of system.
Choose the dimensions of the gate so that you can freely enter the garage. After a while, you can change the car - remember this and make an opening for the gate with some margin.
The seventh stage - interior arrangement

In conclusion, it remains only to carry out work on the internal arrangement of the garage. Recommendations for wall cladding were given earlier - lining is excellent for this work.
If there is an attic space, it is enough to lay out its floor with boards 25-30 mm thick and install a ladder.

An inspection pit and a cellar are arranged accordingly. Electrical wiring is being installed.

All other work is done solely at the discretion of the owner.

For greater convenience, water and sewer pipes are connected to the garage. It is also recommended to consider solving the issue of heating the garage so that it can be used as comfortably as possible even in cold weather.

Successful work!
Video - DIY frame garage
In order to extend the operational life of the car, it is necessary to keep it in comfortable conditions. Any machine does not tolerate low temperatures and high levels of humidity, which can cause it to break. To protect the car from adverse environmental factors, it is recommended to build a frame garage with your own hands. Such work has many nuances to be studied.
In the past few years, certain building techniques have become more popular than traditional stone buildings. This applies to frame houses and garages. This design is easy to install. When using high-quality materials, as well as observing all building codes and regulations, the end result is in no way inferior to classic stone structures. In some aspects, frame structures even surpass their predecessors.

The operational life of such a garage depends entirely on how reliably the foundation was made. And also a very important factor is the strength of the fastenings of the supporting elements. Simple installation allows you to save money and complete the construction in the shortest possible time. And the materials that are commonly used for this purpose are available and have a relatively low cost.
Another advantage of frame structures is their low weight. This advantage eliminates the need to attract specialized equipment during the construction. In addition, the low weight of materials reduces the cost of their transportation.
Note! The material for the frame garage may be different. For construction, wood or metal elements are used - the choice of the owner of the car.
Among other advantages of such a structure, many people note low thermal conductivity. If you correctly think over and perform the insulation of the garage, then in the winter the car will be in comfortable conditions. The strength of the structure also does not raise any questions.

Before starting construction, you need to focus on each stage. The choice of type of garage will determine the degree of protection for your car. Despite the fact that many experts note the small role of the material in the final characteristics of the building, there is still a difference. Therefore, the choice of a type of design must be approached with all seriousness, taking into account all the pros and cons.
Do-it-yourself steps for installing a frame garage
For the independent construction of this structure, you must have basic skills in the field of construction. It is advisable to learn how to use a grinder, and you also need to know how to handle welding equipment. Without these skills, construction will be much more difficult. Two people are required to install a modern frame-based garage.
The event for the construction of a frame structure consists of the following stages:
- site selection and preparation;
- foundation organization;
- building walls;
- roof installation;
- sheathing and insulation;
- gate installation.

Outlining a brief sequence of actions will help in drawing up a plan and drawing of a future building. First of all, you need to find a place for the garage. This takes into account the fact that a short and free entrance should be organized to the structure. The next step is to prepare the site for construction.
The construction of a frame garage begins with the foundation. There are several options for creating the basis for this building. Each of them has its own advantages and disadvantages. Then you can proceed directly to building a house for your car. It all starts with building walls. Next, the roof is installed, the resulting building is insulated. The gates are installed last.
To protect the metal structure from corrosion, it is recommended to use paint that will not allow the walls and roof to rust. It is worth noting that if you wish, you can buy a finished box. The price of a frame garage depends on the materials from which it is made. A budget metal option can be purchased for about 90-100 thousand rubles.

To date, there is the possibility of choosing the material from which the frame structure will be erected. The following types of structures are currently the most popular:
- from corrugated board;
- from a bar;
- frame-shield.
It is worth saying that each material has its own characteristics, not only operational, but also installation. Before choosing the type of construction, it is imperative to study all the nuances of the construction of the building.
DIY metal garagefrom corrugated board
If we sum up the cost of materials that will be required for the construction of such a structure, then the final price will be about 30 thousand rubles. Thus, a metal garage assembled from corrugated board is attractive from a financial point of view.

Regardless of what material is used to build a car garage, its optimal dimensions are 4.5 by 3.5 m. It is worth remembering that these dimensions are suitable for keeping one car. To build a frame garage for 2 cars, more space will be required.
The garage must be designed in such a way that it can accommodate not only the car, but also the necessary tools. The need for usable space does not end there. Inside, you need to organize everything so that there is room for movement.
Various metal profiles can be used for walls and roofs. Experts recommend using the most common version of the frame sheathing - C10 grade sheets. The length of such a metal profile is 2 m. As for the thickness, you should not use sheets for mounting a garage from corrugated board with your own hands, in which this indicator is less than 0.5 mm.
Note! To build a standard garage structure, you need to purchase about 23 sheets of this material. Most of them will go to the installation of walls.

The technology for creating walls involves the use of roofing screws. The joining of individual sheets is performed as follows: the edge of the next sheet overlaps the previous element. When sheathing the roof with corrugated board, it should be noted that a small overhang is required to remove precipitation. For this purpose, it is enough to bring the sheet out of the overall structure by 10 cm.
The time of installation of a structure of this type from corrugated board, as a rule, does not exceed 7 days. In order for the garage to be more durable, it is recommended to connect the frame racks with jumpers. As such stiffeners, a profiled pipe or a metal corner is most often used.
It is important to remember that the consumption of material during the installation of corrugated overlap increases by 20%. This figure must be taken into account when calculating the material for future construction.
Do-it-yourself garage frame-shield: the most budget option
In this case, wooden bars are used to mount the frame, and not. Boards are the material for sheathing, so this design needs proper insulation. Installation of a frame-panel house does not require the preparation of a preliminary drawing. The main thing is to choose a suitable design, manufactured on an industrial scale. In this situation, wall panels and a truss structure will be required.

Another advantage of a panel garage is the fact that it requires the least amount of finance to create it. When choosing this type of building, you can meet only 25 thousand rubles. Despite the simplicity of the design, such a garage copes well with its tasks. The car will be reliably protected from environmental influences.
In order to build this type of garage with your own hands, you must strictly adhere to a certain sequence of actions, which does not differ from the installation of other types of auto garage.
It is important to remember that all structures based on the frame are lightweight. For a garage of this type, it is enough to organize a strip foundation. Panel buildings are distinguished by presentability. Outwardly, they are more like a house. Therefore, such a garage can not only protect the car in the cold season, but also decorate the design of the site.
Timber frame garage: Reliable protection for your machine
In this case, timber is used as the material for the frame. Experts note that it is this garage that has the best characteristics. The car inside it will definitely not freeze. However, the positive qualities of such a building are often offset by its cost, which is 2 times higher than the price of previous types of garage. This fact often becomes the reason for refusing to install such a garage with your own hands. Photos of log houses allow you to visually evaluate the advantages of this design.

Many motorists are advised to choose this option, as it is reliable and has a long service life. Wooden bars have some advantages over metal profiled pipes, among their advantages are noted:
- ease of installation;
- a light weight;
- high environmental friendliness;
- presentable appearance.
Before starting the installation of such a design, it is necessary to pay attention to some nuances. To install the frame, you should select high-quality and durable bars. For a wooden garage with your own hands, it is recommended to organize a regular strip foundation. Its depth may vary depending on the design features (60-80 cm).
Note! Before proceeding with the installation of a wooden frame, it is imperative to draw up a drawing. It should contain all the calculated information about the dimensions of the bars, their number, connecting products, etc. The more detailed the scheme is, the easier it will be to navigate during work.

The joining of the beams during the construction of the frame garage must be carried out by the simplest method of "overlapping"
When erecting this structure, the masters are advised to connect the bars in the simplest possible way (for example, with an overlap). However, in this case, the costs will increase. As for the variety of bars, today on the construction market you can find two types of these products:
- whole;
- glued.
Related article:

Crafting tips, step-by-step technologies and design drawings that allow you to equip a garage.
The former are cheaper, but have some disadvantages. They are not so strong, after installation they shrink. Glued beams are of high quality and are resistant to deformation. Pictures of garages from this material can be easily found on the Internet.
In addition, the bars are divided into non-profiled and profiled. Products that belong to the first group require more careful processing and are cheaper than the second. Not all types of trees are suitable for mounting a garage structure. The selection of material is carried out taking into account factors such as the properties of wood and its cost.

The most budgetary material is pine. However, from such wood it is quite possible to make a high-quality building that will last for many years. It is worth remembering that such material is recommended for use in regions where a dry climate prevails. The disadvantage of such wood is that it is rather brittle.
For those areas in which there is a humid climate, it is desirable to select durable wood from deciduous trees. An excellent option in this case is oak. The disadvantages of this material include the fact that it is quite difficult to process.
When choosing a site for a future garage, it is recommended to take into account the fact that the entrance to the building should be as convenient as possible. For example, a good option for installing the structure is next to the gate. In this case, the facade of the building will be on the same level with the fence, which will allow you to easily drive into the garage from the street.
It is important to remember that if a low point is chosen as a place for this building, then water from the site will accumulate in the garage. This arrangement is categorically not recommended, since the car does not tolerate high humidity. The ideal option is to clear the site, which is located on a small hillock.

It is worth noting that it is best to choose a place located near an electrical line of 220 or 380 V. This will allow you to easily supply electricity after building a garage. With your own hands, you will need not only to make the structure itself, but also to equip it inside.
Useful information! When connecting the garage to electricity, it becomes possible to install a heating device necessary to ensure comfortable conditions.
Thus, the garage should be located on an elevated place in close proximity to the road. The structure should not act to the detriment of other economic structures. It is desirable that it be located near the power line.
How to build a frame garage: drawing up a drawing
A drawing is a document that allows you to summarize a plan for a future design. It indicates all the necessary dimensions and quantity of material. For people who do not have sufficient experience in construction, drawing up a diagram is a prerequisite.

On the Internet you can find many ready-made drawings. To save time, you can download one of them. In addition, today it is not difficult to turn to qualified specialists. Professionals competently and in a short period of time will make a drawing of the garage, taking into account the individual characteristics of your site.
When drawing up a project, it is necessary to specify the consumption of materials. This budget should take into account:
- support beams;
- corrugated board or wood cladding (depending on the type of garage);
- roof panels;
- auxiliary materials.
The estimate indicates not only the dimensions of the products, but also their cost. When compiling it, it is necessary to take into account the percentage of rejects and the cost of installing overlapping cladding (about 20%). If after installation there is a large amount of unused material, do not worry. With the help of boards, you can equip shelves in the garage with your own hands. The main thing to do when drawing up a drawing is to sketch a future design.

The scheme should contain information about the options for attaching the frame components, about the distance between them, as well as about the methods of fixing the panels to the frame. The distance between the lags on the roof must also be taken into account when creating a drawing. During the construction of the garage, it is recommended to use the diagram as an instruction. If it is correctly compiled, no assembly errors should occur.
How to build a garage with your own hands: site preparation
After drawing up the drawing, it is required to prepare a pre-selected place for construction. Site cleanup work is done fairly quickly. First of all, it is necessary to remove all vegetation from it. Next, you should inspect the place for irregularities. The land that enters this perimeter will need to be leveled.
To implement the project, it is necessary to prepare a site measuring 10 by 10 m. Such a space will be enough to complete the construction most suitable for maintaining and servicing the machine. It should be noted that in the case of building a garage for two cars, the dimensions of the site will increase accordingly. The project of a frame garage for 2 cars can also be found on the Internet.

The next thing to do after leveling the ground is to compact the soil. Then gravel is laid on the prepared site. The gravel layer should not be too thick. If desired, you can dilute the stone mass with building sand. This "pillow" should be carefully leveled. A vibrating plate is ideal for this purpose, but if the right tool is not available, then you can level the surface manually.
Note! After preparing the site of the required size, you should proceed directly to the construction of the garage. This process begins with the organization of the foundation. To choose the most suitable basis for a particular case, you need to familiarize yourself with its possible varieties.
What tools do you need to prepare for the garage? It is not so difficult to build a frame structure with your own hands, but you need to stock up on all the necessary tools, as well as materials. You will need to prepare shovels (shovels), a hammer, a level and formwork material. To complete the foundation, it is necessary to mix the cement mortar. For the frame, beams and boards made of a suitable type of wood are taken.

Installation of a frame garage: foundation options
Features of the frame structure do not require the organization of a solid foundation. A garage built using this technology is lightweight, so you can choose a simple base for it. But it is worth remembering that the foundation must be made with high quality, otherwise problems can arise even in the case of a frame structure.
To date, there are 3 common types of foundation that are suitable for frame garages. A more serious foundation is required when building a garage from foam blocks or bricks with your own hands. To choose one of the three options, you need to pay attention to their features. So, there are the following types of foundation:
- columnar;
- monolithic;
- tape.
Columnar. This type of foundation is most often used in the installation of other outbuildings (for example, baths). This is due to the fact that it is suitable for more lightweight structures. But if necessary, you can organize such a base for a frame garage.

Monolithic. This type of foundation is characterized by a high degree of reliability. Many experts recommend a monolithic foundation when building a frame structure. However, this method is more troublesome. For floor screed, reinforcement is required, which not everyone can do on their own. It should also be noted that the rate of hardening of concrete in this case is very slow (about 1 month).
Tape. The most popular option for frame structures that are lightweight. To organize such a foundation, you must study the instructions and clearly follow all of its points.
Do-it-yourself strip foundation for a garage
The process of organizing a tape-type foundation is not very complicated. The main thing is to follow the instructions. It is important to remember that the installation of the foundation is recommended to be carried out in dry weather. Rains can destroy the foundation that has not yet formed, and then you have to do all the work again. Let's consider each item of this event in more detail. First you need to do some markup. To do this, you need to use the following tools:
- building level;
- plumb;
- Laser Rangefinder);
- joiner's square;

- kapron thread;
- pegs.
The markup traditionally starts from the corner of the future building in accordance with the recommendations on how to build a frame house with your own hands. The step-by-step instruction takes into account the placement of the first peg using a plumb line. Next, you need to drive in another element.
Note! The distance between pegs 1 and 2 should be equal to the length of the future garage.
Then both pegs are connected by means of a nylon thread. After that, you can proceed to the placement of the third element, which is performed using a square. This tool is needed in order to measure the required distance from 1 to 3 peg. This distance should correspond to the width of the future building. Then the nylon thread is pulled and the last peg is driven in. All elements are connected with a rope.
After that, it is very important to check the straightness of the corners. For this, the same square is used. In addition, you need to check the distance between the pegs. It must correspond to the dimensions indicated in the diagram. The next step is to organize the markings inside the perimeter. Experts recommend paying attention to the photo of installing a garage with your own hands. The video will also allow you to quickly understand the technology of construction.

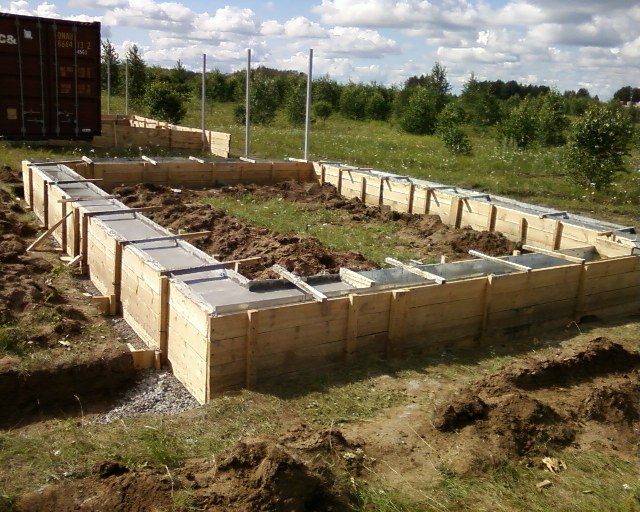
Next, you need to dig a channel for the future strip foundation. The depth of such a trench should not exceed 0.5 m. The best option for a frame garage is 45 cm. The edges of this channel should be as even as possible. After organizing the trench, it is required to tamp its bottom.
The next step is to assemble the formwork. This design most often consists of boards or plywood. It is important to ensure that the formwork fits snugly against the walls of the trench. The fixation of individual elements is performed by means of braces. Then you need to lay a layer of gravel mixed with sand on the bottom of the trench. Cement mortar will be applied to this pillow.
Concrete must be poured correctly. This process includes some nuances that need to be studied. For example, in order to remove excess air from a mixture that has been poured into a trench, there is a special tool - a vibrator. If you do not have the right device, then you can simply pierce the solution with fittings.
Compliance with each of the above points will avoid problems in the future. You don't have to spend money on garage repairs. Each person can dig a trench with his own hands, assemble the formwork and pour concrete mortar into it. For this, it is not necessary to have special skills.

The foundation that has not yet hardened must be covered with plastic wrap. The surface of the concrete needs to be moistened, otherwise it may crack. The foundation is recommended to be watered for several days. After the mixture hardens, it is necessary to grind it to a smooth state and cover it with roofing material. This material will serve as waterproofing.
Do-it-yourself inspection hole in the garage
The foundation is a prerequisite for the construction of a frame structure. In turn, the need for arranging a viewing hole is determined by the personal preferences of the owner. Of course, it is needed if a person himself is engaged in the repair of his car.
From a financial point of view, this event will not harm your budget. However, you still have to spend some time digging a hole. The first thing to do before installing a pit in the garage with your own hands is to mark up. Further actions will take place strictly on it.
The walls of the pit must be strengthened. For this purpose, a brick is suitable. The material is laid in one row, as this is quite enough for such a trench. It is important to remember that the top walls of the pit can collapse under the weight of the machine, so they should be reinforced with metal strapping, which must be properly cemented.

The next stage of arranging the pit is cementing its bottom. In this case, a monolithic foundation is suitable, the layer of which is determined by the characteristics of the soil. The standard version is 3 cm.
Useful information! Before you start pouring concrete, you need to lay a pillow of gravel mixed with sand on the bottom of the pit. Reinforcement bars should be placed in the finished substance.
If necessary, you can do the cellar with your own hands. In the garage, this procedure has some nuances. One of them is the need for waterproofing the pit. If foam blocks are used during the installation process, and the soil in the place is dry enough, then insulation can be dispensed with.
The installation of the frame for the future auto garage is carried out after the foundation of the inspection pit has dried. It is not necessary to wait for the complete hardening of the cement. The initial stage of frame assembly is the installation of wall beams.

How to make a garage with your own hands: installation of the wall frame
The frame of the garage is made of wooden beams or a metal profile. In the first case, it is recommended to use only well-dried products. Wet materials are much more difficult to work with due to their added weight due to water. To build a frame structure, you will need to purchase:
- bars;
- boards for rafters;
- boards for crates;
- floor boards.
The following requirements are put forward for the main beams: they must be solid, without visible defects and signs of decay. The standard size of these products should be 100 by 100 mm. They are used for mounting uprights, as well as for covering the ceiling and floor of a wooden garage. It is much easier to make a frame with your own hands if the material used is dry.
To install the rafters, you will need to purchase boards of a certain width (4 cm). They must be dry and usable. To create the crate, products 2 cm wide are used. The floor board can have different widths. As a rule, the minimum indicator for a garage is 4 cm. The amount of certain materials depends entirely on what dimensions the building will have.

It is important to remember that the installation of the frame is carried out only after the foundation has completely dried. The process itself is carried out in several stages. Let's consider each of them in more detail.
After completion of the work on waterproofing the concrete foundation, it is necessary to make a lower piping. This procedure consists of two stages. First you need to lay bars around the perimeter of the garage. The size of wooden products should be 100 by 100 mm. Next, you should connect them to each other (in the corners) by means of dowels and notches.
This harness will serve as the basis for the installation of corner and intermediate wooden posts. With your own hands, a frame sample garage can only be built if there is a scheme and self-confidence. Fixation of corner and intermediate pillars is carried out with the help of dowels.
Useful information! In order for the frame to have maximum strength and rigidity, it is worth using metal corners.

It is important to remember that the distance between the uprights is less than 2 m. The next step is the installation of the upper trim. The bars in this case are fixed by a similar method (pins and metal corners). Then intermediate racks are installed on the frame. Do not forget about the jumpers, which should be located in a horizontal plane. In this case, metal corners and self-tapping screws act as clamps.
The last step is to create a floor covering. For this purpose, a 40 mm board is traditionally used, which is fixed to the outer trim. Then it remains only to mount the outer boards - and the floor is ready.
We build a garage with our own hands: rafter system and roof
To date, there are two options for organizing a garage roof. The first of them is the simplest and is recommended by experts in the case when you mount the garage yourself. This is a single pitched roof. It has other benefits as well. For example, such a roof is highly durable, and its organization does not require large financial costs. The composition of a conventional shed roof includes several important elements:
- rafter system;
- crate;
- insulation;

- roof covering.
Rafter system. This is a kind of foundation. All other elements are fixed to it. When installing the truss structure, it is recommended to be very careful, since it is this system that performs the main frame role, taking on all the burden. In the event of installation errors, it may not withstand the load, which will then lead to serious problems for the garage roof. Do-it-yourself construction is mounted in accordance with the scheme made at the design stage.
Crate. Fixed to the truss system. The crate performs a very important function, being a support for the roof covering. It is assembled from boards. The material in this case can be both edged and unedged.
Insulation. Various materials are used for this. Insulation performs a very important function: it protects the interior from precipitation. It is used to keep warm in the garage, respectively, if its arrangement is neglected, this will have negative consequences for the car.

Roof covering. Various materials can be used for these purposes. Their choice is based on several factors, such as the weather in the region in which the structure is installed, the financial capabilities and preferences of the builders.
Note! During the installation of the frame structure, it is required to organize one wall so that it is lower than the second. This will allow the slope of the roof, necessary to remove rainwater and snow. The slope should not be higher than 25 degrees, which is also very important.
And now we will consider in more detail the algorithm of actions when installing a garage roof. First you need to install the rafters. If the future construction is calculated for one machine, then the work can be greatly simplified. The truss system in this case will include horizontal beams mounted along or across the room. To save money, experts recommend choosing the second installation option, since it does not require long bars.

It is important to remember that the distance between the individual beams must be acceptable and provide the necessary frame strength. It is calculated at the stage of drafting a frame garage. It is not recommended to place these products at a distance exceeding 1 m from each other. After mounting on the base of the frame, it is necessary to fix the beams with the help of corners and self-tapping screws.
At the next stage, the crate is equipped. In this case, the material may be different (edged and unedged board). In order to calculate the required number of products, there are special online calculators. It is recommended to buy boards with a small margin - no more than 20%. To save money, it is better to stop at unedged products, since after finishing the difference between them and the edged variety will not be noticeable.
Installation of a crate from an unedged board requires its cleaning from the bark. Next, we proceed to the direct installation of the roof. To do this, place the boards on the rafter bars. It is very important that they are perpendicular to the rafters. Then it is necessary to fix them with self-tapping screws. The main thing to remember when installing the crate is to avoid the formation of cracks. All elements must fit snugly together.
At the next stage, the waterproofing material is installed (on top of the crate). In this case, you can use roofing felt, which is an affordable and popular coating. The second fairly common option is the use of a film located under the roof.

Installation of roofing material is carried out in such a way that the next sheet overlaps the previous one (overlapping) by 3-4 cm. This will make it possible to protect the boards from atmospheric moisture as much as possible and extend their service life. After laying the roofing material, it is necessary to nail it to the wooden crate. If a film is used as a waterproofing agent, then it can be fixed with staples.
The last step in the installation of a roof for a frame structure is the installation of a coating. Let's talk about the most common materials that are used for this.
Decking. This material is one of the most common. It has high strength characteristics, therefore it is resistant to mechanical stress. In addition, the corrugated board can be dismantled and reused, which is considered quite a significant advantage.

Slate. Not as durable as corrugated board, but also has good characteristics. The service life of slate sheets under normal use can reach 40 years. The main disadvantage of such a coating is the high cost, which often repels buyers from using this material when building a garage with their own hands.
Metal tile. Modern coating, which is used not only for the roofing of various outbuildings, but also for finishing private houses. Metal tile is more expensive than corrugated board.
Roll covering (roofing material). The least reliable of all the materials on this list. It does not have such strength as corrugated board, but it has one advantage - low cost. The service life of roofing material is 10-15 years.
Useful information! When installing roofing, there are a few things to keep in mind. Material installation starts from the bottom row. To fix the coating, various products are used, but most often screws or slate nails. Installation of sheets is carried out by the "overlap" method. And also it is necessary to perform additional fastenings along the edges, which will eliminate the possibility of the roof being torn off in strong winds.

Installation of a gable roof on the garage
As mentioned above, the roof for a frame garage can be single-pitched or double-pitched. In the second case, the design is more complex, which, of course, affects the installation process. However, a gable roof has some undeniable advantages. Its construction provides for the appearance of additional under-roof space, which can be used for economic purposes. If necessary, an attic can be mounted within it.
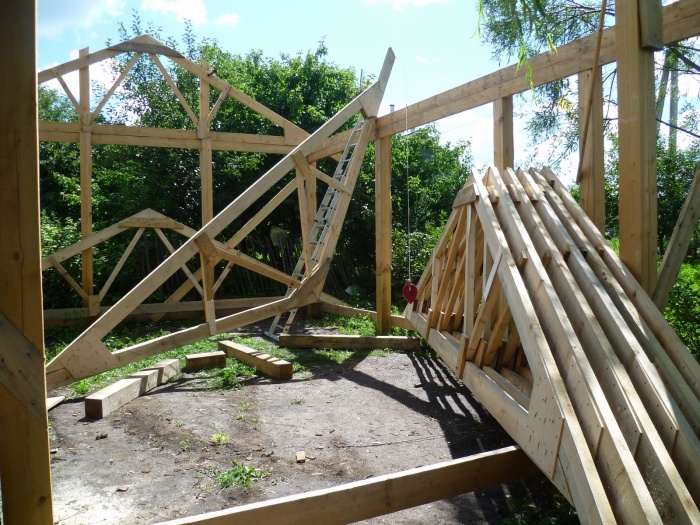
Installation of a gable roof consists of four stages. The organization of the truss system can be carried out in two ways. In the first case, the assembly of all individual structural elements is carried out on the ground. Then they are installed on the wall trim. The second option is more complicated, as it involves the installation of rafters directly on the walls. Such work requires choosing the correct position of the part and holding it in one place when fixing.
Many people are interested in the question of how much a garage with a gable roof costs. The final price of building such a design will be at least 30% more expensive than in the case of a shed variety. The cost is calculated depending on the individual features of the building.

In metal frame structures, it is customary to assemble all parts of the truss system on the ground, and only then raise them to the required positions. Consider the sequence of actions when installing a wooden structure at a height.
The first thing to do is to place the beams that will serve as the ceiling. Next, you should install the rafters in front of the structure. At this stage, they are temporarily fixed by means of racks.
The next step is fixing the ridge board. This element is fixed between two front pairs of beams. Next, you need to determine the step for the subsequent parts and, focusing on this information, install them. As a result, the truss system forms a roof slope. The subsequent crate will give the structure the necessary rigidity.
Do-it-yourself garage floor: how to do it right
Floor installation is recommended to be done last. This rule is due to practical considerations, since in the presence of a canopy and walls, the boards will be protected from getting wet. In this case, special, non-grooved boards are used, which, after installation, do not fit closely to each other. This is a very important point that you should pay attention to.

Note! The gap is not recommended to be less than 3 and more than 5 mm. This rule is very important and must be taken into account when building a wooden frame garage with your own hands.
During installation, the boards are fixed to the joists by means of self-tapping screws. Nails are also suitable for fixing them. It is worth noting that the best condition for organizing the floor is the presence of a slab foundation. Although this option is not the best for a frame structure, it still allows you to create a ready-made base for the floor.
Which garage doors to buy: varieties
Every garage must have a gate. This design is necessary, as it allows the car to drive inside the building. The classic option for a domestic garage is double-leaf swing gates. They open manually and, as a rule, in addition to two wings, they are equipped with a passage door, which is located in one of the halves.

To date, you can order the following types of gates:
- sliding;
- lifting and rolling.
The sliding design is more technologically advanced. If desired, such gates can be supplemented with an automated system. In this case, the door will move to the side. This is done using a rail system. The door itself responds to a signal that is sent remotely. Before you buy a garage door of this type, it is recommended to remember that they are more often used in capital buildings.
Roll-up gates consist of individual elements, which are called slats. They have some advantages, however, due to their cost, they are not as common as the previous two types. The absolute advantage of such gates is that they can be installed in confined spaces.
The roller shutter design is often performed in the case when there is no possibility of mounting other types of gates. In addition, it is easy to install and versatile.

How to assemble a garage door with your own hands
With your own hands, it is easiest to make standard swing gates, which are a double-leaf structure. Other varieties are quite difficult to do with your own hands. Consider a brief instruction for the assembly and installation of such swing gates.
In order to make these gates, the first step is to choose the material for them. In this case, profiled pipes or wooden blocks can be used. The same materials are used as cladding as for the rest of the structure. Thus, corrugated board, siding, as well as ordinary metal sheets or boards can be used for such gates.
Note! In order to eliminate possible errors when installing garage doors with your own hands, it is recommended to prepare their sketch. The diagram takes into account all the necessary dimensions.
The width of this type of structure can be different. This indicator depends on the dimensions of the frame structure and ranges from 2.5 to 4 m. Insulation of the gate is not a mandatory measure. It is necessary only if the arrangement of a heated workshop is planned inside the garage.

Independent production of a frame garage for a car requires careful preparation, as well as a set of all the necessary tools. Before proceeding with the installation of this building, it is recommended to consult with specialists. During installation, you should follow the instructions and pay attention to the advice of the masters. It would be useful to visit the profile forum, where you can find a lot of useful tips that will help simplify the process of building a frame garage with your own hands.
 Basic Techniques for Cropping a Photo in Photoshop How to Uncrop a Photo in Photoshop
 Which acrylic brushes are better to choose: little secrets of choosing the right one Using different piles
 What are the sizes of business cards?