Need a program to restore old photos? Program for restoring old photos Getting rid of small debris and scratches
The lesson was prepared for you by Marina Kolesova.
Today we will learn how to restore old shabby photos in Photoshop. There are many different examples on the Internet on how to do this. I want to bring to your attention the most, it seems to me, simple and understandable. Of course, it is quite laborious and will take some time, but for beginners in Photoshop it is ideal. No need for a bunch of tools, different masks and layer blending modes that get confused in the head. All you need is the Stamp tool and your patience. In addition, beginners during this lesson will make friends with this wonderful tool and will continue to use it in their work.
Let's start studying the lesson.
An old photograph has been lying around in the home archive for a long time, it's time to take it up.
First of all, go to the tab Image - Mode - RGB. If the mode is different, then put a tick on RGB. 
Remove the lock from the layer. Double-click on the lock with the left mouse button and select OK in the pop-up window. 
To be safe, copy the layer. Then we stand on the copy and increase the view. We start at the edges of the photo to practice on. 
Take the Stamp Tool and check the settings. Since we are working in the very corner, do not be afraid to set the opacity and pressure to the maximum. We will stamp with a round brush, pre-select its diameter. Activate the Stamp tool, hold down the Alt key, a window appears on the screen as in a sight. We put it on the section that we want to copy, click the mouse. Then we release the Alt key, the sight disappears and we move the circle to the place we want to paint over, click the mouse. We see how a circle appeared on the damaged area. So let's practice on the corners. The more often we use the Alt key, the more carefully the desired area will be painted over.

Having trained on the corners, we move to another area, but we do not touch the face yet. Since the strip that needs to be masked is small, we change the size of the brush - we reduce the diameter. And again we aim at the area that we want to copy, hold down the Alt key, click the mouse, release the key, go to the area that we want to paint over, click the mouse. 
Periodically reduce the view and look at what happens. 
To compare, we turn off the eye on the copy layer we are working on. It is immediately clear: what and where is painted over. 
In places near the eye, you need to greatly enlarge the image. Since it is already difficult to do this with the engine, we click on the right triangle. With its help, little by little we increase the image. 
We select targets for the sight both above the seam and below the seam. In such areas, it is especially important not to rush and often aim and take areas for cloning. 
When we clone the pupil, we reduce the hardness of the brush. 
When cloning lips, we take a sample from the lips. 
When cloning a pupil, it is possible and necessary to take samples from different sides of the pupil. 
Try not to aim too close to the area that needs to be painted over, so as not to hit too much. 
When we clone the stripes on the suit, we walk from different sides to the scratch. We worship from the bottom, then go to the top and clone from the top. Then again we go to the bottom and so towards the opposite we paint over the area. To get a transition from a white stripe to a black background, try to take into sight the area that is in the middle and includes both white and black stripes. Adjust this with the diameter of the brush, it can be changed more often. 
With the final touch, paint over the white stripe, just to paint over. 
Anyway, no matter how you paint over the background, it will not be even. So we are taking other steps. Use the Rectilinear Lasso Tool to select the shape of the baby. 
Right-click inside the selection and select Feather. 
We accept a small radius of shading. Since the photo is old, we do not need very clear boundaries. 
Copy the selection to a new layer. We use the Ctrl + J keys for this. 
Create a new layer by clicking on the second icon from the right in the layers panel and put it under the layer with the selected baby figure. We extinguish the eyes on the two lower layers. 
Next we go - Run the fill. In order to have a place to take a color sample with a pipette, we will make the layer on which we worked with the Stamp visible (turn on the peephole on it by clicking on it). We check that we are standing on a transparent layer. 
And now we use the Eyedropper tool to fill the layer with color. 
We see that the background has become monochromatic. To diversify it a little, let's make it a little structural. Apply the Unlimited-2 filter, download it from here. 
In the filter window, select the canvas. 
Apply the Sharpen filter to the baby image. Let's check that we are standing on the layer with the baby. 
We extinguish the eyes on the two lower layers and on the Layers tab, select - Merge Visible. 
After that, I saved the file as a JPEG, made a frame from the lesson How to make a frame with torn edges. I instructed the program to slightly correct the image. On the Image tab, I selected Auto Tone and Auto Contrast. 
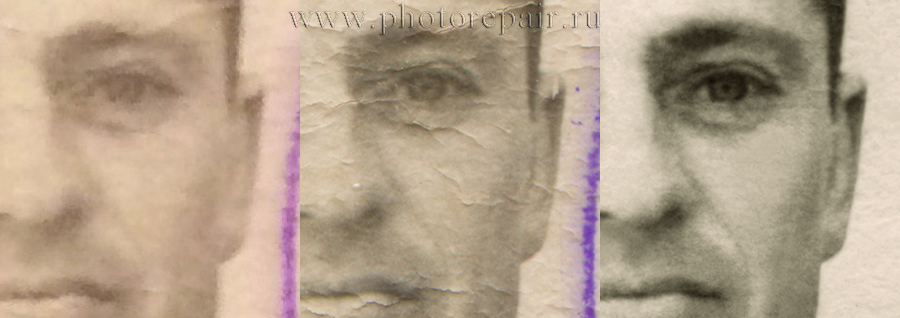
Now you can compare the result. 
With this method, beginners may well take on the restoration of old photos. As you can see, this method is very understandable, the main thing is patience. Everything will work out for us!
Found an old photo in the bins? Unfortunately, paper is not the most reliable medium, and the discovered image, almost a hundred years old, is unlikely to boast of the gloss and clarity of the image. Do not rush to mourn a damaged photo or spend money on a professional restorer, you can restore it yourself! A convenient program for photo restoration PhotoMASTER will come to the rescue. Read how to restore the original look of an old photograph and preserve family history.
PhotoMASTER will help restore even a badly damaged photo
Restoring photos in the PhotoMASTER editor
To save a valuable family heirloom from further destruction and restore its original appearance, you need to convert a paper photograph to digital format. The easiest way to do this is with a regular camera or smartphone. However, this method has disadvantages:
- third-party light sources can leave glare in the picture,
- the photo may be blurry and fuzzy,
- uneven camera position distorts the image.
Ideally, it's best to scan the photo, as this will preserve the original colors and avoid flare.
Now that you have a digital copy, you need to download the program for restoring old photos from our website. Install it on your computer and run it. Open the scanned image in PhotoMASTER and let's get started.
Restoration step by step
- Trimming the damaged edge
If the edges of the image are very frayed, which is very likely after so much time, it is better to get rid of them immediately without regrets. Go to the "Composition" section and select "Cropping". PhotoMASTER offers several cropping options: free frame proportions, keeping the original proportions, as well as a number of standard aspect ratios: for a VKontakte post, for iPhone and iPad, 4:3 size and others. Choose a grid type that will help you correctly frame your image.

Trim frayed edges and yellowed frame
Now select with a frame the part of the picture that you want to leave. The main thing is not to get too carried away so as not to spoil the composition. In cases where the defects at the edges are too deep, for example, the picture is torn to the middle, it is better to partially correct the problem areas with retouching.
- We remove defects
Be patient, as this part of the processing is the most time consuming. However, restoring photos in Photoshop and other editors takes no less time. At the same time, it is much easier to master PhotoMASTER, besides, there are convenient tools for quickly removing defects in a photo.
Go to the "Retouch" section. Here is a whole set of tools that will help mask torn corners, eliminate traces of bends, hide spots that have appeared from time to time and similar problems.
The main instrument of work will be repair brush. It will perfectly cope with both point defects and large damage. Adjust the brush size according to the problem area. If you need to remove a spot from a photo, click exactly in the middle with the brush, and the defect will disappear. If you need to repair a scratch, gently run the brush along it.

Removing a scratch from a photo
In this way, you have to completely retouch the picture. Be patient and it will be rewarded with amazing results! If the brush categorically “does not take” some defects, leave them for processing with the next tool, which we will talk about later.

Photo before and after treatment with a repair brush
Another very useful feature is stamp. It will allow you to quickly and effectively remove unwanted objects from the frame. For example, a red spot in the background can be easily eliminated. Mark the area to be hidden, and then choose the place from which you will take the donor background.

Removing a Scratch with the Stamp Tool
To remove the glare that appeared in the process of converting a photo to digital form, brighten dark areas, sharpen or blur some fragments of the image with a handy tool "Corrector". Select the desired area and adjust the color, toning and sharpness settings.
The corrector can be very useful if in some place you did not manage to carefully use the healing brush and noticeable bumps appeared. Select this unfortunate fragment and slightly increase the blur value. The defect will not be so noticeable.

Slight blurring of the curtain area after removing a large scratch
When restoring portraits, the option will allow a little more "Perfect Portrait". With its help, you can automatically make the skin smoother, the eyes more expressive, and the face brighter.

The Face Lightening style will smooth out remaining imperfections and make skin tone more attractive.
- Increasing the clarity of a photo
Over time, any paper photographs fade, and the technology of the beginning of the last century did not provide the high detail that modern SLR cameras. And yet you can make the photo a little more expressive! In the "Enhancements" section there is a "Sharpness" tab, go there and increase the value of the parameter to the desired value. You will notice that the image has become more expressive.

Sharpen the image to make it clearer and more expressive
- Bringing back the old
If it seems to you that in the process of processing the photo has lost its unique retro flair, this can be corrected. Go to the "Effects" category. Here you will find vintage filters. With their help, you can restore the touch of antiquity and the former charm of photographs from the past.

The Retro 2 effect will color the picture in a pleasant sepia
See how the photo restoration is done in the program: before and after.


Satisfied with the result? Then save the resulting image to your computer. You can print it on paper to replace the damaged old one or publish it on social networks.
Memory is with you forever
Now not a single precious photograph that has come down to you from the last century will be lost. Young great-grandparents will smile from the family album, and time will no longer make their faces fade. Entrust the restoration of old photos to the PhotoMASTER editor!
Download the installation file of the program and run it. Follow the instructions on the screen to properly install the application.
Upload damaged photo to editor
Launch the program and add the photo you want to restore. To add an image for editing, click Open file and select the desired photo.
Use Automatic Photo Recovery
Click the button Restoration on the top panel of the program. If you want to automatically adjust the brightness and contrast of a photo, use the option Enhance Photo. Click the button Restore to fix a corrupted photo.
Please note: after automatic restoration, the photo will become black and white.
Remove scratches, stains and creases
If the photo has been severely damaged, small defects may remain after auto-recovery. To fix them, go to the tab Deleting objects and choose the right tool: brush you can paint an arbitrary area, magic wand- select objects of the same color, Lasso– designate the outline of an object with uneven edges. To correct the selected area, use the tool Eraser. Now delete the unwanted object by clicking the button Erase. To eliminate minor defects, use the tool Stamp: it allows you to copy any parts of the image to the selected area.
Eliminate post-scan noise
Noise may appear on the photo after scanning. To remove noise from a photo, go to the tab Noise elimination. Use one of the ready-made presets or create your own. To create a preset, select from the presets the one that best suits your needs. An icon will appear on the thumbnail of the selected preset. gears. Click on it to open the settings window. Adjust the desired parameters: light noise, color noise, radius, intensity and clarity - using the appropriate sliders. To save a new preset for later use, click save mode.
Enhance your photo
If the photo needs further processing, you can do it automatically or manually using the tools on the tab. Photo enhancement. For automatic correction, press Auto Enhance. To adjust the image settings manually, use the sliders or enter the required values in the appropriate fields on the right.
Before correcting a photo, it is important to understand the causes of fuzziness. Each cause has its own way to eliminate it, and finding the right way means choosing the most correct, fastest and most economical way to a good result.
The easiest way is to send a photo to the restorer, who will know what to do with the photo, but it won't hurt to know the basic principles.
Photo restoration implies that we carry out all improvements with a digital copy of a paper original. Let's take a photo and look at it carefully, zooming in to 100% or more.
Case 1: Faded colors.
The contours are even, in the enlarged portrait one can see small details, such as the outlines of the lips, the shape of the eyes, eyebrows, and sometimes it is possible to make out individual hairs.
Causes.
The photograph faded, faded and faded over time. The most common reason: what always happens with paper photos.
A simple solution.
A faded photo is restored using color correction. However, this is not always enough: as soon as we make the image sharper, defects immediately become more noticeable. Paper photos not only fade, but are also easily damaged. This is clearly visible when magnified: spots, scratches, cracks, scuffs in places. All together spoils the impression, as if the image is hard to see through a layer of dust and dirt.

Professional restoration will restore colors, remove age-old dirt and make the photo look like new. To do this, just send the photo by mail, pay for the work and wait for the result.
Difficult decision.
Self-restoration of photographs is a complex and exciting business. If you have a lot of shots, time and patience, you like painstaking and accurate work, this path is for you. However, for this it is not enough to watch a few lessons. The same technique can fix one photo and ruin another, so without system knowledge and experience, a good result will not work, except in simple cases. If there is severe damage in the photograph, especially on the face, then without experience and some artistic skills, it is better not to take on independent work at all. Correcting mistakes and redoing work, a novice will spend two to three times more time than an experienced restorer. At the same time, it’s a shame when the result of hellish labor turns out to be much worse. Here are just a few typical mistakes: traces of processing are visible, “blurring”, old spots are not removed and new ones appear from somewhere, the face is distorted beyond recognition, etc. All this can be avoided if the work is ordered from a specialist. Is it worth it to restore the photo yourself? To answer this question, you need to make a choice: savings or results.
Case 2. Bad scan.
The contours are uneven, blurry. Breaks, graininess, stripes, notches or small squares are visible.
Causes.
1. Broken edges with jags and squares - a clear sign that the photo was scanned incorrectly, with low resolution or compression, so the borders lost clarity.

2. Graininess, stripes and other artifacts that are not on the paper original indicate that the scanner is not suitable for digitizing photographs. Sometimes the graininess comes from the texture of the paper, whether it is matte, rough, or corrugated.
Smart decision.
1. Rescan the photo, . Photos on embossed paper are digitized. Compare the result. If the photo clearly shows cracks and scratches, this is normal. If nothing has changed and the contours have not appeared, go to the next step.
2. Take the paper original to the photo center, where there is a professional scanner or other modern equipment. Compared to the main restoration, digitization is quite inexpensive and costs five to ten times cheaper. Of course, it will take more time, but isn't it worth it to make sure that the faces of your relatives become clearly visible in the photo? Some centers, along with the digitization service, will also offer restoration. But, alas, the presence of normal equipment in the photo center does not mean the presence of a good restorer, so always carefully look at examples of work. Fortunately, the Internet knows no boundaries: now you can find the best restorer in any city, and uploading a file takes only a few minutes. In addition, ordering photo restoration online is very convenient: you do not have to come for the finished photo a second time, you just receive it by e-mail.
Why can't you skimp on good digitization? When scanner distortion is added to the damage to the paper, the photo loses its original appearance even more. You can restore a photo only from what is. If the contours have lost their sharpness during scanning, then they can be restored either by correct scanning or by artistic means. Whether the likeness remains, the photographic quality, or the faces become drawn and flat, one will have to rely solely on the ability of the restorer. Before ordering a drawing, look at its examples. Scanning is cheaper. For comparison, the average market price of a scan is 60 rubles. and the most primitive rendering - from 3000 rubles.
Wrong decision.
You sent a poorly scanned photograph to a contractor who agreed to restore it inexpensively and did not offer to improve it with digitization. What does it say? The performer is not a professional and does not know that a good result is impossible without proper digitization, or quick earnings are more important for him than the result.
Case 3. Blurred photo.
The contours are blurred, despite the fact that the photo was digitized in accordance with all requirements and high resolution. This happens when the photo is initially taken out of focus. So, in this case, it will not work to make clearer contours in simple ways. What was never in the photograph cannot be restored by digitization or in Photoshop. With the help of special filters, you can only create a visual effect of clarity, but it is impossible to show the details. The only way to correct fuzziness is artistic restoration, .
Examples of restoration without artistic restoration.


Today we will take a look at one of the most interesting topics in photo editing with Photoshop - photo retouching. Retouching in general is a very exciting activity. It is damn interesting and pleasant when, it would seem, something real and tangible is obtained from a completely worthless, spoiled photograph, a past era, people and destinies appear.
Just recently, one of my acquaintances asked to restore an old family photograph he had found almost a century ago. Her condition, you know, was very far from perfect. Once again, one has to be convinced of the advantage of digital over film, at least in terms of the safety of photographic materials ...
So let's start r retouching photo. The first step is to scan our "old lady". As a rule, almost all old photographs have “scars” on their body - kinks, lack of fragments (for example, lost corners when torn out of albums), just fading and much more. This work had all the above "merits". Photo scanned at 600 dpi. In principle, 300 dpi is quite enough for such work when printing, but for retouching it is desirable to have a higher resolution to reduce distortion. The output file is TIFF format and highly desirable 12 or 16 bits. The contrast during scanning needs to be reduced, then, in the process of processing the photo, we will restore it. It is desirable to scan in RGB mode, even if the photo is black and white. Then choose one of the three channels with the least damage, removing the rest. Generally, the noisiest channel is usually blue. Thus, we get the original monochrome image. Since the file size for a monochrome image is significantly smaller, this greatly speeds up its processing. I highlight two methods of approach to retouching complex photographs.

At first we do the simplest operations, gradually moving to the most problematic areas. At the same time (especially if you rarely do this, from time to time) you “fill your hand” in simple operations, approaching complex areas with more experience. And as the simple retouching progresses, the photo begins to improve before our eyes, which is very inspiring for further work. Or we start with the most difficult (more suitable for very experienced users), leaving the trifle “for later”.

Let's focus on the first option retouching photo. Let's try to draw up for ourselves some kind of approximate plan for retouching, so as not to run around the photo from corner to corner in search of defects. Since there is nowhere else to crop our work, it is necessary to restore the edges of our canvas, eliminate creases and large scratches, try to restore the man’s “torn off” leg, retouch the woman’s face (the most difficult), clean up the remaining trifle, and also need a general exposure correction and final toning.

Of course, you can use different methods of processing photos to restore the edges of the canvas. In this case, I did the following. As you remember, we scanned a photo with a very low contrast, now it will come in handy. The inner cover of the scanner usually has a black backing. If this is not the case, then cover the photo with a black sheet of paper and, if possible, press it more tightly against the glass to even out the creases.
Now the black level on your work will match exactly the scanner substrate when scanning, as you can see in the photo above. Make a copy of the layer (Ctrl + J), then right-click (pen) select Color Range (color range) and select our black outline, where there was no photo. In this case, the Fuzziness slider determines the selection range. Then, selecting a drawing tool, for example a brush, with the B key, pressing the Alt key, select the tone of the drawing tool with an eyedropper on the picture itself. First, select a tone in the floor area (lighter) and paint over the selected black area opposite the floor with it. Then choose a medium tone for the rest of the edge (darker) and paint over the rest of the selected black area. Why do we need such complexity - for the correct operation of our miracle tool Patch (patch).


Select the tool with the J key. This function contains three tools: Patch, Healing Brush and Replace Color, which are switched between themselves with the Shift + J keys. Why is this photo editing tool so good? It allows you to replace the texture of the selected area while maintaining its brightness and color components. I will show this on the example of an enlarged fragment of the floor near the woman's leg.
Let's select with a pen the area that we are going to "treat", this will be the edge of the photo, which we painted over with a tone taken as a sample from the border area of the picture. The main thing is not to rush, following the rule - less is better. Since we need to restore the texture of the floor, we move the selected area with the pen to the area where we will take the texture sample, observing the alignment of the sample with respect to the selected area (in this case, along the gap between the boards). After alignment, raise the pen (release the left mouse button). The result is amazing - no traces of stitching fragments. Similarly, we process the entire area. It should be added that the tool has several modes of operation. Source (source) - in this mode, we select the area that we are treating. Destination (target) - in this mode, we highlight the area that we are treating (sampling texture). When the Transpa-rent (transparency) checkbox is checked, the texture sample affects the transparency of the replaced fragment (it is used quite rarely). I consider the Source mode to be the most optimal and convenient.


The photo processing result shown below was obtained in eight steps. If we had not aligned our missing edge of the photo with the previous selection and tone-on-tone operations with the photo itself, then the brightness of the replaced fragment would change from foreground to black. That is, our photo would have a blurry black border, which is unacceptable. The more accurately you match the tone on the missing edges, the better the final result will be. To get back to some of the "fateful" stages of retouching, I highly recommend creating a Snapshot of these stages. After that, you can safely clear the History palette (history) to free up RAM if you do not have enough of it.


Similarly, we work with the entire edge. The work is painstaking, but the result is worth it! Creases and large scratches are eliminated in the same way, using the Patch and Stamp tools. Small dots and scratches are easier and faster to remove using the Healing Brush tool (healing brush). The work of the tool is absolutely similar to the previous one and is very similar to the work of the Stamp tool (stamp), familiar to you. The only difference is that the Healing Brush takes only the texture from the sample, and the brightness and color from the “repaired” area. Some features of its application should be taken into account. The Patch and Healing Brush tools have some blurring of the borders relative to the selection outline, so they cannot be used on the borders of sharp brightness transitions - the result of photo processing will not be very successful.
Thus, attempts to remove “on the forehead” damage near the woman’s head using Patch lead to a blurring of the boundaries and a violation of the uniformity of the tone of the replaced fragment. To prevent such results when processing photos on problem areas of sharp tonal transitions, you can first apply the Stamp tool with adjustable border hardness (for more accurate overlay). It is used to separate (expand) the boundaries of transitions, if the fragment being replaced is large enough. If the fragment is small, then you can simply paint over it with the Stamp tool, and then apply Patch in the same place for alignment.


As you can see, the result retouching photo completely different. If you clearly understand the principle of operation of these tools, then success is guaranteed to you!
The next step in processing the photo is to “make” the man’s missing leg (oh, if it were possible in real life…). Before this crucial operation, you need to straighten the background in place of the missing leg, then it will be more difficult to do. We do this with the Patch tool. Now we select his right leg almost to the knee (slightly higher than the missing part and with an allowance around the perimeter). Next, execute the command Feather (feathering) with a radius of about 10 pixels. Copy Ctrl+C and paste on a new layer Ctrl+V. Hold down the Ctrl key (or, more conveniently, the bottom button of our wonderful Wacom pen) and drag the new leg into place, flipping it horizontally so that it becomes the left one! Next, use the levels (but not the transparency of the layer) to adjust the brightness and contrast of the leg so that the transition point becomes invisible. It turned out like this.
Next, with an eraser, with a transparency of 50%, with light pen movements, we erase our allowance along the contour of the new leg to the background and in the places of the folds on the trousers. You can feel like a magician.
Now we take on the most difficult and delicate thing in photo processing - the restoration of a woman's face. Here everything is somewhat more complicated, but not hopeless. The most difficult thing is to restore the eyes and nose area. We will then make the forehead with the usual tools. You can try to "just" draw the eyes, but I'm clearly not an artist, so we won't even try. You can only finish the small details, but no more. It remains to borrow eyes elsewhere, no matter how blasphemous it may sound.
Having carefully studied all the characters in the photograph, I found that her daughter's eyes, in principle, are very similar. This means that our daughter will be a “donor”. Turn on the lasso with the L key, select the area of the eyes and nose on the daughter’s face (again with a small allowance), do a feathering of about 10 pixels, copy, paste on a new layer and drag the fragment to a new place. First you need to compare the distance between the eyes with the original. Naturally, in a child it is somewhat less. Therefore, we transform the fragment to the desired size. For accuracy, turn on the grid (Ctrl + "). Then we put our eyes in place.
It remains to work a little with an eraser over the eyebrows and the eyes can be considered finished. The seemingly most difficult operation in photo processing was given to us quite easily. Naturally, in the absence of a "donor" in the original image, you can use another suitable photograph. Everything is in the power of your imagination, the main thing is not to give in to difficulties. Then we act according to the old scenario: “no noise, no dust ...”, that is, we eliminate the remaining minor minor defects.

After we have eliminated all (well, almost all) defects in the image, we need to bring it to a good look: raise the contrast, tone it.
To begin with, we will bring its histogram back to normal using the Levels adjustment layer (levels). In order to produce toning (if necessary), the image must be converted to RGB mode. After that, in the adjustment layer Hue / Saturation we carry out toning. The transparency of this layer can be varied by changing the strength of the toning. We will address the issue of toning in more detail in one of the following issues of the magazine.

The result that you see below took about two hours of working time. I will say right away that my friend was very pleased with the result! .. and brought a bunch of old photos.
In conclusion, I want to say: be as careful as possible about the features of the past. Try, if possible, to bring less new to old photographs, otherwise you will get a “remake”. We have now deliberately considered a rather complicated situation when we had to restore the missing elements. But, by doing so, we only once again studied the possibilities of Photoshop tools in photo processing. Before undertaking such work, especially if you are not doing it for yourself, be sure to discuss with the customer the possible consequences of such a deep restoration. Sometimes it is better to leave some moments as they are, rather than distort or add from yourself - after all, this is history!
 Basic Techniques for Cropping a Photo in Photoshop How to Uncrop a Photo in Photoshop
 Which acrylic brushes are better to choose: little secrets of choosing the right one Using different piles
 What are the sizes of business cards?