A frame in Photoshop is a photo cropping tool. Basic Techniques for Cropping a Photo in Photoshop How to Uncrop a Photo in Photoshop
In a few lessons, I'll show you the simplest techniques for working with Photoshop. Preparation of photographs for printing, for placement on the Internet. These lessons show the most necessary steps, without which it is simply impossible to prepare a good photo. The tools that I show are in all versions of Photoshop. If you don't have the same version as mine, some of the tools may be in a different place, but they are!
Lesson #1
Attention! Always make, just in case, a copy of the photo and then "mock" it already! Because the original may come in handy when you are not satisfied with the result of your experiments.
Now open a copy of the photo in Photoshop. Press the button " crop"(1) or "Crop" if you have non-Russian Photoshop.
At the top of the properties panel, set the desired width and height of the image. Since we are preparing a picture for posting on the Internet, in order to maintain the proportions of the monitor screen, we will set, for example, the width to 1024 pixels and the height to 768 pixels.
In principle, here you can set any size. Simply, if you want the photo to be used as desktop wallpaper, then set it to 1920x1080, 1024x768, 1280x1024, 800x600.
If the photo does not "pull" on the wallpaper, or there are several photos on the page, then they need to be made smaller in size, otherwise site visitors may not wait for such a heavy page to load and go to another site.
By the way, I am often asked how to make an avatar for a forum. And you do the same! Usually the maximum size of an avatar is 90x90. Therefore, set Width to 90 pixels, Height to 90 pixels.

After pressing the "Crop" button, the cursor took the form of the "Crop" icon. Now, by pressing the left mouse button in the upper left corner of the photo, drag the cursor down and to the right. In this case, the frame will stretch behind it. Release the button and the frame will freeze in place. But you can stretch - squeeze it by the corners, take it with the cursor and drag the entire frame from place to place. At the same time, it will strictly observe the proportion you set, so you will not be able to flatten the photo. In any case, the size you set will be saved!
By the way, if you are not going to observe the proportion of the photo size, then leave the "width" and "height" fields empty. In this case, by dragging the frame with the cursor by the sides, you can make it wide or narrow, high or low. In short, the photo will be a non-standard size.
As a result of experiments, you will achieve a result when there is nothing superfluous left in the frame, and the future cropping area is darkened.
Now press the right mouse button while holding the cursor on the photo. A context menu will appear with the words "crop" and "cancel" Press the menu item "crop" and you have an improved quality photo!

Note: Now you can proceed to the step of saving the photo. In the future, when you gain experience, you can do all the steps to improve the photo (next pages of the book) and only then save it.
Article chapters:
Crop tool - Photoshop Frame
Crop Frame Photoshop
Crop a photo- these are special actions to change the scale and position of the image within the boundaries of a given frame when taking a photo or when processing it in Photoshop, for storing and then using this photo.
Of course, it is necessary to correctly crop photos when taking photographs, but this is not always possible. But even if the photo is framed flawlessly at this stage, it may need to be resized for some purpose. It is more convenient to crop photos in Photoshop, as it has more options for this.
Cropping photos in Photoshop after taking a photo is necessary in three main cases. Firstly, if the photo needs to be output to some external device, such as a printer or TV. Secondly, if you need to remove image composition errors. And, thirdly, for creative work, such as creating collages.
Before cropping a photo
Cropping a photo is directly related to changing its size and resolution, which are closely related. Changing one of these values changes the others. Before cropping photos in Photoshop, you first need to recalculate the dimensions and resolution, bring them to a clear form, and only after that work with them.
This is especially true for those digital photo files that have been scanned from film negatives or slides. In this case, a high resolution is set, for example 2400 dpi, with a frame size of 36 by 24 mm. To accurately crop a photo in Photoshop, the dimensions must be an order of magnitude higher, and the resolution an order of magnitude lower.
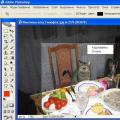
To recalculate the size and resolution of a photo before cropping in Photoshop, you need to select the “Image Size” item on the top panel in the “Image” menu. A window of the same name will open for setting the size and resolution of the photo. You can open this window faster using the hot buttons « alt» + « ctrl» + « I» (Fig. 1).

Rice. 1 Photoshop program window for recalculating the size and resolution of a photo when cropping
Immediately you need to uncheck the box next to the "Interpolation" item. This is necessary so that the image dimensions and resolution change simultaneously and affect each other. If the checkbox is checked, then when changing the resolution, only the dimension in pixels will decrease. The size of the printout will remain the same.
For example, if you uncheck "Interpolation" and change the resolution from 2400 dpi to 300 dpi (Fig. 1), the dimension will remain the same, and the dimensions of the printed print will change from 3.5 x 2.2 to 27.9 x 17.5 cm. Such dimensions are clearer to us and we can consciously work with them in Photoshop when cropping a photo.
How to crop photos
In Photoshop, you can crop photos in different ways, it depends on the ultimate goal of cropping. At the same time, it should be borne in mind that cropping is a way of resizing a photo by cropping it from one or more sides. This process is irreversible and you need to think carefully before cutting a photo.
In order to crop a photo in Photoshop in a different way or in some other way, you need to crop not the photo itself, but its copy. The photograph must be stored unchanged in a digital photo archive. All cropped copies of photographs must be stored separately in this photo archive.
Such separate storage of a photo allows you not to repeat the process of cropping it twice, and if you wish, you can do another cropping of the same photo in Photoshop at any time. Thus, it is possible to crop any photo many times in different ways.
Before you start cropping a photo in Photoshop, you need to determine exactly what it is for. The type of cropping will depend on this - normal, with rotation or with image deformation. This must be determined in advance, since different methods and tools of the Photoshop program are used for each type of cropping.
Photo crop tools
You can use several different tools to crop photos in Photoshop. Depending on the purpose of framing, the desired tool or their sharing is selected.
Photoshop's main photo cropping tool is " Frame". Most often, photos are cropped using this particular tool.
To crop photos in Photoshop, you can use all the tools allocation, which create a dashed frame on the image - an ant track.
With the tool " Ruler»In Photoshop, you can expand and crop the image. Deletes areas of the photo that go beyond its dimensions when rotated.
You can crop a photo in Photoshop without changing its size. In this case, the image is reduced, and its scale is increased. For this, they are used layers.
Tool " Canvas size"This is perhaps the easiest tool for cropping photos in Photoshop. With this tool, you can quickly set the final dimensions of photos or specify how much to crop them on one or more sides.
Another handy photo cropping tool in Photoshop is " Trimming". With it, you can find the borders of shadows or feathered borders and crop the photo according to them.
How to work with each cropping tool in Photoshop, when and why it is better to use them, read in the following chapters of this article.
Today you will learn how to make cropping in photoshop. We will be working with the Crop Tool. But first, let's find out what framing is, and why it is needed.
Cropping is the trimming of excess parts of the image that, according to your plan, do not fit into the composition.
For example, this is the original image:

And this is the cropped version:

There are several ways to carry out cropping in photoshop. The most convenient, in my opinion, is the Crop Tool (Cropping)

Open any image

Now select the Crop Tool, hold down the left mouse button to start the selection and release when the selection is complete. A frame like this will appear:

As you probably noticed, the frame has 8 points. By moving them, you edit the area that you want to leave "in the frame":

Anything outside the frame will be cropped. To confirm cropping, press the Enter key:

Here is such a simple tool. For a snack, I'll show you a few more ways to crop in Photoshop.
Cropping with Selection
Another very good method that I sometimes use. Make an arbitrary selection

And now go to Image (Image) -\u003e Crop (Crop). That's it, framing done! 🙂
You can also copy the image (Ctrl + V) with active selection, then create a new document (Ctrl + N), which will already be the desired size. And then just paste the copied image (Ctrl + V).
Trimming
This is the last cropping method that we will look at today.
Trimming works on the principle of removing unwanted pixels. Those. if there are transparent areas around the edges of the image, trimming will cut them off.

Trimming is called in the menu Image (Image) -> Trim (Trimming):

The Based on parameter specifies on the basis of which the image will be cropped: Transparent Pixels (Transparent pixels), Top Left Pixel Color (Color of the upper left pixel), Bottom Right Pixel Color (Color of the lower right pixel).
Trim Away determines which side will be trimmed. If all checkboxes are checked, trimming will be performed from all sides.
This concludes the tutorial on cropping in Photoshop. Leave your comments 🙂 I say goodbye to you until the next meeting (which will be very soon :)) on the pages of the site
Today we want to teach you how to crop photos in Photoshop. We will learn from the simplest examples.
Cropping, that is, changing the boundaries of the frame, can be done not only during photography, that is, in the process of creating a picture, but also during digital processing. At this stage, a lot can be done with a photo: correct the perspective, align the horizon line, change the center of view, etc. Our tips today will be useful not only for novice Photoshop users, but also for inexperienced photographers who are just learning the basics of photography. These guidelines will help you improve your photo at the stage of its creation. We will also talk about a new tool that appeared in Photoshop CS5. With it, you can easily correct the perspective.
How to crop photos with the Crop Tool
Step #1
Let's open an image in Photoshop. Then in the toolbar, select the tool Crop (frame). Another option to call the frame is to press the "C" key. Then you need to click on the canvas and stretch the frame that appears on the picture. The area to be deleted will be highlighted in dark color. In the corners of the selected area and in the middle of all four of its borders, you will see points, by moving which you can change the borders of this area.

Note:
Within itself, the framing frame in Photoshop has a "Rule of Thrids" grid (Rule of Thirds), which will be of great help to you in composing the frame. The area that will be cut out by the program can be made not dark, but transparent. To do this, press the "/" key.


Step #2
The frame that appears on your image, you can rotate as you like, in any direction. To do this, the mouse cursor must be moved outside the selected area, to the dark part of the image. Immediately you will see that a sign has appeared in the form of two arrows, which are located in the form of an arc. And now you need to hold down the left mouse button anywhere on the canvas and - feel free to twist the frame.

Well, then, when you achieve what you wanted, you need to press the Enter key, and your image will be cropped.

Note:
- In the case when you have already created a frame, but then changed your mind about cropping the image, you need to press the "Esc" key. Then everything will return to its original position.
How to crop to a specific size
Sometimes it is necessary to crop an image to a specific size, for example, 9x12 cm or 13x18 cm, which have long been accepted in photographs. For this procedure, you need to use specially created fields, which serve to enter the exact size of the future photo.
Step #1And here, too, you first need to activate the Crop tool. As we have already said, for this it is enough to press the "C" key. Now pay attention to the top of the screen. You can easily see here several buttons and fields, with which you can set the exact proportions of the future frame. And now in the fields Width (Width) and Height (Height) write down the desired exact dimensions of the image.

After you have set the required frame dimensions, you need to click on the canvas and thus create a frame. You will immediately notice that the proportions of the future image will be exactly what you want them to be. Now it will be impossible to change them. Just like in the first case, the frame can be rotated in different directions. Well, after when you achieve the desired position of the frame, as you guessed it, you need to press Enter.

Note:
In order to reset the aspect ratio settings, you need to click on the Clear button, which is located in the properties of the Crop tool.
If you need to copy the proportions and size of the frame to work on cropping other images, you need to click on the Front Image button. With this operation, you will save a lot of time when working with a large number of photos.
How to straighten slanted photos
Sometimes it happens that when you come home after a walk with a camera in the countryside and sit down at your computer, you will see that some of the pictures you took today have a slight flaw. We are talking about a skewed horizon line. In earlier versions of Photoshop, in order to flatten the horizon, you would have to follow a few specific steps. It would take you quite a lot of time. With version CS5, there is a brand new tool with which you can eliminate this flaw with incredible ease, align the horizon line in just a few seconds.
Step #1
Open the desired image in Photoshop. Now select the Ruler tool from the toolbar. How to find this line? Very simple. First you need to click on the tool tool Eyedropper (Pipette). Immediately, a menu will appear next to it, in which you will see the Ruler.

Step #2
Now, with the help of this ruler in the photo relative to the horizon line, you need to stretch the line. After that, you just have to click on the button Straighten (Straighten), which is located in the tool properties panel. Everything. The horizon in your photo is straightened.


A few more tips for beginners
- When framing a photo, you should try to leave a little more free space on the side of the frame where the movement depicted in the picture is directed. For example, if you are shooting a moving car, then you need to leave a little more space in front of it than behind. This technique will give the picture dynamism, depth, the viewer will immediately feel a sense of speed. Also, a little more space should be left on the portrait from the side where the gaze of the person depicted on it is directed.
- Always try to remove all unnecessary, random elements from the frame. Especially around the edges. This will help you greatly enhance the integrity of the composition. But, nevertheless, sometimes it is permissible to introduce some elements into the frame along the edges that create a sort of natural frame for your photo - for example, a stone arch, tree branches, etc. In this case, you will get a kind of natural vignette.
- the most important thing. Know that a real experienced photographer, a master of his craft, begins to compose a shot even when shooting. He does not rely on post-processing in Photoshop or some other graphic editor.
Based on materials from the site:
 Basic Techniques for Cropping a Photo in Photoshop How to Uncrop a Photo in Photoshop
 Which acrylic brushes are better to choose: little secrets of choosing the right one Using different piles
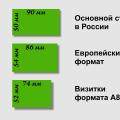 What are the sizes of business cards?