How to make a do-it-yourself plexiglass computer case. Creating a transparent case with your own hands Transparent wall for the system unit with your own hands
Good afternoon, Khabrovites. Thank you very much for the invite! And although it’s not a good idea to start by translating other people’s posts, perhaps this homemade project will seem mega-cool to someone else.
This is a translation of a post from the Overclock.net forum. Show4Pro user decided to take out all the insides of his super computer and hang everything on the wall. Great idea beautifully implemented. Who cares how it was going and how it works - wellcome under cat.
The last time I upgraded my home machine was 1.5 years ago. Well, I thought about upgrading the car to i7 (before that there was Bloomfield), although in fact, I didn’t need a more powerful processor. I wanted to buy a new case - Corsair 900D, to change the 8 year old Super Armor. But I wanted something special, unique. In Battlestations on Reddit, I came across a very simple yet elegant solution - a wall mount computer. And that's where the whole project started.
Accessories:
Processor: Intel Core i7 950
Motherboard: Asus Rampage III Extreme
Video cards: 2 x AMD HD7970
RAM: 6 x 2GB Corsair Dominator
SSD drives: 4 x 120GB Corsair Force GT SSD
HDD drives: 2 x 1TB WD Caviar Black
2TB WD Caviar Green
1.5TB WD Caviar Green
Power supply: Corsair AX1200i
Sound: Creative Sound Blaster Zx
Cooling:
Cooling for CPU:
Water Cooled CPU Heatsink EK Supreme HF Full Copper
Pump Swiftech MCP655 /w Speed Control
Cooler FrozenQ Liquid Fusion V Series 400 ml Reservoir - Blood Red
XSPC RX360 Performance Triple 120mm Radiator
GPU cooling
Heatsink for video card EK FC7970 - Acetal+EN
The pump and cooler are the same as for the processor.
Swiftech MCP655 /w Speed Control
FrozenQ Liquid Fusion V Series 400 ml Reservoir - Blood Red
Watercool MO-RA3 9x120 LT Radiator
Other:
Branch pipes for the cooling system
Koolance QD4 Quick Discounnec No Spill Coupling
Bitspower G1/4 Silver Triple Rotary 90deg Compression Fittings
Monsoon Free Center Compression Fittings
Phobya Angled Clip 90° Tubing Guide
Phobya Terminal Strip Tubing Clip/Holder
Cooling tubes themselves (red) PrimoChill Advanced LRT Tubing Bloodshed Red
Refrigerant phosphorescent, blue EK UV Blue Non-Conductive Fluid
Cables:
Bitfenix Alchemy Premium Sleeved Extensions
Corsair Individually Sleeved Modular Cables
Creation.
First, I took photos of all the components in their real size and put it all together in Photoshop. This way I was able to move them around the work surface and decide what it would look like. Well, this is necessary for wiring the cooling pipes. Here are a couple of layouts:
I refused this, because of the empty space in the lower right corner. And the motherboard turned out to be on the left, although it should be in the very center and draw attention to the entire panel. 
There is also a lot of space on the right, although the power supply and motherboard are already closer to the center. In the final version, the cooling pipes stretch along the entire right edge, plus two thermometers appeared there.

I transfer the motherboard drawing to an acrylic sheet.

Since the video adapters will be far away from the motherboard, I ordered PCIe slot extensions for each of the cards on eBay. This is me testing how they work. True, then I had huge problems with the crossover of cards due to cheap unshielded wires. They were on top of each other and created serious interference. The system hung on loading BIOS. It was possible to launch it with only one card. In the end, I had to fork out for very expensive cables with good protection. But more on that later.

The product has arrived!

Most of the water cooling comes from Performance-PC. They even gave me a T-shirt and two whole mouse pads!

Acrylic substrate for the motherboard.

All acrylic panels are cut at 45° to achieve a glowing edge effect.

The holes are drilled, the fasteners are installed.
TA-dah!!! It turns out that the mother of Rampage III Extreme is eATX format. And this is for the ATX form factor.
I made the correct eATX substrate later.

Time to gut my dusty old hull.


In the old computer, the disks are inserted into Vantec HDCS boxes, which make 3 HDD boxes out of 2 5.25" boxes.


Video cards.
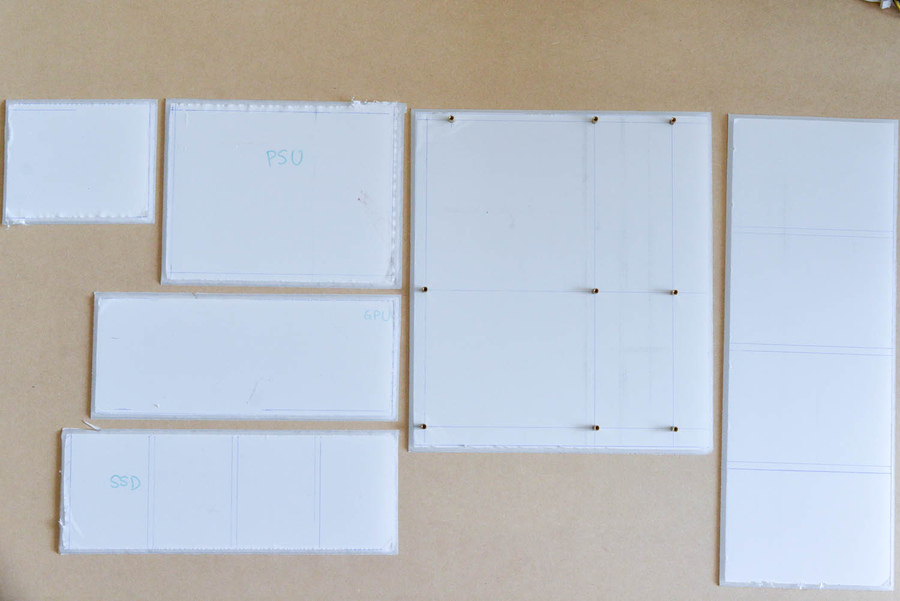
Substrates for all components.

Custom acrylic pump mounts.

Close-up of a rough finish made with a table saw. Later they will need to be sanded.

There is a triangular cut in the center of each plate. It will reflect light that is projected perpendicularly inside the plate at the edges. Without a cut, the edges barely glow.


Test with the light on on the sound panel.

All panels are sanded with 120 grit sandpaper.

Close-up of grinding.
All back panels are pre-drilled.
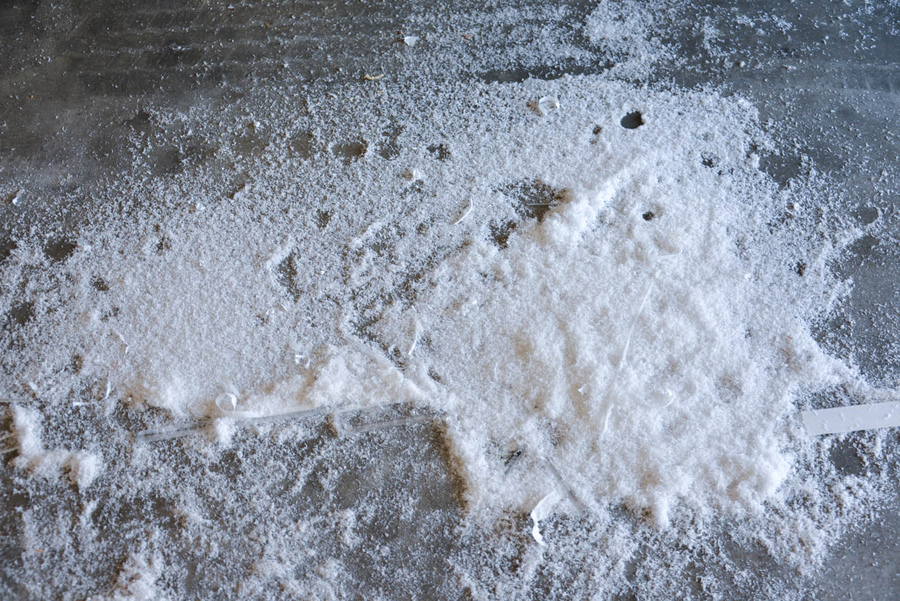
Under the table - acrylic snow.

Preparing to paint red.
Surprisingly, Corsair did put thermal pads on the petals, even though they don't get hot at all.

Marking all the components on the main board to mark the various slots and holes. Board - 1/4 "48 x 30 fiberboard.

All slots and holes are marked in their places.

I'm getting ready to cut the slots with a jigsaw.


I glue the frame.


I paint the inner edges black - the color of the carbon film.


Soldering LED strips.

Workplace.


LED strips. Temporary fastening.

Gluing a giant vinyl film. This was the most brutal part. I almost got a heart attack. How to stick a film on a phone screen, only x1000 more.

No bubbles!


I use aluminum tape to hide the LED on the front side of the hard drive panel, between them.

My assistant is Tommy.

All substrates are installed in their places on the common board with screws No. 10. They were screwed into pre-prepared holes.


Light check.

The coolant and cables have arrived. I used Bitfenix for the components and Corsair for the power supply.


On the left is Bitfenix, on the right is Сorsair. Bitfenix doesn't have black heat shrink on the ends, so the Corsair looks cooler.

Red ties to tighten hanging wires.

Backside. All cables are connected.

We test for leaks while the entire system is on the floor - it's easier to fix problems.
First start.
Not loaded. I connected via iROG USB to my laptop to see the download log. It turned out that the system was stuck on the VGA BIOS. Disconnected one of the video cards - everything worked. Tried to connect another - also works. Both cards are not. Did a little research and found that unshielded PCIe extenders with ribbon cables are very susceptible to EMI. I tried to shield them by wrapping them in several layers of aluminum foil. 

After 4 layers of foil, I was able to run both cards. But the car immediately hung as soon as it launched any game or some 3D editor. Not only that, my Soundblaster is also cascaded to a 3 x1 PCIe slot, and this also greatly interfered with the operation of the video cards and hung up the system.
As a result, with pain in my heart, I had to order expensive protected extenders for PCIe slots from 3M (about $100 each)

Shielded 3M extensions in place. They turned out to be longer than the previous ones and now both video cards have reached PCIe x16.


Changed the previous sound to SoundBlaster Zx. This one looks amazing!

And finally
At the moment everything is working smoothly. The unit has only 2 fans. On the PSU, it barely moves, and I put another one on the chipset - very quiet. The pump runs at the lowest power, so the computer came out pretty quiet. The only thing that irritates is that it turned out that the work of some components is heard outside the case. In my case, this is the buzzing of the video and 1TV hard drive.EK UV refrigerant is very sensitive to ultraviolet light. I know you shouldn't mix coolants to preserve their properties, but gosh, if I used it undiluted, I wouldn't be able to see the coils in the reservoir. For both circuits, I took about 1/8 of the can, the rest is distilled water.
From the translator
I do not pretend to at least some authorship of this incredible project. It's just that I'm a journalist, with an education in electronics, and doing such things is my dream. And to be honest, I would make a table, not a wall. So I decided, all of a sudden, not all Khabrovites are sitting onacrylic products
Along with the constant improvement of technical characteristics, the requirements for the appearance of modern technology are growing. All kinds of devices are becoming not only more productive, but also fantastically attractive, stylish, and bright. In this regard, a specific direction has gained great popularity - the production of equipment in transparent cases. This decision is dictated not only by considerations of aesthetics - in many aspects, the presence of a transparent body provides increased ease of use of the device.
Transparent cases for 3D-printers
 A modern 3D printer is a device that can be used to produce a product of any shape from a digital three-dimensional model. The main components of a 3D printer are the body, guides, print head, motors, controllers, power supply. Various materials (metals and plastics) can be used to make the case. But lately, printers with transparent plexiglass cases have become more and more popular.
This material allows you to freely observe the 3D printing process, which greatly simplifies the operation of the printer. High-quality cutting of the material and precise assembly of the case make it possible to avoid backlash during the operation of the 3D printer - this has a positive effect on the efficiency of the device. The high strength of Plexiglas increases the level of reliability of the 3D printer, making the device more durable.
Transparent computers and home appliances


 Transparent system blocks are a real "boom" in the modern computer industry. Plexiglass walls allow users to admire the inside of a PC and observe the processes that occur while the computer is running. The usual system unit, which everyone is used to hiding under the table, becomes a stylish interior decoration. And in combination with LED lighting, such designs turn into a futuristic masterpiece. There are several design solutions for equipping the system unit with a transparent case.
- - completely transparent cases for PC system blocks;
- - open, well-ventilated plexiglass system blocks with many internal partitions and a minimum number of external walls;
- - system blocks with large or small transparent windows on the side walls of the case.
Almost any household appliance can be made transparent: for example, a refrigerator, a washing machine, an iron, a toaster and many other devices. And all that is needed for this is a creative approach and high professionalism.


Production of transparent cases for equipment on order
"AcrylShik" offers professional services for the manufacture of transparent cases for equipment. Our offer may be of interest to both equipment manufacturing companies and private craftsmen. All products are manufactured at our own manufacturing facility located in the Moscow region.
- - Offer for manufacturers of equipment. Turning to us, you can significantly expand the range of your products - and for this you do not need to engage in readjustment of production, which requires capital investments. In cooperation with the AkrilShik company, the task of creating exclusive models of equipment is easily solved. Our technological capabilities are very wide, production is flexible, so we carry out both single and serial orders.
- - Offer for private masters. Recently, the hand-made manufacture of cases for equipment has gained increased popularity. If you produce such designs to order or plan to make something similar for yourself, please contact our company. We will manufacture a transparent body for equipment of any configuration, perform complex cutting of material according to your drawings, or provide design services for transparent bodies.


Advantages of plexiglass enclosures
We use only high-quality acrylic from European manufacturers, in particular, German PLEXIGLAS plexiglass. This material is perfectly transparent, easy to care for, not susceptible to heat and, of course, very attractive in appearance.
Through the transparent material, you can observe all the processes that occur inside the device. Plexiglas is easily processed, if necessary thermoformed, glued, polished. The technique, dressed in a transparent plexiglass case, has a unique look.
Plexiglas is perfectly combined with decorative lighting - spot or tape. Using LEDs, you can create very bright designs with a futuristic effect.
Transparent cases in the Chinese market - beware of fakes!
It's no secret that transparent cases for equipment are widely represented on Chinese trading floors today. At first glance, such products please with availability and relatively low price. But if you look at things objectively, it becomes clear that Chinese consumer goods will never be able to meet the requirements of demanding customers who know a lot about real quality and understand exactly what kind of product they want to receive. Unlike Chinese fakes, our products have the following advantages:
- - we use materials of the highest quality;
- - the parameters of the cases correspond to the individual requirements of the client;
- - we provide a guarantee for our products;
- - You can personally take an active part in the creation of product design;
- - a transparent case, made to order, may have a non-standard shape - cylindrical, spherical, hemispherical;
- - Your order will be delivered anywhere in Russia.
Our services for the production of transparent cases for appliances

 We offer the following services:
- - development of drawings of transparent cases for equipment;
- - production of cases according to drawings of the customer;
- - production of individual parts of the hulls for individual orders;
- - high-precision cutting of plexiglass on a CNC machine;
- - equipping transparent cases with LED illumination;
- - decoration of cases with patterns, inscriptions, drawings.
No matter how difficult your task is, with us it will be solved in the shortest possible time and at a high level of quality. Our specialists have been working in the production of plexiglass products for many years. The production of AkrilShik is equipped with modern equipment for cutting and curly cutting of plexiglass on CNC machines. Using a special gluing technology, we can produce cases of any shape. In fact, there are no restrictions on the complexity of the part configuration.
Call us right now - we will offer a lot of great ways to implement your original ideas!
Creation date: 17 AUG 2017 Author "Acrylshik"Implemented works
Transparent or with glass inserts PC case, and even with a spectacular LED- the backlight will decorate any room, made in a more or less modern design. Such system units, in addition to aesthetic, also have a practical application: we will have to quickly respond to the slightest dustiness inside and save the computer from overheating of components. Do transparent cases have disadvantages?
Of course, there is, however, like many other things. But certainly not in such numbers as couch experts attribute to them - the spreaders of myths, somewhere somehow learned something from someone, but never saw the object of gossip in person. What are the real pros and cons of transparent system engineers?
So, transparent cases for PCs: on stands in stores and on photos on the Internet, they always look flawless, stylish, futuristic.
But what is it really?
1. Material
Transparent one-piece computer cases and inserts on combined models are usually made of plexiglass, also known as colorless acrylic. This material is easy to process, inexpensive, durable. However, it is prone to scratches and scuffs. So such a body must be protected from the outset, at least to determine a place for it where we will not accidentally kick it with our feet.

There is an opinion that a transparent system unit smells bad. Like, plexiglass, when heated, due to the release of heat from PC components, spreads a pungent odor and synthetic fumes throughout the room that are harmful to the human body. This is wrong. Plexiglas melts at a temperature 160°. This is much higher than the critical temperatures of the components, upon reaching which the computer in most cases will simply turn off due to the protection operation. In terms of unpleasant odor and fumes harmful to humans, there are much more questions, for example, to stretch ceilings made of Chinese low-quality film. Nevertheless, they can be found in many offices, apartments and houses with budget repairs.
2. Static electricity
Another myth propagated by sofa experts is that plexiglass cases accumulate static electricity to such an extent that this can result in the failure of PC components. This is wrong. Statics are accumulated by system units from any material on the market - plexiglass, plastic, iron.
3. Order inside
Whether it is a PC case made entirely of plexiglass, whether it has only a transparent insert, even if this insert is tinted - in any case, the aesthetic effect will take place only when the order is induced inside. To do this, it is necessary that the wires are neatly and neatly laid inside the system unit.

Well, there was no excessive dustiness.
4. Cost
Another myth is that cases with transparent inserts are very expensive. It is not always so. The price of the system unit is formed not only by the material, but also by the form factor, availability/quality power supply, front panel functions (USB, headphone and microphone outputs, card reader, etc.) , additional, in particular, water cooling, etc. Of course, models with standard transparent coolers, with spectacular lighting, with a high-quality power supply, from famous brands, etc. will cost a lot of money. Nevertheless, you can also find cases on the market at an affordable price - which are from the basic model without an plexiglass insert and with that (with backlight in addition) will separate the extra 300-400 rubles. Well, he will be able to offer goods for different wallets, including not for the thickest ones.

True, with all the ensuing risks and functional limitations.
5. DIY transparent body
The network has a lot of instructions on how to make a transparent PC case with your own hands. They lay out in detail "recipes" creation of transparent boxes with compartments for accessories, involving imagination at the stages of design and finishing. Or it is shown how it is possible to transform an ordinary old iron system unit into one with a side glass insert. Good, the same can offer a variety of solutions for embedding into a PC case LED-lights and even ready-made coolers glowing with all the colors of the rainbow.

Of course, with self-production, you can realize your wildest fantasies. But ... Without skill, without accuracy, without at least partially free resources, this kind of craft will be nothing more than clearly visible "masterpiece" handicraft art, in which at least half of the finished product from the store is invested:
with neat seams
without traces of liquid nails;
with the design of the form factor itself is not 10 years old;
not with LED illumination hidden inside the case, but with luminous coolers made of the same plexiglass.
6. What you should pay attention to when buying
When buying a transparent system unit, you need to carefully inspect the glass for scratches and scuffs. And those, by the way, may be invisible due to the transport film. Inspection is best done without it.
Plexiglas should not be blurry. Not that the lack of crystal transparency of the material affected the effect as a whole, but rather the situation "expectations/reality". If we pay for aesthetic pleasure, then we must receive it in the smallest detail.
You need to make sure that the model of the selected case provides the ability to adjust the backlight. So that it can be made weaker or completely turned off. Excessively bright light from coolers will perfectly cope with the role of a night light, but it will also interfere with sleep at night.

So, about a year and a half ago, I first came across a transparent Clear Tech case, or I don’t remember exactly what it was called there. Since then, I had a vague idea that it would be nice for me to do something similar. Once again, having carefully examined it, I realized that there can be no question of repetition, especially since my financial capabilities are very limited. Therefore, I created my own construct, perhaps not so spectacular, but quite viable, and also suitable for repetition. We can talk about this with complete confidence, because when I started making one case, I made three of them, their names are in the title.
I will make a reservation that the guys who did not hold a caliper in their hands should hardly take on such a design, perhaps it is worth practicing and trying to create something simpler, such as such a lamp.
Just to learn how to cut and glue plexiglass. I probably won’t write about these simplest operations, because. this has been done many times before me.
In general, judge for yourself - making such a case is quite simple. When making it, I did not draw drawings, since I did not buy plexiglass in a store (this is a rather expensive thing), but I looked for it at my work (well, for example, a sheet of red plexus, which was enough for the entire KTP-5 ROUGE case, cost me in a bottle of vodka), but this resulted in an additional difficulty - I had to take into account the different thicknesses of plexiglass all the time, so that in general everything looked neat enough.

So, first you need to have material for the side and rear walls, for side, sufficiently large walls, you should not take plexiglass thinner than 5 mm, the back wall should be at least 8 mm thick. Then you can start making the top and bottom covers. The bottom cover is cut out of 10mm plexiglass, the top cover is 6mm. Both lids should be exactly the same, of course, first I made a thick bottom lid, and fitted a thinner top one over it. If possible, it is best to mill both covers in one pass. Next 4 vertical racks. They are also cut from 10mm plex, each has two M3 threaded holes at the bottom and one M3 thread at the top. I drilled the front struts under the edge of the covers, the rear struts with an indent, for the back wall, which is also made of 10 mm plexiglass, as it carries a heavy power supply. I must say that I did not come across Plexiglas, the thickness of which would be expressed in such round numbers as 6 and 10. In fact, everywhere the size of the thickness went with tenths and hundredths, for example 6.35 and 10.2. So, the principle, measure seven times, cut once, is 100% effective here.
After these 6 parts were screwed, I immediately screwed plastic legs to the bottom cover so as not to scratch the nascent case once again. The frame is ready, and we can say that a third of the work is done. Of course, quite a lot of work remains, but from now on, everything that is done is done visually. We make the back wall, its dimensions, if you follow the above drawing, are 470x (140 minus twice the thickness of the side wall). Those. if the side walls are made of 6.35mm plex, then the width of the back cover is 140-(6.35x2)=127.3.

Perhaps it is worth saying a few words about the size right away. These dimensions are not something super-rational, I took them almost from the ceiling. And as you can see in the photos, they can be easily changed.
So the back wall. We have decided on its overall dimensions, it can already be screwed to its rightful place, but that's not all, because the back wall carries a lot of functional loads. At this stage, the turn of the motherboard comes. It is installed on a piece of plexiglass measuring 600x290x4. This piece of plex is attached to the inner sides of the uprights with four M3 screws. Great precision is not required here, and the thickness of this piece does not play a big role. But then you need to be very careful. Modern motherboards have an average of 9-12 mounting holes, I cut the same number of pieces of plexiglass 10x10x8 in size, in the center of each hole with an M3 thread. With short M3 screws we screw these pieces to the motherboard, of course, screws from the part side, plex from the smooth side. In the future, it remains only to carefully smear these pieces of plexus with glue made from sawdust of the same plexus soaked in dichloroethane and glue it in place.
From the old computer case, I sawed out a part of the back wall with a lattice for installing expansion cards. We insert any two boards into the two extreme connectors of the mother, fix the lattice on them and ... now it's the turn of dichloroethane. The frame screwed before, plus the back wall screwed to it, as well as the plex strip (600x290x4) pre-installed in this frame, taking into account the further installation of the power supply - we put all this construct on its side. And then we take the motherboard, on which the boards and the grille are installed, with pieces of plex already screwed to it, grease them with dichloroethane glue and glue it all onto a 4-mm plex strip, so that the grille stands close to the back wall.
Since the back wall is transparent, it will not be difficult to accurately mark the holes in it. In order not to scratch the plexiglass once again, I used a thin felt-tip pen. Subsequently, its traces can be erased with alcohol. Further - a matter of technology: we drill, cut out, align the edges with a scraper. It remains to do exactly the same manipulations with the power supply, and the back wall is ready. On my cases, however, there are some other little things: a fan, power connectors, speaker connectors, but all these details are of secondary importance. Their installation is not particularly difficult, and I mentioned them only for the sake of observing objective reality.


Well, I hope I outlined the process of making the back wall intelligibly enough, but just in case, I give a small illustration. And once again I must say that having made three cases, I was convinced that there are no uniform sizes. All metal inserts were from different cases and, accordingly, had different sizes, in the same way, all three motherboards had a slightly different configuration of output connectors.
Next, you need to make something like a small whatnot for installing hard drives and CD-ROMs. I did this thing for three CD-ROMs, so if someone doesn't like it, then the dimensions will have to be changed.

So the dimensions for the high block, two racks for mounting the FDD and HDD are 323.5x130x8, in both narrow ends I drilled three holes for the M3 thread. The bottom of the shelf for CD-ROMs - 170x146.5x8 is screwed to the top side, the bottom end will be screwed to the 10 mm bottom case cover. The side walls of the CD-ROM box are made of thinner plexiglass - 5mm, they are screwed to the ends to the 8mm top and bottom covers. It remains to mark the holes for mounting CD-ROMs, as well as a 3-inch drive and hard drives, well, this is not difficult. But an unexpectedly difficult task for me was to find long enough screws with an inch thread to secure the hard drives through an 8mm plex. I solved this problem when I took apart some old printer.

One more thing. For structural rigidity, I glued small plexiglass inserts to the sides of the CD-ROM box, they are screwed to the vertical posts with M3 screws. In general, in my construct, there were more screws than glues. Probably something could be simplified, but I tried to make it as convenient as possible, to disassemble everything and get access to any point of the case. I needed this, because in addition to the computer itself, a few more pleasant little things are mounted in my cases.
So, it remains to make the front wall. The principle is the same as with the back wall - we cut it to size, fix it to the front vertical racks and circle the places of cuts for CD-ROMs and floppy with a felt-tip pen. There is also a hole for the indicator on the front panel. In this hole, exactly in size, I fitted a piece of plex of a different color. This is not a very easy task, but you can slowly adjust everything carefully - it turns out very effectively, even better than on branded cases. You can glue this insert using a medical syringe with a thin needle so as not to stick excess dichloroethane on the front panel.


I've used this a few times, and it almost always works. The main thing is to slowly adjust the insert, repeatedly trying it on in the right place. And one more thing: it is better not to cut the insert with a file, but with an effort to scrape its ends with a piece of a hacksaw blade simply ground on emery.

Installing the power, reset and other buttons is quite simple. I used in different cases, different buttons that I could get - soldered them into the appropriate printed circuit board, which was subsequently screwed to the plexiglass holder. A small board is attached to it, into which LEDs are soldered - each strictly above the button. The holder is installed between the racks on which the hard drives are fixed, that is, it should not be wider than the width of the hard drive. I believe that such a fairly simple detail, everyone can design and glue himself, in accordance with the buttons he has. And besides, the buttons can be installed not only horizontally, but also vertically. In general, no difficulties are expected from this side. With two side walls, everything is also quite simple - you just need to cut them to size and fix them with 4 M3 screws to the vertical posts. It would be ideal to find screws with decorative heads, but so far I have not caught my eye, although I did not spare the time to go around the entire Mitinsky and Moskvoretsky markets.
Moreover, it is absolutely not necessary to buy an expensive top-end case - you can make it yourself. It just takes a little effort, experience and patience.
How to make a transparent computer case yourself.
The obvious advantage of a transparent computer case is its aesthetic component. Other advantages of the transparent case include:
- Multicolored modern LED lighting.
- The ability to monitor the visual state of PC components, including transistors and thermal paste.
- Unusual design will make the PC the main decoration of your room.
- You can make and upgrade with your own hands!
In most cases, users complain about such shortcomings:
- Too branded.
- Pets regularly leave new scratches.
- Fragile.
- The price is several times higher than the cost of a conventional case.
- Self-assembly requires skills in handling computer technology and equipment.
The largest manufacturers of cases have long brought to the market a line of models of transparent cases for every taste and budget. And the first problem is what material to choose.
Material
If you have already decided to buy a case with a transparent side panel, another dilemma arises - should you use tempered glass or acrylic (plexiglass)? Both materials have their own advantages and disadvantages, so choosing can be tricky.
Acrylic case
Advantages:
- Less weight.
- Less cost.
- It's easier to disassemble.
Flaws:
- More scratches.
- May warp at higher temperatures.
Strained glass
Advantages:
- More transparent.
- Ease of cleaning.
- Scratch resistant.
Flaws:
- May shatter.
- Price.

Static electricity
You don't need to buy anything or take extra steps to prevent static electricity damage when working with PC components. A few simple tips will help you avoid danger without any additional effort.
- Before you begin, avoid walking on carpet in socks, and remove all woolen items - such materials can accumulate static electricity.
- Leave the computer connected to a grounded (three-prong) power outlet while you work on the computer. Be sure to turn off the mains completely using the main switch on the power supply (on the back of the case) and not the Power button that you press every day.
- Before touching any internal components, touch a metal part of the PC case with your hand. This will ground you by neutralizing the static charge. After that, you can safely get to work without worrying about static electricity.
- Periodically touch the metal parts of the case to neutralize static charge and stay grounded.
- Never forget about static electricity. Especially if you periodically come into contact with any individual components. For example, if you need to replace your graphics card or RAM stick, be sure to ground yourself.
- Professional computer technicians recommend wearing an antistatic wrist strap. To use it, simply put the strap on your wrist and secure it to your PC case. This will ensure constant contact with the chassis and ground, allowing both hands to be used inside the computer.
An anti-static mat also provides complete protection, but the above tips are more than enough. Even an anti-static wrist strap would be overkill for the average PC user. If you have assembled / disassembled your PC many times and have never encountered static electricity, consider yourself very lucky.

Order inside
Be sure to make sure you know where the wires should be routed and how to fix the components. Pay special attention to the second - improper use (landing in the socket, temperature, dust) of components, whether it be RAM or a video card, will certainly lead to PC failure. The main problem inside is the wires connecting the power supply to the rest of the PC. When you are sure that all the components that need separate power are connected, tie the remaining wires together with a plastic tie or electrical tape. In most cases, they can be neatly placed along the edge of the motherboard. The case is cooled in such a way that air flows through all its parts, after which a lot of dust settles there. It clogs the tracks and air communications of the entire system, which also leads to overheating and breakage of expensive components. Therefore, regular cleaning is necessary, even at home. Following our static electricity tips, remove one side wall and vacuum the motherboard thoroughly.
Be extremely careful not to hook the processor or RAM!
Price
The cost of a transparent case ranges from several tens to several hundred US dollars. If you decide to buy a case with a transparent cover, we recommend the time-tested Antec products. The optimal case for the average user, Antec Nine Hundred Two V3, has the following characteristics:
- Handsome outside.
- Lots of ventilation.
- Pretty transparent side window. It also has room for an additional 120mm fan.
- Offers multiple drive bays (including one 2.5" bay) and 8 expansion slots.
- The power supply is located at the bottom.
- Huge fan for maximum circulation.
- Speed controllers for each front fan.
- Rear panel control box for top and rear fans.
- Built-in removable air filters.
As for the shortcomings, users most often complained about:
- Limited small cable routing holes and rubber grommets to improve the appearance of wiring.
- Too many drive bays - they absorb most of the internal space. Some long video cards do not fit.
You can buy such a case now for about $140 on Amazon or the manufacturer's website.

What to look for when buying
Most technicians pay attention to the following characteristics:
- Connecting a CPU cooler - allows you to replace the processor or cooler without disassembling the entire motherboard.
- Front Panel Connection - If you have a lot of external devices, check for quick access on the front of the case.
- Fans and Airflow - The more fans you have in your computer, the better the airflow will be.
- Dust filters - A computer clogged with dust, pet hair and tobacco debris overheats and fails faster. especially considering the transparent case.
- Sound Isolation - Special covers ensure quiet operation by often using sound-absorbing materials inside the cabinet panels.
- Water-cooled support – Liquid cooling is more efficient than ever with the use of hermetically sealed packaged refrigerators.
- Tempered glass body - great but fragile - handle with care!
- Integrated Lighting - Customizable RGB lighting.

How to make a transparent case with your own hands
The first step in creating a transparent PC case with your own hands is to make a list of the necessary materials and equipment:
- 1x1.5 meters of ordinary plexiglass 4 mm..
- 60x15 cm black Plexiglas 3 mm.
Computer components:
- Motherboard (Intel H67).
- CPU (Intel G2030).
- Cooling fan for CPU (Zalman).
- Power supply (Slim Seasonic 250 W).
- HDD 320 GB.
- Case fan.
- 2 switches (Power On/Off and Reset).
- LED Strip Light.
Tools and Peripherals:
- Bolts and nuts (120 or so).
- Drill, a set of drills.
- Saw, a special blade for metal - best suited for cutting plastic.
- Electric drill.
- Wires for LEDs.
- Fan.
- thermoplastic adhesive.
- Tin / aluminum and scissors for metal (for attaching a hard drive).
- Engraver.
- Clamps.
- Aluminum corners.
- Gloves.
- Calipers.

Follow the instructions, and you can easily make a transparent case yourself:

That's all. Assembly completed! In general, all the work may take a couple of days, but the result is worth it. The case itself is very quiet (plexiglass is an excellent insulating material), so you can enjoy watching movies, surfing the Internet and listening to music to the fullest. Which material will be the best as the transparent side panel of your PC case is up to you. The various options have their pros and cons. Summing up, we can conclude that tempered glass is still a little more practical. Despite its weight and fragility, it provides a clearer view of your PC's innards.
 Amaranth - edible amaranth
 Castor plant planting and care at home
 Growing iris in open ground on a personal plot: features of the variety Iris berries