Homemade soft flail (monkey fist) for self-defense. Decorative knot "Monkey fist". Step-by-Step Instructions Manual Decorative Monkey Fist Knot
you can use the so-called "monkey fist". This monkey fist is woven from a thick paracord cord or rope and can be used as a keychain, which, in turn, freely passes into the category when a situation arises when it is necessary to protect oneself from an attack by an aggressor. A metal ball from a large bearing is inserted into a knot woven in a special way for weighting. The ball is closed on all sides with a layer of braided paracord (rope), which will avoid death in self-defense, but can, as they say, knock the spirit out of the enemy, that is, deprive him of consciousness with a precise blow to the head. The monkey fist can be made in principle of any size, both in quality and in a powerful flail. In this article, we will step by step analyze how to weave a monkey fist correctly. So, the monkey fist is, first of all, the type of knot that we will learn to knit today.
Monkey Fist Weaving Technique
When weaving a knot, it is necessary to hold the cord correctly. Place the rope on the open palm of your left hand so that the short tail hangs from its rib. We will create a knot with a long end. To do this, take the long end of the rope with your right hand and make three turns around the first three fingers. The first turn should be closer to the palm, the second and third consecutively closer to the ends of the fingers.
Now we make three more turns, only perpendicular to the first three turns (through each finger).
With your free hand, remove the cord from your fingers, holding the first set of coils still, and put it on your index finger and thumb.
Now wrap the cord horizontally. Take the long end of the rope and wrap it perpendicularly through the three vertical loops you just created. Do this three times. Each horizontal subsequent thread must be higher than the last. When this is done, you should have three turns of rope tied together in three horizontal loops.
It is not necessary to tighten the loops yet. These coils must be free.
Finishing horizontal turns by creating a loop, with the remainder of the rope, passing through three vertical threads. Here, you make your last turn: the end goes through the middle, not the outside.
Make three more vertical turns. Grab the long tail again and wrap it around the last three horizontal loops. Pass the rope through the hole. Go to a horizontal wrap, but between the first three vertical loops. Continue this movement three times.
Ready to create the monkey's fist. Now you need to insert a steel ball into its middle. The ball does not have to be steel. It can be carved from hardwood, or you can pick up a good round stone among river pebbles.
Now you can tighten the monkey's fist. Spend a few minutes gently tugging on each loop to tighten the knot. Start with the first and end with the last.
You must take up the slack by tightening each cycle in the order you created it. Start with vertical stitches, then horizontal stitches, and then the last set of vertical stitches.
But that is not all. From the remaining long end, we need to make a loop in order to attach it to the keys (if you use the monkey's fist as a keychain) or for the convenience of grabbing a homemade flail with your hand.
Create a knot using the fingers of the same left hand as shown in the figure and tighten it, forming a loop of the length you need. This knot can be impregnated with superglue, then you will have a full guarantee that it will definitely not untie. The excess part of the cord can now be cut off.
Weaving a knot for a large monkey fist, you can do not three turns, but, for example, five. In this case, you will no longer have a keychain, but a full-fledged flail. Also, if you leave long ends, then instead of a loop, you can weave a soft handle. Good luck!
There is an opinion that the decorative “monkey fist” knot has a special magical power, because, unlike other talisman knots, it is characterized by a special shape - a ball, although the rest of the knots are flat. It is not so difficult to make it, the main thing is to carefully study the instructions.
Node History
This decorative knot acquired such an original name due to its similarity with a small fist. It was used in the distant past, in cases where a ship in distress needed to throw a rope onto another ship to save it. In this case, this sea knot served as a weighting agent. A small core was placed inside it, and then it easily flew to the side of another ship.
Necessary materials and tools
To weave a decorative monkey fist knot, you will need:
- rope or rope;
- a ball corresponding to the size of the future node (wooden, glass, plastic or metal);
- a tool for tightening the knot (you can use a regular knitting needle);
- when weaving, the hand will serve as a frame.
How to weave a decorative monkey fist knot
To perform the knot, you need to take the cord, press it to the palm with the help of the little finger, throw it over the thumb, and then put it between the ring finger and the little finger.
After this, several turns should be performed, catching the lace on the thumb and little finger. The number of turns will correspond to the diameter of the rope used and the diameter of the weight (the ball must be completely hidden behind the turns of the cord). Next, the rope is wrapped around the little finger and a similar number of turns are made around the first. At this stage, it is necessary to insert the weighting agent inside and continue weaving.
A similar number of turns should completely cover the ball. Particular attention should be paid to the fact that the final batch of turns should capture that part of the lace that covered the little finger.

After completing the weaving, the knot should be tightened. To do this, first of all, the thumb is released and the released loops are tightened (separately each curl). When the first group of loops is pulled up, the little finger can also be released. Next, you need to pull up another freed group of loops. This should be done gradually.
As a result, you need to take a knitting needle and use it to make the final puff. But it must be performed in several stages so that the decorative knot is even and does not warp. Such a product can become a keychain or a talisman. However, in this case, the “monkey fist” needs to be continued a little or secured with other types of weaving.
Decorative knot "monkey fist" in the design of the room
By creating a knot "monkey fist" can be used as a decorative element. It will fit perfectly into the overall picture of the room, and will also become an original stop for doors, which can be hung on the doorknob or placed next to it.
The principle of its creation is the same as in the instructions described above. However, to make the decorative element look more massive, it will take about 4 meters of medium-thick twine or rope to make it, and a tennis ball and filler (sand, rice or small pebbles) will also come in handy for weighting.

Before creating a decorative knot, you need to practice on a thinner rope, performing all the steps in sequence. To create an emphasis for the doors, the “monkey fist” must be weighted using a tennis ball. A small incision should be made on it and the ball should be filled with the selected filler. If it was decided to use sand for these purposes, then after that the incision must be sealed with adhesive tape.

The weighted one is placed inside, slightly stretching the knot. Care should be taken when tightening the knot. You need to work through each loop, leaving no gaps. In addition, a decorative knot can be improved by hiding its tips. If they are not needed, they are simply cut off and hidden in the next three loops.
The knot under the original name "monkey fist" is a great gift or talisman that you can make quickly and with your own hands. But, this beautiful knot has an interesting history, some attribute some magical properties to it.
How to weave a monkey fist knot yourself
There are several legends about the emergence of a node called a monkey fist, and each of them has the right to life:
- a few hundred years ago, when pirates ruled the seas, sinking ships were not uncommon. People fleeing the ship tried to throw rescue ropes at other ships, but the light end of the rope simply did not reach the target. Then the sailors decided to weight the rope with a cannonball. In order to attach the core to the rope, the pirates came up with such a knot;
- in some countries a metal ball hidden in a knot served as a weapon. With a weapon dangerous enough, not every bone can withstand the impact of such a weapon;
- in the United States, this knot has become a symbol of brotherhood and mutual aid. He was popular with the hobo gang. They wore it as a talisman around their neck.
The meaning of this knot comes from the way monkeys are caught. Monkey goodies were thrown into a vessel with a narrow neck and left in places densely populated by primates. Interested, the monkey put its paw into the vessel and clenched the food into a fist, driving itself into a trap. It was impossible to get a hand with food in a fist from a jug. So in ancient times they caught greedy monkeys.
Step-by-step instructions for creating a monkey fist.This knot is still used today in sailing. Today we will create a small, decorative knot. It can be used as a keychain or decoration for a bag, backpack. In order for our knot to keep its shape better and have a certain weight, you can insert any ball that fits in size into the middle. A ball from an old computer mouse is ideal.
To create a knot, you will need the following materials:
- rope. The size of the knot will depend on the thickness of the rope;
- a ball that will serve as a shape and weight;
- a tool with which we will tighten the knot (a knitting needle works great).
The knot is knitted on the left palm. We press the end of the rope to the palm with the little finger. We throw it over the protruding thumb and lead between the ring and little fingers.
Next, we begin to wind the thread by the thumb and little finger. You need to make so many vertical turns to completely hide the ball in the rope. If your weaving will be without a ball, then the number of turns depends on the desired knot size. In our example, there are five. The sixth turn is taken away by the little finger.

Now you need to make the same number of horizontal turns around the vertical ones.
Right now is the time to put the ball into the resulting basket. Gently tighten the ropes so that the ball does not fall out, but do not tighten them too much ahead of time. Otherwise, the knot will turn out to be uneven.
We make five more turns between the horizontal and vertical ones, as if wrapping our ball. The knitting pattern is shown below. It is very important at this step to hide the end in the ropes, which was originally under the little finger.
Then the most responsible and difficult work begins. We begin to pull the ropes. We pull out the thumb from the structure and begin to slowly and gradually pull the upper turns. 
By tightening the upper turns, you can release the little finger, now we tighten the lower loops. Do not tighten the ropes strongly in one jerk, you need to do it smoothly, gradually.

We pull up the third five loops.
We take a knitting needle and finally tighten all the ropes. Here, too, you should not rush, we pull up one rope at a time, otherwise the knot will be crooked. 
All monkey knot is ready. The ends of the ropes can be hidden inside, cut or left. It all depends on the further use of the product.
Video on the topic of the article
Knitting this knot is not difficult and does not take long, you just need a little practice. When creating it, you can use different ropes and fillers. Today we talked about how to make the simplest version of the node. But there are several other techniques. The main thing to remember is that using it as a weapon in the modern world is prohibited by law!
In the video master classes below, we will show other, more detailed options for creating this node.
"Monkey Fist" appeared in the distant past, in the days when there were pirates. At that time, if the ship was wrecked, it was necessary to throw a lifeline. But it is known that during a storm it is quite difficult to do this without a weighting agent, so this type of knot with a weighting agent was invented for such purposes. A lot of time has passed since then, but this knot has not lost its popularity. Only now its meaning and scope have changed radically. Now it's decorative. It does not carry any functional component, but looks very impressive as a decoration.
There are many videos that have a complete and detailed description of how to perform it, and if you try hard, then without much effort you can recreate exactly the same knot with your own hands.
How to make a knot "monkey fist"
This knot is decorative in nature, not a useful practical application. It belongs to the category of stop knots. It consists of three sets of mutually perpendicular turns, that is, three sets of turns located in mutually perpendicular planes. The set and number of turns can be different: from 1 and above. This node is described using the example of three turns, that is, 3x3x3.
- Your own fingers are taken as the base, and a rope is laid on them. The coils are starting to pick up. It should be remembered that the node has three turns in each plane. The end of a coil is a complete revolution.

- After dialing three turns, you need to dial three more turns in a perpendicular plane. To do this, you can remove one finger and, in order not to lower two loops, they are left on two fingers. The coils continue to pick up. The next three turns should be outside the first three turns. The first, second and third turns are made alternately.
- The final stage of the set of turns is done in a perpendicular plane. This set will run inside the first three turns, but outside the second. To do this, the running end is introduced into the first set and begins to wrap around the second set of turns. This should be done carefully so as not to reset the already dialed turns.
- The end of the knot is hidden inside the knot itself, that is, it must be inserted inside.
- Inside the node turned out to be empty. And if you start to tighten it in this form, then all the ropes will be knocked down and will lie ugly, that is, they will not lie with a tape. In order to avoid this, you need to put something inside this node. It can be a ball from an old computer mouse or a small ball of thread. At the end of the rope, since the margin is quite good, you can tie a knot and put it inside the knot. After that, all the turns are well tightened. Such a knot in the middle can hold its shape.
- After that, you should begin to tighten all the turns, moving in the opposite direction, that is, from the end.
- At first it will be difficult to achieve the ideal shape of the knot and in general it is impossible to completely tighten the knot tightly in one stage, so it will be 2-3 stages, but the knot turns out beautiful, and it's worth it. It is not necessary to tighten the knot strongly at the first stage, because all the turns will immediately slip and bunch up. If during operation the knot inside was hollow, then it would already be deformed and have an ugly appearance.
- After all the turns are tightened, a neat ball-shaped knot is obtained. With a little practice, you can achieve the perfect knot shape.

Meaning of the "monkey fist" knot
In addition to its decorative purpose, the monkey fist knot also has a special meaning. It has become a symbol of brotherhood and mutual assistance. It was used as a weapon. To do this, a metal ball was placed inside the knot, and such a projectile was thrown at the enemy. American tramps wore such a knot on their chest as a protective amulet.
The very same name originates from the moment when the capture of monkeys began. It was a long time ago. To do this, they put a jug with a narrow neck, placed a treat inside and set such a trap in the habitat of monkeys. When the monkey smelled the bait, it approached the jug, stretched out its hand inside, grabbed the prey into its fist, but it could no longer stretch its hand back, because the fist does not pass through the narrow neck of the vessel.
Application area
The scope of such a node is common in modern decor. Since the balls have the correct shape, they are often used as a beautiful pendant and with their help they beautifully complete any weaving. If you make a lot of such knots, then with their help you can make a beautiful garland and decorate any room with it.
Jewelry made in this style looks very beautiful. Earrings are solid and original, and a necklace or necklace will have an exquisite designer look.
Another interesting idea is to weave a pillow in the style of a monkey fist. In this case, instead of cords and ropes, soft wool or other soft and dense material is taken.
It is easy to make such knots. A special pattern for weaving will be especially useful. On it you can do weaving exactly according to the instructions.
Video on the topic of the article
The history of the monkey fist knot began two centuries ago. The name comes from the method of catching monkeys by sailors. A delicacy was poured into a jug with a narrow neck, the beast stuck its fingers in and, not wanting to let go of the find, got stuck.
To this day, the knot is used for mooring ships, but more often for creating accessories and decorative elements.
Learning to knit a monkey fist knot
To make a monkey fist knot, you will need a one-meter cord. For the base, it is recommended to use linen, cotton, synthetic or paracord material. A rounded shape is given to the product using a plastic, glass, wooden or metal ball, which is placed inside the knot. Weaving will take up to half an hour (Figure 1).
Figure 1. This is how the "monkey fist" looks like
Upon completion of the knitting of the decorative knot, the monkey fist will remain the free end of the lace. It can be cut or used as the basis for a new weave, such as a lanyard.
The history of the appearance and purpose of the node
To transfer a rope from one to another vessel, it was necessary to weight the end of the rope. For weighting, cannonballs were used, tying them to the ropes with a monkey fist (Figure 2).
The knot is still common in navigation, but inserts available on board modern ships are used instead of lead cores.
The monkey fist has gained popularity outside the maritime industry. American hobos (itinerant workers) at the beginning of the 20th century used it as a symbol of their brotherhood.
 Figure 2. Initially, the connection was used in maritime business
 These days, a monkey fist will do when crafting:
- key rings, pendants for keys, knives or decorative edged weapons;
- auto accessories - you can replace popular Chinese knots for car interiors with a monkey fist;
- buttons or fasteners for braided, paracord bracelets;
- holders for curtains - for a unique design of curtains, a monkey fist is knitted from a dense, massive lace with a large ball inside;
- decorations for clothes or decor;
- talismans for good luck;
- eating for juggling or spinning (most often used at a fire show);
- flails - a modern variety of street cold-crushing weapons.
Node pros and cons
The advantage of weaving is the initial level of complexity. Even if you have never knotted knots more difficult than laces, Monkey's Fist will definitely fit your teeth.
The only drawback (or advantage, it's up to the reader) is the use of a knot to create a weapon. Tassels are prohibited for transportation and use on the territory of the Russian Federation and the CIS countries, therefore it is not recommended to use them for self-defense.
We will tell you how to weave with a ball and without a monkey fist in a step-by-step instruction.
General knitting pattern
Determine the non-dominant hand over which the cord will be wound. For left-handers, it's the right one; for right-handers, it's the left one. Firmly press the straightened fingers so that there is no free space between them (Figure 3).
Throw a piece of cord through the palm of your hand and proceed to the pattern of weaving the monkey fist knot:
- Wrap the rope around your fingers three times, stretching the winding from the little finger to the index. The resulting loops are the basis of the entire knot.
- Pull out the brush, making sure that the loops do not unravel.
- Holding the base, pull one free end of the lace three times across the finished loops crosswise. The turns of the lace should be open, slightly loose and have a place inside for inserting a ball.
- Insert the ball into the resulting base and just tighten. You should have room for the third layer.
- We pass the free end of the cord between the nested ball and the upper loops. Then we unfold it and pass it through the lower loops.
- We wrap the ball three times with the rest of the lace and pull on all ends. If the weaving was done correctly, the loops will fit snugly against the core and completely (or partially, depending on the flexibility of the material) close it.
The standard step-by-step instruction on how to make a monkey fist is extremely simple. At the end, the free ends of the rope are cut and cauterized to prevent the threads from unraveling, or woven with a new piece of cord to continue knitting.
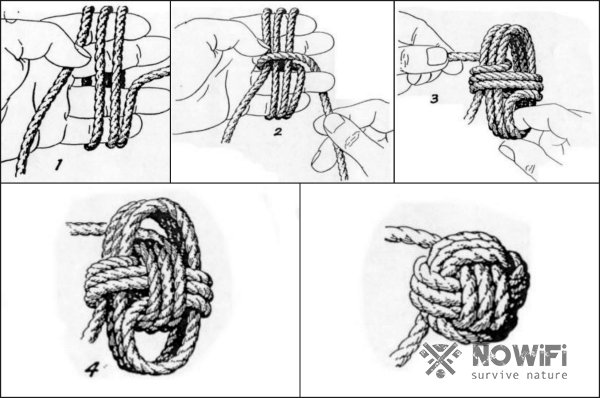 Figure 3. Classic knitting pattern
 The options for how to weave Monkey's Fist do not end with the standard pattern. You can try to make a multi-colored monkey fist using two threads at once. The final version is similar to a volleyball protector.
Knitting methods
There are several additional knitting methods. With your own hands, the monkey fist knot is made from one or two threads.
It is not necessary to put a weighting agent inside, it is enough to use five to seven loops instead of three.
From one rope
Marine knot monkey fist from one rope can be woven according to the scheme:
- We press the lace with the little finger to the palm, throw the free edge over the thumb, then pass it between the little finger and the ring finger. It turns out the first loop.
- We repeat a full twist of the lace from five to seven times, depending on the thickness.
- The base is finished, we wrap the end of the rope around the little finger once. Then we move on to creating loops crosswise around the base.
- In the resulting "nest" put the ball.
- The last loops should pass through the section of the thread wrapped around the little finger and close the core from the inside.
- We tighten all the threads in turn, pulling our fingers out of the weave.
- At the end, there will be a final loop, which can be tightened either with a special tool or by hand, but very carefully. Otherwise, it will get stuck or visually ruin the weave.
 Figure 4. Scheme of knitting from one rope
 If you plan to use the remaining tip as the basis for a new weaving or pendant, it is recommended to make the transition with a diamond knot (Figure 4).
 Types of welded joints. Welding seams. What is a weld
 Decorative knot "Monkey fist"
 Indications and contraindications for artificial crowns