How do sketches for stained glass windows. Do-it-yourself stained-glass windows at home. Technique for creating stained-glass windows according to your own sketch
Do-it-yourself stained-glass window at home: glass painting and pouring technique
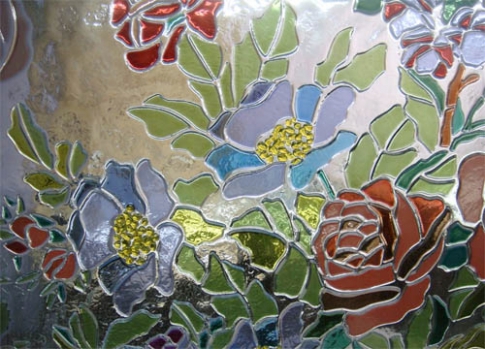
Stained glass windows are a great decorative solution for any interior. Despite the fact that the history of stained-glass windows has more than one hundred years and they can be safely considered a classic, they fit into any modern design unusually organically. The variety of combinations, colors, plots is endless and is determined only by the creator's imagination.
Stained-glass windows, made according to the classical old technology, are very valuable and expensive products. In addition, they are quite massive and look good only in large spacious rooms, preferably with high ceilings.
But there is a wonderful alternative - stained glass imitations that you can make at home with your own hands. They are less massive, they can decorate almost any glass surface, even curved.
The most popular and easy to perform type of stained glass imitation are stained glass windows made with paints.
Paints for stained glass windows
There are special paints designed specifically for glass work. Some of them are designed for subsequent firing of the product, and some are not. To burn or not to burn? The answer to this question depends on the purpose of the product, the conditions for its subsequent operation, as well as on the technical capabilities (I would burn it, but there is no stove).
 A good manufacturer will definitely supply paint tubes with dispensers, with which it will be convenient to apply them.
There are also special contours for stained glass windows. This is a paint of a very thick consistency, which is applied along the borders of individual parts of a stained-glass window and imitates lead seams.
Watch a video about painting glass in stained glass technique with your own hands
Stained glass painting technology
As a basis, you can use not only glass, but also tiles and plastic.
First of all, it is necessary to degrease the surface of the base so that the adhesion is maximum. This is done with alcohol or detergent.
The prepared sketch of the future stained-glass window is placed directly under the glass.
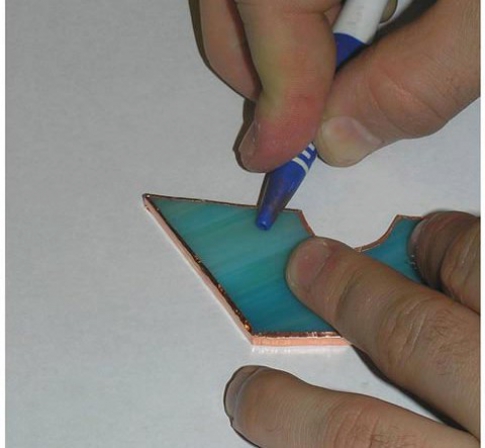
 - First of all, contours are applied - first with a black marker for greater clarity, and then with paint (brush, syringe, needle or toothpick) and leave the stained glass to dry. For contours, varnish or epoxy can be used.
Now the space between the borders is painted with a brush with a thick layer of stained glass paints and dried again. You need to start painting from fragments that are not adjacent to each other, so it is easier to correct possible flaws in painting.

 You can also use the stencil technique, cutting out the necessary fragment in thick paper, applying it to the stained glass window and painting with a brush or spray.
After the stained glass is completely dry, it will be possible to separate it from the base and decorate some other surface. The stained-glass window dries up completely in a few days, usually this information is indicated on the box of paints.
Ready stained glass can be varnished. Use a wide brush or sprayer for this. The varnish will dry for about a week, it is best to place the stained-glass window at this time in a clean and dry place with good ventilation and do not touch it.
This is how a stained-glass window is created in the technique of painting with paints.

 There is also a filling technique.
Bulk stained glass
The initial stages are the same as in the painting technique. A life-size sketch is selected and drawn, the base glass is prepared and degreased.
The contours of a stained-glass window made using pouring technology must be convex and closed so that the paint does not spill. To do this, use a special contour paint with a convenient dispenser or mix ink with glue, adding silver or lead powder for a metallic color.
The contour must be allowed to dry, this will take about 3 hours.
Now the fragments of the stained-glass window are densely filled with stained-glass paint. You do not need to smear the paint, it should drain itself. It is very important to do all the work on a flat horizontal surface so that it does not drip. It is necessary to carefully monitor the possible appearance of bubbles and immediately eliminate them.
 - The stained-glass window needs to be dried again.
Now they re-draw the contours, dry again.
The finished stained-glass window is covered with several layers of transparent nitro-lacquer for protection and fixing.
 - It remains only to frame and hang on the wall.
So, quite simply, you can create a work of art at home with your own hands.
Stained glass windows - a variety of types and techniques, do-it-yourself manufacturing methods
How to make a Tiffany stained glass window at home
It is today that glazing technologies have reached such heights that a window can be of almost any size, shape and color, and our ancestors had to puzzle over filling window openings. This is how the stained-glass window appeared - a translucent panel made of pieces of colored glass or thin stone plates. In this article we will look at how to make stained-glass windows with our own hands, which are still relevant today. And not only as a form of art, but also as an opportunity to diversify almost any interior. Consider:
- what stained glass manufacturing techniques are used today;
- ways to create stained glass windows with your own hands;
- How to make a Tiffany stained glass with your own hands.

Stained glass window techniques
The popularity of mosaic pictures is largely due to the possibility of their self-production in various ways. Depending on the materials and technology, it can be not only stained-glass windows, but also various decorative elements. These are ceiling lamps, and designer flower pots, and door inserts, and furnishings, and framing of interior arches, and much more. Today, there are several common techniques for making stained glass windows with your own hands.
Soldering
Stained glass classic. The plot according to the sketch must be assembled from separate glass fragments (stained glass smalts), which are fixed together with lead, copper, tin or brass. Each smalt is wrapped in a forged or cast "lace" and soldered with the rest.

Now this method has been somewhat modified and a soft metal tape (folia) - copper or brass - is used for edging.
Plots from various small details are collected, soldered and framed, the technology allows you to create any form, not just flat panels.


facet
For stained-glass windows, thick glass, from 6 mm, is used, all sides of each element are chamfered at a small angle, which ensures the refraction of light. Faceted stained-glass windows are made of special types of glass - lead and potash, the first is heavier, but gives a strong optical effect, the second is lighter, but the rays do not play in it the same way. The most spectacular are the combined facet stained-glass windows of both types of glass. Due to the thickness and severity of the elements, such paintings are assembled only in an aluminum profile. Therefore, their second name is aluminum stained-glass windows.

fusing
A more complex technique, but stained-glass windows can also be made voluminous and more spectacular, it is possible to make multi-layered pictures or figures. Multi-colored glass elements are stacked according to the plot, baked and rolled, the boundaries of the fragments can remain clear or layered, showing the texture of the pattern, unattainable in other techniques.


Etching
The relief on the glass is formed in the process of surface treatment with special acids, stencils are used, along the contour of which the pattern is etched.

Application (film stained-glass windows)
This is not exactly a do-it-yourself stained glass technique, although the result is something similar, it is a method of making an imitation using a glass or plastic base, multi-colored stained glass films and special metal tape. The pattern is gradually created on the base by gluing a layer of matte film, and the contours of the image are pasted over with adhesive tape to give a relief pattern.

Painting (fill)
It is also an imitation technique, only the drawing is not glued, but painted on glass with your own hands with special stained glass paints. The painting turns out to be more transparent, and the filling gives brighter, more saturated stained-glass windows. The contours in this case are first drawn with thicker lines with contour paste, to give texture, or also pasted over with tape / wire. Requires artistic skills.


DIY stained glass windows
Not all techniques are suitable for self-creation of stained-glass windows at home, since it is unlikely that everyone has forged or cast metal strips, bevel cutters with aluminum profiles or furnace equipment lying around in the pantry. Theoretically, you can get hydrofluoric acid, but you have to breathe in fumes, and it is difficult to guarantee a pattern, and not a burn. Therefore, home craftsmen are left with the Tiffany technique and two imitations to choose from.
Tiffany stained-glass windows require certain equipment, and the work is quite painstaking and time-consuming, while painting and pouring can be done by any novice stained-glass artist, and even with children. But if Tiffany is a full-fledged stained-glass window that can be inserted even into a window, even into a door, then the imitation of a classic stained-glass window still betrays itself, even if the pattern is mirrored on both sides.
stained glass tiffany
Consider soldering using foil, which you can buy at any art store, as a way to create a real Tiffany stained glass window.
Drawing - when choosing a drawing, you should avoid too complex lines, then not only cut them out of glass, but also process and connect them, it is better to focus on figures with smooth curves and, to begin with, from medium-sized parts. A sketch can be taken from the Internet, there are a lot of options for patterns in various techniques, taking into account the specifics of stained glass painting. You can draw on your own, provided that the desire is supported by at least minimal skills. If none are observed, it is better to use standard blanks.


cutting - the sketch is transferred to thick cardboard and cut into parts (numbered). To leave space for soldering, the contour of the smalt should be deeper than the contour of the template by 0.5-0.7 mm. The template is applied to the glass and outlined, and then the part is cut out of the glass.
Sheet stained glass costs decently, to save money, you can use the old battle. Before taking on smalts, it is advisable to practice cutting ordinary glass with curved lines in order to fill your hand.

Treatment - the edges of each part must be processed with a glass grinder.

But this is an expensive pleasure and more often bars No. 220-240, 12-20 mm wide, are used for fine-tuning smalt, at least square and semicircular, triangular is needed for complex elements when there is a line curving inward.
When grinding, the smalt and the bar are lowered into a suitable container with water. After grinding, each smalt is wrapped around the contour with foil, the edges are rolled up (the tape is leveled and pressed with a piece of wood or plastic). After the edges, the ends are smoothed and once again passed around the entire perimeter.

Assembly - professionals recommend cutting, processing and laying smalts one at a time, but this is a personal matter for everyone. Assembly is easier to do on a blueprint machine. For lack of it, you can put a transparent sheet of plastic or thick glass between the supports and highlight it with a table lamp. It is even easier if there is a coffee table with a glass top - thin fabric, tracing paper (stencil) and go. Illumination is necessary to prevent gaps between smalts; when laying them, they are tightly adjusted to each other or to the borders of the pattern. The stencil is fixed with two strips - on the left and above or on the right and above (for left-handed people), the layout starts from the corner, gradually filling the entire pattern.

Flusovka - the assembled stained-glass window is crimped with slats from the remaining sides, making sure that the parts do not protrude upwards or into a corner, if necessary, add edges, smooth and press. Ideally, the stained glass window is sorted out again in order to evenly cover both the edges and the ends with the flux, but you can simplify the task by carefully going over the edges of each part with a richly moistened brush or cotton swab. The flux is chosen semi-active, with borax, the remnants of the active can corrode the binding over time.
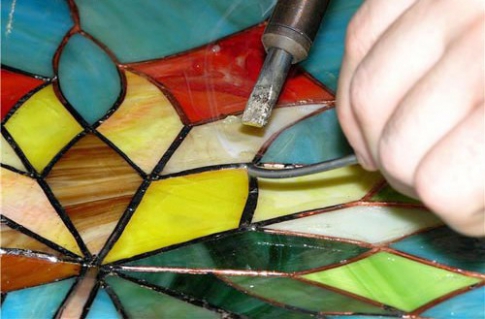
Soldering - differs from the usual radio engineering both in equipment and in the method of execution.
The power of this tool is only 100 W, it heats the elements to the right temperature, but the solder does not stick to it. Ordinary, tin-lead solders are not recommended, because they can crack smalts. Therefore, for Tiffany it is better to use solders with cadmium additives (POSK-50-18, Avia-1). You can get by with POS-61/61M solder, but it is softer and not as strong.
Tiffany is soldered in a capillary way in two stages - first, along the contour of the smalt, they pierce with solder melt about a centimeter (the thread is as wide as a sting), without touching the parts with a soldering iron and solder. It is not recommended to go through a large area in one approach if the stained-glass window is large. They pass a fragment the size of a man's palm, let the stained-glass window cool down, and continue until every detail is dripped through. In the second pass, each seam is soldered, applying solder along the contour of each smalt and heating until it seeps through the seam and covers the joint from the inside.

framing - the finished stained-glass window is soldered to a profile frame, rectangular, if it is a flat panel, or figured, if it is a ceiling or other decorative element. The frame cleaned and degreased (with alcohol) is covered with flux from the inside, and the stained-glass window along the edge from the front and side. The frame is applied to the composition or the composition is inserted into the frame and soldered, like smalts, in fragments, if a gap remains, it is also fluxed and soldered.
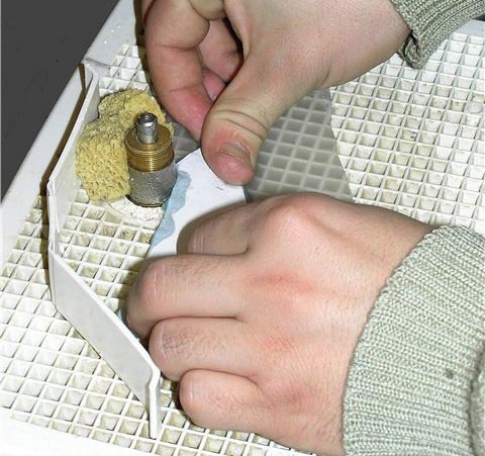
flushing - part of the manufacture of stained glass, necessary to remove the remnants of the flux, no matter how hard you try, but it is collected not only in the seams, but also on the smalts. Today, the easiest way to get rid of these stains at this stage is to treat the stained glass window with a sponge dipped in dishwashing detergent, after which the product is washed and dried.
Patination - if you already take on Tiffany, you should fork out for a special colored glass, sheet or broken, since the film or paint still looks worse. But patination will not harm such a stained-glass window, but only emphasize its beauty. Careful application of the finished composition to the binding is carried out with gloves and a respirator, and the room should be well ventilated. If dirty - feel free to wash, wipe and in conclusion - gently polish with a soft cloth. If necessary, the metal frame is closed with a decorative frame made of wood or imitation.

Regardless of the chosen technique, a stained-glass window made by one's own hands will not only decorate the house, but also delight with the realization that you can handle the most ancient of arts.
A simplified version of stained glass, but also quite capable of enlivening a house or garden, is on our website in an article about ceramic tile decors. Another opportunity to decorate your home in an original way is cork wallpaper or bamboo coverings. This is a completely different, but no less interesting topic. In the video you can peep the tricks of a professional designer.
A Proven Way to Create a Sea Glass Stained Glass Window
The most cost-effective, minimalistic way to create a Tiffany stained glass window at home, proven by experience. I started that way, and when the scale of the disaster became obvious, I got a hood, a serious respirator, and, of course, a hardy soldering iron.
I'll show you on the example of a mushroom nightlight. My partner and I make it LED on a wooden base, but you can also adapt an ordinary small light bulb. Again, I will demonstrate on a specially carved wooden template, but at home you can make a similar one from a cardboard roll from paper towels and a convex saucer for the role of a hat (this is exactly how I did the first mushrooms). But the assembly principle is exactly the same.
So, what does it take to solder a classic stained glass window? The first point, obviously, is glass. I use sea-rolled glass pieces collected from the nearest beach. In the standard version, special multi-colored stained glass is bought, cut, the edges are polished ... I can’t tell you anything about this phase of work, but then everything is approximately the same.
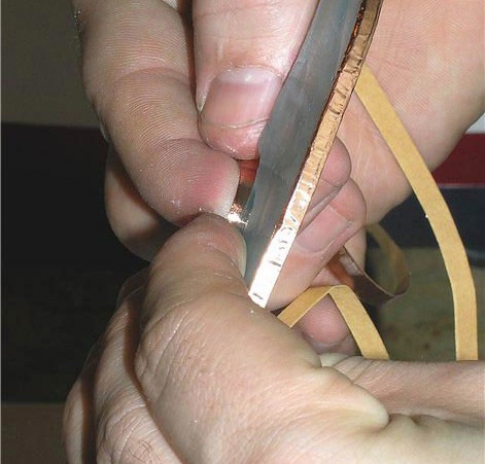
Self-adhesive copper foil is needed, since the glass itself is not soldered in any way - you need to carefully glue each glass along the edge and then rub the foil with a wooden stick (pencil, brush handle, and so on). I order it on Aliexpress - this is the cheapest option found so far (it doesn’t hurt to ask copper foil 5 mm every time in the search: there are often discounts and you can successfully buy even cheaper). It will be faster to buy in stained glass workshops or specialized online stores.

In order for the solder to “stick” to the foil and spread evenly along the seam, you need to apply a flux to the foil. The most popular is soldering acid, soldering with it is easy and pleasant, but it is a rather toxic agent, and the smell ... After a series of experiments, I came to the TT flux. I apply with a brush, it is washed off quite easily, the patina lays down normally. In any case, it is not recommended to solder with rosin or fluxes containing it: they say that it is impossible to tear off rosin from glass (or you need to wash it off with alcohol, which is already off-budget).
Since we're talking, let's turn to safety. I work in a respirator.

It is also important to work in a well-ventilated area. If children and pets are spinning under your feet, it is better to drive them away. And in general, make sure that they do not come into contact with materials. From soldering one ring, nothing will be done to anyone, and if you do this for hours every day, you need to seriously take care of the hood and personal protection.
I put on ordinary non-sterile medical gloves on my hands (it is better to stock up on them, they are easily torn). It is possible and thin economic - nitrile, for example. Thick ones will be difficult to work with. In principle, gloves + a hot soldering iron is also a rather dangerous combination, but I choose to have less contact with fluxes, because I twist the glass every time and this way and that, everything gets dirty.
Solder - POS-60 without rosin in the composition. The main item of expenditure in my case.
The usual "Soviet" soldering iron for 100 watts is suitable for experiments with a bang. If you don’t get it out of the bins, but buy it, make sure that it is collapsible (there are disposables in the literal sense of the word), since the sting burns out instantly. Too bad it's cheap. Special stained-glass soldering irons cost some absolutely inhumane money, so I never had a chance to find out what kind of sensations they bring in work 🙂 Therefore, after much thought and studying forums and reviews, I bought a masterpiece of Chinese industry - a soldering iron with temperature control A- BF GS90D, 90 watts.

Unlike classic stained glass, where the glass is pre-cut according to a clear pattern, I assemble a puzzle mosaic on the go. Therefore, the glass pieces must be pasted over with foil (and rubbed with a wooden stick) - a lot. At least one and a half times more than what is needed for the product. Well, or for that part of the product that is planned to be assembled today - large ones are made for a long time.
The flux is “fatty” to the touch, so it is better to lay a newspaper / cardboard on the workplace, which will then be thrown away.
The very beginning of work is the most nasty and difficult. I “cut” a dozen small pieces of solder in advance with a soldering iron, since there are only two hands, and there is nothing to bring the bar with. We select suitable glass pieces, lubricate with flux - well, not the glass pieces themselves, foil (and so every time). We apply.

Now, with a heated soldering iron, we grab a drop of solder and fasten the glass pieces. With the same “makar” we go further along the edge of the hat, vigilantly making sure that the contour is clearly repeated. This is the most uncomfortable part, everything slips and falls, but then it will be easier.

The lower part of the glass should go down just a little beyond the edge of the cap.

But when the ring closes and keeps itself, everything will go much more fun! Now it will be possible to lay out and pick up large pieces of the puzzle, and then a soldering iron in one hand, a twig of solder in the second and one-one-one.

Just do not forget to check so that the stained-glass window does not warp, otherwise the curvature from above cannot be corrected later, it will be necessary to redo it.
And at this stage, you need to keep in mind, or better, draw with a pencil right across the hat dividing it in half. And approximately along this line, do not fasten the glass pieces - then we will still separate the mushroom into parts in order to remove it from the mold and process the internal seams. It is possible, in principle, to divide according to the principle “the upper part of the hat - the lower bagel - the leg”, but I decided this way.


Now we turn over and drive the lower part - not forgetting to extend the loose line for subsequent disassembly. It's flat, it's faster. From it we rise to the leg - I first laid out two lines of the "half-and-half" connector on opposite sides, so as not to forget about them, and then I filled in the gaps.

In the process of work, you constantly have to invent: how to support and how to turn and fix the whole thing, so that it is a little more convenient 🙂

Theoretically, of course, you can not fasten the glass like this with droplets, but immediately solder the seams normally. I do this for three reasons:
After disassembly into parts and processing of internal seams, the workpiece is deformed, especially if it is large. It is easier to carefully bend such a weak and fragile workpiece during reassembly so that everything fits together, but at the same time the foil does not peel off or tear anywhere;
When soldering the seams from the inside, part of the solder will come out ugly from the outside - that is, the outer ones will “cleanly” pass in any case, which is why I leave them at the very last stage;
This is the fastest way to quickly see the contours of the finished product with your own eyes, and when it is done - it is composed for the first time, it is very impatient 🙂
By the way, in the process of work, the sting will be covered with soot - it is cleaned off with a quick (so as not to have time to melt) movement along the hard side of an ordinary kitchen sponge. If the sting is thin, like mine - by piercing ordinary paper several times, I always have a stack of drafts under this case.

Ta-dammm! At the same time, this is also the most offensive part, when you realize that the mushroom is here, you can already see it, and the work is three more times for as many 🙂
But purely technically it is already further easier. Just go through all the internal seams, assemble it back into a whole, solder all the external ones, and then once again cleanly inspect and feel them all and correct all the flaws. Wash, optionally - make a patina, and give it to electrification.
By the way, do not put off the imperfection for a long time, the flux foil oxidizes and it is more difficult to solder, even if it is re-coated with three layers.
Oh, and unlike classic stained glass windows, which draw a pattern in advance, then cut out, grind, number and fold the pieces, I pick them up on the go. And I twist and twist some pieces of glass, I apply them - no, it doesn’t fit. And already gloves, and everything in a greasy flux.
After the internal seams are soldered, the workpiece can be folded back.

This time everything came together head to head. Large pieces under their own weight are slightly deformed and it is necessary to adjust for a long time during reassembly (gently bend some glass pieces from the nests a little so that the seam is invisible).

Now solder all the outer seams. It's not fast. Along the way, we understand what is the meanness of such an openwork stained-glass window, with holes: because of the need to cover the sides of the glass with solder, it takes longer, and more solder is consumed. We console ourselves with the fact that it was originally going to be faster, and then there will be cool bunnies on the walls.

Having soldered the seams, it would seem clean, we look at them more carefully and see flaws where the foil is visible. We twist in different directions at different angles and clean it all up. And we also run along all the seams with our fingers and remove all the bumps and burrs. It's also not very fast. But then - wash in seven waters with fairies and all sorts of fat-dissolving pshikalki, rinse, wipe!

Then the mushroom goes to comrade Dima, the LED, where magic happens. For many lamps, an ordinary light bulb is quite enough, but you can’t easily highlight such a tricky shape: the bottom of the leg and the edges of the cap can be dark. Another advantage of several tiny light sources is that the sea glass from them seems to fluoresce from the inside, it looks quite magical.


And these are the bunnies thanks to the holes in the stained glass window 🙂
Do-it-yourself stained-glass window at home

To achieve originality in the interior, you can use such an idea as the use of stained-glass windows. To do this, it is not at all necessary to hire a craftsman or purchase expensive finished products. It is quite possible to create a stained-glass window with your own hands at home, with some effort and having studied the proposed material.
Methods for making stained glass windows
First of all, you need to decide what images your stained glass windows will receive. . To do this, you need to come up with a sketch or find a finished one. This will require:
- Paper or cardboard, the same size as the stained glass window.
- A drawing that has clear contours, elements.
- Mark the fragments of the picture with numbers for coloring in the corresponding color.
- If typesetting is enabled, you can specify the grain direction.
Outwardly, the blank resembles a numbered children's coloring book.

What is stained glass film, what are the varieties and how to glue it, read in our material "About films on windows - stained glass, self-adhesive."
Using thumbnails
The production of stained glass requires a sketch that includes small elements. Small drawings are easy to print, large images will require manual drawing, transfer to glass. You can make a photocopy of the drawing for templates. The main stencil is made using the original, transferring it to the glass. You will need to purchase template scissors: they differ from ordinary scissors in the presence of a third blade. This will allow you to cut a strip 1.76 mm wide.
A copy of the sketch must be glued to thick cardboard at least 0.5 mm; fit box. This is necessary for tracing contours. They must be tough. You need to stick the paper evenly over the plane, preventing it from getting wet. It is worth numbering parts of the sketch in advance.
Step by step work
Thinking about how to make a stained glass window with your own hands at home , work plan needs to be developed. You need to start with simple actions, gradually moving to more complex ones.
Do-it-yourself film stained glass at home is the easiest to do, and you should start with it. For this purpose, it is necessary to transfer the image to a glass base. Borders are simulated. You can use self-adhesive tape. The bonding surface must be well degreased. If bubbles appear on the film, they can be pierced with a sewing needle.
This method is simple and cheap, but upon closer examination it will be noticeable that the stained glass is not real. It has no view from the street side. Do-it-yourself film stained-glass windows are most often made for ceilings, since they do not have a reverse side and are far enough from the eyes. For the ceiling, this type of stained-glass window is also good because it is light in weight and completely safe in case of collapse. For the ceiling, you can use an acrylic base, glass should be avoided.

Contour stained-glass windows and painting on glass
Imitation lead binding
The original stained-glass windows have a metal cover. The imitation should also repeat it so that its appearance is more realistic. There are several ways to simulate this element:
- Gluing borders with special adhesive tape. You can buy this in the salon for artists. Scotch tape will help shape the contours. The tape is 1/8 inch wide, designed like regular tape, only it has a matching color. It is very easy to work with this material.
- This method illustrates how to make stained-glass windows with imitation binding using wire. You will need aluminum or copper wire and porcelain glue, you need to find dish glue. Superglue is not suitable, as it leaves a lot of marks. You can use any wire with a thickness from 0.02 to 2.5 mm, depending on the size of your work: it is carefully glued to the seams, then covered with a patina.
- The plate can be made independently. This will require:
- PVA glue for porcelain 50 ml.
- Mascara 30 ml.
- Aluminum powder 40 gr.
All these components must be mixed until a homogeneous mass. If you want to achieve the color of brass, you need to use bronze powder instead of aluminum. Before painting the product, check what color is obtained. Please note that the pasta is not suitable for storage, it must be cooked as needed and constantly stirred. Apply the mass with a brush or a small syringe. This requires skill.

Imitation lead binding
Varieties of stained glass
Making stained glass windows at home X allows you to show imagination and use different technologies, not limited to one recipe.
Fusing is a rather complicated stained glass manufacturing technology. . It requires the use of solid glass, on which elements of different shades are applied. The fragments have pronounced borders; there is no separating metal strip between them. For the finished canvas, calcination in an oven is required. The outlines of the drawing can be varied depending on the idea of the author. Such a technique is available for production, and it is unlikely that it will be possible to repeat it at home.
Tiffany is also stained glass windows, but consisting of separate parts, which are fastened together with metal strips by soldering. This style is distinguished by intricate forms. It has a complex design and bright, varied colors. Most often, using this technology, various items are made, for example, lamps, lamps, toy houses.
This do-it-yourself stained glass manufacturing technology can have a number of problems:
- The need for cutting glass, grinding its edges.
- Soldering a metal thread is difficult, skill is required.
- Work exclusively for adults.

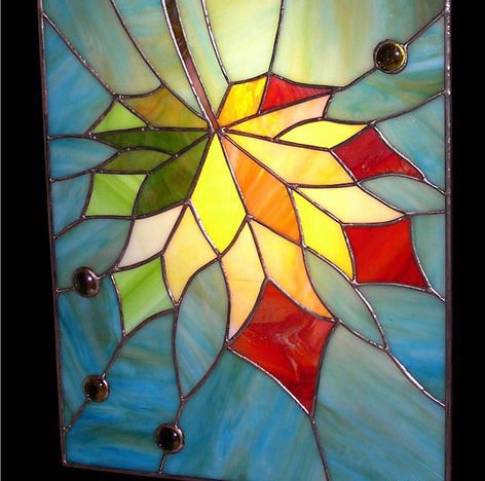
An example of a finished stained glass window using the Tiffany technique
Film stained glass windows
Making stained-glass windows on glass with your own hands is quite difficult, because a very affordable technology is gluing a special film on the glass. For this you will need:
- Self-adhesive film in various colors.
- Lead-based tape.
- Rubber roller.
- Glass.
- Paper knife.
This technique is safe, a teenager can master it, so you can offer him to make such stained glass with his own hands.
To create a picture, you will need to transfer the outline of the picture to the prepared glass using a film. First, a template is created. It can be drawn or printed, then it is applied to the glass with a marker, the contours are glued with lead tape, a colored film is cut out and glued to the glass. After that, the lead film is applied again. To secure the elements, they are passed over with a rubber roller.

Film stained glass manufacturing
stained glass paints
Paints will help solve the problem of how to make a stained-glass window on glass with your own hands, without using complex technology, while achieving realism. The contour of the pattern is applied to ordinary glass using special paints; You can do this work with children.

Stained glass paints and contours
Sketch development
Making a stained glass window with your own hands should not start immediately with windows or doors. It is worth trying on an old piece of glass, a decorative vase, a glass. The paints offered for this work are different: there are fired and non-fired types. The former require heating the product in an oven, which is not very convenient if you, for example, paint a plastic window.
Non-fired paints do not lose their brightness, do not require heat treatment, but are demanding for washing. They are afraid of aggressive detergents. A window decorated with them will need to be washed very carefully. If you are only trying to create stained glass windows with your own hands , don't skimp on paint. Purchase quality imported products. Such materials have optimal density, often equipped with dispensers. They don't run, they don't smudge.
Stained glass outlines can also be purchased separately. They are sold in tubes, making them easy to apply. You should not immediately acquire a black outline: it is difficult to work with. For a beginner, silver or white is well suited. To achieve the desired width without experience will not work - you will need to practice. Excess material must be wiped with a damp sponge immediately, otherwise they will dry out.

For training, you can use any glass or mirror. First you need to clean its surface from dirt, degrease it: you can do this with alcohol or a special solvent. Before you make a stained glass window , think about the sketch. If you have created a drawing, it is better to make several photocopies, the finished version can be printed on a printer. If you started your workout with a lamp, roll up the sheet, insert it inside the glass and attach with tape. After that, the drawing can be circled with a marker already on the glass. The marker is better to take erasable. After that, you can use the stained glass outline. Gently apply it to the surface and let the paint dry.
Shake the paint tube gently before use. It doesn't need to be shaken. otherwise bubbles will appear in the paint. The paint is applied in a thick layer, it is required to paint over each element of the picture. After that, let the paint dry completely. In order to protect the color layer, you can use acrylic varnish or bake the glass in an oven. The second option is used exclusively for heat-resistant glasses.
Find out what are the advantages and disadvantages of classic stained glass, read customer reviews and find out prices in our article "Classic stained glass".
How much do Tiffany stained glass windows cost and what consumers think about them, read on our website.
Teaching a child to draw with stained glass paints
Learn how to make a stained glass window with your own hands , maybe a child. If he is still small, you can prepare materials for him yourself. You will need:
The components must be mixed, obtaining a thick homogeneous mass. Place the resulting mixture in a plastic tube. It is safe even for toddlers who enjoy playing with paints.

Do not use glass. It is quite possible to get by with a safe film. Take the file, put a sheet with the desired image in it. Show your child how to make stained glass. To do this, you need to circle the drawing with a marker, paint it with previously made paints. After the paint has dried, the film must be cut and pasted onto the glass. Let the child come up with a drawing on their own. Many children are happy to show creative activity, draw and make stained-glass windows.
Do-it-yourself stained-glass windows
Do-it-yourself stained-glass windows
stained glass this is one of the most sophisticated ways to decorate the interior. Not everyone can on one's own create such a work of art. Traditional stained glass techniques, such as tiffany or classic stained glass require a lot of time and effort. However, there stained glass technology that everyone can do on one's own- This false stained glass.

Pseudo-stained glass can be application or filling. Application stained glass technique considered the most popular. It's not that hard to make it. To do this, pieces of colored film corresponding in shape and size are glued onto ordinary glass in the correct order. And instead of a metal profile, like in a classic stained glass window use a very similar self-adhesive tape.

Filled stained glass also quite popular and affordable. A contour is applied to the glass cut to size with special paint, which hardens after a while. After that, the necessary places on the glass are filled with pre-selected paint, the appearance of which will depend on where the stained glass will be used.

Due to the availability of technology and low cost, pseudo-stained-glass windows have been very widespread. They are used to process interior details giving them uniqueness. Ordinary lampshade, painted with stained glass paints, can noticeably refresh the room, and the glass in the interior doors, with applique stained glass own production, will delight with its beauty for a long time. Also, pseudo-stained-glass windows are used for decorating mirrors, ceilings of various accessories.
Pseudo-stained glass is one of the most accessible ways to decorate the interior, show imagination, work for the soul.
stained glass windows photo


%D0%B2%D0%B8%D1%82%D1%80%D0%B0%D0%B6%D0%B8%20%D0%B2%20%D0%B8%D0%BD%D1%82%D0 %B5%D1%80%D1%8C%D0%B5%D1%80%D0%B5%20%D1%84%D0%BE%D1%82%D0%BE%20
%D0%B2%D0%B8%D1%82%D1%80%D0%B0%D0%B6%D0%B8%20%D1%84%D0%BE%D1%82%D0%BE%20%D1 %81%D0%B2%D0%BE%D0%B8%D0%BC%D0%B8%20%D1%80%D1%83%D0%BA%D0%B0%D0%BC%D0%B8
The oldest example of stained glass art that has survived to this day dates back to the 7th century BC. As strange as it may sound, the process of making stained glass is so simple that even children can learn how to make stained glass with their own hands.
Stained Glass Styles
For a long time the existence of this type of creativity, the technology for creating glass drawings with your own hands has improved significantly. New types and technological features have appeared.
Having studied all the techniques, you will be able to choose the right one, each time planning new interesting stained-glass windows.
Classic way
The classic technology for creating stained-glass windows with their own hands has been preserved to this day. The master draws sketches on the main glass, cuts them out, and, according to these blanks, prepares the details of the future composition from colored glass. The particles are inserted into a pre-prepared forged frame.
After the installation of colored glass is completed, the iron partition is sealed for greater strength. The finished product is a beautiful picture of large geometric elements with a clearly defined metal outline.
In ancient times, wide openings of buildings were decorated in this way. Stained-glass windows were especially often used to decorate windows in Christian and Muslim churches - the ideas for drawings were taken from biblical and Koranic motifs.
The beauty of the classic method is that it allows you to connect large parts with your own hands. Unfortunately, the design turns out to be quite voluminous and heavy, so it is not recommended to use it to decorate the ceiling. In addition, rough metal does not make it possible to draw a pattern from small curved parts.
Tiffany stained glass
The improved technology was developed by the founder of the Tiffany jewelry company, Louis Tiffany, at the turn of the 19th and 20th centuries.
He came up with a rather simple solution, thanks to which the stained-glass windows began to look different. Instead of lead rods, Louis began wrapping glass parts with thin copper strips with his own hands. As a rule, the strip protrudes slightly above the plane of the part.

After drawing up the drawing, the parts are treated with flux to prevent rust and soldered to each other. The protruding edge of the copper tape is leveled above the glass surface, creating additional protection against falling parts from the frame.
Thanks to the Tiffany technique, stained glass windows have turned into real works of art! Fine filigree patterns, consisting of small particles, allow for a smoother color transition and naturalness of the image.
Tiffany stained glass can be used to create almost any product due to their lightness and beauty.
fusing glass
The amazing fusing technique allows you to create a variety of products - from glass inserts in doors and furniture to painted dishes. But this method is too laborious to make stained-glass windows of large sizes with your own hands.
The peculiarity of the technique is that colored elements are laid out on top of the main transparent glass. The workpiece is sent to the furnace, where, under the action of high temperature, the parts are fused into each other. This way you get colored glass without an iron partition.
Another disadvantage of fusing is that it is difficult to find a kiln in which large items can be placed.
Pseudo-stained glass
Modern technologies have given people the opportunity to create stained glass windows with their own hands without learning the laborious process of forging, metal processing and glass cutting.
All you need is a piece of transparent glass of a certain size and a special film with colored patterns that allows light to pass through. There are several types of film:
- self-adhesive - a sticky layer is applied on one of the sides of the material;
- a film that needs to be attached to the glass using a special colorless glue.
Film stained-glass windows help to save on interior decoration, while maintaining an interesting appearance of glass.

In addition to the film method, the use of special stained glass paints is also widely used. Transparent gel-like mixtures are applied to the workpiece in the form of a specific pattern. After they harden, the glass takes on the appearance of a transparent stained glass product.
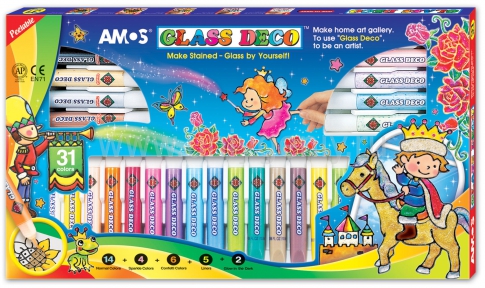
This technology is so simple that children's kits for creativity have recently begun to appear, allowing you to create painted stained-glass windows with your own hands.
Tiffany stained glass: master class
Tiffany stained glass is very easy to create even at home. Prepare colored glass shards, glass cutter, thin copper foil - foil, soldering iron, grinder, flux, soldering tin.
- Create a blank sketch - the more T-shaped connecting lines in the drawing, the stronger the details of the stained-glass window will hold.

- Print out 2 life size copies of the sketch. Number the pieces on each sketch and cut one of them along the seam lines.
- The second whole sketch is pasted over with adhesive tape and inserted into a wooden working frame.

After working on the sketch, you can proceed to the preparation of parts.
- Attach the cut out parts of the first sketch to the fragments of a certain color.
- Take the glass cutter and start cutting out the colored element, holding the tool at a 45 degree angle to the surface. Try to cut the part in one continuous line, keeping a constant pressure, otherwise you may get chips and cracks.

- After the glass cutter, microcracks formed in the glass. Barely tapping on it, you can separate your part.
- Use a sander to smooth the edges of the glass and give them a rough texture before the next steps.
- Now wrap the piece with copper wire. Use foil - a special thin long copper material with one adhesive side.
- Bend and smooth out the protruding edges of the foil on the product.
- Install the finished element on the general drawing with the help of nails driven around.

- When all the parts are in place, remove the nails and flux the gaps between them.

The preparatory stage is completed - you can start soldering!
- Put the tip of the tin wire to the joint and heat it on top with a soldering iron. Thus, gradually process all the seams with your own hands. Do not keep the soldering iron in one place for a long time - you can overheat the foil and glass, and also melt too much tin.
- After completing the soldering of the pattern, remove the wooden frame and bring the iron blanks to the sides of the picture.
- Using tin, solder them with the image at the points of contact with the seams.
Leave the product to cool in a dry, ventilated area for an hour or two. When it reaches room temperature, wash the painting well with a sponge, water and degreasing detergents.
Now your creation can be hung on the wall or placed on a shelf.
Filled stained glass: master class
Try to make flooded stained-glass windows with your child - the kid will surely enjoy the process of non-standard drawing. The main thing is to follow the safety rules: after all, your main material - glass - can lead to injuries and cuts.
Prepare stained glass paints - these are easy to find in large office supply stores - and a small square piece of glass. Pre-insert it into the frame with rounded corners to protect the child from sharp edges.
With dark color paint, draw thin sketch lines on the glass with your own hands. The most commonly used color is black. You have defined hollow areas. Near the black color, but not on it, drip several times with a color tint - it should spread over the cell on its own.

You can create beautiful stained-glass windows with your own hands for decorating a candlestick by watching the following video.
With this technique, you can decorate a glass frame for a photo, a locker door or a window in a nursery.
In this article, we will consider a do-it-yourself film stained glass window, what are its features, advantages and disadvantages. Stained glass craft has been developing since ancient times and as soon as the technique of patterned colored glass is not improved. There are already a lot of technologies and each of them has its own application.
Firstly, the construction industry continues to use the method of gluing pieces of various colored glasses using metal soldering. This technology is unchanged in the design decoration of premises. But it wasn't always like that.
Stained-glass windows were not used in the decoration of residential premises for a very long time and were used only in cathedrals and temples, so the artists did not immediately raise their hand to the "holy". And only towards the end of the 19th century crafts with a creative bias began to develop at high speed, as the chemical industry provided new paints, materials and technologies. Many artisans, in particular the artist and later the famous glass designer Louis Comfort Tiffany, showed great interest in experimenting in creating artistic paintings with various materials on all sorts of previously unthinkable surfaces. He created a method of stained glass that is still used today, named after him - stained glass Tiffany.

There are specialized workshops that make stained glass windows to order, although the technique of creating a stained glass window from pieces of glass is also available at home if the necessary materials are available.
The work requires professional tools - a blowtorch, grinding equipment and a diamond glass cutter. Also, as a consumable, you need to stock up on colored glasses, copper tape, tin wire and soldering acid.
According to the sketch of the drawing, markings of the drawing are applied to the glass with a marker and cut into pieces, the pieces are then polished and envelop all the details with copper, then they are assembled like a mosaic on a flat surface and soldered. This work is very difficult for beginners, beautiful work may not turn out right away.
Related article: Volumetric quilling: master class "How to make an Elf"

There are also special stained-glass stained-glass paints that imitate colored mosaics on glass. The advantage is ease of getting started. It is enough to remove the glass and start painting. You can create artistic painting with paint no worse than on paper - play with paint colors, mix several colors, draw with dots and thin curls. But such paints are used in small works, so it is quite difficult to distribute them, they dry quickly and leave stains. Therefore, for the extensive details of the pattern, a very neat kind of stained glass art with colored self-adhesive film is used.

This type of stained glass requires the purchase of a special translucent film for stained glass and aluminum or lead strips.
A simple lesson
Film stained glass is also not an easy task and is not cheap. But regarding the fact that this creative art is used in decor, and also in terms of service life it will delight your eyes for a long time, it is worth at least once to make yourself beautiful, for example, on the window. The master class will help you quickly and easily make such beauty.
For work, we need glass, a stationery durable knife so that it can cut lead wire and film, a roller, preferably rubber, scissors, lead tape, a sketch of a drawing, a set of color film.

First, let's prepare a drawing, you can draw it yourself, remember that you still have to cut out the details on it, so it's better not to get carried away in small details. The easiest way is to print ready-made traditional stained glass patterns. Some examples will be provided at the end of the article.
Now we take the glass, clean it of dirt with microfiber and glass cleaner on both sides. If lint or stains remain under the film, they can ruin the whole look.

Glue the lead tape along the outline of the picture, then turn it over. We cut out pieces of film from a colored tape, using our stencil, and paste it on the reverse side. On top of it, we again glue it with tape, we get a kind of double-sided stained-glass window, as shown in the photo.
Related article: Handmade camera case


Ideas for creativity
There are several ways to cut the film into mosaic details. If it is transparent, put a drawing under it and circle it with a pencil or a thin pen. Also, for a stained glass window, you can use some additives of an opaque film, then these details are cut out of the picture as if through stencils, or transferred through carbon paper. Film stained glass is also convenient to do with illumination from below. At home, the glass should be placed on a stand on a hill on a frame, and a lamp should be placed under the bottom.
Stained glass is undergoing a renaissance. Colored glass paintings are increasingly being used by designers to decorate interiors in a variety of styles. Such a picture is able to decorate the room, become its accent, set the tone for the entire interior. But in the past, making stained-glass windows was a time-consuming and expensive task, while modern techniques allow you to create masterpieces on glass yourself.
Styles and techniques
There are many styles of stained-glass windows, because the stained-glass window itself appeared in the Middle Ages. Over time, it changed, reflecting the cultures of different countries and eras, the emergence of new techniques made it possible to diversify the materials used. Now, several styles are used to decorate the premises.
- Classical. Assumes a symmetrical pattern, floral motifs or a geometric pattern. Made in warm, pastel colors. Appropriate in a classic interior with clear lines, solid, heavy furniture.
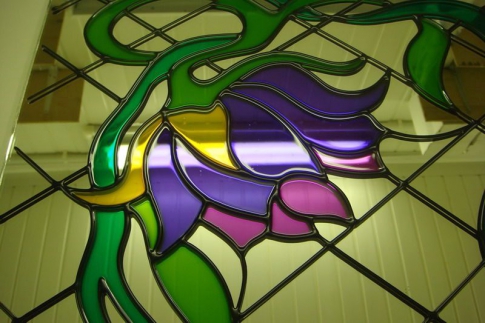
- Gothic. This is the style of the Catholic churches of medieval Europe. Twilight, upward aspiration of narrow lancet windows and high towers with spiers, dark red, scarlet, gold, green, blue, purple colors. It uses religious motifs or scenes from the life of medieval knights, castles, exploits, dragons, unicorns. Gothic stained glass will give the space a touch of mystery, fabulousness. It was during the Middle Ages that the most famous stained-glass windows were created, recognized as masterpieces.
Stained glass in the Gothic style - a fairy tale and a mystery in your home
- Modern. Perhaps a universal style for any interior. The main motives of this style are marine, the idea is the priority of form over content. This style is characterized by smooth bizarre lines, one way or another repeating the shape of the sea wave, grace, sophistication. Pale, muted colors, halftones, blue-green colors. Modern goes well with modern technology and gets along well with high-tech interiors.
Stained glass in Art Nouveau style is appropriate in any interior
- Abstract. Assumes a geometric pattern and bright, joyful colors. It does not conflict with almost any interior, with the exception of the most orthodox. Brings a special emotionality to the space. In an abstract stained-glass window, it is important to strike a balance between form and color, and then it will never get bored, charging you with optimism and encouraging creativity.
Stained glass in an abstract style is suitable for any interior and will never get bored
- Egyptian. Soft paintings in sandy-brown tones. The drawing reproduces Egyptian hieroglyphs, gods, pharaohs and scenes from their lives.
- Antique. The paintings resemble antique mosaics with ancient Greek scenes. Characterized by the presence of many small details. Suitable for rooms in a minimalist style.
Stained glass in antique style is often a finished work
- Byzantine. Distinguished by the use of not only colored, but also transparent glass, which makes the image seem to be hanging in the air. Such stained-glass windows resemble painting on glass, suitable for rooms filled with light.
The use of transparent glass in the Byzantine style creates the illusion of the pattern floating in the air.
- Vanguard. The plot of the picture can be anything. But thanks to modern performance techniques, it is given a sense of volume. The image is multi-layered, with three-dimensional details, on transparent or frosted glass, glossy, shining. This stained glass window sets the tone for the entire room and makes it trendy.
Stained glass in an avant-garde style can contain voluminous details
Stained glass in the interior creates a powerful accent, so it is important not to make a mistake when choosing a style. It should be in harmony with the overall style of the room or set it. Then the rest of the interior will complement and beat it without creating dissonance.
You can decorate with a stained glass window any glass or mirror surface. This will give the interior originality, originality and a sense of luxury. It is appropriate to place a stained-glass window in any room.
Where to place a stained-glass window in an apartment
- Window. The stained-glass window will give the bedroom a feeling of comfort, and the nursery - fabulousness. The stained-glass window in the window can be used as protection from the sun, hide the bathroom from prying eyes, add festivity and comfort in the kitchen.
Floral pattern on the balcony window will create the illusion of a country house
- Doors. You can decorate both full glass doors and glass inserts. The drawing is best done in the same style on all doors.
Drawing on all doors is best kept in the same style
- Fake windows. Such a glass picture is supplied with lighting and is often installed in bathrooms or on landings.
A stained glass window will help to avoid the feeling of a closed space and additionally decorate the room.
- Ceiling lamps. Large glass shades or acrylic inserts in the ceiling will add originality to the interior.
Gothic interior will decorate the stained-glass ceiling
- Glass partitions. They can be transparent and matte. Such partitions are often installed between the kitchen and the bathroom or the toilet and the bathroom. The stained glass window allows light to pass through, but does not allow you to see what is happening behind it.
Stained glass is a good solution for zoning a room
- Furniture facades, glass tabletops. Decorating furniture with stained glass is a good way to give it personality. Even old furniture, decorated with stained glass, looks expensive and luxurious.
Stained glass inserts are appropriate for both furniture in the living room and for the kitchen
- As already mentioned, the plot of the drawing should correspond to the general style and atmosphere of the room.
- Dark colors and horizontal lines are suitable for spacious rooms with high ceilings, they visually reduce the space.
The dark tones of the stained glass create an atmosphere of mystery, but visually reduce the space.
- Stained glass on a mirror is a good choice for small spaces. It will create a perspective of space and visually enlarge the room.
Stained glass on the mirror will create a sense of perspective and expand a small room
- The abundance of bright colors and variegated images can eventually tire. Keep this in mind when choosing an ornament.
- For the bedroom and nursery, it is better to choose calm, light colors that are conducive to relaxation.
For the bedroom it is better to prefer calm colors.
- It is appropriate to decorate the kitchen with a landscape or still life, the bathroom - with a marine plot.
Fish plots are suitable for the bathroom
But not every stained glass can be done independently. There are several types of performance techniques.
Types of equipment
- Classic or set. The most complex and ancient technique. Colored glass fragments are inserted into metal frames assembled into a pattern and soldered. The technique requires special tools and skills. It is used for large structures and only by professionals.
Stained glass in classical technique is indispensable for large areas
- English or film. The pattern is formed on glass from stained glass self-adhesive film. Each fragment is cut out separately and glued to the place determined by the stencil. The pasted fragments are framed with lead tape. With certain skills, such a stained glass window can be made independently.
- Fusing. The stained-glass window is made without a metal frame by sintering multi-colored fragments into a monolithic pattern. It is impossible to make such a stained-glass window at home; a special oven with a high temperature is required.
Fusing stained glass strikes with the brightness of colors and the integrity of the composition
- Tiffany. This technique is similar to the classical one. Fragments of the pattern are cut out of colored glass, bordered with copper tape. Finished elements are assembled into a pattern and soldered together. For beginners, this technique is difficult, but it is quite possible to master and use it at home.
Stained glass in the Tiffany technique successfully replaces the classical technique
- Sandblasting. It consists in processing glass on a stencil with sand supplied under high pressure. The treated areas become dull, and the pattern becomes airy. Not applicable at home, requires special equipment.
- Cast. Each element is cast or blown from glass separately. After that, the fragments are assembled into a picture using reinforcement or mortar. Does not apply at home.
- Etching. Hydrofluoric acid etching of glass creates deep relief patterns. Using this strong acid at home is dangerous to health.
- Painted stained glass. The pattern is copied onto the glass and outlined. After drying, the contour of the void is painted with stained glass paints.
In the painted technique, you can create real paintings
- Contour filling. As with the painted technique, the outline of the drawing is first prepared. After it dries, the voids are filled with thick layers of paint. If necessary, the paint is leveled with a brush or wooden stick.
Filling technique most successfully imitates classical styles
Video: making an English film stained glass window with your own hands
The most accessible for self-production are painted stained-glass windows and contour pouring techniques. They do not require special knowledge, materials and tools, and can imitate almost any other technique. For the manufacture of such stained-glass windows, only special paints, accuracy and patience are needed.
Video: do-it-yourself Tiffany stained glass window
What you need to make stained glass
Before you get started, prepare everything you need. For painted and flooded stained glass, you will need paints.
Paints
Special stained glass or acrylic paints on glass are used. All of them have their own characteristics.
Acrylic paints
The composition includes three main components: pigment, water and acrylic polymer emulsion. Sold in tubes or jars.
Acrylic paints are sold in jars and tubes.
Acrylic paints dry quickly, after which they become resistant and elastic. After drying, they are resistant to changes in temperature and humidity. It is very difficult to scrape off the dried coating, as well as to remove it with sandpaper.
Acrylic paints dry quickly and are easy to work with at home.
The color of the finished coating is matte, bright. It is not subject to fading and does not fade over time. Paints of different colors can be mixed with each other. The brush is washed immediately after use with water, for a dried one you will have to use a solvent.
There are two types: fired and non-fired. Fired after application, they heat up in the oven, harden and become resistant to external influences. The firing temperature is indicated by the manufacturer on the packaging.
Stained glass paints can be fired and unfired
If the paints are not fired, after a week they will dry and harden in the same way as when they were fired, but until then there is a risk of smearing them. The paints are water-based, which is why they are diluted with it. Brushes are also washed with water.
Unfired paints dry from 1 to 3 days depending on the manufacturer. The drawing requires fixing by applying a layer of nitro-lacquer.
These colors are more vibrant. They are thicker due to the synthetic solvent included in their composition. They fit well, they are more convenient to work on vertical surfaces.
Homemade paints
Some masters prefer to use paints of their own production. They are easy to make yourself from what is sold in hardware stores.
- Based on nitro lacquer. NTs-2141 or another similar one is used. Nitrolak is diluted with solvent 647, in a ratio of 1 to 0.4. It is tinted with artistic oil paint or building color. The dye is added little by little until the desired color intensity is achieved.
- Based on BF-2 glue. The glue is diluted twice with acetone, tinted with any alcohol-based dye. It can be ballpoint pen paste or other paint. The emulsion is stirred in a glass dish, tested on glass. If necessary, paint is added until the required intensity is reached.
- Gelatin based. 5-6 g of gelatin is brewed with 200 ml of hot water to the consistency of a paste and a fabric dye is added. Drawing from such paint requires fixing with nitro-lacquer.
In addition to paints, you will need a contour for work. This is a special thick paste for outlining the borders of the pattern. It imitates metal frames for pieces of smalt in painted and stained-glass windows.
Circuit
Contours-reliefs are made on a water basis, sold in tubes. With their help, the drawing is outlined, which is then filled with paints. It can also be used to create a three-dimensional drawing.
Stained glass contours can be used to create a three-dimensional pattern
At home, contour paste can be prepared on the basis of PVA glue. To do this, you need 50 ml of dishware PVA, 20-30 ml of natural black ink (the best is Dutch), 30-40 g of silver or bronze powder.
Ink is introduced into the glue with constant stirring, and then powder, until a creamy consistency is obtained. Such a paste is prepared as needed, it is not stored. Stir each time before use. Masters apply it with a brush, forming a roller, it is more convenient for beginners to use a confectionery syringe.
Required Tools
For the manufacture of stained-glass windows using different techniques, a special tool is required. In drawing and pouring technique, it will need a minimum:
- ruler;
- pencil;
- glass marker;
- brushes;
- wooden sticks or toothpicks.
And of course, making a stained glass window is impossible without a pattern stencil. How to do it, consider in more detail.
Stencil for stained glass
A suitable stencil can be purchased from a specialized store or stained glass artist. But it is much more interesting to make a stencil on your own, choosing a suitable sketch.
Do not choose a sketch with many details and voids; such a pattern will look sloppy on a finished stained glass window.
The image can be downloaded from the Internet and simply printed at the desired scale, taking into account the size of the future stained glass window. Or take your favorite picture, postcard and enlarge it to the required size.
Photo gallery: stencil samples for self-creation of stained glass
 Floral motifs never go out of style and are suitable for any room.
  The details of the stencil are numbered for the convenience of coloring the stained glass window.
  The lattice complements the flower and gives the picture a finished look.
  Birds - another timeless story for stained glass
Number the details of the picture of the same color. This will help you not to make mistakes when coloring.
How to enlarge a drawing
- Draw the pattern into cells with a side of no more than 1 cm.
- Number the resulting grid vertically and horizontally.
- Measure stained glass.
- Transfer the dimensions to paper.
- Mark the sheet according to the number of cells in the figure.
- Draw a grid on the sheet in accordance with the markup.
- Cell by cell, transfer the image from the postcard to paper on an enlarged scale.
- The finished drawing can be corrected, colors can be changed.
If you have drawing skills, you can create a pattern yourself. To do this, transfer the dimensions of the future stained-glass window onto a sheet of paper and mark the contours of the pattern. Draw with a simple pencil so that you can correct inaccuracies.
When choosing an image, keep in mind that its proportions may suffer when enlarged. If necessary, draw the picture not with squares, but with rectangles.
Draw the details, you should get a whole picture. Circle the finished drawing along the contour with a ballpoint pen or a thin marker.
Application

Having prepared everything you need, you can start making stained glass. Make sure that the work surface is level, and remember that if handled carelessly, the glass may break.
Making a stained glass window: step by step instructions
- Lay the glass on the prepared stencil so that their edges match.
- Thoroughly degrease the glass with alcohol, acetone or vinegar. Dry the surface with a dry, lint-free cloth.
- Transfer the outlines of the pattern from the stencil to the glass with a special disappearing marker. If you have experience in drawing, the lines can be applied directly with a contour or contour paste.
Drawing a contour requires accuracy and an accurate eye
- Let the outline dry, otherwise the drawing will be smeared.
- Now it remains only to fill the voids of the drawing with paints. This is done with a thin brush or directly from the tube. Tubes of ready-made paints are equipped with a convenient spout.
Paints on stained glass are applied with a brush or with a nozzle on a tube
- Paint is applied from the edges to the center. It's not scary if paint gets on the contour during work - correct it with a wooden stick or a toothpick. After drying, special paints become transparent and the outline will show through them.
- If the pattern provides for color transitions, lighter or darker tones are applied after the base ones. They can be mixed or blended with the main ones with a toothpick.
- Bubbles formed during operation are also removed with a toothpick.
- Let the finished painting dry completely. Some paints need to be additionally covered with nitro-lacquer, pay attention to this. Such information is indicated on the packaging.
- It remains only to insert the stained glass into the frame.
Stained glass window can be framed
To protect yourself from cuts, the edges of the glass can be pre-pasted with masking tape before work.
Video: a master class for making a stained-glass window with a flood technique
Having mastered the painting and pouring techniques, you can try yourself in the English film or fusion technique. This will require large expenses, materials and skills, but it's worth it.
Photo gallery: a few ideas for placing stained glass windows in the interior
 Abstract pattern suitable for high-tech style
  Floral ornament will decorate the windows of the living room
  A stained-glass window on the bathroom window will give a special atmosphere and protect from prying eyes.
  The geometric pattern for the living room is easy to make with stained glass film
  Stained glass windows of the landing are made in the same style
  Bay windows are well suited for stained glass
  Ceiling insert can be decorated with film stained glass
Creating stained glass windows is a creative and exciting activity. The simplest stained-glass windows can be made even by children. And let your work not be like the masterpieces of world art, but they will bring originality and a particle of your individuality to your home.

Stained-glass windows are a special decor that enriches and increases the value of the interior, making it original and sublime. However, the interior is made expensive not only by the highly artistic stained glass products, but also by their considerable cost. And this is quite justified, because stained glass is a painstaking creative work, art, and skill in such a matter is highly valued. In this case, reasonable questions arise whether it is possible to master this craft on your own and how to make a stained glass window with your own hands.


Stained glass windows with your own hands - where to start?

Do-it-yourself stained-glass windows, of course, begin with a great desire, and if closer to the point, with the development of a sketch. If we talk about classical techniques and their imitations, then the sketches should be:
- full size stained glass on paper and cardboard;

- with clearly traced contours of details, breaking the pattern into separate figures;

- on cardboard indicating the color and material of each fragment;

- for stacked stained-glass windows - possibly with an indication of the direction of the glass fibers and the numbering of parts.

In theory, this may seem complicated, but in practice everything is simpler: the appearance of a complete stained-glass window scheme is similar to a coloring book for children, on separate parts of which numbers, arrows or other necessary symbols are drawn, which makes it easier to assemble the stained-glass window. Depending on the complexity of the pattern and the stained glass technique, more or less of them will be required.


Advice. To save time and effort on developing a sketch and stencil, you can download and print a ready-made stencil for stained glass. You will need a disappearing marker to transfer the design to the glass.

Stained glass technology

The manufacturing technology is selected, among other things, on the basis of what will be the stained-glass object: whether it is planned to have a stained-glass window on a window or on a door, on a mirror or on a vase, or perhaps it will be stained-glass lamps or glass paintings. Each individual case will have its own manufacturing and installation features that make a certain technology a priority.

The following three techniques are most suitable for the production of stained glass at home:
- type-setting stained-glass window Tiffany;

- film false stained glass;

- contour stained-glass window.

They do not require specific expensive equipment, such as a fusing oven, or a well-equipped workshop in connection with working with chemicals, abrasives and harmful fumes, such as for frosting glass or making stained glass windows using the classic lead-solder technique.

The Tiffany theme essentially combines all three methods, since film and flooded stained-glass windows are ways to imitate classical techniques.

How to make stained glass Tiffany

In short: according to the finished sketch, templates of parts are cut out of cardboard, they are outlined on glass, the parts are cut out with a glass cutter, polished, each element is wrapped around the perimeter with copper foil, all parts are laid out in a single pattern, the position of the edge elements is fixed with cloves, the foil at the joints is treated with flux, soldering is carried out with tin solder on one, and then on the other side of the product, the stained-glass window is inserted into the frame of the metal profile and soldered to it.

At each stage of creating a stained glass window, a lot of nuances should be taken into account:
- details with several sharp corners (N-shaped smalts) or intricate S-shaped curves are not desirable in the drawing: soft bends of curved lines are best;

- it will be cheaper not sheet glass for stained-glass windows, but cullet glass; glass cutting should be done with a diamond glass cutter, having previously trained on ordinary glass; for curvilinear figures, it is necessary to perform auxiliary cuts along the tangent;


- the production of parts and their placement in the drawing is carried out simultaneously: each part, starting from the upper corner, is cut out, polished, applied to the drawing, wrapped in foil, again applied to the drawing and, after verification, fixed in the appropriate place; it is more convenient to assemble a stained-glass window on a surface illuminated from below;


- for soldering, you need a 100-watt soldering iron with a nickel-plated tip and low-melting tin solder without rosin; so that the glass does not crack, you should not solder too large areas at a time, you need to let the stained glass cool down, etc.


Do-it-yourself stained-glass windows, master class:
How to make film stained glass
Making a film stained glass window is a simpler task than assembling a Tiffany stained glass window.
- Glass is cleaned; according to the sketch placed under it, contour lines are laid out with a lead tape. The ends of each line should overlap with the next piece of tape. When all the contours are pasted over, the tape is rolled with a roller;
- The glass is turned over, wiped; elements from the film are cut out along the contours formed by the lead tape, glued to this reverse side and also rolled with a separate film roller;
- The joints of the films are glued with lead tape, repeating the contours of the tape on the first side, and rolled with a roller; the finished stained-glass window is wiped with detergent.
To decorate a false stained-glass window, you can use real glass parts that are seated on a special glue.


How to make a stained glass window
A stained-glass window requires a polymer contour and stained-glass acrylic lacquer or special paint.
- A sketch is drawn or printed, which is placed under transparent glass or transferred with a disappearing marker to a matte or mirror base;
- The glass surface is cleaned and degreased;
- A polymer contour is applied according to the drawing, forming closed areas;
- After the contour has dried, each element is carefully poured with liquid paint.
You need to apply a drop of paint near the contour, without touching it. The paint should not be smeared, it should spread naturally, so that the result is a beautiful stained glass window playing with light.
DIY stained glass, video:
 School for an electrician: everything about electrical engineering and electronics Wiring and circuit diagrams
 How to make a small Damascus steel knife (without a mechanical hammer)
 Making Damascus Steel