Pull-out shelves drawing. Original shelves from boxes from old furniture. Detailing of the boxes themselves
Pull-out drawers are an integral part of any wardrobe. Sometimes situations arise when there are not enough of them in order to arrange all things in a convenient place and order.
The drawers are very easy to use. They can be made even by those who have never made anything themselves.
Here it is worth talking about the fact that you can make drawers with your own hands. Some, of course, will want to purchase them, but the right size may not always be on the market. In this case, the retractable elements are the only way out of the impasse.
Tools and materials
So, in order to assemble the products that are being put forward, you will need the following list of tools and materials:
- drill or powerful screwdriver;
- an electric jigsaw, which will allow you to cut the material as efficiently as possible;
- building corner;
- ruler;
- pencil;
- roulette;
- rag;
- iron.
When everything is assembled, you can proceed directly to the installation.

The guides will be an integral part of the design. You just can't do without them, because the boxes have to move on something?
Full roll-out guides are the best option. However, roller products can also be used. Some people prefer to install just ordinary pieces of wood instead. However, this is not the best solution.
All guides on the market have a pitch of 50 mm. Thus, if we are talking about a box, the length of which will be 450 mm, then it will need a guide with a size of 400 mm. In this case, the system will work efficiently and reliably.
It's one thing to buy, but you have to deliver. This is done very simply. The design of these elements assumes a standard fastening using self-tapping screws or other fastening materials.
Detailing of the boxes themselves
Now it's time to make the boxes themselves. For blanks, you can use chipboard sheets or purchase ready-made furniture boards. Even if they are smaller in size, they will be enough for work, but there will be a lot of waste from the chipboard (of course, if you do not equip a furniture set).
You can cut all the elements yourself using an electric jigsaw. Sometimes you can go the other way, for example, order this service in the store where the purchase of the material was made. The front and back walls of the boxes must be fixed between the sides. The bottom must be attached to the box.
DIY drawer assembly

All parts are ready for assembly, it's time to start. Before starting work, the edge of the elements is glued. This is done very simply - with the help of a not very heated iron and a rag. At the same time, the edge is laid with the beautiful side up, and then the iron is passed over it several times (the fastening will be more reliable).
The rag is then removed. Then everything is wiped with a dry cloth, the excess edges are cut off with a knife. All ribs must additionally be processed with sandpaper. The result should be a very nice picture.
For confirms, holes with a diameter of 8 mm are drilled in the product, and 5 mm in the end. The guide markings on the drawer can be in any convenient position, but it is best if this line runs in the middle of the product.
Some features
It will be about the full roll-out guides, which were mentioned above. They are the most appropriate in such a situation. The products consist of two parts. The wide part must be firmly attached to the side of the cabinet using self-tapping screws of the appropriate size. They should not be too large so that the fasteners do not protrude outward. A small part of them should be attached directly to the boxes. Initially, these elements are sold as a unit, but must be disconnected before starting work. This is easy enough.
Now the guides can be attached to the cabinet and to the drawer. On the first element, this is done with a slight indentation, which is approximately 3 mm from the edge. As for the drawers, no gaps are needed here. The guide is flush-mounted.
The facades themselves need to be fastened from the inside with self-tapping screws.

There is one little trick to help you set these elements exactly:
- First, on the facades, you need to make the appropriate holes for the handles.
- Next, you need to attach it to the place, and then attach it from the outside through these holes. Then the drawer is pulled out, the facade is attached from the inside in normal mode, and then the fasteners are turned out. A very complicated system, but in practice it is quite easy to figure it out.
Now you can drill to the end of the hole for the handles, and then start directly attaching them. This is where the work starts.
It can be stated that the drawers are completely ready for use. In this case, it is imperative to first check their performance. If something is wrong, then you will have to adjust the elements from the very beginning. And this is highly undesirable. It is better to make sure that everything is done as efficiently as possible even at the design stage. Only in this case the work of all structural elements will be correct.
Thus, as is clear, making boxes with your own hands is quite simple. Most importantly, follow the instructions above. This will allow eliminating various modifications and defects that may arise at different stages of work and operation of structural elements of this type. Good luck!
In a new review, the author has collected examples of shelving and shelves that you can cook with your own hands. You need to use them, of course, for their intended purpose. Having looked at the photographs collected here, you can easily make sure that there is nothing fundamentally complicated in the proposed option.
1. In the shape of a circle

An original round shelf, the edging of which is made of thin fiberboard, and the shelves themselves are made of an ordinary board, painted white. Of course, such a structure will not be suitable for storing an entire home library, but it will be able to accommodate several educational books, a small houseplant and a couple of framed pictures.
2. Hanging shelf

A charming hanging shelf that can be made from several unnecessary books or notebooks of the same size. Such a shelf is not only suitable for storing cosmetic accessories and small decor items, but in itself will become a wonderful decoration for any wall.
3. Arrow

A stylish illuminated arrow-shaped bookshelf made from leftover metal plumbing pipes will fit perfectly into the interior of a teenage boy's room or bachelor's apartment.
4. Practical and unusual

An original and practical shelf that can be made from a small tray from an old cart and a few wooden blocks. Such a shelf is reliable and spacious and is suitable for storing a variety of things.
5. Charming bookcase

Stylish and original shelving made of a slightly modified and white painted door. Filled with your favorite books, candles, family photos and small decorative elements, this rack will be a real highlight of any space.
6. Narrow slats

Old skis that have been gathering dust in the closet for many years can be used to create unusual shelves. Such shelves will perfectly fit into the interior of the nursery and are suitable for storing toys and books.
7. Stylish copper

Massive shelves made of wood, covered with a stylish copper film, are perfect for placing houseplants.
8. Old pallet

An old wooden pallet is easy enough to turn into an original shelf for storing magazines and family photos.
9. Industrial style

Stylish storage system in the current industrial style, which can be made of wood or MDF boards, painted in gray and interconnected by a structure of metal water pipes.
10. Bright honeycomb

Original shelves made of bright hexagonal gift boxes attached to mirrors of the same shape. Of course, such a design is unsuitable for storing large, heavy objects, but it is suitable for storing lovely little things and decor items, and will also become a unique wall decoration.
11. Stylish transformation

The drawers of the old table, prepared for disposal, can be used to create original shelves. Drawers, neatly painted and modified to your liking, can be fixed to the wall, both vertically and horizontally, and used for storing a variety of things.
12. Rough design

Rough shelves made of untreated wood, opened with varnish or paint, will perfectly fit into the interior of a room decorated in a rustic or country style.
13. The abundance of cells

A huge wall-to-wall shelving made of a variety of wooden boxes, painted in vibrant colors, can be a stylish and budget alternative to a massive shopping closet.
14. Wicker basket
MDF shelves.
Compact MDF shelves with fruit slices painted under them will become a bright and functional decoration of the kitchen wall.
17. Rustic style

A dense piece of bark or untreated wood can be turned into a fantastic hanging shelf that is an ingenious alternative to the standard bedside table.
Where does your old furniture go after purchasing a new one? To the garage? To the dacha? To “poor relatives”? But, as you know, if the furniture is still quite sturdy, it deserves to get a chance for a new life - just thanks to your imagination and skillful handles.

Suppose you have an old chest of drawers, a desk or kitchen cabinets that you don't want to throw away, but there is no point in leaving them in the same place, because their new counterparts have already been bought. What these pieces of furniture have in common is that they have drawers that can be turned into an unusual and practical element of the interior.


You can make original wall shelves and even shelving from the drawers of an old chest of drawers, a table or a wardrobe. On such improvised shelves, you can place useful or just beautiful little things, creating pretty islands of decor. Most likely, such a creative will appeal to lovers of vintage solutions, as well as those who wish to update the interior with little or no investment.
Any old drawers will do - from wood or chipboard, from a chest of drawers, a desk or an old kitchen:


any size and number of drawers can find a worthy application, as you will now see.
Here is the algorithm for your actions:
remove boxes from old furniture, check them for the integrity of surfaces and joints;
to remove the pens or not is a matter of taste, nevertheless, many believe that with them - the view is more original;
change the appearance of the boxes if you want;
add transverse shelves if you want to place small items in several tiers;
screw it to the wall with screws at a convenient height;
small drawers can be made removable - on the back of the frame, attach 2 fasteners for hanging light furniture on the wall;
arrange your little things or decor.
how to use drawers from an old chest of drawers or wardrobe
Small drawers are ideal for interior decoration, while medium and large drawers can be used to create additional storage space.
option number 1: beautiful - displays for decor:
Beautiful dishes, small plastic, any collections and even photographs - all this looks very unusual in boxes fixed on the walls.


option number 2: convenient - shelves for small items:
Books and discs, bath and dining accessories, shoes and jewelry, handicrafts and stationery, garden and household tools - this is not a complete list of little things that can be placed in boxes from old furniture, hung on the wall.


how to make drawer shelves more attractive and practical
Change the look of the boxes as your imagination tells you and taking into account the purpose.
back wall decoration:
In this case, the “back wall” is the bottom of the box. How can you make it more interesting? Leftover wallpaper or fabric (for all surfaces), smooth or textured paint (for wood and plywood), slate-effect paint, sheet music or old maps. In a word, everything that can be found in the house.


internal shelves:
In boxes that will turn into volumetric shelves, it makes sense to make horizontal partitions, i.e. internal shelves. Sometimes they already exist as intended by the manufacturer. If you are going to place small but heavy items, take care to reinforce the bottom (with a wooden plank or bracket).


other ideas for creating shelves from the drawers of an old cabinet
If you have a lot of boxes from old furniture, you can create a creative composition. And the shelves from the drawers can be horizontal, as if sliding out of the wall.
how to combine multiple boxes:
Close or spaced, at different angles and in combination with traditional shelves, adding wall decor or modular compartments.


horizontal mount:
In small boxes, traditionally fixed to the wall (with the handle forward), you can place even more small things. But they need to be hung on reliable brackets used for the shelves.


floor racks from drawers of an old chest of drawers
And you can also build a rack, and even if it is not the most roomy, but you will not spend a dime! In addition to checking the reliability of the boxes and a possible update of their appearance, you will need to correctly compose the composition of the modules so that it is stable, and then firmly connect the boxes to each other, and then additionally attach them to the wall.


modular bookcase made of old drawers:

An equally interesting solution, when from the old kitchen furniture made of wood there are not only drawers, but also frames. Rotating the elements in different directions, create an optimal composition, if possible, without gaps. Attach each element to the wall and add sturdy brackets from below.

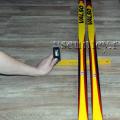
This master class will be especially useful for those who live in small one-room apartments. I will show you how to make a pull-out rack in the gap between the wall and the refrigerator. It would seem that there is only a few centimeters wide, but you will definitely be surprised when you see how many items you can store in this gap.
Initially, the shelf-rack is not visible in any way. In fact, after its manufacture, nothing will change in your kitchen, except for the fact that a new and convenient space is formed for storing various jars, bottles, etc.

The shelf is pulled out with a simple movement. Now look how much is stored there.


The distance of the gap is only 11.5 cm (in the photo, the tape measure in inches), and what a huge number of different items can be stored.

Materials (edit)
Required materials I used for this project:- Back board for the back. I have a size of 61 cm in depth and 121 cm in height - in fact, these are the dimensions of the entire rack without thickness. The width of the entire rack is slightly less than the width of the gap.
- Shelf boards - 6 pieces.
- Two boards on top and bottom.
- Two boards on the sides of the shelf.
- Two wheels to move the entire structure.
- Round wooden slats.
- Wood screws
- Wood glue.
- Cabinet handle for shelf extension.
All this can be done in 15 minutes by drawing a sketch on paper with a pencil.

Making a rack for the kitchen
The whole structure can be easily assembled on some self-tapping screws, but in addition I glued everything with glue on wood.I laid out the shelves, figured out the amount needed.


Began assembling the box. I put the joints on the glue.

Left to dry, pressing what it was.

The result is a glued rack box.

Additionally fixed with self-tapping screws. If you will be using thin boards, drill a hole before screwing in the self-tapping screw so that the board does not crack.

As a result, I got to the shelves, placed them and screwed them on with self-tapping screws.


Since the rack is very narrow and when you slide out of it, bottles and cans can fly off, you need to make a kind of side. At the beginning, I thought of pulling the line or rope, but in the end I settled on round slats.


I drilled holes on the sides, cut the rail lengthwise, inserted and fixed everything with glue.

At the end, we measure the thickness so that there are no excesses. In my case, they should not be, since I cannot move the refrigerator a little further.
Hello, friends!
Today I want to offer you an overview of an interesting topic. We will talk with you about drawers that are often used when.
This is a very often designed element; it can be found in almost any furniture.
Its advantage is that it is quite convenient to use.
For example, take the lower kitchen unit.
If it contains swing doors, then in order to get any object out of it, you need to squat down (or bend over strongly), after which you need to find this object inside the box.
Retractable elements are another matter! It is enough to open them from any position - and at once all its contents are in plain sight.
Of course, the cost of such a box in comparison with the same, but with swing doors is very different (due to the amount of material used and built-in fittings), but they also differ in ease of use.
The boxes themselves are assembled in a certain way (as shown in the figure). To calculate their sizes, you need to know two things:
- Dimensions of the box in which they are to be installed
- The gap on the guides, by means of which they are attached to it
The size of the box affects all the parameters of the sliding element we are considering: On its width, depth and height.
Knowing the overall width, we can find out the inner opening. And if so, then knowing the tolerances for the installation of retractable fittings, you can determine the total width of the drawer.
When purchasing accessories, you need, if possible, to look in their instructions, or in the manufacturer's catalogs. But the standard rail clearance is 13 millimeters.
 We calculate the total width of the box
X = S-90(mm), where X is the size of the part of the box, S is the total width of the box.
Similarly, for a chipboard with a thickness of 18 mm, the formula will look like this:
X = S-98(mm)
Now let's talk about the depth of the box.
Usually, this size should match the size of the rail installed on it.
The box (for them) is designed based on the dimensions of the same guides (250mm-300mm-350mm-400mm-450mm-500mm-550mm-600mm).
To these dimensions are also added tolerances for the "stroke" of the element itself (5-10 mm), and, if necessary, for stiffening ribs (20mm), if any.
The height is determined based on the height of all facades designed for this module
Parts are attached to each other with confirmations (up to 150 mm - one confirmation per corner, over 150 mm - two each).
The bottom is made of fiberboard, which is stuffed with nails (h = 20mm), after which it is reinforced with self-tapping screws (16x4, 16x3.5).
Fixing the bottom is a crucial moment in the assembly process. The fact is that, in addition to its direct purpose, it also gives the rigidity of the entire structure, and fixes its dimensions. Therefore, having “nailed” the bottom to the box, you need to make sure that its diagonals are the same (this is a very important point).
Sometimes the bottom is designed from chipboard, but then the structure turns out to be rather heavy. In this case, to give it the correct geometry, the bottom is made inline (enclosed between its parts).
It is better to make its dimensions 1 mm less than the internal width and depth (so when cutting a sheet, parts are made with a tolerance of + 1mm).
There are also almost ready-made solutions (for their assembly it is enough to have one part made of chipboard - the bottom), for example, samboxes or tandemboxes.
For information: samboks are "nonsense" from the category of roller guides, and tandemboxes are a high-quality system with a self-adjuster, not cheap and quite reliable.
The video below shows an example of assembling a drawer for telescopic e.
The bottom is made of fiberboard, made from leftovers from previous orders.
In "garage" conditions, all this is done quite simply, as shown in the video.
That's all, see you.
 How to install ski bindings
 Daria Domracheva and Ole Einar Bjoerndalen got married
 Ski Pole Walking: Dangerous or Beneficial?