How to weave a fence from branches. We make a wicker fence with our own hands: step by step instructions. Photo of a wicker fence made of vine
For a city dweller, blind fences that do not have any cracks have long become familiar. They reliably protect the territory of their master from intruders.
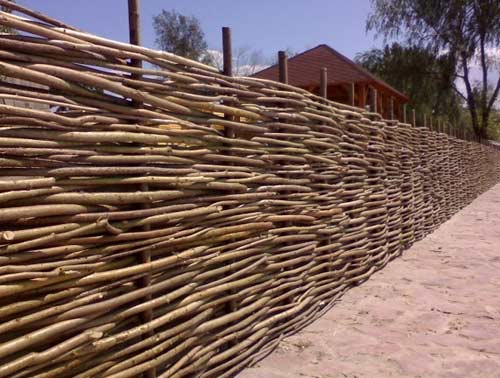
This is what a classic willow fence looks like.
The situation is completely different in the country. Everyone here is familiar, constantly in contact with each other, so a fence made of branches, which is more decorative in nature, can be called a real find. It looks very original, but it costs very little. you can do it quite simply with your own hands, using waste material. For this, branches are suitable:
- rowan;
- birch;
- aspen;
Weaving
A decorative fence made by weaving can be very easy to do with your own hands, for which any available material is suitable.
Planks
You can make the most vertical or horizontal connection. Moreover, the boards are easy to combine with metal and brick.

An example of a wicker fence made of boards
The result will be.
Fence
Well-planed planks make it possible to weave them in both vertical and horizontal directions.
Thin flexible branches
To make a fence with your own hands, branches of any thickness are quite suitable. A branch fence is the cheapest among all similar products.
Branches of any trees can be used as material. They can be grouped in bundles or used separately if they are large.
Green braids
A fence made of willow branches, you can do it yourself. With the onset of spring, willow branches are stuck deep into the ground. They take root, they begin to grow, and a living weaving is obtained. 
Procurement work
- apple trees:
- pears;
- plums;
- cherries;
- rowan.
You can also weave a fence with your own hands from twigs cut in the copses, which are located near the holiday village.
The twigs are cut at right angles with a well-sharpened garden pruner.
To obtain a tight weave, you need to try to choose rods that have a small diameter, preferably less than two centimeters.
As a result, the fence will be deaf, without gaps.
The best material for making good. It is sold in special nurseries.
To make a decorative fence, craftsmen recommend purchasing a thin willow vine with a diameter of less than one centimeter.  To weave a fence, you need to remember about the stakes that form the basis of the fence. Each peg must be more than five centimeters in diameter.
To make the fence tough and stable, special horizontal poles are selected. Wooden stakes will successfully replace:
- Steel tubes;
- Corner;
- Armature;
- Plastic pipes.
Willow twigs must be cleaned by removing the bark, covered with an antiseptic compound, and then painted with a suitable stain. Willow twigs with a white color look beautiful. To make such a color, willow twigs must be treated with hydrogen peroxide.

Option for a fence made of willow branches
It is very easy to do such work with your own hands. Hydrogen peroxide is applied to the willow branch with a fine brush. After that, the branch should mature for several days. This operation can be repeated several times to obtain the "whiteness" effect.
Weaving methods
As mentioned above, several weaving methods are known.
Vertical
Prepared rods for horizontal placement are mounted between the supports, while maintaining a step of 20 centimeters. Then willow twigs are stretched between them, starting from the very bottom.

Example of a vertical woven fence
Horizontal
This weaving method is considered a classic. The rods are intertwined with a figure eight. When the willow twigs are very thin, they are collected in bunches before weaving. Thus, the bundle becomes one section.
Oblique
This method can be called a design move. Some of the rods are intertwined in a diagonal direction. It is best to use this method for those who were able to make small fences, for example, a summer cottage.
To obtain greater strength, the joints of the rods must be fastened with wire.
How does horizontal weaving
The preparatory process is considered one of the most important points. It is quite laborious and painstaking.
To perform such work, you must have:
- shovel;
- secateurs;
- hammer;
- screwdriver;
- awl.
First, the fishing line is pulled, repeating the line of the future fence. The locations of the supports are marked.
Horizontal wicker fence
Columns with a diameter of at least 4 cm are prepared. For a long service life, it is better, since the tree will quickly rot.
The digging depth of the supports should be up to 50 centimeters. Their installation is carried out in increments of 30 cm. Moreover, for greater reliability, the step at the very beginning of the fence, as well as at its end, is made less.
The length of the post should be 20 cm greater than the height of the fence. For a high fence, thick rods must be harvested.
To make the weaving even, on top. When the work is completed, it is removed. But if a strong wind often blows in the summer cottage, it is better not to remove the bar.
You need to start weaving the fence from the bottom. The thickest end is left in front of the initial support. Then it is intertwined with all subsequent pillars. The resulting branch edges should remain on one side only, which will allow them to be trimmed.  The weaving of the second row must be started from the next pillar.
To make the fence more beautiful and attractive, the branches can be painted or varnished to preserve the willow color before starting work. The paintwork will give the hedges increased durability.
After weaving four rows, the product requires a seal. To this end, not far from the post, you need to knock on the hedge with a hammer.
The lower part of the fence, located next to the ground, often begins to rot due to high dampness. To prevent this from happening, nails are nailed at the very bottom, which will not allow the fence to slide.
A similar operation, after completion of the work, is done at the top of the support. The willow branches are fixed with nails so that atmospheric phenomena cannot influence its original shape.

An example of a fence woven from thick branches
The wattle fence is a rather colorful fence created in ethnic style. Previously, the wattle fence or, as it was also called, "tyn" was an obligatory attribute of every courtyard in the countryside. Over time, people abandoned such fences, because more modern materials appeared: metal, brick, cement. Circumstances have become more serious, and the fences have become stronger. But today, more and more often, such a decorative design element as a wattle fence can be seen only in the rural outback, but also in modern household plots, and even located in the center of the metropolis. You can make a wattle fence in the country with your own hands, and it is not at all necessary to assign security functions to it - with the help of such a fence you can fence a flower bed, a flower garden, a garden, a recreation area, a gazebo, etc. This building will fit very nicely into any interior, especially if you want to add a touch of ethnic style.
A wicker fence will give the backyard not only a rural look, but also a special soulfulness. The wicker especially looks great if you add ethnic design solutions around it - this will add a special flavor to your home.
Wattle: advantages:
- Made from ecological material.
- It is inexpensive.
- Easy to manufacture.
- Can be disassembled and reassembled several times.
- Original solution.
- An excellent decorative element.
- For construction, you can use any material: not only the branches that remained after the rejuvenation of shrubs and trees, but also thin PVC pipes.
The wattle: disadvantages:
- Short-lived.
- It is used only as a decoration, since it does not carry the full functions of a fence.
- It breaks down quickly, even with little physical effort.
Today the wattle can be seen in ethno cafes and restaurants, in kindergartens and in playgrounds. This fence is beautiful and is often used as decoration for resting places. The wattle fence looks very original in a large city surrounded by all the benefits of civilization. But in its own area, the wattle fence can fence off a flower bed, lawn, gazebo, barbecue, the main thing is to choose the right accessories and design.
To make your improvised wicker fence a success and last as long as possible, remember these simple tips:
- The durability of the wattle fence depends on the speed with which the branches rot, therefore, in order for the fence to serve faithfully as long as possible, you need to help it in this - to protect it from rotting. The cheapest antiseptic is car oil - they need to treat the surface of the branches. A significant disadvantage of this tool: the branches will acquire a dark color, and it will be contraindicated to touch the fence - the oil is not absorbed and does not dry out, which means that the wattle will leave greasy marks on any object that touches it.
- Another way to prolong the life of the wattle fence is a drainage layer, which will prevent the branches from contacting the ground. Crushed stone or sand can be used as drainage, or both can be used. First you need to dig a trench - 50 cm deep, then fill in the drainage layers and install vertical pegs.
- In order to protect the support pegs, the part that will be underground must be charred. This can often also be lubricated with bitumen.
- To facilitate the installation of the pegs, you can first drive a scrap into the ground - this creates a kind of hole. Pegs can now be quickly installed in these holes.
- A wattle is weaved by tying the branches between the stakes. To prevent the lower and upper branches from sliding off the pegs, it is necessary to tie the first and last branch with wire to the middle branches.
- You should not use dry branches that have been lying for a long time to create wattle fence, because they do not have elasticity. As soon as you try to bend such material a little, the branch will immediately crack. That is why soaked branches are needed - they will soften, after which it will be possible to create more interesting things with them.
- To create a beautiful wattle fence, choose the same branches - both in thickness and in length.
- When choosing branches for the pegs, remember that 50 cm will be hidden underground, which means that the length should correspond to the height of the fence.
- If you do not braid 10 cm to the top, then you can use to decorate the pegs with decorative elements.
- Think over the decorative elements - the wattle fence looks much richer if it is decorated with traditional rural "decorations".
- The wattle can be screwed to a netting or a metal fence - this way you will not only decorate your home, but also hide the yard from prying eyes.

How to make a wattle fence: the preparatory stage
Wicker: how to prepare material
Are you firmly decided to build a fence with your own hands? Then you need to know the secrets of material procurement.
- Raw materials for making wattle fence are harvested in January - at this time you will definitely not harm the trees.
- Go to the forest or any other place where trees grow and where you can easily cut the required number of branches.
- The branches must be flexible and have a length of at least 50 cm and a diameter of at least 1-2 cm.
- Experiment: find branches of different colors and shades.
- Before starting to weave a fence, the branches must be soaked for at least a day in water - in any container so that the liquid completely covers the raw material.

What branches are suitable for making wattle fence
For some reason, there is a stereotype according to which branches of such trees are ideal for building a wattle fence: willow, birch, apple, dogwood, walnut, pine. In fact, this is not entirely true, because wattle can be made from any type of wood.
Of course, the best choice is the long and flexible branches of trees and bushes: willow and hazel. But if you fantasize a little, then you can weave an excellent fence from other raw materials, for example, collecting cattail (reeds), bunches of straw, birch, turf or even Amur grapes. Annual aspen shoots are suitable for making wattle fence.
Give preference to straight and flexible branches of trees and shrubs that grow near bodies of water. It is believed that such branches are more saturated with moisture, they will have a small core and a very smooth surface.
If you turned your eyes to straw, then take rye: it is more durable and has long internodes. If it is well wetted, then such a straw retains its flexibility well, becomes elastic and suitable for weaving. In addition, this straw has a very beautiful color, although, in which case, the wicker made of this material can be easily painted with aniline dyes - in any color that suits you.
But to make a wattle fence from reeds (cattails), raw materials must be collected from August to October.

How to make a wattle: the process of work
First of all, you need to decide on the material from which you will weave the fence. Then - with the place to install it and decoration.
The wicker consists of a support (base) and a "body" of the fence (rods).
Wicker: preparing the base
- As the basis of the wattle fence, you can use a wide variety of branches - pegs that are driven into the ground at approximately the same distance from each other.
- The pegs should be driven into the ground by at least 20 cm, but in order for the structure to withstand even strong winds and ground draft, it is necessary to deepen the branches by 50 cm.
- The diameter of the pegs for the base must be at least 5 cm.
- The most reliable stakes are made from larch.
- Wooden pegs can be replaced with metal or plastic ones. For these purposes, you can use both fittings and PVC pipes. They can be painted in a color convenient for you, and plugs can be put in the hollow pipes. Thanks to this, the structure will be able to stand for a very long time.
- If you use wooden stakes, treat them with an antiseptic, varnish, Pinotex impregnation, paints - this will prevent decay and improve the strength of the base. The slices are best charred or treated with an antiseptic.
- Do not forget to drain the base - from sand and gravel.
- The pegs should be no more than 50 cm apart, but it is better to place them more often - about 30-40 cm apart.
- The height of the wattle fence is selected individually.

Wicker: preparing the rods
- The most important requirement for rods is flexibility.
- If you do not have freshly cut twigs, you need to soak those that were cut a long time ago for a day. But if the rods are left in the water for too long, they can turn black.
- You can soften the rods with steam - give them a steam bath and they will become more flexible. Can also be placed under wet burlap.
- The rods can be painted in any color - paints or vegetable dyes. For example, a yellow fence will be thanks to onion skins and birch leaves, and brown - thanks to a decoction of branches and black alder. You can use potassium permanganate, stain, etc.
- Before you start painting, you need to remove the tannins - they are found in the bark of many plants. In order to do this, you need to put the branch in a soapy solution for a couple of hours.
- If you are not going to paint the branches, then you should not peel them from the bark - this way the wattle will look very natural.

Weave a horizontal fence
- Take straight and thick rods (fittings, pipes, etc.) and build the foundation of the future fence.
- If the branches are thin, place them closer together.
- Take a branch and thread it in turn between all the vertical twigs.
- Do not forget that the branch should braid the twigs in turn: left, then right, and so on, until the end of the fence (section of the fence).
- Weaving starts at the thick end of the branch!
- Alternate weaving - the branches should twist the pegs in turn, both from right to left and from left to right.
- The next branch should not repeat the path of the previous one: if you started braiding the first peg on the right, then the next branch should braid it on the left, then the next branch braids it on the right, etc.
- Thick and thin ends of the branches should be evenly distributed over the fence.
- The thickness of the wattle fence should be the same.
- After you have reached the desired height of the fence, you need to trim the length of the branches - this can be done with a pruner or a garden knife.
- Do not forget about the locks - these are the ends of the rods that are attached with wire to pegs and other branches.


Weave a vertical fence
- The pegs are driven in as described above.
- Several branches are horizontally tied to the pegs - these are the planks to which the remaining branches will be attached.
- The branches are installed vertically - they braid the horizontal strips.
- The thick end of the branches should rest against the ground.
- From above, the rods are tied: you can do this with a wire or rope, or you can weave several branches horizontally.

Wicker from PVC pipe
If you have not prepared twigs for building a wattle fence, then you can build it from thin PVC pipes. The specifics of work are exactly the same as with natural raw materials.
- Cut the pipe into tubes of the required length. The vertical pegs should be longer.
- Drive the pegs into the ground.
- Braid the pegs with tubes, starting from the bottom: first on the left, then on the right, etc. until the material runs out or until you reach the desired length.
- Cut off the sides of the pipe.

How to decorate a wattle fence
- It is believed that sunflowers and cornflowers were necessarily planted near the wattle fence - this is a classic decoration for this fence. A sunflower may well be artificial: plastic, polymer clay, fabric, etc.
- Near the wattle fence, late chrysanthemum, chamomile, gladioli, asters, delphinium, nasturtiums look great.
- The wattle can be a good support for climbing plants.
- Near the wattle fence, you can put a colorful bench made of stumps and boards.
- Clay pots, children's shoes, etc. can be hung on top of the pegs.

Weaving baskets, boxes, hedges and even small shed-shaped buildings was common for our ancestors. Everyone is trying to fence themselves in with large, high fences built of brick, stone and other materials.
And those who miss the simple village hedges have found good use for them in their dachas.
Wicker and branch hedge
A hedge of branches and twigs is called a wattle fence... It is popular among those who want to install a decorative fence for beauty on their land plot. Wicker can divide the site into zones. This beautiful tradition even came up with their own style in design - "country". It is popular for its simplicity.
Decor items are easy to create with your own hands. In their manufacture, precision of movements and accuracy are not required, and the appearance of roughness and negligence makes the products look like a forgotten past. One of these products is a wicker fence.

Excellent wicker fence around the house - high, covering the entire space well
The stakes at their ends are sharpened in such a way that it is easier to drive them into the ground. To make the fence stand longer, and its base (stakes) does not begin to rot, break and bend, all the harvested material is processed with bitumen. You can burn the edges that will be hammered into the ground over the fire.
Harvesting rods
If the rods were not purchased in the reserve, and the owner decided to make them with his own hands, then this process will take longer than making stakes. To harvest rods, you should adhere to the following rules:
- All cut rods are selected at least two meters in length.
- With the help of a pruner, all branches are removed and the leaves are cut off.
- It is better to prune trees in the spring, when sap flows in the vine. Such material will be easier to bend.
- If the branches remain from last year, they should be soaked in water for 2-3 days.
- It is enough to hold new dried rods in water for 5-6 hours.

Decorative wicker fence - weaving options
Next, the owner will have to decide what kind of hedge he wants to see. If the wattle fence will be painted or varnished, then the bark must be removed from the rods. Some people think that this way the hedge will last longer. The bark is most easily removed from young branches, on which leaves are just beginning to bloom. Read about the common spruce hedge.
Fence installation
Installation of a fence made of twigs begins with a marking. Since the rods are bent, and the fence does not have to be even, two pegs are driven in first - at the beginning and where the structure will end. It is better to drive the first and last stakes in two with a distance of 10-15 cm. This will make the fence stronger. Find out about a fence made of welded mesh with a polymer coating.
Further, the placement of the remaining stakes depends on their strength and elasticity. The stronger the peg, the more distance you can leave. It fluctuates from 30 cm to 1 meter.
When all the stakes are installed, the weaving of the fence begins. Holding the edge of the rod with our hand at the beginning, with the second hand we pass it from the seamy side of the second peg, and again from the front third. The procedure is repeated until the length of the rod ends. But, inserting the second rod, the next one begins to weave one peg earlier, for example: the vine ended on the 5th peg, we begin to weave the next vine from the 4th.
Little weaving secrets
- If opportunities allow, then it is better to hammer the stakes not into the soil, but into the cuttings of pipes (plastic or iron), rammed into the ground. This option will make the structure stronger. But there is one caveat: the stake must enter the pipe tightly without gaps, otherwise rainwater that gets into the gap will spoil it over time.
- To make the hedge more beautiful, and the joints were not visible, it is better to take vines of different sizes.
- The lowest row is not woven close to the ground. The gap between the soil and the vine will help prevent rainwater from collecting and spoiling the material.
- Since the branches for weaving are taken raw, after a while they will dry out and become thinner in diameter. This will create gaps. To avoid gaps, every 2-3 rows are tapped with a hammer to compact the branches.
- If the bar is bent and does not fit snugly against the peg, it can be leveled and secured with a nail or wire.
As an option, it is possible to use, which will harmonize very well on almost any site.
Video: how to make a wattle fence with your own hands Watch, learn and repeat!
Hedge decoration
An already built fence-wicker can be decorated, giving it the look of antiquity. For this, the rods can be coated with matte or clear varnish. If the rods were taken from different varieties of trees and their color is different, you can use hydrogen peroxide, completely making them white. A solid brown color can be applied using a stain or manganese solution. But iron vitriol will give a gray tint to the rods.

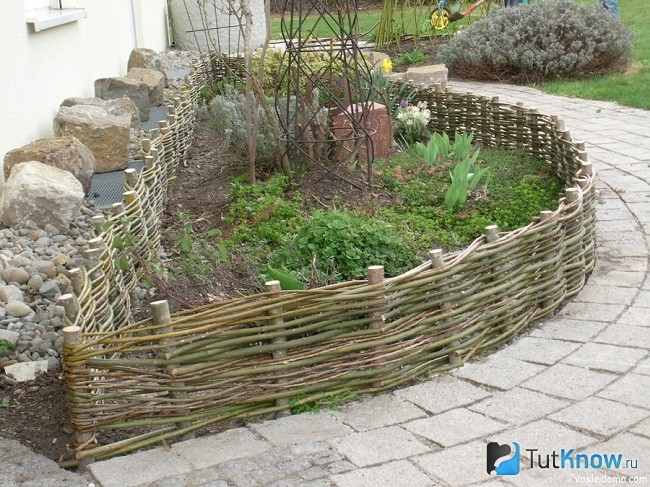
Wicker fence, decorated with clay pots and flowers in vases
Decorating a wicker fence is also possible with the help of clay pots. The stakes in the fence are not completely braided with rods and pots are hung upside down on them.
The mallow and decorative sunflowers planted along the fence will look very good and harmonious, and not far away there will be an artificial stork with a nest. It is possible to combine such a hedge as.
If you want to know how to make a wattle, a scarecrow to put it next to you, then you've come to the right place. Visual master classes, photos will help with this.
Decorative fences from branches - preparation of the necessary
Periodically, foresters cut down excess young growth in the forest. Around summer cottages, this is done by members of garden associations at subbotniks. Then the shoots have to be taken out, spending money. But you can turn the trunks of young trees, the branches into a wattle, making it with your own hands.
To make it easier for yourself, remove branches directly in the forest with pruning shears and keep an eye on suitable stakes. The latter must be strong, so use trees such as:
- Pine;
- larch.
- alder;
- Rowan;
- willow;
- hazel.
So, for it you will need:
- branches;
- stakes;
- wire;
- secateurs;
- axe;
- sledgehammer.
Branches should not be old and dry, they do not bend, but break. The best time to collect twigs is in spring or from July to autumn.
Do-it-yourself wicker fence
It can be quite high, this is located on the border of the plots. But a short one will also come in handy. Such a decorative fence protects the front garden, delimits the territory into zones. You can turn this corner into a resting place, a feast, by hanging clay pots on a wattle fence, placing figures of people and animals nearby.

We begin to make a wicker fence with our own hands with the preparation of stakes. If you decide to arrange a global fence, their height is 240-250 cm, since 70 cm will be in the ground.
Sharpen the end of each pole with an ax. Lubricate the lower parts with molten bitumen or burn on a fire so that the wood does not rot in the ground for as long as possible. Soak the upper part with an antiseptic, then it will remain for a longer time.
The next stage requires male strength - you need to drive the stakes with a sledgehammer 70 cm into the ground. But if you are making a small decorative fence, use stakes 1 meter high, 30 cm of which must be driven into the ground. The sledgehammer is heavy on a woman's hands, so use a hammer. To prevent the top of the peg from deforming, place a plank on them during this work.
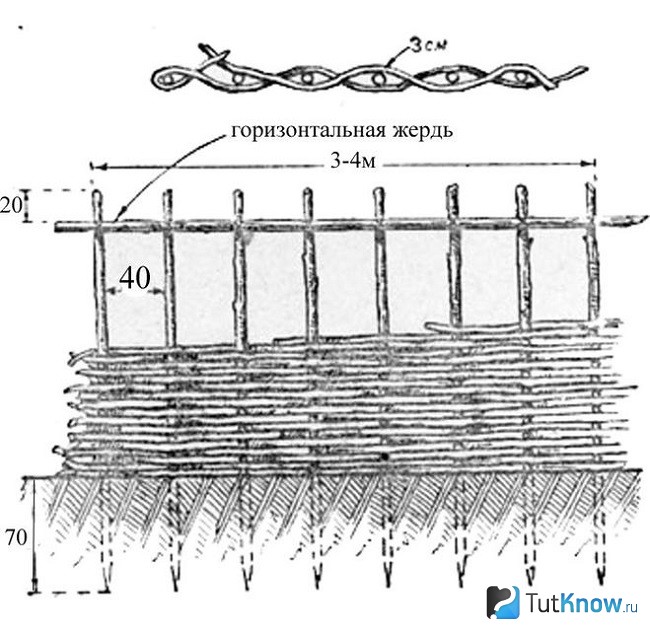
As you can see in the diagram, the stakes are placed every 40 cm, but it is possible less often. After that, they must be fastened with a horizontal pole, tied with wire or fixed with self-tapping screws. Here's how to make the wattle next. If you have freshly harvested branches, it is enough to clean them of foliage and unnecessary shoots. If the branches lie down for a while and do not bend well, put them in a container, fill them with pre-salted boiling water, leave for a day, after which you can use.

There are several ways to weave vines:
- Starting from the bottom corner, skip the whip in front of the even stakes, and for the odd ones, it should be in the back. Braid the second rod so that its turns are staggered in relation to the first. Further, all odd rows correspond to each other, as well as even ones.
- If you are making decorative fences for flower beds, you can braid the branches vertically. Then you need to fix 3-5 horizontal poles. Starting at the top of the first pillar, pass a branch between the crossbars, intertwining it. The rest are staggered.
- You can also make an openwork decorative fence using the same technique. With your own hands, you need to bend the first vine in half, attach this middle part in front of the vertical stake, wind the ends of the branch on it, twist it a little, thread them into the formed loop. Tighten. Now put both ends of the vine on the second stake in front, wrap it 1 time, also thread them, but already in the second loop.
- If you want to finish the work as soon as possible, take not one thin branch at a time, but several. You can weave them not close to each other, but at a distance.

If your task is to make a wicker fence so that the rods are located close to each other, tap it with a hammer after each decorated row.

When the branch ends, tie a second wire to it and continue weaving. It is better to do this near a horizontal post.
You can braid the branches to the top, leave the tops of the stakes uncovered, or decorate here with such semicircular turns.

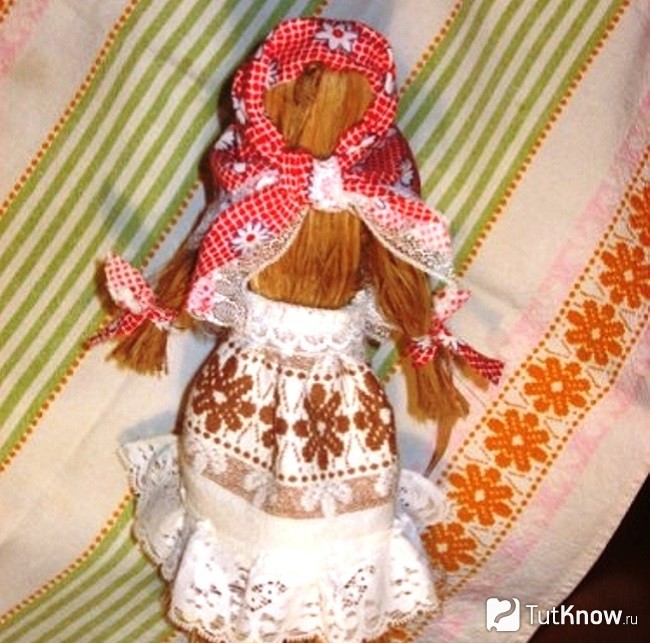
Next to such a wattle fence, a figure of a man will look great. You can make these from the most unexpected materials, for example, from a broom.
How to make a stuffed animal with your own hands - 3 options

To craft this, you need:
- broom;
- cotton wool or synthetic winterizer;
- small dress or T-shirt and tight tights;
- markers or felt-tip pens;
- scissors;
- wire;
- multi-colored ribbons.
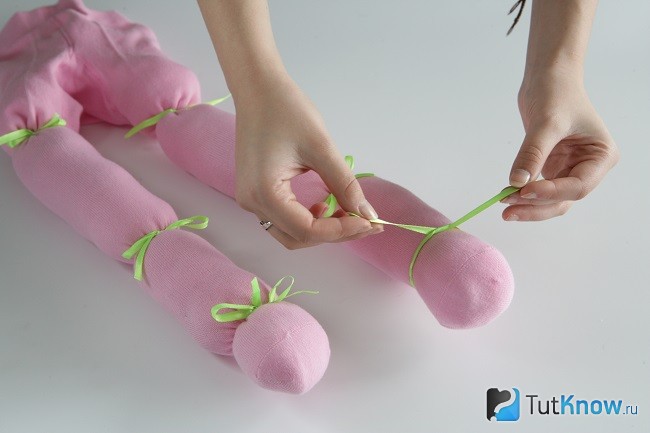
Also stuff the upper part of the tights with padding polyester or cotton wool, tie at the top and bottom to make a head. Place the broom handle under the doll's chin, secure it with wire and ribbons.

We do our hair. For her, cut the top of the tights into strips, tie them with a beautiful bow. To make our garden scarecrow charming, put on a dress or a T-shirt on the figurine, which must be tied with a ribbon at the waist. Draw the doll's facial features and you can put it near the wattle fence.
And here is the second option, which will also tell you how to make a stuffed animal with your own hands. This is how it will turn out.

To make a stuffed animal, you will need:
- straw;
- screws;
- wire;
- 2 bars of different lengths;
- rope;
- white cardboard;
- acrylic paints;
- broom;
- the cloth;
- kerchief.
To make the scarecrow further, you need to dress it up in an old sundress, dress or make a cutout in a square canvas in the center, put it on the neck, before attaching the head. It remains to gird the tunic and admire the result of the work.
Here's another interesting idea. After reading it, you will learn how to make a stuffed animal to put it where the wattle fence is.
For it you will need the following materials:
- bast brush or washcloth;
- satin ribbons;
- scraps of tissue;
- lace;
- kitchen towel;
- threads.
- needle;
- sewing machine (if any);
- scissors.
You can buy a bast brush at a hardware store and a bast sponge at the market. If not available, replace these materials with straw.

Fold the washcloth in half, rewind the thread at the top to indicate the head. Separate the right and left strands, tie each strand of fabric around the wrist. Trim the washcloth here to get the handles you want.

Cut a triangular flap out of the fabric, hem it on one side, and sew lace on the other two. Sew a skirt, stitch a belt to it, tie it around the doll like an apron.
If you want something original in the garden so that, when you get up in the morning, you can smile at an interesting garden figurine, see how to make a scarecrow of this type.

It can also be placed where the decorative fence is located - in front or behind it. If harmful neighbors live nearby, you can direct the most prominent part of the scarecrow in their direction.
This idea requires small, round gourds. If they are not there, you can replace them with balls.
Here's what you will be using:
- 3 pumpkin or balls;
- old jeans, hat and shirt;
- fittings;
- wire;
- scissors;
- white plastic.
Before scarecrowing, put jeans on the bottom of the reinforcement. Then stick it into the ground. Now stuff your trousers and shirt with straw. Bandage it to shape the body.
At the neck, connect both upper ends of the reinforcement with wire, put on the pumpkin-head, but first you need to prepare it. Cut out the side of the ponytail. Take out the seeds with a spoon, using this hole you will put the pumpkin head around your neck. Add guidelines for the mouth. Here you need to make a semicircular cut and insert teeth. They can be made from plastic white milk bottles by cutting with scissors.
Place round plastic circles in the eye incisions, drawing pupils on them with a marker or paint. 2 pumpkins will become the buttocks of a mischievous scarecrow. If you want, at the very beginning of the process, fix the sneakers, having previously made holes in them in order to thread the reinforcement.
What plants to plant near the wattle fence?
Traditionally, these are sunflowers. See how they fit perfectly with such a fence.
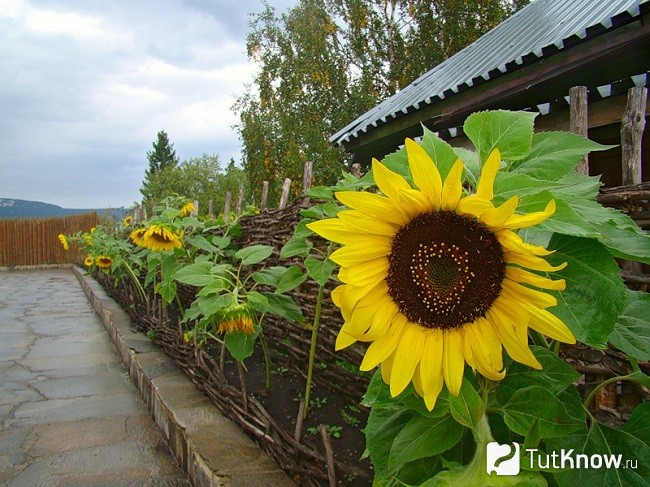
To get a similar effect, not fried sunflower seeds are soaked in water for two days in early May, then planted in front of the wattle fence, on the south side of it. Then, in July - August, the plants form a head with yellow petals, in the center of which tasty seeds gradually ripen.
If you don't want to wait so long, plant decorative sunflowers. They are short, very much like their miniature fruit-bearing counterparts, but do not produce edible seeds. Sometimes these plants are sold in pots. You can buy decorative sunflowers in a container, remove it with a lump of earth and plant it after the wattle is made.
Plant Jerusalem artichoke behind it. It is in great harmony with sunflowers and wattle, blooms at the end of summer, and the stems 2 meters high are visible from afar. Its tubers are edible and very healthy. You can dig them up in autumn or spring, make vitamin salads, vinaigrette, cook, stew. Dried Jerusalem artichoke makes delicious coffee. But Jerusalem artichoke grows strongly, consider this when planting at the fence.
Here's how to make a wattle fence, a scarecrow, plant sunflowers, Jerusalem artichoke to create an extraordinary rest corner in the country.
Visual aids will allow you to see the process of creativity on a given topic:
Even in the recent past, wicker fences were the main method of fencing private territory. The availability of consumables and its lightweight structure made it possible to build such a structure without serious financial investments. The wicker fence has not lost its relevance today. The emphasized archaism and natural material organically fit into the suburban landscape. The advantage is the ability to make a wattle fence with your own hands.
Features of a wicker fence
A traditional wattle fence is a lightweight fence made of flexible branches or shoots. A characteristic feature of such a fence is a chaotic, artisanal structure, that is, the material is used in a "natural" form, and is practically not processed. Wicker fences belong to decorative structures, as they rarely exceed 1.5 in height. High wattle fence is found now, but this solution does not justify its existence, since the dimensions do not compensate for the fragility of the material, and the slits will not allow you to hide the area from prying eyes.
It is customary for scourge to enclose relatively small private estates, or use them as additional fences inside and outside the site, for example, to fence off flower beds, a vegetable garden, etc. territory.
Preparatory work
To obtain a positive result, it is very important to prepare everything qualitatively for further work. The making of wattle fence is no exception.
Selection and calculation of material
Traditionally, willow (willow), hazel and willow are used to form wicker fences. These branches are long, straight and naturally flexible with a minimum of transverse branches, ideal for such fences. This material is also characterized by symmetry, which is an undoubted advantage. In some cases, weaving from wild reeds is practiced. Smooth and long stems bend perfectly, but such a fence will be very fragile. The bamboo wattle will be more durable, but in this case the material will have to be purchased.
The calculation of the required amount of vines is carried out "by eye". On average, one armful of twigs is enough to form a fence with a height and length of 0.5 m. The value can deviate up or down, depending on the diameter of the rods and the density of the weaving.
Note! You can weave a tyn from young shoots of any trees and shrubs, but provided that the branches are at least 1 m long.However, it should be borne in mind that when choosing this material, weaving will be chaotic, and the process itself will be more troublesome.
Large, even branches with a diameter of 4 cm or more are used as support pillars. The use of a round bar, boards or metal rods is also appropriate, since this will extend the service life of the structure, however, they will stand out strongly against the general background, and the wattle will lose its naturalness.
On average, the spacing between the bearing crossbars is from 0.5 to 0.3 m, based on which the required amount of material is calculated. The more often the supports are located, the denser the weaving will be, and, accordingly, the structure will be stronger. With vertical weaving, you will also need longitudinal beams, at least five for the entire height of the fence.
Photo gallery: patterns of weaving a decorative fence
Horizontal weaving is traditional  There are other options for horizontal weaving.
  Decorative weaving patterns can be used if you want to decorate your site
  The appearance of the fence depends on the weaving method
Procurement of material
The harvesting of rods for wattle fence is done in early spring or autumn. During this period, the movement of sap is minimal, and the tree is not burdened with excess foliage. The most even and longest shoots are selected. If the production of the fence will not be carried out immediately after harvesting, the branches must be well dried. For standard weaving, rods with a diameter of about 1 cm are selected. Branches of a larger diameter strengthen the structure, but at the same time make the structure less dense.
Immediately before weaving, the shoots are soaked in a container of water to make them more flexible and remove the bark. On average, this stage lasts about a week; for freshly cut branches, the period can be reduced to several days. After the material becomes flexible and the bark begins to peel off easily, you can start processing. Ideally, a pinch is used to remove the bark - a split branch of medium thickness with a limiter. Under normal conditions, you can use wire cutters or pliers. The tip of the rod is inserted between the clamps of the nippers or pinchers, pulled towards itself. If the branch is well soaked, then the bark should be removed with little or no effort.
Fully cleaned rods can be coated with antiseptic and stain to increase durability or color change. This operation is appropriate only if a small fence is being erected, since each branch must be processed separately. The lower part of the support stakes is impregnated with antiseptics and moisture-proof compounds to protect them from decay.
Video: how to properly process willow vines
Tools
In addition to preparing the material, you need to take care of the availability of all the necessary tools:
- secateurs;
- hacksaws for metal;
- roulette;
- a wooden hammer;
- a large hammer or sledgehammer;
- wire;
- construction thread or fishing line;
- screwdriver.
How to make a wicker wooden fence from branches with your own hands
Horizontal weaving is traditional, as it forms a dense and durable fence. The vertical arrangement of the branches will not provide the required density. The installation of the wattle fence is carried out in the following order:
- The markup is being carried out. A thread or fishing line is pulled along the line of the future fence. Marks for supports are placed according to the established reference point. The distance between the bearing stakes with horizontal weaving can be from 0.3 to 0.5 m. With the vertical arrangement of the branches, the posts can be driven in every meter.
- Bearing supports for the fence are driven in to a depth of at least 0.5. With a horizontal arrangement of the vine at the beginning and at the end of the fence, there are two racks so that the rod can be wrapped between them, thereby fixing it.
- If a horizontal wicker is assembled, the tops of the support posts are fixed with a rail so that they are not "led" during the creation process. With the vertical arrangement of the branches, transverse crossbars are installed. You can use nails or screws to fasten them.
- Twigs are woven between the pillars. Work begins at the thicker end. Weaving is carried out according to the principle of eight - the first pillar is bypassed in front, the second behind, the third again in front, etc. The lower rods are attached to the supporting stakes by means of wire. This will keep the fence from slipping to the ground.
- Surplus is cut off. If the rod ends, for example, on the fifth pillar, then weaving continues from the fourth. This is necessary in order for the fence to be uniform. You also need to periodically direct the rods in the other direction, changing the course of weaving. The protruding ends of the branches can be fixed with wire.
- Before installing the last row of rods, the fixing bar is removed. The top row is also tied with a wire to the supporting stakes.
The deepened part of the supports is the weakest point of the wattle fence, since it quickly decays and collapses due to the influence of ground moisture. Therefore, it is recommended to install the stakes in plastic pipes of a suitable diameter pre-driven into the ground. This will increase the service life of the fence several times.
Vertical weaving is carried out according to a similar principle, with the difference that it is recommended to fix each rod both from above and below so that the structure does not stagger.
Video: how to make a wattle fence from hazel twigs in the country
Care for the finished tyn
On average, the service life of the wattle fence does not exceed 5–7 years. After this period, the fence begins to deteriorate. The main "enemy" of a wicker fence is dampness, which causes the supports and the lower part of the structure to rot. To prolong the life of this product, it is necessary to prevent the accumulation of water under it. It is also undesirable for thick and tall grass to grow under the fence, since high humidity is created in the thickets.
For protection, you can use antiseptics or matte varnishes. They will protect the aboveground part from moisture. If you prefer varnish, then it is advisable to use matte compositions, since the gloss will look unnatural. Annual treatment with protective compounds will help to maximize the life of the wicker fence.
It is easy to make a wicker fence with your own hands, even outside the city. At the same time, financial costs will be minimal.
 We issue a child's passport
 Easter cake in a bread maker - simple and delicious recipes with a photo step by step, video - How to make dough for Easter in a bread maker: Panasonic, Moulinex, Redmond, Kenwood
 In Chelyuskintsev park, a roller coaster trailer knocked down an administrator to death - Salidarnasts